7 Visitor Handling
All visitors going on-board or leaving the ship must register at the security checkpoint, unless prior registration is performed in the Advance Quick Check-In module.
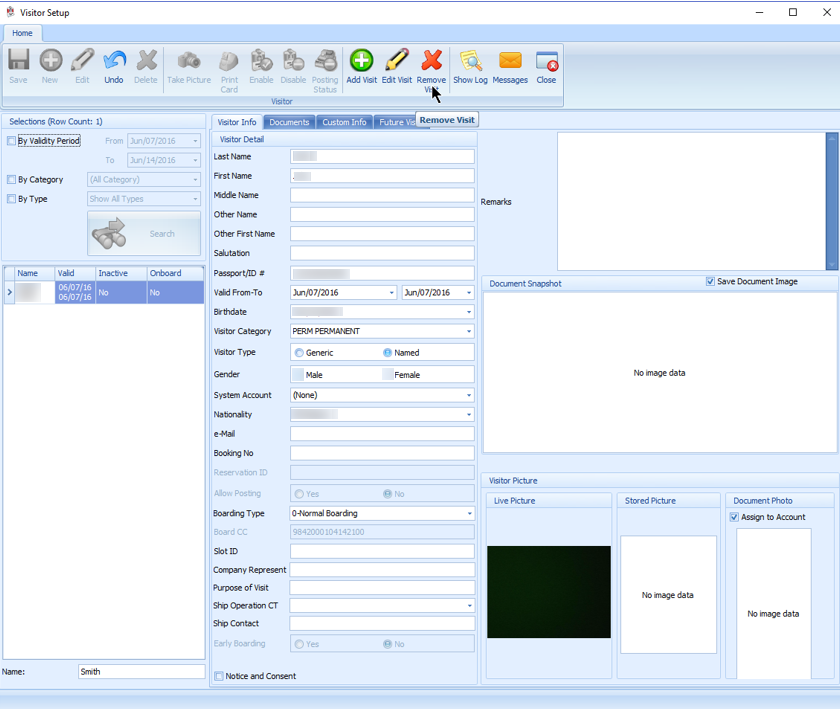
Figure 7-1 Visitor Registration Form

Visitor Registration
-
At the WPF Security main window, click the Visitor icon on the Toolbar to open the Visitor Setup form.
-
At Visitor Setup form, click New to add a new visitor record and fill in the details in the Info tab.
-
At the ribbon bar, click Take Picture to capture a live picture. Ensure a camera is attached to the workstation and the device is correctly setup in Management, Option, Video parameter.
-
Click Swipe Passport on the ribbon bar to open the ATB Document Entry form, then scan the passport through the passport reader and click OK to save.
-
Click Print Card to generate a visitor board card. This function starts the Batch Board Card Printing if the card fails to print.
-
Select the Notice and Consent check box located next to the Name Search field. If this check box is deselected, the system prompts a warning message and disallows you from proceeding.
-
Click Save to save the visitor record.
Editing Visitor Record
-
At the Visitor Setup window, search the visitor record using the filters or enter the last name in the name search field.
-
Click Edit on the ribbon bar.
-
Edit the necessary information and click Save to save the changes.
Adding/Editing/Deleting a Travel Document
-
Repeat step 1 of Editing Visitor record and navigate to the Document tab.
-
Click Add New to start the Document Add/Edit form. Manually enter the necessary information or scan the passport using a passport reader.
-
Click Upload File to upload the document image.
-
Click OK to save the information.
-
Click Edit to edit the information or Remove to remove the information entirely.
Adding Future Visits
Future visits can be added to visitors who visit the ship regularly.
-
At the Visitor Setup window, search the visitor record using the filters or enter the last name in the name search field.
-
Click Edit at the ribbon bar.
-
Navigate to the Future Visits tab and at the ribbon bar, click Add Visit.
-
Select the visit date from the calendar and click OK to add.
-
To edit, click the Edit Visit and select a new date.
-
To remove, select the visit date from the grid and then click Remove Visit.
Deleting Visitor Record
-
Repeat step 1 of Editing Visitor record and click Delete.
-
At the Delete Visitor dialog box, click Yes to delete.
Enable/Disable a Visitor Record
This function enables/disables a visitor from going onboard and sets the posting status to inactive when the record is disabled.
-
Repeat step 1 of Editing Visitor record and click Disable on the ribbon bar.
-
In the dialog box, select Yes to disable the record. The Enable button illuminates when the record is disabled and the status in the Inactive column of the search grid changes to Yes and vice versa.
Updating Visitor Onboard/Ashore Status
On most occasions, the onboard/ashore status of the visitors going onboard or leaving for shore are updated by swiping/scanning their board card. A manual intervention may be required on some instances, and is performed from the Visitor Setup window.
-
In the Visitor Setup window, search the visitor record using the filters or enter the last name in the name search field.
-
Double-click the selected account and select Yes when prompted.
-
This updates the Onboard status column in the search grid to Yes.
Posting Status
A visitor can have an account assigned for posting consumption charges while onboard, and this requires linking a System Account to the profile.
The Allow Posting radio button is set to Yes by default when a System Account is assigned and when the visitor status changes to Onboard, as illustrated in table below.
Table 7-1 Posting Status Definition
| Function | Allow Posting Enabled When |
|---|---|
|
Activate ‘Enable Visitor’ |
System Account is linked and visitor is onboard. |
|
Linked to System Account |
Visitor is onboard and status is active. |
|
Change status to Onboard |
System Account is linked and visitor is active. |