Working with P6 Team Member Status Updates
If you are assigned the appropriate privileges, you can view, update, approve and reject status updates made by team members using P6 Team Member interfaces.
View only pending status updates to see the new updates requiring your attention. The number in the bubble shows how many updates are currently pending for the selected projects.
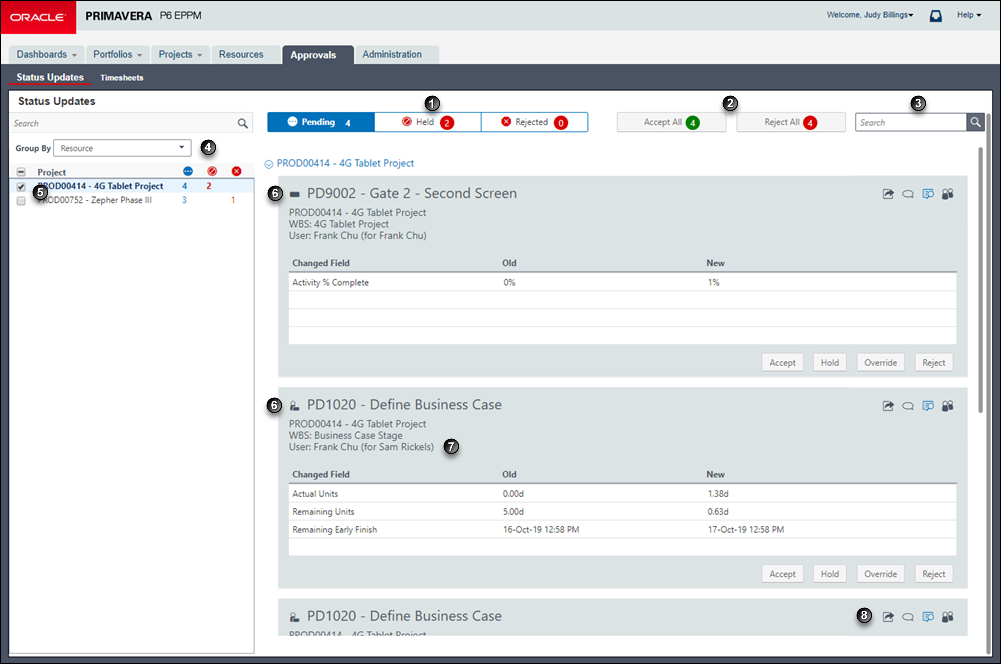
Table of Screen Elements
Item | Description |
|---|---|
| Pending: View only pending status updates to see the new updates requiring your attention. The number in the bubble shows how many updates are currently pending for the selected projects. Held: View only held updates to focus on updates which were not approved when they were initially made. The number in the bubble shows how many updates are currently held for the selected projects. Rejected: View only rejected updates to see which updates were not approved and have not yet been modified and resubmitted by team members |
| Accept All: When you have reviewed all the updates in the view and are satisfied that the updated data is correct, select Accept All to apply the updated information to the activities. When you select Accept All, only the status updates in the view are approved. The number in the bubble shows how many updates will be accepted. Reject All: When you have reviewed all the updates in the view and the remaining updates are all updates which must be resubmitted, select Reject All to reject the status updates and provide feedback to the team members about what needs to be changed. When you select Reject All, only the status updates in the view are rejected. The number in the bubble shows how many updates will be rejected. |
| Search: Use search as another way to filter the status updates visible on the page. You can search using any field name in the view. For example, to view all status updates for a single resource, search on the name of the resource. When you select Accept all updates, only the status updates in the view are approved. |
| Group By: You can choose to group the page by None, Resource, or Review. You must be an Admin Superuser or Project Superuser to view this option. |
| Project Filter: To reduce the number of status updates displayed on the page, choose to view only some projects. The status update cards are grouped by project. |
| Assignment or Owner or Team Member work distribution filter: These icons indicate whether the activity is assigned to a resource assignment, an activity owner, or a user with a Team Member work distribution filter assigned. |
| User (for Resource): If the project level setting to allow users to status other resources is selected, you can see the resource which was updated by the user who submitted the status update. |
| Accept: If you see that all the information in the status update is correct, accept the update to allow the data to be integrated into the activity or resource assignment. Hold: If you need more information before you approve the status update, place the update on hold. After you click Hold, the status update will move to the Held category. Team members can continue to make updates to their activities even when the update is in the held state. If a team member makes another update while the initial status update is in the held state, the data is updated and a message displays indicating a change was made. Override: If you see incorrect information in the status update and know what the correct data is, override the update to correct the incorrect information. Reject: If you see incorrect information in the status update, reject the update to have the team member review the data and resubmit the update. Team members can continue to make updates to their activities even after an update is rejected. If a team member makes another update while the initial status update is in the rejected state, the data is updated and a message displays indicating a change was made. |
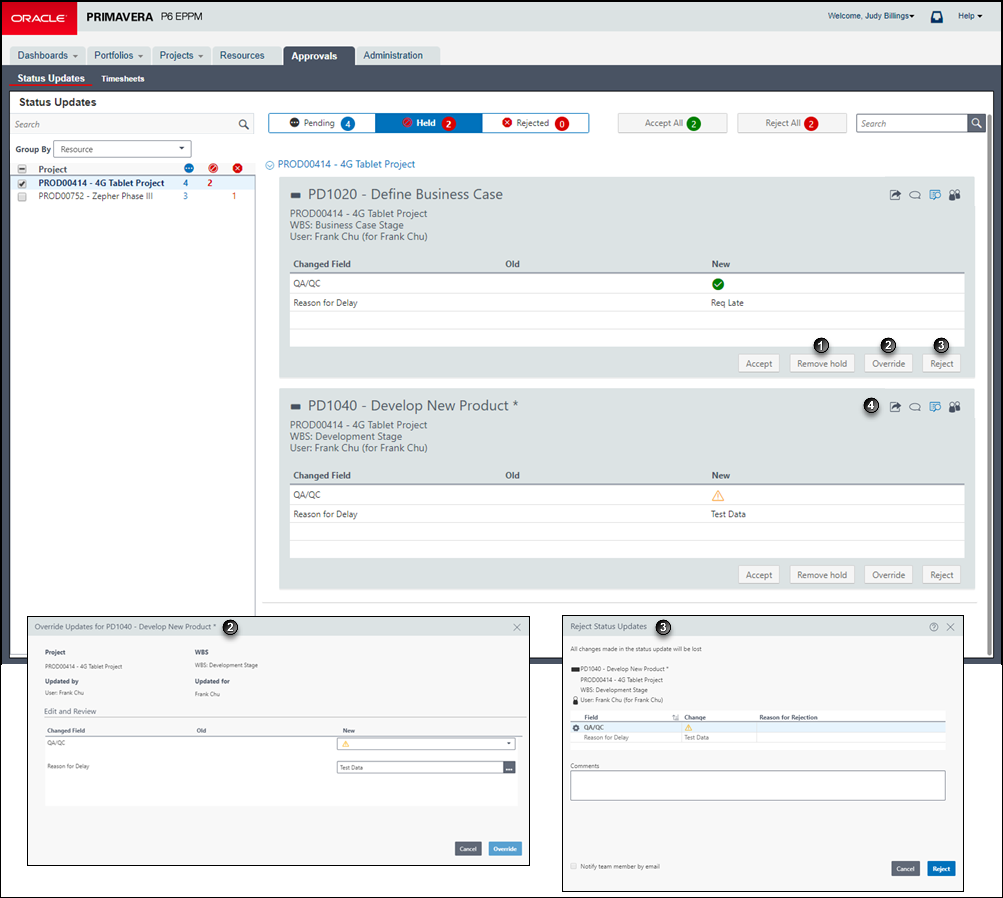
Table of Screen Elements
Item | Description |
|---|---|
| Remove Hold: When you are ready to approve a status update in a held state, select Remove Hold to return the card to the Pending list. The status update will be approved when you select Accept All in the Pending list. Alternatively you can select Accept on the card in the Held list to accept the status update. |
| Override: If you need to make a correction to a status update, click Override. The updated values will be saved to the activity once you click Accept. |
| Reject: If you see incorrect information in the status update, reject the update to have the team member review the data and resubmit the update. Enter your reason for rejection for each of the fields which is incorrect and an overall comment for the team member. Select the option to Notify team member by email that their update was rejected. |
| Send Email: To email the team member about an assignment, select Send Email to open a dialog box with a preformatted message. You can edit the email before you send it. Discussion: Launches a dialog box where you can communicate with the team member assigned to the activity. A number by the discussion icon indicates the number of unread messages. More...: Launches a dialog box which provides information about the submitted date, held date, activity codes, and UDFs assigned to the activity. Reviewers: launches a dialog which provides information about the reviewers for this task and the type of review. |
Related Topics
Last Published Wednesday, July 10, 2024