- DSR Cloud Installation Guide
- Installation
- DSR Installation on OL8 and KVM
- Installing DSR on OL8 and KVM
2.3.1 Installing DSR on OL8 and KVM
Note:
- This installation procedure only applies while installing DSR on Oracle Linux OS through direct KVM.
- For the Oracle Linux OS, Oracle Linux 7.7 release is used and verified.
- The screenshots shared in this procedure are taken from HP Gen-10 Blade.
- This procedure can run on any flavor of blade that requires DSR install on OL7.8 and KVM.
- Perform this procedure on each blade.
All the respective infrastructures have to be up and running.
- To mount virtual media containing Oracle Linux OS software, perform the
following steps:
- Open iLO GUI.
- Click Remote Consoles on the left
pane menu.
Figure 2-1 Remote Console

- Click Web Start under Java Integrated
Remote Console (Java IRC).
Figure 2-2 Java IRC

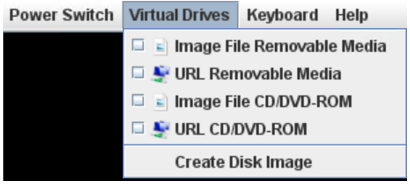
- Navigate to Virtual Drives and
select Image File CD-ROM/DVD.
Figure 2-3 Virtual Drives
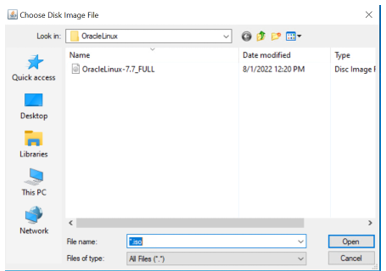
- Browse and select the Oracle Linux 7.7 image file.
Figure 2-4 Browse Oracle Linux 7.7 file
- To reboot host, perform the following steps:
- Log in to Blade Server iLO GUI browser page and launch remote console.
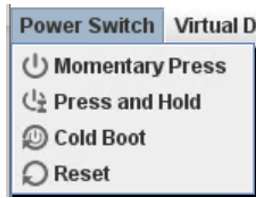
- Click Power Switch and select
Reset from the drop-down menu.
Figure 2-5 Power Switch
- Click Ok to confirm reset.
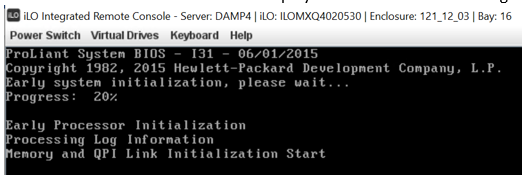
- The Remote Console window displays
that the host is rebooting.
Figure 2-6 Host rebooting
Wait for a couple of minutes for reboot to complete.
Once reboot completes, the host boots with Oracle Linux installation ISO and the GUI screen prompts for the installation options.
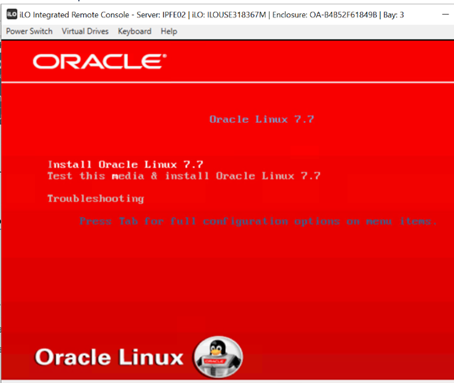
- To initiate Oracle Linux Platform installation, select Install Oracle Linux
7.x to continue.
Figure 2-7 Installation Options
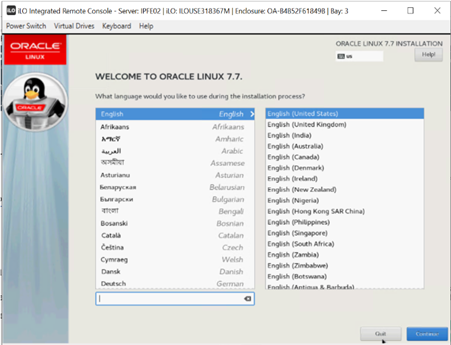
- To choose Oracle Linux OS language, select English as
Oracle Linux OS language and click Continue to go to next
step.
Figure 2-8 Language Selection
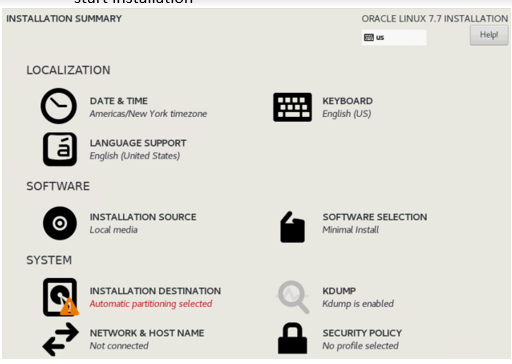
The next page INSTALLATION SUMMARY displays the required information to start installation.
- To set up time zone, click DATE & TIME under
LOCALIZATION.
Figure 2-9 Installation Summary
- Click Network & Hostname under
System and ensure that the system is connected to a network.
Figure 2-10 Network and hostname

- Click Done to continue.
- Click Localizationà Date & Time.
- Pick a time zone by selecting a region and city from the
drop-down list, or by clicking location on the map.
Figure 2-11 Date and Time

- Toggle the switch to turn ON Network Time.
- Click Settings, configure the NTP
servers used by the system.
Figure 2-12 Add and mark for usage NTP servers
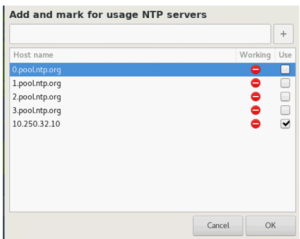
- Click Ok to go back to the previous screen.
- Click Done to continue.
- Click Network & Hostname under
System and ensure that the system is connected to a network.
- To set up installation on base environment, perform the following steps:
- Click SOFTWARE SELECTION option in the SOFTWARE area.
- Select Server with GUI from the
Base Environment area, and ensure that the
following add-ons are selected:
- Virtualization Client
- Virtualization Hypervisor
- Virtualization Tools
- Compatibility Libraries
Figure 2-13 Software Selection

- Click Done to save the changes and go back to the main configuration page.
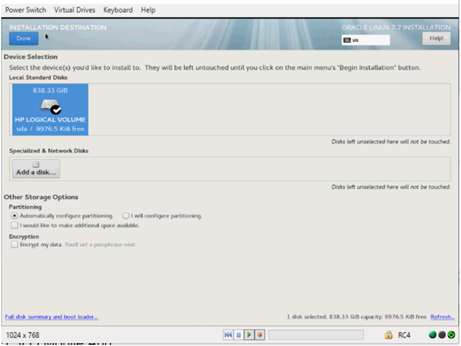
- To setup installation destination, click INSTALLATION
DESTINATION in the SYSTEM area, then
perform the following steps:
- Select sda or sdb to be used.
- Check Automatically configure partitioning.
- Click Done to continue.
Figure 2-14 Installation Destination
- To start installation, review all the information and click Begin
Installation.
Figure 2-15 Installation Summary

Note:
Network configuration is not mandatory at this point and can be performed after Oracle Linux OS is installed. - To create login credentials, configure root credential or any other login
credentials as required.
Figure 2-16 Login Credential Configuration

Note:
At the same time Oracle Linux installation software lays down files into Gen 10 local hard disk.Wait for the installation to complete until the following screen appears.
Figure 2-17 Installation Configured

- To reboot host after the installation is completed, click
Reboot.After reboot is done, license agreement page appears.
Figure 2-18 License Agreement
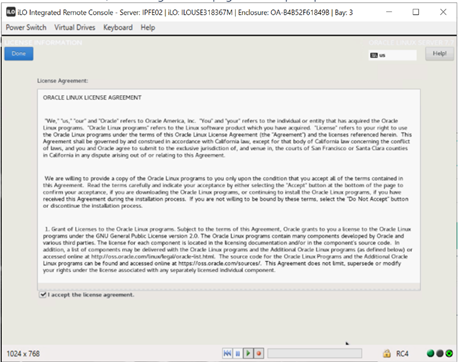
- To accept license agreement, read and check I accept the license
agreement checkbox, and click Done to
continue.
Note:
Skip when prompted for ULN settings. - Login, select Language, and click Next.
- Select Keyboard layout and click Next.
- Turn off the location services and click Next.
- Click Skip when prompted to connect to online accounts.
- To verify kernel and KVM versions, open SSH Console
window and check the following.
- # sudo su –
- # virt -manager
- # uname -a
- o # virsh version
- To change network interface name pattern to ethx, perform the following
steps:
- To append
'net.ifnames=0'with optionGRUB_CMDLINE_LINUX, edit/etc/default/grubcat /etc/default/grub
- Re-create the grub2 config
file.
grub2-mkconfig -o /boot/grub2/grub.cfg - Restart host and verify that the network interfaces have ethx
name pattern.
shutdown –r
- To append
- To create bond0 device, perform the following steps:
- Create device bond0 configuration file, save the file and
exit.

- Create device eth0 configuration file, save the file and exit.

- Create device eth1 configuration file, save the file and exit.

- Bring up devices into services.

- Create device bond0 configuration file, save the file and
exit.
- To create IMI bridge, perform the following steps:
- Create
bond0.<imi_vlan>configuration file.vim /etc/sysconfig/network-scripts/ifcfg-bond0.<imi_vlan>
- Create imi device configuration
file.
vim /etc/sysconfig/network-scripts/ifcfg-imi
- Bring up devices into services.

- Create
- To create XMI bridge, perform the following steps:
- Create
bond0.<xmi_vlan>configuration file.vim /etc/sysconfig/network-scripts/ifcfg-bond0.<xmi_vlan>
- Create xmi device configuration
file.
vim /etc/sysconfig/network-scripts/ifcfg-xmi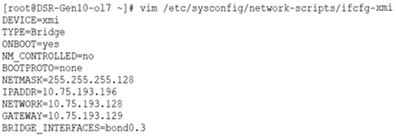
- Set default route for xmi
network.
vim /etc/sysconfig/network-scripts/route-xmi default via <xmi_gateway> table main
- Bring up the devices into service.

- Create
- To create bond1 device, perform the following steps:
- Create device bond1 configuration
file.
vim /etc/sysconfig/network-scripts/ifcfg-bond1
- Create device eth2 configuration
file.
vim /etc/sysconfig/network-scripts/ifcfg-eth2
- Create device eth3 configuration
file.
vim /etc/sysconfig/network-scripts/ifcfg-eth3
- Bring up devices into services.

- Create device bond1 configuration
file.
- To create xsi1/xsi2 bridge, perform the following steps:
- Create device
bond1.<xsi1_vlan>configuration file.vim /etc/sysconfig/network-scripts/ifcfg-bond1.<xsi1_vlan>
- Create device xsi1 configuration
file.
vim /etc/sysconfig/network-scripts/ifcfg-xsi1
- Bring up devices into services.

Note:
Perform similar steps to create network devices for xsi2. - Create device
- To set hostname, rename host by modifying
/etc/hostnamefile.# cat /etc/hostname # vim /etc/hostname - Review the hostname # hostnamectl status - To set NTP service, perform the following steps:
- Modify
/etc/chrony.confconfiguration file. Then, comment out all server * entries and append your NTP server IP to the list with prepending 'server' text.
- Force ntp to sync with newly added
server.
$ ntpdate <NTP server IP>
$ timedatectl
$ chronyc tracking
- Modify
- To create
/home/ovadirectory, run the following command.
- To transfer OVA file directory, use sftp tool.

- To untar the ova file, run the following command.

- To convert the
vmdkfile toqcow2file, run the following command.
- To copy the
qcow2files for SO and MP, run the following command.
- To configure storage for corresponding
qcow2files as per VMs, perform the following steps:- Set the storage for each VM, by running the following
command:
qemu-img resize <NO_qcow2_filename>.qcow2 <storage_in_gigabytes>G - Run the command for a VM if storage required is greater
than 60 G.
For example: If resource profile is 2K Sh and VM is NOAMP,whereas the storage required is 70G, then run the following command:
qemu-img resize DSRNO-84_17_0.qcow2 70GNote:
- No need to run this command if the storage required is less than or equal to 60G.
- For multiqueue settings, refer to Multiqueue on IPFE (OL/KVM).
- Set the storage for each VM, by running the following
command:
- To set the txqueue length for the ether-net adapter to a high value on the host
machine, add the following script to the created file
/sbin/ifup-local.[root@DSR-Gen10-ol7 ova]# vim /sbin/ifup-local ifconfig eth0 txqueuelen 120000 ifconfig eth1 txqueuelen 120000 ifconfig eth2 txqueuelen 120000 ifconfig eth3 txqueuelen 120000 - To verify txqueue length for the ether-net adapter to a high value on the host
machine that is added on all interfaces, run the following command.
[root@DSR-Gen10-ol7 ova]# ifconfig <ethernet adapter>Note:
Verify same for eth1, eth2, and eth3. - To restart all the ethernet adapters (eth0, eth1, eth2, and eth3), run the
following command on each adapter one at a time.
[root@DSR-Gen10-ol7 ova]# ifdown <ethernet adapter> [root@DSR-Gen10-ol7 ova]# ifup <ethernet adapter> - Perform the steps in the Ring Buffer Configuration section.
- To reboot the host machine, run the following command.
[root@DSR-Gen10-ol7 ova]# reboot - To confirm the configurations, verify the following on host machine as per the
configuration:
- If multiqueue configuration is performed on IPFE, ensure the configuration is done as mentioned in Multiqueue on IPFE (OL/KVM).
- If the ring buffer size is set to max on all the ether-net devices by using the steps in Ring Buffer Configuration.
- If the
txqueuelength for all the ether-net adapter is set to a high value by using Step 28.