Enabling PUM Automated Merge
To enable Object Merge in Change Assistant:
In Change Assistant, select Tools, Options.
Select the PUM Source tab.
Select Enabled for Object Merge.
(Optional) Use the Show button for a list of objects that can be merged.
Select Manage button for the Customization Repository to upload customization projects to the PUM Source.
Note: Only Select Existing Database Object and Create New Database Project options are available on Manage Customization Repository page if Object Merge is enabled.
Select Edit button for the Default Merge Rules to review or change the default merge rules.
This example illustrates the fields and controls on the PUM Source Options. You can find definitions for the fields and controls later on this page.
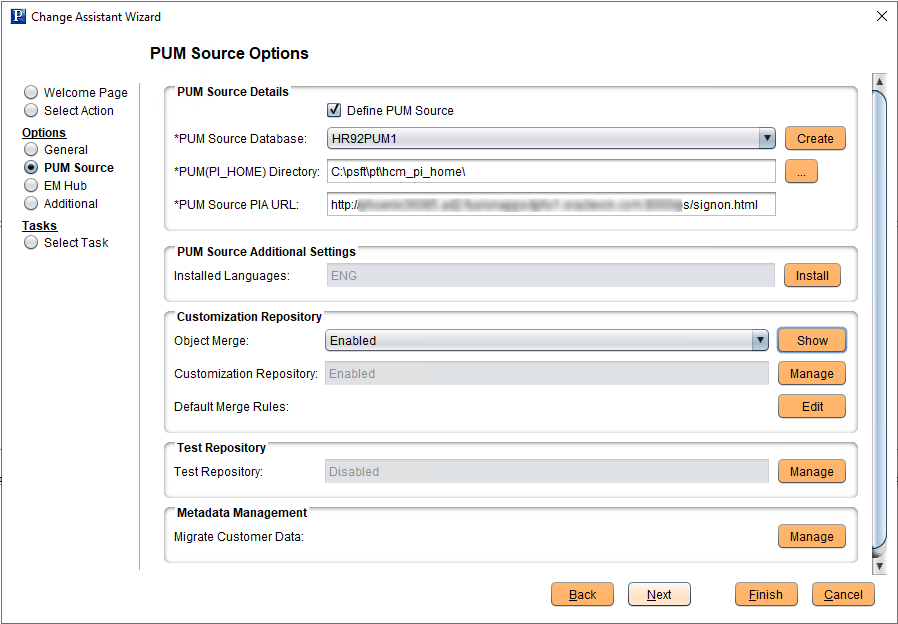
Select Enabled for the Object Merge to enable object merge.
Select the Manage button for Customization Repository to upload customizations. See Uploading Customer Data to Image.
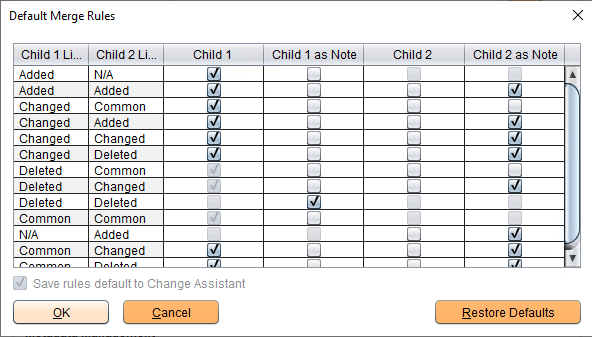
The default merge rules provide the basis for the automatic merge.
Select the Edit button for Default Merge Rules to review or modify the default merge rules.
When the merge analysis runs, if a difference is detected for a line of code, this table is used to determine the action to be taken based on the status combination.
This example illustrates the fields and controls on the Default Merge Rules page. You can find definitions for the fields and controls later on this page.
Modify the default rules as necessary for your environment.
Child 1 is the data uploaded by user to the customization repository. Child 2 is PeopleSoft delivered data in the PUM source.
If the Child 1 as Note or Child 2 as Note column is selected, the line of code will display greyed out in the Merge Session. This helps to visualize and verify which line of code is getting merged or replaced by the merge rules. These lines of code are not added to the merged output.
Select the Restore Defaults button to restore the default rules.
Versioning of Objects
Customization objects that are uploaded to merge repository are assigned a version number. Only those objects that have version numbers are considered during the merge analysis step.
After running merge analysis, when the promote merge step is run, the merged output is written back to the merge repository with a newly calculated version number.
The versioning format is nn.xx.yyy.
where,
nn- indicates the Image
number.
xx- is reserved for future
use.
yyy- indicates the upload
iteration of the object. This increments when the same object is uploaded again.
Example on how versioning is calculated:
Consider a development (target) database which has updates applied from Application Update Image 12. An Object X (Peoplecode, XSLT, or SQL), has been customized by user in the development database.
Assume that the same object X was modified or delivered by multiple bugs (Bug 1, Bug 3, Bug 7, and Bug 8) in the following Images, which were applied to the development database:
Bug 1 delivered in Image 05.
Bug 3 delivered in Image 07.
Bug 7 delivered in Image 11.
Bug 8 delivered in Image 13.
If bugs Bug 1, Bug 3 and Bug 7 were applied on the development (target) database, then the version of Object X will be 11.00.001, where:
11- indicates the version of
the highest Image in which Object X was modified or delivered.
00- reserved for future
use.
001- indicates the upload
iteration. In this case, the Object X was uploaded for the first time.
If the same object is uploaded again, then the version of Object X is 11.00.002.
If all the bugs Bug 1, Bug 3, Bug 7, and Bug 13 are applied on the development database, then the version of Object X will be 13.00.001.
An Object Y, which is created by customer, and not delivered by PeopleSoft Images will not be considered for merge. This object is assigned the version 99.00.001 to identify as a customer created object.
Consider that Bug 9 delivers Object X in Image 14. If the merge process is run using Image 14 with Object X, then the merged version of Object X is assigned 14.00.001 and written-back to the merge repository.
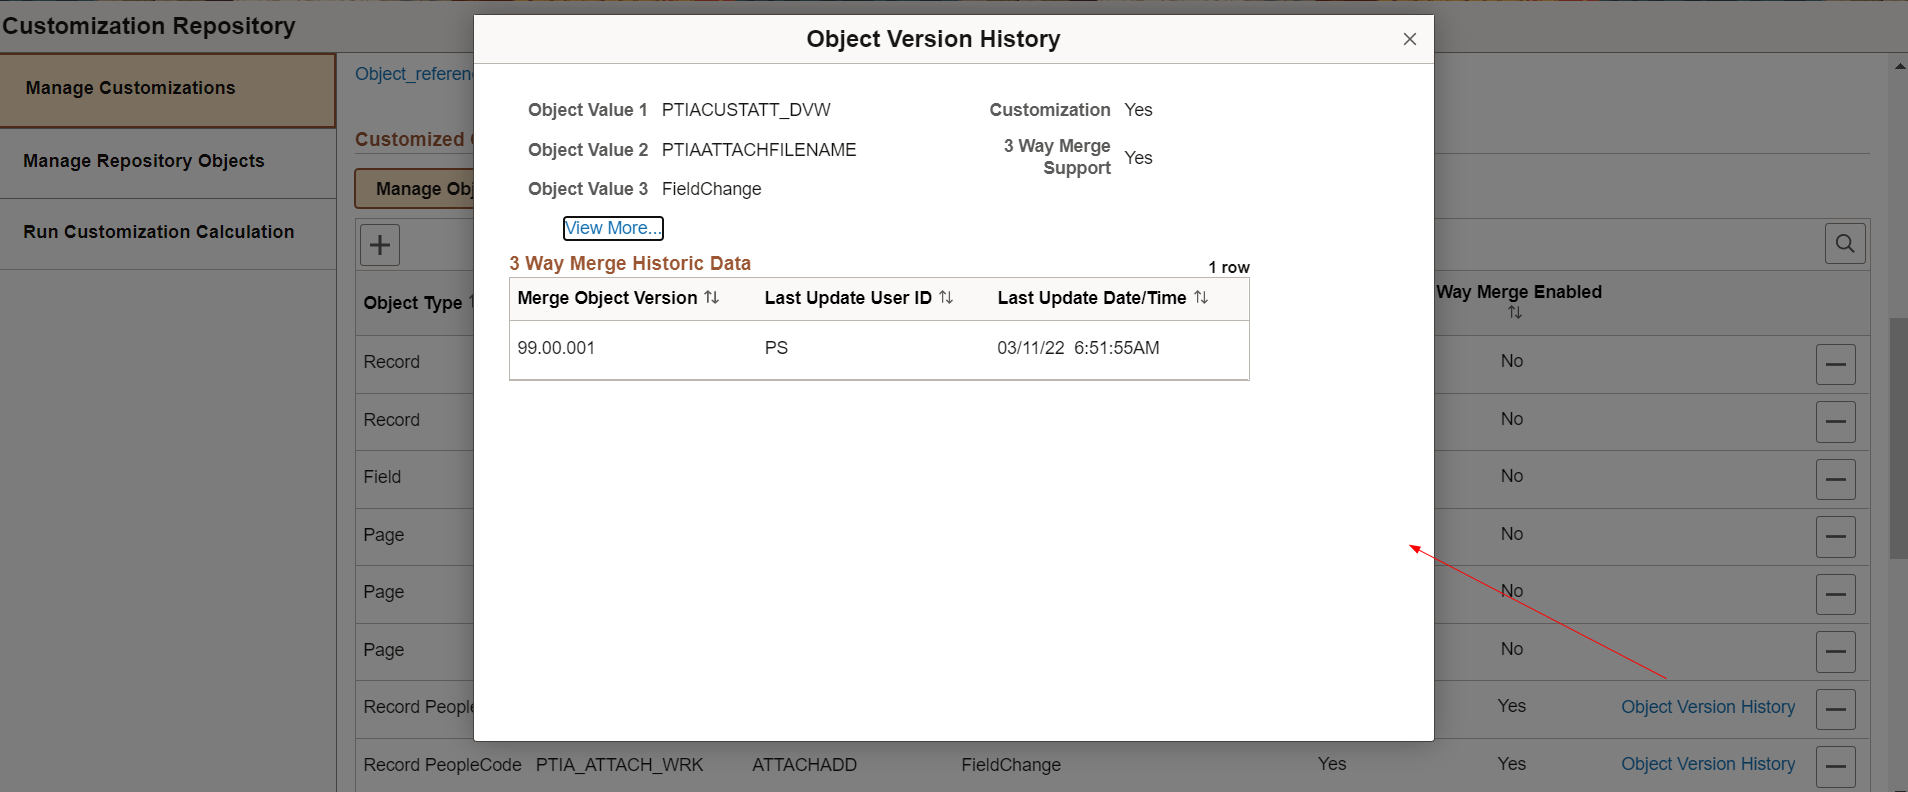
On the Customization Repository pages in PIA, you can view the version numbers of the customization objects.
This example illustrates the fields and controls on the Object Version History page.
Change Assistant writes back merged version of customized objects and merge session details in PUM source as part of the promote merge step.
For subsequent PeopleSoft application maintenance updates, Change Assistant can use the previously written-back merged objects as the latest customizations. This avoids re-upload of customizations.
Managing versions of customizations and details of merge sessions allows you to:
Use previous merge session objects for the next merge session.
Re-run merge sessions multiple times with same version of customization objects.
Use the appropriate object version of customized objects in different merge use cases as explained below.
Delete merge sessions, including promoted written-back versions, to roll back to use user uploaded version of customizations in the next run of merge process.
Few use cases on how to select the appropriate object versions of customized objects for merge analysis:
When you run merge analysis for the first time, there is no record of merge sessions stored in the PUM source. In this case, Change Assistant uses the latest uploaded customization objects for merge analysis. When running merge promotion, the merged version of the object is retained in the PUM source to be used in subsequent runs of merge process.
You can run the merge analysis step again with modified merge rules until the merged version of the object is satisfactory. If you want to only change the merge rules to tweak the merge output, but use the same object versions that were used in the previous merge process run, then you can do so by re-running the merge analysis step with same merge session name.
Using the same merge session name, lets you to pick the same set of customization objects that were used in the previous run of that session.
After running a merge session (SESSN1), an updated merged version of the customization (M1), is written-back to the merge repository tables. On next merge session run (SESSN2), M1 will be used. If you want to revert to using the previous user uploaded version (A) instead of M1, then the merge session that wrote-back the merged version of the object must be deleted, which is SESSN1.
If you want to upload a new version of the customization object again (A2) and use SESSN2, then all previous merge sessions, including SESSN1, must be deleted. This happens if A2 version is lower than the written-back version of the object (M1) from any previous merge runs (SESSN1).
By deleting all the previous merge sessions (SESSN1), the merge output that was written-back gets deleted (M1). At this point, Change Assistant picks the latest customization that was re-uploaded (A2).
To delete, refer the succeeding section on deleting merge session.
Note: New version of customizations can be uploaded using either Change Assistant or Administer Metadata in Update Manager.
For details on syncing merge repository through Administer Metadata, refer to Defining and Managing Database Activities
When the merge analysis step runs on a subsequent change package apply job, the latest version of customization objects are picked from the merge repository. The latest version could either be the written-back version of the customization objects from the previous merge session or the version of the object that was synced through the Administer Metadata; whichever is the highest version of that object.
Delete Merge Session
You can delete existing merge sessions in Change Assistant. This deletes the merge session data and the corresponding merged objects.
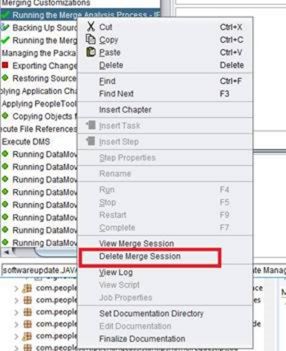
To delete existing merge session in Change Assistant:
Set the action type as View PUM Automated Merge Sessions.
Open the Tools menu.
Select Merge PeopleCode/SQLT/XSLT option.
Next, select Delete Merge Session.
In the Delete Merge Session window, you can select multiple merge sessions to delete using the Shift and down arrow key.
You can also delete a merge session while applying a change package.
You can also delete merge sessions from command line.
For more details, refer to Constructing Command Line to View and Delete Merge Sessions
Merge Session History
Change Assistant maintains the merge session details in the merge session history tables.
When customer runs the same merge session multiple times, then Change Assistant can lookup the merge session history tables to use the same set of customized objects that were used for merge analysis. This allows customer to run multiple sessions with changed merged rules.
When a merge session is re-run, Change Assistant deletes the previous merge session with the same merge name and inserts the latest one as the active merge session.
You can migrate (import or export) merge history tables.
In Change Assistant, select Tools, Options, PUM Source tab, then click Manage for Migrate Customer Data.
This example illustrates the fields and controls on the PUM Data Migration page.
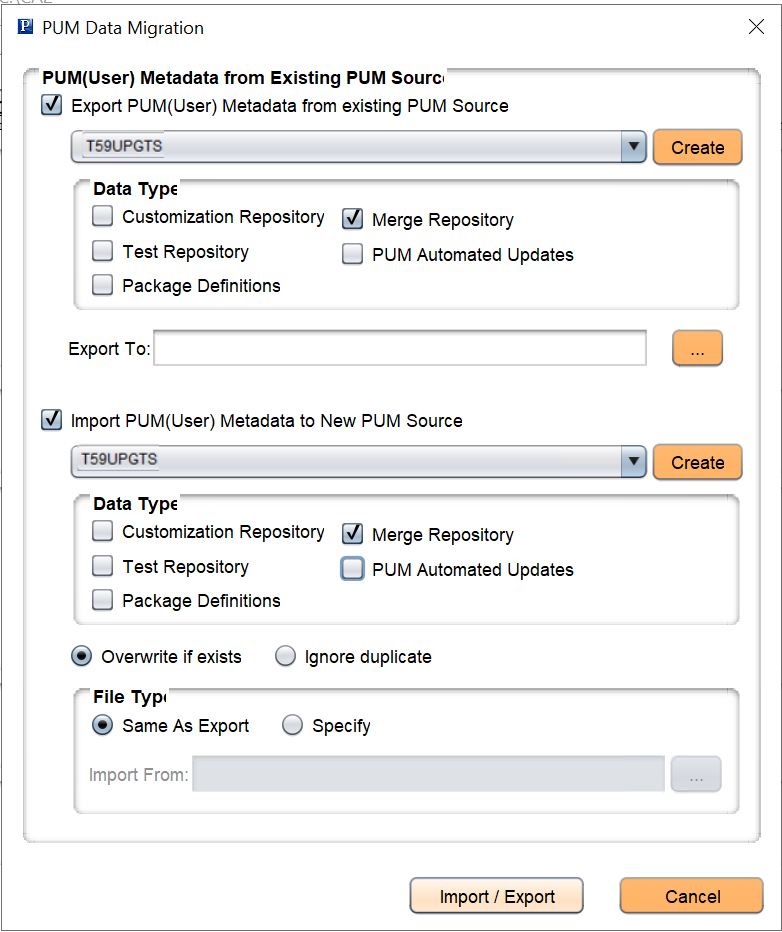
Select the appropriate Merge Repository option to import or export merge history tables.