Defining the Setup Process Definitions Component
Business analysts use the Setup Process Definition page to define an approval definition process. The process is made up of stages and their paths and steps. The approval steps that you place on the approval path represent the approval levels that are required for a transaction.
This section discusses how to define the setup process definitions component.
|
Page Name |
Definition Name |
Usage |
|---|---|---|
|
EOAW_PRCS_MAIN |
Define approval process stages. |
|
|
EOAW_CRITERIA |
Define criteria for workflow approvals. |
|
|
Notifications Page |
EOAW_NOTIFY_DEF |
Define notification options. |
|
Timeout Options Page |
EOAW_TIMEOUTDEF |
Define global timeout and escalation settings. Individual transactions determine their own timeout periods. |
|
EOAW_PATH_SEC |
Set up workflow approval paths. |
|
|
EOAF_STEP_SEC |
Define steps for workflow approvals. |
Use the Setup Process Definitions page (EOAW_PRCS_MAIN) to define approval process stages.
Navigation:
This example illustrates the fields and controls on the Setup Process Definitions page. You can find definitions for the fields and controls later on this page.
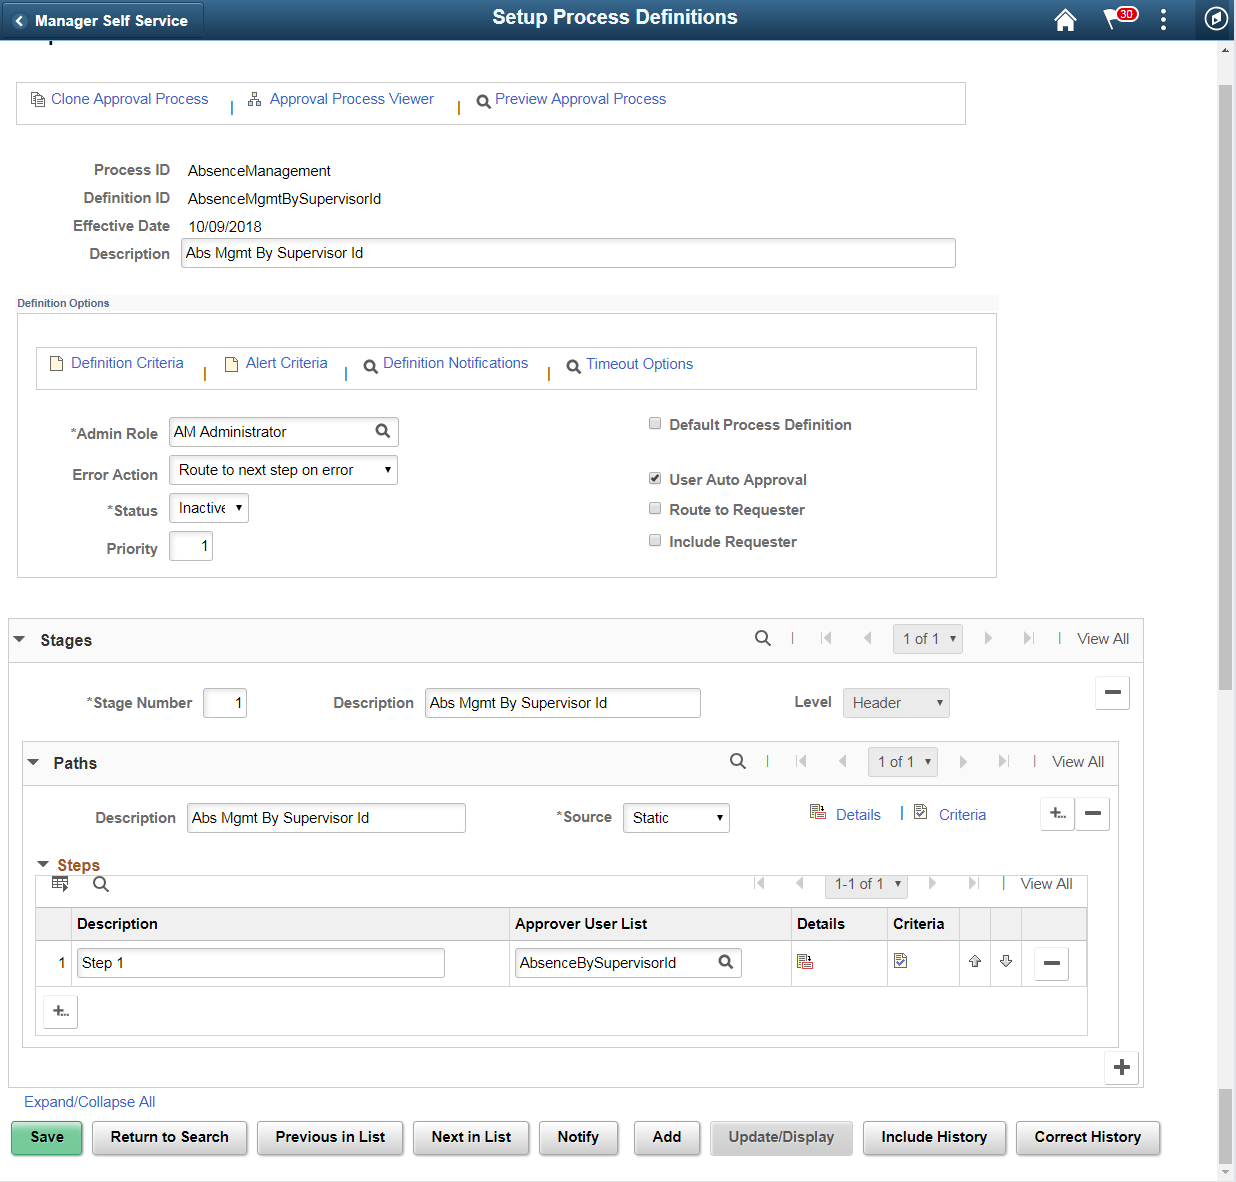
Business analysts use this page to define an approval definition process. The process is made up of stages and their paths and steps. The approval steps that you place on the approval path represent the approval levels that are required for a transaction.
You can develop approval processes that:
Meet organizational or tiered approval limits.
Use parallel processing to allow multiple transaction entities to be processed at the same time.
Use staged approvals that require one sequence of processing to complete before another can begin.
Typical approval processes might include:
Monetary based approval criteria.
Two different approvers for each step, where both approvers at a step must approve the request for it to advance to the next step.
Field or Control |
Description |
|---|---|
Process ID |
The Process ID created on the Register Transactions page. |
Definition ID |
Enter any identification code that provides meaning to you. This identifier is used as a search field on the Monitor Approvals page. Note: When upgrading from a previous release, the SetID field is used for the Definition ID. |
Effective Date |
Indicates the date on which this approval process became effective and ready for system use. This value applies to approval processes for a particular approval process ID and definition ID, and it includes PeopleSoft functionality associated with effective-dated entities. For instance, if multiple approval processes are active with the approval process ID, definition ID, and effective-date specification, then the system uses the most current effective dated row. |
Description |
Enter a description for the approval process. |
Clone Approval Process |
Click this link to clone the approval process. |
Approval Process Viewer |
Click this link to access a graphical tool, which enables you to view each stage, path, and step of the approval process. Note: An SVG Viewer is required for this feature. Note: When you are viewing the graphic tool in the Approval Process Builder page, if you elect to make changes the system will return you to the standard Approval Process Definition page. |
Preview Approval Process |
Click this link to view what a workflow instance would look like if it were running. |
Definition Options
This section of the page is used to define options for the approval process.
Field or Control |
Description |
|---|---|
Definition Criteria |
Click to access the Criteria Definition page, where you can define user and field criteria along with monetary and application class criteria for this process. This page works similar to the other Criteria Definition pages that are used for paths and steps, however this criteria is used to determine which Definition ID is to be used to process the Approval. |
Alert Criteria |
Click to access the Criteria Definition page, where you can define user and field criteria along with monetary and application class criteria for this process. This criteria can be evaluated by applications to highlight conditions of a transaction to be approved. For example, a one-time shipping address used only on this request. Alert Criteria is not used to determine how an approval should route. It is used by the application to determine if messages (Alerts) should be displayed as part of the approval process. |
Definition Notifications |
Click to access Approval Framework Notifications page, where you can define notification options to the override one or more of the process definition notification options defined in the Configure Transactions component. |
Timeout Options |
Click to access Approval Framework Timeout Options page, where you can set global timeout and escalation settings at the Approval Definition level. Path level timeout settings will override the Approval Definition level settings if they differ. You can specify the Calender ID if you want the escalation to be based on a calendar. To set timeout options based on unique calendar, see Escalations Calendar Setup page |
Admin Role (administrative role ) |
Select the PeopleSoft role used by workflow to route the transaction to all users filling that role in case of an error during approval processing. Note: The error conditions are no approvers or not enough approvers. |
Error Action |
In the event of an error during the approval process, choose how the approval process should automatically proceed. The options available are: Route to next step on error This is the default setup and the system will proceed to the next step in the approval process. Route to admin on error The system will route the request to the admin user in the event of an error. |
Status |
Select the current state of this approval process. The values are: Active: Indicates the approval process is available for use. Inactive: Indicates the approval process is not available for use. A transaction that has started with a specific definition continues using that definition, even if the status is Inactive. |
Priority |
Enter the priority for the definition. Priority 1 is the highest. When a definition is not explicitly passed to the Approval Framework by the calling application, the Approval Framework uses the Definition Level Criteria to determine which definition to use. If multiple definitions return a criteria of true, the definition with the highest priority is used. Note: Multiple Definition ID’s with the same priority may result in inconsistent behavior, in the event that multiple definition ID’s match. |
Default Process Definition |
Select to indicate that the system should use this process definition as the default when no other definition ID matches the criteria entered. |
Take Action on Line Completion |
Select to allow each line to continue to the next step of the approval process, with out waiting for other lines within the transaction to complete. This setting applies to approval processes that have a line-level stage at the end of the process. When this check box is selected, the approved lines of a transaction can move forward to the next approval step even though some of the lines in the transaction have not yet completed the approval process. As each line completes the approval process, the header and line status are updated immediately so that the individual line can move forward without having to wait for the all the lines of the transaction to complete workflow approval. When this check box is clear, all lines within a transaction must complete the approval process before any line of the transaction can flow to the next approval step. For example, a requisition line cannot be sourced to a purchase order until all lines of the requisition have completed the approval processing. The header and line statuses remain in a pending status until the last line of the transaction has completed the approval process. Once that last line has had an approval action made against it, then the header status is updated, as well as each line status. An approval action could be a denial as well as an approval. For example, if there are two lines on a transaction, one line is approved and the second line is denied, then the approval process is complete and the approved line can move forward to the next step. |
User Auto Approval |
Select to enable the system to remember an approver’s action for this process. The next time this approval process is presented to the approver, the system automatically applies the approver's selections. The automatic application of steps in the process is left in place until you clear the User Auto Approval check box. This setting applies to the specific line or header the approver had previously approved in this process only. A header approval implies line approvals for all lines. |
Route to Requester |
Select this check box to route this approval to the requester. When this check box is selected and the requester is also an approver, the requester must manually approve the transaction, unless the minimum approvals have already been satisfied. If this check box is not selected and the requester is also an approver, the system will check is self-approval is active. If self-approval is active, the criteria will be checked. |
Include Requester |
Select to enable the user to insert the requester in the event the requester is not equal to the originator. |
Stages
This section of the page is used to define the stages. An approval process can contain multiple parallel paths but they must be at the same header or line record level. The system executes stages in sequence where one must complete before the next one begins.
Field or Control |
Description |
|---|---|
Stage Number |
Enter a number indicating sequence for this stage. |
Description |
Enter a description for the stage. |
Level |
Select either Line or Header. |
The system executes stages in sequence where one must complete before the next one begins. A stage can be at either a header level or at a line level. Stages at a line level make it possible for approvers to sign off separately on individual line items for a single transaction. The Approval Framework sees each header and each line as individual pieces. A line is a child of the header. A header stage acts on the unique header while a line stage acts on each line. A stage consists of one or more paths.
Paths
This section of the page is used to define the paths for the stage. Use the Details and Criteria links to add the information for each path.
See Criteria Definition Page, Approval Path Definition Page.
Steps
This section of the page is used to define the steps for the path. Use the Details and Criteria links to add the information for each step.
See Criteria Definition Page, Approval Step Definition Page.
Use the Criteria Definition page (EOAW_CRITERIA) to define criteria for workflow approvals.
Navigation:
Click the Definition Criteria link on the Setup Process Definitions page.
Click the Alert Criteria link on the Setup Process Definitions page.
Click the Criteria link from the Setup Process Definitions page in the Path section.
Click the Criteria link from the Setup Process Definitions page in the Steps section.
This example illustrates the fields and controls on the Criteria Definition page. You can find definitions for the fields and controls later on this page.
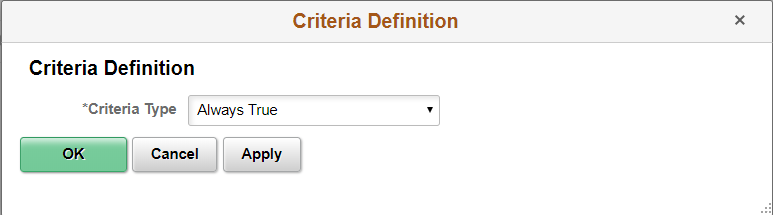
Use this page to define the different types of criteria you want to apply to an approval process. You can create definitions consisting of a field with a logical operator and a value of definitions consisting of an application class that takes in transaction data to process the approval.
Field or Control |
Description |
|---|---|
Criteria Type |
Select one of these options:
|
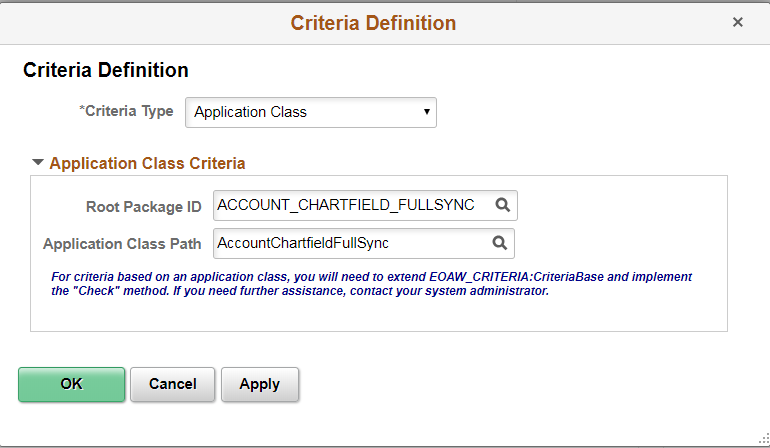
Application Class Criteria (Section)
Use this section to assign application packages as criteria for the approval process definition. When you define a class, the system uses it along with other criteria you enter to process the approval.
This example illustrates the fields and controls on the Criteria Definition page showing criteria type Application Class. You can find definitions for the fields and controls later on this page.
Field or Control |
Description |
|---|---|
Root Package ID |
Select the primary application package. This selection is the parent class for other packages or for child application classes. |
Application Class Path |
Select a path that describes a specific class within the root package. |
Application Class: Example
Here is an example of an application class written for approval criteria that extends EOAW_CRITERIA:CriteriaBase and implements the “Check” method. This example can also be found in EOAW_CRITERIA:EXAMPLES.
import EOAW_CRITERIA:DEFINITION:*;

class CriteriaClassExample extends EOAW_CRITERIA:DEFINITION:CriteriaBase
  1- method CriteriaClassExample(&rec_ As Record);
  2- method Check(&recBind As Record) Returns boolean;
  3- method CheckwithComments(&recBind As Record) Returns array of string;
private
   instance Record &rec;
   method CheckSQL(&recBind As Record) Returns boolean;
end-class;

method CriteriaClassExample
   /+ &rec_ as Record +/
   %Super = create EOAW_CRITERIA:DEFINITION:CriteriaBase(&rec_.EOAWCRTA_ID.Value);
   &rec = &rec_;
end-method;

method Check
   /+ &recBind as Record +/
   /+ Returns Boolean +/
   /+ Extends/implements EOAW_CRITERIA:DEFINITION:CriteriaBase.Check +/
   Local boolean &queryStatus;
   rem %This.CheckQuery(&recBind);
   Local boolean &sqlStatus = %This.CheckSQL(&recBind);

   Return &sqlStatus;

end-method;

method CheckwithComments
   /+ &recBind as Record +/
   /+ Returns Array of String +/
   /+ Extends/implements EOAW_CRITERIA:DEFINITION:CriteriaBase.CheckwithComments +/
   Local array of string &aryComments = CreateArrayRept(" ", 0);

   Return &aryComments;

end-method;

method CheckSQL
   /+ &recBind as Record +/
   /+ Returns Boolean +/
   Local string &sqlDef, &SQLText;
   Local integer &i;
   Local Rowset &rsResults;

   &SQLText = "SELECT 'X' FROM PS_INSTALLATION";
   Local string &output;
   REM ***** Specify a query that uses some or all of the transaction keys as input;
   SQLExec(&SQLText, &output);
   If All(&output) Then
      Return True
   Else
      Return False
   End-If;
end-method;
Note that:
CriteriaClassExample is the class name. It should match at all levels. The input is a record that contains the field EOAWCRTA_ID. The method must have this parameter.
The Check method is the main method doing the work. It validates if the criteria is true or false. It can call anything you want to add. In this case, it is calling a private method called CheckSQL. The &recBind parameter is the transaction cross reference record. The cross reference record ties the approval workflow engine to the transaction. The transaction keys are fields on the cross reference record. There is also a field called RECNAME so that it is possible to reconstruct the transaction record.
The CheckwithComments method is nearly identical to the Check method. The difference is that it returns any “descriptions” from the criteria page for criteria that was true. This is useful in the area of Alert Criteria on the Approval Process Definition page. If there are simple notifications (messages) that the application wants to display, they can be done with the CheckwithComments method. One example of this is the one-time address check in eProcurement.
Here is an example of how the call is made from Self Criteria:
If (All(&c) And
            &c.Check(%This.path.thread.rec)) Then
         &self_ok = %This.utils.SELF_OK;
      End-If;
And this is the constructor for the Criteria object:
&SelfAppCriteria = &fact.GetCriteria(&rec.EOAWSELF_CRTA_ID.Value);User Entered Criteria (Section)
Use this section to define additional criteria for the approval.
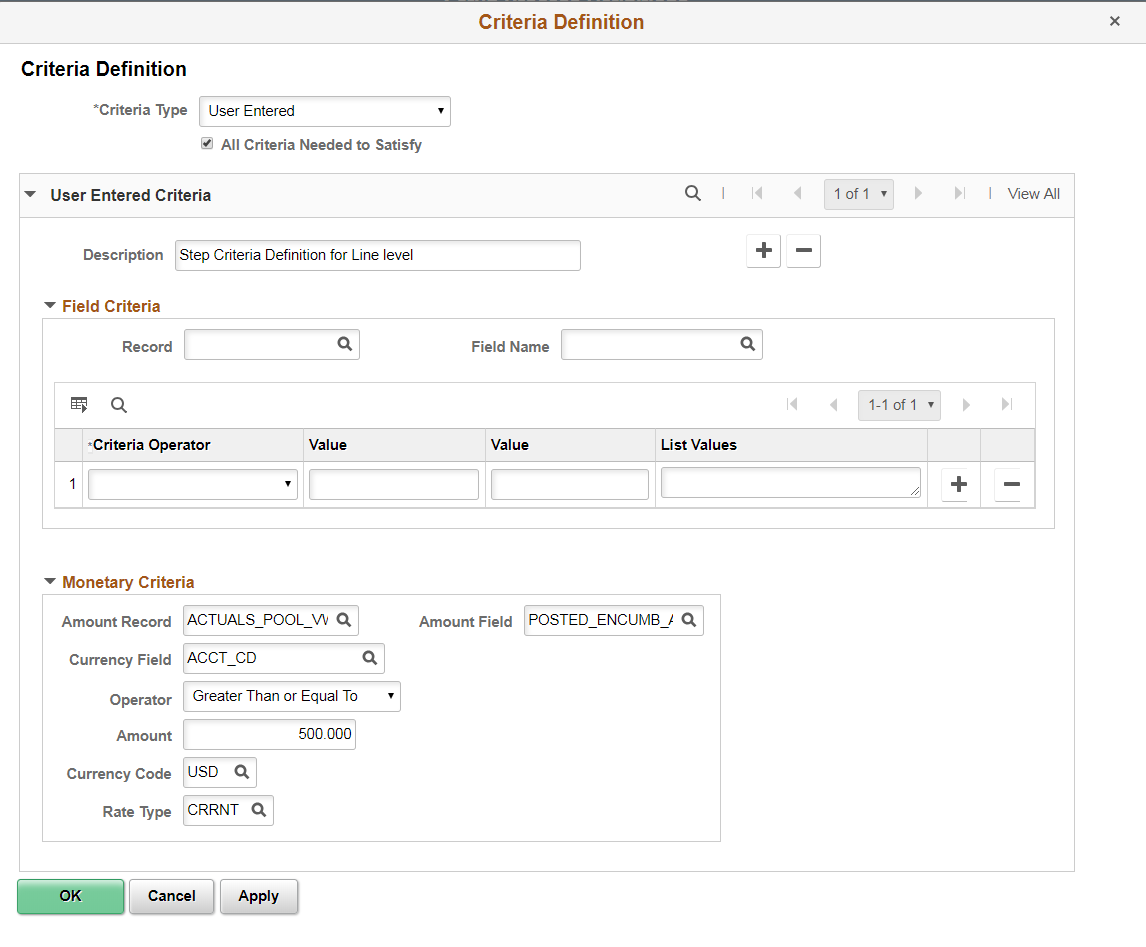
This example illustrates the fields and controls on the Criteria Definition page showing criteria type User Entered. You can find definitions for the fields and controls later on this page.

Field or Control |
Description |
|---|---|
Description |
Enter purpose of the alert. For example, if you are using a one-time ship-to address, create a description that indicates that a one-time ship-to address is attached to the requisition. |
All Criteria Needed to Satisfy |
Select to indicate that all criteria defined on the Criteria Definition page must be met in order to trigger the workflow to evaluate as true. Note: This check box applies to the outermost group box. This means that for every User Entered Criteria row, the combination of Field Criteria and Monetary Criteria is combined. If there is more than one User Entered Criteria row, then all rows are applied separately. |
Field Criteria (Section)
Use this section to select a record and field on which to control and filter ranges of data or types of data placed in the file you want to use in the approval process. As you add rows in this section to build your approval criteria, they get translated into a long SQL string by the approval framework, each of them connected by the OR operator. For example, the where clause of the SQL generated for the criteria that is specified in the screenshot above looks like this:
“where HRS_JOB_OPENING_ID > '10000' OR HRS_JOB_OPENING_ID < '9900'”
Important! If the Not Equal To criteria operator is used in a row, subsequent rows will be connected using the AND operator instead of the OR operator. Here is an example of an SQL constructed for field criteria that contains the Not Equal To operator:
“where HRS_JOB_OPENING_ID <> '10500' AND HRS_JOB_OPENING_ID > '10000' AND HRS_JOB_OPENING_ID < '11000'”
The approval framework does not support the insertion of parentheses around specified criteria values in SQLs.
Field or Control |
Description |
|---|---|
Record Name |
Select a record that you want to use in defining approval criteria. For example, if you are indicating a one-time address, identify PO_ADDR_REQ_VW as the record. |
Field Name |
Select a field you want to use to define approval criteria. The values you define in the remaining field criteria grid are those that are used in determining the approval criteria. |
Criteria Operator |
Select the operator to build the approval criteria. These operators are available:
|
Value |
Use the two Value fields to define a range upon which you want the operator criteria to evaluate. The second value is only used when the selected criteria operator is Between. |
Monetary Criteria (Section)
Use this section to establish approval criteria for requisition amounts. The system uses the values you define to determine the routing for approving the requisition. When the system evaluates the criteria for an approval process or a step or path within the process, it uses monetary values you define in this section.
Note: AWE performs currency conversion for the approval submitted date and not the entered transactions date if the business unit currency is different from the transaction currency. This causes Approval Workflow to operate different than expected if the effective date of the transaction currency on the Market Rate page has a new effective date and rate. If conversion is expected on the transaction date, you can create a view that has only amounts in the currency used in AWE criteria. This causes the AWE conversion to not run at all.
This example illustrates the fields and controls on the Criteria Definition page showing criteria type User Entered for monetary amount. You can find definitions for the fields and controls later on this page.
The system uses values from fields in this section in conjunction with the Operator field to determine whether to run a step.
Field or Control |
Description |
|---|---|
Amount Record |
Select the record name containing the amount in the original transaction to be used when comparing the minimum amount required to trigger the step. |
Amount Field |
Select the field within the amount record to be used when comparing the requisition to the minimum amount required to trigger the step. The system uses the value you select to evaluate the Amount field. |
Currency Field |
Select the currency field that corresponds to the currency code you select in the Currency Code field. |
Operator |
Select a value that determines how the system processes the values in the Amount fields. Values include Between, Greater Than, and Less Than. |
Amount |
Use the Amount fields to define an amount range for use with the Operator field. In the first field, enter the minimum amount required on the transaction in order to trigger the step. The system identifies all lines in the transaction that meet the criteria defined in the Amount Record and Amount Field fields. The amounts on these lines are totaled based on the Amount Record and Amount Field specified. If the requisition total is higher than this minimum amount, the criteria is met. If no amount is specified, zero is considered the minimum. Note: If you select Operator with a value of Between, a second Amount field becomes active. |
Currency Code |
Select the monetary unit you want to use for the approval. |
Rate Type |
Select how the system arrives at the currency value, such as the current rate or a financial rate. |
Use the Approval Path Definition page (EOAW_PATH_SEC) to set up workflow approval paths.
Navigation:
Click the Details link within the Paths group box on the Setup Process Definitions page.
This example illustrates the fields and controls on the Approval Path Definition page. You can find definitions for the fields and controls later on this page.
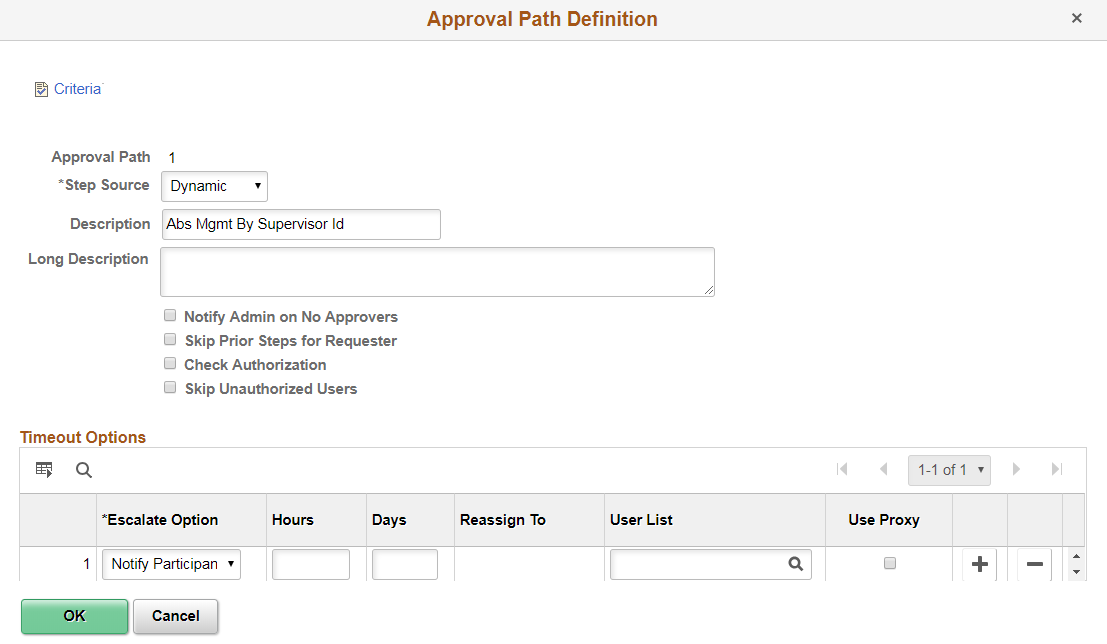
Use this page to set up additional parameters that determine how the system processes an approval path. Use the escalations feature to define time elements for when an approver takes too long to approve or deny a pending request.
Field or Control |
Description |
|---|---|
Criteria |
Click to access the Criteria Definition page where you can define user and field criteria along with monetary and application class criteria. |
Approval Path |
Displays the path name that you are creating or updating. The path provides the sequence of approvers of a request, usually from a single reporting (or other) hierarchy. |
Step Source |
Static: Select this source to indicate that you want the system to use the individual user-defined steps when it processes an approval. Dynamic: A dynamic path definition contains only one step. When begun, the single step definition could yield any number of instances in sequence. When using the Dynamic source, the system uses the user list on the step definition to initialize the steps in the path. The single step definition is repeatedly run, until the step's user list returns no more approvers. All these instances are queued in sequence. |
Notify Admin on No Approvers (notify administrator on no approvers) |
Select to indicate that the administrator is to be notified if the system does not find an approver for the path. This option is only available when the selected step source is Dynamic. Note: This is the default behavior for static paths. |
Skip Prior Steps for Requester |
Select to indicate that if one of the approvers in this path is also the requester, then the system is to skip all steps in this path prior to that approver's step. |
Check Authorization |
This option is only available when the selected step source is Dynamic. Select to bypass the existing criteria and use the Authorize Approvers component and criteria definitions. Check Authorization enforces an exit point for dynamic paths. |
Skip Unauthorized Users |
This option is only available when the selected step source is Dynamic. Select to bypass an approver that is not qualified to approve the transaction. and exits when an approver is qualified to approve a transaction. For example, if the first approver can approve transactions less than 500 and the second approver can approve transactions less than 5000 and the transaction is for 675, the first approver would be skipped and the transaction would go directly to the second approver. Since the second approver is qualified, no further approvals are necessary. |
Timeout Options
Field or Control |
Description |
|---|---|
Escalate Option |
Advanced Approval: Skip the current approver. Advance Approval will not advance if it is on the last step of the last stage. Notify Participant: Sends an email, or whatever notification is defined in the transaction registry, to the individual. Reassign Approval: Reassigns to a user ID or a user list. Note: If you select Advanced Approval and defined a User List, a notification is sent to the user list members. |
Hours |
Enter the number of hours a transaction can remain at one workflow step before being escalated. This field is combined with number of days to determine the total time an approver has to take action on an approval request. |
Days |
Enter the number of days a transaction can remain at one workflow step before being escalated. This is the length of time an approver has to do something such as approve or deny a transaction. |
Reassign To |
If you have selected Reassign as the option, you can enter a user name or a specific user list. Note: A user list will reassign to the first user in the list that does not match the current user. |
User List |
Select the list of users the workflow should be routed to. |
Use Proxy |
Select this check box to indicate that the escalation should be routed from the perspective of the current approver (proxy). If the check box is not selected, the escalation is routed from the perspective of the original approver (delegator). |
Use the Approval Step Definition page (EOAF_STEP_SEC) to define steps for workflow approvals.
Navigation:
Click the Details link within the Steps group box on the Setup Process Definitions page.
This example illustrates the fields and controls on the Approval Step Definition page. You can find definitions for the fields and controls later on this page.
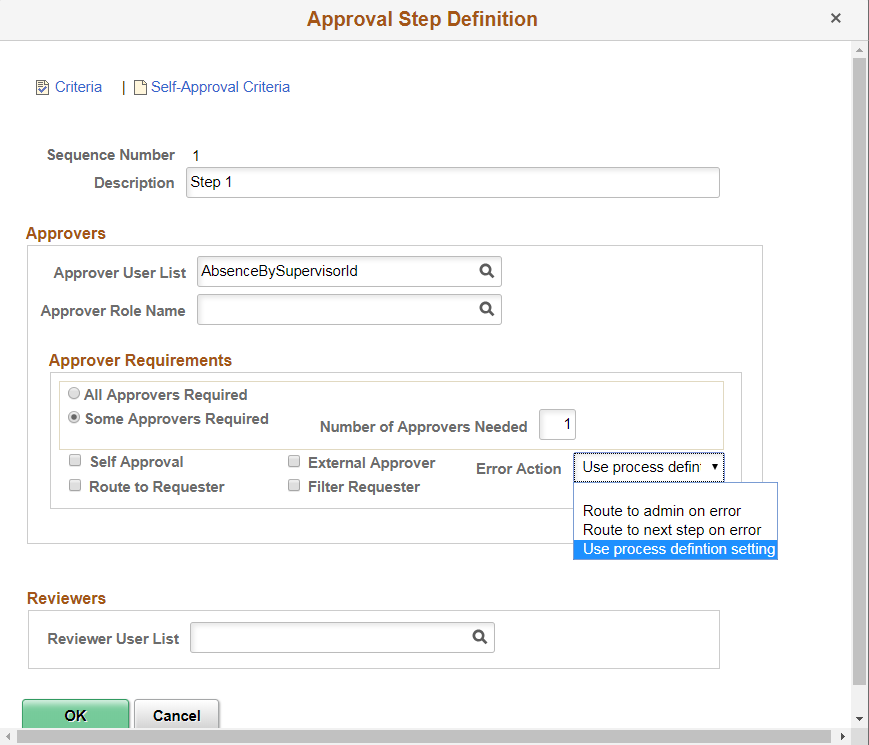
Use this page to set up additional parameters for the step definition.
Field or Control |
Description |
|---|---|
Criteria |
Click to access the Criteria Definition page, where you can define field criteria along with monetary and application class criteria. |
Self-Approval Criteria |
Click to access the Criteria Definition page, where you can set up self-approval criteria for a user, including field criteria and monetary and application class criteria. |
Sequence Number |
Displays the sequence number in which the approval is routed. Each step typically represents a routing to an approver. However, it is possible to route to multiple approvers or reviewers within a step. |
Approver User List |
Select the type of approver you want to use for this step based on the user list. |
Approver Role Name |
In addition to a User List, a role can be added to check for additional authorization checking. Select a role that specifies the authority that a user has. The Approval Framework filters approvers returned by the user list for this role. It also enforces the role at the time the approver acts. If the role assignment changes, such as the approver is no longer in the role, the approver is blocked from acting on the requisition. |
All Approvers Required |
Select to indicate that all approvers at this step are required to approve the transaction at this step. You can select to have all approvers or some approvers approve the transaction at this step. |
Some Approvers Required |
Select to indicate that it's not required for all approvers to sign off on a transaction. If you select this option, you can define the number of approvers required in the Number of Approvers Needed field. Note: After the number is met, the approval advances to the next step. |
Number of Approvers Needed |
Enter the minimum number of approvers you want to sign off for a requisition at this step. When an approval process is launched and this number can't be met, the system notifies the approval Admin Rolename. |
Self Approval |
Select to indicate that requesters can also approve their own requisition. This setting only applies if the requester also appears as an approver in the step. You can establish criteria that controls the requester's approval authority by using the Self-Approval Criteria link. If the associated criteria evaluate to true, then self-approval is acceptable. For example, you can place a limit on the dollar amount for the requester so that if the transaction is over that amount, the requester is not used as an approver. If you select self-approval and the criteria is not met, the Approval Framework requires that there be at least one more step after this one in the path. This does not apply to ad hoc steps. Clearing the check box means that self approval is never acceptable. Note: If the criteria is not met and no later step exists, the system inserts an additional step. This selection is then routed to the administrator. |
Route to Requester |
Select this check box to route this approval to the requester. When this check box is selected, the requester must always manually approve the transaction. Route to requester works in conjunction with the self-approval flag. |
External Approver |
Select to indicate that an external approver is supplied the email information. This feature is used to notify someone that is not part of the Employee Portal. Note: Notification information for the external approver must be set up on the Configure Transaction page. |
Filter Requester |
This check box is only visible if Route to Requester is not selected. When this check box is selected, requester’s user Id is filtered from the result set whenever it is encountered. |
Error Action |
In the event of an error during the step level approval process, choose how the approval process should automatically proceed. The options available are: Route to next step on error This is the default setup and the system will proceed to the next step in the approval process. Route to admin on error The system will route the request to the admin user in the event of an error. Use process definition setting The system will route the approval as per the error action option set at the process definition level Note: When the step is part of a Dynamic path, the error action field is disabled. |
Reviewer User List |
Select the type of reviewer you want to use for this step. Use a user list to map users to certain functional roles. The system then uses the list and its users to run automated business processes. The list defines the user sources who can be used in approval and review steps. |
See Understanding Approval Features.
See product documentation for PeopleTools: Workflow Technology.