Setting Up Trigger Definitions
|
Page Name |
Definition Name |
Usage |
|---|---|---|
|
GP_TRGR_SETUP |
Define iterative, segmentation, and retroactive triggers. To create a retroactive or segmentation trigger, first define the appropriate event ID on the Retro Event Definition page or Segmentation Event Definition page. |
|
|
GP_TRGR_SETUP_SEC |
Indicate which field values initiate actions. |
This topic discusses the setup steps for automatic trigger generation by the online system.
Note: PeopleSoft recommends that when you define a retroactive or segmentation trigger, you also define an iterative trigger. If a calendar group has been calculated once and data changes are subsequently made, unless an iterative trigger is defined, retroactive or segmentation triggers generated from the data changes are not processed until the next Identify phase.
Setting Up Iterative Triggers
Iterative triggers can be defined for both effective and begin and end dated records, as well as for non-dated records.
To set up iterative triggers:
Select Set Up HCM, Product Related, Global Payroll & Absence Mgmt, Triggers, Trigger Definitions.
The search page for the Trigger Definitions component (GP_TRGR_SETUP) appears.
Select the Add a New Value tab.
On the Add a New Value tab, select a country, identify the record you want to make sensitive to data changes in the Record (Table) Name field, and select a trigger type of Iterative.
Click the Add button.
The Trigger Definitions page appears.
On the Trigger Definitions page, select a Trigger Level of Record or Field.
Select Record to generate a trigger in response to a change to any field in the record; select Field if you want the system to generate a trigger only in response to changes to a specific field or group of fields in the record.
If you select Field, you must list the fields that you want to make sensitive to data changes in the List Fields With Trigger group box. You can further restrict the data changes that result in trigger generation by selecting the Dependent on Field Value Action check box for a specific field and specifying the values that trigger iterative processing.
Setting Up Retro Triggers
Retro triggers can be defined for both effective and begin and end dated records, as well as for fixed date records.
To set up retro triggers:
Select Set Up HCM, Product Related, Global Payroll & Absence Mgmt, Triggers, Trigger Definitions.
The search page for the Trigger Definitions component (GP_TRGR_SETUP) appears.
Select the Add a New Value tab.
On the Add a New Value tab, select a country, identify the record you want to make sensitive to data changes in the Record (Table) Name field, and select a trigger type of Retro.
Click the Add button.
The Trigger Definitions page appears.
On the Trigger Definitions page, select a trigger event ID (or primary event ID if the trigger level is Field).
Trigger event IDs tell the system how to process retroactive data.
Note: Define trigger event IDs on the Retro Event Definition page.
On the Trigger Definitions page, select a Trigger Level of Record or Field.
Select Record if you want the system to generate a trigger in response to a change to any field in the record; select Field if you want the system to generate a trigger in response to changes to a specific field or group of fields in the record.
If you select Field, you must list the fields that you want to make sensitive to data changes in the List Fields With Trigger group box. You can further restrict the data changes that result in trigger generation by selecting the Dependent on Field Value Action check box for a specific field, click the List Field Values link, and specifying the values that trigger retro processing.
In addition, you must specify a trigger event ID or primary event ID at one of the following levels:
If you select Record as the trigger level, specify the trigger event ID in theTrigger Event ID field at the record level on the Trigger Definitions page.
If you select Field as the trigger level, and trigger generation is not dependent on specific field values, specify the trigger event ID at the field level in the List Fields With Trigger group box on the Trigger Definitions page.
If you select Field as the trigger level, and retro is dependent on specific field values, click the List Field Values link and specify the trigger event ID at the field value level in the Field Values group box on the Trigger Definitions – Field Values page.
In addition, if you select Field as the trigger level, you must enter a primary event ID at the record level in the Primary Event ID field on the Trigger Definitions page. This ID functions as the default event ID when the changed, added, or deleted row that triggers retro processing is the first row in the buffer (that is, a prior row cannot be found).
Note: The Primary Event ID field appears only when the trigger type is Retro and the trigger level is Field.
Setting Up Segmentation Triggers for Effective-dated Records
In Absence Management, you can set up segmentation triggers for effective-dated records. In this topic we discuss the steps for setting up segmentation triggers for effective-dated records.
To set up segmentation triggers for effective-dated records:
Select Set Up HCM, Product Related, Global Payroll & Absence Mgmt, Triggers, Trigger Definitions.
The search page for the Trigger Definitions component (GP_TRGR_SETUP) appears.
Select the Add a New Value tab.
On the Add a New Value tab, select a country, identify the record you want to make sensitive to data changes in the Record (Table) Name field, and select a trigger type of Segmentation.
Click the Add button.
The Trigger Definitions page appears.
On the Trigger Definitions page, select a Trigger Level of Record or Field.
Select Record if you want the system to generate a trigger in response to a change to any field in the record; select Field if you want to system to generate a trigger in response to changes to a specific field or group of fields in the record.
If you select Field, you must list the fields that you want to make sensitive to data changes in the List Fields With Trigger group box. You can further restrict the data changes that result in trigger generation by selecting the Dependent on Field Value Action check box for a specific field, click the List Field Values link, and specifying the values that should result in trigger generation.
In addition, you must define a trigger event ID at the appropriate level:
If you select Record as the trigger level, define the trigger event ID at the record level on the Trigger Definitions page.
If you select Field as the trigger level, and segmentation is not dependent on specific field values, specify the trigger event ID at the field level in the List Fields With Trigger group box on the Trigger Definitions page.
And if you select Field as the trigger level, and segmentation is dependent on specific field values, click the List Field Values link and specify the trigger event ID at the field value level in the Field Values group box on the Trigger Definitions – Field Values page.
Note: The trigger event IDs tells the system what type of segmentation to use (period or element segmentation), and in the case of element segmentation, what elements to segment in response to a change in data. You define trigger event IDs on the Segmentation Event Definition page.
Use the Trigger Definitions page (GP_TRGR_SETUP) to define iterative, segmentation, and retroactive triggers.
To create a retroactive or segmentation trigger, first define the appropriate event ID on the Retro Event Definition page or Segmentation Event Definition page.
Navigation:
This example illustrates the fields and controls on the Trigger Definitions page.
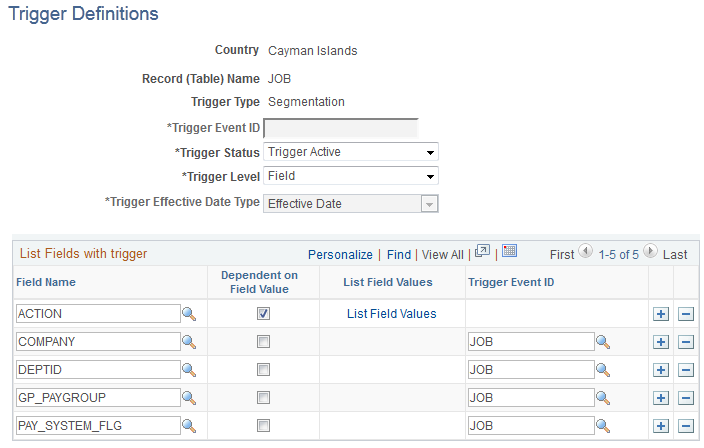
Note: The fields on this page vary depending on the type of trigger you are creating and the values you select.
Field or Control |
Description |
|---|---|
Country |
Specify the country for which you are defining the trigger. |
Record (Table) Name |
Displays the record (table) name that you selected to access this page. This record can stand alone or be part of the record and field combination that generates a trigger in response to an online data change. |
Trigger Type |
Displays the trigger type that you selected to access this page. Options are: Iterative, Retro, and Segmentation. |
Trigger Event ID |
For retro and segmentation triggers, specify the trigger event ID at the record level, the field level, or the field value level:
Note: Iterative triggers don't have trigger event definitions, because their only function is to process a payee in the current open calendar; therefore, the defined event is always the same. |
Trigger Status |
To activate the trigger definition, select Active. |
Trigger Level |
Select Record if you want the system to generate a trigger in response to a change to any field in the record; select Field if you want the system to generate a trigger in response to changes to a specific field or group of fields in the record. If you select Field, you must list the fields that you want to make sensitive to data changes in the Field column in the List Fields With Trigger group box. You can further restrict the data changes that result in trigger generation by selecting the Dependent on Field Value Action check box for a specific field, click the List Field Values link, and specifying the values that should result in trigger generation. |
Primary Event ID |
Enter one of the event IDs defined on the Retro Event Definition page. The primary event ID functions as the default event ID when the trigger level is Field and the changed, added, or deleted row that triggers retro processing is the first row in the buffer (that is, a prior row cannot be found). In this case, the system generates a retroactive trigger using the primary retroactive event ID. Note: The Primary Event ID field appears only when the trigger type is Retro and the trigger level is Field. |
Trigger Effdt Type |
This field displays one of the following values, based on the record specified in the Record (Table) Name field: Effective Date Begin-End Date Fixed Date Only retro triggers can have a trigger effdt type of Fixed Date. To generate retro triggers with a fixed trigger effective date, you must pass the date as a parameter to the generic PeopleCode function Generate_Triggers. The system generates only one trigger regardless of the number of data changes. |
List Fields with Trigger
If you select Field in the Trigger Level field, the List Fields With Trigger group box becomes available.
Field or Control |
Description |
|---|---|
Field Name |
Enter the name of the field that you want to make sensitive to data changes. |
Dependent on Field Value |
Select this check box to indicate that the fields that you've defined as sensitive to data changes are dependent on specific field values. In this case, only changes to the values you specify on the Trigger Definition - Field Values page will trigger a system action. This enables you to limit the kinds of changes that cause iterative, retroactive, or segmentation processing. |
List Field Values |
This link becomes available when you select the Dependent on Field Value check box. Click to access the Trigger Definitions - Field Values page, where you can list the field values that trigger an action. |
Trigger Event ID |
This field is required when the trigger level is Field and Dependent on Field Value is cleared. Based on the type of trigger you are defining, enter an event ID that you defined on either the Retro Event Definition page or the Segmentation Event Definition page. Note: This field is not used with iterative triggers. |
Use the Trigger Definitions - Field Values page (GP_TRGR_SETUP_SEC) to indicate which field values initiate actions.
Navigation:
Click the List Field Values link on the Trigger Definitions page.
This example illustrates the fields and controls on the Trigger Definitions – Field Values page.
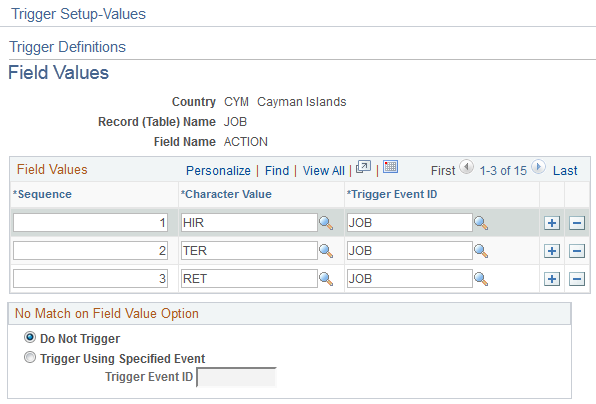
Field Values
Field or Control |
Description |
|---|---|
Sequence |
Enter a sequence number, which the system needs to uniquely identify the field values and distinguish them from other rows of data that you might set up. |
Numeric Value |
If the record and field combination stores numeric values, this field is available for entry. Enter the value that triggers a system action. |
Character Value |
If the record and field combination stores character values, this field is available for entry. Enter the value that triggers a system action. |
Date Value |
If the record and field combination stores date values, this field is available for entry. Enter the value that triggers a system action. |
Trigger Event ID |
This field is required when the trigger level is Field and Dependent on Field Value is selected. Based on the type of trigger you are defining, enter an event ID that you defined on either the Retro Event Definition page or the Segmentation Event Definition page. Note: This field is not used with iterative triggers. |
Offset Days |
This field is available only when the trigger type is Retro. Enter a positive or negative number to increase or decrease the retro trigger effective date relative to the date of a database change. For example, if you enter -1 in the Offset Days field for one of the values listed in the Field Values group box, and you retroactively enter that value into the database with an effective date of January 1, 2000, the system automatically adjusts the trigger effective date to December 31, 1999 (one day earlier). The system then processes pay periods going back to December 1999 rather than January 2000. |
No Match on Field Value Option
Use the fields in this group box to specify a default trigger event ID to use when a change to a field involves values other than those listed on the Trigger Definitions – Field Values page. Use these fields only if you want these other values to trigger iterative, retro, or segmentation processing.
Field or Control |
Description |
|---|---|
Do Not Trigger |
This option is selected by default because the system assumes that triggers should be generated only when there is a match between values actually entered in the database and the field values that you identify on the Trigger Definitions – Field Values page. |
Trigger |
When you select this option, the Trigger Event ID field becomes available for entry. |
Trigger Event ID |
Enter a default trigger event ID to use to process field values that are not linked to a trigger event ID on the Trigger Definitions – Field Values page. |
Example: Using Offset Days with Retro Triggers
In PeopleSoft system considers the effective date of a termination entered in the Action field in the JOB record to be the first day that a payee is no longer working (in other words, the day before the termination is the last day the payee is considered active). If you attach a trigger to this field to process retroactive terminations, the system, by default, sets the trigger effective date equal to the effective date of the termination row in JOB. This can create problems when the termination effective date is equal to the period begin date (meaning, the last day worked is the last day of the prior pay period). For example, assume that you enter a termination in the JOB record on February 1 after processing and closing the January calendar. In this situation, the system generates a retro trigger with an effective date of February 1, which is within the current period—a period in which the payee is "inactive" and will not be picked up for processing. Because there is no trigger in the prior, closed period (January), this period will not be recalculated and any rules you have set up to generate termination payments will not be processed. To avoid this problem, set the offset days for the Termination action value in the JOB record equal to -1.