Understanding Absence Processing
This topic discusses:
The absence entitlement process.
The absence take process.
Absence processing features.
Absences and segmentation.
Absences and retroactive processing.
Preparing to run the entitlement or take process.
Absence processing preparations.
Absence processing sequence.
Absence processing phases and options.
This process updates frequency-based entitlements for payees and makes entitlement available. For example, if entitlement is granted monthly, you run the entitlement process once a month, even if you run weekly payrolls. You do not run this process for per-absence entitlements because they are updated by the Take process. You can run the entitlement process before or after the take process.
During this process, the system looks at each daily record and determines the amount of time that should be paid or unpaid, according to your absence rules. It converts paid and unpaid units to positive input and adjusts entitlement balances. The take process creates daily data and uses system elements in daily data. These two aspects of the take process are discussed below:
Daily Data
When you run the take process, one of the first things the program does is expand each absence event in the process list that occurred for a payee during the absence processing period (or current segment, if the processing period is segmented). Expanding the event means that the system creates a detailed row of data for each day of the absence in the GP_RSLT_ABS record. We call these rows daily data.
The take process expands each event that includes a date in the current segment. It creates a row for each day of the absence event, including days that fall outside the processing period. The system also populates the work schedule and holiday schedule system elements for the day before and after the absence, if the payee was not absent on those days. If the payee was absent the day before or the day after the reported absence, other absence-related system elements can be populated, depending on your rules.
For example, assume that the processing period is May 1 to 31, and there is no segmentation. If the payee is absent from May 5 to May 6 and again from May 29 to June 2, the take process creates two rows of daily data for the first absence and five rows for the second absence.
This graphic illustrates how daily data is created for each day of an absence event.

Even though the system creates a row of daily data for each day of an absence event, this does not mean that each day is processed. The entire event is expanded so that the system has all the information it needs to accurately evaluate each absent day. Only those days that occurred during the processing period are processed. Using the above example, the system would process the following absent days: May 5, 6, 29, 30, and 31.
Sources of Daily Data
Data that populates the daily data row initially comes from two sources:
The payee’s work and holiday schedules, which provide the day of the week, scheduled hours, and holiday type.
The absence event, which provides the absence take, begin and end dates, partial days absent, if applicable, and other information.
The following graphic illustrates the sources of daily data.
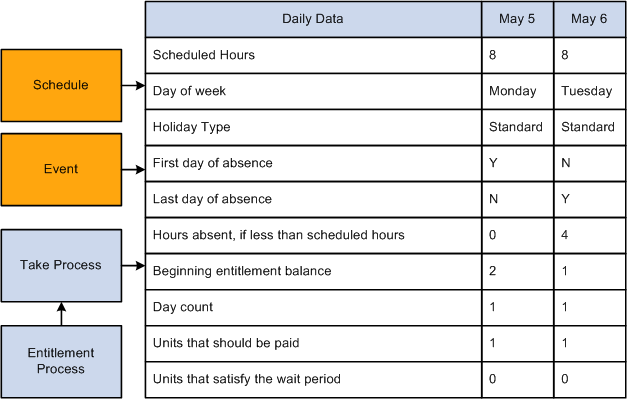
The take process also contributes to the daily data. When it applies the absence rules—defined by your absence elements—to the event and schedule data, it derives a set of results that populates the daily data. The results include the beginning entitlement balance, absent units, paid and unpaid units, ending balance, and other information.
The day formula, which you create and assign to your take rule, is what drives the results. This formula interprets each day of the absence and returns the number of units that the absent day represents; for example, four hours or one day. Once the system knows the absence day count, it can compare the count to the entitlement balance, determine whether a wait period or any other requirements for payment have been met and determine whether any part of the absent day should be paid. It can also calculate the ending entitlement balance.
The Role of System Elements in Daily Data
Much of the daily absence data is stored by system elements—a collection of predefined elements.
Using System Elements in Formulas.
When you define a take element, you identify the day count formula that the system will use to calculate the number of units that the payee was absent for the day being processed. The formula makes use of any information that is stored in the daily data, including—in some cases—data from the day before or after the day that is being evaluated. For example, three system elements store a payee's scheduled hours:
SCHED_HRS captures the number of hours that the payee was scheduled to work for the day that is being evaluated.
SCHED_HRS_DB captures the number of hours that the payee was scheduled to work the day before.
SCHED_HRS_DA captures the number of hours that the payee was scheduled to work the day after.
You might create a day count formula that uses the prior or next day's values in its calculations. Or you might create a day count formula that uses the value of the SCHED_HRS element to calculate the day count.
Depending on what absence features you want to use, you might need to create other formulas. Any of these formulas can make use of the daily data that is captured by the system elements.
Using User-Defined Fields.
User-defined system elements enable you to capture and use absence data that is specific to your organization. Data that is entered into these fields is stored by system elements and added to the Daily Data records during the Take process. As is true of all system elements, the data captured by these elements can be used by any absence formula. Each of the following pages includes a set of user-defined fields:
Absence Event Entry
Take Calculation
Shift
This topic discusses:
Process lists.
Iterative processing for preliminary absence runs.
Stream processing.
Group lists.
Troubleshooting tools.
Process Lists
Once you’ve finished setting up your absence system, you’re ready to run an absence process. Whether you’re running the process for absence take or absence entitlement, the steps are the same. Your process list and calendar definitions determine who and what gets processed. Useful features of process lists include:
The absence period can be the same as or different from the pay period. For example, January absences can be paid in January or February. You specify the target calendar pay for each absence process.
You can run the entitlement and take processes together or separately.
More than one take process can target the same pay calendar. For example, vacations taken in January and sick time taken in February can be paid in February. To accomplish this, create two absence process lists, one for vacations and another for sick time, and attach each process list to a separate absence calendar. On each absence calendar, select the pay calendar as the target calendar.
The system can process absence takes according to their sequence on the process list or in chronological order. To process absences in chronological order, you include take elements in an absence take section of a process list.
Iterative Processing for Preliminary Absence Runs
Iterative processing enables you to process complex, preliminary absence runs quickly with minimal demands on system resources. You launch an Identify phase that flags each payee that meets the selection criteria for your absence run, then launch a Calculate phase that computes absence take or entitlement, as applicable, for all identified payees. After reviewing the results and making the necessary corrections, you rerun the Calculate phase for payees that have had changes since the last run.
Stream Processing
Stream processing is an optional feature that you can use to reduce processing time. You divide payees into subsets, based on their employee IDs, so that the system can perform calculations for multiple sets of payees at the same time.
Group Lists
Group lists are user-defined subsets of the payee population that are scheduled for processing. This feature enables absence administrators to work concurrently with different sets of payees in the same pay group.
Troubleshooting Tools
When you run absence calculations, you can generate an element resolution chain that shows, by payee, how and in what order each element was resolved. This chain also shows how long it took to resolve each element on the process list. Significant system resources are needed to produce an element resolution chain, so we recommend that you use this feature for problem solving only.
When you run the take process, the system assigns an instance number to each event, based on the following rules:
If Multiple Instances is selected on the Absence Take - Calculation page, the system assigns a separate instance number to each like event that falls within the same absence period.
If Multiple Instances is not selected, the system assigns the same instance number to all like events that fall within the same absence period.
When the absence element that is associated with the take element is segmented, the take process creates multiple instances, regardless of whether you selected Multiple Instances. Multiple instances are also created if the percent defined for the take element changes. (Percent is defined on the Generate Positive Input Member List on the Absence Take - Day Formula page.)
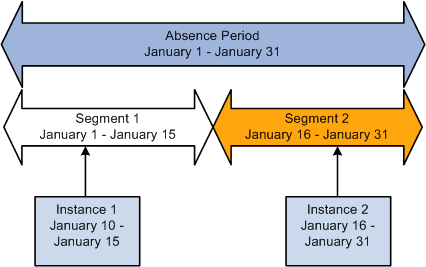
Example
Payee A is absent from January 10 to 17. The absence element is segmented as shown below. The event is divided into the two instances.
This graphic illustrates how the system divides an event into multiple instances due to segmentation.
This section describes how absences work with retroactive processing.
Setting Up Triggers for Absence Events.
Triggers are the mechanism that Absence Management uses to detect changes to data that result in some type of system action. We recommend that you create retro and iterative triggers so that the system recognizes the online changes that users make to absence events through the Absence Event Entry page (the GP_ABS_EVENT record). Then iterative or retro processing is triggered whenever you add, delete, or update events.
Retro Processing Method.
Retro processing of absence calendars is carried out using the corrective retro method. Retro processing creates a new version of the generated positive input results and new versions of the daily absence data (GP_RSLT_ABS). For example, if an absence event occurs from 1 to 5 January (when it was originally processed), the event is represented by five rows of data in the daily record, each named Version1. If you change the end date to 7 January, 7 rows appear in Version 2 of the results.
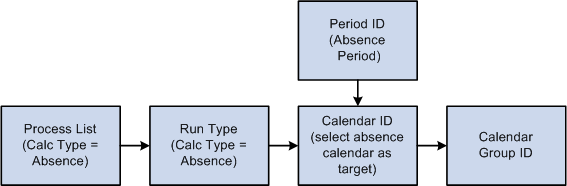
Following are the steps to prepare for running the entitlement and take processes:
Create one or more absence process lists to define the absence take elements or frequency-based entitlement elements that are to be resolved during processing.
Associate the process list with a run type.
Create a calendar for the absence processing period.
Attach the calendar to a calendar group ID.
This diagram illustrates the steps to prepare for running the entitlement and take processes.
Typically, you create process lists and attach them to run types when you implement Absence Management. Then perform the remaining tasks on a regular basis.
After defining the Calendar Run ID, you're ready to start the process. Complete the Run Control page and use PeopleSoft Process Scheduler to start the process.
This illustration shows the steps to prepare for absence processing.
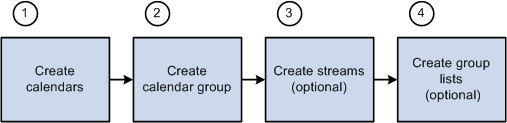
Here are the steps to prepare for absence processing:
(Required) Create calendars.
Calendars tell the system which pay group, run type, process list, and calendar period to process. You define pay groups, run types, and process lists during system implementation. You can define calendar periods during implementation or when you set up your calendars.
Important! You should not edit fields on the Calendar Period, Calendar, or Calendar Group ID pages after you initiate processing (other than to add payees to the Calendar, if you selected the Listed Payees option). To make changes to those pages, you must cancel the absence run.
(Required) Create the calendar group ID.
The calendar group ID identifies the set of calendars to run together and the sequence in which to process the calendars. If you want to use stream processing, you must indicate that when setting up the calendar group ID.
(Optional) Create streams.
To use stream processing, identify the range of employee IDs for each stream. Stream set up is a one time process that may require the assistance of a database administrator.
(Optional) Create group lists.
To use the group list feature, clerks who run the absence process select the payees for each group list. (Group lists are tied to user IDs.)
This illustration shows the absence processing steps.
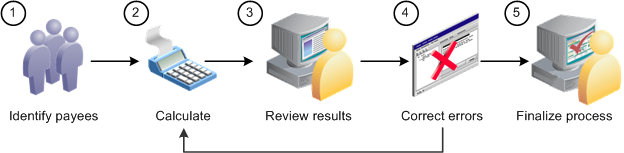
Here are the steps for processing absences (use the Payroll/Absence Run Control page for steps 1, 2, and 5):
Identify payees (Identify phase).
The absence cycle begins when you run a process that identifies all payees that are to be processed.
Perform calculations (Calculate phase).
This phase computes each payee’s absence take or entitlement units for an absence run.
Review results.
If the system encounters problems during the Calculate phase—for example, invalid element definitions or payee eligibility problems—it places the payee in error. You can use various pages to review summary results, errors, and warning messages.
Correct any errors and recalculate.
To correct errors, you may need to update the Positive Input pages or make changes to the data in other applications that are integrated with Absence Management, such as HR or Time and Labor. You can then run the Calculate phase again to process only the payees that need to be recalculated.
Finalize the run.
When you’re satisfied with the processing results, run the Finalize phase to close the calendar group ID.
This section explains in detail some of the steps in absence processing.
Identifying Payees
You begin an absence run by selecting the Identify phase on the Payroll/Absence Run Control page. The Identify phase loops through each calendar that is linked to the calendar group ID and finds all the payees that belong to the pay group that you identified when setting up the calendars. It then identifies the subset of payees that meet the payee selection criteria on the calendars.
You run the Identify phase once per calendar group ID (or once for each stream, if you’re using stream processing). Later, if you add new hires, remove terminated payees, enter positive input, or make other changes that affect payee eligibility, the system detects the changes by looking for iterative triggers when you run the Calculate phase. (You must define iterative triggers for the types of changes to the Job record that you want the system to detect.)
For example, after running the Identify phase, you add five new hires to the pay group. As each new hire is added, the system creates a trigger. When you run the Calculate phase, the system sees the triggers for the new hires and includes them in the population of payees to be processed.
A calendar group ID is considered open from the time that you launch the Identify phase until you run the Finalize phase.
Calculating Payees
Once you identify payees, you can perform absence take or entitlement calculations. The system calculates one payee at a time, calendar by calendar. If a calendar that is associated with a payee is segmented, the system calculates absences each segment before calculating the payee’s absences in the next calendar. After the system has calculated a payee’s absences across all calendars, it continues to the next payee.
Usually you run the Calculate phase several times for the same calendar group ID, first for the entire population of payees that you selected during the Identify phase and then for payees with changes or errors. With each iteration, you identify which payees you want to calculate by selecting one of these options:
Calculate
This is the Calculate option that you’ll select most often. It instructs the system to identify all payees with iterative triggers, including new hires and transfers, payees placed in error during a previous calculation, and those for whom you’ve manually entered processing instructions using the process indicator.
Recalculate All
Occasionally, you might need to recalculate every payee that is associated with a calendar group ID, stream, or group list. The Recalculate All option instructs the system to delete existing calculations and calculate each payee again without identifying the payees; that is, without trying to determine whether each payee still meets the payee selection criteria.
Freezing and Unfreezing Calculations
If your organization is like most, you have a short window of time between the day that you start running the absence process and your cutoff date. At some point, you might want to stop processing payees with iterative triggers (for example, those with salary adjustments) and concentrate on correcting errors so that you can finalize your absence run. To do this, you instruct the system to freeze calculations for the population that you specify. The Calculate phase ignores any subsequent online changes that you make to payees during the pay run and any positive input that you enter later for these payees. (The system keeps the triggers in case the payee is unfrozen later.) However, if you run the Recalculate All option after payees are frozen, the payees are recalculated.
You can freeze or unfreeze all payees that are in the current process stream, group list, or calendar group ID by selecting the Freeze option on the Payroll/Absence Run Control page or you can freeze selected payees on the Payee Status page.
To freeze calculations for a payee, the following conditions must be met:
Each absence that is associated with the payee (for all segments of all calendars) must have a calculation status of Payment Calculated. If you freeze or unfreeze one segment for a payee, all of the payee’s segments for the calendar become frozen or unfrozen.
The selection status cannot be Suspended by User, Suspended by System, or Cancelled..
Suspending Active Payees
When submitting processing instructions, you have the option to automatically suspend all active payees under certain circumstances so that you can process a special run, such as a one time adjustment for a small group of payees. The Suspend Active option on the run control page controls this feature. For on-cycle processing, this option is available when you run the Identify or Calculate phase (including Recalculate All). For off-cycle processing, this option is selected automatically and cannot be changed.
When the Suspend Active option is activated, the system does the following when it processes each payee:
Checks to see if the payee is associated with another open on-cycle calendar group.
When this condition is true, the system checks the payee's calculation status in that calendar group:
If the status is Identified, the system suspends the payee from that run, so that the payee can be immediately identified and calculated in the new run.
If the calculation status is Frozen, the system suspends the payee in the new run that you're submitting.
Checks to see if the payee is associated with another open off-cycle calendar group.
When this condition is true, the system suspends the payee in the calendar group that you just submitted.
Status codes and process indicators play an important role in absence processing. Status codes help you monitor and interpret the processing results; process indicators enable you to manually enter processing instructions for specific payees. This section focuses on how the codes are created and how to interpret them.
Status Codes
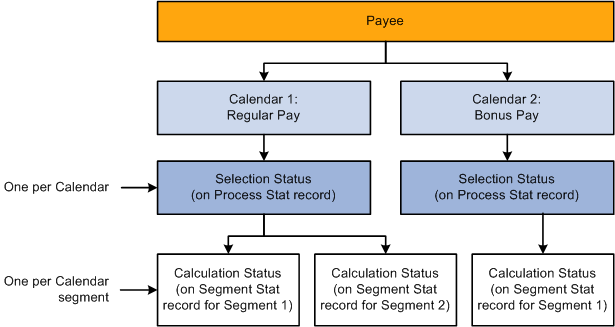
The system creates two sets of status codes as it identifies each payee for processing:
One selection status code for each payee for each calendar, which it stores on the Process Stat (process status) record. During the first run of the Identify phase, each payee’s selection status is set to Active or Inactive to explain why the payee was identified for processing. With each iteration of the Calculate phase, the system updates the status to explain why the payee was included in or excluded from processing.
The system keeps a record of excluded payees only if they were suspended or canceled. If the payee simply no longer qualifies for selection (for example, the payee is assigned to a different pay group), the system does not record this, and the payee's process and status records are deleted.
One calculation status code for each payee, per calendar segment, which is stored on the Segment Stat record. If a calendar has no period segmentation, a payee has one calculation status. Calculation status tells you the most recent action that has been completed for the segment, for example, identified, calculated, or frozen. Before you run the Calculate phase for the first time, the status code for each identified payee is Identified.
This diagram illustrates the status codes created by the system when payees are identified for processing.
Process Indicators
Sometimes you might need to cancel a payee from an absence run; temporarily suspend a payee from processing; freeze, unfreeze a payee; or take some other action at the payee level. You do this by entering a process indicator that tells the system what action to take during the next iteration of processing. For example, if the selection status for payee A is Active, and you need to cancel that payee from the absence run, set the payee’s process indicator to Cancel. The next time you run the Calculate phase, the system deletes all calculation results for payee A and changes payee A’s selection status to Cancelled. You update the process indicator on the Payee Status component.
Important! Changing a process indicator updates all of a payee’s segments that are in the same calendar group ID.
Status Code and Process Indicator Definitions
The tables below list the status codes and process indicators. Selection status (one per payee per calendar) and calculation status (one per calendar segment) are system-maintained; the process indicator is user-maintained.
|
Selection Status |
Definition |
|---|---|
|
Active |
Payee was active for at least one day within the calendar. |
|
Inactive |
Payee was not active within the calendar, but was selected because of positive input, a retroactive trigger, or a forwarded adjustment. |
|
Cancelled |
You manually canceled the payee from the calendar run. The system doesn’t reselect the payee for the current calendar run or a retroactive run. |
|
Suspended by User |
You manually suspended the payee from the calendar run. The next time you run Calculate, the system tries to reidentify the payee and recalculate the net pay. |
|
Suspended by System |
The payee is linked to another open calendar group ID. (A payee can be selected for only one unfinalized calendar group ID at a time.) |
|
Calculation Status |
Definition |
|---|---|
|
Identified |
Segment has been identified for calculation but has not been calculated. |
|
Calculation Successful |
Segment has been calculated. |
|
Frozen For Further Calc |
Segment is not subject to further calculations unless you unfreeze it or run the Recalculate All phase. |
|
Finalized |
The calendar run has been finalized. You can no longer make changes. |
|
Calculation Error |
An error occurred during calculation. |
|
Calculation Error — Bypassed |
The system did not attempt to calculate the payee because of an error. |
|
Calculation Error — By Rule |
An error was produced because of a condition that you defined through a message element. |
|
Deleted by Process |
Segment has been deleted by the process. |
|
Has No Payment |
Note: This calculation status is not applicable to Absence Management. |
|
Process Indicator |
Definition |
|---|---|
|
Normal |
This initial setting appears after each calculation. It indicates that there are no special processing instructions for this payee. |
|
Cancel |
The payee will be canceled from the absence process during the next iteration of the Calculate phase. The selection status will be changed to Canceled. The payee will not be identified again unless you change the indicator to Uncancel before finalizing the absence run. |
|
Recalculate |
All calculations that are associated with the payee’s jobs (employee ID and employee record number combination) will be rerun the next time you run the Calculate phase. This is similar to the Recalculate All option on the Payroll/Absence Run Control page, but it applies only to payees that you select. |
|
Suspend |
The payee will be withheld from processing the next time you run the Calculate phase. The selection status will be changed to Suspended by, and all calculation results will be deleted. During subsequent calculations, the system will try to reidentify and recalculate the payee (until it succeeds or you cancel the payee). You do not need to take any action. |
|
Uncancel |
The system will change the selection status from Canceled to Active, Inactive, or whichever selection status is appropriate and will try to reidentify and recalculate the payee the next time the Calculate phase runs. |
|
Freeze |
The payee is not subject to recalculation unless you select Recalculate All or Un-freeze on the Payroll/Absence Run Control page or the Payee Status page. |
|
Unfreeze |
Reverses a payee’s freeze status. |