Setting Up Loans and Advances
This section provides an overview of setting up loans and advances.
|
Page Name |
Definition Name |
Usage |
|---|---|---|
|
GPFR_LOANS |
Enter loan or salary advance details, create and modify the reimbursement schedule, and view past and current loan/salary advance balances. |
|
|
GP_PI_MNL_ERNDED |
Use this page to set up reimbursements for permanent salary advances and an advances on salary (acomptes). |
|
|
GP_PI_MNL_SEC |
|
This section discusses:
Loans.
Salary advances (avances).
Permanent salary advances.
Advances on salary (acomptes).
Loans
To set up a loan, use the Request Advances/Loans FRA page.
For each loan, PeopleCode automatically generates positive input for the following elements using a component interface:
Deductions RETENUE PR1, RETENUE PR2, or RETENUE PR3.
The system allows each payee to have up to three loans at a given time. When you enter a loan into the system, Global Payroll for France first assigns deduction RETENUE PR1 to the payee, then RETENUE PR2, and finally RETENUE PR3.
Calendar ID.
Instance.
The deduction's base (which is set to the reimbursement amount).
Loan identification PIN (PRE VR IDENTIFIANT).
Start date of the loan (PRE VR DATE DEBUT).
Loan initial capital (PRE VR CAPITAL).
Salary Advances (Avances)
To set up an advance on salary, use the Request Advances/Loans FRA page.
For each advance on salary, PeopleCode automatically generates positive input for the following elements using a component interface:
Deductions RETENUE AV1, RETENUE AV2, or RETENUE AV3.
The system allows each payee to have up to three advances at a given time. When you enter a salary advance into the system, Global Payroll for France first assigns deduction RETENUE AV1 to the payee, then RETENUE AV2, and finally RETENUE AV 3.
Calendar ID.
Instance.
The deduction's base (which is set to the reimbursement amount).
Salary advance identification PIN (PRE VR IDENTIFIANT).
Start date of the salary advance (PRE VR DATE DEBUT).
Salary advance initial amount (PRE VR CAPITAL).
Permanent Salary Advances
To set up a permanent salary advance:
Access the One Time (Positive Input) page and assign the deduction RETENUE AVPE to the payee.
Note: The deduction RETENUE AVPE does not affect payroll results—it is used only to enter and track the initial amount of a permanent salary advance.
Click the Details link on the One Time (Positive Input) page (see step 1) to access the Positive Input - Details page.
On the Positive Input - Details page, enter the amount of the advance in the Initial Capital of Loan field (do not use the Amount field on the One Time (Positive Input) page to do this).
When you save your data, the system populates the supporting element PRE VR CAPITAL with the amount of the advance. When the advance is processed, the resolution formula for the permanent salary advance stores the value of PRE VR CAPITAL in the balance accumulator PRE AC AVPE. Later, when the payee departs, the system uses the deduction RETEN AVPE D to automatically recover the amount in the balance accumulator.
To recover all or part of an advance prior to a payee's departure:
Access the One Time (Positive Input) page
Click the Details link on the One Time (Positive Input) page (see step 1) for the row containing the deduction RETENUE AVPE.
The Positive Input - Details page appears.
On the Positive Input - Details page, enter the amount you want to recover in the Reimburs Permanent Advance field.
The resolution formula for the advance verifies that the reimbursement amount does not exceed the amount in the balance accumulator PRE AC AVPE. If this amount exceeds the balance, Global Payroll for France puts the payment in error. If the amount requested does not exceed the balance, the system processes the RETEN AVPE D deduction to recover the advance.
Note: The balance of the permanent salary advance is stored in the accumulator PRE AC AVPE. To modify this balance, access the One Time (Positive Input) page, assign the deduction RETENUE AVPE, and override the value of the variable PRE VR CAPITAL.
If you want to know the amount of the balance for the permanent advance, look at the accumulator PRE AC AVPE calculated during the previous payroll.
Note: Note that the balance of a permanent salary advance—stored in the accumulator PRE AC AVPE—is recovered automatically when a payee leaves the organization. In other words, the steps in this section apply only when you want to recover a salary advance prior to a payee's departure.
Advances on Salary (Acomptes)
PeopleSoft delivers the deduction RETENUE ACOM to enable you to reduce a payee's net payment by the amount advanced. PeopleSoft does not deliver an earning element to pay the advance itself, and there is no automatic retrieval of the amount paid as no earning is provided. Nevertheless, you can create rules that enable you to enter an earning for the payment and then automatically process a deduction in the next pay run.
To recover an advance on salary (acompte):
Access the One Time (Positive Input) page and assign the deduction RETENUE ACOM to the payee.
Enter the amount to recover (deduct) in the Amount field on the One Time (Positive Input) page.
Use the Request Advances/Loans FRA page (GPFR_LOANS) to enter loan or salary advance details, create and modify the reimbursement schedule, and view past and current loan/salary advance balances.
Navigation:
This example illustrates the fields and controls on the Request Advances/Loans FRA page. You can find definitions for the fields and controls later on this page.
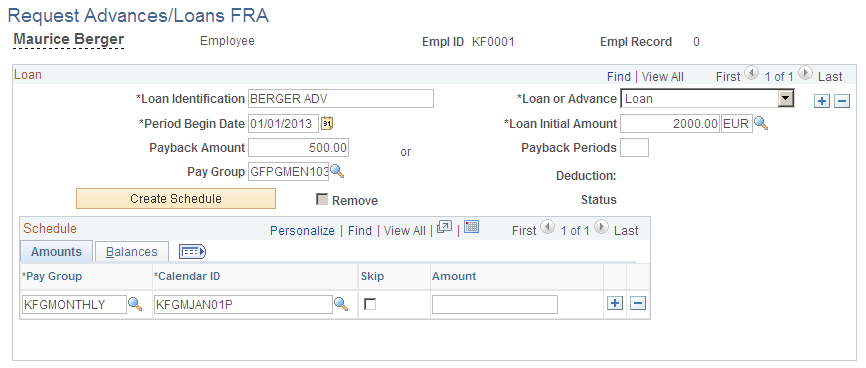
Loan
When you click the Create Schedule button, it is not possible to change any data in the Loan group box; instead, adjust data on the Amounts and Balances tabs, which are located in the Schedule group box.
Field or Control |
Description |
|---|---|
Loan Identification |
Enter a loan or salary advance ID. This character field is mandatory and must be unique to each payee. |
Loan or Advance |
Select Loan to create a loan or Advance to create a salary advance. Loan is the default value. |
Period Begin Date |
Enter the date that the loan or salary advance begins. This date cannot be before the next calendar ID. |
Loan Initial Amount |
Enter the amount of the loan or salary advance. Also specify the currency. |
Payback Amount |
Enter the amount of each payback installment. After you create the schedule, this payback amount populates the Amount field in the Schedule group box. The Payback Periods field in the Loan group box must remain empty if you enter a payback amount in this field. |
Payback Periods |
Enter the number of payback periods here. If you enter the number of payback periods, the system divides the initial loan amount by the number of payback periods to determine the payback amount in each installment. The payback amount populates in the Amount field in the Schedule group box. The Payback Amount field in the Loan group box must remain empty if you enter the number of payback periods in this field. |
Pay Group |
Select the payee's pay group. This field is used to generate the schedule, but it is not required. |
Deduction |
Displays the first free deduction element that the system assigns. If you are setting up a loan, the three possible deduction elements are RETENUE PR1, RETENUE PR2, and RETENUE PR3. If you are setting up a salary advance, the three possible deduction elements are RETENUE AV1, RETENUE AV2, and RETENUE AV3. |
Create Schedule |
Click this button to create the reimbursement schedule automatically. The system splits the initial loan amount into segments, using either the payback amount or the number of periods. It starts from the begin date and retrieves the different calendars available for the pay group listed. If more than one calendar has the same begin date and is available to the same pay group, the system uses the calendar that was created first; the other calendar is not used. After creating the schedule, all changes must be made in the Amounts and Balances tabs. This button is not mandatory for creating the reimbursement schedule. You can also create the schedule row by row. For example, if the payee changes his pay group, then you must manually change the schedule for each row affected. |
Remove |
Select this check box to remove a loan or advance from the system. |
Status |
Displays Removed when the loan has been created (saved) and then removed. |
Amounts Tab
This tab displays the payback amounts and their associated calendar IDs.
Field or Control |
Description |
|---|---|
Pay Group |
Displays the pay group entered in the Loan group box. Overwrite the pay group by selecting a new pay group. |
Calendar ID |
Displays the calendar ID for each reimbursement. You can change the calendar ID any time that the value in the Status field is Created, Updated, or Awaiting. |
Skip |
Select if you want to suspend a reimbursement for the calendar period. Note: If you skip a reimbursement, ensure that the total amounts of all non-skipped reimbursements add up to the initial loan amount. In other words, when you skip a reimbursement, you must increase the amounts of the remaining payments to ensure that the full amount of the loan is paid. Or, you can add an extra monthly payment for the same amount as the skipped one. |
Amount |
Displays the amount of each reimbursement. The system evenly distributes the initial loan amount over the number of payback periods to obtain the payback amount for each period. The sum of all the amounts listed in the Amount fields must equal the amount in the Loan Initial Amount field. If you change the amount of one of the payments, check to make sure that all of your scheduled payments add up to the total amount of the loan. If the amounts do not equal the initial loan amount, the system does not validate the information. It also issues an error message and explains what to do to fix the error. |
Balances Tab
This tab displays reimbursement balance information.
Field or Control |
Description |
|---|---|
Balance |
Displays the balance at the end of the calendar ID date. |
Status |
Displays one of these values: Created: Appears if the schedule row has been created, but the page has not been saved; thus, no positive input exists in the system for this row. Awaiting: Appears if positive input has been created and saved and is ready for payroll processing. Processed: Appears if positive input has been created and the payroll is finalized. You cannot update a processed row. In order to determine whether positive input has been processed, the application reads the payroll results and checks if the pay run for each corresponding pay group and calendar have been finalized. Error: Appears if the schedule row is not synchronized with positive input that was updated manually. In this situation, you must process a new payroll. Updated: Appears if the row has been modified since its creation. This may happen even if positive input has already been generated. Updated appears if one of the following is true:
Note: When an amount on this page has a status of Processed, the Amount field becomes unavailable for data entry and cannot be changed or skipped. Removed: Appears if the positive input was generated and then removed before the pay run was finalized. This status appears when positive input has been deleted. For example, when the row is created, the page is saved, and then the row is skipped, or when the loan is created, saved, and then removed. |
Deleting a Loan or Advance
Deleting a loan involves two steps:
Step 1: Remove the loan.
To remove a loan from the system and cancel the positive input, select the Remove check box and save the page. When you remove the loan, the loan definition still exists, but the positive input is deleted.
Step 2: Remove loan details.
To delete the loan details, click the minus sign in the top right corner of the page.
Note: You cannot delete a loan with a status of Updated or Processed.
Updates to Loans and Advances
When an amount on the Request Advances/Loans FRA page has a status of Processed, the amount cannot be changed or removed, and the row cannot be skipped. If you need to make a retroactive change, you have to make the change directly through positive input. When an amount on the loans page has a status equal to Awaiting, a change to the row produces a warning message informing you that you must recalculate the payroll for the employee if you want the change to be recorded.
Note: If you modify a loan or advance retroactively by making changes directly through positive input, the amounts deducted won't be synchronized with the data on the Request Advances/Loans FRA page.
Use the One Time (Positive Input) page (GP_PI_MNL_ERNDED) to use this page to set up reimbursements for permanent salary advances and an advances on salary (acomptes).
Navigation:
This example illustrates the fields and controls on the One Time (Positive Input) page. You can find definitions for the fields and controls later on this page.
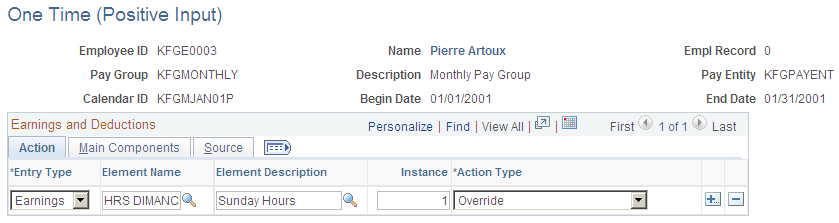
To set up a permanent salary advance, enter the deduction RETENUE AVPE in the Element Name field with an action type of Override. Enter the amount of the advance in the Initial Capital of Loan field on the Positive Input - Details page.
To set up an advance on salary (acompte), enter the deduction RETENUE ACOM in the Element Name field with an action type of Override. Enter the amount of the advance in the Amount field on the Main Components tab.
Note: This page is documented in full in the PeopleSoft Global Payroll .
Use the Positive Input - Details page (GP_PI_MNL_SEC) to .
Navigation:
Click the Details button on the One Time (Positive Input) page.
This example illustrates the fields and controls on the Positive Input - Details page. You can find definitions for the fields and controls later on this page.
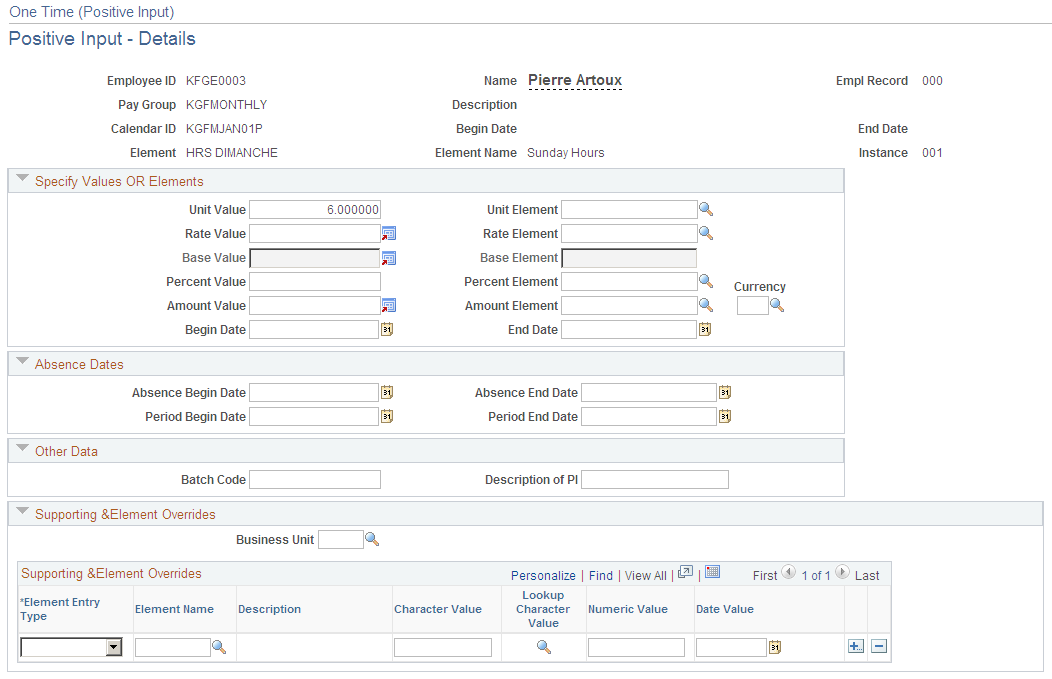
Enter the amount of the permanent salary advance in the Initial Capital of the Loan field.
To recover a permanent salary advance prior to the departure of a payee, specify the amount to recover in the Reimburs. Permanent Advance field.
Note: This page is documented in full in the PeopleSoft Global Payroll .