Creating a Set of Calendars
|
Page Name |
Definition Name |
Usage |
|---|---|---|
|
Calendars - Automated Creation Page Automatic Calendar Creation Page |
GP_AUTO_CAL1 |
Run the Automatic Calendar Creation process to create a set of calendars. |
Before creating a series of calendars, define the run type and periods associated with the calendars. Use the automatic period creation feature to create periods automatically.
If you're creating calendars for an absence run or for a pay run that generates positive input for another calendar, create the target calendars first.
Note: Calendars are associated with a single pay group. If you change a payee's pay group assignment, period segmentation results.
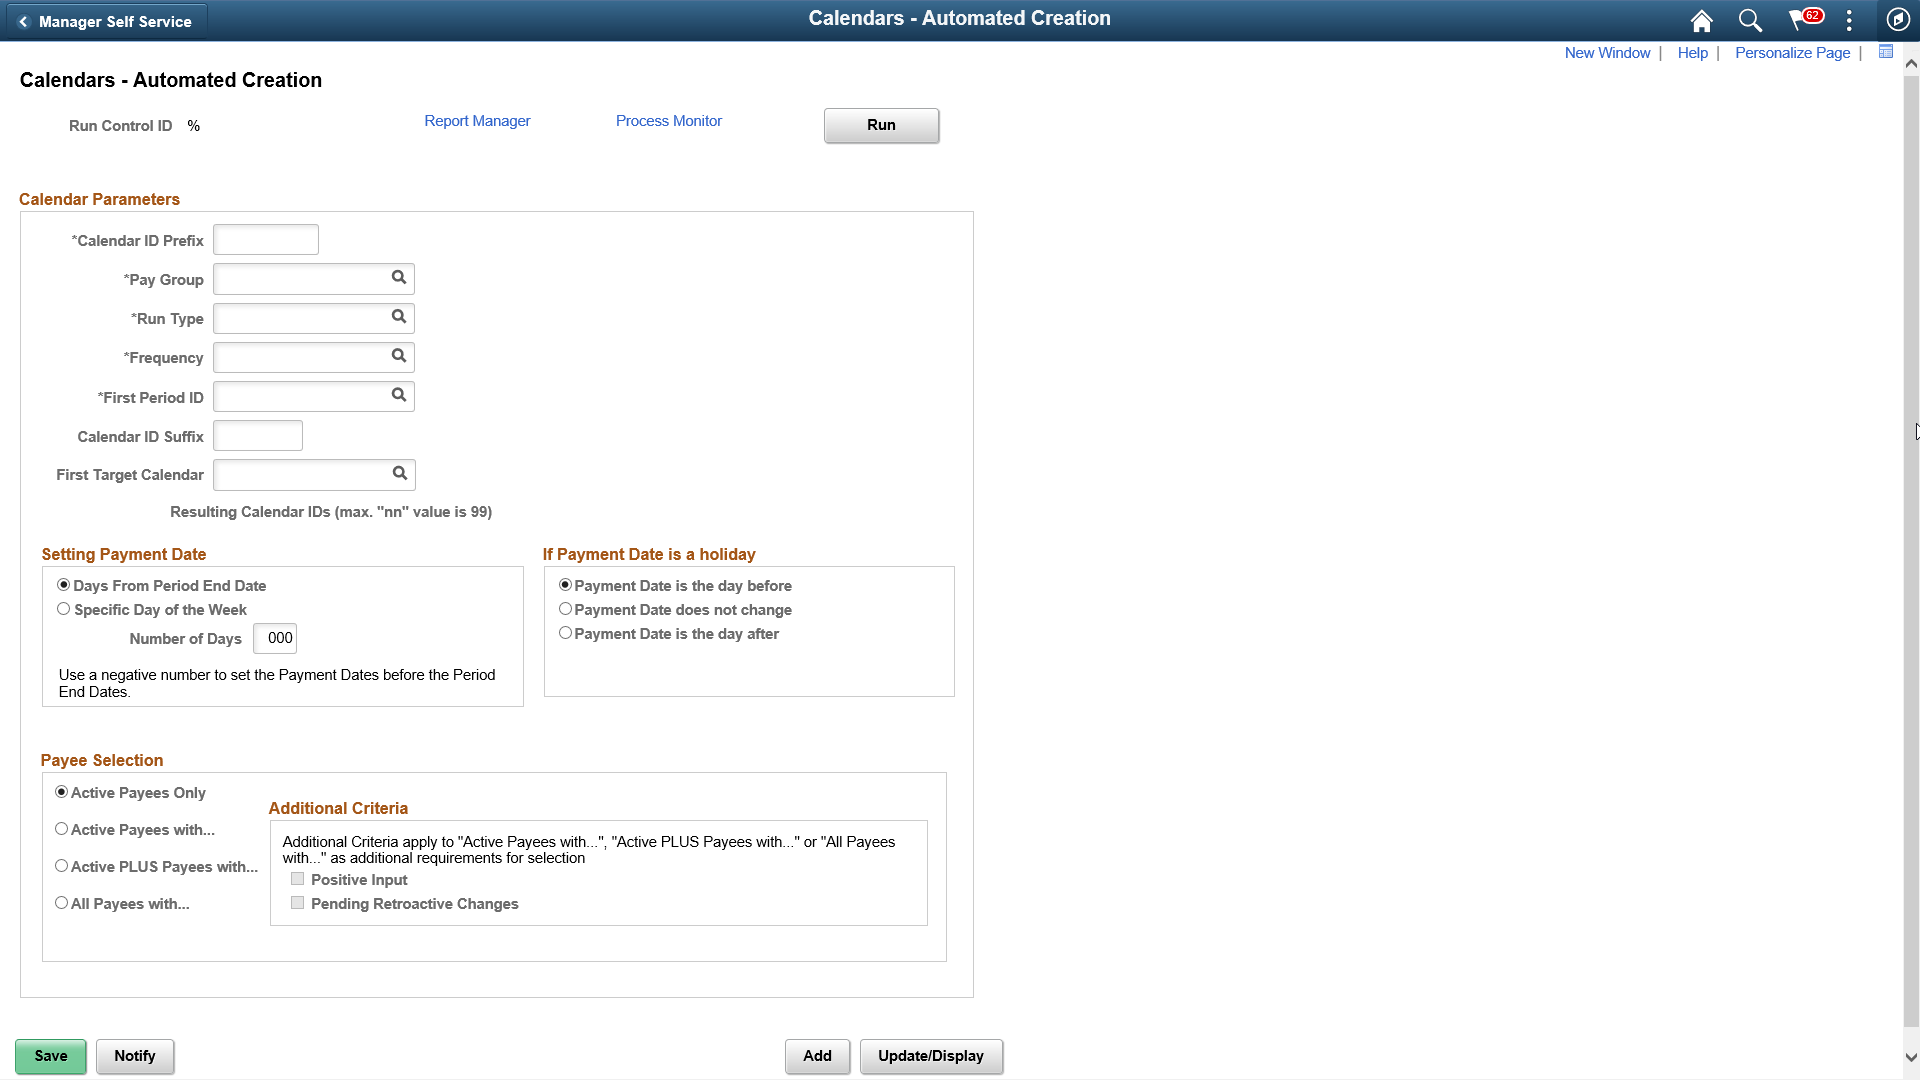
Use the Calendars - Automated Creation page (GP_AUTO_CAL1) to run the Automatic Calendar Creation process to create a set of calendars.
Note: When accessed from the Global Payroll & Absence Mgmt menu, the page name is Calendars - Automated Creation. When accessed from the Set Up HCM menu, the page name is Automatic Calendar Creation. Other than the title, the pages are the same.
Navigation:
This example illustrates the fields and controls on the Calendars - Automated Creation page.

Field or Control |
Description |
|---|---|
Calendar ID Prefix |
Enter a prefix of up to seven alphanumeric characters. The system creates a unique calendar ID for each calendar it creates, by adding this prefix to the period ID associated with the calendar and the number of the calendar. For example, if the first period ID is PAY2001M01 and you enter a prefix of REGULAR, the calendar ID for the first generated calendar becomes REGULAR PAY2001M01. |
Pay Group |
Enter the pay group for which the calendars are being built. |
Run Type |
Enter the run type to which the calendars are associated. |
Frequency |
Enter the frequency for creating the calendars. |
First Period ID |
Enter the first period that the system uses to build calendars. The period IDs from which you select are based on the frequency ID. The system generates calendars for the number of consecutive periods that you defined when creating the periods. |
Calendar ID Suffix |
Enter the calendar frequency suffix that's added to the calendar ID. The default is the first seven letters of the First Period ID. You can enter customized calendar id suffix as per requirements. |
First Target Calendar |
If you're defining calendars for an absence processing run or for a pay run that generates positive input for a different calendar, enter the target calendar ID for the first calendar being created. This field is optional. Based on this ID, the system determines the sequential target calendars to use for auto created calendars. Note: For the system to determine sequential target calendars, the calendar entered in the First Target Calendar field must follow a standard naming convention that ends with two digits to describe the month or any other period that the calendar represents. For example, you can select a first target calendar of GXCI CPY2000M01, because the system can use the last two digits to determine the appropriate sequential target calendars. If you select a nonstandard first target calendar, such as GW10204P, you receive an error message if you click Save or Run. This process enables you to create up to 99 calendars, but each one must be based on an existing target calendar. For example, if you try to generate calendars ABS001 through ABS099, but the only target calendars that exist are PAY001 through PAY050, the system cannot create calendars ABS051 through ABS099. |
Setting Payment Date
Field or Control |
Description |
|---|---|
Days From Period End Date and Number of Days |
Select to have the payment date be a specific number of days before or after the period end date. Enter a positive or negative number in the Number of Days field. For example, to always pay two days before the period end date, enter -2 in the Days Adjustment field. |
Specific Day of the Week |
Select to have the payment date always fall on the same day of the week. Enter the selected day in the Payment Day Is field. Select either On or Before Period End Date or On or After Period End Date to specify what happens if the selected day differs from the calendar end date. For example, suppose that you select Friday as the payment date for a monthly calendar, the period end date is May 26, and the last Friday in May is May 25. If you select On or Before Period End Date, the payment date is May 25. If you select On or After Period End Date, the payment date is the next Friday, June 1. Or, suppose that you set up weekly calendars and designate Saturday as the period end date and Friday as the payment date. Using July 2001 as an example, the period end dates are: July 7, 14, 21, and 28. If you select On or Before Period End Date, the payment dates are July 6, 13, 20, and 27. If you select On or After Period End Date, the payment dates are July 13, 20, 27 and August 3. |
If Payment Date is a Holiday
Select an option that determines what the system does if the payment date falls on a holiday. Options are: Payment Date is the day before, Payment Date does not change, and Payment Date is the day after.
Payee Selection
This group box is identical to the Payee Selection group box on the Calendars - Definition page except that Listed Payees Only is not an option.