Managing Employee Self Service Pages
|
Page Name |
Definition Name |
Usage |
|---|---|---|
|
GP_ABS_SS_REQUEST |
Request absence based on the start date of the absence event. |
|
|
SCH_EE_MONTHLY |
Employees view their schedule for a one month period for any past or future month. |
|
|
GP_ABS_SS_BALANCES |
This page includes links to pages to request absence, view absence requests, view monthly schedule, and forecast balances. |
|
|
GP_ABS_SS_REQHIST |
View processed or pending absence events based on the specified date range. This page is also available to managers. |
|
|
GP_ABS_SS_REQSTAT |
View details for a specific absence request. |
|
|
GP_ABS_SS_FCST_BAL |
Run the online forecasting process for future absence entitlement balances based on date, absence type and absence name. This page is also used by managers. |
|
|
HCM_JOB_SELECT |
Employees with multiple jobs use this page to select the job for which they want to enter or review a self-service absence transaction. |
Use the Request Absence page (GP_ABS_SS_REQUEST) to request absence based on the start date of the absence event.
Navigation:
This example illustrates the fields and controls on the Request Absence page.

The Request Absence page consists of three group boxes: Absence Detail, Additional Information, and Comments. The available fields in the Additional Information group box depend on how your organization sets up self-service for Absence Management.
Absence Detail
Field or Control |
Description |
|---|---|
Start Date |
Select the first day of the absence event. The field option defaults to the current date. If there's a break in the absence, enter each event separately. For example, if you're out sick for two days, return to work for three days, and are out sick again, enter two absence events. If the absence includes a weekend (say, Thursday to Monday), enter one absence event. |
End Date |
Select the last day of the absence event. If you leave this field empty and the Calculate End Date option on the Configure Country Take Setup - Date Rules Page is selected, the system automatically determines the end date based on the begin date, duration, and partial days options. |
Original Start Date |
Select the original start date of the absence event. Enter a date if the absence has legal or payment implications based on the original start date of the absence. This field is visible when Display Original Begin Date is selected on the Configure Country Take Setup - Date Rules Page. For example, an employee has a leg injury. He reports an absence from January 3, 2005 to January 7, 2005. The employee starts to feel better and returns to work. Later, he has a relapse and has to take two more days of absence starting on January 17, 2005 to January 18, 2005. The original begin date for the second absence should be January 3, 2005. The system can link the two events and treat the event as a single one in terms of eligibility or a minimum waiting period. Note: Careful consideration is needed when enabling this field in self-service. Incorrect data entered in this field might lead to incorrect eligibility calculations and payment for one or more events. |
Filter by Type |
Select the absence type. The selection you make in this field will limit or filter the selections available in the Absence Name field. |
Absence Name |
Select the absence name from the available options. The options available depend on the selection in the Filter by Type field, the absence takes that are enabled in the Country Take setup, and the elements for which the employee is eligible. After you select entries in the above fields, the system refreshes the page with additional fields. Note: If you decide to change the Absence Name previously selected, the system will display a warning that all your existing absence data will be lost. See Element Eligibility. |
Reason |
Select a reason from the available options. The reasons available depend on your selections in the previous fields. Absence reasons are linked to the Absence Name (Take) through the Absence Take Type. |
Partial Days |
Specify which days of the absence event are partial days. If the Calculate End Date or Duration option is enabled on the Absence (setup) page, and the Unit Type is Hours, the system does consider any partial hours or half-day entries that are entered in this group box when it calculates the end date or duration. For example, an employee has a work schedule of 8 hours per day from Monday through Friday. The employee reports an absence from Monday, January 8, 2007 through Wednesday, January 10, 2007. Then employee takes a half day off on Monday and full days off for the rest of the absence. Example 1: The Country Take set up is defined as follows:
With these settings, to correctly enter the absence data the employee should report:
Example 2: The Country Take set up is defined as follows:
With these settings, to correctly enter the absence data the employee should report:
Warning! If the absence unit type is defined in days in the Country Take setup, we do not recommend using partial days options. Note: Data that you enter in the following fields is used in the absence calculation process only if the data is referenced by your absence formulas. The available options in the Partial Days field when the absence is calculated in days include:
Depending on the option that you select, up to two check boxes appear that allow you to specify which days of the absence event are half days. Select the check boxes that are appropriate for the absence event. |
Duration |
Enter Duration by days or hours. You do not have to enter Duration if the Calculate Duration is enabled on the Absence (setup) page). The system calculates the duration of the absence in hours or days when you click the Calculate Duration button. The behavior of this field depends on the settings on the Absence (setup) page. The value is automatically calculated if the Calculate End Date option is selected.
|
Calculate End Date or Duration |
Click this button to have the system calculate the end date of an absence event based on the entries in the Start Date and Duration fields, or to calculate the Duration based on entries in the Start Date and End Date fields. Note: If you selected to calculate end date and duration in the Country Take — Date Rules page, then you had to indicate which field to recalculate when both fields contain values. Hence if the user entered values for duration and end date and clicks Calculate End Date or Duration button, one of the fields will be recalculated. |
Forecast Balance |
Click this button to run the online absence forecasting process for the type of absence take selected for this absence request. This button will appear only for those absence names that require forecasting. After the forecasting process is completed, the page will display the Forecast Returned Value and Status and a link View Forecast Details to access the list of the forecast balance details. |
Save for Later |
This option enables the employee to save the absence event information for later review and editing, and does not generate workflow for the approvals process. |
Submit |
This option saves the information and generates the workflow approval process that routes the request to one or more managers whose roles are defined in workflow to enable them to approve, deny, or push back the absence request to the employee with their comments. The push back is often used by approvers to suggest absence request revision or to obtain additional information. |
Cancel |
This option is available only for requests that have been saved for later or that were pushed back from the approver. Depending on the Country Take setup, when you click Cancel the application either physically deletes the request from request and workflow records, or sets the status of the request to cancelled. |
Additional Information
The fields that appear in this group box depend on how Global Payroll is configured during the implementation process.
Comments
The Requestor Comments field enables the employee to enter free form text related to the absence request that becomes part of the record and is visible throughout the approval process. Comments appear on the Absence Details page.
Use the Monthly Schedule page (SCH_EE_MONTHLY) to employees view their schedule for a one month period for any past or future month.
Navigation:
Click the View Monthly Schedule link on the Request Absence page.
This example illustrates the fields and controls on the Monthly Schedule page (1 of 2).
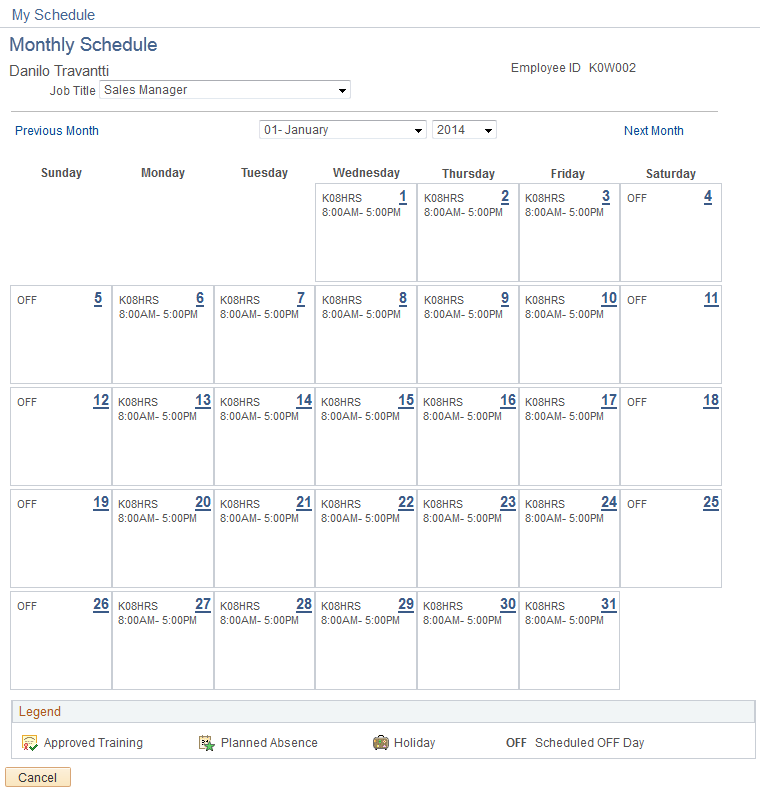
Employees can view their schedule for one month in the future or past by using the available options in the month and year fields. Click the Previous Month and Next Month buttons to view previous or subsequent months, respectively.
For employees with multiple jobs, the Select Job Title field appears on this page.
See Select Job Page.
Use the View Absence Balances page (GP_ABS_SS_BALANCES) to this page includes links to pages to request absence, view absence requests, view monthly schedule, and forecast balances.
Navigation:
This example illustrates the fields and controls on the View Absence Balances page.
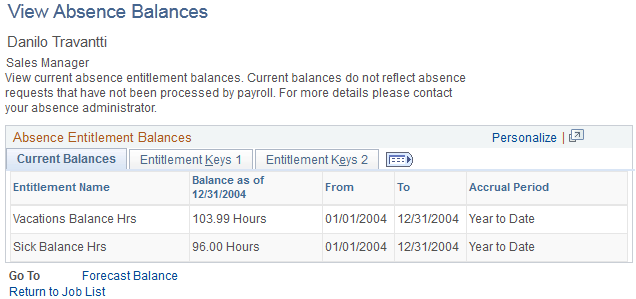
This page contains the following links:
Request Absence.
This is a link back to the Absence Request page.
View Absence Request History.
This is a link to the Absence Request History page.
View Monthly Schedule.
This is a link to the Monthly Schedule page.
Forecast Balance.
This is a link to the Forecast Balance page.
Job List.
This is a link to the Select Job page for employees with multiple jobs.
See Select Job Page.
Note: If you are integrating with Time and Labor, absence entitlement balances can be viewed on the Timesheet page.
See Reporting Time.
Use the Absence Request History page (GP_ABS_SS_REQHIST) to view processed or pending absence events based on the specified date range.
This page is also available to managers.
Navigation:
Click the View Absence Request History link on the Request Absences page or the View Absence Balances page.
This example illustrates the fields and controls on the Absence Request History page.
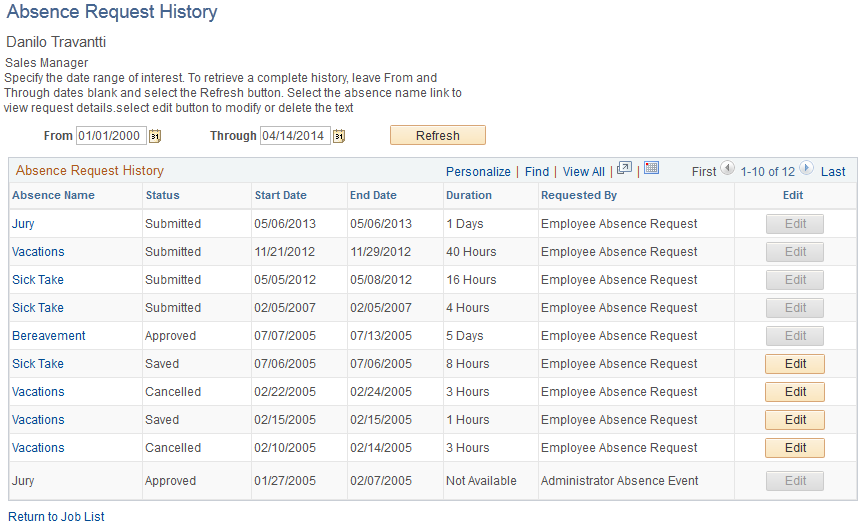
This page display all absence requests for the employee. Absence requests entered by the employee contain a link in the Absence Name column. Absences that are entered by the Absence Administrator via Absence Event Entry component do not have a link in the Absence Name column, nor a Status and Duration value. The employee can edit absences requests that are saved, but not yet submitted, by clicking the Edit button in the Edit column. The employee also can edit absence requests that have been, cancelled or denied by clicking the Edit button.
Absence requests or any absence entered or modified via Timesheets or by the Absence Administrator using the Absence Event Entry component can not be edited in Absence self-service.
Note: If the absence was requested by the manager as an employee, the Requested By column will display Manager.
Field or Control |
Description |
|---|---|
From: and Through: |
The user can display absence request that fall within a specified date range by entering dates in the From: and Through: fields. If the employee enters a date in only the From field, the system displays absence requests that have a Start Date equal to or after the specified date. Alternatively, if the employee enters a date only in the Through: field, the system displays absence requests that have an End Date equal to or prior to the specified date. If no date is entered in either field, the system displays all absence requests for the employee. The From and Through date range is determined by the Default History Date Range values entered on the History Grid page of the Country component. If the Default History Date Range has not been set up, the system will use the defaults of current date – 90 days for the From date field and current date + 90 days for the Through date field. |
See Defining Self Service Absence Rules by Country.
Field or Control |
Description |
|---|---|
Refresh |
Click after entering, changing, or removing dates in the From: and Through: fields. |
Field or Control |
Description |
|---|---|
Edit |
This button is available for absence requests with a status of saved, cancelled, or denied. When you click this button the Request Absence page is opened. |
See Request Absence Page.
The Absence Request History group box contains Absence Name, Status, Start Date, End Date, Duration, and Requested by. You can sort the rows by any of these criteria by clicking the column heading.
Note: The system calculates and stores duration values for absence requests entered through Absence self-service or Timesheets only. The system does not calculate or store absence duration for absences entered or modified through other online pages such Absence Event Entry or through Component Interface.
Use the Request Details page (GP_ABS_SS_REQSTAT) to view details for a specific absence request.
Navigation:
Click the link for the absence in the Absence Name column on the Absence Request History page.
This example illustrates the fields and controls on the Request Details page.

This example illustrates the fields and controls on the Request Details page.

The page displays information about the selected absence.
Note: If the absence was requested by the manager as an employee, then in the Request History section the employee's name will be displayed in the Name field.
Note: The approval path map and details is only displayed in the Absence Self Service applications. This path and details are not displayed in Timesheets self-service.
Use the Forecast Balance page (GP_ABS_SS_FCST_BAL) to run the online forecasting process for future absence entitlement balances based on date, absence type and absence name.
This page is also used by managers.
Navigation:
Click the Forecast Balance link on the View Absence Balances page.
This example illustrates the fields and controls on the Forecast Balance page.

This page enables the employee to run the online absence entitlement balance forecast process, and to view entitlement balances as of a future date, by absence type, and absence name.
Field or Control |
Description |
|---|---|
As of Date |
Enter a future date that the system will use to calculate the balance. |
Filter by Type |
Select the absence type. The selection you make in this field will limit or filter the selections available in the Absence Name field. |
Absence Name |
Select the absence name from the available options in the field. Note: The user must make an entry in this field in order for the system to display the Forecast Balance button. |
Forecast Balance |
Click to run the online absence balance forecasting process. When the process is completed, the forecasted absence entitlement balances appear in the Forecast Balance Details group box. Note: The system does not automatically save your absence request before initiating the Forecasting process. Although the system prompts you to save before leaving the page, it is not necessary to save your forecast information before or after the Forecasting process. |
Use the Select Job page (HCM_JOB_SELECT) to employees with multiple jobs use this page to select the job for which they want to enter or review a self-service absence transaction.
Navigation:
This example illustrates the fields and controls on the Select Job page for an absence request.

Employees with multiple jobs must select the job for which they are entering or reviewing self-service absence transactions This sample page shows an example of an employee with multiple jobs that is entering an absence request. A similar page with a modified title appears whenever this employee initiates any absence self-service transaction.
After the employee selects the job title, the processes are identical to those discussed in the previous topics.