Reporting Time
This section lists common elements and discusses how to report time.
Note: This feature has been replaced by the Report Time functionality in Fluid. For more information, see Using PeopleSoft Fluid User Interface for Time Reporting as an Employee.
|
Page Name |
Definition Name |
Usage |
|---|---|---|
|
TL_MSS_TIMESHEET TL_RPTD_PCH TL_RPTD_ELP |
Report time and task details for a day, week, or time period for either punch or elapsed time reporters. |
|
|
Select Job Title Page |
CO_MULTI_JOB_SRCH |
Enables employees with multiple jobs to select the job for which they want to view or report time. The page lists both punch time and elapsed time jobs, and includes terminated jobs. |
|
TL_WEBCLK_ENTR_PCH |
Enables employees to enter a single In, Break, Meal, Out, or Transfer punch. Employees can provide time and task detail when entering punches. Includes links to pages for viewing overtime requests and the holiday schedule. |
|
|
Save Confirmation Page |
TL_WEBCLK_CONFIRM |
Confirms the date, punch type, time zone, and punch type reported through the Web Clock - Enter Punch page. |
|
TL_MASS_TIME_SELF TL_MASS_SELF_SAVE |
Specify the range of dates and the method for reporting time. |
|
|
TL_MASS_TIME_SELF TL_MASS_SELF_SAVE |
|
|
|
TL_COMPTIME_PNL |
View compensatory time balance and expiration information. |
Field or Control |
Description |
|---|---|
Time Reporting Elements and Task Reporting Elements |
The self-service pages that employees use to report time include fields for selecting time reporting and task reporting elements. The employee's time reporting template determines which fields appear on the self-service pages. Should data be reported in error for invalid time or task elements (through TCD, Mass Time, or Rapid Time Reporting pages, for example), those time reporting or task fields will appear so that employees can make corrections, even if those fields are not chosen on the employee's time reporting template. |
Timesheet Page |
Both punch time and elapsed time are reported using the Timesheet navigation component. When selected, the system determines whether the employee has multiple jobs. If multiple jobs exist, the Select Job Title page appears, with links for each job. If the time reporter has only one job, the Select Job Title page does not appear, and the time reporter is taken directly to the appropriate Timesheet page. The Timesheet page displays either the punch time page (TL_RPTD_PCH) or elapsed time page (TL_RPTD_ELP) based on the Time Reporter Type value selected on the Create or Maintain Time Reporter Data pages. |
Use the Timesheet page (TL_MSS_TIMESHEET) (TL_RPTD_PCH) (TL_RPTD_ELP) to report time and task details for a day, week, or time period for either punch or elapsed time reporters.
Navigation:
This example illustrates the fields and controls on the Timesheet page. You can find definitions for the fields and controls later on this page.
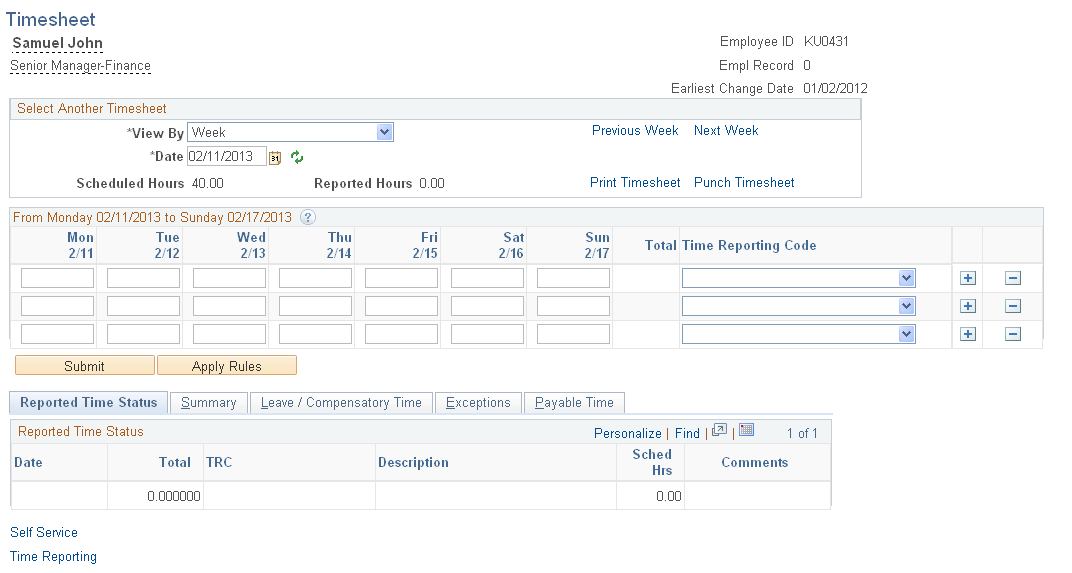
The Days, Total, TRC and Type fields are based on the related time reporting template. The remaining fields are based on the task reporting template.
Field or Control |
Description |
|---|---|
<Job Title> |
Placing your mouse over the Employee’s Job Title displays a pop-up window containing job information specified on the Self Service Header Info page. |
View By |
The defaults for the View By field are set on the User Preferences page. This field may be display only, depending upon the settings for the time reporting template. Values are Day, Week, or Time Period. |
Date, Refresh |
If you change the Date field, click the Refresh button to update the page. |
Previous Day, Previous Week, Previous Time Period, Next Day, Next Week, Next Time Period |
Use the requisite link to view the previous or next time reporting period. If you use one of these links, additional text appears to let the user know that reported time is being entered for a prior or future period. |
Print Timesheet |
Select this link to print the Timesheet to a PDF file, in order to create a physical timesheet for signatures. |
Punch Timesheet or Elapsed Timesheet |
Select to switch the timesheet to either an elapsed time or a punch timesheet. This option may not be available, based on the configuration specified on the Time and Labor Installation page. |
Show All Punch Columns |
Select this option to show all of the Punch Time columns on this spreadsheet. This option is only available on Punch Timesheets. The Time Reporting Template page determines which Punch Columns are shown on the Punch Timesheet and whether the Show All Punch Columns button is available. |
Reported Hours |
This field is updated when the Save for Later or Submit buttons are clicked. |
Scheduled Hours |
The value is displayed when you access the Timesheet page. |
Total |
This field is updated when the Save for Later or Submit buttons are clicked. This field displays the total hours per row. |
Time Reporting Code |
If applicable enter a Time Reporting Code. |
Type |
This field is updated when the Save for Later or Submit buttons are clicked. It shows the TRC's related Type — Amount, Hours, or Units. |
Taskgroup |
If applicable, enter a related taskgroup. |
Billable |
Select this field if the hours entered are billable. |
Task Profile ID |
If applicable, enter a related task profile ID. |
Apply Rules |
Click this button to save your data and launch the Apply Online Rules process, which immediately applies the online rules for the time reporter to the time entered on this page. If absence event data is entered in the Absence Event grid, the Apply Online Rules process generates absence payable time with the status Estimated (E) or Needs Approval (NA).. If any exceptions are generated, the Manage Exceptions page is displayed automatically after the process completes. If no exceptions occur and payable time is created, the View Payable Time Detail page appears with the rows of estimated time that were created from the online rules. The Apply Online Rules process does not generate payable time estimates when the reported time has the status Needs Approval (NA). Note: This button is displayed only if the Run Online Rules feature is activated on the Time and Labor Installation page. See: Setting Up System Defaults and Loading Dates |
Reported Time Status |
The fields displayed are Date, Status, Total, Time Reporting Code and Comments. Click the icon in the Comments column to add a comment for a row. Note: This grid applies only to elapsed Timesheets (not punch). |
Absence |
Click this tab to display the Absence Events grid and Absence Balance grid and add absence information. Depending on the setup of Absence Management, you may be enabled to report, save, submit, and approve or deny (managers only) absence events within the range of the Timesheet dates. Balance information can include sick or vacation balances, and your absence entitlement balance if the time reporter is active in the Absence Management system. Note: This tab is displayed only if the Time and Labor system is integrated with Global Payroll or Absence Management. |
Summary |
Click this tab to show the Total Reported Hours values to obtain a summary of reported hours. |
Leave / Compensatory Time |
Select this tab to view leave and compensatory time balances as of the date specified for the timesheet. This balance may be positive or negative, depending on how the plan is set up and what has been reported. Select the View Detail icon to access the Compensatory Time page |
Attendance |
Select this tab to view a list of attendance violations for this employee. |
Save for Later |
Use this button to partially enter a timesheet and to complete at a later date. Enter information on the page each day and submit at the end of the reporting period. When using this button a message window may appear, asking whether the user would like to validate the time entered. |
Submit |
Use this button to submit the Timesheet. |
Clear |
Click this button to remove entries from the gird that have not been saved or submitted. This button only appears on Punch timesheets. |
Request Absence |
Click this link to access the Request Absence page. That page has a link to return to the Timesheet page. |
Note: TRCs that are set up with the Absence Flag check box selected on the Time Reporting Codes - Definition page are not displayed on the online time reporting pages (Timesheet, WebClock, and Mass Time). Consequently, you cannot report time using an Absence TRC on these pages. TRCs that have the Rules Only TRC check box selected on the Time Reporting Codes - Definition page are not displayed on any of the time reporting or scheduling pages, except the Adjust Paid Time page.
The Timesheet page displays different information when accessed from the Self-Service component compared to the Manager Self-Service component. The User Preferences page also plays an important role in the Timesheet display.
Task Value Prepopulation
The following is true when viewing either the Self-Service Timesheet (as an employee) or the manager Timesheet (a manager viewing an employee's timesheet):
To determine what task information to display on the timesheet, the system needs to determine if the employee is a task template or task profile reporter and if task value defaults are present in User Preferences. The determination of the employee's type of task reporting is first based on whether the page displayed is the Punch or Elapsed Timesheet. This page display is determined by the employee's time reporter type of Punch or Elapsed on the Maintain Time Reporter Data page.
Then, depending on the elapsed or punch timesheet display, the system checks for that same type of time reporting template on the Maintain Time Reporter Data page. If no time reporting template exists on Maintain Time Reporter Data, it will check for the default time reporting template on the Task Default Values group box of the Time Reporting Preferences page, or for one on the employee's default taskgroup on Maintain Time Reporter Data. The time reporting template determines if the task profile or the task elements should appear on either the punch or elapsed timesheet.
If the derived time reporting template is setup to use a task template, then any task information that is populated in the Task Default Values group box of the Time Reporting Preferences page will be used, when the time prepopulation method of task values is specified. If no default task values are specified on Time Reporting Preferences, then the timesheet displays the employee's default taskgroup and related task element fields. If there are multiple rows defined for Task Default Values, they will be displayed as multiple rows on either the Punch or Elapsed Timesheet
If an employee is a Task Profile reporter, the Timesheet will just use what is defined as the default Task Profile, either from Maintain Time Reporter Data or from the taskgroup displayed on the Timesheet, and not look at the User Preferences.
Examples of Timesheet display with User Preferences
The system is configured as follows:
|
Time Reporter Data |
|||
|---|---|---|---|
|
Time Reporter Type |
Time Reporting Template |
Default Taskgroup |
|
|
ELAPSED |
Enabled |
Task Element Reporting |
Task Element Reporting |
|
PUNCH |
Blank |
Blank |
Task Element Reporting |
The User Preferences
Prepopulation Method = Task Values
Task Value Default
Selected Taskgroup has associated Time Reporting Template IDs to reflect:
Elapsed – Task Element Reporting
Punch – Task Profile Reporting
Task values are entered for all associated task elements.
Elapsed Timesheet
The system prepopulates the timesheet with the taskgroup and task values that are reflected on the User Preferences page. Prepopulated task values can be used because the time reporter's elapsed time reporting template on the Maintain Time Reporter Data page uses task element reporting,
Punch Timesheet
The timesheet displays the taskgroup and associated task elements from the default taskgroup on the Time Reporter Data page. Prepopulated task values from User Preferences cannot be used, as the time reporter does not have a punch time reporting template on the Maintain Time Reporter Data and the punch time reporting template associated with the taskgroup on User Preferences uses task profile.
Schedule Information Prepopulation
If your schedule has tasks associated with it, in order for the scheduled tasks to prepopulate on the timesheet, the employee needs to be set up as the same type of task reporter that the system defines on the schedule.
The display of task profile or task elements on the timesheet is first derived from the Maintain Time Reporter Data page to see if a Time Reporting Template is listed. This is true for both Punch and Elapsed Timesheets.
If none exists on Maintain Time Reporter Data, then the timesheet display will derive the time reporting template of the scheduled taskgroup, to determine whether to use task profile or task template.
If the schedule is composed of shifts, then the system uses the taskgroup associated with the shift. If the schedule is not using shifts, then the system uses a taskgroup associated to the schedule.
Employee User Preferences and Manager Timesheet Display
When viewing an employee's time on the Timesheet page, a manager sees the following default settings:
TRC Code/TRC Description: Display the preference from the manager's own user preferences, not the employees.
Time Prepopulation Method: Display the default task values as mentioned previously. The Manager Self-Service Timesheet will not prepopulate with the employee's scheduled time, or prior period time.
Default Timesheet Display
(View by): Display the preference from the manager's own user preferences, not the employees. However, if the manager changes the Date and View by setting while on the Timesheet page, and then clicks on Next Employee or Previous Employee, those settings will remain - they do not return to today's date and the default View By setting. For example, if the manager changes the date to January 1, 2004 and View By Time Period, when clicking on the Next Employee button, the time period displayed is for January 1, 2004 for the next employee.
Start Day of Week: Display the preference from the manager's own user preferences, not the employees.
The Timesheet will display existing time in the database in the following way:
Time Reporting Elements:
Employees only see those fields that are specified on the Time Reporting Template.
For managers, if the field, Show all Time Reporting Fields, is selected on the Time Reporting Options group box of the Time and Labor Installation page, then the manager will see all time reporting elements displayed. If this is not selected, than the manager will see only those fields that are specified on the Time Reporting Template, and those fields that have values.
Task Elements:
Employees see those fields that are specified on the Task Template, and those fields that have values.
Managers see those fields that are specified on the Task Template for the employee, and those fields that have values.
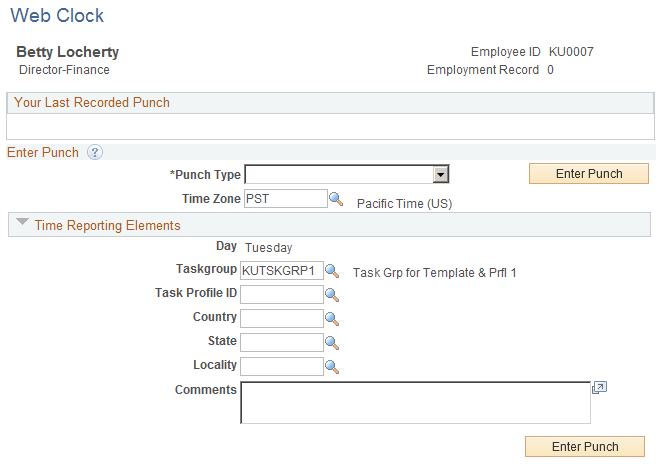
Use the Web Clock - Enter Punch page (TL_WEBCLK_ENTR_PCH) to enable employees to enter a single In, Break, Meal, Out, or Transfer punch.
Employees can provide time and task detail when entering punches. Includes links to pages for viewing overtime requests and the holiday schedule.
Navigation:
This example illustrates the fields and controls on the Web Clock - Enter Punch page. You can find definitions for the fields and controls later on this page.
Field or Control |
Description |
|---|---|
Punch Type |
Select a punch type: In, Out, Meal, Break, or Transfer. |
Enter Punch |
Click after you've selected the punch type and entered element and task information. The system uses the current date and time for the punch and applies the same validations that are used for the Timesheet page. |
Time Zone |
By default, the system uses the employee's time zone as defined on the Create Time Reporter Data page in Time and Labor; you can override the time zone during data entry. |
Task Reporting Elements
These fields only apply to In and Transfer punches.
Use the Mass Time Reporting feature to save time and keystrokes when reporting time. It enables you to easily report different attributes of time for a period rather than having to enter them manually for each day in the specified period.
The Mass Time Reporting feature enables you to report time in several different ways by using a template type format. You enter the period of time for which you want to report time and select the method that Time and Labor uses to generate reported time.
Understanding Mass Time
The options in the How do you want to report time? section of the Mass Time Reporting page function differently depending on whether the Regenerate Reported Time check box is selected on the TL Installation page and whether the Create Partial Work Hours for Partial Absence check box and Exclude Holiday for Generating Time check box are selected on Workgroup page.
If the Regenerate Reported Timecheck box is selected, then the total number of hours of reported time generated for any day will not exceed the number of hours scheduled for that day. The total number of hours is the sum of absence time taken, compensatory time taken, leave time taken, and non-compensatory leave time taken, less compensatory time earned.
If the Create Partial Work Hours for Partial Absence check box is selected, then on any day on which a partial absence is reported, the system will generate reported time in the manner described in the previous paragraph. If this check box is cleared, no time is generated by Mass Time on any day on which a partial absence is reported.
On the Mass Time - Select Time Reporting Method page, when you select the Exclude Holiday for Generating Time field, and Report time for selected TRC using scheduled hours is also selected, Mass Time will not generate any reported time on days defined as holidays, even if scheduled hours exist on those days.
See Setting Up System Defaults and Loading Dates, Setting Up Workgroups.
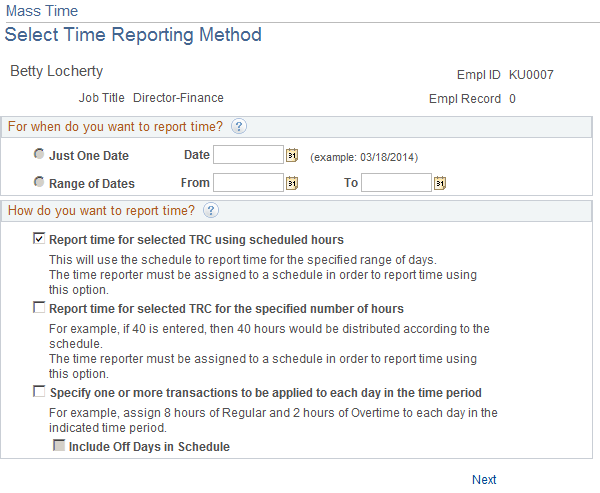
Use the Mass Time - Select Time Reporting Method page (TL_MASS_TIME_SELF) (TL_MASS_SELF_SAVE) to specify the range of dates and the method for reporting time.
Navigation:
Click Next on the Mass Time - Select Time Reporters page.
This example illustrates the fields and controls on the Mass Time - Select Time Reporting Method page. You can find definitions for the fields and controls later on this page.
Field or Control |
Description |
|---|---|
Just One Date |
To report time for just one day, enter a date in this field. |
Range of Dates |
To report time for a range of dates, enter beginning and end dates in these fields. |
You can report time in one of three ways using the Mass Time Reporting feature:
Report time for selected TRC using scheduled hours.
Use this option to report time according to your schedule. If you (or your employees, if you are a manager) are assigned to a schedule, you can report time according to that schedule for a specified day or for a range of dates. Once you specify the date or date range, the system generates reported time by looking at your schedule for the dates that you specified. For example, to report taking vacation for two weeks, specify a date range for those two weeks and indicate a time reporting code to be applied. The system looks at how your schedule is built for that particular date range and generates reported time for the same number of hours for those dates. You must be assigned to a schedule for reported time to be generated using this option.
Report time for selected TRC for the specified number of hours.
Use this option if you want to specify a lump sum amount, for example, 40 hours, and have it distributed according to your or your employee's schedule over the date or date range specified. For example, suppose that you specify a date range of two weeks, indicate a time reporting code of REG, and enter 80 hours to be distributed. The system looks at your schedule and distributes 80 hours of REG over the two weeks according to how your schedule is set up.
Note: You must be assigned to a schedule to use this feature. Also, the system doesn't distribute the total number of hours evenly over the time period. If your schedule dictates that you normally work only 70 hours in a two-week period and you enter 80 hours to be distributed, then the extra 10 hours is lumped into the last day of the date range specified. The reason for this is that you are requesting that a lump sum of time be distributed according to your schedule. If the number of hours you report is short or over that which is indicated in the schedule, those hours are applied to the last day.
Specify one or more transactions to be applied to each day in the time period.
Use this option to report time and specify multiple transactions for the system to apply to the specified date or date range. For example, suppose there is one week for which you need to report six hours of regular time and two hours of paid time off for each day, instead of reporting your usual eight hours of regular time. Rather than having to enter these two transactions for each day, you can enter it only once by specifying six hours of REG and two hours of PTO. The system applies the six hours of REG and two hours of PTO to each of the days that you specified in your date range, excluding your regular days off. You need to be assigned to a schedule to report time using this option.
If you select this Mass Time reporting option, then the Include Off Days in Schedule check box appears below this selection. This check box affect how reported time is generate in these ways:
If you have an assigned schedule and this check box is cleared, then reported time is created only for workdays and not scheduled days off.
If you have an assigned schedule and you select this check box , then reported time is created time for all days in the schedule.
If you do not have an assigned schedule, reported time is created for all days in the date range you enter regardless of the setting of the Include Off Day check box, `based on the data you enter on the Reporting Details grid on the Mass Time – Report Time page.
Click the Next button to continue on to the Mass Time - Report Time page.
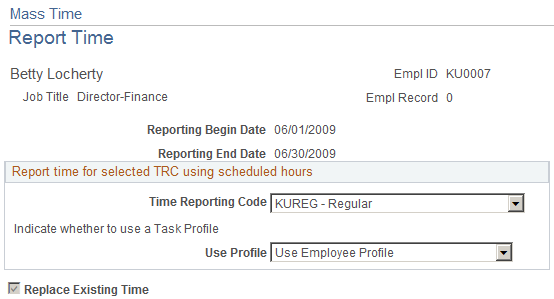
Use the Mass Time - Report Time page (TL_MASS_TIME_SELF) (TL_MASS_SELF_SAVE) to specify the range of dates and the method for reporting time.
Navigation:
Click Next on the Mass Time - Select Time Reporting Method page.
This example illustrates the fields and controls on the Mass Time - Report Time page. You can find definitions for the fields and controls later on this page.
Field or Control |
Description |
|---|---|
Time Reporting Code |
Enter a time reporting code (TRC) in this field to specify which method to use for processing the time worked. Every active TRC that is valid for the employee appears here, unless it is specified as a "Rules Only" TRC. If it is a rules only TRC, then it will only be used in processing rules and will not show up on the time reporting pages. Select a TRC that is attached to the TRC program assigned to the employee for whom you are reporting time. If you're reporting a lump sum of time to be distributed according to your schedule, enter the total number of hours that you want distributed in the Specify how much you want to report box. Note: On the previous page, if the Use the scheduled hours for the day(s) specified or the Use the total number of hours entered and distribute them according to the schedule option was selected, and a TRC is being used, if the selected employee has a punch schedule, then a TRC will be inserted with the punch scheduled time. If the user decides to report a TRC with punch time, then the new rule Template 135 should be reviewed, in order to determine if all punch time rows with a TRC should be paid or paid with a different TRC. If a TRC is not specified in this field, and a TRC exists on the employee's schedule, the system uses Scheduled TRC. If there are any other Time Reporting elements on the schedule, these will be used to populate reported time as well. |
Use Profile |
Select one of the values to define how you want task information applied to reported time. The values for the Use Profile field are: Use Employee Profile. Select this value to use this profile as the default task profile on the Maintain Time Reporter Data page for reported time. Use Scheduled Tasks. Select this value to display any task and time reporting information on the employee's schedule to populate reported time. Use Taskgroup Default Profile. Select this value to use the default task profile on the employee's taskgroup listed on the Maintain Time Reporter Data page. |
Submit |
Click to submit the time that you reported for processing. The validation process runs, and the system generates exceptions if errors exist. The Submit process updates the employee's status codes and creates reported time. If you selected the Automatic Rules Run option on the Time and Labor Installation page, the Time Administration process runs and creates payable time. |
When the Specify one or more transactions to be applied to each day in the time period option is selected on the Mass Time - Select Time Reporting Method page.
Field or Control |
Description |
|---|---|
Taskgroup |
(Optional) If this field is left blank, when time is submitted it appears by default from the employee's assigned Taskgroup, which is indicated on their Time and Labor Employee Data record, or the Taskgroup assigned to the group for which you are reporting. If a Taskgroup other than the default is reported, this is considered Taskgroup borrowing. When the time is submitted, it uses the task reporting elements associated with the borrowed Taskgroup. The selection of a Taskgroup determines which fields appear on the Task Reporting Elements tab. |
Time Reporting Elements, Task Reporting Elements (tab) |
If applicable, enter information on the Time Reporting Elements or Task Reporting Elements tabs. Time reporting elements are based on your Time Reporting Template information and the Task Reporting Elements are based on the Taskgroup that is being reported. |
TRC |
Specify all the transactions that the system is to report for each of the days in the specified date range. Select a TRC in the Specify which Time Reporting Code (TRC) you want to use field on the Mass Time Reporting page to indicate which method the system should use for processing the time worked. Every active TRC that is set up in the system appears here. Select a TRC that is attached to the TRC program assigned to the employee for whom you are reporting time. If you select a TRC that is not valid for an employee, the system generates an exception when the time is submitted. |
Quantity |
Enter the number of hours. Note: This field appears if the second option (use the total number of hours entered) or the third option (specify multiple time transactions) on the Select Time Reporting Method page is selected. A value is required in the Quantity field in order to complete the transaction. |
Country, Currency Code, State, Locality, Comp Rate Code, Billable Indicator, Override Rate |
Enter values in these fields if applicable. |
Replace Existing Time |
This check box is selected by default and cannot be edited if you select the first option for Mass Time reporting. When this check box is selected, only existing time generated through Rapid Time or Mass Time (time that has a reported time source (RT_SOURCE) equal to SCH) is deleted. Time generated through the Timesheet page is not deleted (time with a reported time source equal to SYS). Time entered through Mass Time is added to any time that was entered through the Timesheet pages. If you do not select this check box, the system adds the time in this entry to previous data. For example, suppose that you reported eight hours of TRC REG for an employee on March 1, 2000. Then you enter two hours of TRC REG for the same employee on the same date. If you selected this check box, the system records two hours of TRC REG for that day. If you did not select this check box, the system will add two hours of TRC REG to the existing eight hours for a total of ten hours for this date. |
Use the Compensatory Time page (TL_COMPTIME_PNL) to view compensatory time balance and expiration information.
Navigation:
This example illustrates the fields and controls on the Compensatory Time page. You can find definitions for the fields and controls later on this page.
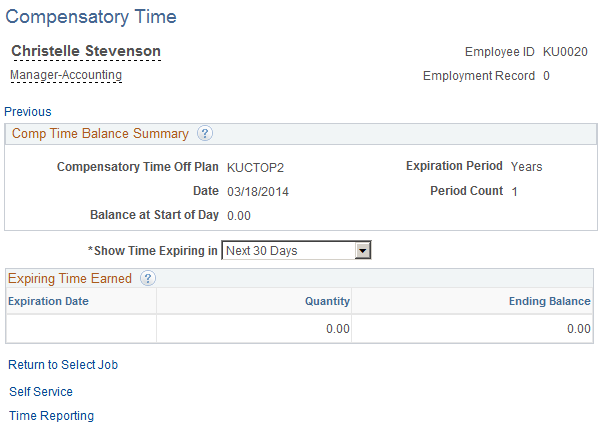
The Compensatory Time page includes the compensatory time balance as of the date specified. This balance may be positive or negative, depending on how the plan is set up and what has been reported.
Field or Control |
Description |
|---|---|
Show Time Expiring in |
Select how far in the future you want to view compensatory time expiration information. Once you make a selection, the system displays all compensatory time with an expiration date that meets the criteria. For example, if you select Next 30 days, the system displays all the compensatory time expiring within the next 30 days. If the compensatory time has no expiration date, it doesn't appear here. |
Expiration Date |
Displays the date that the employee's reported compensatory time is set to expire. The time expires at midnight of the date specified in this field. |
Quantity |
Displays the number of compensatory hours that were originally reported and are set to expire on the date specified in the Expiration Date field. |
Ending Balance |
Displays the compensatory time balance at the end of the date specified in the Expiration Date field once the hours have expired. |