Setting Up System Defaults and Loading Dates
This section discusses how to set up system defaults and load dates, using the TL Installation (TL_INSTALL) component.
|
Page Name |
Definition Name |
Usage |
|---|---|---|
|
TL_INSTALLATION |
Set up general system defaults and to activate specific features for your Time and Labor application. |
|
|
TL_INSTL_PUNCH |
Set up schedule total options, schedule resolution options, punch pattern defaults and Schedule Change Limits for your Time and Labor application. The navigation to Load Dates for GAP and Absence Management Setup is HCM, Product Related, Global Payroll and Absence Management, System Settings, Installation Settings. |
|
|
TL_DATE_LOAD |
Load dates into your Time and Labor system when you implement the system and each time you approach the end of the load period. |
|
|
TL_INSTL_MSS_DFLT |
Set up manager selection criteria fields and options that will be used for returning employee lists for all Time and Labor manager self-service pages. |
|
|
TL_INST_SS_HDRFLD |
Define the additional information shown on the Self Service page with the employee name and job title. |
|
|
TL_INST_TR_PREF |
Define default values for the user preferences set within the PeopleSoft Fluid User Interface Time page. |
|
|
TL_AENRL_INSTALL |
Enable the auto enrollments setting using Time and Labor installation settings. |
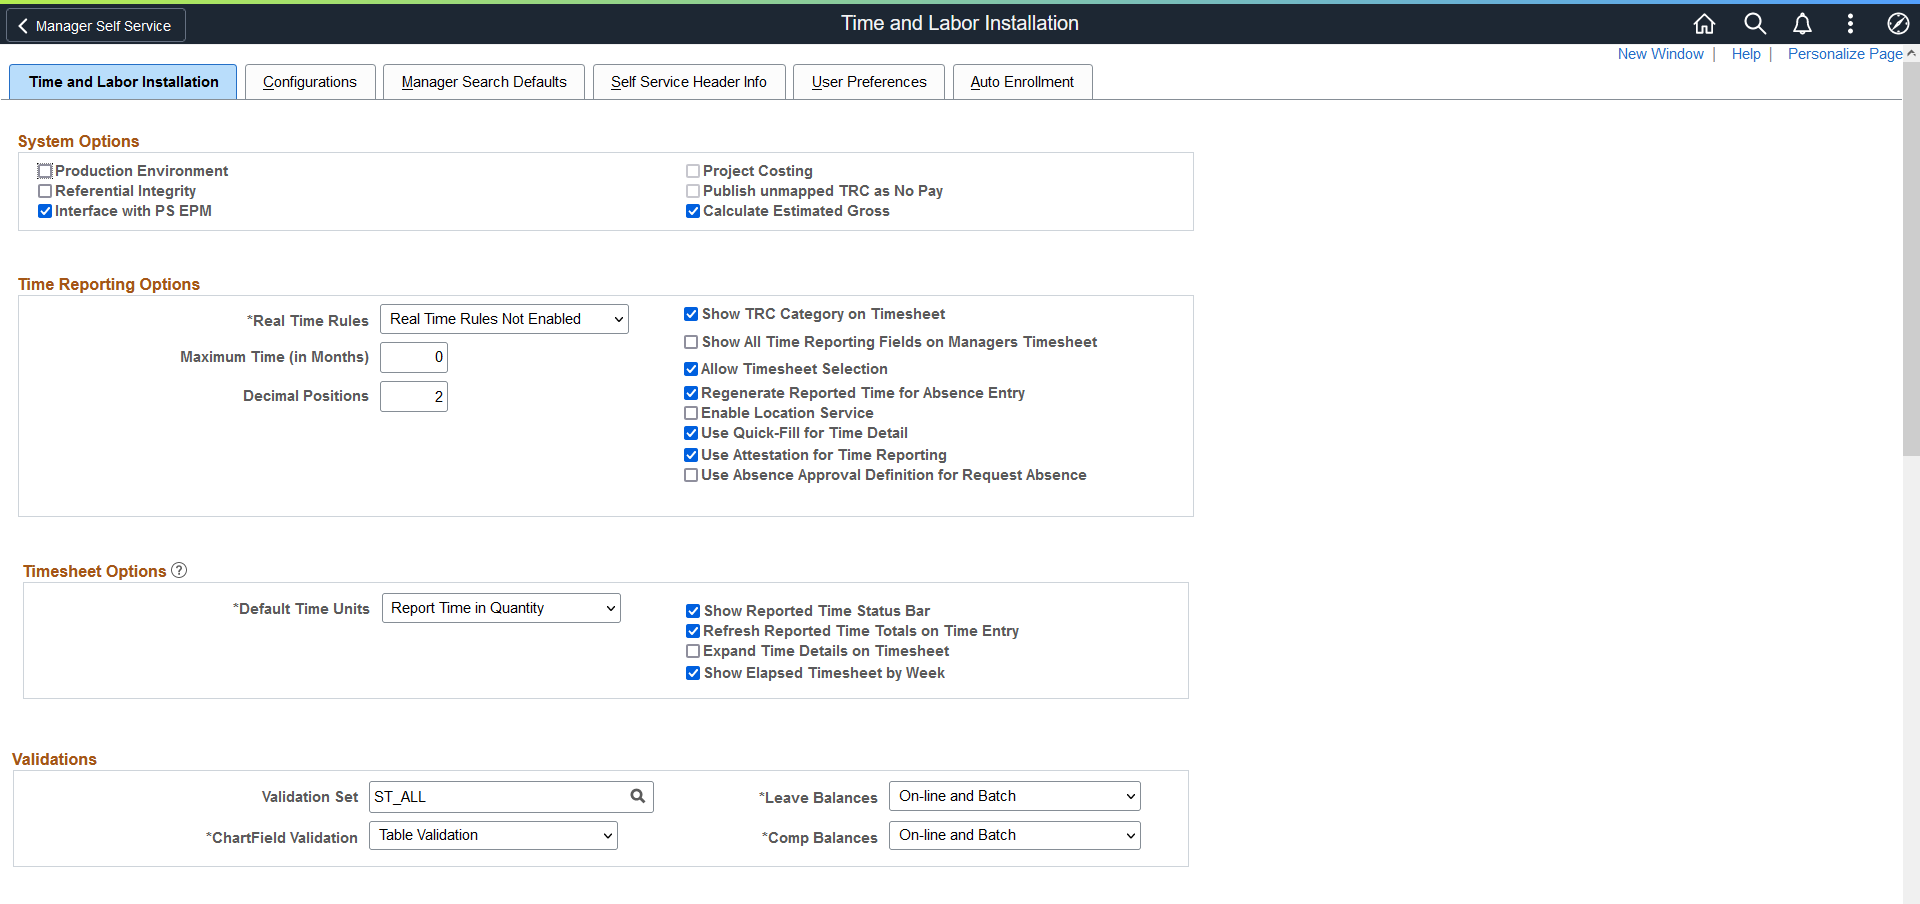
Use the Time and Labor Installation page (TL_INSTALLATION) to set up general system defaults and to activate specific features for your Time and Labor application.
Navigation:
This example illustrates the fields and controls on the Time and Labor Installation page. You can find definitions for the fields and controls later on this page.
This example illustrates the fields and controls on the Time and Labor Installation page. You can find definitions for the fields and controls later on this page.

This example illustrates the fields and controls on the Time and Labor Installation page. You can find definitions for the fields and controls later on this page.
System Options
Field or Control |
Description |
|---|---|
Production Environment |
Select to indicate that the system is no longer in a testing environment. Use this check box to test the production functionality with the ability to change task templates and rules, and to understand exactly how the system responds in production. |
The following table describes how certain processes function when the Production Environment check box is selected or cleared.
|
Process
|
What Happens When the Production Environment Check Box Is Cleared or Selected |
|---|---|
|
Task Templates |
Cleared: You can change your task template elements to required, optional, or not used. These changes are allowed, but if you have live data already reported to a template, the resulting tasks may be invalidated, and there will be no validation to catch these errors. Selected: You can change the task template by adding optional task elements or changing required elements to optional. |
|
System Date/TL Security |
Cleared: You can select the system date so that it appears on the Row Security Permission List page. This option enables a testing environment in which various users access the same database and enter different system dates to test different time frames. Selected: The System Date field does not appear on the Row Security Permission List page. |
|
Rule Objects |
Cleared: All rule objects can be changed. Selected: No rule objects can be changed. |
Field or Control |
Description |
|---|---|
Project Costing |
Select this field if you will interface Time and Labor with Project Costing. |
Referential Integrity |
Cleared: No referential integrity processing for changes to effective-dated tables. Normally, this involves reevaluating reported and payable time, and creating exceptions for all affected time. Selected: Referential integrity processing occurs as necessary. Note: During non-production times, the system doesn't need to perform referential integrity checks because setup tables will change often, and the reported time is not real. The Referential Integrity Flag controls whether there are inserts in the RI_CNTRL_TBL, when a change occurs to an effective dated setup table. The rows in the RI_CNTRL_TBL are then read when the system runs the Time Administration process. This typically involves creation of exceptions for all reported time effected by the change. This flag has no dependency on the Production Environment Flag. |
Publish unmapped TRC as No Pay |
Two processes use this check box so set the payable time status to No Pay (NP):
If selected, this option creates Time and Labor No Pay Actuals rows in PS Projects. |
Interface with PS/EPM |
Select this field if you will interface Time and Labor with PeopleSoft Performance Management. |
Calculate Estimated Gross |
Clear for the system to not calculate estimated gross for all instances of time. This check box is selected by default. If you clear this check box, all future instances of time lack the estimated gross calculated during the Time Administration process. If there is payable time with estimated gross attached that you don't want, rerun the Time Administration process. You can view the estimated gross by TRC for the time reporter by accessing the Payable Time pages. After a payroll is run, the system distributes the actual gross back to Time and Labor during the Labor Distribution process. For example, you may want to bill estimated costs before the pay cycle. Use the estimated grosses to book the estimated costs ahead of time. When the actual dollars from the Labor Distribution process are posted, you can reverse the estimates and replace them with the actual amounts. |
Time Reporting Options
Field or Control |
Description |
|---|---|
Real Time Rules |
Select an option to enable the online rules feature. This feature enables you to define online rules and launch an online process (from the Timesheet page) that immediately applies the rules to a time reporter's time. The options are:
Note: On the Timesheet page, if the user clicks the Apply Rules button, the user is taken to the Payable Time Details page. If there is no payable time created, and if there are exceptions, the user is taken to the Exceptions page.Apply Rules are not for Fluid User Interface. |
Maximum Time (in Months) |
The system uses the value in this field as an upper limit when comparing the starting date specified on a Timesheet and the Earliest Change Date (ECD) for a time reporter. If the time period that the user wants to process is too long, meaning that the ECD is older than the value specified in this field, the system disables the Apply Rules button This can prevent unacceptable system response times when retroactive changes force the system to recalculate a large volume of Payable Time. To change this situation, the user can change the date on the Timesheet to a prior period and bring the ECD forward incrementally, or the time administrator can run the Time Administration process to move the ECD forward. |
Show TRC Category on Timesheet |
Select to display TRC categories in the Reported Hours Summary on the Timesheet page |
Show all Time Reporting Fields on MGR Timesheet |
Select to determine if all the time reporting fields appear on the Manager Timesheet, or only the fields that are selected on the Time Reporter's time reporting template. |
Allow Timesheet Selection |
Select to enable the user to transfer between the Elapsed and Punch Timesheets. |
Update Reported Hours on Entry |
Select to enable the real time update of reported hours on entry, in time entry pages. |
Decimal Positions |
Display the entered number of decimals for the Timesheet pages. Used in the PeopleSoft Fluid User Interface Report Time screen to display the entered number of decimals for the Timesheet, Report Time and Report Leave pages. |
Regenerate Reported Time for Absence Entry |
If selected, when absence entries are reported or approved, the system regenerates reported time based on the employee's schedule (Reported Time source is SCH) so that the sum of reported absence and work time from other sources equals the number of scheduled hours for a day. This check box functions in conjunction with the Create Partial Work Hours check box on the Workgroup Defaults page in Time and Labor. If this check box is selected and the Create Partial Work Hours check box is cleared, the system uses full day absence logic when generating time. If the Create Partial Work Hours check box is selected and this check box is cleared, there is no impact on reported time. Select to specifically mention only Absence Management Time Reporting Codes. Time Reporting Codes designated as Leave Taken are not considered as Absence type codes and payable time is not created to complete the schedule. For Example, If TRC defined as Leave Taken is reported as 3 hours on a day the employee is scheduled for 8 hours; only 3 hours would be paid. In order to make the employee whole, you need to also report 5 hours of regular time along with the 3 hours of Leave. Cleared: No referential integrity processing for changes to effective-dated tables. Normally, this involves reevaluating reported and payable time, and creating exceptions for all affected time. Selected: Referential integrity processing occurs as necessary. Note: During non-production times, the system doesn't need to perform referential integrity checks because setup tables will change often, and the reported time is not real. The Referential Integrity Flag controls whether there are inserts in the RI_CNTRL_TBL, when a change occurs to an effective dated setup table. The rows in the RI_CNTRL_TBL are then read when the system runs the Time Administration process. This typically involves creation of exceptions for all reported time effected by the change. This flag has no dependency on the Production Environment Flag. Note: The default setting for this option is cleared. The workgroup check box setting of Create Partial Work Hours for Partial Absence is also specific only to absence management TRC's. |
Enable Location Services |
Check box to capture employee location when time is reported, provided the employee accepts the use of location services. This is only for Fluid User Interface and not applicable for timesheet. |
|
Use Quick-Fill for Time Detail |
Select to use the Quick fill facility. Note: This option is available only when the quick fill is allowed at both the installation and workgroup level. By default, both Show Reported Time Status Bar and Use Quick-Fill for Time Detail are unchecked. |
|
Use Attestation for Time Reporting |
Enable attestation for time reporter. Note: By default, this option will be unchecked. Select this option if you want the users to attest their time. This option will work in conjunction with the acknowledgement options set up under employees Workgroup Timesheet Controls, Employee Signature Acknowledgement ID. For more details, refer Setting Up the Acknowledgement Framework. |
|
Use Absence Approval Definition for Request Absence |
Enables a newly added absence route for approval as per the approval definition ID set for that absence in Absence Management. |
Note: The Learning Management field on the Products page (Set Up HCM, Install, Installation Table), needs to be selected, in order for the user to view LM training data icons in Manage Schedules, Monthly Schedules and Calendars.
Timesheet Options
Field or Control |
Description |
|---|---|
Default Time Units |
Select one among the following options to enter time:
Note: This option controls how the time is entered and viewed on the Enter Time page. This option will not have any impact on how the time is stored and processed. |
Show Reported Time Status Bar |
Select to display the status bar for Enter Time and View Time Summary pages. Status bar displays for each day if there is schedule configured. Use the User Preferences tab to control the default color settings for this option. |
Refresh Reported Time Totals on Time Entry |
Select to enable the immediate update of reported hours on entry in both Employee and Manager Self Service pages. If not selected, the reported hours and status bar will not be updated until the time is either saved or submitted. |
Expand Time Details on Timesheet |
Select to view the time detail values inline in the Timesheet pages for Time Administrators, Managers and Employees. This applies in both view and edit modes for punch and elapsed time reporters. When unselected, the time details are shown under the Time Details icon. For more details on Employee Self Service pages, refer Enter Time Page for Elapsed Time Reporter and Enter Time Page for Punch Time Reporter. For more details on Manager Self Service pages, refer Time Detail values inline for Punch Time Reporter under Select Employee Page and Time Detail values inline for Elapsed Time reporter under Weekly Time Entry page. To know more about Expand Time Details on Timesheet, watch this video: Video: Image Highlights, PeopleSoft HCM Update Image 34: Fluid Timesheet Fluid Details Display. |
|
Show Elapsed Timesheet by Week |
Enables the timesheet to display days paginated as weeks for time periods greater than weekly. Deselecting this option will display all the days for the chosen time period in a single view. Note: By default, this option will be checked |
Validations
Field or Control |
Description |
|---|---|
Leave Balances |
Select On-line Only for the system to validate leave balances only when entered during online processing. Select Batch Only for the system to validate leave balances only during batch processing of rules or validating time. Select On-line and Batch for the system to validate leave balances during online and batch processing. Select None for the system not to validate leave balances. If you change the validation option, all time processed prior to the change may need to be reevaluated as leave balances have been processed and exceptions created. |
Compensatory Balances |
Select On-line Only for the system to validate compensatory balances only when entered during online processing. Select Batch Only for the system to validate compensatory balances only during batch processing of rules or when validating time. Select On-line and Batch for the system to validate compensatory balances during online and batch processing. Select None for the system not to validate compensatory balances. If you change these values, all time processed prior to the change may need to be reevaluated as compensatory time has already been processed, and exceptions will be created. |
Validation Set |
Select the validation ID to determine the validation definitions that will run during the Time Reporting validation process. This validation process is triggered by the Submit Time process and during the Referential Integrity process. The system delivered validation sets are ST_ALL, ST_TA and ST_SUBMIT. |
Chartfield Validation |
Select Table Validation for the system to validate Chartfields against the VALID_COMBO_TBL directly within HCM. Select Sync Message for the system to validate Chartfields by messaging the FMS database. Select None for the system not to validate Chartfields. |
Time Administration Options
Field or Control |
Description |
|---|---|
Max Employees in a Batch (maximum employees in rules run) |
Enter the number of employees for the system to process at a time when running rules (Time Administration process). The number controls system performance during batch processing. The default value is 100. Note: Set this value as high as necessary, as long as your database is capable of handling a higher volume per batch. High values create fewer batches during the Time Administration process and system performance improves due to a reduction in TL_TA000410 loops during the Time Administration process. |
Continue with Exceptions |
Select to enable the system to continue to run the process when exceptions are encountered. The system generates payable time for the employee, except for the days with high severity exceptions. This means that for a high severity exception, the system generates the exception and does not generate payable time for the impacted reported time. For any other exceptions, the system generates the exception and continues to generate payable time for the impacted reported time. Clear the field to indicate that when the system encounters any exception, no payable time is generated for the impacted reported time. |
Include All Jobs |
Select to process all employee record (Empl_RCD) numbers for the Employee ID, if the TA status and ECD are ready for processing. This selection overrides any Employee Record numbers specified on the Request Time Administration run control page. Employee Record numbers in different workgroups are processed in different batches. Clear this field to process the Employee Record numbers specified on the Request Time Administration page or all of the Employee Record numbers in the same workgroup as the Employee Record numbers listed on the Request Time Administration page. Employee Record numbers in the same workgroup are processed in the same batch. |
Smart Delete Threshold |
Use this impacted rows to determine whether to use truncate or delete. The default value is 3000. |
Smart Update Stats Threshold |
Use this impacted rows to determine whether to use Update stats or not. The default value is 3000. Note: The Smart Delete Threshold and Smart Update Stats Threshold should be set to 1000 for the customised template based rules to work. Smart batches of employees benefit by decreased runtime in TL rules processing. |
Run As Part Of Submit Time |
Check this option to determine whether the Time Admin needs to run when Time is submitted through the Timesheet. |
Use Effective Dated Value List |
Select to add Effective Dating to value lists for use in rule templates and keep the original tables in place for all other value list functions. |
Understanding the Identity Column
To determine the correct number of temporary table instances for the TL_TA_RESEQX record, you have two options:
You validate the Instance Count value on the TL_TIMEADMIN Application engine program, Properties folder and add that to the number of Temp Table instances (Online) defined on the PeopleTools Options page, or
Open the Application Designer and create the TL_TA_RESEQX table using the Build SQL Script option. This option creates the script to build the required number temporary table instances.
If you are using the first option above of determining the number of temp table instances, then use the script below for building each temp table instance. For each temp table instance, replace the temp table number for "n" in the script. For PS_TMP_TS and PS_TMP_TSIDX, replace with your appropriate tablespace and index tablespace, respectively, for the table TL_TA_RESEQX.
This displays the Base table of the TL_TA_RESEQX record.
DROP TABLE PS_TL_TA_RESEQXn;
CREATE TABLE PS_TL_TA_RESEQXn (PROCESS_INSTANCE DECIMAL (10) NOT NULL,
   EMPLID CHAR (11) NOT NULL,
   EMPL_RCD SMALLINT NOT NULL,
   DUR DATE,
   SEQ_NBR DECIMAL (15) NOT NULL,
   SEQ_NBR1 DECIMAL (15) GENERATED ALWAYS
      AS IDENTITY
      (START WITH 1,
         INCREMENT BY 1,
         CACHE 72000,
         MINVALUE 1,
         MAXVALUE 10080000),
   TRC CHAR (5) NOT NULL,
   TL_QUANTITY DECIMAL (18, 6) NOT NULL) IN PS_TMP_TS INDEX IN PS_TMP_TSIDX
 NOT LOGGED INITIALLY;
COMMIT;
CREATE UNIQUE INDEX PS_TL_TA_RESEQXn ON PS_TL_TA_RESEQXn
 (PROCESS_INSTANCE,
   EMPLID,
   EMPL_RCD,
   DUR,
   SEQ_NBR,
   SEQ_NBR1);
COMMIT;
If you are using the second option above, Building SQL Script to create the table then you would alter the generated script as follows:
Replace SEQ_NBR1 references with:
SEQ_NBR1 DECIMAL (15) GENERATED ALWAYS
      AS IDENTITY
      (START WITH 1,
         INCREMENT BY 1,
         CACHE 72000,
         MINVALUE 1,
         MAXVALUE 10080000)
This change ensures the creation of the SEQ_NBR1 field as an Identity column for TL_TA_RESEQX.
Payroll Related Options
The setting in this group box affects integration between Time and Labor and Payroll for North America.
See Configuring Time and Labor for Use with Payroll for North America.
Field or Control |
Description |
|---|---|
Number of Months to Process |
Enter the maximum number of months that the Load Time and Labor process will look back for prior adjustments. Enter the number of prior months of data to process during the loading. The number entered must not be negative, or else a error message would be generated. For example, if current date is 6/30/03 and the user entered 3 to the field, it will go back to 3/30/2003 on the Frozen Date field to load payable time to Payroll. |
Process Prior Paygroup Time with Current Paygroup |
This check box controls how Payable Time is loaded into paysheets when a Prior Period Adjustments (PPA) exists and the employee had a pay group change. For example, an employee transferred from pay group 1 to pay group 2 on September 1. When payroll is run on August 31, all Payable Time is loaded up to August 31 and the employee has one check in pay group 1. When payroll is run on September 30, all Payable Time in September is loaded and the employee has one check in pay group 2. Then, a prior period adjustment (PPA) occurs for the August pay period:
|
Concurrent Load Time and Labor Runs |
Select this check box if you run the Time and Labor Load processes concurrently (that is, multiple Load processes are run simultaneously). Clear this check box if the Time and Labor Load process is never run concurrently. |
Concurrent Load Time and Labor Cleanup |
Set this field using the following criteria:
|
Set Ignore Status for Not OK to Pay |
This check box defines the payable time status code and reason codes that Time and Labor sets during the Distribution Dilution process when a no pay other earning or pay earning are processed:
The default setting for this option is selected. |
Note: The Payable Time rows, that are in ignore (IG) status, generate offsets in all cases. When the original row was processed under North American Payroll, the negative row will be generated directly by Time Administration in Ignore status. This addresses any over or underpayment issues and thus properly create offsets as usual for a Global Payroll user.
TCD File Integration
Field or Control |
Description |
|---|---|
Outbound File Directory |
Enter the directory path for the TCD outbound flat files created by Integration Broker. These files are sent to your time collection device. Your path must end with a backslash (\). This directory is for flat file TCD integration only. |
Inbound File Archive Directory |
Enter the path for the TCD inbound flat file data to be archived after the inbound file process reads the data. Your path must end with a backslash (\) for successful creation of the flat file. This directory is for flat file TCD integration only. |
Max Punches in a Batch |
Enter the maximum size of each batch of incoming messages from a TCD server for use with the PUNCHED_TIME_ADD service operation. The value in this field only affects the batch size of messages when you activate the PUNCH_ADD_DAEMON service operation handler. This field is only available after you have activated the PUNCH_ADD_DAEMON handler. See Incoming Service Operations from the TCD Server to the PeopleSoft Server. |
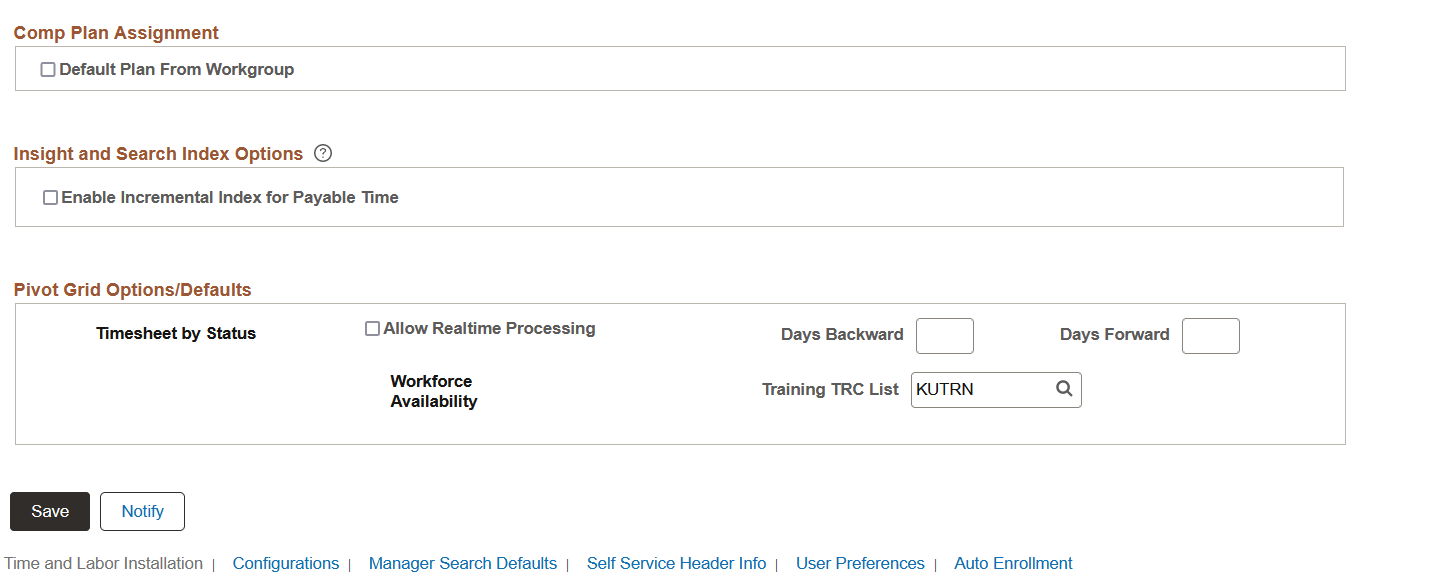
Comp Plan Assignment
Field or Control |
Description |
|---|---|
Default Plan From Workgroup |
Select for the system to automatically populate the Comp Plan Enrollment page with the compensatory plan associated with the workgroup of a time reporter. If you select this check box, you can't:
The compensatory plan is controlled by the association of the workgroup to the time reporter. You can alter the compensatory plan association for the time reporter in two ways:
The system will automatically update the compensatory plan association accordingly. If you don't select this check box, you can enter any number of rows on the Comp Plan Enrollment page and inactivate any of the compensatory plans. You can't delete a row on the Maintain Time Reporter data page if it inactivates an association to a compensatory plan. Inactivate the association of the compensatory plan to the time reporter on the Comp Plan Enrollment page; then delete the row on the Maintain Time Reporter Data page. Important! You can only change this option once. The system doesn't enable changing this value back and forth because:
|
See the product documentation for PeopleTools: PeopleSoft Application Designer Developer's Guide and
Insight and Search Index Options
|
Field or Control |
Description |
|---|---|
|
Enable Incremental Index for Payable Time |
Select this option to enable the Incremental Search for Payable Time. Note: This option requires database triggers, therefore ensure database triggers are created. Contact your database administrator to implement triggers on the database. |
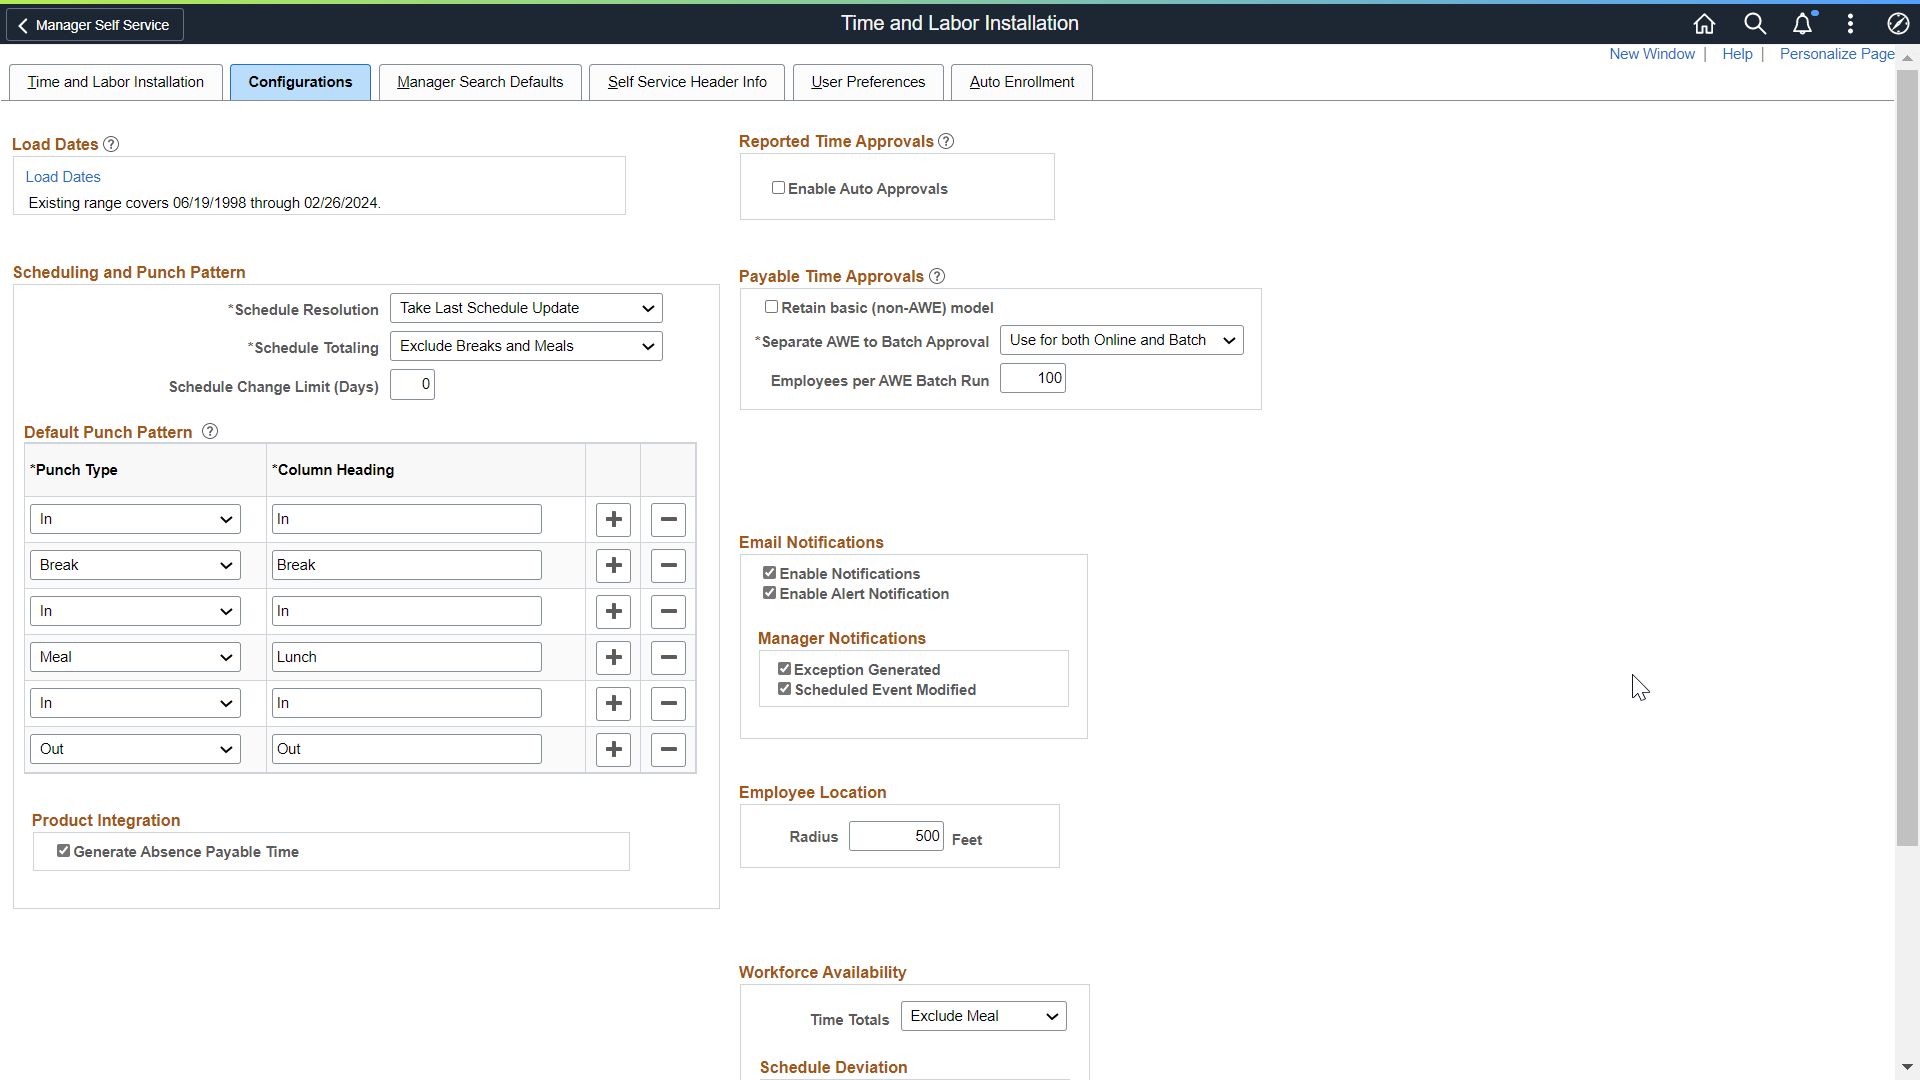
Use the Configurations page (TL_INSTL_PUNCH) to set up schedule total options, schedule resolution options, and punch pattern defaults for your Time and Labor application.
Navigation:
This example illustrates the fields and controls on the Configurations page. You can find definitions for the fields and controls later on this page.
Important! This page (TL_INSTL_PUNCH) is the same as the Schedule Settings Page for Global Payroll and Absence Management. The settings that you define on this page are shared between Time and Labor, Global Payroll, and Absence Management.
Load Dates
Field or Control |
Description |
|---|---|
Load Dates |
When you click this link, the system accesses the Dates Table Load page, where you can determine the range of dates to use for time-reporting and scheduling purposes. When loading the number of years for processing prior, current or future time, keep the years in sync with the years loaded in the Time Zone Offset table. |
Scheduling and Punch Pattern
Warning! Be careful to create a punch pattern that makes sense, without the same punch type in a row.
Field or Control |
Description |
|---|---|
Schedule Resolution Options |
This field specifies how to resolve schedule changes. If the Take Last Schedule Update field value is selected, whether the last schedule update is from a workforce scheduling third-party system, or an online override, the system will take the last update to resolve the employee's schedule. If the Take Online Override field value is selected, the system will look for an online schedule override for resolving the schedule for the day, if an override exists. The system will not look for any changes from a third-party workforce scheduling system. |
Schedule Totaling |
Use this option to configure whether meal and/or break times are included in Scheduled Hours totals on schedule definitions, and shift definition and Manage Schedules. Valid values are Exclude Meals and Breaks, Include Breaks, Include Breaks and Meals, Include Meals. The default is Exclude Meals and Breaks. |
Schedule Change Limit (Days) |
Enter days in number for setting the schedule change limit. The schedule change limit value is set as three digits number. Note: If the default installation setting is set 0, then the schedule change is not applicable. This means that the manager should be able to make retroactive schedule changes without any limitation on Manage Schedule and Assign schedule pages. Managers will not be able to make schedule changes beyond the limit set at the installation level. This validation is only for Managers. For Administrators, there is no restriction in changing the schedule anytime in the past. |
Default Punch Pattern |
For the Time Reporting and Scheduling pages, set up the punch pattern you require to be defaulted. A total of ten punches can be entered. A label can also be specified for each punch type row. The default punch pattern set here also defaults to the Time Reporting Template page. On the Time Reporting Template page, you can override the Installation Table settings and establish a different punch pattern for specific groups of punch time reporters, rather than for all punch time reporters. Important! Be sure not to create the same punch type successively, check the order of your punch types. |
Product Integration
Field or Control |
Description |
|---|---|
Generate Absence Payable Time |
Select the check box to enable administrators to generate absence payable time directly to Time and Labor. If you deselect this check box, the Generate Absence Payable Time Page doesn’t display any absence management calendars and it’s related buttons/links. |
Reported Time Approvals
Field or Control |
Description |
|---|---|
Enable Auto Approvals |
Auto Approvals for Enter Time Punch and Elapsed Pages. Any Time Entered by the Manager on behalf of their employees should be auto-approved for this approval level if the following conditions are met:
|
Payable Time Approvals
Field or Control |
Description |
|---|---|
Retain Basic (non-AWE) Model |
Select to retain a simpler security based model for approving payable time, rather than implement the Approval Framework for payable time. This means that a manager’s access and ability to approve a time reporter’s payable time is based on the same security that grants the manager access to view and modify the person’s time. |
|
Separate AWE to Batch Approval |
Select the required option to setup the AWE processing of Time Admin can either be set up as a separate process for Batch, Batch and Online or Normal AWE, while maintaining all current Time Admin processing. |
|
Employees per AWE Batch Run |
Number of employees per AWE Batch Run. Setting the Employee per AWE Batch Run creates groups or batches of employees per AWE run. These runs are concurrent depending on how many concurrent processes can be handled by the process scheduler. |
Email Notifications
Field or Control |
Description |
|---|---|
Enable Notifications |
Choose this field specify the use of email notifications. |
Manager Notifications
Field or Control |
Description |
|---|---|
Exception Generated |
Select this option to generate an email to a manager if exceptions are generated when:
|
Schedule Event Modified |
Select this option to generate an email to a manager if an external schedule event is updated or deleted. (This will be triggered with updates from Enterprise Learning Management, if the user is utilizing this application with Time and Labor). |
Note: Oracle PeopleSoft delivers Notification Composer Framework to manage the setup and administration of all notifications in one central location.
Once you have adopted the Notification Composer feature, you must use it to create new notifications and manage your existing notifications.
Notifications delivered with HCM Image 47 or later must use Notification Composer.
For more information about Notification Composer Framework, see Understanding Notification Composer.
Note: In order for a batch process to insert a URL in an email notification to a manager, the following setup needs to be completed for the database local node. This determines the portal and node used for this process.
On the Portal page in the Nodes (IB_NODE) component, ensure that the Content URI Text and the Portal URI Text fields are populated as per the format displayed on the screen.
See PeopleTools Portal Technologies PeopleBook, Configuring the Portal Environment
Employee Location
When employees report time and have accepted the use of location services in the device which they use, and your organization has licensed and enabled Oracle Maps Service for PeopleSoft on the Installation Table - Third Party/System Page, their location displays on a map on the Reporting Location page. For situations where a single employee is reporting time at the same location a few feet apart, the installation setting groups the reported time into a single marker on the map.
Field or Control |
Description |
|---|---|
Radius |
Specify a radius in feet where multiple time reports in that radius are grouped into a single marker. The default setting will be 500 feet. With these settings, any reported time or elapsed time reported within 500 feet are considered as the same location. |
Note: The map display functionality shown in the HCM features requires a separate license to Oracle Maps Cloud Service for PeopleSoft. For details see the Licensing Information User Manual (LIUM).
Workforce Availability
Field or Control |
Description |
|---|---|
Time Totals |
There are two possible values for Time Totals: Exclude Meal: This is the default value for this field. When this value is selected, Meal duration is excluded while calculating the Total Scheduled/Reported hours for an employee displayed in the right panel Include Meal: When this value is selected, Meal duration is included while calculating the Total Scheduled/Reported hours for an employee |
Schedule Deviation |
Select check boxes for Schedule Deviation ranging from Early In, Early Out, Meal, Late In and Late Out.
|
See Also
See the product documentation for:
PeopleTools: PeopleCode API Reference
PeopleTools: Workflow Technology
PeopleTools: System and Server Administration
Use the Dates Table Load page (TL_DATE_LOAD) to load dates into your Time and Labor system when you implement the system and each time you approach the end of the load period.
Navigation:
Click the Load Dates link on the Configurations page.
This example illustrates the fields and controls on the Dates Table Load page. You can find definitions for the fields and controls later on this page

Field or Control |
Description |
|---|---|
Years |
Enter the number of years for the system to load into the database. The system will enter the dates for the number of years you entered, backward and forward. For example, if you entered 2, the system would load two years backward and two years forward. The maximum number of years to enter is 10. Important! Towards the end of the period you specify, be sure to load the next set of dates. |
Load Dates |
Click to load dates into the TL_DATES_TBL and create data in the TL_TA_OFFSET record. |
Return |
Click to return to the Configurations page. |
The Load Dates link populates years of dates into two tables.
The first table is TL_DATES_TBL, which populates years of dates for schedule resolution, and determines the date display while reporting time in the Time and Labor Timesheet. Global Payroll, Absence Management and Time and Labor uses the Schedule resolution process. Based on the number of years entered, the system populates that number of years prior to the current date, and after the current date.
The second table populated is TL_DSTOFFSET for Daylight Savings, which is used in Time Administration for Time and Labor. The system uses this table to calculate the duration of the transition times that occur at the beginning of daylight savings or at the ending of daylight savings per time zone.
Finally, the table, PSTZOFFSET is populated from the Time Zone Query Offsets function from the Time Zones page, and is also used in Time and Labor's Time Administration process, as well as the Scheduling process. The system uses PSTZOFFSET to convert the base time zone into the reported or scheduled time zone. (Refer to Tools page for Time Zone Query Offsets.)
All three tables, TL_DATES_TBL, TL_DSTOFFSET and PSTZOFFSET should be in sync with each other, with regards to the years loaded.
Use the Manager Search Defaults page (TL_INSTL_MSS_DFLT) to set up manager selection criteria fields and options that will be used for returning employee lists for all Time and Labor manager self-service pages.
Navigation:
This example illustrates the fields and controls on the Manager Search Defaults page. You can find definitions for the fields and controls later on this page

This page is used by managers and time administrators to set defaults that display on the Manager Search Options – Select Default Criteria and Options page. The Manager Search Options page is used for the various manager functions, to provide a consistent interface in which managers and administrators can easily identify, select and navigate through the pool of employees in whom they are interested.
You can establish preferred employee criteria and default values by configuring options on the Manager Search Defaults page. Employee lists can be pre-populated with a subset of a managers overall employee pool, criteria can be changed and data refreshed to expand or contract employee lists. When the employee pool is identified on pages that use the Manager Search page, the list persists throughout the application for easy navigation.
Loading of Matching Employees
Field or Control |
Description |
|---|---|
AutoPopulate Results |
Auto populate the employee list when entering the page. |
Prompt for Results |
Do not automatically populate the employee list, allowing the manager or administrator to review or change criteria values. A button is then selected and the employee list displayed. |
Default Criteria Presentation
Field or Control |
Description |
|---|---|
Show Criteria List Collapsed |
Collapse the Manager Search Criteria group box when entering the Manager Search Options page. |
Show Criteria List Expanded |
Expand the Manager Search Criteria group box when entering the Manager Search Options page. |
Employee Selection Criteria
Use the fields in this region to choose the fields that are displayed in the Search Criteria group box when entering the Manager Search Options page.
Field or Control |
Description |
|---|---|
Include in Criteria |
Select to include this field in the Manager Selection Criteria. When the Manager Selection Criteria is displayed on the Manager Search Options page, this field can be used to filter employee lists. |
Include in List |
Include this field in the employee list that is returned on the Manager Search Options page. You can choose Do Not Include to prevent the display of the specified field in the employee list. For fields that display as a code and have a description on their definition table, you can configure the list display using the following values: Include Code Only, Include Code and Description, or Include Description Only. |
Data Loading in Time Management
Enter the chunk size that you would like the Employee search to load. The system uses this size to determine initial row load and subsequent chunk rows.
Use the Self Service Header Info page (TL_INST_SS_HDRFLD) to define the additional information shown on the Self Service page with the employee name and job title.
Navigation:
This example illustrates the fields and controls on the Self Service Header Info page. You can find definitions for the fields and controls later on this page
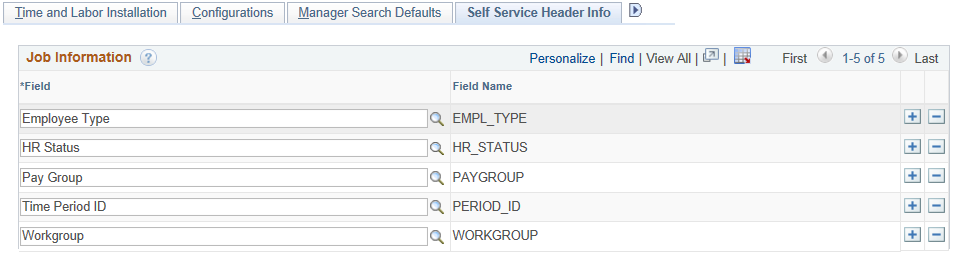
Use this list to define additional information you want to display in the Self Service page headers with the employee’s name and job title. The information is visible on the Self Service page as a pop-up window when the user moves his or her mouse over the employee’s job title.
Use the User Preferences page (TL_INST_TR_PREF) to define default values for the user preferences set within the PeopleSoft Fluid User Interface Time page.
Navigation:
This example illustrates the fields and controls on the User Preferences page. You can find definitions for the fields and controls later on this page.
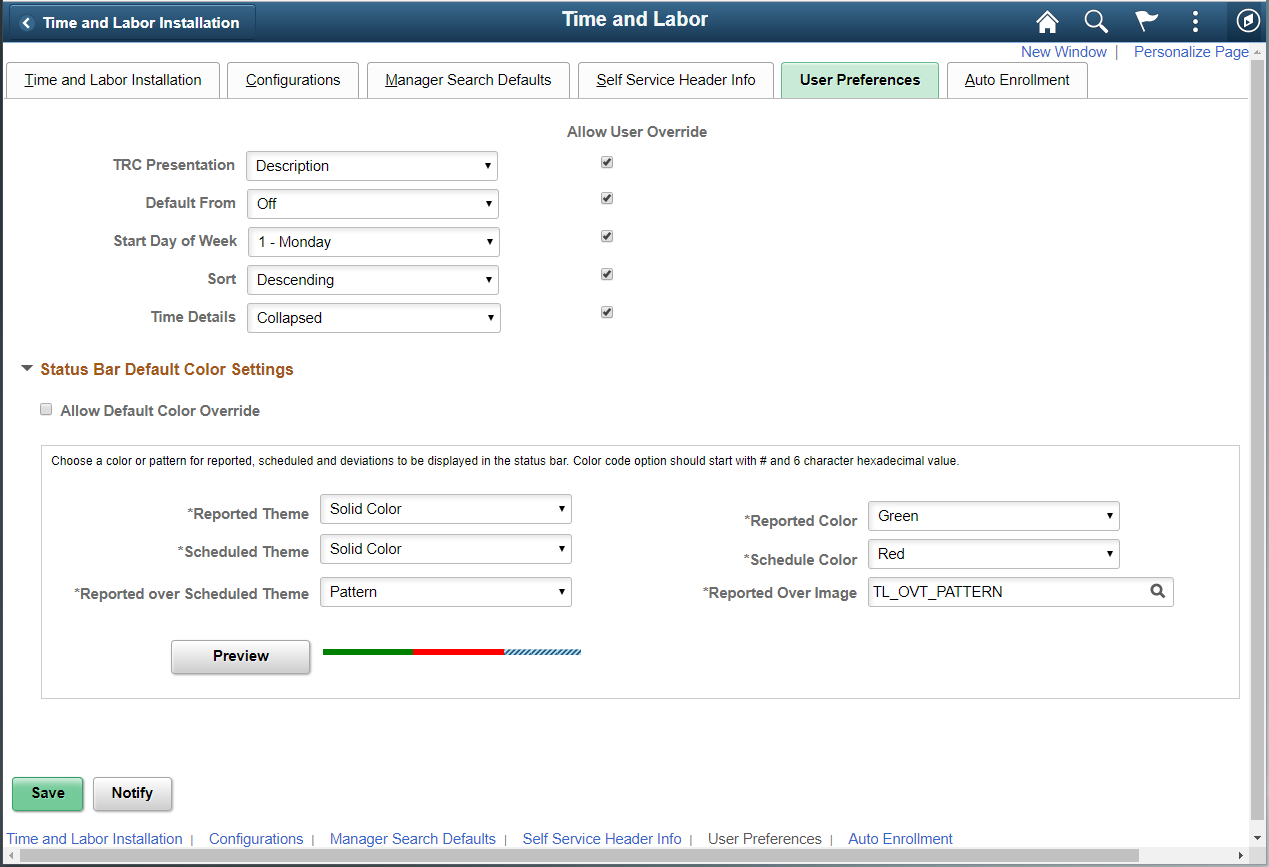
The administrator uses this page to define default user preferences for the PeopleSoft Fluid User Interface Time pages. When granted permission, users can override these options.
Field or Control |
Description |
|---|---|
TRC Presentation |
Select the default option on how TRCs should display on the Select Employee Pageand the Weekly Time Entry pagein the PeopleSoft Fluid User Interface. Options are:
|
Default From |
Select the default option on how to copy elapsed time entry. The options are:
|
Start Day of the Week |
Select the default option on how to display a snapshot of the week by indicating the first day of a work week. |
Sort |
Select the default option on how to display punch time reported entries. Options include:
|
Time Details |
Select the display option that should be provided by default to the user when viewing the Report Time Select Employee Filters pagein fluid. Options are:
|
Status Bar Default Color Settings
Field or Control |
Description |
|---|---|
Allow Default Color Override |
Select this option to override the colors specified here. Users will use the fluid User Preferences page to override the preference set here. |
Reported Theme |
Theme selection for reported theme is given with three options of Solid Color,Pattern, and color code. |
Scheduled Theme |
Theme selection for scheduled theme is given with three options of Solid Color,Pattern, and color code. |
Reported over Scheduled Theme |
Theme selection for Reported over Scheduled Theme is given with three options of Solid Color,Pattern, and color code. |
Reported Color |
Select a color or pattern to display for reported time. |
Scheduled Color |
Select a color or pattern to display for scheduled time. |
Note: If schedule is not configured then the status bar will not show up irrespective of whether reported time color settings are present.
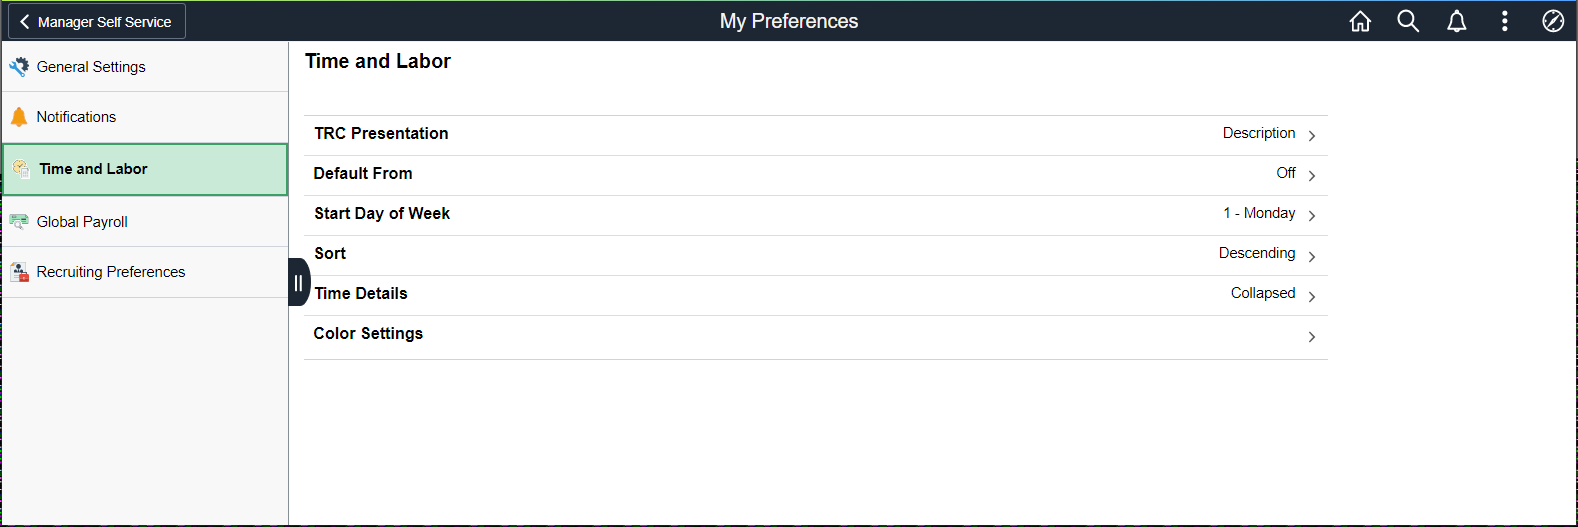
Use the My Preferences for Time and Labor (TL_TR_PREF_FLU) to set the preference for different set ups of Time and Labor.
Navigation:
Select Actions List on the header bar.
Select Time and Labor from the left pane. Select Color Settings from the right pane.
This example illustrates the fields and controls of the My Preferences_Time and Labor page.
This example illustrates the fields and controls of the My preferences_Color Settings page.
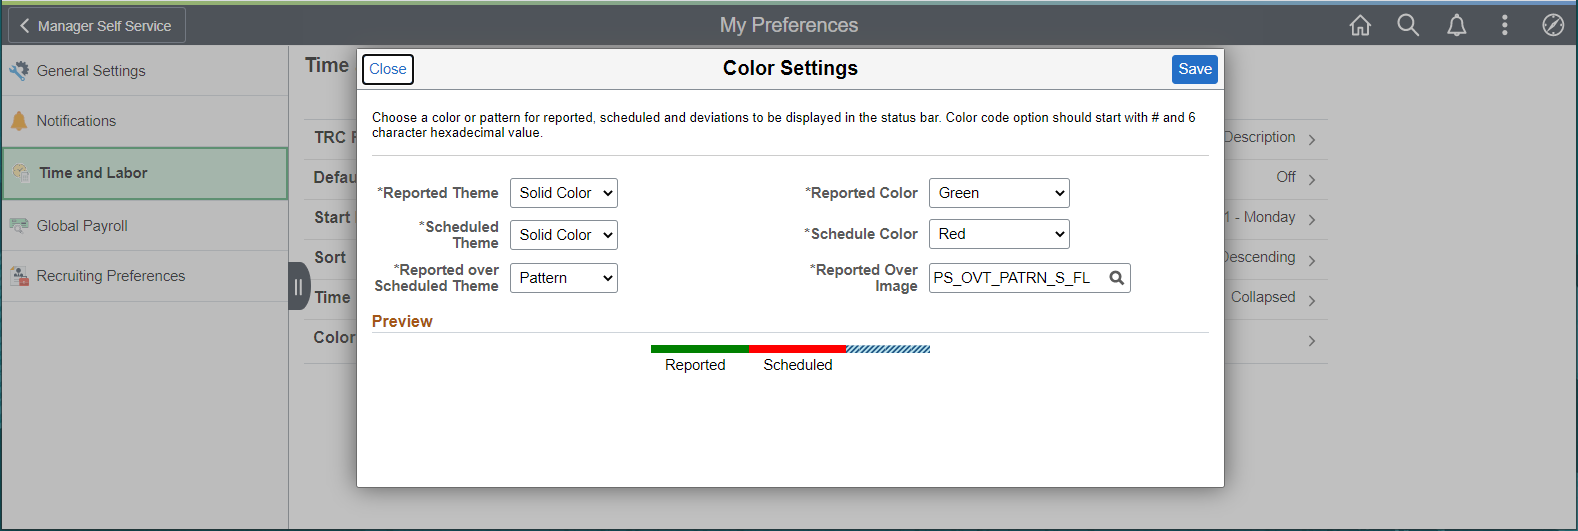
Note: This section will not be available for users if the "Allow Default Color Override" check-box is not selected in the TL Installation option.