Defining Installation Settings
To define installation settings, use the Installation Table (INSTALLATION_TBL), Installation Settings (GP_INSTALLATION), and Countries (GP_COUNTRY) components.
When you install Global Payroll, you select various settings and default values that are specific to your implementation.
|
Page Name |
Definition Name |
Usage |
|---|---|---|
|
INSTALLATION_TBL1 |
Define the PeopleSoft applications installed. |
|
|
INSTALLATION_TBL3 |
Define country-specific information. |
|
|
GP_INSTALLATION |
Define installation settings that are unique to Global Payroll. |
|
|
TL_INSTL_PUNCH |
Define default settings for work schedules. |
|
|
GP_ACTIVAT_SETTING |
Enable and configure feature settings. |
|
|
Dates Table Load Page |
TL_DATE_LOAD |
Load dates for use in resolving schedules. |
|
GP_COUNTRY |
Define country-level setup parameters, such as the net pay validation formula, the default retroactive method, and banking and general ledger processing. |
Use the Products page (INSTALLATION_TBL1) to define the PeopleSoft applications installed.
Navigation:
If your organization also uses PeopleSoft Payroll for North America or PeopleSoft Payroll Interface, select these check boxes as well. You can pay your employees exclusively through Global Payroll or through a combination of payroll applications. For example, an employee who holds three jobs in your organization might be paid for one job through Global Payroll, another through Payroll for North America, and yet another (using a third-party payroll vendor) through a Payroll Interface data export.
To install Global Payroll country extensions, click the Installed GP Countries link on the Products page and select the country extensions that apply.
Use the Country Specific page (INSTALLATION_TBL3) to define country-specific information.
Navigation:
Use the Country field to define the primary country in which your organization does business. This should be the country from which the majority of your payees are paid.
Use the Installation Settings page (GP_INSTALLATION) to define installation settings that are unique to Global Payroll.
Navigation:
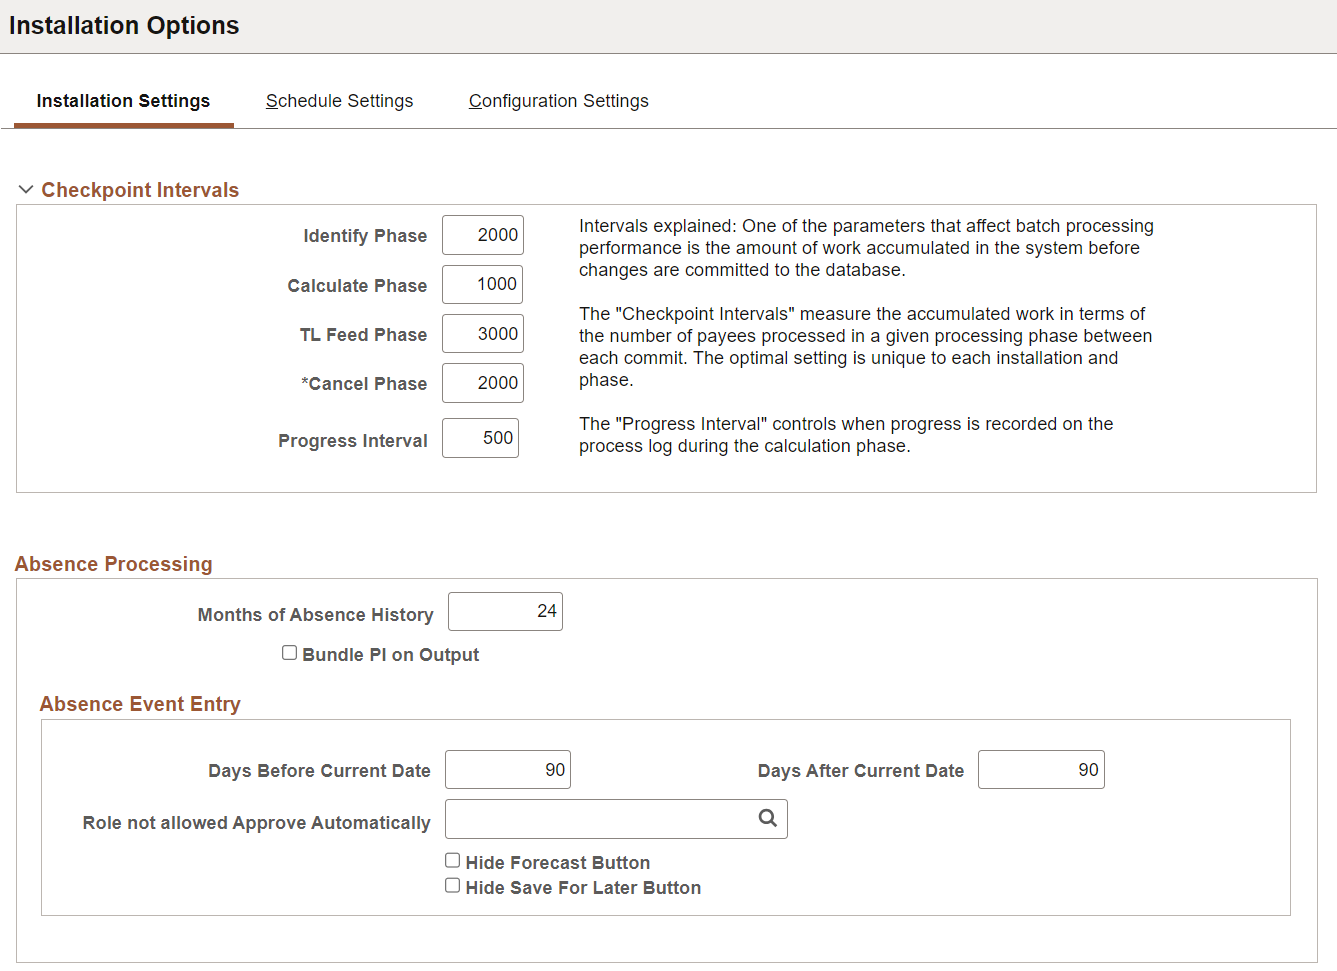
This example illustrates the fields and controls on the Installation Settings page (1of 3).
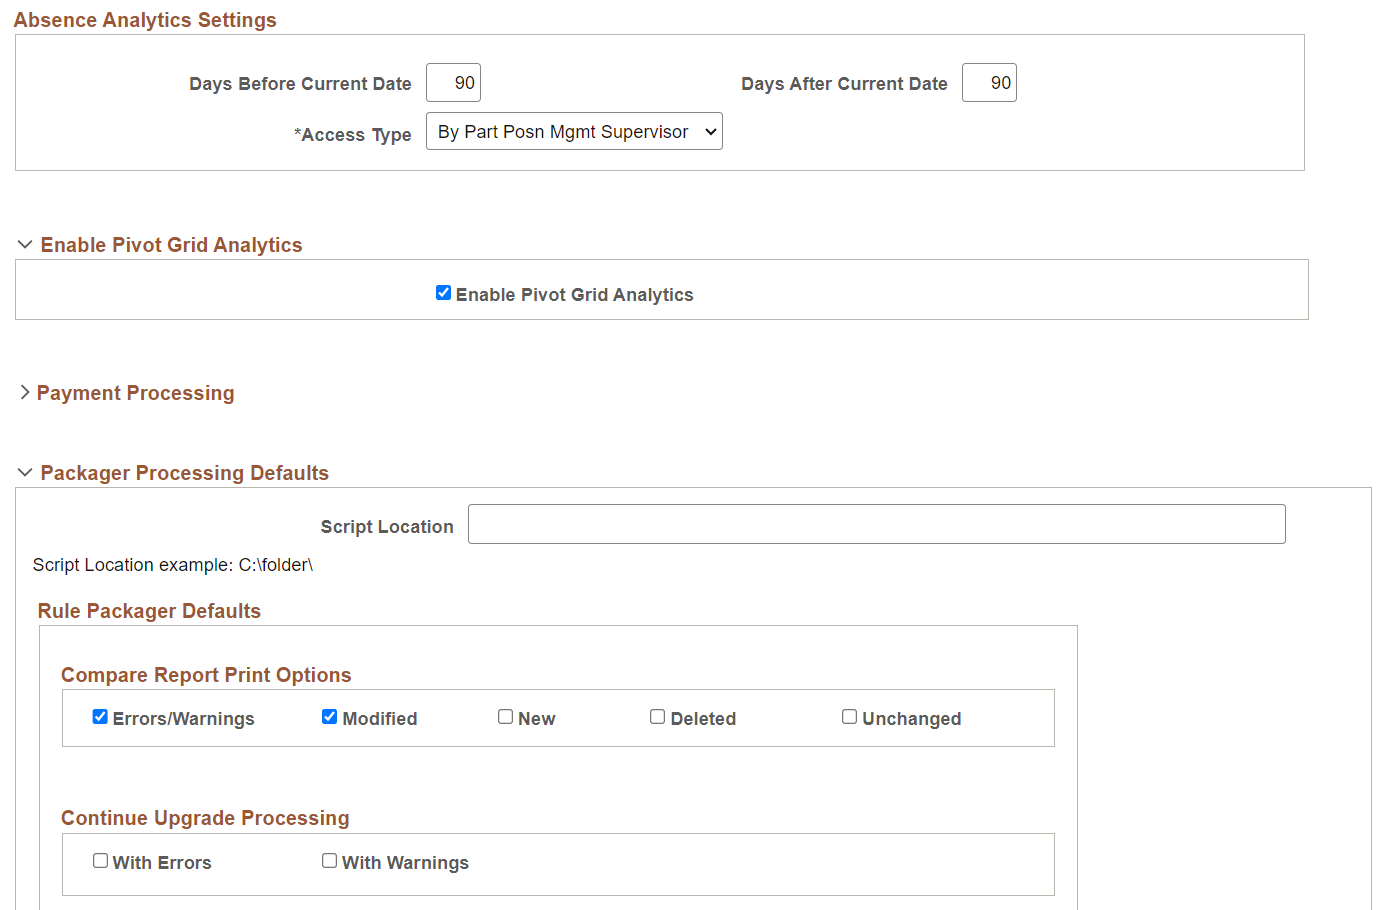
This example illustrates the fields and controls on the Installation Settings page (2 of 3).
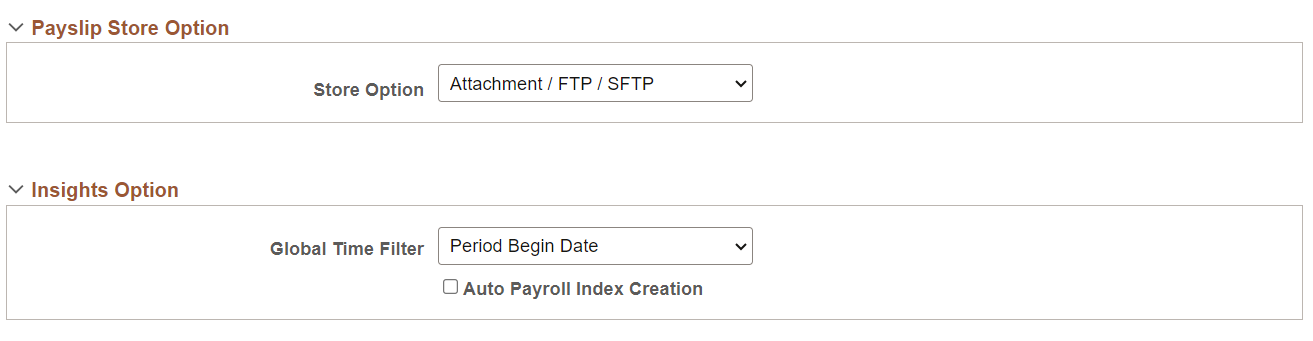
This example illustrates the fields and controls on the Installation Settings page (3 of 3).
Checkpoint Intervals
Checkpoint intervals control how many employees are processed between database commits. You can select a different interval for the identify and calculate processing phases. Employees that are committed do not need to be recalculated if the run has to be restarted because of a technical error.
Field or Control |
Description |
|---|---|
Progress Interval |
Controls how often the process writes a line to the process log stating how many employees have been processed. |
Absence Processing
Field or Control |
Description |
|---|---|
Months of Absence History |
Controls how many months of absence daily history to load into the batch process for use with the absence take element processing and duration element. The absence daily history is loaded from the result table, GP_RSLT_ABS. |
Bundle PI on Output (bundle positive input on output) |
Selecting this check box causes the system to consolidate positive input during the absence process, when possible, so that you can send a single row of positive input to payroll. Positive input entries for the same absence event that share the same percent and rate are combined; the unit, amount, and base values are summed In other words, the bundled generated positive input rows will be output from the absence process instead of daily rows. This is a consideration when considering the size of data storage for the generated positive input result table. Keep in mind, the daily earning/deduction element details will not be stored. This does not effect the actual earning/deduction calculation during the pay calculation. If this check box is off, daily rows would be inserted into the generated positive input result table from the absence process, and the daily rows would be bundled as part of the input process for the pay calculation. See Absence Processing. |
Absence Event Entry
Use the fields in this group box to configure the Create and Maintain Absence Requests Page and theApprove Absence Requests Page.
Field or Control |
Description |
|---|---|
Days Before Current Date and Days After Current Date |
Use these fields to define the default date range that appears in the Search group box of the Create and Maintain Absence Requests page in the From Date and Through Date fields. |
Role not allowed Approve Automatically |
Users that have the role that you enter here cannot select the Approve Automatically value in the Submit Option field on the Create and Maintain Absence Requests page. |
Hide Forecast Button |
Select to hide the Forecast button on the Create and Maintain Absence Requests and Approve Absence Requests pages. |
Hide Save For Later Button |
Select to hide the Save For Later button on the Create and Maintain Absence Requests page. |
Absence Analytics Settings
Use the fields in this group box to establish default settings for the Absence Cost Analysis, Absence Events Analysis, Absence Liability and Trends, and Periodic Absence Rate pivot grids that appear on the Absence Analytics Dashboard.
Field or Control |
Description |
|---|---|
Days Before Current Date and Days After Current Date |
Use these fields to define the default date range for which the pivot grids display information. You can change this date range when you access the individual pivot grids. |
Access Type |
Enter the access type that the pivot grids use to determine direct reports for managers. |
For more information on the Absence Analytics Dashboard, see Using the Absence Analytics Dashboard Pagelets.
Enable Pivot Grid Analytics
Field or Control |
Description |
|---|---|
Enable Pivot Grid Analytics |
Select to enable the process that extracts data for the pivot grids that appear in the Absence Analytics Dashboard. For more information, see Preparing and Loading Absence Analytics Data. |
Payment Processing
Use this group box to define database-specific payment processing settings that are used when communicating payment information.
Field or Control |
Description |
|---|---|
Database Identifier |
Enter a unique alphanumeric identifier that the system adds to payment messages that it sends. |
Payment Count |
Enter the number of payments that you want the system to chunk together with each payment message. For example, if you enter 3000 here, the system will create and publish a separate payment message for every 3000 rows of payment data. |
Packager Processing Defaults
Field or Control |
Description |
|---|---|
Script Location |
Enter the location where DMS scripts are created. The default will be blank. An example displays below the field to let you know how to enter the script location. Note: The value will default for the rule and non-rule packages. This script location should match the location set up for the PSNT process scheduler in which you are using. This is set up in the psconfig.cfg file. |
Compare Report Print Options |
This group box controls the sections of the Compare Report that will be printed. Select the sections of the report to print . The options on the Packager Processing page will default the values selected each time you run a Compare Report. The check boxes can be overridden on the processing pages. Values for the report sections include:
The above two options reflect the delivered defaults.
|
Continue Upgrade Processing |
This group box controls the ability to upgrade when there are errors or warnings. The default for each value is cleared. Valid values include:
|
Payslip Store Option
|
Field or Control |
Description |
|---|---|
|
Store Option |
Select the required payslip transfer options. Available options are:
|
Insights Option
|
Field or Control |
Description |
|---|---|
|
Global Time Filter |
Select the default date option for Global Time Filter to be used in Insights dashboard. Available options are:
The default value is Period Begin Date. If the default value is changed on Installation Options page, user has to run Schedule Search Index (PeopleTools > Search Framework > Administration > Schedule Search Indexes) process so that the changes take place. Indexing type to be run must be Full Index. |
Use the Schedule Settings page (TL_INSTL_PUNCH) to define default settings for work schedules.
Navigation:
This example illustrates the fields and controls on the Schedule Settings page.
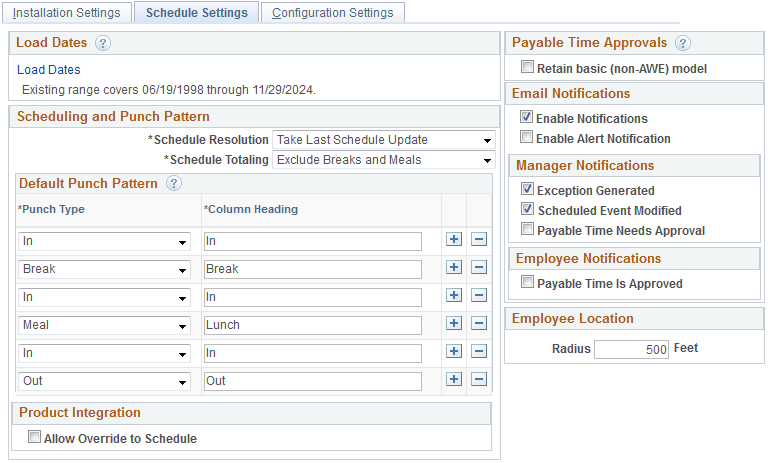
Important! This page (TL_INSTL_PUNCH) is the same as the Configurations Page for Time and Labor. The settings that you define on this page are shared between Time and Labor, Global Payroll, and Absence Management.
Field or Control |
Description |
|---|---|
Load Dates |
Click to access the Dates Table Load page where you can load the range of dates to be used in schedules. Dates from 1994 to 2014 are pre-loaded. You need only use this feature to load dates before or after this date range. |
Schedule Resolution |
Specify how to resolve schedule changes. Select Take Last Schedule Update to have the system use the last update to resolve an employee's schedule, whether the update comes from a third-party, workforce scheduling system or an online override. Select Take Online Override to have the system look for an online schedule override to resolve the schedule for the day. The system does not look for changes from a third-party workforce scheduling system. |
Schedule Totaling |
This field applies only if People Soft Enterprise Time and Labor is installed. Specify whether to include or exclude meal times, breaks, or both in the scheduled hours totals on schedule definitions, shift definitions, and the Manage Schedules page. Options are Exclude Meals and Breaks, Include Meals and Breaks, Include Meals, and Include Breaks. The default is Include Breaks. |
Default Punch Pattern
Specify the default sequence for displaying punch types on the scheduling pages. You can also use the Grid Column Heading fields to modify the punch type labels that are to appear as column headings on the schedule pages.
Payable Time Approvals
Field or Control |
Description |
|---|---|
Retain basic (non-AWE) model (retain basic non-Approval Workflow Engine model) |
Select to use the basic model for approving Time and Labor payable time instead of Approval Workflow Engine. |
Email Notifications
Field or Control |
Description |
|---|---|
Enable Notifications |
Select to enable email notifications. You cannot select any of the check boxes in the Manager Notifications or Employee Notifications group boxes unless the Enable Notifications check box is selected. |
Manager Notifications
Field or Control |
Description |
|---|---|
Exception Generated |
Select to generate a notification when an exception is generated. |
Scheduled Event Modified |
Select to generate a notification when a scheduled event is modified. |
Payable Time Needs Approval |
Select to generate a notification when payable time needs approval. |
Employee Notifications
Field or Control |
Description |
|---|---|
Payable Time Is Approved |
Select to generate a notification when payable time is approved. |
Use the Configuration Settings page (GP_ACTIVAT_SETTING) to enable and configure feature settings.
Navigation:
This example illustrates the fields and controls on the Configuration Settings page.
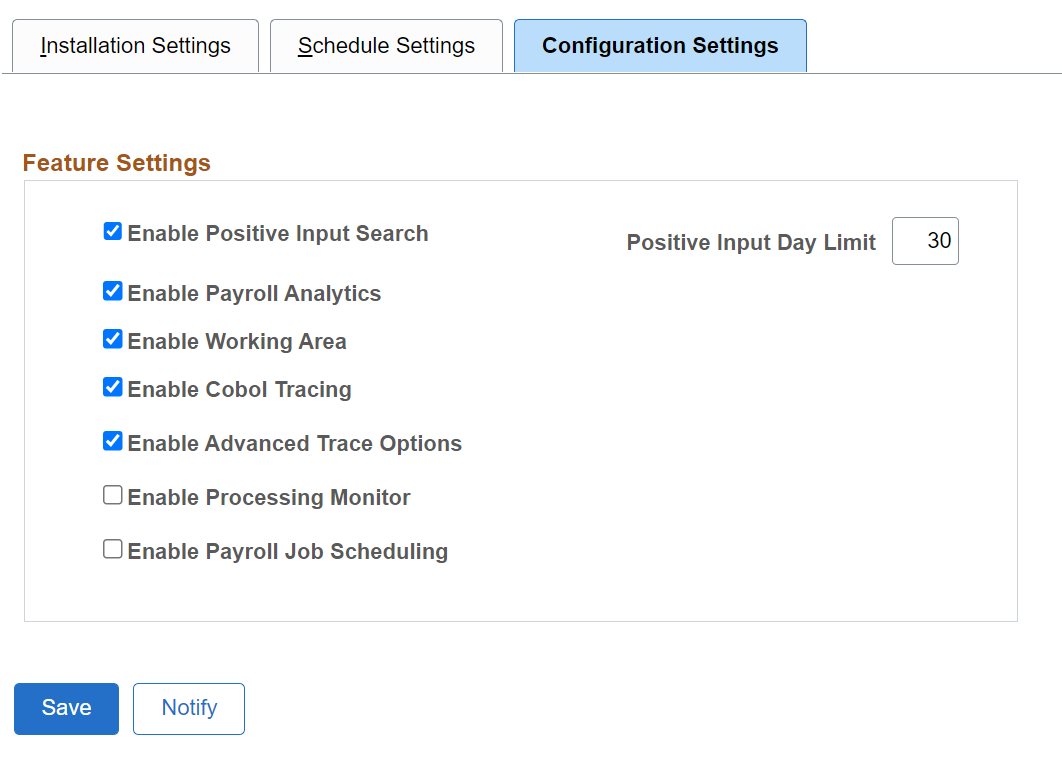
Feature Settings
Field or Control |
Description |
|---|---|
Enable Positive Input Search |
Select to enable the Positive Input Search page. If this check box is deselected, users trying to access the Positive Input Search page receive an error message explaining that this check box must be selected before the page can be accessed. |
Positive Input Day Limit |
Enter the number of days in history for which the keyword search retrieves results on the Positive Input Search Page. For example, if the value in this field is 100,, the search looks for positive input entries that match your keywords and that were entered 100 days ago or less. |
Enable Payroll Analytics |
Select to enable access to the Global Payroll Analytics Page. If this check box is deselected, users trying to access the page receive an error message explaining that this check box must be selected before the page can be accessed. |
Enable Working Area |
Select to calculate work item counts during the payroll process. They system displays these counts on the Payroll Work Items Page. |
Enable Cobol Tracing |
Select to enable the Cobol Trace functionality on the Debug and Tuning Options Page. |
|
Enable Advanced Trace Options |
Select to enable the generation of Element Trace even if the payroll execution fails. If this checkbox is selected, 'Payee Selection' block is displayed in the Debug and Tuning Options page. For details, see Entering Processing Instructions. |
Enable Processing Monitor |
Currently, this functionality is not supported in PeopleSoft. |
Enable Payroll Job Scheduling |
Select to enable the scheduling of Payroll Job. If this option is selected the user can schedule the payroll job for Calculate (and Recalculate) option. The system retains the calendar control run parameters for scheduled run and in case if multiple users finalize or cancel the calendar, the stored run control parameters are deleted and its corresponding scheduled job is also cancelled. In case the user who scheduled the payroll job is different from the one who cancels or finalizes the calendar the mail notification is sent to user who scheduled the job about deletion of stored run control parameters and cancelation of scheduled run. |
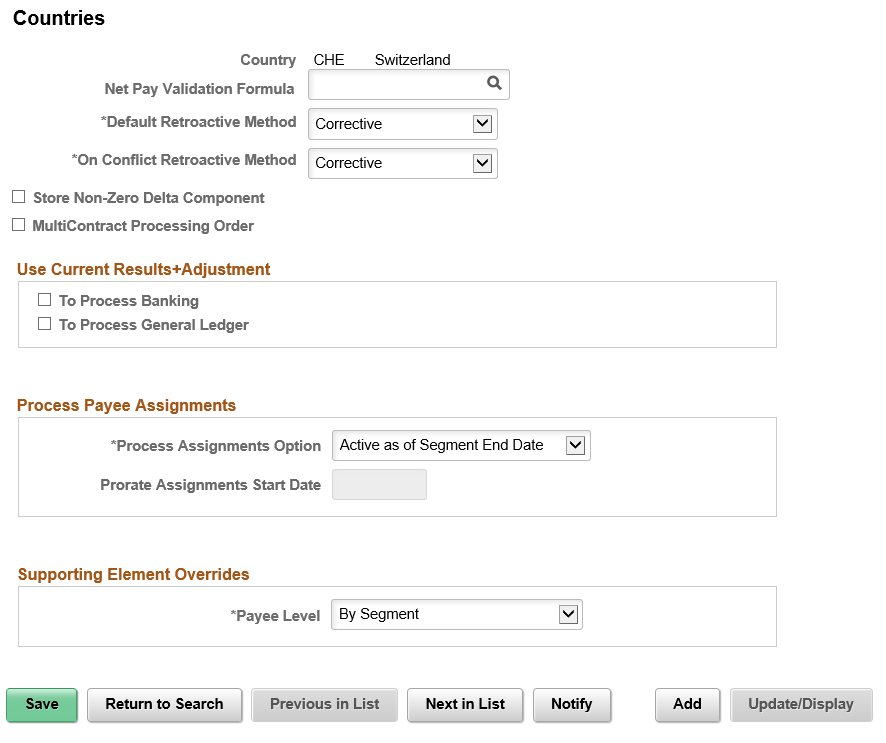
Use the Countries page (GP_COUNTRY) to define country-level setup parameters, such as the net pay validation formula, the default retroactive method, and banking and general ledger processing.
Navigation:
This example illustrates the fields and controls on the Countries page.
Field or Control |
Description |
|---|---|
Net Pay Validation Formula |
Select the net pay validation formula to use for this country if you intend to use the net pay validation by priority feature. Net pay validation prevents a deduction from reducing net pay below zero or a minimum amount that you define. With net validation by priority, after the system calculates all deductions according to processing sequence, it resolves the formula that you specify here for each deduction starting with the deduction with lowest priority (the highest priority number). The formula returns a value that tells the system whether to calculate the element, perform net pay validation, do both, or skip the element. Guidelines for creating the formula are provided in the topic on Defining Processing Elements. Note: Net pay validation is discussed in detail later in this product documentation. See Understanding Net Pay Validation and Arrears Processing. |
Default Retroactive Method |
Select a Default Retroactive Method to use for the selected country. Values are Corrective and Forwarding. |
On Conflict Retroactive Method |
Select which retroactive method, Corrective or Forwarding, to use when:
|
Prorate Assignments Start Date |
If the Process Assignment Option is Active Anytime within Segment, enter a start date to prorate the assignment. When the date is left blank, the proration functionality is in effect for all time periods processed (including retro periods). When a start date is entered, the proration functionality is in effect on or after the date specified. This avoids impacting prior rows which could otherwise change retro results. |
Store Non-Zero Delta Component
Select this check box in order for the system to store any delta amount or delta component that has a nonzero value, regardless of the setting on the Element Name (GP_PIN) page, Results group box for the element. deselect this check box in order for deltas to inherit the element's store option.
The following table provides an overview of how the system interprets the check box settings at different levels:
|
Element Store Option |
Country Delta Option |
Element is Stored |
Delta is Stored |
|---|---|---|---|
|
ON |
ON |
YES |
YES |
|
ON |
OFF |
YES |
YES |
|
OFF |
ON |
NO |
YES |
|
OFF |
OFF |
NO |
NO |
Note: Additional information regarding retroactivity is discussed in detail in another topic in this product documentation.
MultiContract Processing Order
Select this check box to set the processing order to Emplid/Empl_Rcd for Swiss clients with Multi Contract. This field is displayed only for CHE Switzerland.
Use Current Results + Adjustment
If you select either To Process Banking or To Process General Ledger in this group box, the effect is different depending on the retroactive method.
If the Default Retroactive Method is Corrective, the enhancement does not change the behavior of corrective retroactivity in banking or general ledger.
If the Default Retroactive Method is Forwarding, the system does not reverse prior amounts or post recalculated amounts during retroactive processing. Instead, the system implements current results (V1R1) plus adjustments in banking or general ledger, depending on which check boxes you select.
Note: Additional information regarding what happens during retroactivity in relation to banking and General Ledger is discussed in other topics in this product documentation.
Process Payee Assignments
The Process Assignments Option field determines when to process earning or deduction payee assignments. The options are:
Active as of the Segment End Date: Select to have an element entered on the payee assignment page processed if the assignment is active as of the segment end date.
Active Anytime within Segment: Select to have an element entered on the payee assignment page processed and prorated for rows falling within a segment in addition to rows active as of the segment end date.
Note: This option is used when the proration of earning/deduction assignments is desired. This is the first in a series of steps to setting up the proration of earning/deduction assignments functionality. Additionally a segmentation trigger definition must be defined for the payee assignment record (GP_PYE_OVRD).
Supporting Element Overrides
The Payee Level field determines the level at which Payee Supporting Element Overrides are resolved.
Available options are:
By Segment: Override value applies to the full segment.
By Slice: Override value can be resolved separately for each slice in case of Element Segmentation.
If no value is selected in this field, the option ‘By Segment’ is taken by default.