Defining Deduction Elements
To define deduction elements, use the Deductions (GP_DEDUCTION) component.
|
Page Name |
Definition Name |
Usage |
|---|---|---|
|
GP_PIN |
Name the element and define its basic parameters. |
|
|
GP_PIN_USR_FLD_SEC |
Define user fields to create unique instances of an element. |
|
|
GP_ERN_DED_CALC |
Define calculation rules for a deduction element. |
|
|
GP_ERN_DED_RND |
Specify rounding and proration options for a deduction element. |
|
|
GP_ERN_DED_ARR |
Specify what to do when available net pay is insufficient to cover the deduction, how to pay back arrears, and how the third-party recipient is to be paid, if there is an arrears balance. |
|
|
GP_AUTOGEN_ACUM |
Define characteristics of automatically generated accumulators for a deductions element. |
|
|
GP_ERN_DED_ACM_SEC |
Define which accumulators the system creates. |
|
|
GP_AUTOGEN_SEC |
Displays the system- generated components and accumulators that have been created for a deduction element. |
|
|
GP_ERN_DED_AC_ADDL |
Indicate the accumulators (already defined in the system) to which the deduction element contributes. |
|
|
GP_RCP_DED |
Select a general recipient for a deduction (the entity that receives all amounts that are withheld from payees for a particular deduction, such as a government agency). |
|
|
GP_ELM_DFN_SOVR |
Override the value of certain supporting elements that are used by the definition of the deduction element or override the supporting elements when they are not part of the deduction definition. |
A deduction is any payroll element that subtracts from a person's pay. A deduction can be voluntary or statutory. Voluntary deductions include deductions for retirement plans, company stock purchases, union dues, and parking fees. Statutory deductions include deductions for taxes and garnishments.
To create a deduction element:
Define the deduction name, calculation rule, rounding and proration rules, accumulators, and supporting element overrides, as needed.
Note: The pages that you use are similar to the Earning definition pages.
Define the rules that apply when net pay is insufficient to cover a deduction.
Use the Deductions - Arrears page to define these rules. An arrears is a way to store deductions that the system can't take from the current pay run because of insufficient net pay. An arrears stores an amount that will be deducted at a future time.
Select a general recipient, if applicable for the deduction using the Deductions - Recipient page.
Note: Only pages that are unique to the Deductions component are documented here. Pages that are common to both the Earning and Deduction components are documented in the Earnings topic of this topic.
When defining a deduction, you can define the action the system takes when a payee's net pay is not sufficient to cover the entire amount of a deduction. You can also establish a payback method for the amount that is not taken (the arrears).
Note: Before you define deductions for your organization, you may want to decide whether you want the system to perform the functions described on the Deduction - Arrears page or whether you want to handle these functions on your own.
Net Pay Validation
The net pay validation feature prevents a deduction from reducing net pay below zero or a minimum amount that you define. To use the system's arrears management and payback features, you must enable net pay validation. If you do not use net pay validation, the system always takes the entire amount of a deduction, even if the payee's net pay drops below zero. In addition, none of the arrears processing options are available.
When using net pay validation, you can specify the order for taking deductions when there's not enough net pay to cover all deductions. The choices are:
Processing sequence
Priority order
Processing sequence refers to the order in which deductions are encountered in a section during processing, as determined by the deduction's assigned sequence number in the section. When the system calculates the deduction, it immediately verifies whether the payee's net pay is sufficient to cover it. If net pay is insufficient, the system deducts a partial amount or no amount, according to what is defined on the Deduction - Arrears page.
Priority order refers to a relative priority number that you can assign to a deduction on the Deduction - Arrears page. When net pay validation occurs by priority order, the system first calculates all deductions according to their processing sequence with no net pay validation. It then checks the net pay accumulator. If net pay is greater than zero (or a defined minimum), processing is complete. Otherwise, the system adjusts the deduction with the lowest priority and then checks to see if net pay is still insufficient. It repeats this process for the deduction with the next lowest priority until net pay is above zero or the defined minimum. Because net pay validation by priority requires iterative processing, it is available for subprocess sections only.
Note: Net pay validation by priority order can be useful when a deduction's processing sequence is different from its priority. For example, a pretax deduction must be processed before tax calculations to determine the correct net pay. However, it might be more important to deduct funds for a garnishment that's processed after taxes than it is to cover a pretax deduction.
Note: Typically, only one method of Net Pay Validation is used in a given pay run.
The following examples illustrate the difference between using processing sequence and priority order for net pay validation.
Example: Net Pay Validation in Processing Sequence
This table shows the processing results when net pay validation (NPV) is based on processing sequence. Assume that each deduction is defined to allow a partial deduction when net pay drops below zero.
|
Process Sequence |
Always Recalculate |
Amount (Pre-NPV) |
Resolved Amount |
Amount Not Taken |
Available Net |
|---|---|---|---|---|---|
|
Salary |
9,000 |
||||
|
Car Allow |
9,000 |
||||
|
Health |
N |
500 |
500 |
0 |
8,500 |
|
Pension |
N |
1,500 |
1,500 |
0 |
7,000 |
|
Tax1 |
Y |
2,240 |
2,240 |
0 |
4,760 |
|
Tax2 |
Y |
720 |
720 |
0 |
4,040 |
|
Union Dues |
N |
500 |
500 |
0 |
3,540 |
|
Parking |
N |
300 |
300 |
0 |
3,240 |
|
Garn1 |
Y |
1,208 |
1,208 |
0 |
2,032 |
|
Garn2 |
N |
3,000 |
2,032 |
968 |
0 |
In this case, net pay is sufficient to cover all deductions except Garnishment2. For Garnishment2, only a partial deduction can be taken (3,000 - 2,032 = 968).
Example: Net Pay Validation in Priority Order
This table shows the processing results after the first pass when net pay validation (NPV) is based on priority order. Net pay validation does not occur during the first pass of the subprocess.
|
Process Sequence |
Always Recalculate |
Amount (Pre-NPV) |
Resolved Amount |
Amount Not Taken |
Available Net |
|---|---|---|---|---|---|
|
Salary |
9,000 |
||||
|
Car Allow |
9,000 |
||||
|
Health |
N |
500 |
500 |
0 |
8,500 |
|
Pension |
N |
1,500 |
1,500 |
0 |
7,000 |
|
Tax1 |
Y |
2,240 |
2,240 |
0 |
4,760 |
|
Tax2 |
Y |
720 |
720 |
0 |
4,040 |
|
Union Dues |
N |
500 |
500 |
0 |
3,540 |
|
Parking |
N |
300 |
300 |
0 |
3,240 |
|
Garn1 |
Y |
1,208 |
1,208 |
0 |
2,032 |
|
Garn2 |
N |
3,000 |
3,000 |
0 |
-968 |
Note: Car allowance is a non-cash earning. It contributes to taxable gross, but not to net pay.
Because net pay is negative, another pass is required. During the second pass, net pay validation is applied to parking, because it has the lowest priority (the highest priority number). First the system backs out the prior value of parking. The deduction's recalculation rule (as defined by the Always Recalculate check box on the Deduction Name page) is always honored, so during the second pass the system does not recalculate parking, it only applies net pay validation.
|
Process Sequence |
Always Recalculate |
Net w/o Ded |
Amount (Pre-NPV) |
Resolved Amount |
Amount Not Taken |
Available Net |
Priority |
|---|---|---|---|---|---|---|---|
|
Salary |
-968 |
||||||
|
Car Allow |
-968 |
||||||
|
Health |
N |
500 |
500 |
0 |
-968 |
450 |
|
|
Pension |
N |
1,500 |
1,500 |
0 |
-968 |
500 |
|
|
Tax1 |
Y |
2,240 |
2,240 |
0 |
-968 |
100 |
|
|
Tax2 |
Y |
720 |
720 |
0 |
-968 |
100 |
|
|
Union Dues |
N |
500 |
500 |
0 |
-968 |
700 |
|
|
Parking |
N |
-668 |
300 |
0 |
300 |
-668 |
800 |
|
Garn1 |
Y |
1,208 |
1,208 |
0 |
-668 |
225 |
|
|
Garn2 |
N |
3,000 |
3,000 |
0 |
-668 |
225 |
Net is still negative after the second pass. Parking can't be reduced any further so it's excluded from the priority list. In the next loop, the deduction with the lowest priority is union dues. All recalculation logic is followed except that parking is skipped and union dues are subject to net pay validation processing. After union dues, the system evaluates the pension deduction. The process repeats until available net is zero or greater.
Note: To improve system performance, you can assign the same priority number to all post-tax deductions so that they are modified during the same iteration.
Setup Steps for Net Pay Validation by Priority Order
Configuring the system to validate net pay based on a deduction's priority requires some additional setup that is not necessary when net pay validation is based on processing sequence.
Following are the high-level setup steps for using priority order for net pay validation:
Define a formula for net pay validation.
After the system calculates all deductions according to processing sequence, it resolves this formula for each deduction starting with the deduction with lowest priority (the highest priority number). The formula returns a value that tells the system whether to calculate the element, perform net pay validation, do both, or skip the element. Guidelines for creating the formula are provided in the topic on Defining Processing Elements.
Assign the net pay validation formula to the country.
Select the formula in the Net Pay Validation Formula field on the Countries page.
Specify the priority order for the deduction on the Deduction - Arrears page.
Include deductions in a subprocess section.
The subprocess section must be enabled for net pay validation by priority.
Arrears Components and Accumulators
When you create a deduction element, the system automatically generates three component elements for arrears processing and an arrears balance accumulator, regardless of whether or not you've chosen to use net pay validation. The system automatically updates these components only if you're using net pay validation:
Amount Not Taken
This component stores the amount of the deduction that exceeds the defined limit based on the net pay accumulator for the current pay period.
Note: The net pay accumulator is defined on the Definition page on the Process Lists component (GP_PROCESS).
Payback Amount
This component stores the portion of the arrears balance that is being paid off during the current pay period. It does not include the Amount Not Taken for the current pay period.
Add to Arrears
If you select the Deduction Arrears Allowed check box on the Deduction - Arrears page, the Add to Arrears equals the Amount Not Taken.
Arrears Balance
This accumulator keeps track of the arrears for a payee. The Add to Arrears component adds to this balance accumulator; the Payback Amount component subtracts from it.
Arrears Processing Methods
When net pay does not cover the entire amount of a deduction, you can have the system deduct a partial amount or nothing. The options that you select in the Deduction Processing Method group box on the Deduction - Arrears page determine this behavior. The two examples that follow illustrate the outcomes of the different processing methods.
Arrears Processing: Example 1 (Partial Amount Allowed = No)
If partial deductions are not allowed, the system takes a deduction for the current pay period only if net pay covers the entire deduction. If the full deduction can't be taken, the system adds the entire deduction amount to the arrears balance. This table lists the net pay, deduction, and arrears for the example that follows:
|
Current Available Net Pay |
Deduction |
Begin Arrears Balance |
|---|---|---|
|
100 |
120 |
50 |
The processing sequence is:
Add the deduction amount of 120 to Amount Not Taken.
Add the deduction amount of 120 to Add to Arrears (if the Deduction Arrears Allowed check box is selected).
Move zero to the deduction amount.
Move the Beginning Arrears balance of 50 to Payback Amount.
Move the Beginning Arrears balance of 50 to the deduction amount (add the Payback Amount to the deduction amount).
This table lists the end values:
|
Deduction |
Amount Not Taken |
Add to Arrears |
End Arrears Balance |
|---|---|---|---|
|
50 |
120 |
120 |
120 |
The resolved value of the deduction element = Deduction Amount + Payback Amount.
Arrears Processing: Example 2
January Available Net Pay (prior to deductions) = 50
Deductions:
D1 = 25, Partial Amount Allowed.
D2 = 50, Entire Amount Only.
D3 = 50, Partial Amount Allowed.
This table lists the values calculated during arrears processing for deductions D1, D2, and D3:
|
Ded |
Re- solved Amt |
Amt Not Taken |
Add to Arrears |
Payback Amt |
End Arrears Bal |
Accum. YTD Val |
Trans- fer Amt |
End Net Val |
|---|---|---|---|---|---|---|---|---|
|
D1 |
25 |
0 |
0 |
0 |
0 |
25 |
25 |
25 |
|
D2 |
0 |
50 |
50 |
0 |
50 |
0 |
0 |
25 |
|
D3 |
25 |
25 |
25 |
0 |
25 |
25 |
25 |
0 |
Final Net Pay in January = 0
February Available Net Pay (prior to deductions) = 110
This table lists the values calculated during arrears processing for deductions D1, D2, and D3 for February:
|
Ded |
Re- solved Amt |
Amt Not Taken |
Add to Arrears |
Pay- back Amt |
End Arrears Bal |
Accum. YTD Value |
Trans- fer Amt |
End Net Val |
|---|---|---|---|---|---|---|---|---|
|
D1 |
25 |
0 |
0 |
0 |
0 |
50 |
25 |
85 |
|
D2 |
85* |
0 |
0 |
35 |
15 |
85 |
85 |
0 |
|
D3 |
0 |
50 |
50 |
0 |
75 |
25 |
0 |
0 |
* 50 + 35 = 85 (current deduction plus amount of arrears balance that can be paid back)
Final Net Pay in February = 0
Arrears and Segmentation
When a period is segmented and a deduction goes into arrears in the first segment, the system attempts the payback on any subsequent segment.
Net Pay Validation and Retroactive Processing
The retroactive adjustment will be added to the deduction amount prior to Net Pay Validation. If there is not enough net to cover the adjustment, any remaining amount will be added to Amount Not Taken.
Arrears processing must take into account two basic situations:
An arrears was originally calculated for a pay period, but a subsequent retroactive process for that period doesn't calculate the arrears.
An arrears was not originally calculated for a pay period, but a subsequent retroactive process for that period calculates the arrears.
Here is a list of the basic rules for arrears and forwarding retroactive processing:
If an element is based on an element that is being forwarded, it should not be set up to also act in a forwarding manner.
If an element that's based on another element is a deduction:
Forward the deduction that's based on an element that is not being forwarded.
Do not forward a deduction that's based on an element that is being forwarded.
Note: PeopleSoft recommends that you always select the Use Corrective check box on the Accumulators - Level page when you define arrears accumulators . This is because the component that contributes to the accumulator does not itself generate a delta, making double-counts very likely if the accumulator behaves in a forwarding manner.
See Understanding Accumulators,Understanding Retroactive Methods, .
Example: Arrears and Forwarding Retroactive Processing
The following example illustrates how elements that are based on other elements should be set up and how they function during retroactive processing. Although the example used here deals specifically with the recalculation of arrears in a previous period, it can apply to any situation in which there is interdependency between recalculated elements.
This example assumes the use of the forwarding retroactive method. In forwarding retro, not every element is automatically forwarded—you must manually select the elements that you want forwarded. You follow certain setup rules when you have deductions that are based on other elements. The example below illustrates a typical setup.
For this example, assume the following:
There are two pay periods: January and February.
In February, a retroactive payment is made for January.
The following elements are involved:
E1 = Flat Amount (Numeric) = 100.
D2 = Flat Amount (Numeric) = 95.
D1 = Base × Percent (where Base = Earning (E1) and Percent = Numeric (10%), therefore, D1 = E1 × 10%.
Additional element definitions:
E1. Retro Recalculate Option = Yes.
D2. Retro Recalculate Option = No.
D1. Retro Recalculate Option = No.
The retroactive adjustment to E1 in January is 100. The payee should have been paid a total of 200. There is a 100 delta that will be forwarded to February.
This table shows the original and recalculated amounts for E1, D1, D2, D1_ANT, D1_PBK, D1_ATAR, and D1_ARR over a period of two months (February is the current period, so there is no recalculated value column for February):
|
Element |
Retro Recalc Option |
January - Prior Results |
January - Recalculated Results |
February |
|---|---|---|---|---|
|
E1 |
Always Recalculate |
100 |
200 (with 100 delta) |
300 (200 + 100 delta forwarded from January) |
|
D2 |
Do Not Recalculate |
95 |
95 |
95 |
|
D1 |
Do Not Recalculate |
5 |
5 |
35 (30 + 5 payback) |
|
D1_ANT |
Do Not Recalculate |
5 |
5 |
0 |
|
D1_PBK |
Do Not Recalculate |
0 |
0 |
5 |
|
D1_ATAR |
Do Not Recalculate |
5 |
5 |
0 |
|
D1_ARR |
Use Corrective = No |
5 |
5 |
0 |
|
Net Pay |
Not applicable |
0 |
0 |
170 |
Here is an explanation of the example:
D1 in January = 5.
Since D1 = 10% of E1, D1 would normally = 10 in January, but since Net Pay cannot go below zero and E1 = 100 and D2 = 95, the maximum amount that D1 can equal in January is 5. The outstanding amount of 5 is brought over to D1_ANT (Amount Not Taken), D1_ATAR (Amount to Add to Arrears), and D1_ARR (Arrears accumulator).
E1 for February is 300.
This is calculated as 200 (E1 February original amount) + 100 (forwarded delta amount from January) = 300
D1 in February is 35.
This is calculated as: 30 (10% of E1 in February) + 5 Payback Amount (January value of D1_ARR is carried over to February) = 35.
The total amount that should be deducted for D1 is 40, which represents the sum of the two months: D1 = 5 (January) + 35 (February) = 40.
You can also validate that this retroactive calculation is correct in the following way: Since D1 = 10% of E1, add the total of the original amounts for E1 for both months: 100 (January) + 300 (February) = 400. Therefore, D1 = 40 (10% of 400).
If there is a positive input row with Do Not Process instructions for a deduction and an arrears balance exists, the system attempts to collect it, as long as the deduction is still on the process list and net pay is sufficient.
When generation control is checked for an element and does not indicate for an element to be resolved, payback processing still occurs if there is an arrears balance and the Arrears Payback Controlled By option is set to All Pay Runs.
The arrears balance being considered for payback processing does not include the new amount that was added to the arrears balance.
Payback Processing and Eligibility
Payback processing does not look at a payee's eligibility for a deduction. If a payee has an arrears balance, the system attempts to collect it, as long as the deduction is still in the process list and net pay is sufficient. For example, if a payee who has an arrears balance changes eligibility groups, and the deduction element does not belong to the new eligibility group, the system still processes the payback.
Example: Arrears and Payback Processing
In this example, assume the following:
Net Pay = 100.
Deduction = 120.
Beginning Arrears Balance = 50.
Perform Net Pay Validation is selected, Partial Amount Allowed is not selected, Deduction Arrears Allowed is selected, and the Payback Option is set to No Limit.
The deduction and Add to Arrears would be:
Amount Not Taken = 120.
Add to Arrears = 120.
Deduction = 0.
The payback processing would be:
Beginning arrears balance to consider for payback purposes = 50.
Net Pay = 100.
Payback is set to 50.
The payback is added to the deduction (0 + 50 = 50).
The arrears accumulator would be calculated as follows:
Beginning balance = 50.
Add to Arrears = 120.
Payback Amount = 50.
Formula: Beginning Balance + Add to Arrears − Payback Amount.
50 + 120 − 50 = 120.
Use the Deduction Name page (GP_PIN) to name the element and define its basic parameters.
Navigation:
You name every element and define its basic parameters on an Element Name page. All element components within Global Payroll share the same first Element Name page (GP_PIN). However, the Deduction Name pages contains some additional fields that apply only to deductions.
The Deduction Name page is similar to the Earnings Name page.
Use the Deductions - User Fields page (GP_PIN_USR_FLD_SEC) to define user fields to create unique instances of an element.
Navigation:
Click the User Fields link on the Deduction Name page.
The Deductions - User Fields page is similar to the Earnings - User Fields page.
Important! If a deduction is defined with user fields, the system automatically transfers these fields to the deduction's auto-generated arrears accumulator as user keys. If you change the user fields, the system automatically synchronizes the accumulator keys of the arrears accumulator with the user fields. After an element has been processed, you cannot change the user fields.
Use the Deductions - Calculation Rules page (GP_ERN_DED_CALC) to define calculation rules for a deduction element.
Navigation:
The Deductions - Calculation Rules page is similar to the Earnings - Calculation page.
Use the Deductions - Rounding/Proration page (GP_ERN_DED_RND) to specify rounding and proration options for a deduction element.
Navigation:
The Deductions - Rounding/Proration page is similar to the Earnings - Rounding/Proration page.
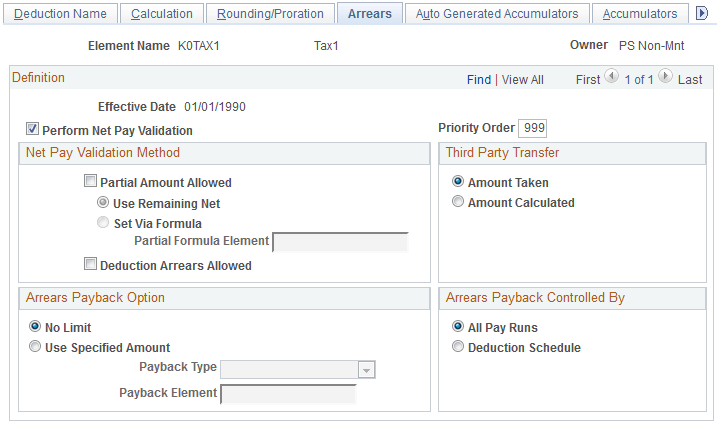
Use the Deductions - Arrears page (GP_ERN_DED_ARR) to specify what to do when available net pay is insufficient to cover the deduction, how to pay back arrears, and how the third-party recipient is to be paid, if there is an arrears balance.
Navigation:
This example illustrates the fields and controls on the Deductions - Arrears page.
Field or Control |
Description |
|---|---|
Perform Net Pay Validation |
Select to enable net pay validation for this deduction. Net pay validation prevents the system from reducing net pay below zero or a defined minimum when a payee's net pay is insufficient to cover the deduction. (You can select Partial Amount Allowed and Deduction Arrears Allowed to specify whether the deduction is to be taken and how much is to be taken.) If you do not select this check box, the system takes the full amount of the deduction, even if net pay becomes negative. You must define what to do with the negative balance. To prevent net pay from dropping below a minimum amount other than zero, define the minimum on the Process List - Definition page. Note: Other fields on this page are available for entry only if you select this check box. |
Priority Order |
Specify the priority of this deduction, relative to other deductions, when the system detects that the payee's net pay is insufficient to cover all deductions. The default value is 999, which is also the maximum value. Deductions with a low priority number have the highest relative priority. For example, the system will try to deduct funds for an element that has a priority of 1, before it tries to cover other deductions. If more than one deduction has the same priority number, net pay validation is applied to deductions in the order in which they're encountered in the section (that is, in processing sequence). If a deduction has more than one instance, priority order is the reverse of processing order. So, if there are instances 1, 2, and 3 for element D1, processing order would be 1, 2, 3. Net pay validation would follow this order: 3, 2, 1. Note: This field applies when you base net pay validation on a deduction's priority. It appears only when a net pay validation formula is associated with the country for which the deduction element is defined or when the deduction is defined for use by all countries. Use the Countries page to select a country's net pay validation formula. See Understanding Net Pay Validation and Arrears Processing. |
Net Pay Validation Method
Your selections in this group box instruct the system on how much, if any, of the deduction should be processed and whether to track the amount not taken as an arrears balance.
Field or Control |
Description |
|---|---|
Partial Amount Allowed |
Select to have the system deduct a partial amount when the deduction exceeds available net pay (or the minimum net defined on the Process List - Definition page). Specify how much the system is to deduct by selecting one of the following options: Use Remaining Net: This option causes the system to deduct the remaining available net pay. For example, if a payee has net pay of 100 and the deduction is 120, the system deducts 100. If you defined a minimum net pay, the system does not deduct below the minimum. Set Via Formula: With this option, the system uses a formula to determine the amount to deduct. Set Via Formula is especially useful for pretax deductions when you base net pay validation on priority order. You can create a formula that sets the partial amount to an amount that's less than the remaining net, for example, to a third of the remaining net. This can reduce the number of loops the system needs to make through a net pay validation subprocess section. The formula should assign the partial amount to the system element OVRD CURR AMT VAL. Since rounding on the resolved amount happens prior to Net Pay Validation processing, you need to apply rounding to the partial amount, according to your rounding requirements, in this formula. During processing, the system checks to see if the value of this element is greater than zero and less than or equal to the remaining net (system element NET AVAILABLE) taking the minimum net into account. If OVRD CURR AMT VAL is less than zero or greater than NET AVAILABLE, the deduction and payment are put in error. The formula might look
something like this: In this case, the formula determines the partial amount by dividing the remaining net amount that was calculated during the first pass by two. If you don't select the Partial Amount Allowed check box, and the system can't deduct the entire amount, it will not deduct any of the amount from the payroll. The resolved amount is zero. |
Partial Formula Element |
If you select Set Via Formula , enter the formula here. |
Deduction Arrears Allowed |
If you select this check box, and a deduction exceeds available net pay, the system stores the deduction amount in an accumulator (an arrears balance). This is how the system keeps track of the Amount Not Taken (either a partial amount or the entire amount, depending on whether you selected the Partial Amount Allowed option) and knows that it has to take the amount from a future payroll. Indicate how much you want paid back in future payrolls in the Payback Option group box. If Perform Net Pay Validation is selected, the system always tracks the Amount Not Taken. Only if you select Deduction Arrears Allowed does the Amount Not Taken move into the Add to Arrears component and become eligible for payback. This in turn adds to the arrears balance. |
Third Party Transfer
Indicate how much of the deduction to send to the deduction recipients. (You define recipient information on the Deductions - Recipients page.)
Field or Control |
Description |
|---|---|
Amount Taken |
Select this option if you plan to send only the amount that was resolved for the payee. This does not include any amount stored in the amount not taken component. |
Amount Calculated |
Select this option to send the amount that was calculated (the resolved amount plus amount not taken). |
Example: Comparing Third Party Transfer Methods
The end result of Amount Taken and Amount Calculated is the same, once the arrears amount is paid back. Assume the following:
D1 = Amount Taken; value = 100
D2 = Amount Calculated; value = 100
In period 1, 50 is taken for D1 and zero for D2 because of insufficient net pay. For D1, 50 is sent (the amount taken). For D2 100 is sent (resolved amount plus amount not taken).
In period 2, net pay is sufficient to cover the current and payback amounts for both deductions. D1 resolves to 150 (100 current plus 50 payback). D2 resolves to 200 (100 current plus 100 payback). For D1, 150 is sent (current plus payback); for D2, 100 is sent (current only). After period 2, 200 is sent for each deduction.
Arrears Payback Option
Field or Control |
Description |
|---|---|
No Limit |
Select this option to have the system try to deduct the entire arrears balance. For example, assume a payee has an arrears balance of 200 after the first payroll. If you select No Limit, the next time a payroll is processed, the system tries to deduct 200, the entire amount of the arrears balance. This is known as the Payback Amount. |
Use Specified Amount |
Select this option to specify the maximum payback amount by entering a numeric value or by selecting a bracket, formula or variable element. |
Payback Type |
This field is available only when you select Use Specified Amount. Select the type of element that returns the maximum payback amount—that is, the maximum amount the system deducts from each payroll until the arrears balance is zero. Values are: Bracket, Formula, Numeric, and Variable. |
Payback Element |
Select the element to return the maximum payback amount or enter the numeric value. For variables, brackets, and formulas, only elements with a decimal or monetary field format are allowed. Note: The system uses the currency that is defined for the element on the Earnings or Deduction Calculation page. If no currency is defined on that page, it uses the currency that is defined on the User Preferences page. |
Arrears Payback Controlled By
Specify when paybacks are paid.
Field or Control |
Description |
|---|---|
All Pay Runs |
Select this option to have the arrears payback occur every time a person is paid and for every segment that's processed for that payee, even for periods where generation control conditions exist. |
Deduction Schedule |
Select to have the system perform the payback function only when the deduction is resolved. For example, you may have a deduction that is scheduled for processing (resolved) only in the first weekly period of every month (for a weekly payroll). If during this period, an arrears is created for the payee, the system will not perform the payback function until the first weekly period of the next month (controlled by generation control). However, if positive input is entered for the nonscheduled periods, the system will perform the payback function. |
Use the Deductions - Auto Generated Accumulators page (GP_AUTOGEN_ACUM) to define characteristics of automatically generated accumulators for a deductions element.
Navigation:
The Deductions - Auto Generated Accumulators page is similar to the Earnings - Auto Generated Accumulators page.
Use the Deductions - Accumulator Periods page (GP_ERN_DED_ACM_SEC) to define which accumulators the system creates.
Navigation:
Click the Accumulator Periods link on the Deductions - Auto Generated Accumulators page.
The Deductions - Accumulator Periods page is similar to the Earnings - Accumulator Periods page.
Use the Deductions - Generated Elements page (GP_AUTOGEN_SEC) to displays the system- generated components and accumulators that have been created for a deduction element.
Navigation:
Click the View Generated Elements link on the Deductions - Auto Generated Accumulators page.
The Deductions - Generated Elements page is similar to the Earnings - Generated Elements page.
Use the Deductions - Accumulators page (GP_ERN_DED_AC_ADDL) to indicate the accumulators (already defined in the system) to which the deduction element contributes.
Navigation:
The Deductions - Accumulators page is similar to the Earnings - Accumulators page.
Use the Deductions - Recipient page (GP_RCP_DED) to select a general recipient for a deduction (the entity that receives all amounts that are withheld from payees for a particular deduction, such as a government agency).
Navigation:
This example illustrates the fields and controls on the Deductions - Recipient page.
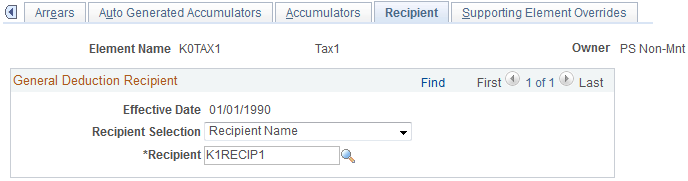
Note: Define the general recipient on the Deduction Recipient page first. If you want to use a formula to identify the recipient, define the formula first.
Field or Control |
Description |
|---|---|
Recipient Selection |
Select the parameter by which you select a recipient for the deduction. Values are: Recipient Name: Select to make the available values in the Recipient field prompt from the Recipient ID Table. Recipient by Formula: Select to make the available values in the Recipient field prompt from formula names. |
Recipient |
Select the recipient for this deduction. Identify the general recipient of all amounts that are withheld for this deduction, if applicable. (You designate a recipient category—general or individual—through the Deduction Recipients component that is described in the Banking section.) Leave this field blank if you want to assign the recipient at the payee level (as you might with garnishments, for example). Instead, use the Payee Deduction Recipients page to identify the individual recipient(s) of the amounts deducted for a particular payee. If more than one individual recipient is identified for a given payee/deduction (for deductions that have multiple resolutions), you may then use the Element Assignment By Payee or the Payee Assignment By Element page to identify the individual recipient for the instance. Note: When you assign a general recipient to a deduction, you can override the recipient for a particular payee. This can be done by setting up individual recipients through Payee Deduction Recipients page and then using the Element Assignment By Payee or Payee Assignment By Element as necessary. |
Use the Deductions - Supporting Element Overrides page (GP_ELM_DFN_SOVR) to override the value of certain supporting elements that are used by the definition of the deduction element or override the supporting elements when they are not part of the deduction definition.
Navigation:
The Deductions - Supporting Element Overrides page is similar to the Earnings - Supporting Element Overrides page.