Managing Schedules
This section discusses how to manage schedules.
|
Page Name |
Definition Name |
Usage |
|---|---|---|
|
Manager Search Options Page |
TL_MSS_SRCH_OPTION |
Set up preferences and display options for viewing employees. Enter the employee selection criteria you want to use when searching for employees. This search information will be the default for manager self service pages where there is an Employee Selection Criteria option. A partial value may be entered in any search field to get a list of employees with similar values. |
|
SCH_MNG_OPTIONS |
Set up preferences and display options for viewing schedules. |
|
|
Schedule Preferences Page |
SCH_EE_PREF |
View an employee's contact and schedule preferences. |
|
Daily Schedules, Weekly Schedules, Date Range Schedules Page |
SCH_MNG_DAILY SCH_MNG_WEEKLY SCH_MNG_DRANGE |
Adjust a time reporter's schedule. |
|
Daily Detail Page |
SCH_MNG_DAILY_DTL |
Override a schedule, refresh or add a schedule for the day, or enter a new schedule for the day. |
|
SCH_MNG_REPLACE |
Schedule a replacement for an employee for a day. |
|
|
SCH_MNG_COPY |
Copy an employee schedule to be used by another employee for a day or specified date range. |
|
|
SCH_MNG_SWAP |
Swap two employees' schedules. |
|
|
Scheduled Hours Page |
TL_SCHRPT_RNCTL |
Generate TL004 that provides information about a time reporter's scheduled time. It gives details such as: punch types and times for employees with a punch schedule; duration of work hours for employees with an elapsed schedule; and the values for the In, Out, Flex, and Core Period fields for time reporters with flex schedules. |
Field or Control |
Description |
|---|---|
Date Fields and Link Names |
If Day is selected in the View By field, enter or click the Previous or Next Day links to change the Date value. For Punch type employees, a bar in the Employee grid indicates the start time and end time of a shift. If Week is selected in the View By field, enter or click the Previous or Next Week links to change the Week Of value. The Total Scheduled Hours link with Start time and End time is displayed in the Employee grid. If Date Range is selected in the View By field, enter or click the Previous or Next Range links to change the Start Date, End Date, or both values. The maximum number of days a date range can span is 31. The Total Scheduled Hours link with Start time and End time is displayed in the Employee grid. |
Use the Manage Schedule Options page (SCH_MNG_OPTIONS) to set up preferences and display options for viewing schedules.
Navigation:
Scroll down and click the Schedule Display Options link (The page opens in a new window).
This example illustrates the fields and controls on the Manage Schedules Options page. You can find definitions for the fields and controls later on this page.
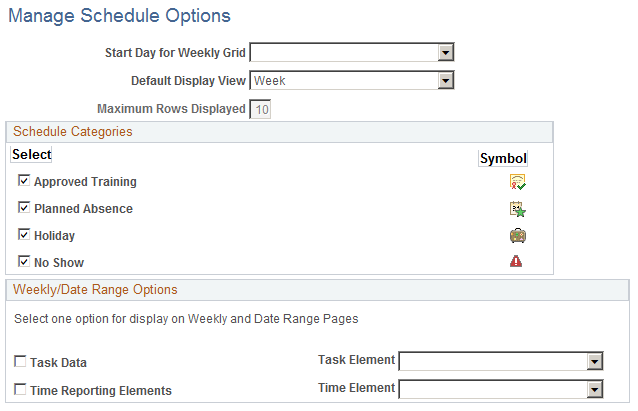
Use this page to set defaults for the Manage Schedules pages.
Field or Control |
Description |
|---|---|
Start Day for Weekly Grid |
Select a day of the week that a schedule should be displayed. |
Default Display View |
Select the default display view that the Manage Schedule page should use when entering the page. Select the Day value for the default Daily Schedules page (SCH_MNG_DAILY), the Week value for the default Weekly Schedules page (SCH_MNG_WEEKLY), and the Date Range value for the default Date Range Schedules page (SCH_MNG_DRANGE). |
Maximum Rows Displayed |
This field is display only and displays a maximum of ten employees at a time. |
Schedule Categories |
Select the Schedule Category values to display the respective icons on the Employee grid on the Manage Schedules pages. A legend also appears on the Manage Schedules pages with a description of each category and icon. Values are Approved Training, Planned Absence, Holiday and No Shows. Note: The No Shows value only displays for the Daily Schedules page. No Shows information is stored, so any No Shows information from the past can be viewed. |
Weekly/Date Range Options |
Choose one value to display on the Weekly and Date Range pages. Values are Task Data and Time Reporting Elements. If using the Task Data and Time Reporting Elements, select a field value for each from the drop-down list box. From the Task Data drop-down list, the values are: Activity ID, Business Unit, Combination Code, Customer, Department, Job Code, Location Code, PC Business Unit, Performance Measurement Business Unit, Position Number , Product, Project/Grant, Resource Category , Resource SubCategory , Resource Type, Task Profile ID, User Field 1 – 4.. From the Time Reporting Elements drop-down list, the values are: Country, State, Locality, TRC, Billable Indicator. |
Note: By choosing a value from Task Data or Time Reporting Elements, the employee who is scheduled with this value, appears in the daily cell of Manage Schedules for that day. If there are changing elements throughout the day, there will be an icon representing any changing elements in the shift. This is an indicator to the user that they can drill down into the Schedule Daily Detail page for more information on the daily changes.
Note: In order for all of the schedule category icons and other options to be displayed to the user, the user must ensure that they save this page, in order to save the options.
Use the Manage Schedule Options page (TL_MSS_SRCH_OPTION) to set up preferences and display options for viewing employees.
Enter the employee selection criteria you want to use when searching for employees. This search information will be the default for manager self service pages where there is an Employee Selection Criteria option. A partial value may be entered in any search field to get a list of employees with similar values.
Navigation:
This example illustrates the fields and controls on the Weekly Schedules page (1 of 2). You can find definitions for the fields and controls later on this page.
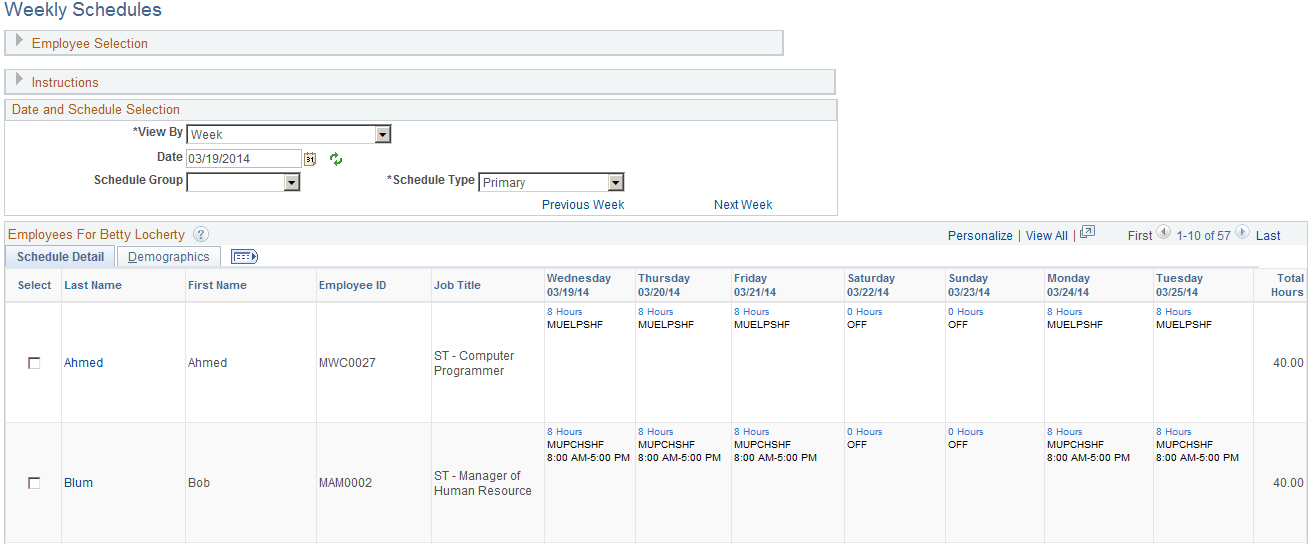
This example illustrates the fields and controls on the Weekly Schedules page (2 of 2). You can find definitions for the fields and controls later on this page.

Note: The previous graphics do not show the entire page. Scroll to the right on your system to view all of the fields on the page.
When entering the page, the system displays either the Daily, Weekly, or Date Range Schedules pages, depending on the default set on the Manage Schedules Display Options page. This page also sets defaults that are used on the Schedule Replacements, Copy Schedules, and Swap Schedules pages, such as date fields and link names.
Enter values in Employee Selection Criteria and click the Get Employees button to filter the list of employees that requires changes or review.
Click the Instructions expand section to view instructions about how to use the page.
Field or Control |
Description |
|---|---|
View By |
Select Day, Week, or Date Range to view the listed employees and their schedules using this option you select. |
Date |
If Day is selected in the View By field, enter or click the Previous or Next Day links to change the Date value. If Week is selected in the View By field, enter or click the Previous or Next Week links to change the Week Of value. If Date Range is selected in the View By field, enter or click the Previous or Next Range links to change the Start Date, End Date, or both values. The maximum number of days a date range can span is 31. |
Schedule Type |
Select the Schedule Type. Values are Primary or Alternate. If Global Payroll is not installed, the Schedule Type field is hidden and only primary schedules are shown. |
Schedule Group |
This field lists the schedule groups. Once a schedule group is entered, and the Refresh button clicked, the grid redisplays the employees associated to that schedule group (as determined from their Assign Work Schedule page). |
Coverage (only displayed on the Daily Schedule page) |
This field has values of All, Scheduled or Unscheduled. Select All to view all employees who are scheduled, not scheduled or who are scheduled as Off. Select Scheduled to view all employees who are scheduled for the day. Select Unscheduled to view all employees who either have no schedule or who are scheduled as Off for the day. |
Refresh |
Click this button to refresh the page. Note: All of the filters and buttons on the Manage Schedules pages are controlled by the Refresh Schedules button at the top of the page. Only the View By field automatically refreshes the page. |
Employee Grid |
Click the employee name link to transfer to the Schedule Preferences page. View the schedule preferences of the employee before making any scheduling changes. For punch employees, the scheduling information start time and end time are displayed on a bar. If there are multiple shifts, multiple shift icons appear and all start and end times appear on the bar. Click the Scheduled Hours link to open a new page and transfer to the Daily Detail page to override shift information. Click the Schedule Hours link to transfer to the Daily Schedule page. Hover text is used to display the schedule hours for punch and elapsed employees. For elapsed employees, schedule hours appear. In addition to the elapsed information, events such as Approved Training, Absence, and Holiday information appear in the Elapsed column as icons. Training and absences data can be from different sources (Training - Training Administration, Enterprise Learning Management: Absence- Absence Management, Reported Time), and detailed scheduling information appears on Daily Schedule Details. Total Schedule Hours for the day appear if the Daily value is specified for the View By field. If the Day is an Off day, no hours appear but the OFF text icon appears. If there are multiple shifts for a day, only the first shift information appears. An icon denotes that there is a second shift. The second shift and the details of the second shift appear on the Daily Schedule Details page. If the shift crosses midnight, an icon denotes shift continuation. On the Day View page, if an employee does not show up for a shift (known as a no show), the No Show icon appears. If an employee is replacing another employee for a shift or number of shifts, the R (Replaced Employee) icon appears. Note: The system uses the following logic to determine whether or not an employee has a holiday. First, the system checks to see if an employee has a holiday schedule specified on the Job Data record. If there is no holiday schedule specified on the Job Data record for an employee, the system checks the Pay System Flag on the Job Data record for a value of Global Payroll. The system then derives the holiday schedule from GP pay group. If the Pay System Flag has a value of Payroll for North America or Payroll Interface and Absence System is equal to Absence Management, the system will derive the holiday schedule from GP pay group. If the Pay System Flag is equal to Payroll for North America or Payroll Interface and Absence System is equal to Other, then the system will derive the holiday schedule from the Payroll for North America pay group. If there is no holiday schedule on the Payroll for North America pay group, the system derives the holiday schedule from the Time and Labor workgroup. This logic is used for the Manager Calendar Views pages (Daily, Weekly, Monthly), the Manage Schedules pages for managers, and the Monthly Schedule page for employees. |
Replace Schedule |
Select one employee and click the Schedule Replacements button to find a replacement for this employee. |
Copy Schedules |
Select an employee and click the Copy Schedules button to copy a schedule based on this employee's. |
Swap Schedules |
Select two employees and click the Swap Schedules button to swap two employees' schedules. |
Legend |
The legend contains descriptions of the Manage Schedule icons. The icons default from the Manage Schedules Display Options page. In addition to the Schedule Categories, other icons displayed include Multiple Shifts, Scheduled OFF Day, Replaced Employee, Crossover Shift (for shifts that span midnight). |
Note: The schedule actions of Schedule Replacements, Swap Schedules, Copy Schedules, and Override Schedules are audited.
Use the Schedule Detail page (SCH_MNG_DAILY_DTL) to override a schedule, refresh or add a schedule for the day, or enter a new schedule for the day.
Navigation:
Click the link in the Daily Schedule Details column on the Daily Schedules page. On the Weekly Schedules and Date Range Schedules pages and then click the link in the Date column.
This example illustrates the fields and controls on the Schedule Detail page. You can find definitions for the fields and controls later on this page.
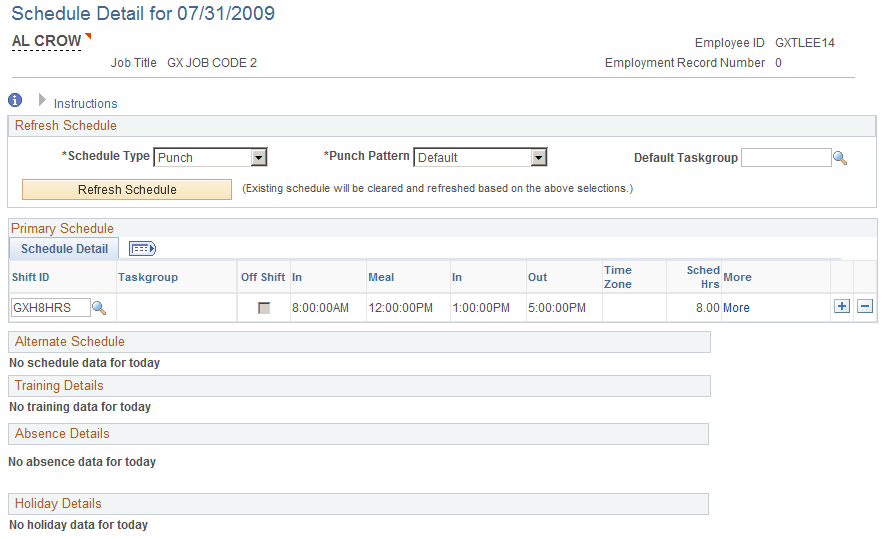
You can override a schedule on this page by refreshing or adding an existing schedule for the day, or you can create a new schedule for the day.
|
Field or Control |
Description |
|---|---|
|
Schedule Type |
Options in this field are Punch and Elapsed. |
|
Punch Pattern |
This field is available If you selected the Punch option in the Schedule Type field. Options for this field are Default and All Punches.
|
|
Default Task Group |
Enter a value in this field to display Time Reporting Elements and Task Elements or Task Profile values. Using a default taskgroup for the day is appropriate if you enter schedule changes without using a Shift ID. If making schedule overrides using a Shift ID, any taskgroup and task information from the Shift ID is derived and displayed in either the Primary Schedule or Alternate Schedule group boxes. The selection of Schedule Type and Taskgroup will derive the time reporting template used to default the display of Time Reporting Elements and Task Elements or Task Profile values for that taskgroup. If you defined the time reporting template to use the task template, these tabs are displayed in the Primary Schedule and Alternate Schedule group boxes. Note: The selection you enter in the Schedule Type and Taskgroup fields derive the time reporting template used to display Time Reporting Elements and Task Elements or Task Profile values for the taskgroup. If you defined the time reporting template to use the task template, these tabs are displayed in the Primary Schedule and Alternate Schedule group boxes, and may include Task Reporting Elements and Chartfields. |
|
More |
Click this link to open the Daily Detail – Shift Information page. |
|
Refresh Schedule |
Click this button after you change the Schedule Type Punch Pattern or Default Taskgroup values for the day. This resets the day to enter a new schedule override. Note: Remember to save the page for the schedule change to be reflected in the Manage Schedules components. |
This example illustrates the fields and controls for the Schedule Detail Page.
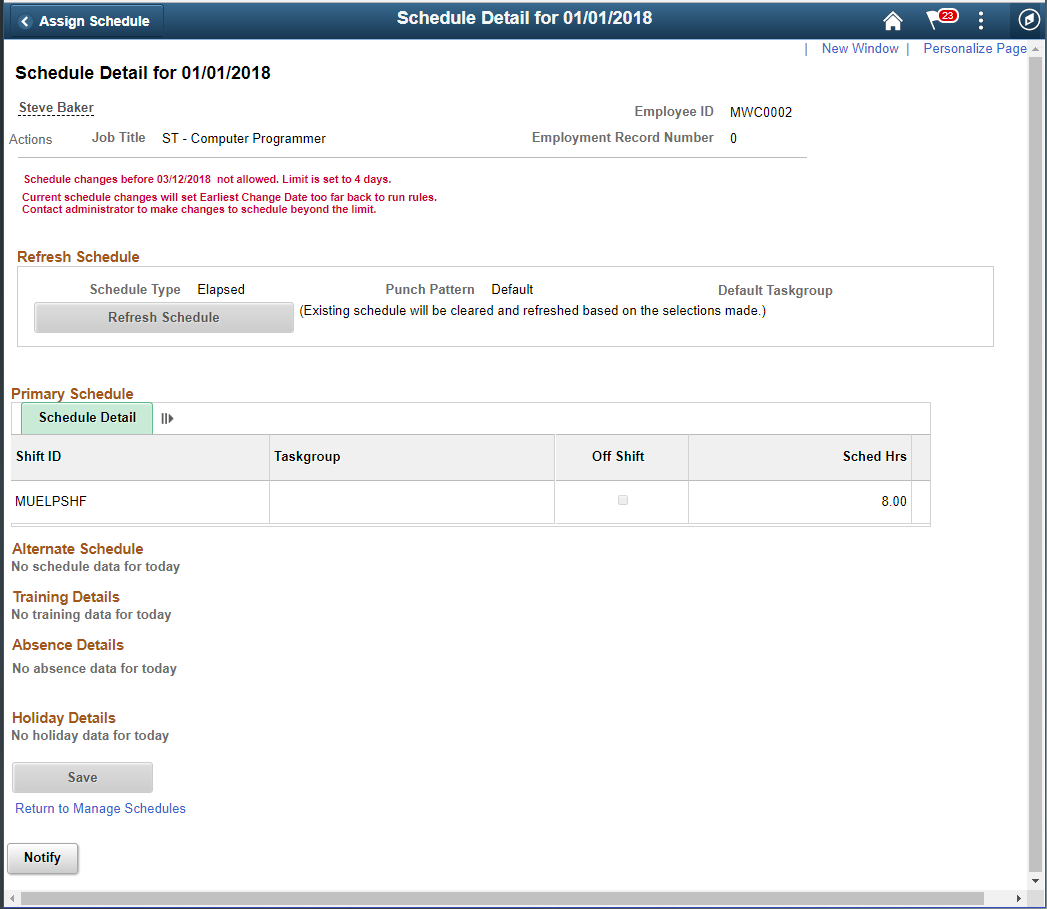
In this example, the Refresh Schedule will be greyed out as the schedule change limit is not within the specified period mentioned in Installation options and Time Period ID mentioned under Workgroup Defaults in Workgroup - Definition Page.
Note: The Manage Schedules component recognizes the date and time formats selected by the user under My Personalizations.
Schedule Daily Detail and the Display of Shift ID
When you have set the appropriate SETID for an employee, the system displays the Shift ID field for that employee. The SETID is derived from the Schedule Group associated with the employee's predefined or default schedule assignment. The only time that a Shift ID field does not appear on the Daily Detail page is when:
There is no row in Assign Work Schedule for the employee.
There is no schedule ID defined on the employee's workgroup.
If the employee does not have a long term schedule, then the Shift ID field will not appear on the page. As a result, you need to enter the shift data manually for the day. Select the Refresh Schedule button to activate fields in the Primary Schedule and Alternate Schedule group boxes.
Primary Schedule and Alternate Schedule
Any schedule information from a prior schedule change, or imported schedule information, or permanent work schedule is displayed in these group boxes. If no primary or alternate schedule detail exists for the day, it can be added using the Refresh Schedule button. You can enter a schedule override with a predefined shift which has the SetID of the employee's Schedule Group. You can also enter a schedule override that has only punch times or only scheduled hours for an elapsed schedule, without using shifts. If changing time reporting or task elements exist in a shift, the detail of the Shift can be accessed through a More link both on the Primary and Alternate Schedule sections. An icon representing Shift has Changing Elements appears for those shifts that have changing elements.
To enter an off shift, you can choose a predefined shift that has the Off Shift check box activated. If you are not using shifts, you can enter either elapsed hours with an Off Shift check box activated or an IN and OUT time with an Off Shift check box activated. The Off Shift check box determines that the Scheduled Hours are zero, it does not change the duration of the off shift.
Multiple shifts can be entered as a schedule override for a day. If you enter a punch shift that overrides the times of another punch shift for the day, you will receive a warning message.
The Alternate Schedule Detail tab is displayed only if core Global Payroll or Absence Management are installed and selected on the Installation Table – Products page.
Training Details
This group box displays training detail information from PeopleSoft Training Administration or Learning Management. The start time and end time of the training for the day are displayed.
Absence Details
This group box displays the duration of an absence from Global Payroll or Absence Management, or from leave reported directly on the Timesheet in Time and Labor or PeopleSoft Base Benefits.
Holiday Details
This group box displays the name of the holiday and number of hours from the Holiday Schedule. If a holiday schedule exists for the employee on the Job Data page, it is displayed. If no holiday schedule exists on that page, the system checks if the employee is a Global Payroll employee and uses the holiday schedule from the Global Payroll pay group. If the employee is not enrolled in a Global Payroll pay group, but is enrolled in Time and Labor, the system uses the holiday schedule from the employee's Workgroup.
Use the Schedule Replacements page (SCH_MNG_REPLACE) to schedule a replacement for an employee for a day.
Navigation:
Select one check box in the Select column and click the Replace Schedule button on the Daily, Weekly, or Date Range Schedule pages.
This example illustrates the fields and controls on the Schedule Replacements page. You can find definitions for the fields and controls later on this page.
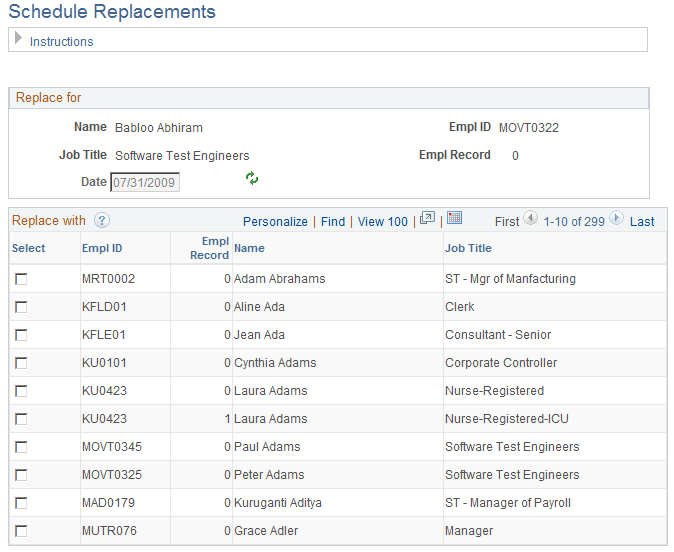
On the Schedule Replacements page, change the date if required and select one employee to substitute the schedule for the day. In most cases, the user would be finding a replacement for an employee who will be absent for the day. All the employees who are not in training for that time, and not absent for the day, appear in the Replace with grid.
After an employee is Replaced, an R is placed next to the employee in their daily cell, on any of the Manage Schedules pages - day, week or date range. The employee who is replacing the employee, inherits the schedule. The replaced employee retains the original schedule, so as to represent what the original schedule was, and for appropriate payment if the employee then reports an absence for the day.
If you decide that the replacement was a mistake, you can undo it by accessing the Daily Detail page from the Scheduled Hours link, and clicking the Undo Replacement button and then clicking the OK button on the Confirmation page. As a result, the R will no longer be displayed on the Manage Schedules page.
For the employee who had inherited the employee's schedule, the schedule for that day would need to be changed, if the employee is no longer replacing the employee's schedule for that day.
Note: If you selected the Day View By Option, the Date field on this page is display only.
Use the Copy Schedules page (SCH_MNG_COPY) to copy an employee schedule to be used by another employee for a day or specified date range.
Navigation:
Select one check box in the Select column and click the Copy Schedules button on the Daily, Weekly, or Date Range Schedule pages.
This example illustrates the fields and controls on the Copy Schedules page. You can find definitions for the fields and controls later on this page.
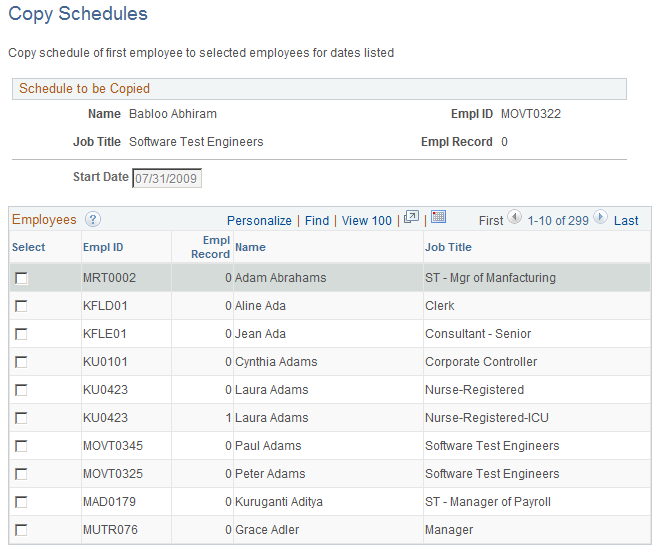
On the Copy Schedules page, change the Start Date and End Date if required. Select single or multiple employees to copy schedules and click the Copy button. The whole day will be copied for the date or range of dates defined. .
Note: If you selected the Day View By option, the Date field on this page is display only.
Use the Swap Schedules page (SCH_MNG_SWAP) to swap two employees' schedules.
Navigation:
Select two check boxes in the Select column and click the Swap Schedules button on the Daily, Weekly, or Date Range Schedule pages.
This example illustrates the fields and controls on the Swap Schedules page. You can find definitions for the fields and controls later on this page.
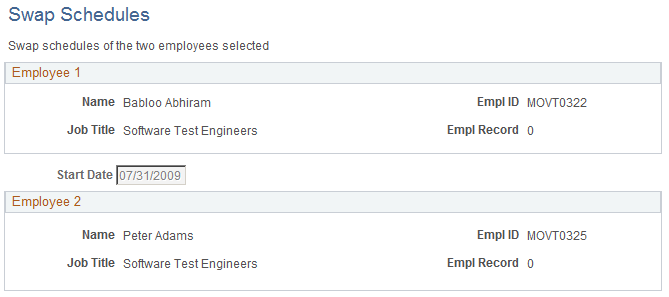
On the Swap Schedules page, change the Start Date and End Date if required and click the Swap button. Click the Cancel button to return to the Manage Schedule page and make another selection. The whole day's schedule will be swapped between the two employees, or all the days listed if it is a range of dates.
Note: If you selected the Day View By option, the Date field on this page is display only.