Managing Schedules Using Fluid
This topic provides an overview on how to manage schedules for employees using fluid.
|
Page Name |
Definition Name |
Usage |
|---|---|---|
|
HC_MNG_EMP_SCH_FL_GBL |
Select to access the search criteria page and related pages for schedule actions using the Schedule Actions Summary page. |
|
|
EOSF_SRCH_FL |
Look up employee schedules by entering search criteria manually, using Saved Searches, or My Recent Searches. This page uses the HCM Configurable Search framework to define the fields to search on and the fields that are returned from the search. |
|
|
MNG_SCH_ACTION_FLU |
Page that lists schedule related action options. |
|
|
SCH_ASSIGN_FL |
Assign a time reporter to a schedule. |
|
|
SCH_ASSIGN_HIST_FL |
View all schedule assignments for an employee, including default schedule assignments. |
|
|
MNG_SCH_FL |
Swap two employees' schedules for a day or for a specified date range. |
|
|
MNG_SCH_FL |
Schedule the replacement for an employee for a day. |
|
|
MNG_SCH_FL |
Copy an employee schedule to be used by one or more employees for a day or for a specified date range. |
|
|
SCH_EE_PREF_FL |
View the employee's contact and schedule preferences. |
|
|
MNG_EMP_SCH_FL |
Override or add a schedule for an employee for a day. |
Administrators and Managers can use the Manage Schedule tile to navigate to the employee search page to access Schedule Actions Summary page. Select respective pages to assign, view and manage schedules.
Navigation:
For Administrators, select Workforce Administrator from the drop down Menu. Select the Time and Labor tile to open the landing page with Manage Schedule tile.
Managers can personalize their Homepage by adding the Manage Schedule tile. Select Manager Self Service from the drop down menu and select the Manage Schedule tile.
The following video provides an overview of Fluid Manager Self Service Scheduling:
Video: Image Highlights, PeopleSoft HCM Update Image 40: Fluid Manager Self Service Scheduling
This example illustrates the Manage Schedule Tile.

Use Manage Schedule tile to access the search page and then the Schedule Actions Summary page to view or manage schedules for employees.
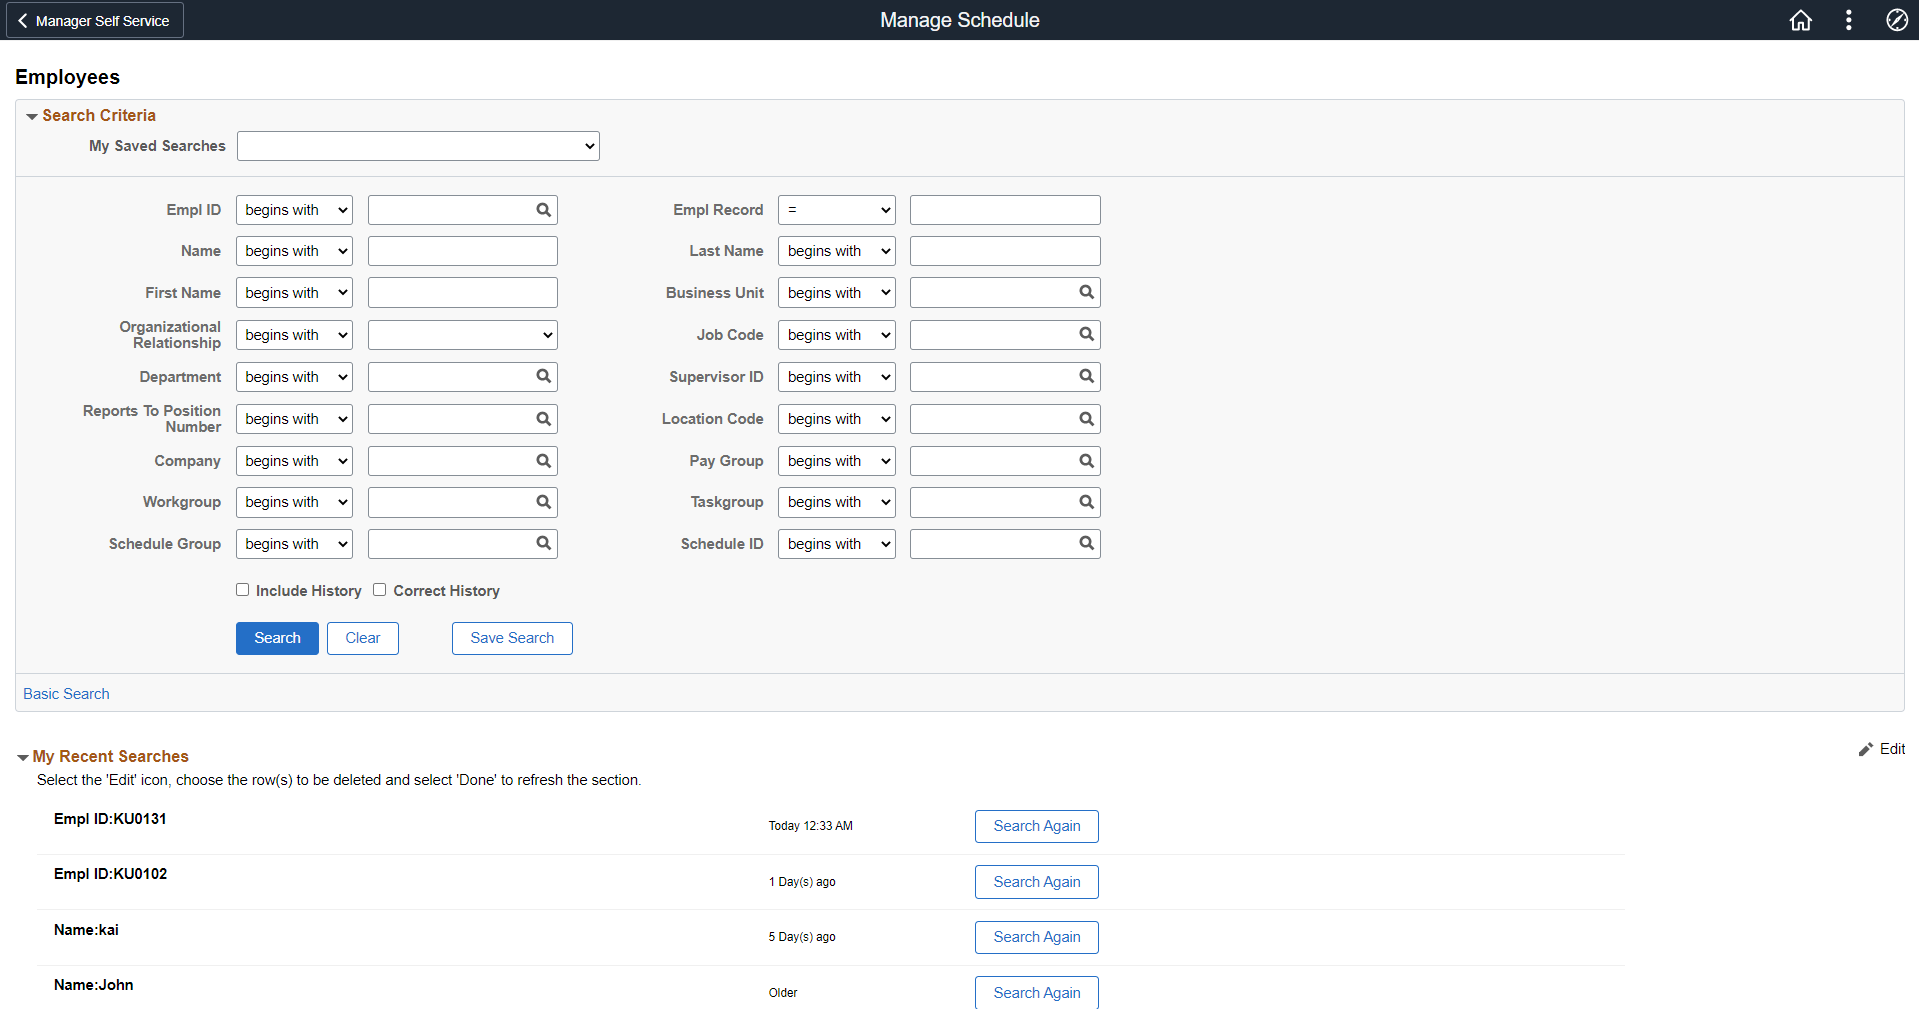
Use the Manage Schedule - Search Criteria page to search for an enrolled employee in Time and Labor.
The page first displays the Advanced Search mode with multiple search fields, the ability to use saved searches or recent searches, and save the search results. Use the Search By field in Basic Search mode to retrieve data using the search criteria drop-down menu. Administrators responsible for creating search configurations can modify these options according to the needs of their organization.
For more information on setting up search page configurations, refer to Setting Up Search Configuration.
This video provides an overview of the Configurable Search feature:
Video: Image Highlights, PeopleSoft HCM Update Image 36: Configurable Search
This example illustrates the fields and controls of the Manage Schedule - Search Criteria page.
|
Field or Control |
Description |
|---|---|
|
My Recent Searches |
View the results of a search that was previously used. Use the Edit link to delete the rows from the search history. |
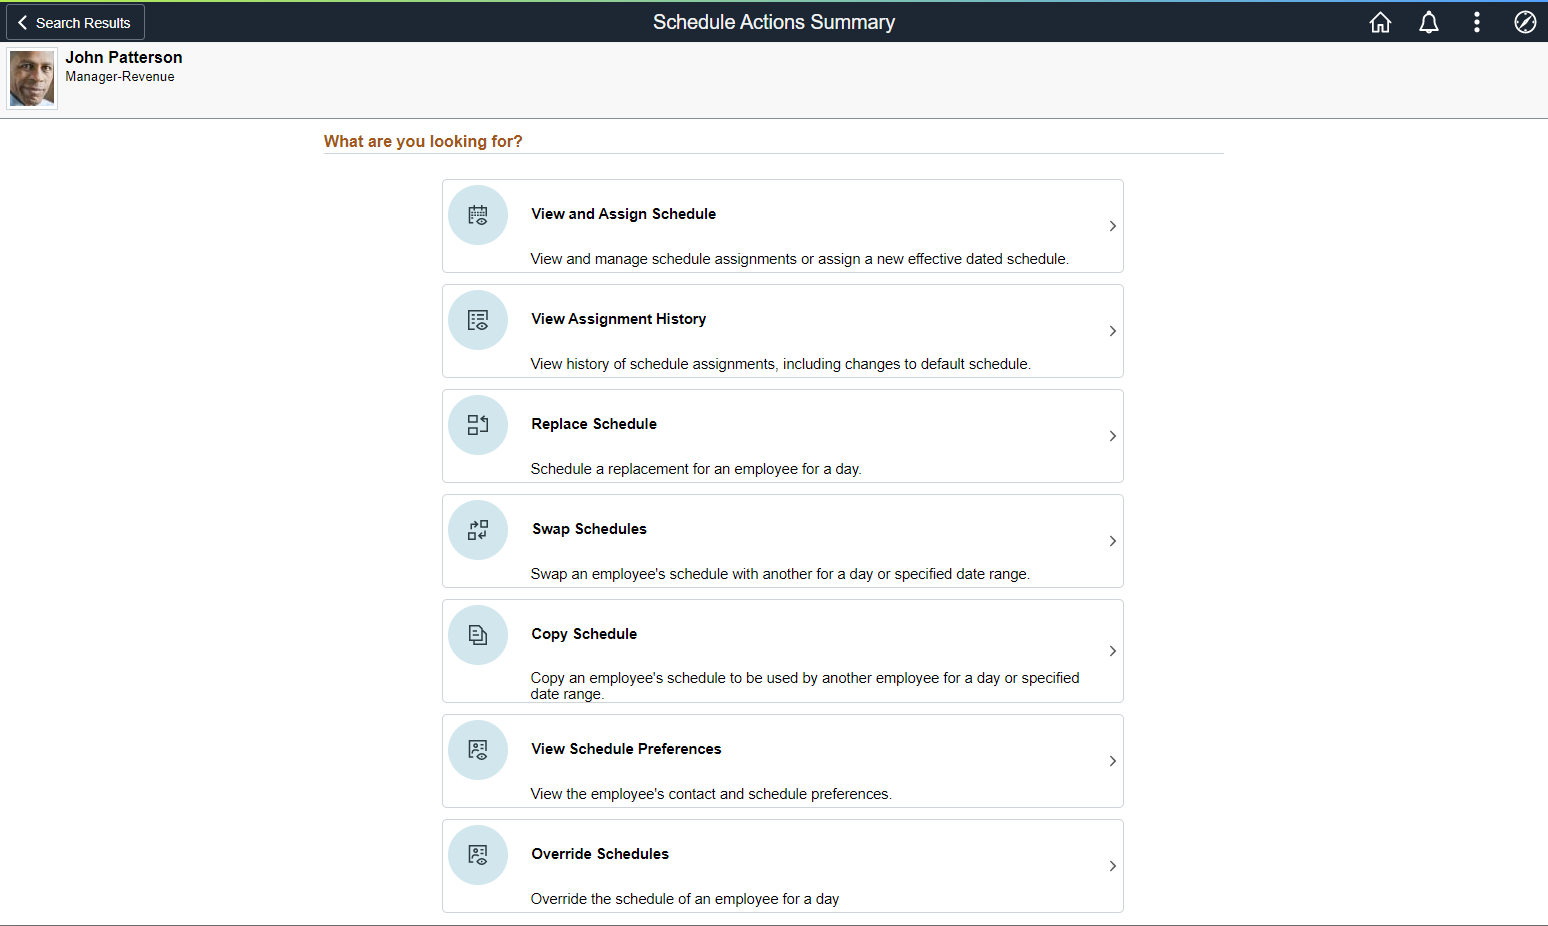
Select the employee from the search results to access the Schedule Actions Summary page.
Use the Schedule Actions Summary (MNG_SCH_ACTION_FLU) to access the following pages:
View and Assign Schedule
View Assignment History
Replace Schedule
Swap Schedules
Copy Schedule
View Schedule Preferences
Override Schedules
Navigation:
This example illustrates the fields and controls on the Schedule Actions Summary page.
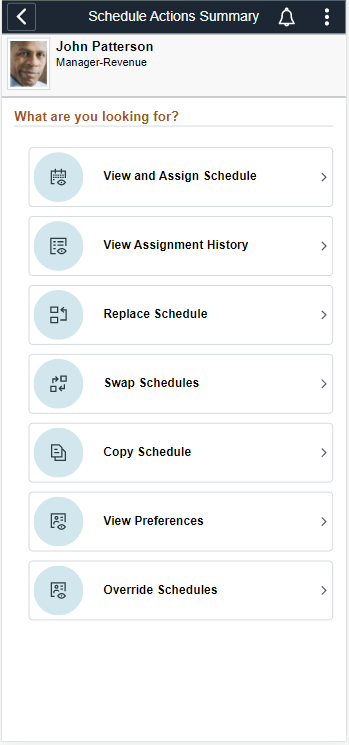
This example illustrates the Schedule Actions Summary page using a smartphone.
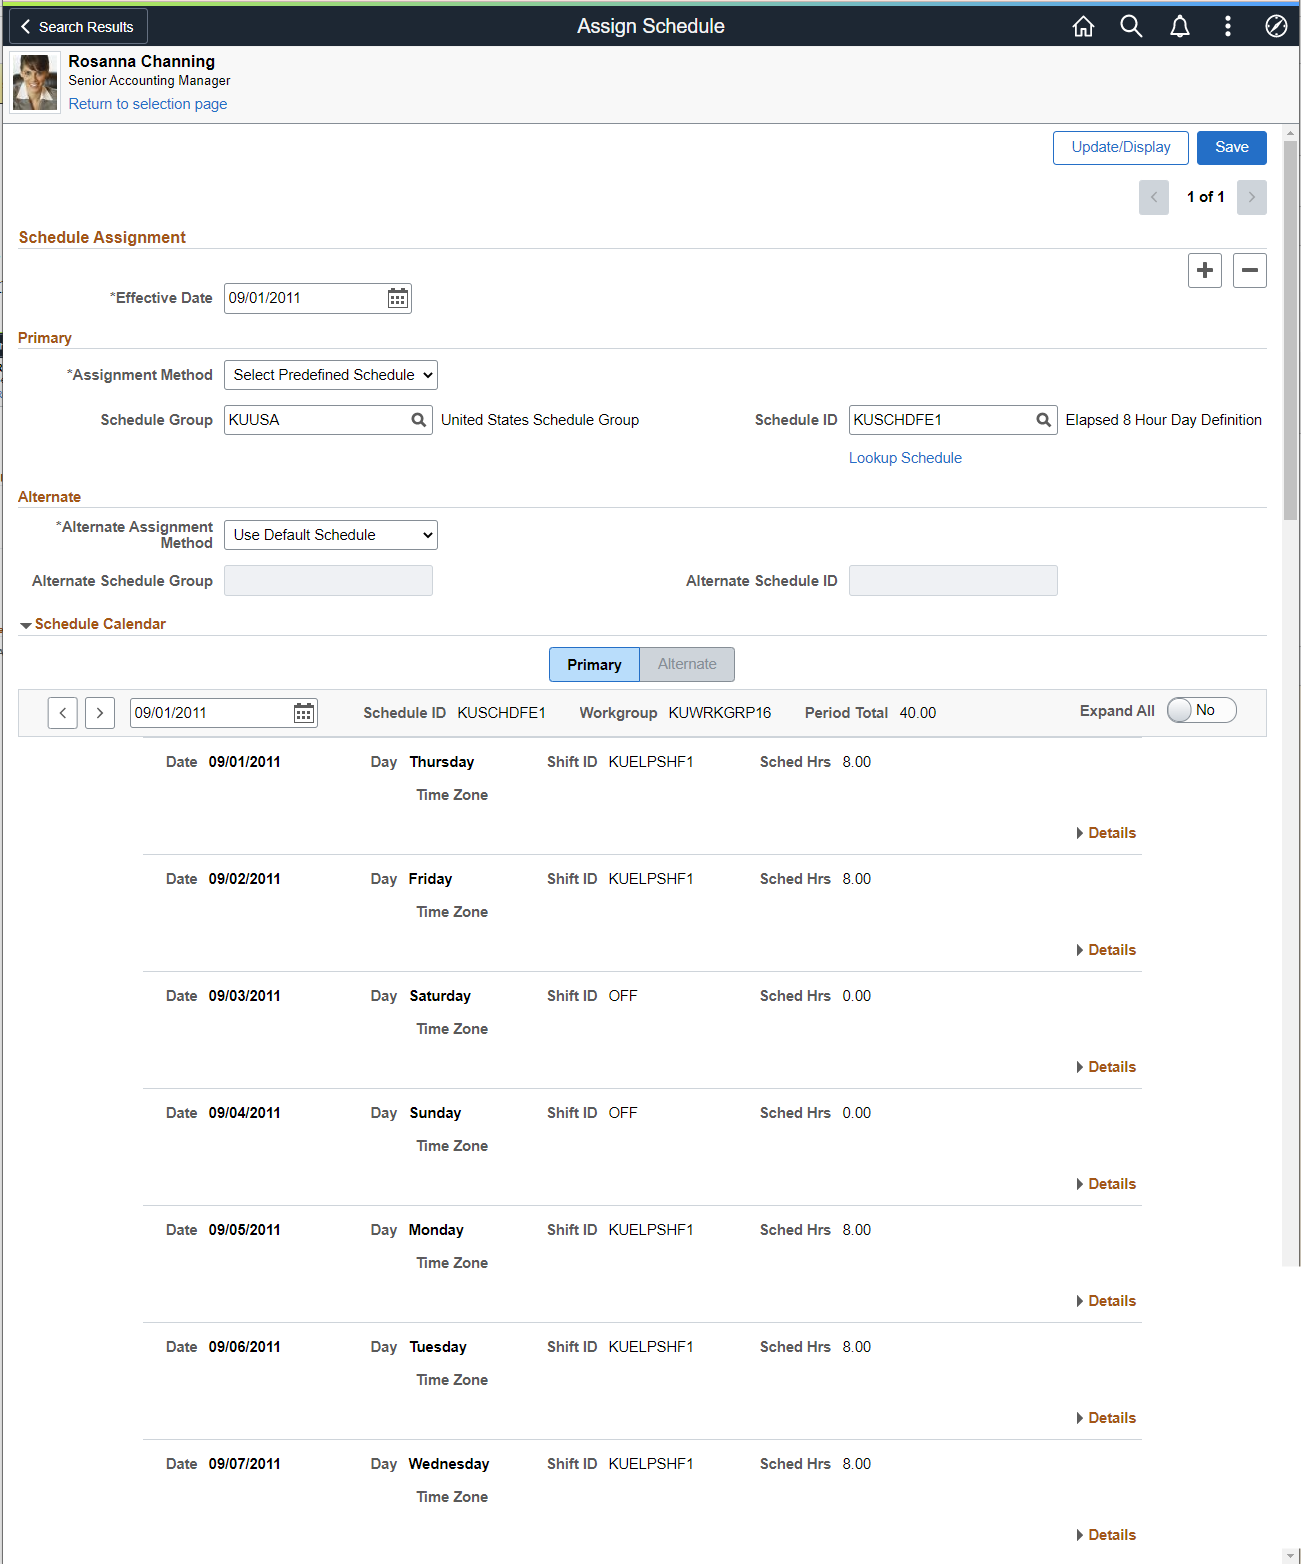
Use the Assign Schedule page (SCH_ASSIGN_FL) to view and manage schedule assignments or assign a new effective dated schedule.
Navigation:
This example illustrates the fields and controls of the Assign Schedule Primary Page.You can find definitions for the fields and controls later on this page.
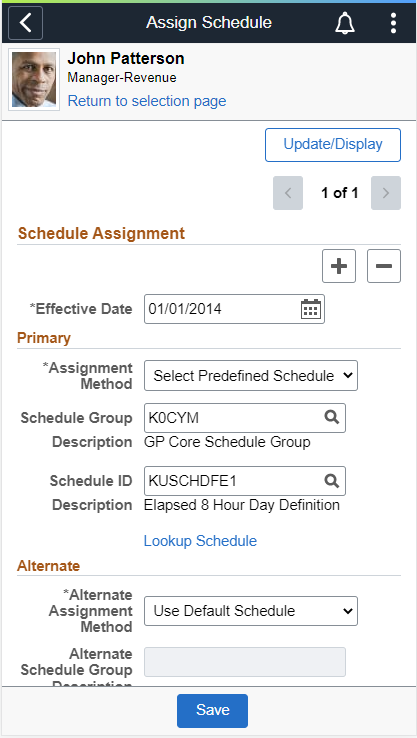
This example illustrates the Assign Schedule page using a smartphone.
Note: The Alternate tab will be hidden for users who do not have an alternate schedule.
|
Field or Control |
Description |
|---|---|
|
Effective Date |
Select the start date of the new schedule assignment. |
|
Assignment Method |
Select Create Personal Schedule, Select Predefined Schedule or Use Default Schedule. When selected, the Create Personal Schedule value allows you to create an effective dated personal schedule for this employee. A Create Schedule link is displayed on the right side of the grid. In addition, you can select a Schedule Group for the employee. The Schedule ID is automatically populated with the EmplID, Employee Record Number and three additional digits. The Select Predefined Schedule value enables you to select a Schedule Group an associated Schedule ID. The Use Default Schedule value derives a default schedule for the time reporter. For Global Payroll, the schedule defaults from the Global Payroll pay group assigned to an employee (from the Job Data record). For Time and Labor employees that are not in Global Payroll, the schedule defaults from the workgroup assigned to employees on the Maintain Time Reporter Data page when they are enrolled in Time and Labor. If no row is displayed for schedule assignment, the schedule resolution process still resolves the default schedule on the Global Payroll pay group assigned to an employee, or the default schedule on the employee's workgroup if not enrolled in a Global Payroll pay group. |
|
Schedule Group |
Schedule Groups are used to group employees with like schedules. A Schedule Group must be entered. For default schedules, both the workgroup and Global Payroll pay groups have Schedule Groups associated with a Schedule ID. The Schedule Group is associated with a SetID, so only valid schedules for a particular SetID that is associated to an employee are displayed. |
|
Schedule ID |
If the assignment method is Select Predefined Schedule, select the schedule to assign to the payee. If the assignment method is Use Default Schedule, the system displays the schedule ID that the payee inherits from the pay group. |
|
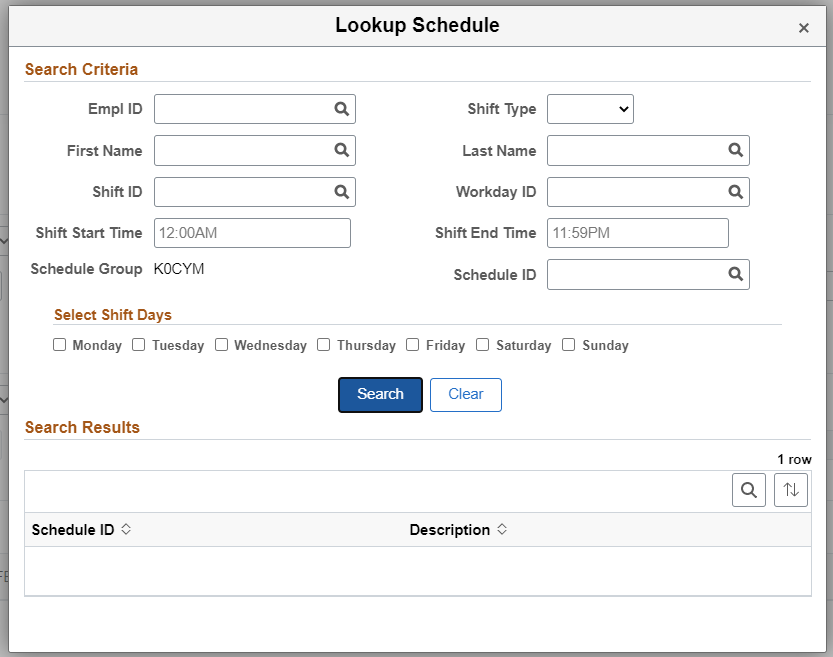
Lookup Schedule |
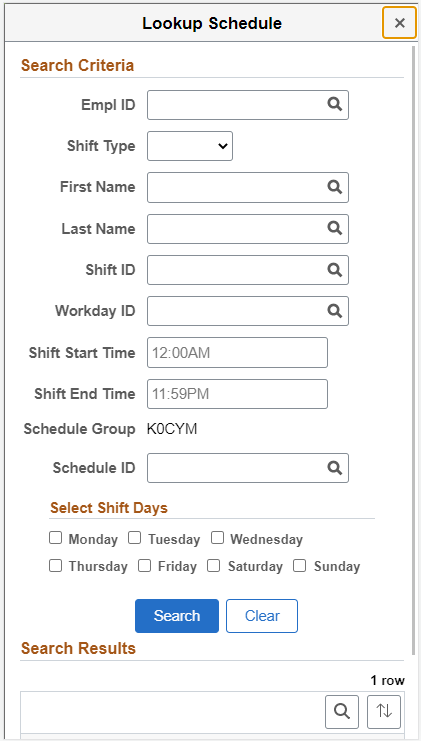
Open the Lookup Schedule modal to look for the schedule. The Lookup Schedule modal is provided to assist you in searching for the right schedule. The Lookup opens a modal which lets you search for schedule based on one or more schedule or shift attributes. Once you select the resultant value the schedule information will be transferred to the main page automatically. |
|
Alternate Assignment Method |
Select Create Personal Schedule, Select Predefined Schedule and Use Default Schedule. for alternate assignment. |
 |
A star icon appears in the Assign Schedules group box, when you assign an employee a default schedule from either a Time and Labor workgroup or a Global Payroll pay group, and the default schedule has changed over time. This default assignment can occur manually, or as a result of an employee hire triggering the Workforce Sync message to insert a default assignment row in Assign Work Schedule. The Assign Schedules group box displays the Schedule ID that is most current at the time, from the workgroup or pay group, despite the schedule assignment effective date. The display of this Schedule ID assists in determining which schedule the system is currently using for schedule resolution. The display of the star icon alerts you to review the History of Schedule Assignments, including Default Changes section to determine what the schedule changes are from the initial schedule assignment to the current date. |
This example illustrates Lookup Schedule.
This example illustrates the Lookup Schedule Modal using smartphone.
The Schedule Calendar grid displays the schedule ID, Workgroup, Period Total and field to change the date and previous and next button to view periods of the schedule.
This example illustrates the fields and controls on the Schedule Calendar grid. You can find definitions for the fields and controls later on this page.

|
Field or Control |
Description |
|---|---|
|
Expand All |
Expand all of the Schedule Calendar details under each workday. |
|
Period Total |
Displays the sum of the work hours for a particular period in the schedule calendar for the logged in employee. |
|
Shift Detail link |
Select to open the Shift Detail modal. The Shift Detail grid lists the Shift Time tab, Time Reporting Elements tab (if a time reporting template is chosen), Task Reporting Elements tab (if the time reporting template has task template selected instead of task profile), and Chartfields tabs. |
The Schedule Calendar area lists all of the elements associated to the schedule. The page also resolves the actual "day" associated with the dates of the schedule.
Note: If a user sets up a Shift or Schedule Definition that spans more than 24 hours, the shift displays the begin date of when the shift began.
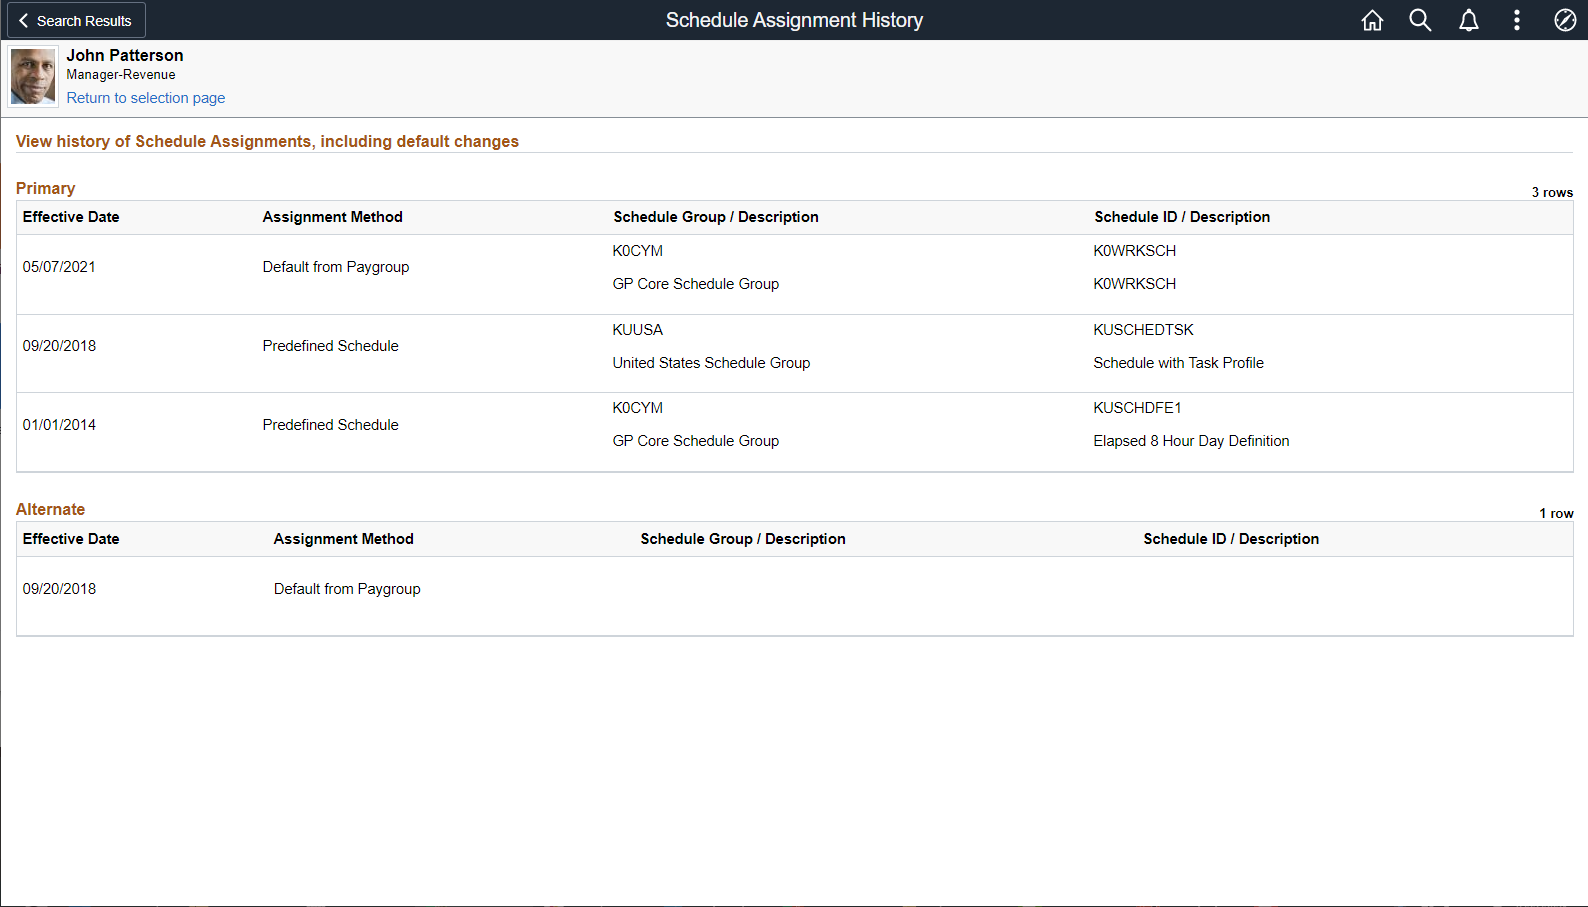
Use the Schedule Assignment History page (SCH_ASSIGN_HIST_FL) to view history of schedule assignments, including changes to the default schedule.
This section shows all of the schedule assignments, including what default schedules may have changed either on a Global Payroll pay group or Time and Labor workgroup, if the user has a default schedule assigned.
Navigation:
This example illustrates the fields and controls on the Schedule Assignment History page.
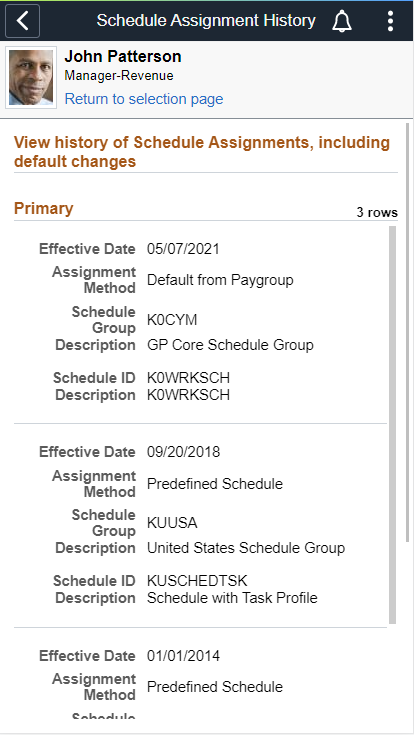
This example illustrates the Schedule Assignment History page using a smartphone.
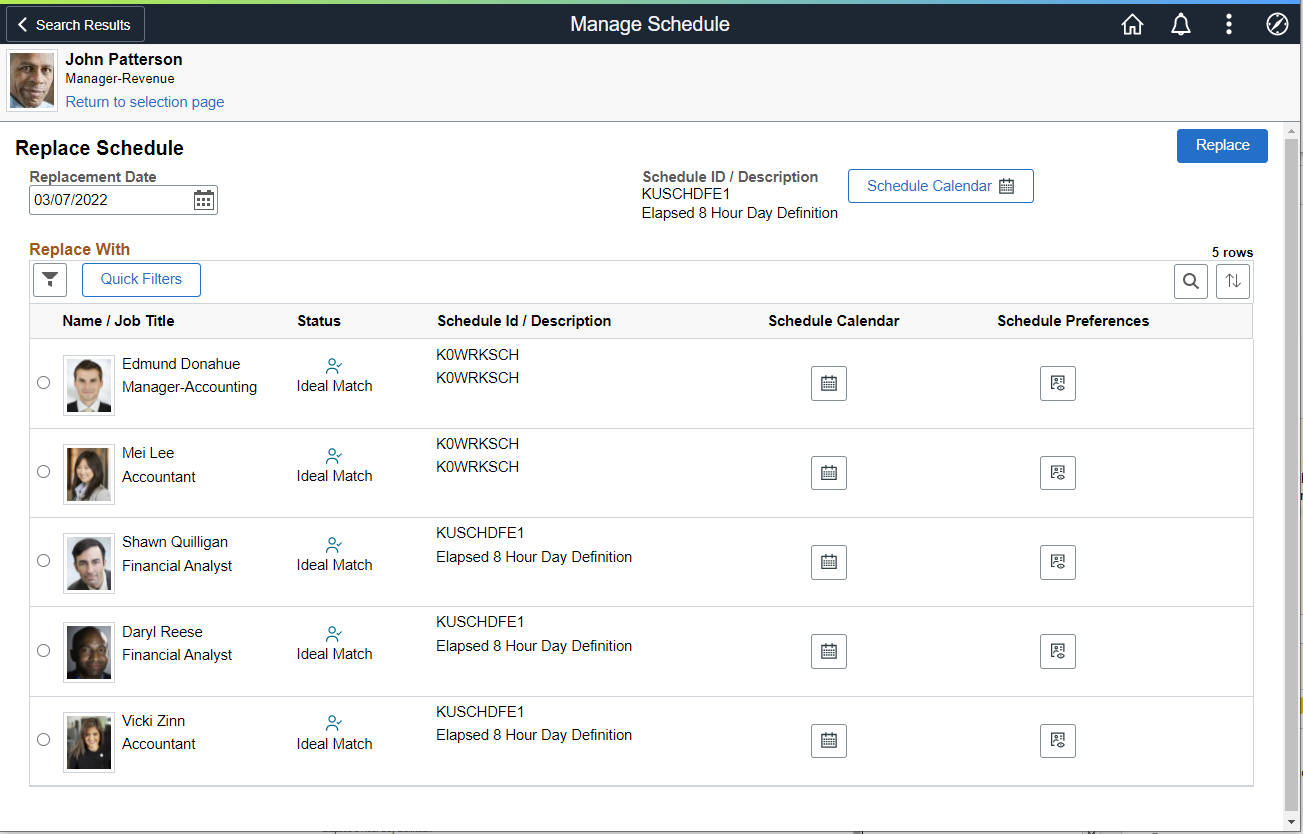
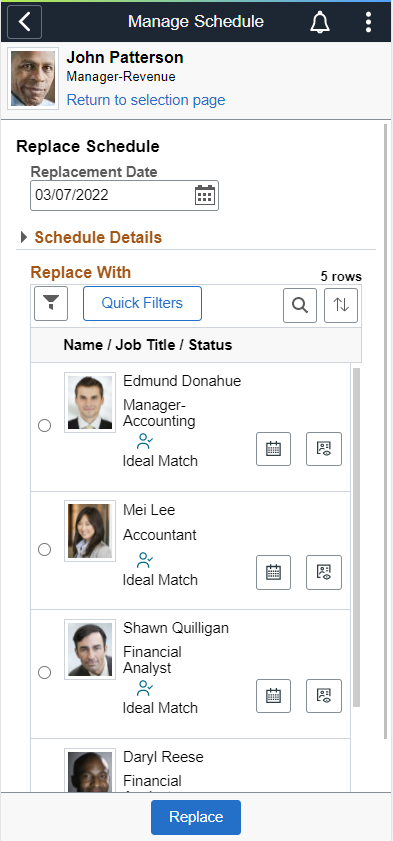
Use the Replace Schedule page (MNG_SCH_FL) to schedule a replacement for an employee for a day.
Select the employee to be replaced from the Search Results page.
On the Replace Schedule page, change the date, if required, and select one employee to substitute the schedule for the day. By default, the current data populates.
Navigation:
This example illustrates the fields and controls on the Replace Schedule page. You can find definitions for the fields and controls later on this page.
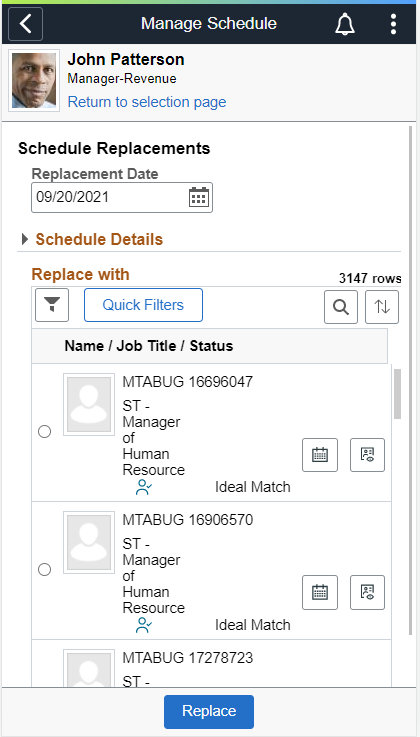
This example illustrates the Replace Schedule page using a smartphone
|
Field or Control |
Description |
|---|---|
|
|
Select to look up potential substitutes (other employees) for the specified replacement date on the employee's schedule using the Filters page (modal). Search fields that appear on the Filters page are enabled to be included in search criteria on the Manager Search Options - Select Default Criteria and Options Page. |
|
|
Select to access predefined filters based on matched status. |
|
Status |
Identify the ideal match or employees with conflicting schedules or who are not available. By default, filters are set to View All. |
|
Schedule Calendar |
Select to access the respective Schedule Calendar for the employee. For employees whose shifts are overridden for the dates selected, the Schedule ID/Description column will display as "Shift Overriden" and the corresponding Schedule Calendar selection will be disabled. |
|
Schedule Preferences |
View an employee's contact and schedule preferences. |


From the Replace With section, you can select only one employee as the replacement.
Quick Filter
These are the pre-defined filters that target employees into defined categories.
This example illustrates the fields and controls on the Manage Schedule pages with Quick Filters. You can find definitions for the fields and controls later on this page.

Fields or controls and descriptions for Quick Filters:
|
Field or Control |
Description |
|---|---|
|
Ideal Match |
All employees based on the Manager Self Service search filter appear in this bucket if they satisfy the following criteria:
|
|
Unavailable |
All employees based on the Manager Self Service search filter appear in this bucket if they satisfy the following criteria:
|
|
Shift Conflict |
All employees based on the Manager Self Service search filter appear in this bucket if they satisfy the following criteria: For Punch Employees their punch begin and end times overlaps with the source employee begin and end times for the selected date range. |
On Selecting Replace, a message indicates that the replacement was successful for the employee for the selected date.
After successful replacement, the Replace button appears as the Undo Replacement button. The replaced employee inherits the schedule of the existing employee. It also retains the original schedule to represent the previous schedule and for appropriate payment in case the employee reports absence for the day.
If a replacement already exists for the source employee or the selected employee for the date chosen, then an informational message is displayed for managers and administrators so that they are aware of it.
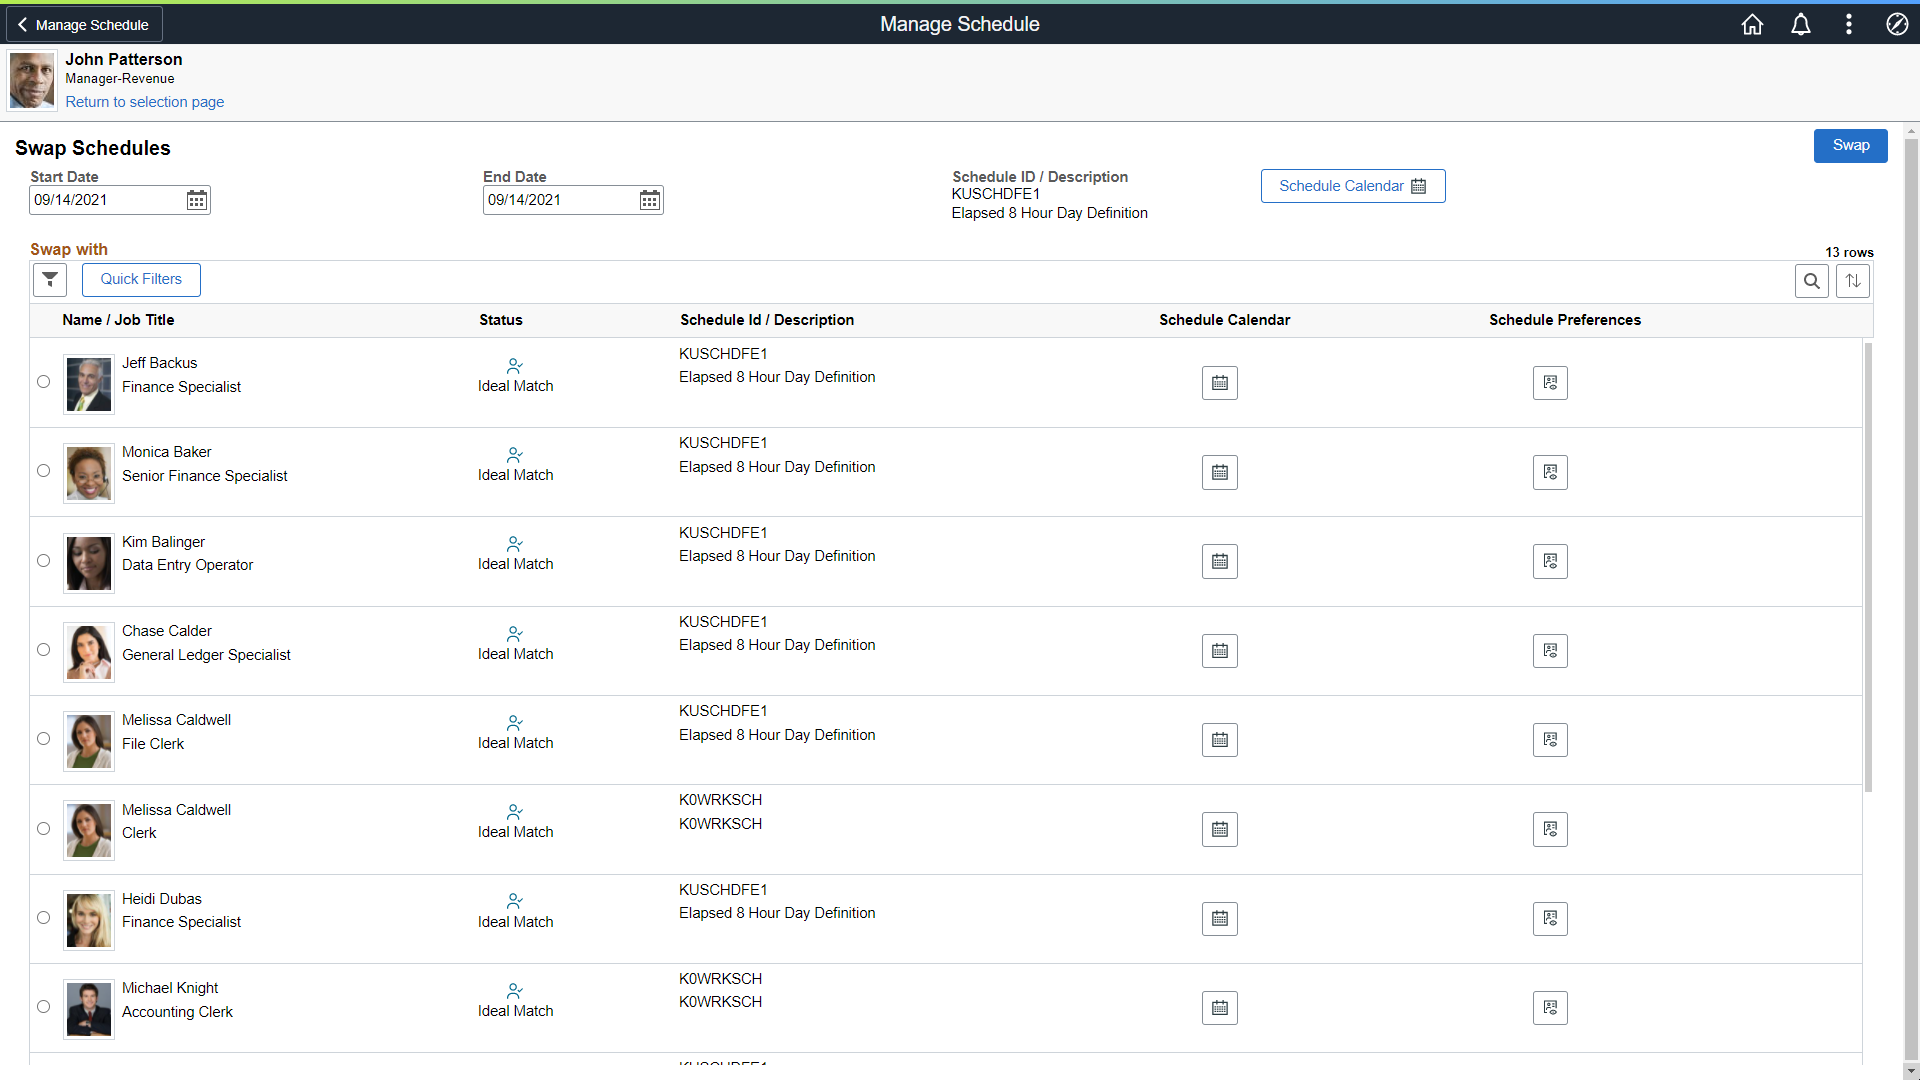
Use the Manage Schedule - Swap Schedules page (MNG_SCH_FL) to swap schedules.
On the Manage Schedule - Swap Schedules page, change the start and end dates if required, and select an employee to swap the schedules for the day. By default, it populates the current day for both begin and end dates.
Navigation:
This example illustrates the fields and controls on the Manage Schedule - Swap Schedules page. You can find definitions for the fields and controls later on this page.
This example illustrates the Manage Schedule - Swap Schedules page using a smartphone.
The Swap with grid shows the employees that are returned from the search on the Filters page.
You can select only one employee to swap.
If a swap event already exists for the source employee or the selected employee for the date chosen, then an informational message is displayed for managers and administrators so that they are aware of it.
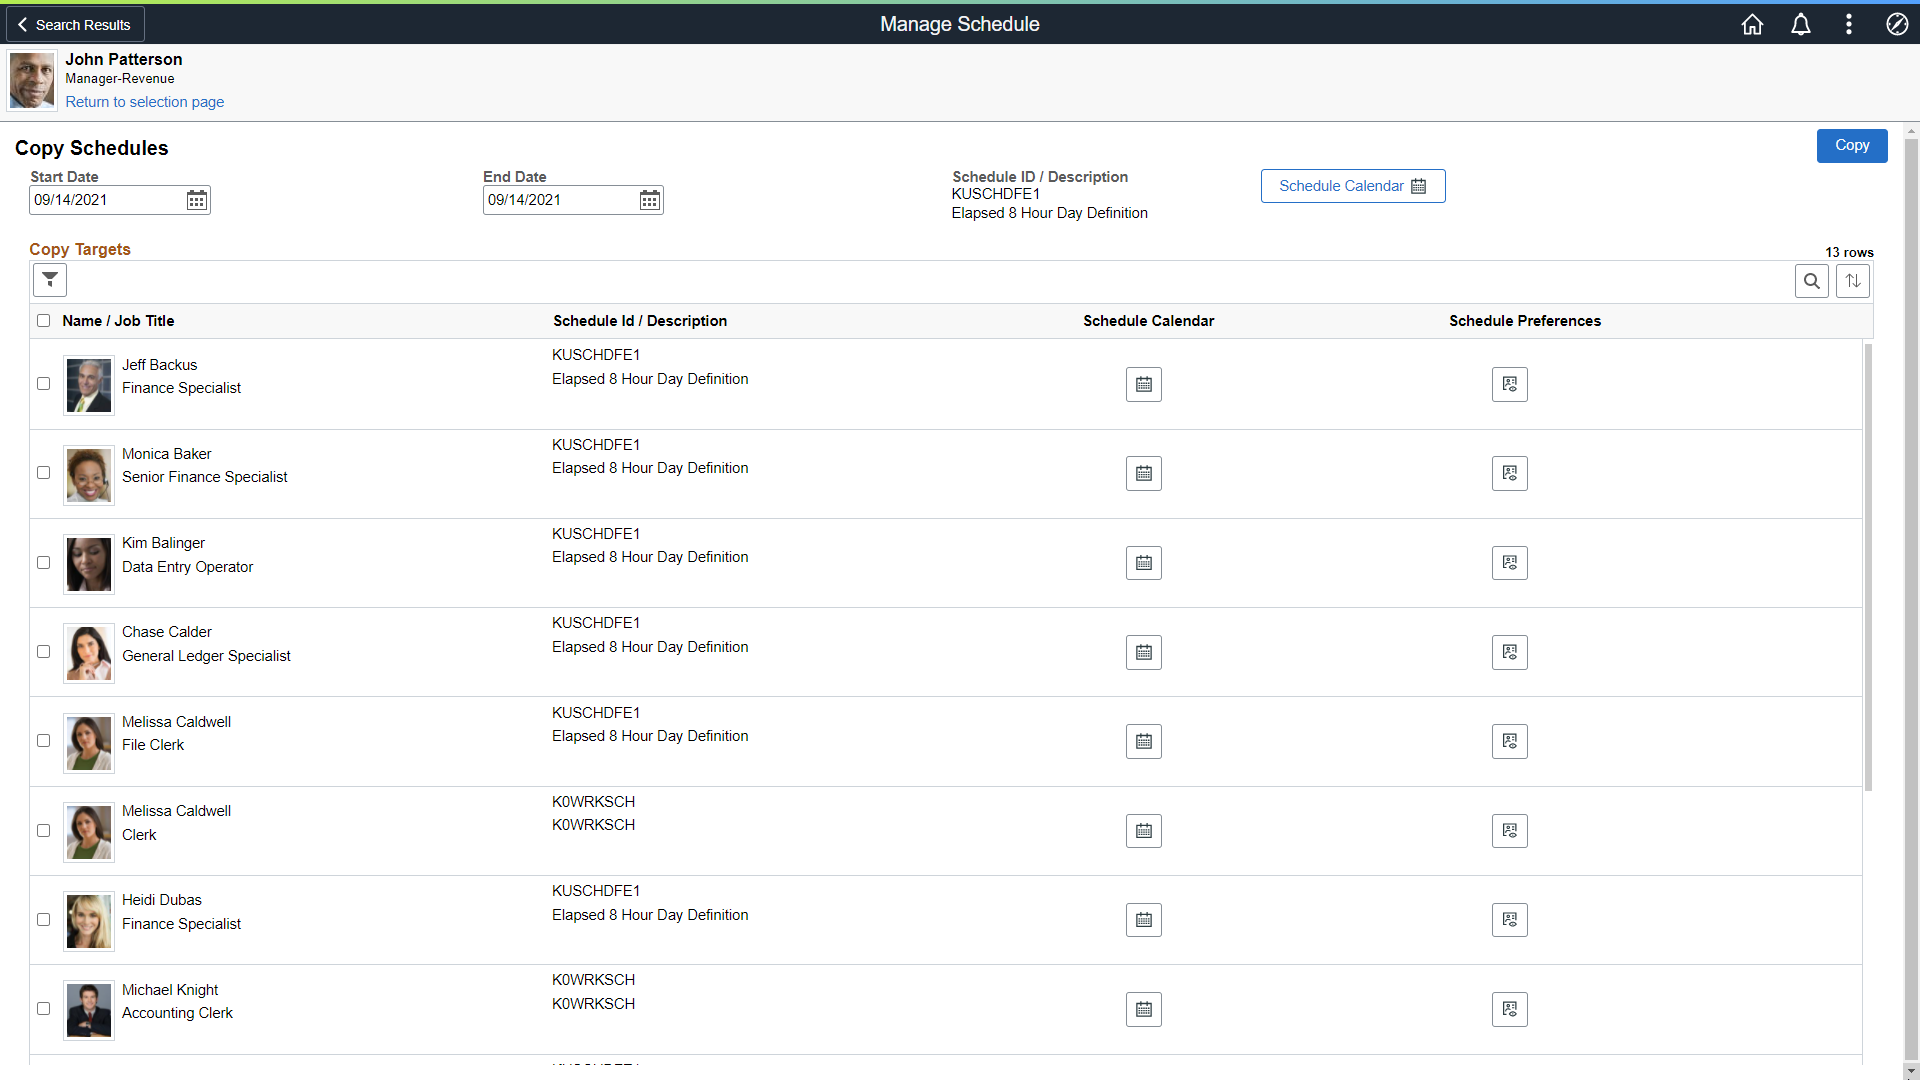
Use the Manage Schedule - Copy Schedules page (MNG_SCH_FL) to copy an employee's schedule to be used by another employee for a day or specified date range.
On the Manage Schedule - Copy Schedules page, change the dates if required, and select the employees to copy the schedules for. By default, it populates the current day for both begin and end dates.
Navigation:
This example illustrates the fields and controls on the Manage Schedule - Copy Schedules page.
This example illustrates the Manage Schedule - Copy Schedules page using a smartphone.
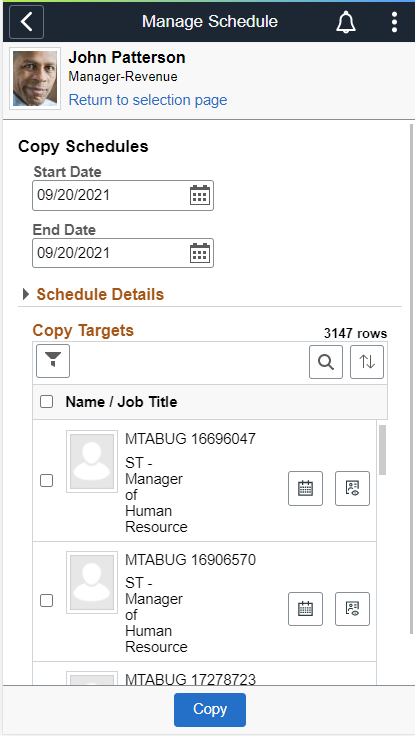
The Copy Targets grid shows the employees that are returned from the search on the Filters page.
Use the Schedule Preferences page (SCH_EE_PREF_FL) to view the employee's contact and schedule preferences.
Navigation:
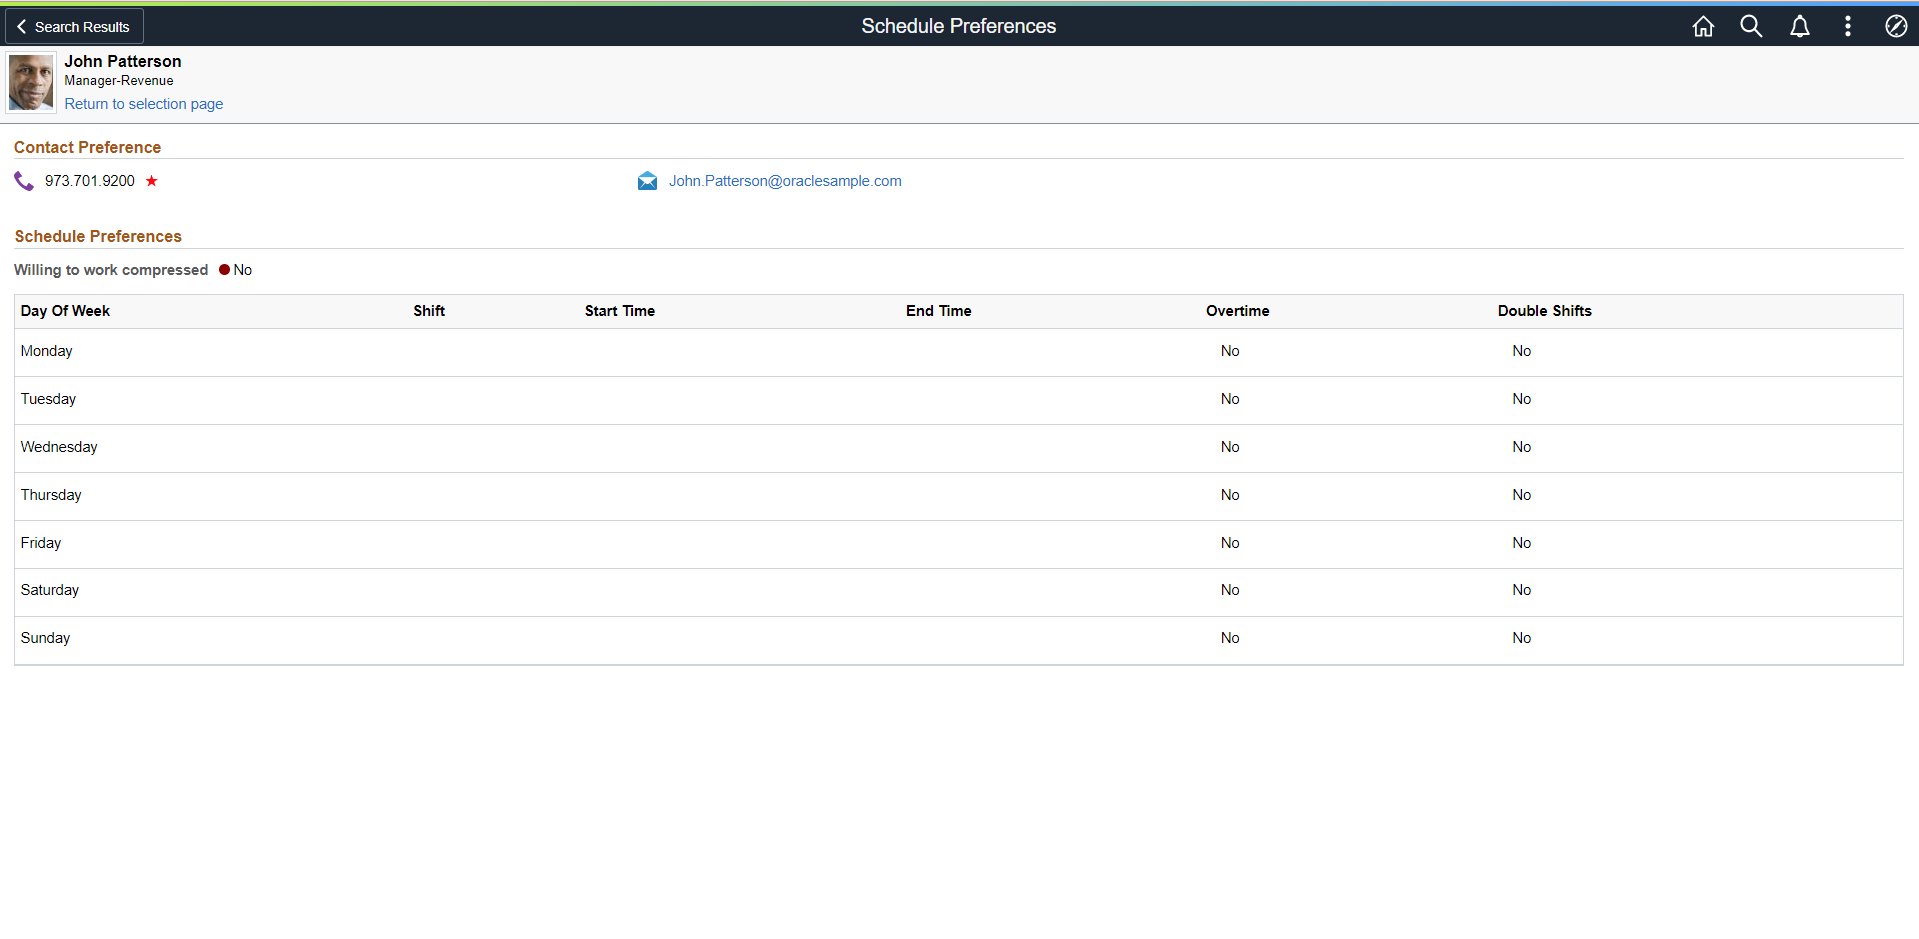
This example illustrates the fields and controls on the Schedule Preferences page.
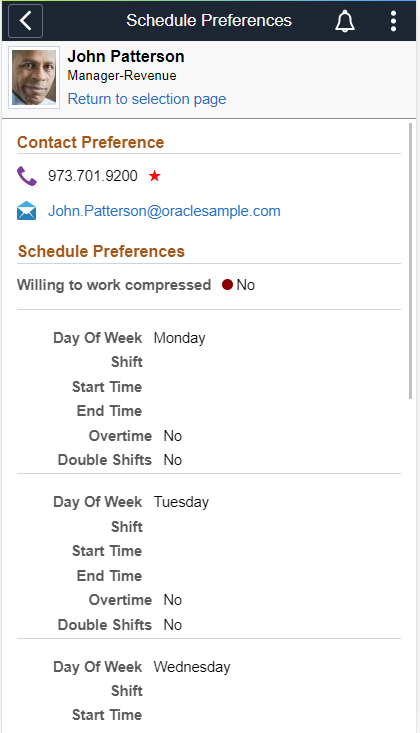
This example illustrates the Schedule Preferences Page using a smartphone.
|
Field or Control |
Description |
|---|---|
|
Contact Preference |
The manager or administrator can view the employee's preferred phone number and email address. |
|
Schedule Preferences |
View the shift or start and end times an employee prefers to work for each day of the week. |
|
Willing to work compressed |
View if an employee is willing to work a compressed work week. |
|
Shift |
The managers and administrators can view the shift an employee prefers to work. This field is populated based on the particular EmplID. |
|
Start Time, End Time |
View the start and end times an employee prefers to work. |
|
Overtime |
View if an employee is willing to work overtime. |
|
Double Shifts |
View if an employee is willing to work double shifts. |
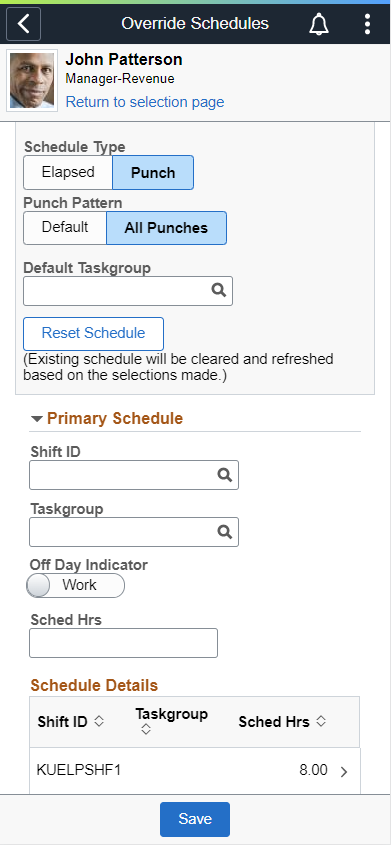
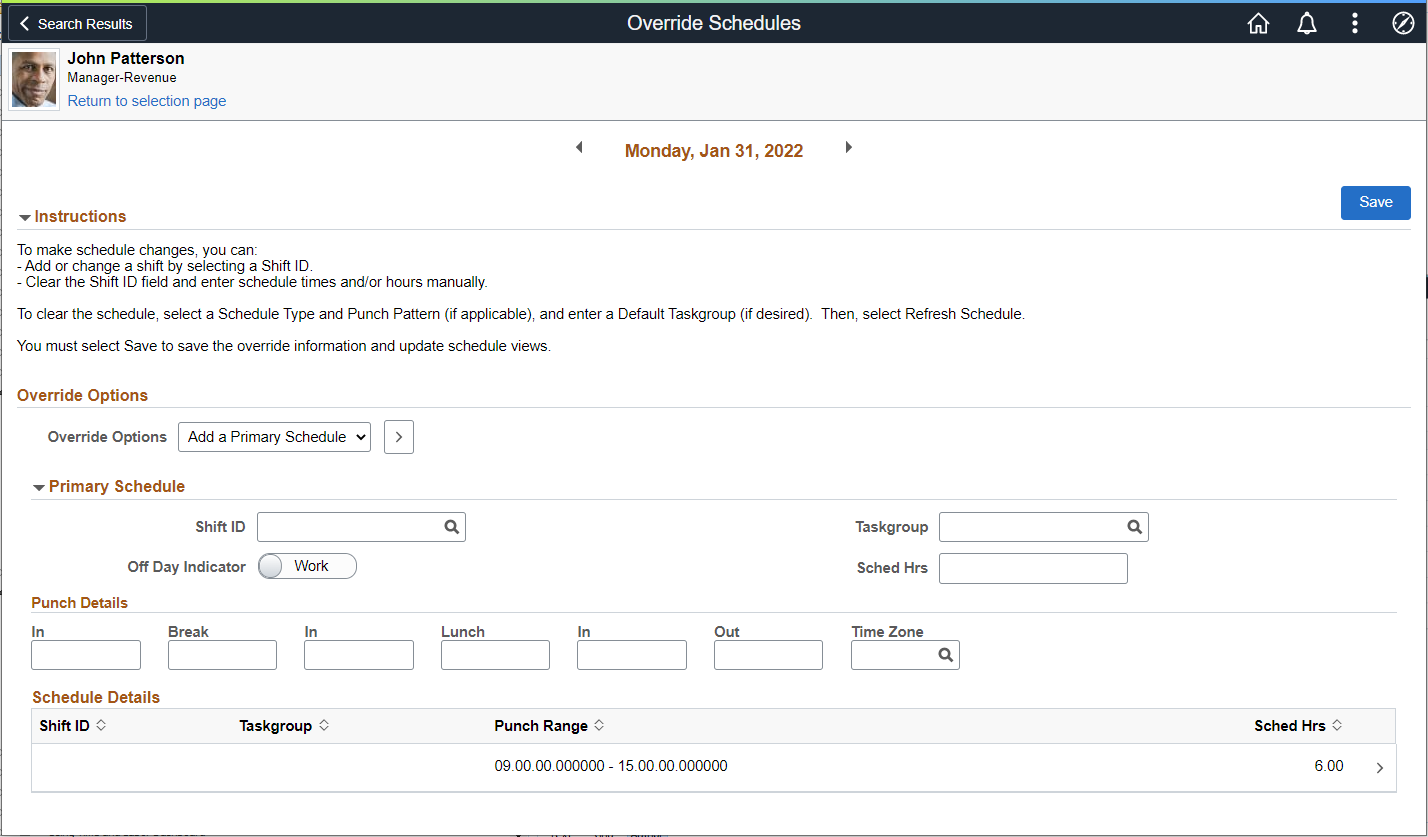
Use the Override Schedules page to override the schedule of an employee for a day.
Navigation:
Choose the date by navigating through the dates using the Previous and Next day selector on the date header, or by selecting the date and using the calendar.
Expand the Instructions section to view the instructions on how to use the page.
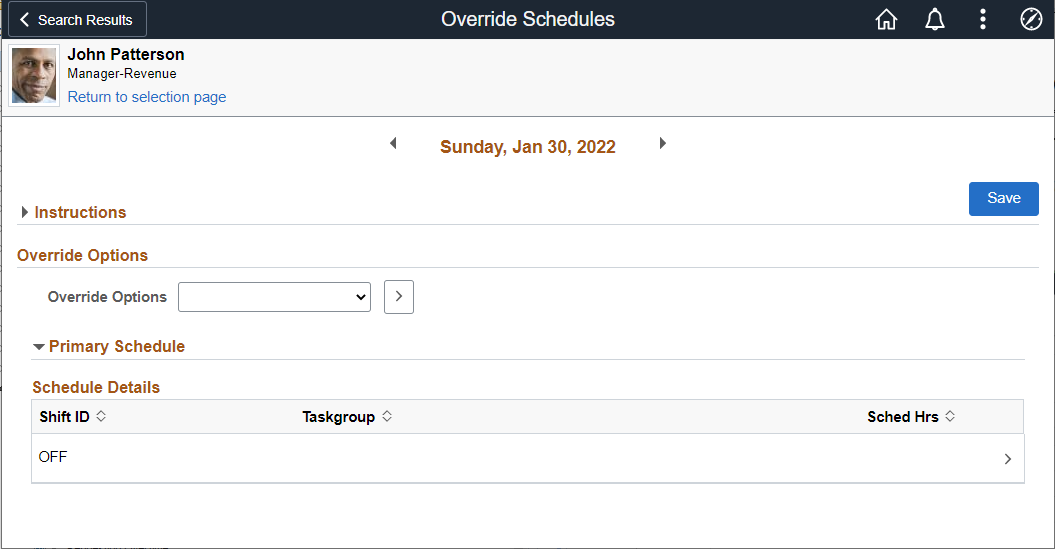
This example illustrates the fields and controls on the Override Schedules page.
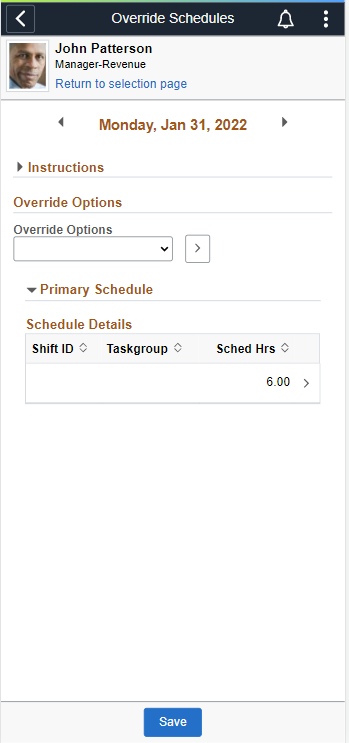
This example illustrates the override Schedules Page using a smartphone.
Choose the date by navigating through the dates using the Previous and Next day selector on the date header, or by selecting the date and using the calendar.
|
Field or Control |
Description |
|---|---|
|
Instructions |
Expand section to view instructions about how to use the page. |
|
Override Options |
The schedule override options are in the drop-down list:
Note: The alternate schedule will not show in the drop-down list for employees who do not have an alternate schedule to add. |
|
Primary Schedule |
Schedule Type field is hidden and only primary schedules are shown. |
|
Schedule Details |
Shows the Schedule details. |
Select Add a Primary Schedule to enter the details of Shift ID, Off Day Indicator,Task Group and Sched Hrs
This example illustrates the fields and controls on the Add a Primary Schedule_Override Schedules page.
|
Field or Control |
Description |
|---|---|
|
Shift ID |
Select to Add or change a shift. |
|
Taskgroup |
Select Taskgroup details. |
|
Off Day Indicator |
Select the slider to indicate Wok or Off. The Off selector determines that the Scheduled Hrs are zero, it does not change the duration of the off shift. |
|
Sched Hrs |
Enter the Schedule hours details. |
 |
Click to override information and update schedule views. |
|
Schedule Details |
Lists the Schedule Details added. Select the line to open the Edit override schedules modal. |
Edit override schedules modal
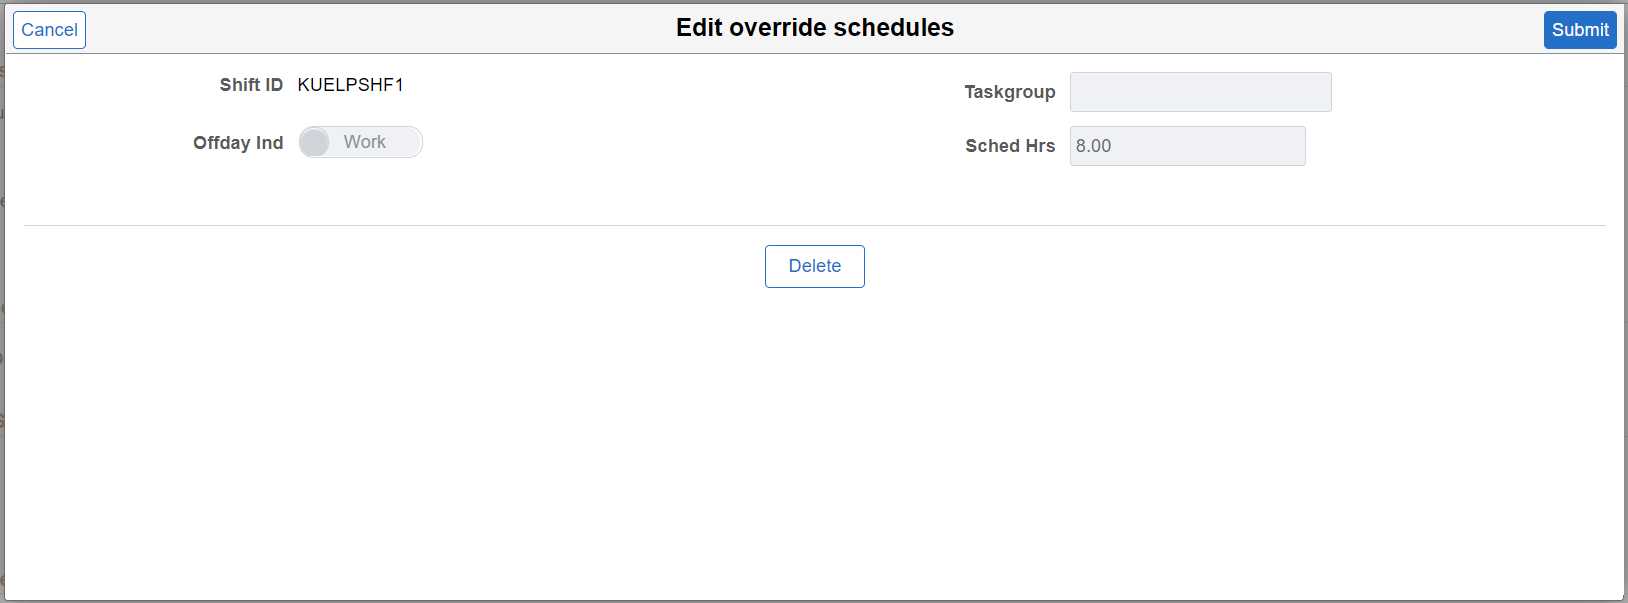
Select Submit or Delete according to your need.
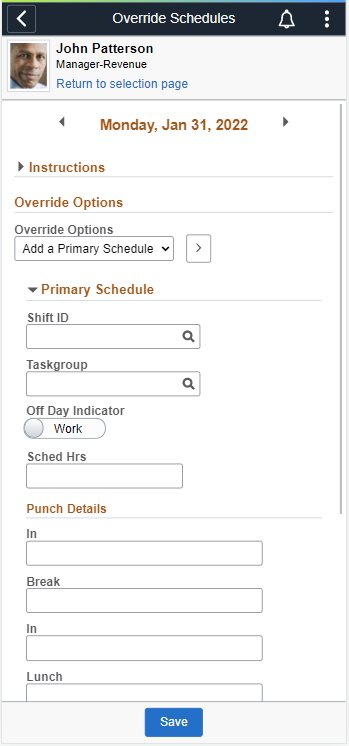
This example illustrates the Add a Primary Schedule using Override Schedules Page using a smartphone.
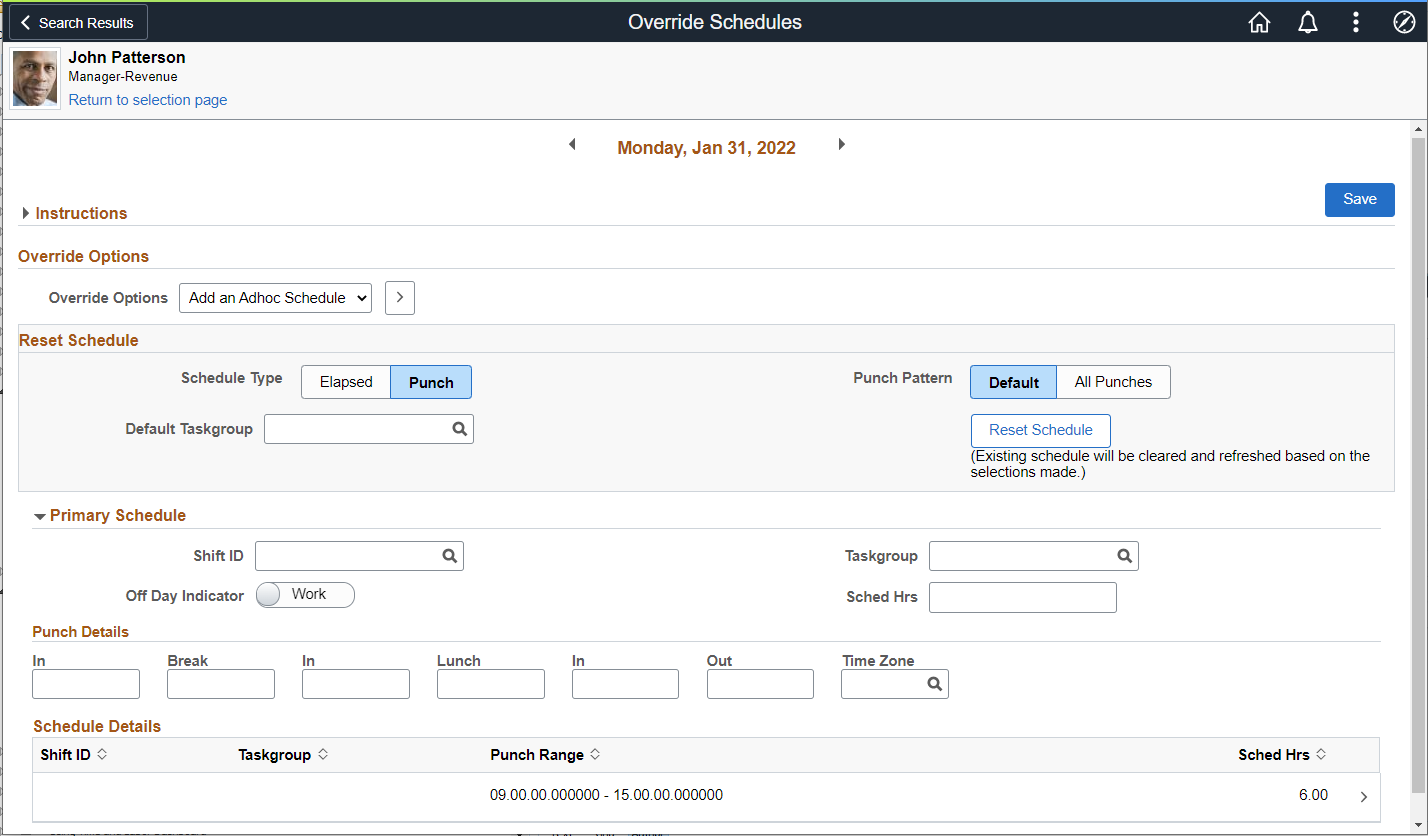
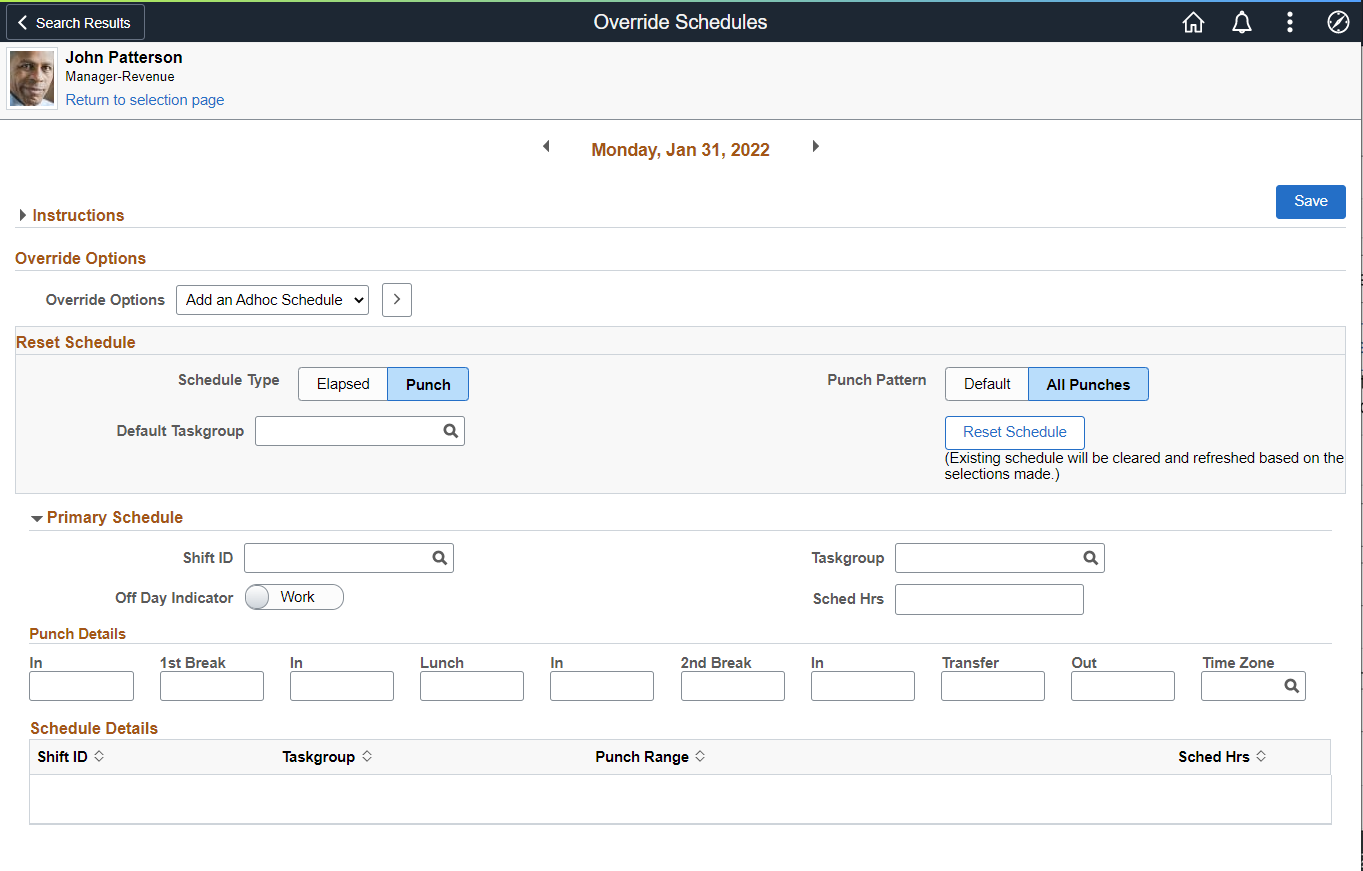
Select the Add an Adhoc Schedule override option to add adhoc punch schedules.
This example illustrates the fields and controls on the Add an Adhoc Schedule page.
|
Field or Control |
Description |
|---|---|
|
|
Select to reset the schedule added. |
|
Punch Details |
Enter punch details like In, Breaks, Lunch, Out and Time Zone. |
|
Schedule Details |
Display the schedule details including the punch range. |
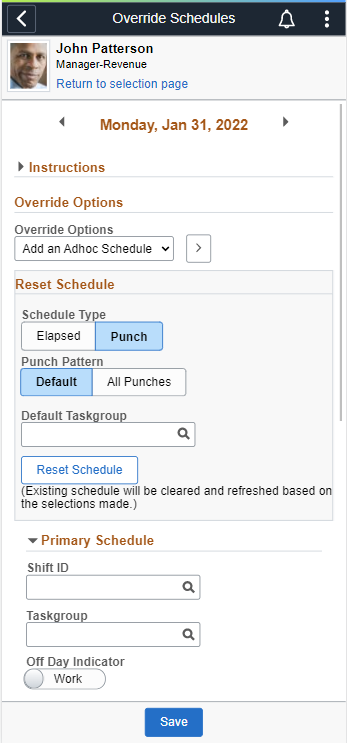
This example illustrates the Add an Adhoc Schedule Page using a smartphone.
Select All Punches to show all the punch pattern.
Note: Multiple shifts can be entered as a schedule override for a day. If you enter a punch shift that overrides the times of another punch shift for the day, you will receive a warning message.
The Alternate Schedule Detail tab is displayed only if core Global Payroll or Absence Management are installed and selected on the Installation Table – Products page.
This example illustrates the fields and controls on the Add an Adhoc Schedule for all Punches page.
This example illustrates the Add an Adhoc Schedule for all PunchesPage using a smartphone.