Working with Timesheets
You can report and review actual time spent on activities, send notes about the timesheet, and submit time for approval in the Timesheets view. After you have submitted a timesheet and until it is approved, you can withdraw the timesheet to make changes to it. You can open and view a timesheet and report actual work time if an administrator or project manager has designated you as a timesheet user.
If you have not been designated as a timesheet user, the Timesheet view is not available to you. Depending on the way your organization tracks actual work, you might be required to report actual work time in the My Activities page.
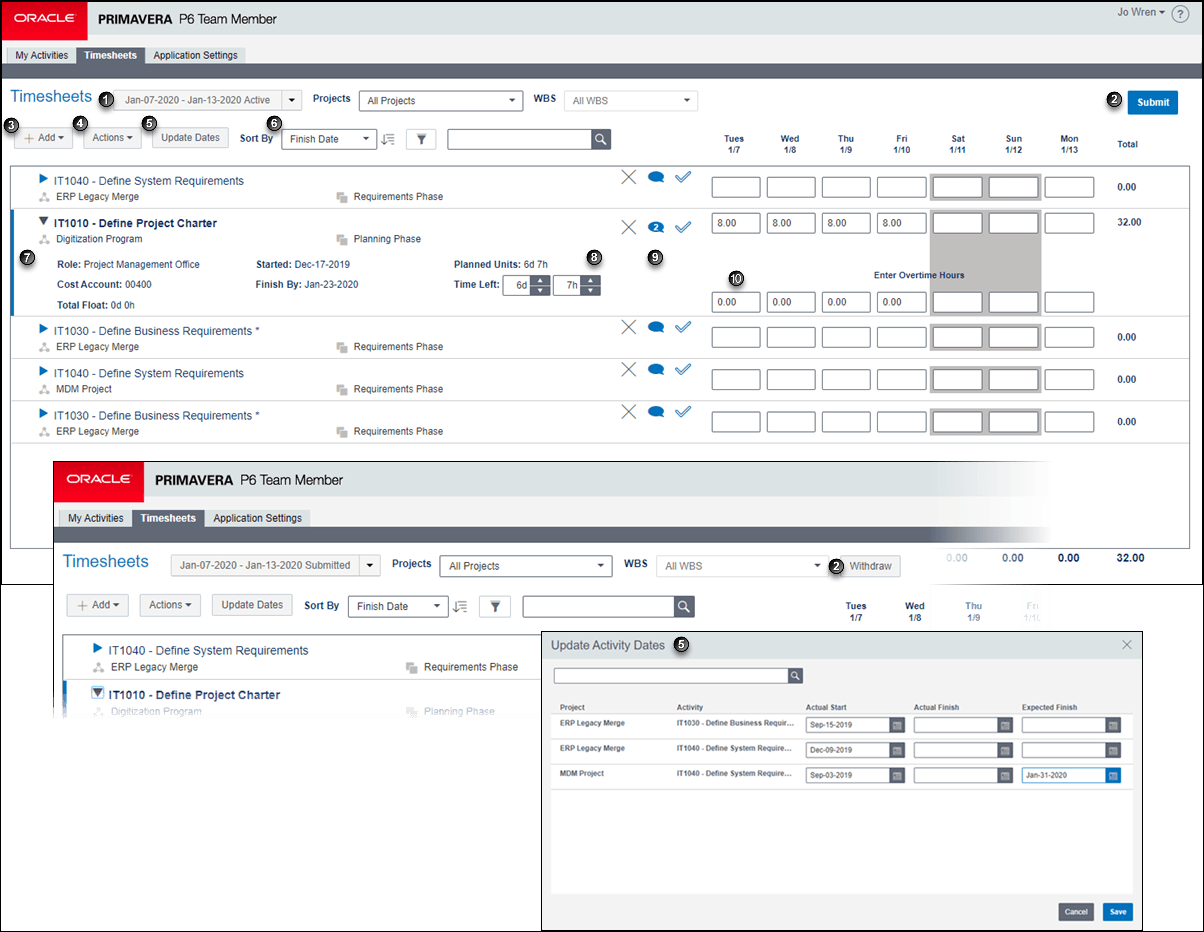
Table of Screen Highlights
Item | Description |
|---|---|
| Timesheet list: Choose a timesheet to work with. Note: The number of past and future timesheets you can see is controlled by an administrative privilege. |
| Submit: When you have finished entering hours into your timesheet, you must submit it before those hours will be counted against activities. Once submitted, you can withdraw a timesheet as long as it has not been approved. Note: An administrative setting controls whether timesheets require approval or submission. If your administrator has configured P6 EPPM with the Auto Submission or Auto Approval options, you will not need to submit and you will not be able to withdraw your timesheet. |
| Add |
| Actions Note: You can only edit another resource's timesheet if you have the required privileges. You cannot see timesheet notes for timesheets you have not started. |
| Update Dates: Launches a dialog box where you can update the Actual Start, Actual Finish and Expected Finish dates for activities where you are the primary resource. Note: Your Project Manager configures the project to determine whether you can update activity dates in timesheets. |
| Sort by: You can sort the list of activities by activity ID or name, project ID or name, start date, finish date or WBS in either ascending or descending order. |
| Activity details: You can see details of activities, select Expand to see more details of an activity, or collapse the row to see more activities in one screen. |
| % Complete or Time Left: Enter the percentage complete for the activity or the time remaining until the activity will be complete. Note: Your Project Manager configures the project to determine whether you report % Complete or Time Left. |
| Remove This Activity: Removes the activity from this timesheet. The activity will still be assigned to you and you will be able to see it in My Activities. Discussion: Launches a dialog box where you can communicate with your project manager, or another team member assigned to the same activity, regarding the selected activity. A number on the Discussion icon indicates the number of unread messages. Mark Activity Complete: Select the check mark when you have finished work on the activity. |
| Enter regular hours and overtime hours: You can report hours for the activity either by day or by reporting period (depending on how your administrator has configured the application settings). If your organization allows, you can enter overtime hours worked on the activity. Note: An administrative setting controls whether you can enter hours as a decimal value, hours and minutes, or rounded to the nearest quarter-hour. For example to enter 2 hours and 20 minutes, as a decimal you would enter 2.33, as hours and minutes you would enter 2:20 and rounded to the quarter-hour you would enter 2:15. |
Step me through...
Learn more about...
Last Published Wednesday, November 27, 2024