Adding a Conditional Step
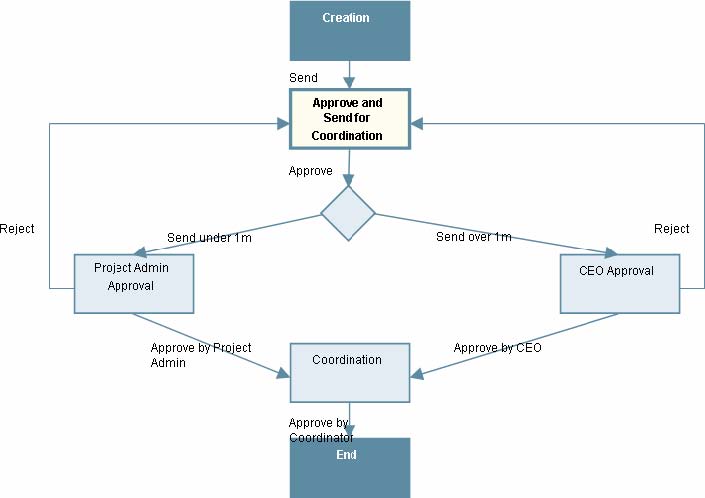
A workflow can contain a conditional step that must be resolved before the workflow can continue. Conditional steps entail separate (conditional) routing. This routing is triggered at the step by a field condition or situation you can specify in uDesigner. An example of conditional routing is a purchase order that follows one path through a workflow if the total amount is less than a certain amount, and follows another path if it is equal to or greater than that amount. (The trigger value for the field on the conditional step's form is assigned when the business process is set up in Unifier.)
When the workflow reaches a conditional step, the business process tests the value of the field on the form to see whether it meets the trigger value.
To design a conditional routing, in uDesigner, you need to specify:
- Which step spawns the conditional routing
- Which field(s) in the form attached to the step contain the trigger value(s) that will be tested by the BP
When you define the trigger condition, you can specify the data elements that must be satisfied to activate the trigger. For example, on a purchase order, conditional steps could be triggered by a combination of the dollar amount and the region where the purchase is being made. A cost above $500,000 in New York may not trigger a conditional step, whereas a cost above $500,000 in Georgia may.
Tip: If you are creating a business process that allows users to add line items, keep in mind that users may be able to add line items after the conditional routing step. For instance, using the purchase order example, if the P.O. is under $1000 and is routed appropriately, a subsequent user could add line items that push the total over $1000, thereby bypassing the "over $1000" workflow. A way to prevent this is to create an additional Action form for the BP that prevents adding line items and use that as the Action form for the workflow steps that follow the conditional routing step.
To add a conditional step:
- In the Workflow Designer window, click the Condition button.
- Click the canvas. The conditional step appears as a diamond shape.
You can include multiple conditional routings in a workflow, but only one condition per step.
- Specify the conditional step's properties.
Use the instructions under Adding Steps to the Workflow.
- In the Trigger Element field of the Step Properties window, click the Add button and select the field (data element) that will serve as the trigger for the conditional step.
This is the trigger that must be resolved before the workflow can continue. The value of the data element at runtime will dictate whether the conditional step must be resolved. (These trigger values are assigned when the business process is set up in Unifier.)
You can specify multiple data elements. If you do so, the values of all the data elements must be met to trigger the conditional step.
Notes:
- You cannot use a multi-select data element as a trigger element because the trigger element feature does not recognize the commas that separate the values in these elements.
- You can use data elements that have been linked in shell hierarchies.
- Connect the conditional step to other steps as appropriate.
A conditional step must have one incoming connector and two outgoing connectors.
- Denote the links as conditional:
- Double-click the line or elbow connecting the conditional step (the diamond) to another conditional step. The Conditional Properties window opens.
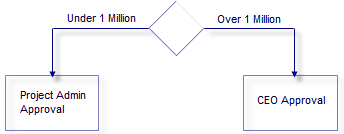
- In the Conditional Name field, enter a name for the action of the conditional link; for example, "Under 1 Million" to route an invoice approval to one authorizer, or "Over 1 Million" to route it to another authorizer.
Last Published Saturday, June 6, 2026