Processing a Physical Inventory
This topic discusses how to process Physical inventory.
|
Page Name |
Definition Name |
Usage |
|---|---|---|
|
Load/Match/Reconcile PI Info Page (Mobile Physical Inventory) Load/Match/Reconcile PI Info Page (Classic Physical Inventory) |
RUN_AMPI1000 |
Execute each step of the classic and mobile physical inventory process. |
|
Physical Inventory Page (Mobile Physical Inventory only) |
PI_SCAN_PHY_FL |
Perform mobile physical inventory, scan assets, retrieve and display asset information from the Asset Repository, and automatically populate the Physical Inventory and Scan History tables with scan records—all from your mobile scanning device. |
|
Edit Scan Record Page (Mobile Physical Inventory only) |
PI_SCAN_EDIT_SCF |
Modify scanned asset information. |
|
New Asset Scan Record Page (Mobile Physical Inventory only) |
PI_SCAN_NEW_SCF |
Manually add a new scanned asset to the Physical Inventory interface table. |
|
Find Asset Page (Mobile Physical Inventory only) |
PI_SCAN_FIND_FL |
Manually create a scan record for an asset without scanning a barcode. |
|
Notify (Email Notification) Page (Mobile Physical Inventory only) |
PI_SCAN_EMAIL_SCF |
Send email notification regarding an asset. |
|
Review Extracted Data Page (Classic Physical Inventory Only) |
PI_EXTRACT_01 |
(Optional)) View the results of the extract data one asset at a time. You can also search by PI line number, asset ID, department, tag number, serial ID, and location. The PI line number reflects the number of this asset in the extract sequence. For instance, the third asset that was extracted falls on PI Line Number 3. The system presents you with all the assets that match your criteria. Select the one you want to view. You can run the report AMPI2000 to list all the information that has been extracted. Run this from the Physical Inventory Reports page. |
|
PI_SCAN_01 PI_SCAN (component) |
Verify scanned data for the Physical Inventory ID. |
|
|
PI_SCAN_01 PI_SCAN_DUP_TAG is the component |
Conduct searches for finding and correcting physical inventory data. |
|
|
PI_SCAN_01 PI_SCAN_DUP is the component |
Conduct searches for finding and correcting physical inventory data. |
|
|
PI_RESULTS_01 |
View the results of the matching process. |
|
|
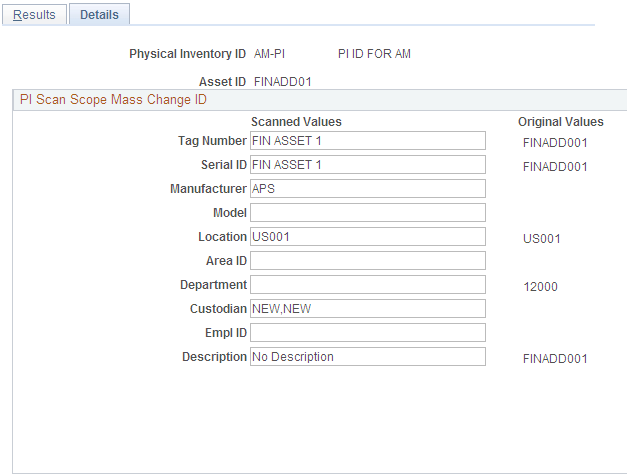
Review Matching Results - Details |
PI_RESULTS_02 |
View the original and scanned data. You can run reports that list inventoried assets (AMPI2200), unders (AMPI2210), and overs (AMPI2220). |
You will use the Physical Inventory tile to perform mobile physical inventory, scan assets, retrieve and display asset information from the Asset Repository, and automatically populate the Physical Inventory (PI_SCAN) interface and Scan History (PI_SCAN_HIST) tables with scan records—all from your mobile scanning device. The Physical Inventory tile is part of the PeopleSoft Fluid User Interface and can be accessed from your mobile scanning device (with web browsing capability).
Physical Inventory tile and the Asset Tracking homepage
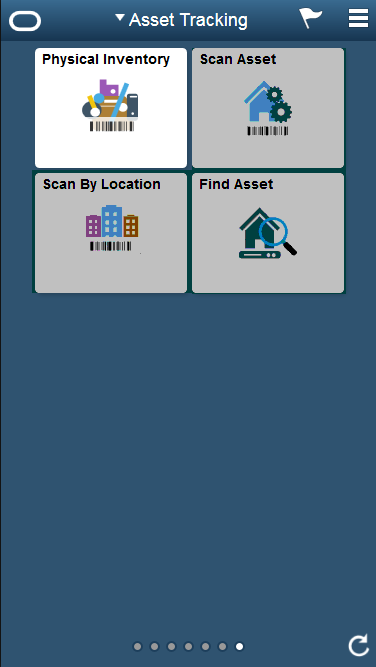
You will use the Physical Inventory tile after running the Generate Scan Scope process and before you generate results and transactions. During the scanning process an individual uses the Physical Inventory tile along with a scanning device to scan a barcode; asset information is automatically retrieved from the Asset Repository and presented to the scanning device. Scanned assets appear in list form on the left side of the page. This process also populates the Physical Inventory and Scan History tables with scan records.
After you configure your physical inventory process and define the extract scopes and scan scopes for your physical inventory IDs, as well as the physical inventory schedule, you can extract data from PeopleSoft Asset Management tables. When the extract is complete, you can use the extract data in subsequent steps of the physical inventory process.
In order to process physical inventory, you must execute each step in its proper order. The Load/Match/Reconcile PI Info page includes each step in the proper order and prominently displays the step that was last processed for a given physical inventory ID
Note: Because steps 2 and
3 of Load/Match/Reconcile PI require writing and reading files, you
should run the AM_PIJOB, which consists of the AMPI1000 SQR program
and AM_PIWS_RUN Application Engine program that are executed in parallel
for these steps from the file location. For example, if you are writing
and reading files from c:\temp\file.txt or c:\temp\scan.dat, you would run the
process on the client. If you are writing and reading files from a
directory on the PeopleSoft Internet Architecture server, run the
process on that server.
Use the Load/Match/Reconcile PI Info page (RUN_AMPI1000) to execute each step of the Physical Inventory process. It is recommended that you add a new run control ID for each physical inventory ID (PI ID). Also use this run control ID for subsequent steps within the same PI ID.
Navigation:
Load/Match/Reconcile PI Info page
You can navigate either by clicking on the corresponding Step buttons or by clicking the Next and Previous buttons.
Run the various steps in sequential order from this run control page for a specific PI ID (Physical Inventory ID) and click the Run button.
Last PI Step Executed displays the step number and step description of the last step that was processed in the physical inventory process.
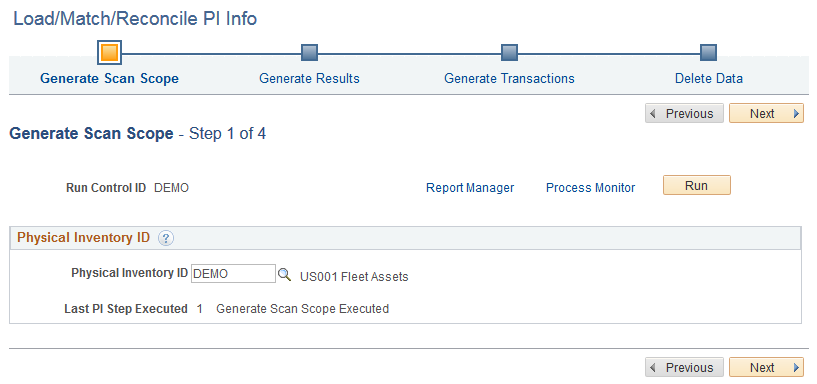
Generate Scan Scope (Step 1)
After defining scan scope parameters you can run step 1 of the Load/Match/Reconcile PI process.
Load/Match/Reconcile PI Info - Generate Scan Scope page
Click the Run button to run the Generate Scan Scope process. This process automatically defines a set of assets that should be scanned and provides that list to the Physical Inventory page, which is accessible from your mobile scanning device.
Generate Results (Step 2)
After scanning barcodes in combination with the Physical Inventory tile (which inserts scanned records into the PI_SCAN table), review the scanned data before running step 2 (generate results).
Step 2 performs matching between a physical inventory scan scope and scanned data, and creates physical inventory results for review.
Load/Match/Reconcile PI Info - Generate Results page
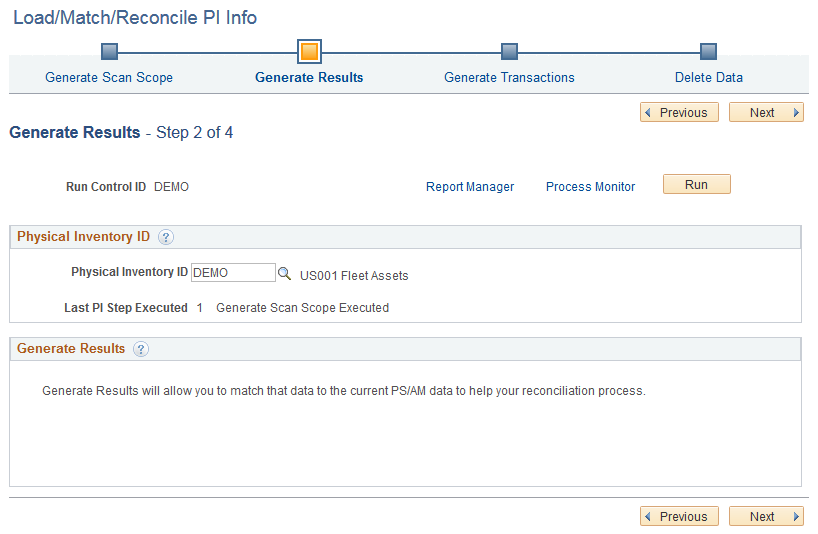
Remember before you generate results, you should use the Verify Duplicate Tags page and Verify Duplicate Serial ID page to clean up any possible errors in the scanned data.
Generate Results Select the Generate Results option and click the Run button to initiate processing. Note that this step may take some time to complete due to the amount of information that must be processed.
Because this step involves some complex processing, you may want to have your database administrator optimize the database before you execute the step.
Generate Transactions (Step 3)
After matching is performed, you create physical inventory transactions that reconcile the data in Asset Management with the results of the physical inventory.
Load/Match/Reconcile PI Info - Generate Transactions page
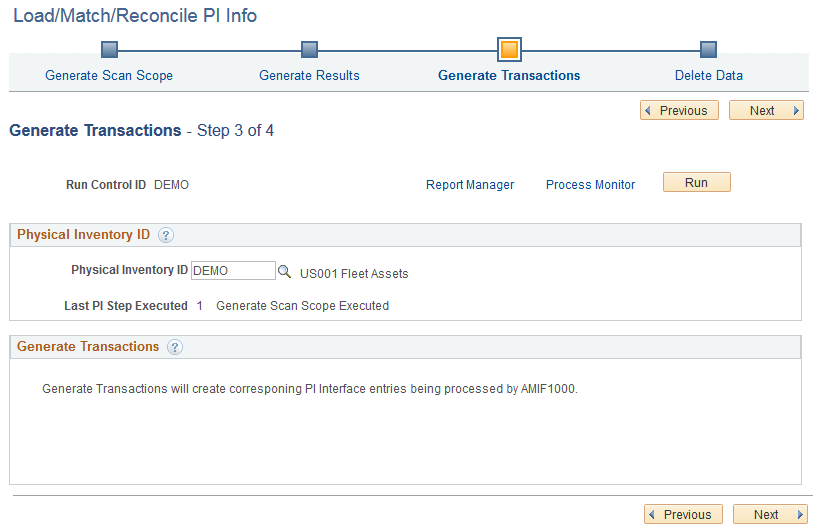
Select the Generate Transactions step and click the Run button to begin generating the transactions.
Because this step involves some complex processing, you may want to have the database administrator optimize the database before you run it.
This step takes the longest time to process, so be sure that you are satisfied with the generated results before you load the transactions. You can see the results of the matching process by reviewing the Results page and the Results Detail page.
See Results Page
After you have created, reviewed, and approved the reconciliation transactions, you load them by using the Interface Asset Information component and the Transaction Loader.
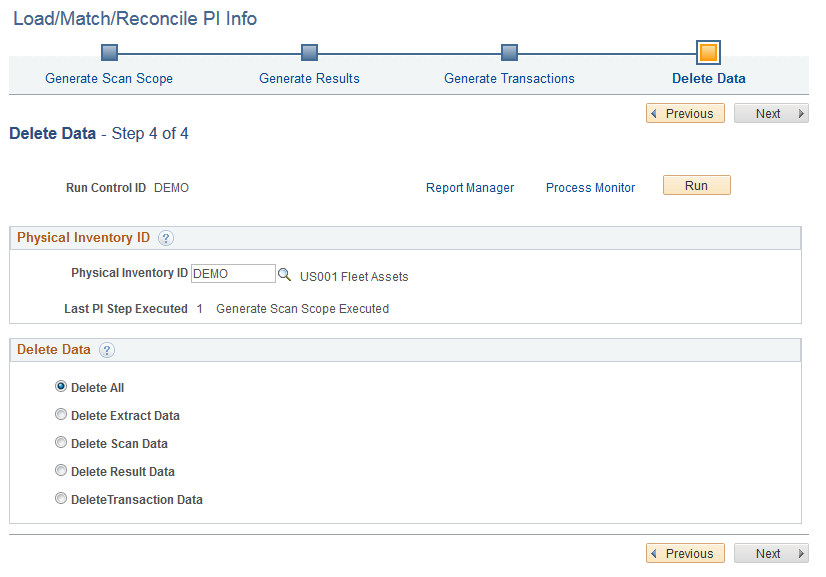
Delete Data (Step 4)
When you no longer need your physical inventory data, select one of the following options and click the Run button.
Load/Match/Reconcile PI Info - Delete Data page
Field or Control |
Description |
|---|---|
Delete All |
Select to delete all physical inventory data generated for the specified Physical Inventory ID: (Scan Data, Result Data, and Transaction Data). |
Delete Scan Data |
Select to delete the physical inventory scan data. |
Delete Result Data |
Select to delete the physical inventory results data. |
Delete Transaction Data |
Select to delete the physical inventory transaction data. |
Upon successfully completing all the steps, the system will advance the navigator to the next step. The user can click the Run button to submit the process.
Note: You may want to archive records from the Scan History (PI_SCAN_HIST) table when the scan history data is no longer needed (at the conclusion of a physical inventory cycle, for example). Use PeopleTools Data Archive Manager to remove records from the Scan History table. If you choose to use Data Archive Manager, you will have to create the archive and history table for the Scan History table.
See ‘Understanding PeopleSoft Data Archive Manager’ and ‘Understanding Archiving Strategy’ in the PeopleTools Data Management documentation.
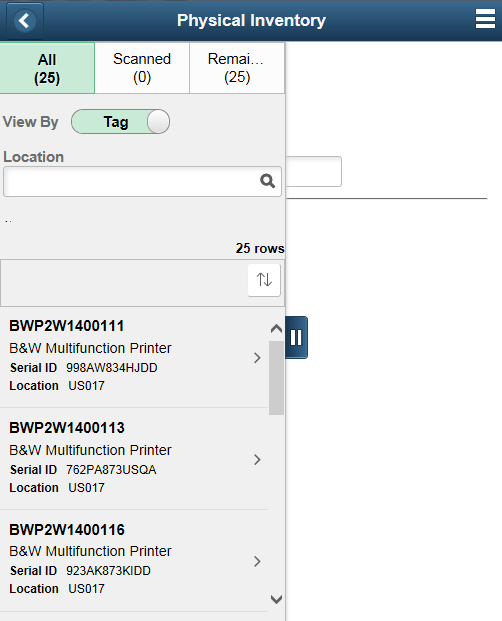
Use the Physical Inventory (PI_SCAN_PHY_FL) page to perform mobile physical inventory, scan assets, retrieve and display asset information from the Asset Repository, and automatically populate the Physical Inventory (PI_SCAN) and Scan History (PI_SCAN_HIST) tables with scan records.
Navigation:
This example illustrates the fields and controls on the Physical Inventory page - Scan Scope. You can find definitions for the fields and controls later on this page.
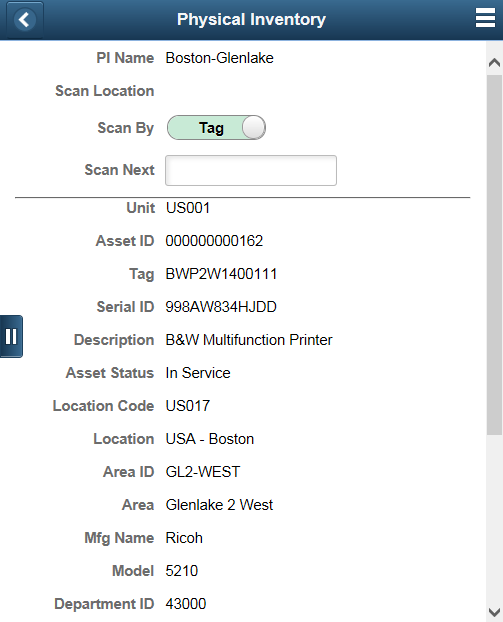
This example illustrates the fields and controls on the Physical Inventory page - detail.
When you begin physical inventory, the asset inventory list displays on the left side of the page. You can filter the list by all assets (all assets in scan scope, plus scanned assets not in the scan scope), scanned assets, and remaining assets (assets not yet scanned). You can also use the Grid Sort icon to sort list results by Tag Number, Description, Serial ID, Location, or Scan Date.
The View By toggle switch determines whether to display the Tag or the Serial Id as the primary/secondary data in the grid. The View By toggle switch is available only when the Scan By field option is Tag Number or Serial ID. For details see Setting Up Application-Specific Installation Options
Note: The asset inventory list displays when you select the Show Inventory List option on the Scan Options page. If you do not enable this option, the asset inventory list is hidden from the page.
Scan an asset barcode to perform physical inventory and populate the Physical Inventory (PI_SCAN) and Scan History (PI_SCAN_HIST) tables with scan records.
From here you can access related physical inventory pages that enable you to edit asset information, manually add a scan record for a new asset, and manually add a scan record.
The Scan By toggle switch is displayed based on the value entered in the Installation Options - Asset Management page. For details see Setting Up Application-Specific Installation Options
Select the Edit button to access the Edit Scan Record page and edit scanned asset information.
Select New Asset from the Actions List menu to access the New Asset Scan Record page and add a new scanned asset to the PI_SCAN table.
Select Find Asset from the Actions List menu to access the Find Asset page and manually create a scan record for an asset without scanning a barcode.
Use the Edit Scan Record (PI_SCAN_EDIT_SCF) page to modify scanned asset information.
Navigation:
Edit Scan Record page
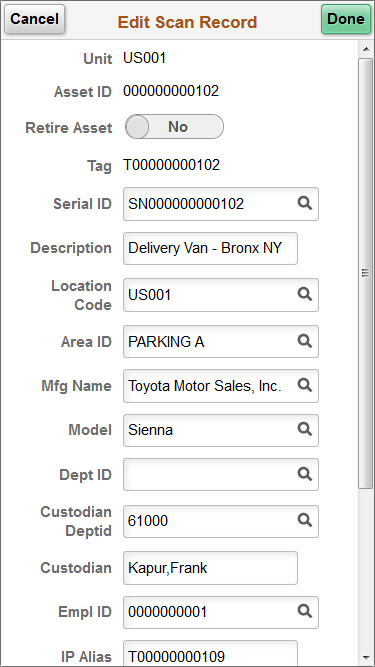
You can use the Edit Scan Record page to modify scanned asset information. If this is a new asset you can edit all fields on this page. If this is an existing asset you cannot edit Business Unit, Asset ID, and Tag.
Use the Retire Asset toggle to retire the scanned asset. This field is functional when you select the Allow Retirements option on the Scan Options page. If you do not enable this option, you cannot use the Retire Asset toggle.
Select Done to save your changes.
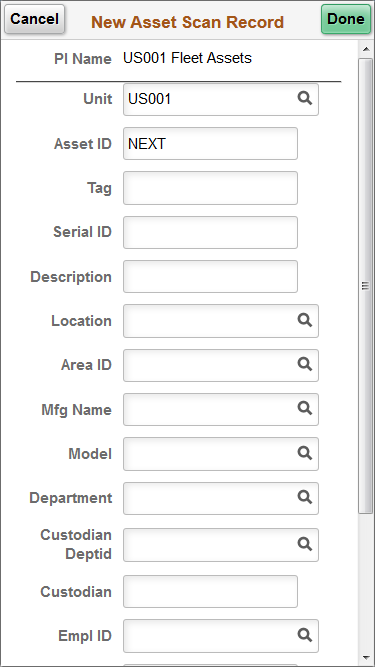
Use the New Asset Scan Record (PI_SCAN_NEW_SCF) page to manually add a new scanned asset to the Physical Inventory (PI_SCAN) interface table.
Navigation:
New Asset Scan Record page
Use the Find Asset (PI_SCAN_FIND_FL) page to manually create a scan record for an asset without scanning a barcode.
Navigation:
Find Asset page
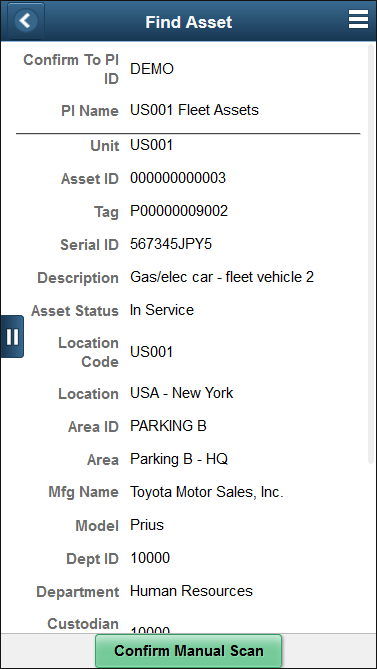
When you are unable to scan a barcode while performing physical inventory, you can use the Find Asset page to manually create a scan record for an asset without scanning a barcode.
Simply enter search parameters, such as Business Unit and Asset ID, and select Search to retrieve asset information from the Asset Repository. Asset information is displayed in a list on the left side of the page.
Use the list to select an asset you want to manually create a scan record for, and select Confirm Manual Scan to complete the process. Similar to scanning an asset, selecting Confirm Manual Scan populates the Physical Inventory (PI_SCAN) and Scan History (PI_SCAN_HIST) tables with the scan record.
Use the Load/Match/Reconcile PI Info page (RUN_AMPI1000) to execute each step of the Physical Inventory process. It is recommended that you add a new run control ID for each physical inventory ID (PI ID). Also use this run control ID for subsequent steps within the same PI ID.
Navigation:
This example illustrates the fields and controls on the Load/Match/Reconcile PI Info page. You can find definitions for the fields and controls later on this page.
You can navigate either by clicking on the corresponding Step buttons or by clicking the Next and Previous buttons.
Extract data allows you to extract all your current PS/AM data
Run the various steps in sequential order from this run control page for a specific PI ID (physical inventory ID) and click the Run button.
Last PI Step Executed – Displays the step number and step description of the last step that was processed in the physical inventory process.
This step executes the actual data extract from PeopleSoft Asset Management. When you extract data, you do not need to enter a file name or file type. The data is saved in a relational table called PI_EXTRACT. Click the Extract button and click the Run button. If you want to view the extract data before using it in subsequent steps, access the Extract Data page.
You can navigate either by clicking on the corresponding Step buttons or by clicking the Next and Previous buttons.
Run the various steps in sequential order from this run control page for a specific PI ID (Physical Inventory ID) and click the Run button.
Last PI Step Executed displays the step number and step description of the last step that was processed in the physical inventory process.
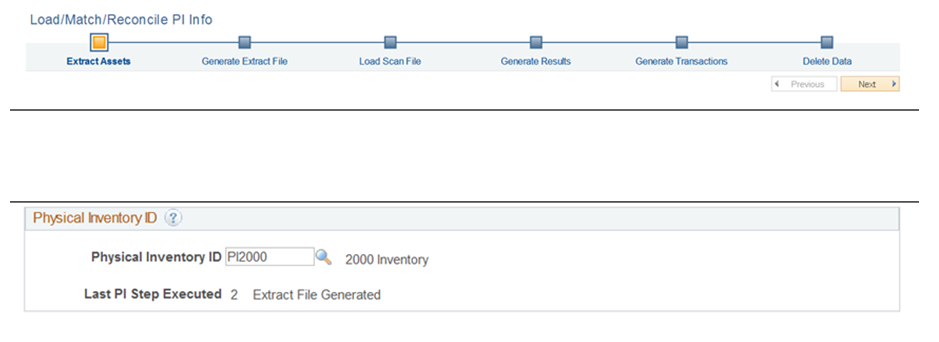
Extract Assets (Step 1)
Select this physical inventory option to extract asset data and click the Run button to process the step.
This example illustrates the fields and controls on the Extract Assets Page. You can find definitions for the fields and controls later on this page.
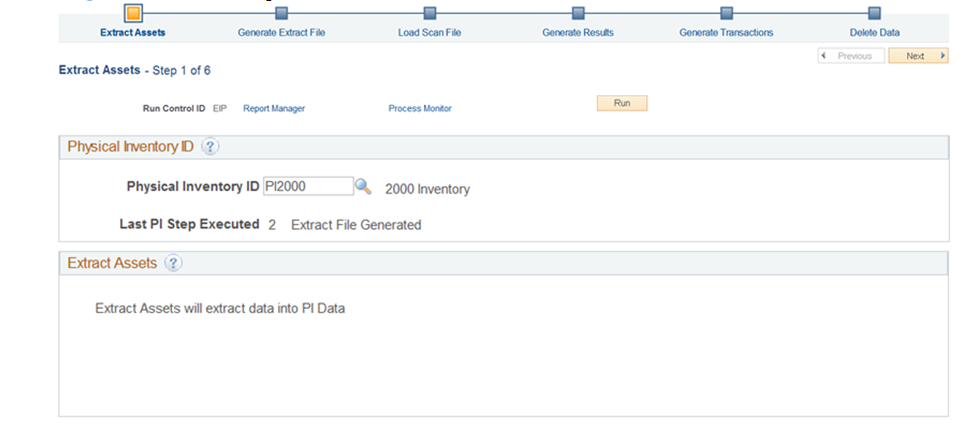
This step executes the actual data extract from PeopleSoft Asset Management. When you extract data, you do not need to enter a file name or file type. The data is saved in a relational table called PI_EXTRACT. If you want to view the extract data before using it in subsequent steps, see Review Extracted Data Page (Classic Physical Inventory Only).
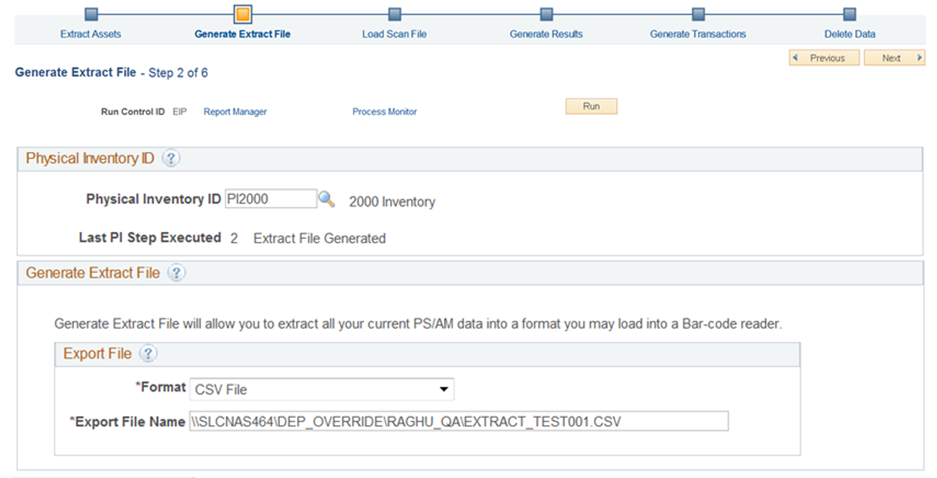
Generate Extract Export File (Step 2)
Select this step to create an output file from the extract data. When you select this option, you must select an export file format and supply a file name:
This example illustrates the fields and controls on the Generate Extract File Page. You can find definitions for the fields and controls later on this page.
Field or Control |
Description |
|---|---|
Export File |
CSV File - Select CSV File for a comma-separated values (CSV) file. Scanner File - Select Scanner File as the export file type, and enter a file name (as well as any additional path information) for the file that you want to generate. The output file is formatted for loading into a bar code scanning device in preparation for performing physical inventory. Generate Labels - To create a file for printing labels rather than performing inventory, select Generate Labels as the export file type. A label file is created for the printer in a different format from the one used for a scanning device. To generate files for both a scanning device and a printer, perform step 2 twice with a different output file type each time. Web Service - Select Web Service to use the Integration Broker web service option to load the physical inventory data. This happens without any input or initiation. As soon as an inbound XML message is received from the third party vendor, the associated handler loads the scanned data. Note: When using the web service option, remember to supply the file size for chunking on the Asset Management Installation Options page. This specifies the chunk size for the message GET_PIDATA. |
Note: The EXTCOPY.BAT file is configured to copy the extract file to the A:\ drive for demonstration or quick overview purposes. You need to modify EXTCOPY.BAT if you want to copy the extract file to the appropriate drive on a scanner.
Copy the scanner program (PI.EXE) and scanner file to the MS-DOS based scanning device. You can easily do this using a communications software package. You may wish to use a certified integration solution provided by recommended software vendors. Consult the bar code scanning device manual and software vendor for more information.
Once you have loaded the extract file and scanner program into the inventory-scanning device, you can perform the physical inventory. Each time that you scan an asset that is included in the extract file, the scanner displays the asset's information, such as tag number, description, serial ID, asset ID, and custodian. For the asset that you scan, you can retain or modify the values displayed on the scanner.
While you are performing the physical inventory scan, the scanning device creates a sequential file that contains information on all the scanned assets. The next step is to load the scanned file into PeopleSoft Asset Management for review.
Note: The files EXTCOPY.BAT and PI.EXE reside in the \PI directory. EXTCOPY.BAT is no longer supported, but it may be useful for a quick overview of the process.
Review the section on hardware requirements for further information about bar code scanners and methods of moving data to and from scanning devices.
If you are using an IT asset discovery tool from a third party vendor , you need to run a gateway extract so that you have a file to load into PeopleSoft Asset Management.
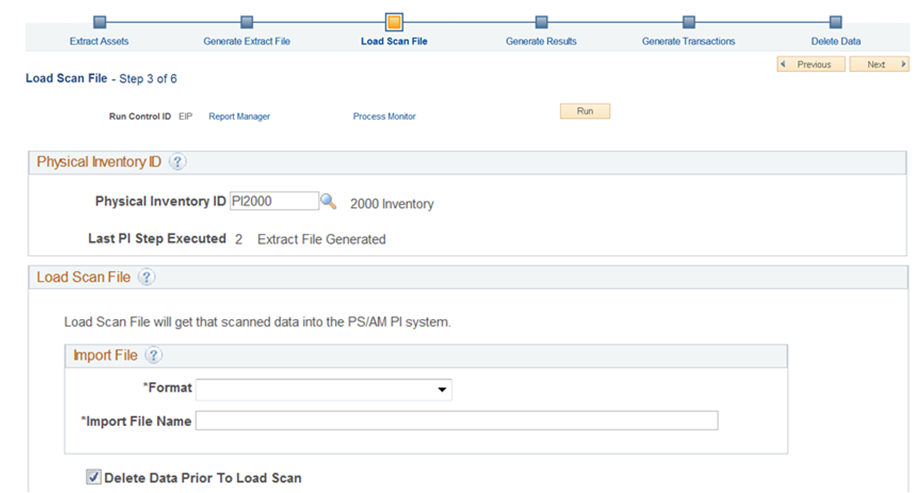
Load Scan Import File (Step 3)
After completing the physical inventory with the scanning system, download the scanner data into a workstation or network server so that it can be converted back into a PeopleSoft Asset Management table called PI_SCAN. You do this using a communications software package or by using the certified integration solution provided by various software vendors. Consult the bar code scanning device manual or software supplier for more information.
This example illustrates the fields and controls on the Load Scan Import File. You can find definitions for the fields and controls later on this page.
Note: PeopleSoft Asset Management provides an unsupported file called SCANCOPY.BAT (found in the \PI directory) that can be edited to copy the SCAN.DAT file from the scanner to the computer. You may need to modify the copy statement in SCANCOPY.BAT so that it copies from the drive letter corresponding to the scanner's drive. This is similar to the modification that you may need to make to EXTCOPY.BAT.
Once the scanner files are available to load into Asset Management, you can run step 3 of the physical inventory process.
Enter the directory and file name of the inventory file. This is most likely \TEMP\SCAN.DAT. If located on the PeopleSoft Internet Architecture server, you can run the next process on the server.
Select the Load Scan Import File option and click the Run button to load the scan data into PeopleSoft Asset Management. You can load as many files as you need by renaming SCAN.DAT (during the bar code scanning process) with unique file names and loading each file separately.
Note: If you have written your own scanning program or modified PI.BAS to configure fields or field lengths, you need to update the file formats in AMPI1000.SQC to match.
Once you have completed this step, review scanned data, find any duplicate tags, and verify that there are no duplicate serial IDs.
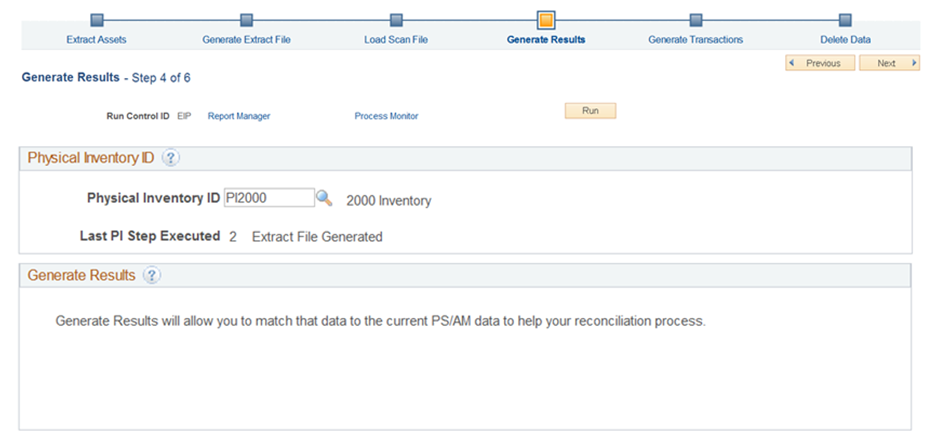
Generate Results (Step 4)
After the inventory data is loaded into Asset Management and you have reviewed it, correcting any duplicates or errors, you can run step 4. ,This step performs matching between a physical inventory scan scope and scanned data and creates physical inventory results for review.
This example illustrates the fields and controls on the Generate Results . You can find definitions for the fields and controls later on this page.
Note: Remember before you generate results, you should use the Verify Duplicate Tags page and Verify Duplicate Serial ID page to clean up any possible errors in the scanned data.
Field or Control |
Description |
|---|---|
Generate Results |
Select the Generate Results option and click the Run button to initiate processing. Note that this step may take some time to complete due to the amount of information that must be processed. Because this step involves some complex processing, you may want to have your database administrator optimize the database before you execute the step. |
Generate Physical Inventory Transactions (Step 5)
After matching is performed, you create physical inventory transactions that reconcile the data in Asset Management with the results of the physical inventory.
Select the Generate Transactions and click the Run button to begin generating the transactions.
Because this step involves some complex processing, you may want to have the database administrator optimize the database before you run it.
This example illustrates the fields and controls on the Generate Physical Inventory Transactions. You can find definitions for the fields and controls later on this page.
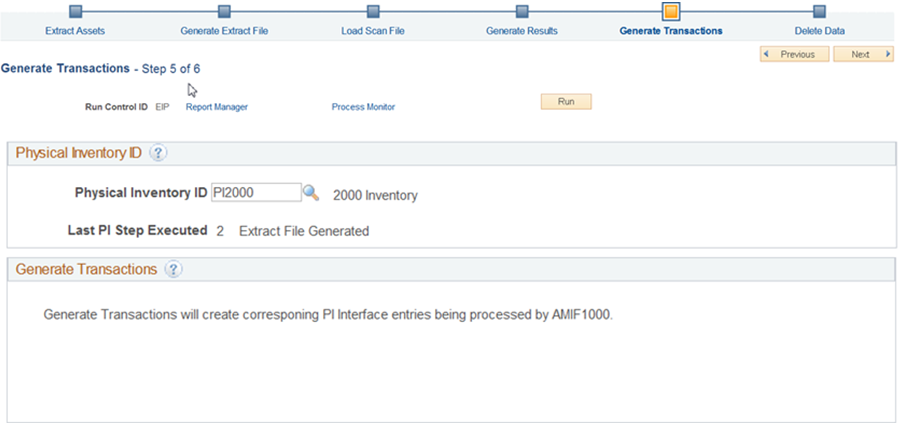
Note: This step takes the longest time to process, so be sure that you are satisfied with the generated results before you load the transactions. You can see the results of the matching process by reviewing the Results page and the Results Detail page. See Results Page.
After you have created, reviewed, and approved the reconciliation transactions, you load them by using the Interface Asset Information component and the Transaction Loader.
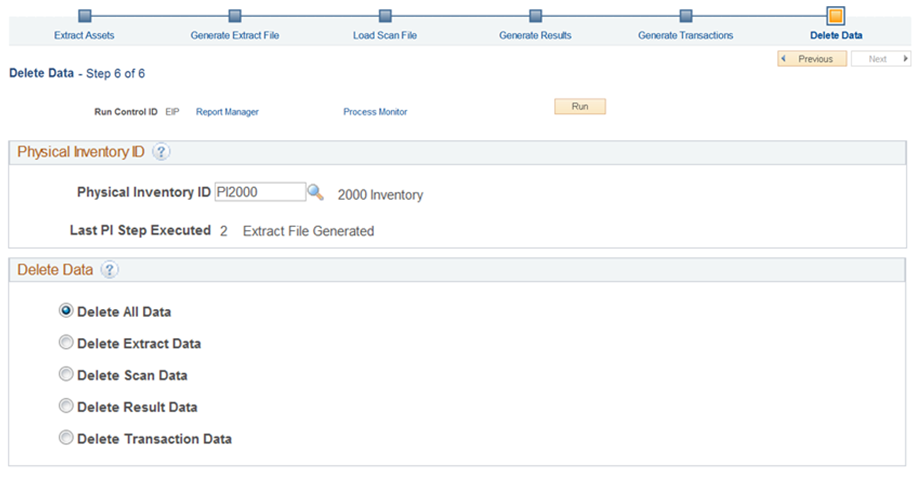
Delete Physical Inventory Data (Step 6)
When you no longer need your physical inventory data, select one of the following options and click the Run button.
This example illustrates the fields and controls on the Delete Physical Inventory Data. You can find definitions for the fields and controls later on this page.
Field or Control |
Description |
|---|---|
Delete All |
Select to delete all physical inventory data generated for the specified Physical Inventory ID: (Extract Data, Scan Data, Result Data, and Transaction Data. |
Delete Extract Data |
Select to delete the Physical Inventory extract file. |
Delete Scan Data |
Select to delete the physical inventory scan data. |
Delete Result Data |
Select to delete the physical inventory results data. |
Delete Transaction Data |
Select to delete the physical inventory transaction data. |
Upon successfully completing all the steps, the system will advance the navigator to the next step. The user can click the Run Button to submit the process.
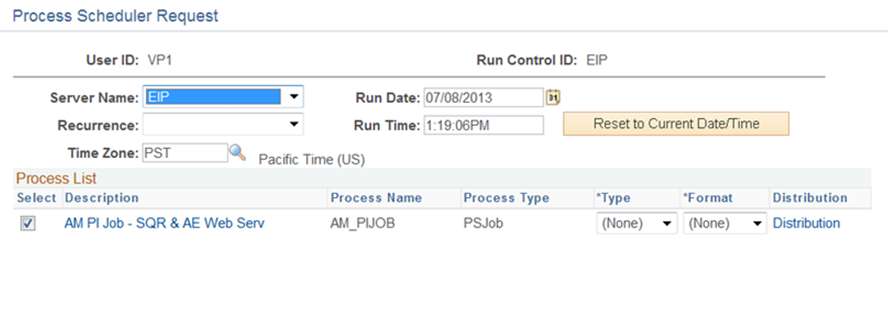
This example illustrates the fields and controls on the Process Scheduler Request Page. You can find definitions for the fields and controls later on this page.
Use the Review Extracted Data page (PI_EXTRACT_01) to view the results of the extract data one asset at a time. This step is optional.
You can also search by PI line number, asset ID, department, tag number, serial ID, and location. The PI line number reflects the number of this asset in the extract sequence. For instance, the third asset that was extracted falls on PI Line Number 3. The system presents you with all the assets that match your criteria. Select the one you want to view.
Navigation:
This example illustrates the fields and controls on the Review Extracted Data page. You can find definitions for the fields and controls later on this page.
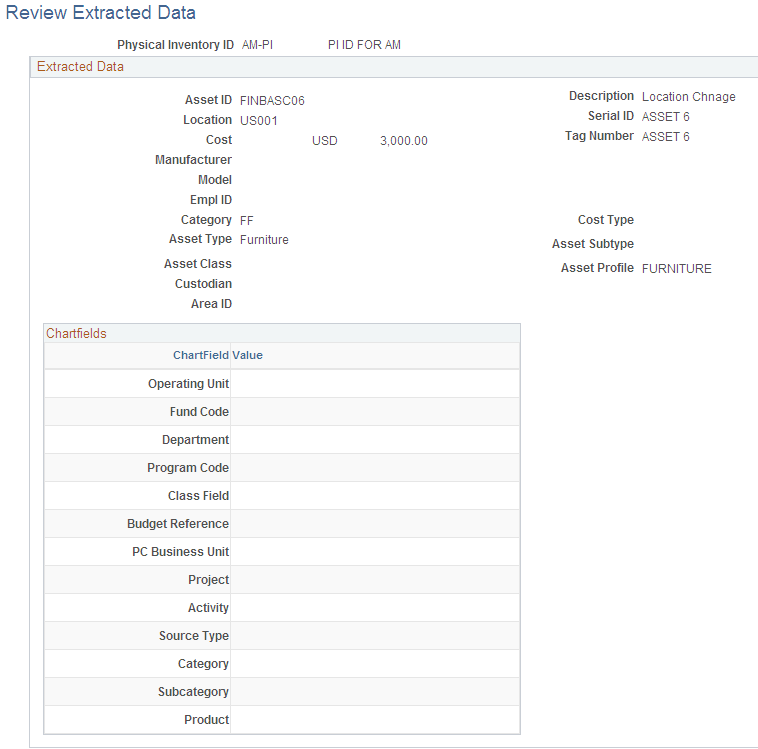
View the extract data one asset at a time. You can search by Physical Inventory ID, PI line number, asset ID, , tag number, and location code. The PI line number reflects the number of this asset in the extract sequence. For instance, the third asset that was extracted falls on PI Line Number 3. The system presents you with all the assets that match your criteria. Select the one you want to view.
Use the Verify Duplicate Tags page (PI_SCAN_DUP_TAG) to conduct searches for finding and correcting physical inventory data.
Navigation:
It is very common for an asset to be scanned multiple times during physical inventory, thus creating more than one entry with the same tag or serial number. In order for PeopleSoft Asset Management to perform inventory reconciliation, each tag or serial number must be unique. Therefore, it is extremely important that you identify and resolve any duplicate entries. If any duplicate entries exist when results are generated, these entries are marked as errors and are not processed any further.
This example illustrates the fields and controls on the Verify Duplicate Tags page. You can find definitions for the fields and controls later on this page.
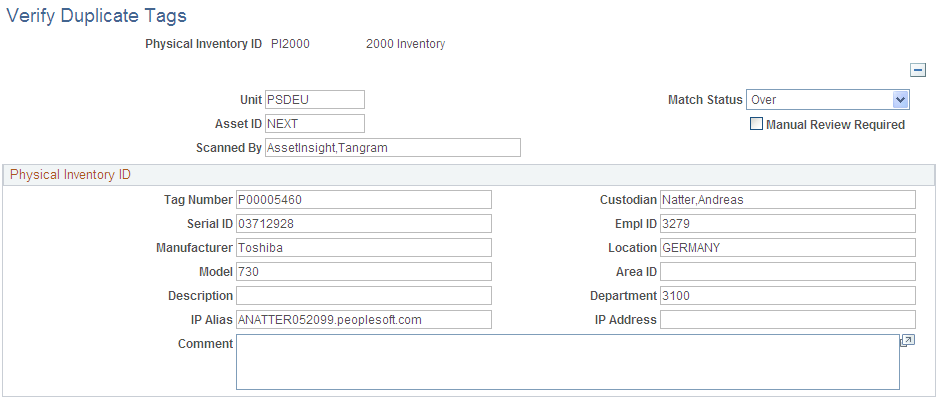
You can search on a tag and a physical inventory line number. The physical inventory line number reflects the number of this asset in the scanning sequence. For instance, the third asset that was scanned falls on physical inventory line number 3.
If duplicates exist, the system displays a page on which you can correct or delete assets that have duplicate numbers.
The IP Alias and IP Address fields describe the internet protocol attributes of IT assets that are extracted from the IT discovery tools database.
Use the Verify Duplicate Serial ID (identification) page (PI_SCAN_DUP) to conduct searches for finding and correcting physical inventory data.
Navigation:
This example illustrates the fields and controls on the Verify Duplicate Serial ID page. You can find definitions for the fields and controls later on this page.
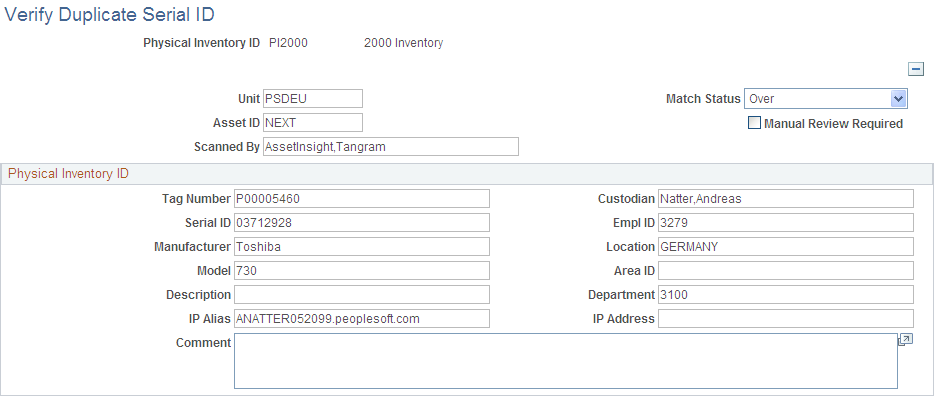
The Duplicate Serial Number page is similar to the Duplicate Tags page except that you are reviewing created records that have a duplicate Serial ID number.
Identification of duplicate serial IDs within the same physical inventory ID.
Use the Verify Scanned Data page to review the scanned data.
Navigation:
This example illustrates the fields and controls on the Verify Scanned Data page. You can find definitions for the fields and controls later on this page.
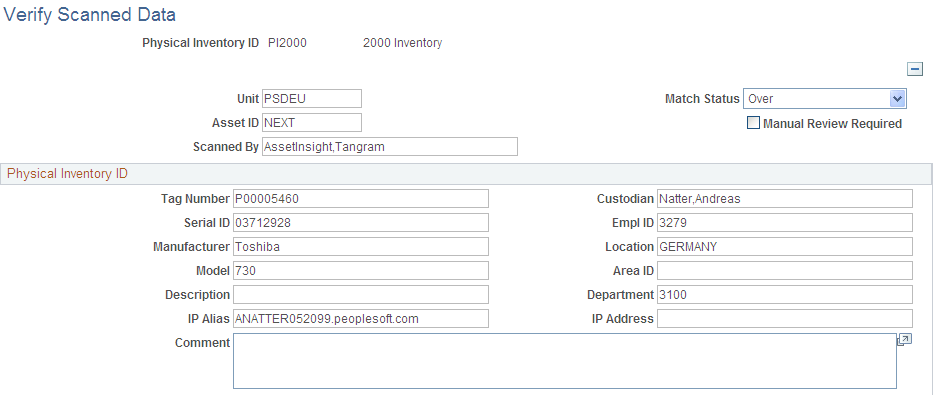
The Verify Scanned Data page is similar to the Verify Duplicate Tags page except that you are reviewing the scanned data.
Use the Results page (PI_RESULTS_01) to view the results of the matching process.
Navigation:
This example illustrates the fields and controls on the Results page. You can find definitions for the fields and controls later on this page.
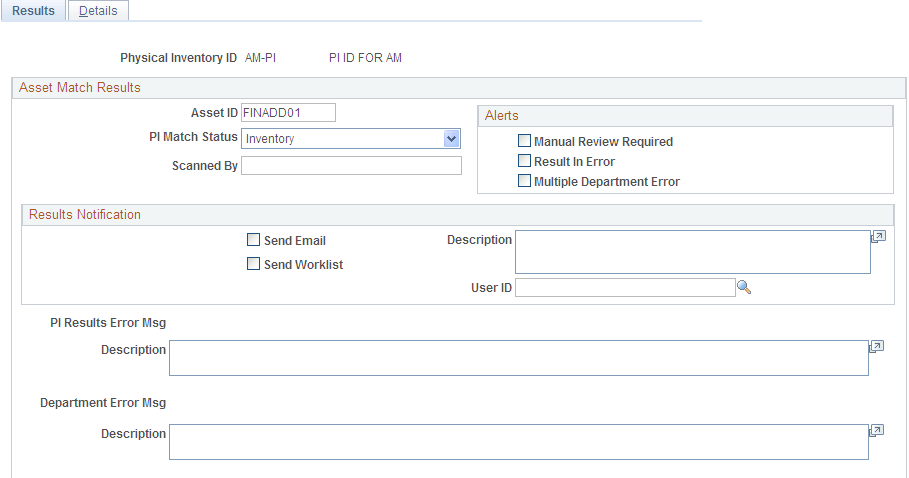
The PI Match Status (physical inventory match status) field displays an asset's physical inventory status when results are generated and matching is performed. An asset can have one of the following statuses:
|
Status |
Reason |
Transactions Generated |
|---|---|---|
|
Accel |
NA |
NA |
|
All I, O, U |
||
|
Discard |
||
|
Initial |
||
|
Inventory |
Asset was scanned during inventory as expected. |
Transfers and physical changes (description, location, department, custodian, and so on). |
|
None |
||
|
Over |
Asset was scanned but not expected. |
Physical adds. |
|
Retire |
Asset was scanned during inventory and was determined to be sold/retired. |
Retirements. |
|
Special Depr |
||
|
Under |
Asset was expected but not scanned. |
Retirements. |
Field or Control |
Description |
|---|---|
Manual Review Required |
This check box is selected if the scanner operator requested a special review for this asset. |
Results in Error |
This check box is selected if the physical inventory processing cannot process a result further. The following error conditions may apply:
|
Results Notification
If you use Workflow, this section contains fields that are used in workflow processing to generate automatic physical inventory results notifications. These can be sent to a worklist, an email address, or both.
This example illustrates the fields and controls on the Details Page. You can find definitions for the fields and controls later on this page.