Setting Up Application-Specific Installation Options
Use the Installation Options component (INSTALLATION) to set up application-specific installation options for PeopleSoft applications.
Page Name | Definition Name |
Usage |
|---|---|---|
|
INSTALLATION_AM | Review delivered transaction types, enable asset processing features, enable depreciation attributes, set system-wide options, and enable Asset Lifecycle Management solution integration options. | |
INSTALLATION_BI |
Define installation options specific to Billing. | |
INSTALLATION_BI3 |
Define installation options specific to Billing. | |
INSTALLATION_BI2 |
Define installation options specific to Billing. | |
INSTALLATION_CA |
Define installation options that are specific to Contracts. | |
|
INSTALLATION_EM | Define installation options for eSettlements. | |
INSTALLATION_EX |
Define installation options for Expenses. | |
|
EX_URGENCY_SETUP | Configure urgency levels for expense reports, time reports, travel authorizations, and cash advances by entering the number of days that the system uses to calculate and trigger a high, medium, or low urgency level for a transaction. | |
|
INSTALLATION_GL | Define installation options and mobile approval options for General Ledger. | |
INSTALLATION_CSR |
Define Grants installation options. Use this page to indicate that you can include optional attachments, to establish cost-sharing analysis types for each feeder system with which you plan to use the Grants cost-sharing features, and to determine the source for calculating unliquidated obligation balances for the Federal Financial Report. | |
|
INSTALLATION_GMPT | Define Grants Portal options. | |
INSTALLATION_INV |
Define several settings used by PeopleSoft Inventory; including staged date options, interunit transaction options, unit of measure conversion methods for bar code transactions, methods to number accounting entry lines, search limitations for the Storage Location Search page, and default values for lot IDs, serial numbers, and receiver information. In addition, use this page to define the default hold code applied to material stock requests when they fail to pass the Screen For Denied Parties process (SCM_FSS). | |
INSTALL_IN_COUNTERS | Define the starting values for your automatically generated numbers. | |
INSTALLATION_RE |
Select to enable lease activation for a lease. If selected, the roles defined can activate leases. Also, set mapping instructions for the Site Map page. | |
INSTALLATION_WM |
Define installation options for Maintenance Management. | |
|
INSTALLATION_MG | Set the calculated quantity per assembly (QPA) rounding precision. This rounding precision is reflected in PeopleSoft Manufacturing, Engineering, Cost Management, and Supply Planning. | |
|
INSTALLATION_MIN | Define installation options for Mobile Inventory Management. | |
INSTALLATION_AP |
Define the posting method and enable federal payment schedule processing, late interest charge calculation, evaluated discount, and document association processing options for your Payables application. Configure the Document Content Management Interface at the time of using a third party imaging solution for capturing invoice data from an image. | |
INSTALLATION_PL |
Define the message numbers and default planning instance for Supply Planning. | |
INSTALLATION_PGM |
Establish program management system defaults for workflow and email notification. | |
|
INSTALLATION_PC | Establish default settings for project fields and control fields used across . | |
INSTALLATION_PCINT | Establish the parameters for integration processes between and other applications. |
|
|
INSTALLATION_PO | Define general purchasing controls, requisition loader parameters, procurement card controls, and vendor attributes. In addition, you can define the maximum number of rows to display on various PeopleSoft Purchasing pages and select Oracle BI Publisher as the purchase order reporting tool for both PeopleSoft Purchasing and PeopleSoft eProcurement. | |
|
INSTALLATION_AR | Define the installation options that are particular to your Receivables application. |
|
ACCT_BAL_SBP |
Specify which balances to display on the Account Overview - Balances page. | |
|
INSTALLATION_OM | Set order, quote, and buying agreement chunking parameters and enable searching, claimback, and feature function security. | |
INSTALLATION_RS |
Define the installation options that are specific to your Resource Management application. | |
INSTALLATION_SP |
Define Services Procurement installation options. | |
INSTALLATION_FO |
Define Staffing Front Office and Pay/Bill Management installation options. | |
PSOPTIONS | Enable multiple jobs. Doing so will enable the employee record number to appear on the Employees search page and on the Job Data page. | |
INSTALLATION_AUC |
Use to set up award details bid display options and multichannel framework sourcing defaults. | |
INSTALLATION_CS |
Set up Supplier Contract Management installation options. | |
INSTALLATION_TR |
Define integration options for accounting, JD Edwards General Ledger, and PeopleSoft Financial Gateway functionality. |
Use the Asset Management page (INSTALLATION_AM) to review delivered transaction types, enable asset processing features, enable depreciation attributes, set system-wide options, and enable Asset Lifecycle Management solution integration options.
Navigation:
This example illustrates the fields and controls on the Installation Options - Asset Management page (1 of 2). You can find definitions for the fields and controls later on this page.

This example illustrates the fields and controls on the Installation Options - Asset Management page (2 of 2). You can find definitions for the fields and controls later on this page.
Transaction Types
The transaction types shown are delivered with the system and represent the types of asset transactions commonly used. You can rename the transaction types using new abbreviations as needed but only until you begin entering actual asset transactions into the system. Once you have done so, you can no longer modify the transaction types table.
Field or Control |
Description |
|---|---|
Accretion Expense | This transaction type is used in recording the period-to-period changes in the carrying amount of the asset retirement obligation recorded as expense for income statement purposes. This field appears when you enable the Asset Retirement Obligations feature (Asset Retirement Obligations check box in the Features group box). See Accounting for Asset Retirement Obligations. |
Prior Lease Payment | This transaction type is used when a lease payment is made in the current period for a prior period. The Prior Lease Payment (PLP) transaction type functions similarly to the Lease Payment (LPY) transaction type for accounting entry purposes. See Accounting Entry Template IDs Page |
Features
Asset management supports various processing features to meet the requirements of your location or industry.
Field or Control |
Description |
|---|---|
Joint Venture | Select to enable joint venture options in Asset Management. This enables two or more business units to share ownership of an asset. The default for this feature is disabled. |
Group Asset | Select to enable group asset processing features. The default for this feature is disabled. |
Child Inherits Parent's Life | Select to enable a feature that enables child component assets to inherit the remaining life of their parent asset. The default for this feature is disabled. |
Inflation |
Select to use the Inflation Processing feature, which provides for monthly inflation adjustment transactions (transaction type INF) that adjust the asset balances (cost, period depreciation, year-to-date depreciation, and accumulated depreciation) for inflation. This is primarily used in countries other than the U.S. The default for this feature is disabled. |
Impairment |
Select to use impairment processing, which provides for testing of assets that may meet impairment standards for your country. |
Revaluation | Select to use revaluation processing, which provides for periodic asset cost adjustment to fair market value. |
Copy Zero Impair/Revalue Rows | Select to create zero impairment or revaluation rows to the other books in order to maintain synchrony, even though those books do not process impairment or revaluation. |
Effective Rate | Select this option to enable functionality that converts transaction currency to base currency using the effective date that PeopleSoft provides rather than using the asset's transaction date. This option is valid only for transactions originating in . |
Field or Control |
Description |
|---|---|
Trans Currency Translation (transaction currency translation) | Select this option to direct the accounting entries (AM_AMAEDIST) and depreciation close (AM_DPCLOSE) processes to utilize the primary book's base currency as the transaction currency. Deselect this option if you want the accounting entries and depreciation close processes to keep the original transaction currency balanced for each individual transaction. This option directly impacts PeopleSoft General Ledger journal entries. |
Field or Control |
Description |
|---|---|
Capitalization Threshold | Select this option to enable capitalization threshold processing at the system level. If this option is not enabled within installation options, any capitalization thresholds set at the business unit or profile levels are ignored. When implemented, the capitalization threshold feature enables PeopleSoft Asset Management to automatically assess the need to capitalize assets according to user-defined rules for different profiles of assets based on asset cost. The system uses the specified thresholds to determine whether to classify an asset as capital, noncapital or expense. See PeopleSoft Asset Lifecycle Management Fundamentals, Setting Up Accounting Entry and Financial Processing for PeopleSoft Asset Management, "Defining Financial Processing for PeopleSoft Asset Management." |
Asset Retirement Obligations | Select this option to enable asset retirement obligation processing. This functionality provides asset retirement obligation measurement and reporting in compliance with Financial Accounting Standards (FAS 143) for leased assets, group assets, and asset impairment. |
Project ChartField Detail | Select a value to enable the interface of (PC) detail ChartField values from the source systems into PeopleSoft Asset Management. When this check box is set properly, the ChartField values (Project, PC Business Unit, Activity, Source Type, Category, and Subcategory) are carried over to Asset Management pages and on through to General Ledger. The values are:
The default value is ‘Project ID Only’, meaning that only the Project ID value from system sources will be carried over by the interface programs to Asset Management, and ultimately to General Ledger. |
System Wide Options
Field or Control |
Description |
|---|---|
Last Interface ID | Primarily informational, assigned incrementally by the system. After you set this number, the next interface will be assigned a value one greater than the number you set. |
Last Pre-Interface ID | Primarily informational, assigned incrementally by the system. After you set this number, the next pre-interface will be assigned a value one greater than the number you set. Note: Pre-Interface ID is one of the keys to the Pre-Interface table used by the PeopleSoft Payables/Purchasing to Asset Management interface. When inserting data into the Pre-Interface table, Payables and Purchasing use the Last Pre-Interface ID field and then increment the ID counter by one. You can enter a different Last Pre-Interface ID before using the interface; otherwise, the system uses a value of 1. If the Pre-Interface table contains rows of data, the last pre-interface ID must be greater than or equal to the largest pre-interface ID number found in the table. |
Account Entry Template ID | Select the default that you want to use. Account entry template IDs help speed up entry of the accounting templates by enabling you to associate more than one chart of accounts with an asset. |
File Size for chunking (MB)(Megabytes) | Specify the chunk size for the message, Get PIDATA, which is generated by Asset Management's Physical Inventory feature for usage by third party vendors. If the File Size for chunking (MB) is 8, and the total size of the message is 18 MB, the message is split into three chunks based upon the value provided in this field: the first and second chunks of 8 megabytes each and the third chunk of 2 MB. If this field is assigned a value of zero, the Tools Installation level variable (%MaxMessageSize) is used to determine the size of chunk. |
Precision for ARO Calculations | This field appears when you enable the Asset Retirement Obligations feature (Asset Retirement Obligations check box in the Features group box). Enter the number of characters for the calculation of asset retirement obligations. Example: The formula for Liability is: (Expected Cash Flows Adjusted for Market Risk) * (1/(1+credit adjusted risk free rate) ^ estimated life). This formula can produce a large number of decimal places and reporting precision requirements vary; therefore, the system uses the number as specified in this field to round the result. Suppose that Precision for the ARO Calculation is 4. The Liability is calculated as follows: A = Expected Cash Flows Adjusted for Market Risk B = round((1+credit adjusted risk free rate) ^ estimated life, 4) Liability = A * round(1/B,4) For more information, see Accounting for Asset Retirement Obligations. |
Federal Fund Attribute | Enter a name for the Federal fund attribute. The Federal fund attribute will be used to set up chartfield attributes on the ChartField Attribute page in order to specify whether a fund is Federal. |
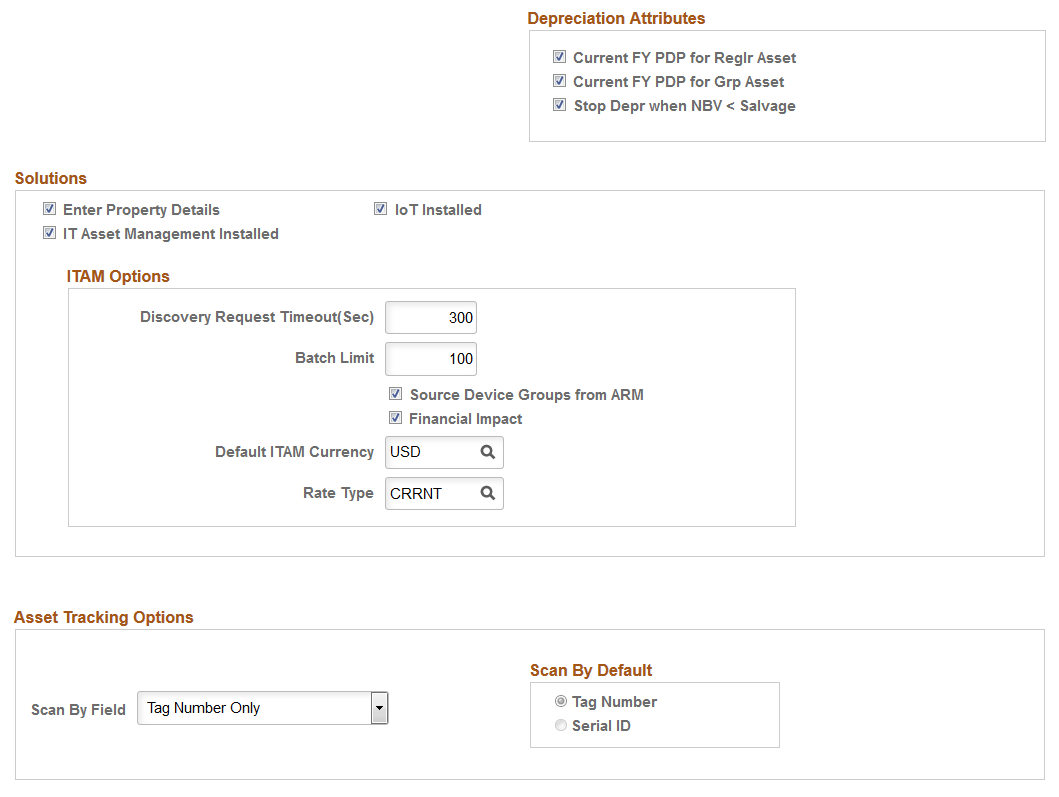
Depreciation Attributes
Field or Control |
Description |
|---|---|
Current FY PDP for Reglr Asset (current fiscal year prior depreciation period for regular asset) |
Select this option when adding assets with the Calculation Type of Remaining Value and the asset In Service date is earlier than the transaction date. If adding assets within the same fiscal year, the system calculates prior depreciation period (PDP) based on the In Service date as long as this option is selected. It is selected by default. For example, if the fiscal year is 01/01/05 to 12/31/05, asset in service date is 03/01/05, transaction date is 05/01/05, accounting date is 05/01/05, calculation type is Remaining Value, and convention is Following Month, the system calculates PDP from 04/01/05. |
Current FY PDP for Grp Asset (current fiscal year prior depreciation period for group asset) | Select this option when adding assets with the Calculation Type of Remaining Value and the asset In Service date is earlier than the transaction date. If adding assets within the same fiscal year, the system will calculate PDP based on the In Service date as long as this option is selected. It is selected by default. For example, if the fiscal year is 01/01/05 to 12/31/05, asset in service date is 03/01/05, transaction date is 05/01/05, accounting date is 05/01/05, calculation type is Remaining Value, and convention is Following Month, the system calculates PDP from 04/01/05. |
Stop Depr when NBV < Salvage (stop depreciation when net book value is less than salvage value) |
Select to stop the depreciation calculation when the net book value becomes less that its salvage value. This selection prevents the generation of negative depreciation. |
Solutions
Asset Management is the core product in the PeopleSoft Asset Lifecycle Management (ALM) Solution suite of integrated products. The other products are:
Lease Administration.
IT Asset Management.
Maintenance Management.
Field or Control |
Description |
|---|---|
Enter Property Details | Select this option to enable the Asset Property page for the Asset - Basic Add and Define Asset Operational Info components. |
IoT Installed(Internet of Things Installed) | Select this option to indicate your organization has enabled integration with Oracle Internet of Things Asset Monitoring Cloud Service. When you select this option, the Add Asset - Basic Add component includes an additional option to indicate the asset is an IoT asset as well as a separate IoT page to assign IoT attributes to your asset. See: Understanding the Integration with Oracle Internet of Things Asset Monitoring Cloud Service |
IT Asset Management Installed | Select this option to enable IT Asset Management options. |
Discovery Request Timeout (Sec): |
Enter the time out threshold in seconds when interfacing with asset discovery tools. |
Batch Limit | Enter the maximum limit for rows processed in a batch. |
Source Device Groups from ARM | Select to set the default for group creation to source device groups from the Asset Repository field (ARM) when creating new Software Device Groups within IT Asset Management. This default can be overridden at the time of group creation or edit. |
Financial Impact | Select this option to include Financial Impact Analysis during IT Asset Management processing for the Manage Exceptions and Assets not Reporting pagelets and detail. This option displays financial information (asset cost, net book value, and fair market value) that provides financial managers with immediate visibility of the financial impact of IT assets for proper disclosure in accordance with regulatory requirements. |
Default ITAM Currency | Set the currency code to the base currency for Financial Impact values. This option is visible only when the Financial Impact check box is selected. The values for Financial Impact for Manage Exceptions and Assets not Reporting will be stored in the currency that is specified here. When the actual values display, they are converted to the currency that is specified within individual user preferences. |
Rate Type |
Set the rate type for Financial Impact values. This option is visible only when the Financial Impact check box is selected. The values for Financial Impact for Manage Exceptions and Assets not Reporting will be stored as specified here. When the actual values appear, they will be converted to the rate type that is specified within individual user preferences. |
Asset Tracking Options
Field or Control |
Description |
|---|---|
Scan By Field | Select the field value to be scanned for in the Physical Inventory, Scan By Location, and Scan Asset pages or tiles. The available options are the following:
|
Scan By Default | The Scan By Default option specifies the default value for the Scan By Field drop down. This default value is used in the Physical Inventory, Scan By Location, and Scan Asset tiles. The Scan By Default option determines the default value for the toggle switch on the Fluid pages. |
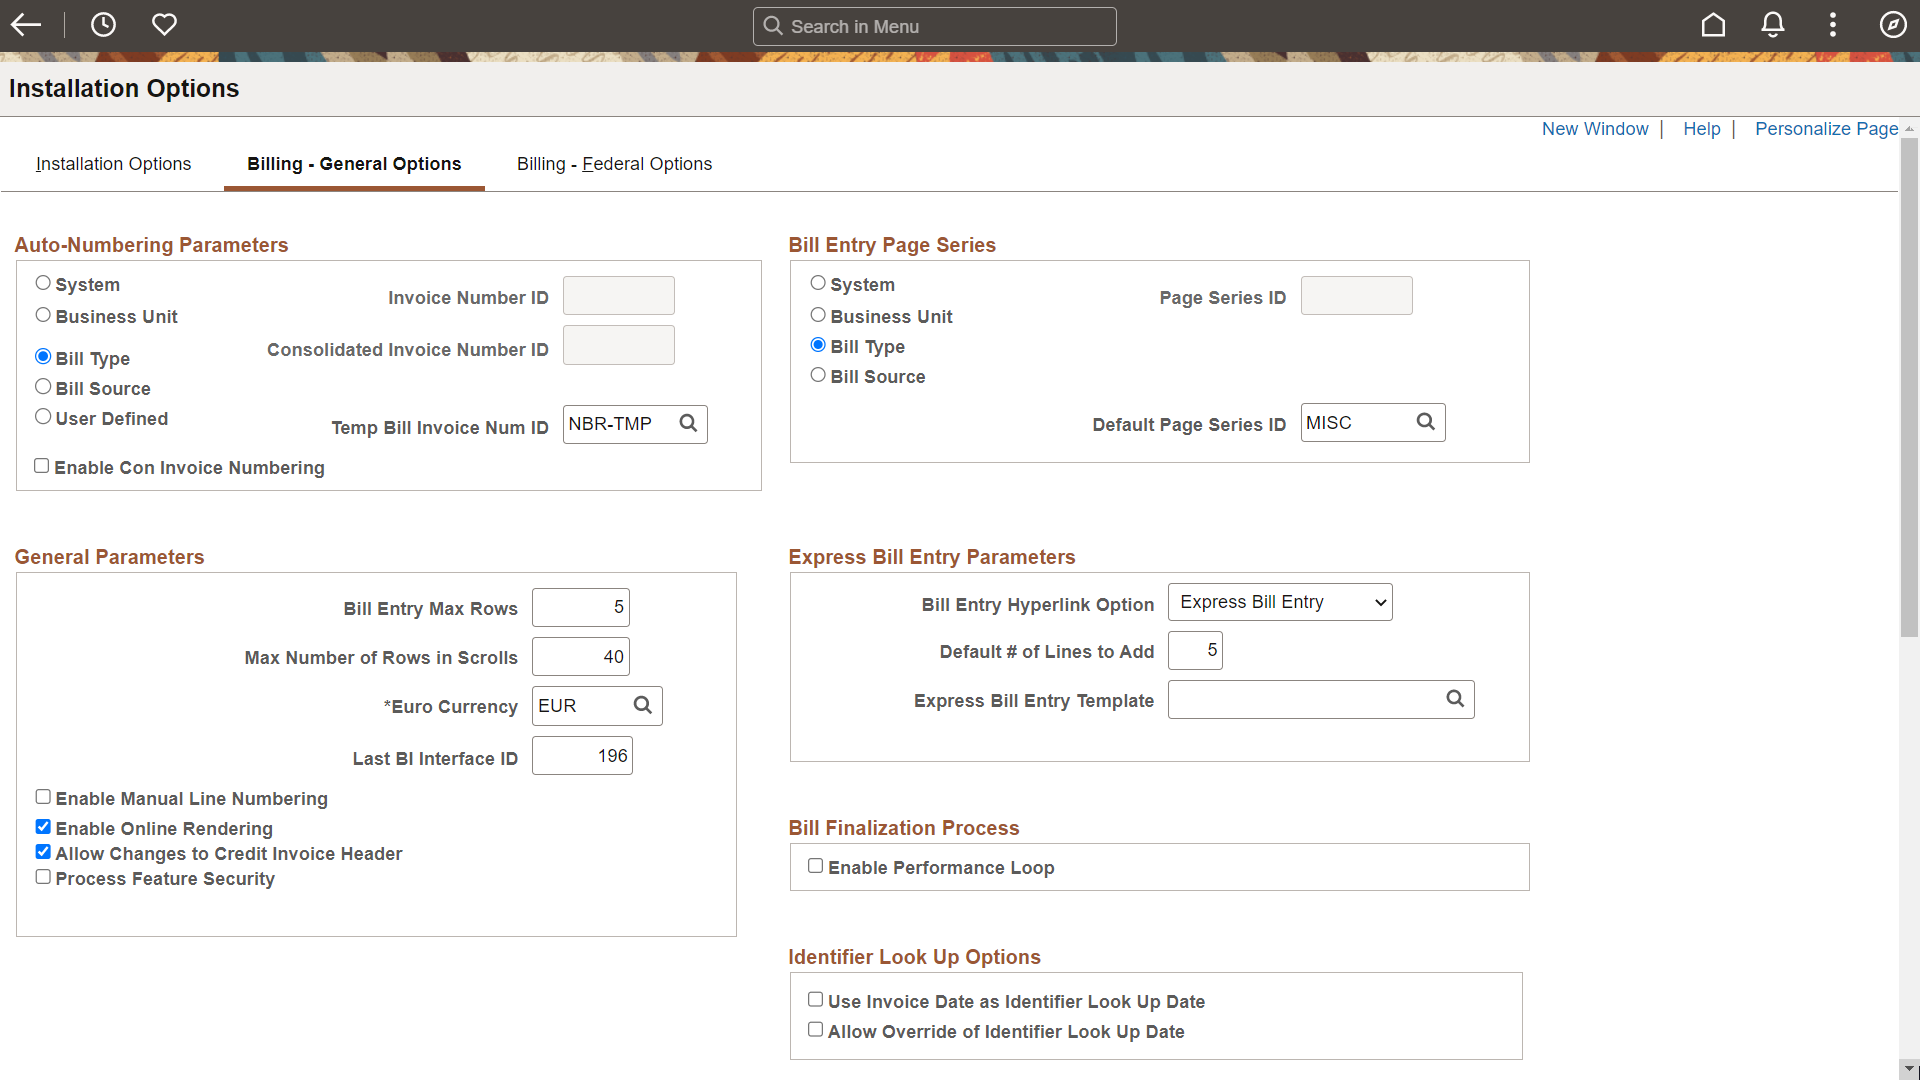
Use the Billing - General Options page (INSTALLATION_BI) to define installation options specific to Billing.
Navigation:
This example illustrates the fields and controls on the Installation Options - Billing - General Options page (1 of 2). You can find definitions for the fields and controls later on this page.
This example illustrates the fields and controls on the Installation Options - Billing - General Options page (2 of 2). You can find definitions for the fields and controls later on this page.

Note: You must first define valid invoice number IDs on the Invoice Number page and define valid page series IDs on the Bill Entry Page Series page.
The Auto-Numbering Parameters group box determines the system level that controls the assignment of invoice numbers. The Bill Entry Page Series group box determines which Billing pages you want to access and in what order during bill entry or inquiry. For example, you can place pages that you rarely use at the end of your page series. In each group box, select from the following options:
Field or Control |
Description |
|---|---|
System | When selected in either the Auto-Numbering Parameters or Bill Entry Page Series group box, the field adjacent to the System field is available for entry. For auto-numbering parameters, select a valid predefined invoice ID. You define valid invoice IDs on the Invoice Number page. All billing activity uses this same invoice number-sequencing scheme. For Bill Entry Page Series, select a valid predefined page series ID to ensure that all billing activity uses the same page series definition. You define page series IDs on the Bill Entry Page Series page. |
Business Unit, Bill Type, and Bill Source |
To specify a default invoice number or page series ID at a level other than system-wide, you are required to define the default value for the level desired on a different page. For example, to define page series navigation at the business unit level, select Business Unit. Selecting this option activates the Page Series ID field on the Billing Definition - Business Unit 1 page, and requires you to return to the Business Unit 1 page to specify the Bus Unit Level (business unit level) default page series ID. |
Changing the Default Level of the Invoice Number and Page Series IDs
To Define at the Level of: | Move to: |
|---|---|
Business Unit | Billing Definition - Business Unit 1 page |
Bill Type | Bill Type 2 page |
Bill Source | Bill Source 2 page |
User Defined criteria (for invoice number IDs only) | Invoice Number page |
Important! The invoice number ID is required at the level that you define in the Auto-Numbering Parameters group box. If you change the parameters in this group box, you must move to the appropriate page and define the default value for the level that you want. For example, if you change the autonumber parameters from Bill Type to Bill Source, you must go to the Bill Source page and assign an invoice numbering ID at the bill source level. You must also ensure that every bill source you set up in your system has an invoice number ID definition. Failing to follow these implementation requirements can cause unexpected results in future process runs.
Field or Control |
Description |
|---|---|
Temp Bill Invoice Num ID (temporary bill invoice number identification) | Assigns each temporary bill to a temporary bill invoice number identification. Define your temporary bill invoice number identification on the Invoice Number page. |
Enable Con Invoice Numbering | Select the check box to allow users to define their own consolidated invoice numbering rule. If the check box is selected for the Business Unit level, then the Consolidated Invoice Number ID field will appear on the Business Unit setup page. |
Default Page Series ID | If you define your Bill Entry Page Series options at a business-unit, bill-type, or bill-source level, the system uses this default ID if a page series ID is undefined for any business unit, bill type, or bill source. |
General Parameters
Field or Control |
Description |
|---|---|
Bill Entry Max Rows and Max Number of Rows in Scrolls | Define the default number of maximum rows to limit the number of rows that appear within the scroll area at one time in bill entry or express bill entry, and define the maximum number of rows that appear in scroll areas in bill search or bill line search. If you define search parameters that normally fetch 200 rows of billing data, for example, but you set the maximum number of rows to 40, you see 40 rows per chunk of the scroll. You can view the rest of the fetched data, 40 rows at a time, using the chunking arrows. You can also change the maximum number of rows displayed directly in bill entry, express bill entry, bill search, and bill line search. |
Warning! The larger the values that you enter in these fields, the greater the possibility that system response time will degrade.
Field or Control |
Description |
|---|---|
Euro Currency | The currency control code used for euro currency amounts throughout the Billing tables. Displays EUR by default, which is the euro currency code that the PeopleSoft system delivers in the Currency Code table. If you are not using the International Standards Organization (ISO) currency codes, change this default value to the euro currency code that you are using. |
Last BI Interface ID (last billing interface identifier) | Stores the last interface ID used by external sources that pass billing transactions into the Bill Interface structure. External sources that use this ID are responsible for updating and maintaining its value every time they use a number from this field. |
Enable Manual Line Numbering | Enables manual invoice line numbering. The Billing invoice line numbering feature enables you to enter invoice line numbers during online bill entry. You can control invoice line numbers when you insert bill lines into a new or existing bill, delete existing bill lines, or update invoice line numbers for existing bill lines. Manual invoice line numbering only applies to bill lines entered online. It does not apply to bill lines imported through the Billing Interface. Selecting this option activates a Manual Line Numbering flag on the Header - Info 2 page. Manual line numbering functions only if you enable the feature here and set the Manual Line Numbering flag on the bill header to ON. Note: Manual invoice line numbering bypasses the Billing chunking feature. When you select this option, the system disables the chunking buttons and sets the value of Bill Entry Max Rows on the Bill Entry Bill Line pages to 99999. In this scenario, when you access a bill, the entire set of rows appears. |
Enable Online Invoice Render | Select this check box to enable online invoice rendering for the print pro forma job where the invoice form is in BI Publisher format. The invoice document will be rendered online in PDF format if the check box is selected. |
Allow Changes to Credit Invoice Header | Select this check box to change certain header fields on a Credit Invoice. If the check box is selected, the user can edit the fields and save them. However, a warning message that the changes are not recommended will be displayed to the user. If the check box is not selected, an error will be displayed when the user tries to change some of the fields on the Credit Invoice Header and the change will not be allowed. The header fields that can be edited using this option are Currency, Customer, Type, Source, Cycle ID, Pay Terms, Billing Specialist and Sales person. |
Process Feature Security | Select this check box to enable Process Feature Security. Feature function security enables you to define user/role security down to the feature and field level to control access to entire features or individual fields within certain Order Management features. In Billing, Feature Security will impact customers who use third-party taxes and use the option to Calculate Use Tax on Free Goods on the Billing Business Unit. It limits the entry and/or display of the Use tax basis and Use tax amount on Entry (Line Tax), Inquiry(Line Tax) and Interface pages. |
Express Bill Entry Parameters
Field or Control |
Description |
|---|---|
Bill Entry Hyperlink Option | Determines whether links on the Bill Search pages navigate you to Standard Bill Entry, which is the default value, or Express Bill Entry. |
Default # of Lines to Add | The system populates the Lines to Add field on the Bill Entry Express - Line List page with this value. |
Express Bill Entry Template | Select a template from the list of templates available. The express bill entry template allows you to configure the express bill entry page based on your requirement. Header sections and line tabs can be hidden. Within the line tabs, only the fields you select will be displayed. A single Accounting Distributions page is also configurable through the template. |
Bill Finalization Process
Field or Control |
Description |
|---|---|
Enable Performance Loop | Select to instruct the Finalization process to sequentially loop through business units when processing bills. This option improves processing performance by looping through business units instead of processing transactions in a random order. This option applies to the Finalization process for non-consolidated bills only. Consolidated bills can comprise of bills from multiple business units, thus eliminating the ability for the Finalization process to perform this task on consolidated bills. |
Identifier Look Up Options
Field or Control |
Description |
|---|---|
Use Invoice Date as Identifier Look Up Date | Select to set the invoice date as the default date for Identifier Look Up. If the option is not selected, current date will be used for Identifier Look Up. This will allow the user to retain the functionality of using current date for all pricing. |
Allow Override of Identifier Look Up Date | Select to allow override of the Identifier Look Up Date. If this option is selected, the Identifier Look Up Date is displayed for each Bill Line in Bill Entry or Express Bill Entry. The field may be changed for each line. |
Update Bill Line Description
Field or Control |
Description |
|---|---|
Use Effective Dated Identifier Description for Generating Recurring Bills and Copied Bills | Select this flag to update the latest identifier description on the newly created invoices. The description will be updated for the new invoices created through Copy Bill and Recurring Bill. |
Insights Reporting Preferences
|
Field or Control |
Description |
|---|---|
|
Reporting Currency |
According to the selected currency, all the transaction amounts are displayed on the Insights dashboard pages. Click the Search icon and select the currency type from the Look Up Reporting Currency pop-up window. For example, if you select the currency type as USD, all the transaction amounts are displayed in US Dollar. |
|
Rate Type |
According to the selected Rate Type, the currency is converted and displayed on the Insights dashboard page. For example, if the Reporting Currency is USD and Rate Type is CRRNT, all the transaction amounts are displayed in US Dollar as per current exchange rate. |
Authorize Delete Attachments
|
Field or Control |
Description |
|---|---|
|
Authorize Delete Attachments |
Select to indicate that you want to authorize specific roles to delete attachments from the Header Documentation Page and the Line Documentation page of an invoice. When you select this check box, the Roles Authorized to Delete Attachments appears. Deselect to allow all users to delete attachments from invoices. |
|
Role Name |
Select the roles that you want to grant the ability to delete attachments from Header Documentation Page and the Line Documentation page of an invoice. The user who originally attached the file can delete as well. |
Collector/Credit Analyst Default
The system uses this default hierarchy when this check box is selected:
When creating invoices using the online option, this table determines where the Collector and Credit Analyst values default from depending on setup.
Defined for
Defaults from
Bill Source
Bill Source
Bill Type
Bill Type if not defined at Bill Source
Billing Options
Billing Options if not defined at Bill Source or Bill Type
Customer
Customer Bill To options if not defined at Bill Source, Bill Type, or Billing Options
When creating invoices from the billing interface, the system uses the Auto Numbering Parameters section of this page to determine the default values.
When Bill Type is selected as the auto numbering options, The Collector and Credit Analyst values default from the Bill Type.
If Bill Type is selected as the auto numbering option and no collector and credit analyst information is populated for the Bill Type, then the defaults for collector and credit analyst comes from Billing Options.
If there is no collector or credit analyst information at any these three higher levels, the default values come from the Customer - Bill To options.
For the defaults to come from Bill Source, the BILL_SOURCE_ID must be added as a bill by field to the Bill By identifier. After this is done, Bill Source can be selected as the Auto Numbering option and the Collector and Credit Analyst defaults from the Bill Source.
|
Field or Control |
Description |
|---|---|
|
Use Bill Source, Bill Type, or Billing Options |
Select to have the system automatically populate online bills and bills from the billing interface using the information above. Deselect to default the Collector and Credit Analyst from the Customer - Bill To options. |
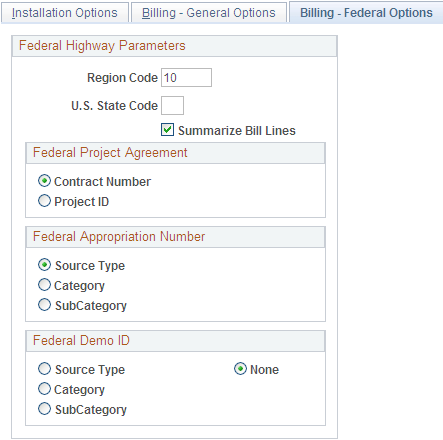
Use the Billing-Federal Options page (INSTALLATION_BI3) to define installation options specific to Billing.
Navigation:
This example illustrates the fields and controls on the Billing-Federal Options page. You can find definitions for the fields and controls later on this page.
Field or Control |
Description |
|---|---|
Region Code | Enter a 2 character Region Code. There is no prompt list for the Region Code field. |
State Code |
Select a value for state code from the prompt list. |
Select one of the options in the Federal Appropriation Number group box to define which field will be used to store the value for Federal Appropriation. The available options are Source Type, Category, SubCategory, and None. The field selected is used by the Federal Highway Billing flat file extract process to group detail rows. If the Federal Appropriation Number is set to a value other than None, the Region Code and State Code fields cannot be left blank since they are going to create the extract flat file if the flag is not set to None.
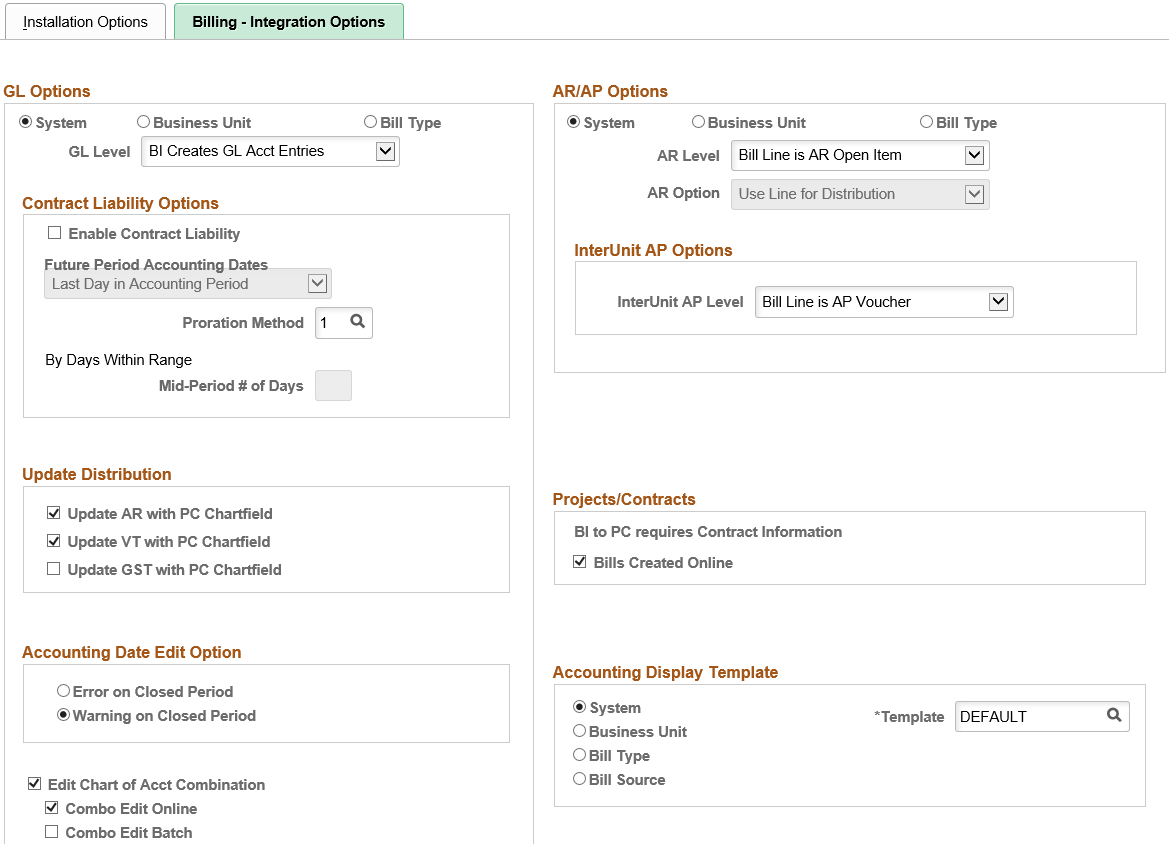
Use the Billing-Integration Options page (INSTALLATION_BI2) to define installation options specific to Billing.
Navigation:
This example illustrates the fields and controls on the Installation Options - Billing - Integration Options page. You can find definitions for the fields and controls later on this page.
Field or Control |
Description |
|---|---|
Edit Chart of Acct Combination | Select to enable the Online ChartField Combination Editing process for bill entry, which prevents you from passing invalid ChartField combinations to your general ledger. |
Combination Edit Batch | Select to enable combination editing process to be done in batch for transactions that do not have ChartField inheritance turned on. |
Combination Edit Online | Select to enable combination editing process to be done for online transactions that do not have ChartField inheritance turned on. |
GL Options
Field or Control |
Description |
|---|---|
GL Options |
Define the level of detail that you pass to the system that generates your general ledger accounting entries. If you select Business Unit or Bill Type, the GL Options page appears, where you can define the GL level options that default to all existing business units or bill types, respectively. Note: In deferred mode, when you select Business Unit or Bill Type, the GL Options page appears after you click the save or refresh button. |
GL Level |
(Required) Define how the system passes accounting entries to your general ledger system. If you select System in the GL Options group box, the GL Level field on this page becomes available for entry. Select one of the following values: AR Creates GL Acct (accounting) Entries: Receivables creates accounting entries and passes them to your general ledger system. Select this value to indicate that Billing will not track accounting information, and to disable any validation requirements for values defined for each revenue line of a bill when you change the status to RDY. BI Creates GL Acct Entries: Billing creates accounting entries and passes them to your general ledger system. No GL Accounting Entries: You pass no accounting entries to your general ledger system. |
Contract Liability Options
If you select System in the GL Options group box, the following fields are available for entry. If you select Business Unit or Bill Type in the GL Options group box, the following fields are available for entry on the GL Options page, where you can define default values for the business unit or bill type definition.
Field or Control |
Description |
|---|---|
Enable Contract Liability | Enables calculation and creation of accounting entries to be posted to your general ledger for future accounting periods. Use this to process bills that contain revenues to be realized in a future accounting period. This option is available for entry only if you selected BI Creates GL Acct Entries in the GL Level field. Before you can generate contract liability, you must select this check box and define the future period accounting dates parameter at the same level that you set the GL options. For example, if you defined the GL options at the business unit level, select Enable Contract Liability and define the future period accounting dates parameter on the GL Options page to display by default all business units. On the Billing Definition - Business Unit 2 page, you can select values different from the defaults selected on the GL Options page. If you defined the GL options at the bill-type level, select Enable Contract Liability and define the future period accounting dates parameter on the GL Options page to display by default all bill types. On the Bill Type 2 page, you can select values different from the defaults selected on the GL options page. |
Future Period Accounting Dates | Determines the accounting date that the system uses when you create future-dated accounting entries, and is available only when you select the Enable Contract Liability check box. Select First Day in Accounting Period to post contract liability to the proper realized income account on the first day of the realized accounting period; select Last Day in Accounting Period to post on the last day of the realized accounting period. |
Proration Method | The calculation method used to divide and distribute contract liability across accounting periods. Click the Detail button to access the following valid proration method values: (1) By Days Within Range: The system divides the number of revenue days in the period by the number of days in range. (2) Evenly Using All Pds (periods): The system divides the total invoice line amount by the number of periods in the range. Revenue is recognized in equal portions for each accounting period, regardless of the number of days in each period. (3) Evenly Using Mid-Period Rule: The system divides the total invoice line amount by the number of recognizable periods in the range. The number of recognizable periods is derived from applying rules to start/end days and mid-period day to determine whether the first and the last periods are recognizable or excluded entirely from the calculations. (4) Evenly/Partial by Days: The system divides the total invoice line amount by the number of recognizable periods in the range. The number of recognizable periods is derived from applying rules to start/end days and mid-period day to determine whether the first and the last periods are recognizable or excluded entirely from the calculations. (5) User Defined Proration Method: Available if you want to create your own proration method. |
Mid-Period # of Days | Enter the day in an accounting period that determines whether the accounting period is either fully recognizable or not recognizable at all. You can specify the mid-period day here, or allow the system to assign the date. The system defines the mid-period day by dividing the number of days in the accounting period by two and rounding to the nearest whole number. This field is available only when you select the proration method Evenly Using Mid-period Rule. |
Accounting Date Edit Option
Field or Control |
Description |
|---|---|
Error on Closed Period | Select to prevent invoices from being saved with Ready status during closed accounting period. If the accounting date is in closed accounting period, then the invoice cannot be saved with the status Ready. Also, the invoice cannot be processed in the subsequent billing processes. |
Warning on Closed Period | Select to allow invoices to be saved with Ready status during closed accounting period. If the accounting date is in closed accounting period, then the invoice can be saved with the status Ready but a warning message is displayed. The invoice can be processed in the subsequent billing processes. |
AR/AP Options
Field or Control |
Description |
|---|---|
AR / AP Options | Define the level of detail to pass to your accounts receivable and accounts payable system. If you select in this group box Business Unit or Bill Type, the Default AR/AP Level page appears, where you can define the AR Level, AR distribution or AP Level option that displays by default all existing business units or bill types, respectively. Note: In deferred mode, when you select Business Unit or Bill Type, the Default AR/AP Level page appears after you click the save or refresh button. |
AR Level |
Define the level at which Billing passes open items to your receivables system. This field is available for entry only when you select System in the AR Options group box. Select from the following values: Bill Line is AR Open Item: Billing passes each bill line as an open item in the receivables system. Header is AR Open Item: Billing passes each bill as an open item in the receivables system. No AR Open Items: Billing passes no open items to the receivables system. |
Note: For invoices subject to ChartField inheritance processing, the Load AR Pending Items process creates pending items in the receivables system based on a summarized set of balanced ChartFields of accounting entry type AR when the AR level is set to Header is AR Open Item and the AR option is set to Use Header for Distribution.
Field or Control |
Description |
|---|---|
AR Option |
Define the level of detail for passing AR account distribution to your accounts receivable system. This field is available for entry only when you select System in the AR Options group box. Select from the following values: Use Header for Distribution: Send an AR account with each invoice/open item. Use this AR option only in conjunction with the AR level Header is AR Open Item or No AR Open Items. Use Line for Distribution: Send an AR account for each line of the invoice. This is the only option available if you select the AR level Bill Line is AR Open Item. |
Note: Select the AR option Use Line for Distribution if you want one invoice as an open item, but you want to use more than one receivables account. Project data is tracked in Receivables at the item distribution level. If you want project cost data to flow through Billing to Receivables, you may need to use this option.
Field or Control |
Description |
|---|---|
InterUnit AP Level | Define the level at which PeopleSoft Billing populates the AP Voucher Staging records. Select from the following values: Bill Line is AP Voucher: Billing generates an AP voucher for each bill line. Header is AP Voucher: Billing generates an AP voucher for each bill header. No AP Voucher: No voucher is created. |
Update Distribution
Select to control the Project Costing ChartField entries that are generated for AR, VAT, and GST when inheritance is not being used. If inheritance is not being used for a ChartField and a distribution code is not available, then Project Costing ChartFields are copied from the line value, to the AR, VAT, and GST entry.
ChartField inheritance is determined on the ChartField Inheritance Page.
Projects/Contracts
Field or Control |
Description |
|---|---|
Bills Created Online | If this check box is selected, the contract number and bill plan as well as project information are required to be populated for the manually entered bill to interface with . If the check box is deselected, only the project information is required for a manually entered bill to interface with . |
Bills Created by Interface | This option is available only if Bills Created Online option does not require contract information. This option determines if bills loaded through billing interface for system source of BBI or blank will require contract information in order to interface to . This option has no impact on interface from other system sources. |
Accounting Display Template
Field or Control |
Description |
|---|---|
Accounting Display Template | Bill entry accounting templates enable you to define a selection of ChartFields that you want to work with while in the bill entry pages. If there are ChartFields that remain a constant value when you enter accounting information for your invoices, you may configure a template to exclude this ChartField. Defining an accounting template minimizes keystrokes in data entry, and keeps your page free of redundant information. Define accounting templates on the Bill Entry - Acctg Template page. You can define your bill entry accounting template at the system, business-unit, bill-type, or bill-source level. If you select System, the Template field option becomes available for entry, where you can select a valid predefined bill entry accounting template ID to ensure that all billing activity uses the same bill entry accounting template. If you define a bill entry accounting template at the business unit, bill type, or bill source level, enter a default template ID. Note: In deferred mode, the template ID fields appear when you click the save or refresh buttons. |
Note: Bill entry accounting templates affect which ChartFields appear online. They do not determine whether a ChartField is populated with a value. A ChartField may be populated automatically with a value defined in the distribution code.
Use the Contracts page (INSTALLATION_CA) to define installation options that are specific to Contracts.
Navigation:
This example illustrates the fields and controls on the Installation Options - Contracts Page. You can find definitions for the fields and controls later on this page.
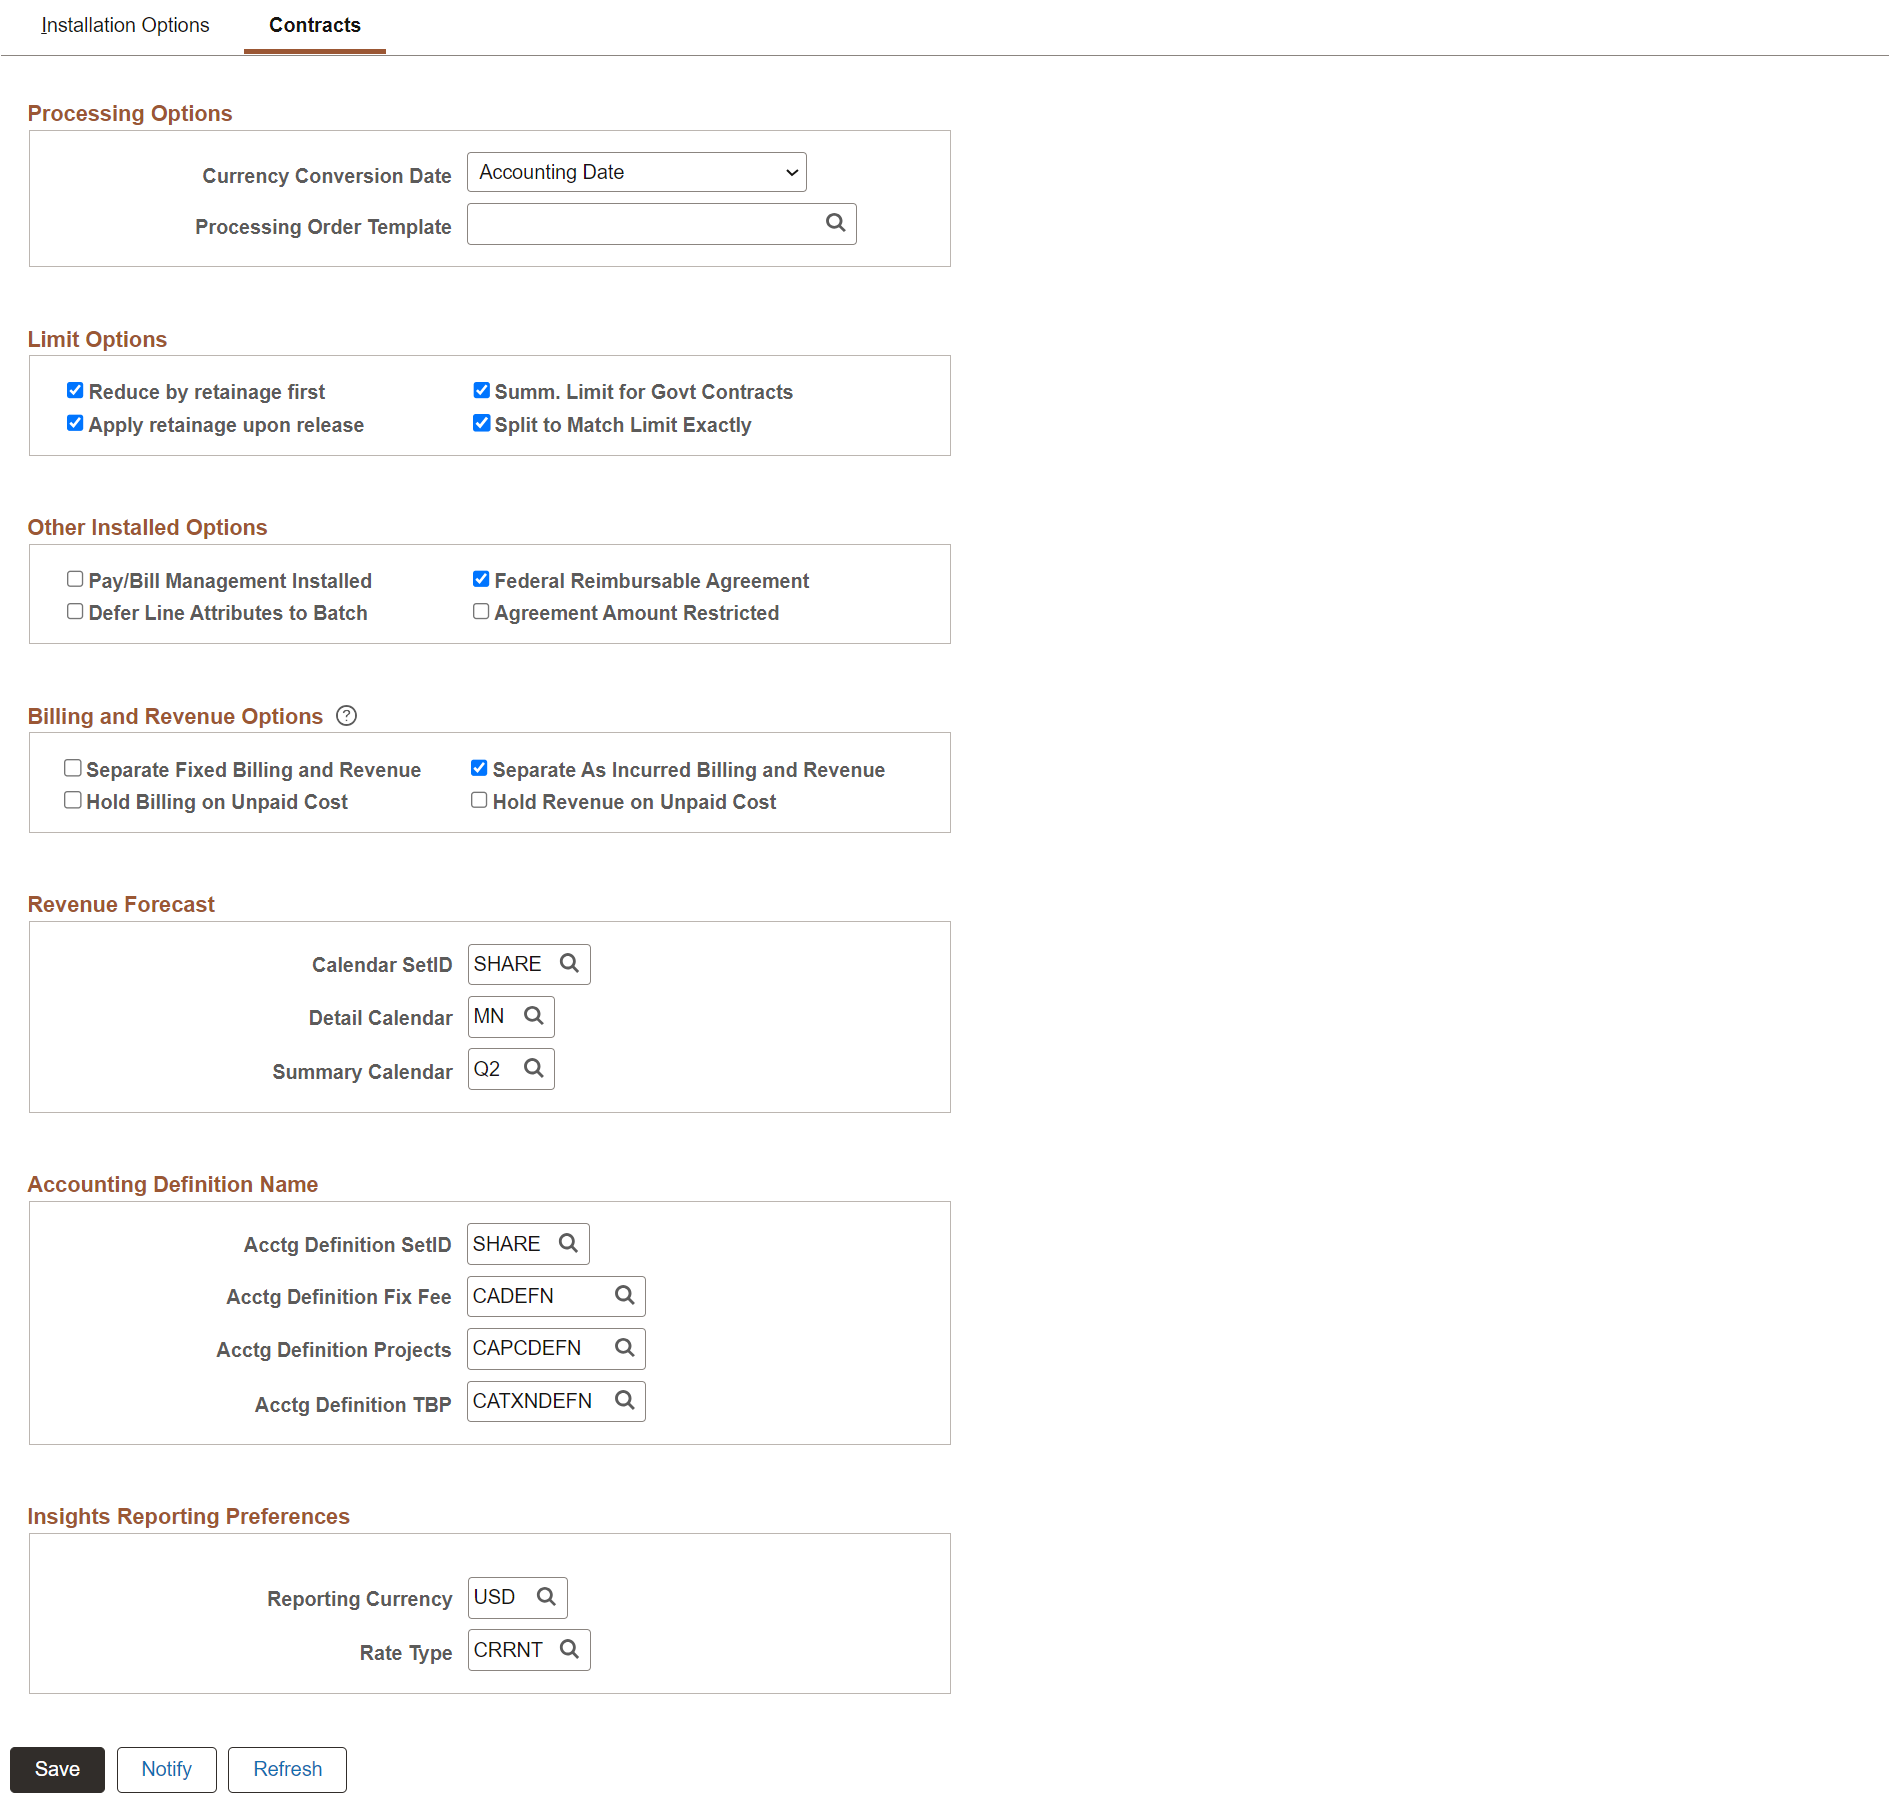
Processing Options
Field or Control |
Description |
|---|---|
Currency Conversion Date | Select the date for the system to use for currency conversion by the Contracts billing process. Values include: Accounting Date and Transaction Date. This field is also used for as-incurred revenue processing (PSA_ACCTGGL) for currency conversion. |
Limit Options
The limit options enable you to apply retainages to limits that you have defined for a contract line. For example, you could have a contract line associated with a project that has a 10,000.00 USD limit and have that contract line associated with a retainage of 10%. If you select Reduce by retainage first, the system applies the 10% retainage to the transaction before the transaction is compared to the limit. Thus, if a 5,000.00 USD transaction comes through, the system applies only 4,500.00 USD (5,000.00 USD–500.00 USD retainage) against the limit. If you select Apply retainage upon release, the system applies accumulated retainages to the limit for the contract line once you have released the retainages on the billing plan with which you have associated the contract line. In this example, when you release the retainage on the Billing Plan, the system applies the 500.00 USD to the limit. If you do not select either option, the system applies the gross transaction to the limit up-front.
Field or Control |
Description |
|---|---|
Reduce by retainage first and Apply retainage upon release | If you select Reduce by Retainage First and do not select Apply Retainage Upon Release, the system applies the reduced transaction to the limit and never applies the retainage to the limit. If you select both Reduce by Retainage First and Apply Retainage Upon Release, the system backs the retainage out of the transaction; upon your releasing the retainage on the billing plan, the system applies the retainage to the limit. Warning! Do not select Apply Retainage Upon Release without also selecting Reduce by Retainage First. Doing this would result in a double application of the retainage against the limit. (Using our example above, the system would apply 5,000.00 USD against the limit when the transaction is first processed, and then 500.00 USD more against the limit when the retainage is released, resulting in a double application of 500.00 USD on a 5,000.00 USD transaction.) |
Summ. Limit for Govt Contracts | Select to enable summary limits to be calculated when the Limits process (CA_LIMITS) runs. This option is used only for government contracts. This option determines if certain fields and pages appear that are used with summary limits for government contracts. For example, if this option is selected, the PVN Generation Level field is shown on the Contracts Business Unit - Defaults page and the Contract Header - Billing Options page. If this option is selected, the Limits process summarizes the excess amounts for each contract line when adding rows to PROJ_RESOURCE. The summarized rows are passed to PeopleSoft Billing with a billable (BIL) and revenue (REV) analysis type, and potentially to General Ledger and Receivables. If this option is not selected, the Limits process does not summarize the incoming transactions when adding them to PROJ_RESOURCE. Instead, if the limit is exceeded, the process creates over the limit (OLT) and revenue over the limit (ROL) analysis type rows. In other words, if this option is not selected then the logic of the Limits process when it processes a government contract, is same as a standard contract. However, if this option is selected, for only government contracts, the Limits process summarizes incoming transactions. Note: If you select this option, the Split to Match Limit Exactly option applies only to regular contracts, not government contracts. If you deselect this option, the Split to Match Limit Exactly option applies to regular contracts and government contracts. For more information about the summary limits process: |
Split to Match Limit Exactly | Select to enable OLT splits for contract lines with limits. When you select this option, the system splits a OLT row into one BIL line and one OLT line. This allows you to reach the limit amount exactly with the BIL line and the system places the remaining amount onto an OLT line. If the Enable Summary Limits option is selected, this option applies only to regular contracts, not government contracts. Note: With retainages, the Contracts Billing interface optionally checks for limits when retainages are released. If the row is over the limit, it is returned to as OLT rather than RRT. With OLT splits, the RRT is split into an RRT and an OLT. For contracts with a classification of Government, when the Limits process evaluates revenue transactions against revenue limits, the resulting revenue (REV) rows are either passed to the general ledger or marked as revenue over the limit (ROL) and passed to . Select the Split to Match Limits Exactly check box to enable the system to split a REV (revenue) row into one REV line and one ROL (revenue over-the-limit) line when a revenue transaction breeches the limit defined for the contract line. This selection enables you to reach the limit amount exactly with the REV line, while passing the remaining transaction amount on to a ROL line. Note: Creating separate revenue transaction rows and applying them to a separate revenue limit is only applicable to government contracts containing rate-based contract lines associated with a fee type (cost-plus), where the Separate Billing and Revenue check box is selected. |
Field or Control |
Description |
|---|---|
Processing Order Template | Select a template that you want the system to use during the Limits Process to determine the sequence in which transactions are processed based on your business process. This list is based on the Processing Order Templates defined in the Process Order Template page. See Setting Up a Processing Order Template. Note: Processing Order Templates are optional. If Processing Order Template is not used then by default transactions are processed based on RESOURCE_ID_FROM and RESOURCE_ID field values. |
Other Installed Options
Field or Control |
Description |
|---|---|
Pay/Bill Management Installed | Select if you have the Pay/Bill Management application installed on your system. |
Defer Line Attributes to Batch |
Select to defer processing from real time to batch. When you save contract lines to a contract, the system creates accounting distributions, and optionally, billing and revenue plans. In high volume cases, deferring processing of these attributes from real time to batch may speed up contract data entry. However, if you choose this selection, the contract attributes are not immediately available. |
Federal Reimbursable Agreement | Select to enable reimbursable agreement functionality. By selecting this option, the Federal Reimbursable Agreement value appears in the drop-down list for the contract classification field when adding a new contract. While the value in the contract classification field defaults to Standard, you can select to specify the contract as a reimbursable agreement. Reimbursable agreements are subject to additional edits as described in the PeopleSoft Contracts. documentation. |
Agreement Amount Restricted | Controls whether the amount field on the Contract General page is open and editable upon adding a contract or unavailable for entry. If you select this check box, the amount field on the Contract General page is unavailable for entry and the system populates the amount field. This field appears on the page only if you select the Federal Reimbursable Agreement check box. |
Billing and Revenue Options
Field or Control |
Description |
|---|---|
Separate Fixed Billing and Revenue | Select to define and apply different amounts for billing and revenue on amount based and percent based contract lines. Options selected here default to the Contracts Business Unit when new business units are created. By default this option is not selected. |
Separate As Incurred Billing and Revenue | Select to define and apply different rates for billing and revenue on rate-based contract lines. Options selected here default to the Contracts Business Unit when new business units are created. By default this option is not selected. |
Hold Billing on Unpaid Cost | The value selected here defaults to a similar selection on the Sponsor (Customer) when one is created. |
Hold Revenue on Unpaid Cost | The value selected here defaults to a similar selection on the Contract when one is created. |
Revenue Forecast
The Detail and Summary calendars control the time period for which you forecast revenue. For forecasting based on predetermined dates (such as an In Progress apportionment revenue plan), the events are summarized into the corresponding period of each calendar. For forecasting that uses the estimated start and end date (such as an as-incurred revenue plan), the amount is spread evenly over the periods of the detail calendar, and then those periods are grouped into the periods of the summary calendar.
Field or Control |
Description |
|---|---|
Calendar SetID | Select a SetID for your calendars. |
Detail Calendar | Select a calendar with the lowest level of time periods for which you want to sum and display forecasted revenue. |
Summary Calendar | Select a calendar with a higher level of time periods than the detail calendar, for which you want to sum and display forecasted revenue. |
Note: Use the budget period calendar to modify the choices that appear on the detail and summary calendars.
Accounting Definition Name
Field or Control |
Description |
|---|---|
Acctg Definition SetID (accounting definition SetID) | Select an accounting definition SetID for the Journal Generator. The system uses the value in this field for streamlined revenue processing. |
Acctg Definition Fix Fee (accounting definition fix fee) | Select an accounting definition for fixed fee contract lines. The system uses the value in this field for streamlined revenue processing. |
Acctg Definition Projects (accounting definition projects) | Select an accounting definition for rate-based contract lines. The system uses the value in this field for streamlined revenue processing. |
Acctg Definition TBP (accounting definition Transaction Billing Processor) | Select an accounting definition for contract lines coming from the Transaction Billing Processor. The system uses the value in this field for streamlined revenue processing. |
Insights Reporting Preferences
Field or Control |
Description |
|---|---|
Reporting Currency | Select the currency that will be used across all Business Units for reporting in the Contract Analytics dashboard. |
Rate Type |
Select the rate type to be used for converting amounts to the defined reporting currency. |
Note: Changes to the Reporting Currency or Rate Type will require a full refresh of the Contracts Insights Index. For more information on the processing of currency in the Contract Analytics dashboard, see Analyzing Contracts Using PeopleSoft Insights.
Use the eSettlements page (INSTALLATION_EM) to define installation options for eSettlements.
Navigation:
This example illustrates the fields and controls on the Installation Options - eSettlements page. You can find definitions for the fields and controls later on this page.
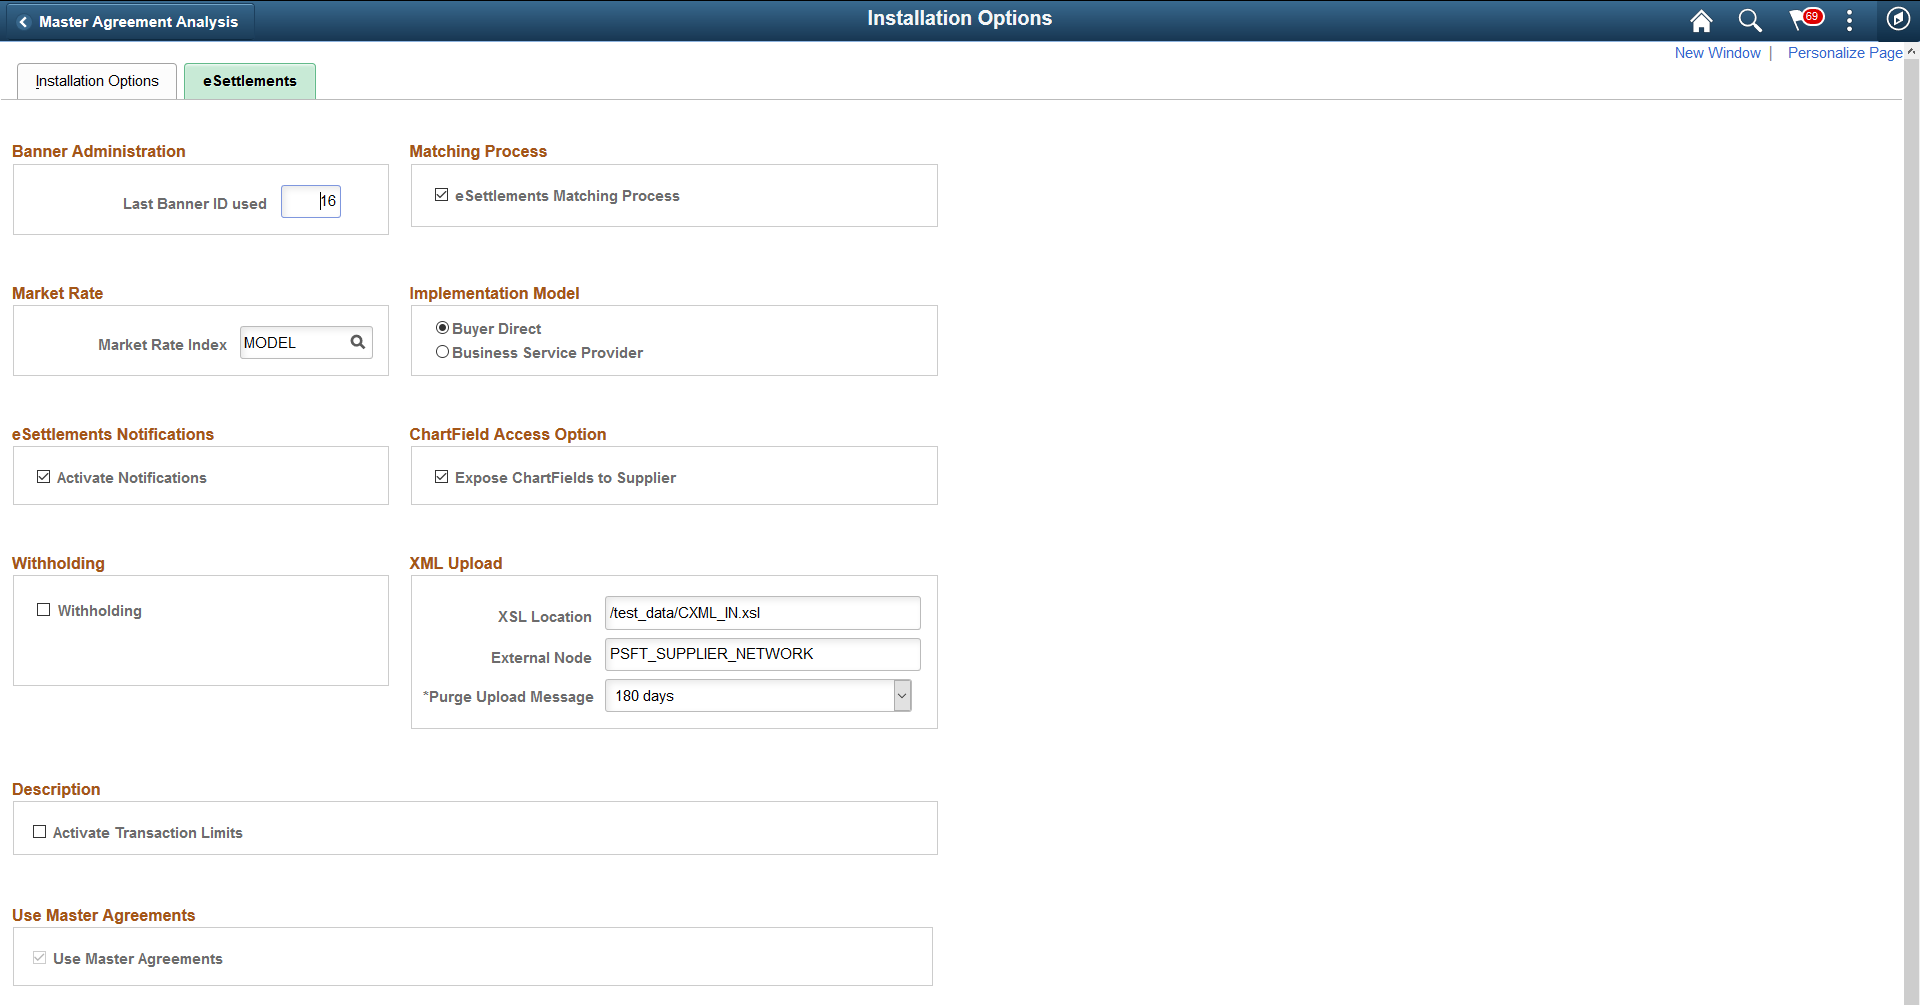
Important! Because certain eSettlements processes depend on the check box selections on the Installed Products page documented in this topic, ensure that you have selected the Payables check box on that page. You must select this check box even if you have not purchased Payables.
Field or Control |
Description |
|---|---|
Last Banner ID Used | The last sequence number for the advertising banner used in the system. Banner IDs are system-generated and stored here. |
eSettlements Matching Process | Select to require additional, subsequent voucher approval to occur after the Payables Matching Application Engine process (AP_MATCH) completes. eSettlements uses the Matching process, established at the payables business unit level. However, you can specify additional voucher approval during buyer registration. If you do not select this check box, any voucher that passes the Matching process is set to approved. |
Market Rate Index | The highest level of organization throughout your PeopleSoft system. Enter an index to be used throughout eSettlements when calculating exchange rates. |
Buyer Direct | Select for a buyer direct implementation wherein a single buying organization (buyer) controls the application and provides an interface for many suppliers. |
Business Service Provider | Select for a business service provider implementation wherein a consolidator controls the application and provides an interface between multiple suppliers and buyers, acting as an intermediary and collecting or aggregating invoices from multiple suppliers for multiple buyers |
Activate Notifications | Select to enable email notifications to be sent to buyers and suppliers. Notifications are sent to recipients according to the notification setup that you define on the Define Buyer Notifications - Define Notification Types page in the Review Buyer Details component in eSettlements. |
Expose ChartFields to Supplier | Select to enable suppliers to see the accounting information on invoices. Depending on buyer specifications, the supplier may be able to edit information as well as view it. Selecting this check box enables the buyer to, at the buyer registration level, define ChartFields to display, be editable, or remain hidden. Selecting this check box means that all buyers have access to the ChartField Configuration page in the Review Buyer Details component. Note: By selecting this option, you are enabling supplier access to update the ChartFields on non-purchase order invoices. |
Withholding | Select to enable users to enter withholding information for suppliers. |
XSL Location | Enter the location of the CXML_IN.XSL file on the application server for use with the cXML attachment upload feature. |
External Node | Enter the external node for cXML routing. In the delivered data, the external node is PSFT_SUPPLIER_NETWORK. This value is used by the cXML attachment upload feature. |
Purge Upload Message | Select the number of days for the Upload Message to purge. The Purging process is initiated whenever a pre-validation batch is processed. |
Transaction Age | Enter the age of the transaction to be selected in years, months and days. |
Use Master Agreements | Indicates that Master Agreement is implemented by the internal buying organization. Note: This check box is hidden if Master Agreement is not implemented. To implement Master Agreement, see Creating Master Agreements |
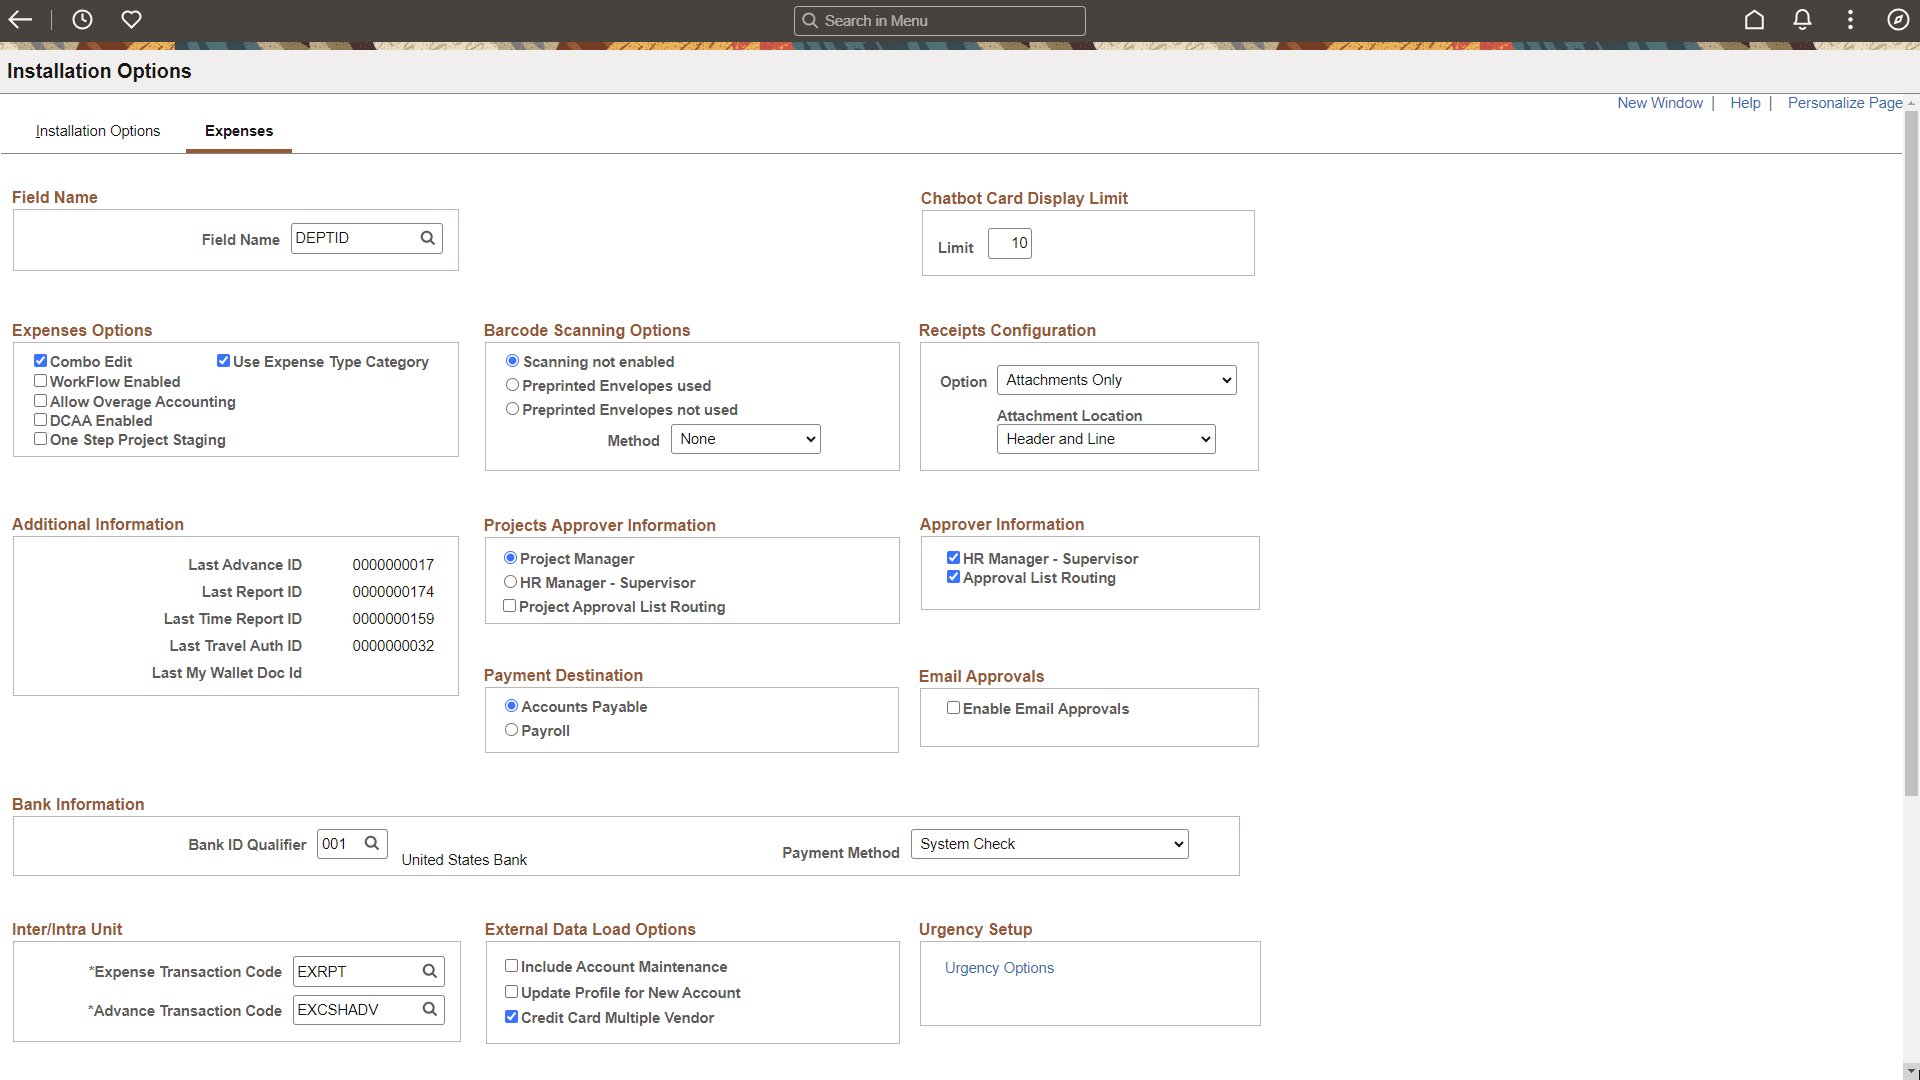
Use the Expenses page (INSTALLATION_EX) to define installation options for Expenses.
Navigation:
This example illustrates the fields and controls on the Installation Options - Expenses page (1 of 2). You can find definitions for the fields and controls later on this page.
This example illustrates the fields and controls on the Installation Options - Expenses page (2 of 2).

Field Name
Field or Control |
Description |
|---|---|
Field Name |
Displays DEPTID by default. If you have performed ChartField configuration or created another field that represents a department in your organizational structure, select the field name for your department ChartField. |
Chatbot Card Display Limit
Field or Control |
Description |
|---|---|
Limit | Enter the number of expense reports that the system displays when a user accesses the Expense Inquiry Bot. The default is 10, which indicates that the system displays the last 10 expense reports based on the date submitted. You can change this setting. For more information about the Expense Inquiry Bot, see Inquiring on Expense Reports Using the Expenses Skill |
Expenses Options
Decide if you want to implement any or all of the following expense system options:
Field or Control |
Description |
|---|---|
Combo Edit | Activates combination editing, which prevents adding rows containing invalid combinations of ChartFields. |
Workflow Enabled | Links the expense system to PeopleSoft Workflow so that you can automate your expense-related business processes and send emails to employees regarding expense reports, approvals, cash advances, and so forth. |
Allow Overage Accounting | Select to enable Expenses to process amounts exceeding approved limits for expense types. When you set up an expense type, you can select a billing code parameter called Overage for that expense type. Selecting this option activates the Overage column on the Expense Types 2 page, which allows employees to charge a different account for the amount they spend over their approved limits for the expense types. This option must be selected if you are enabling DCAA. |
DCAA Enabled (Defense Contract Audit Agency enabled). | Select to enforce DCAA audit requirements for time reporting. When selected, Expenses enforces DCAA compliance and functionality, unless you disable DCAA processing for specific business units or employees. |
One Step Project Staging | Select to enable users to stage time reports and adjustments in Expenses and automatically call the PC_EX_TO_PC Application Engine to stage the data into the PeopleSoft tables. If this option is disabled, the Expenses process only stages the transactions. You must then manually execute the PC_EX_TO_PC process from the menu. Note: Expenses displays this check box only if is installed. If you are using the one-step staging process to automatically load expense data into , you must set up identical run control IDs for both the EX_PC_TM_STG and PC_EX_TO_PC application engine processes for the functionality to successfully stage the Expenses data to . |
Use Expense Type Category | Select this check box to allow users to search expense types by categories. By default, this check box is not selected. When this check box is selected, the Select Expense Type Category button will be displayed next to the Expense Type field whenever you create or modify an expense reports. |
Barcode Scanning Options
Expenses supports the use of bar code scanning to facilitate document tracking. Select one of the following scanning options:
Field or Control |
Description |
|---|---|
Scanning not enabled | Select to prevent your expense system from using bar code scanning. |
Preprinted Envelopes used | When you select this option, scanning a preprinted envelope from the Receipt Barcode Verification page populates the Receipt ID field with a value different from the Report ID field. Track receipts by placing them in an envelope printed with a bar code; track expense reports by using a bar code printed on the report itself. If this option is not selected, the Receipt ID field on the Receipt Barcode Verification page is inactive. |
Preprinted Envelopes not used | When you select this option, selecting an expense report ID from the Receipt Barcode Verification page populates the Report ID field and the Receipt ID field. Therefore, you can track receipts using the same bar code as for the expense report. |
Method | Select Font to use a font stored on the client machine; select None for no bar coding. |
Note: To scan bar codes, you must acquire and install the Code 39 True Type Font, which is not delivered with PeopleSoft applications.
Receipts Configuration
Field or Control |
Description |
|---|---|
Option | Select an option that indicates how you want to store receipts. Note: Keep in mind that this is at the installation level. Options include:
|
Attachment Location | Select an option to indicate where attachments are allowed for expense transactions at the installation level. This field appears only when Attachments Only or Both Imaging and Attachments is selected in the Option field. Options include:
The value you select in this field determines the open fields on the Receipts Required Page. |
Additional Information
Field or Control |
Description |
|---|---|
Last Advance ID, Last Report ID, Last Time Report ID, Last Travel Auth ID and Last My Wallet Doc Id | Expenses uses automatic numbering to identify expense documents. This region displays the most recently used number for cash advances, expense reports, time reports, and travel authorizations. |
Projects Approver Information
This option is used by PeopleSoft Workflow and your email system to route expense documents for first-line approvals. You can enable project managers to approve expense documents before they undergo final processing.
Field or Control |
Description |
|---|---|
Project Manager | If selected, the system searches for the designated project manager in the system and routes the expense documents to that person. |
HR Manager - Supervisor | If selected, the system searches the employee table to find the employee's manager who is the designated approver. |
Project Approval List Routing | Select to require special or supplemental approvals following the Project Manager approval. |
Approver Information
Select HR Manager - Supervisor, Approval List Routing, or both; however, you must select at least one. Selecting both check boxes implies special or supplemental approvals after the HR Supervisor approval. Expenses approval system use these options to route expense documents for approvals.
Field or Control |
Description |
|---|---|
HR Manager - Supervisor | The system searches the employee table to find the employee's manager or supervisor who is the designated approver. |
Approval List Routing | The system searches the approval tables to find the correct approver for the employee's business unit. |
Payment Destination
Field or Control |
Description |
|---|---|
Accounts Payable or Payroll | Select where the employee expense reimbursements should come from, when the Stage Payments process runs. See Staging Payments. This setting applies to the installation level only. This option is also specified at the business unit level using the Expenses Definition - Business Unit 1 Page and at the employee level using the User Payment Option Page. This selection applies only to expense payments for employees. You still use your payables system for expense payments to other recipients, such as credit card vendors. |
Email Approvals
Field or Control |
Description |
|---|---|
Enable Email Approvals | Select to enable email approvals for expense transactions when no risk template is defined in the system or no risk template is assigned to an approver. When a risk template is defined and assigned to an approver, the template overrides the email approval setting on the Installation Options - Expenses page. Note: When this option is used, there is a hierarchy that determines email approvals. |
Bank Information
This section contains fields used to set up the movement of direct deposit data from your payroll system to Expenses.
Field or Control |
Description |
|---|---|
Bank ID Qualifier | Displays part of the bank table used to differentiate banks within the same country. |
Payment Method | Select how expense payments will be made. Values are:
|
Inter/Intra Unit
Field or Control |
Description |
|---|---|
Expense Transaction Code | Select the transaction code to use for interunit and intraunit processing of expense reports. The transaction code is associated with ChartField values for various accounting entry types. |
Advance Transaction Code | Select the transaction code to use for interunit and intraunit processing of cash advances. The transaction code is associated with ChartField values for various accounting entry types. |
External Data Load Options
Field or Control |
Description |
|---|---|
Include Account Maintenance | Select to indicate that the account maintenance process should run during the Load External Data process. This applies to American Express, Visa, and MasterCard credit cards. Deselect to indicate that only transaction data loads during the Load External Data process |
Update Profile for New Account |
Select to indicate that the Load External Data process automatically adds a new account to the employee profile if there are credit card numbers in the file that can be matched with an existing employee. This applies to American Express, Visa, and MasterCardV3 (xml file). Note: MasterCardV2 (flat file), employee identification is not passed, therefore all the new accounts are sent to the error table where the error message must be corrected. In addition, you must manually add the new account to the employee profile if it is received from a MasterCardV2 flat file. Note: You must select Include Account Maintenance before selecting this option. Deselect to indicate that all new credit card information is sent to the error table where the error message must be reviewed and corrected. |
Credit Card Multiple Vendor | Select to enable multi-vendor credit card load. This option allows you to map one or more card issuer for each data source on the Payment Type - Corporate Card Page. When this option is selected, you need to provide a SetID for the credit card issuer, when loading external data using credit card files on the Load External Data Sources Page, and when mapping credit card codes to payment types on the Payment Type – Corporate Card page. |
Urgency Setup
Field or Control |
Description |
|---|---|
Urgency Options | Click to access the Installation Options - Urgency (in Days) Page. |
Insights Reporting Preferences
Changes to (or when entering for the first time) Reporting Currency or Rate Type requires a full refresh of the Expenses Insights Dashboard index. Use these values:
Search Instance = PTSF_DEFAULT
Search Definition = EP_EX_SRCH_RISK_EXCP_KIB
Indexing Type = Full Index
Field or Control |
Description |
|---|---|
Reporting Currency | Select the currency to use across all business units for reporting in the Expenses dashboard. |
Rate Type |
Select the rate type to use for converting amounts to the defined reporting currency. |
For more information about processing currency in the Expenses dashboard, see Understanding PeopleSoft Insights for Expenses.
Duplicate Line
|
Field or Control |
Description |
|---|---|
|
Duplicate Review Required |
Select to indicate that expense reports cannot be submitted if duplicate conditions exist. If selected, the system checks for duplicate conditions and displays an Expense Entry Error at the top of the Expense Entry page indicating that there are duplicate lines. You are required to enter a reason code in order to submit the expense report using the Possible Duplicates Exist Page. If not selected, you can submit expense reports without selecting the Review Duplicate Lines button and reviewing the duplicate information. Regardless of whether this check box is selected, PeopleSoft Expenses checks for duplicate conditions. |
Create Expense Document Options for Authorized User
|
Field or Control |
Description |
|---|---|
|
Prompt for Employee ID |
Select to indicate that the system should look to authorized user configuration when employees create expense reports. When selected, the Employee Search Page (Delegate) is displayed to a delegate when the create an expense report. The delegate selects Create for Self, or an employee for the expense report. Note: This option applies only to expense reports. Not other expense transactions. This option is used when you have employees who can create expense reports on behalf of another employee. You must select this option and then authorize "delegate" employees using the Authorize Expense Users (Search) Page. |
Use the Installation Options - Urgency (in Days) page (EX_URGENCY_SETUP) to configure urgency levels for expense reports, time reports, travel authorizations, and cash advances by entering the number of days that the system uses to calculate and trigger a high, medium, or low urgency level for a transaction.
Navigation:
Click the Urgency Options link on the Installation Options - Expenses page.
This example illustrates the fields and controls on the Installation Options – Expenses Urgency (in Days) page. You can find definitions for the fields and controls later on this page.
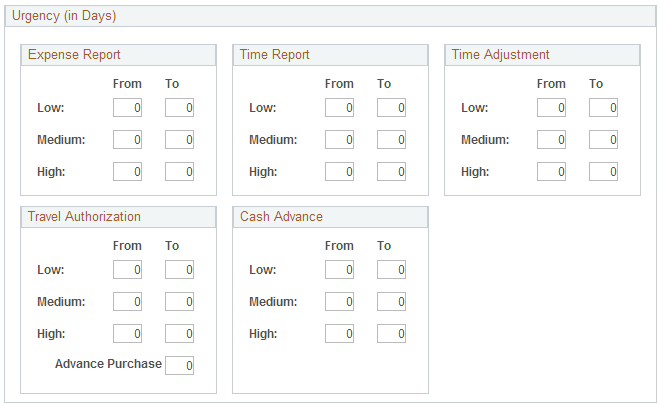
Urgency settings enable approvers to determine which expense transactions need immediate attention. You use the Urgency (in Days) page to configure the number of days that trigger a low, medium, or high urgency icon for each expense transaction. When an urgency level is triggered for an expense transaction, the appropriate urgency icon appears next to the transaction on the Summary Approvals page, on the report, as well as in email approvals.
When viewing the expense transaction, the Urgency column displays these symbols for the different levels of urgency:
Urgency Level |
Icon |
|---|---|
High | Red square |
Medium | Yellow triangle |
Low | Green circle |
Field or Control |
Description |
|---|---|
From andTo | Enter the number of days that represents the days outstanding that each report is considered to be a low, medium, or high level of urgency. For Expense Reports, Cash Advances, Time Reports, and Time Report Adjustments, the difference in days is calculated from the date the report is submitted to the current date. For example, if a report is considered a low level urgency when it is 0-10 days outstanding, then enter 0 in the From field and enter 10 in the To field. If the report is considered a medium level urgency when it is 11-20 days outstanding, then enter 11 in the From field and enter 20 in the To field. If the report is considered a high level urgency when it is 21-999 days outstanding, then enter 21 in the From field and enter 999 in the To field. As a result, any report that has been in the approvers' queue for more than 21 days is displayed as a high urgency. For travel authorizations, the difference in days is calculated from the current date to the Date From field on the Travel Authorization Entry page. The setup is different from the other reports. An example of a travel authorization is: a low level urgency is from 999 to 15 days; a medium level urgency is from 14 to 4 days; and a high level urgency is from 3 to 0 days. |
Adv Purchase | Enter the number of days to be added to the high, medium, or low value when calculating advance purchases. In some industries, advanced purchases (for example 2 weeks) can result in lower prices. To accommodate this, travel authorizations include the Adv Purchase field. This field includes a number that is added to the low, medium, and high values when calculating urgency. For example if high urgency is set from 3-0 days, and the Adv Purchase field is set to 14 days, high urgency is triggered from 17-0 days before travel begins. This insures that the travel authorization report is displayed as a high urgency so that the report can be approved before the price goes up. |
Use the Installation Options - General Ledger page (INSTALLATION_GL) to specify the journal workflow options for general ledger journal entries and standard budget journals.
Navigation:
Set Up Financials/Supply Chain, Install, Installation Options, General Ledger
This example illustrates the fields and controls on the Installation Options - General Ledger page (1 of 2).

This example illustrates the fields and controls on the Installation Options - General Ledger page (2 of 2).
Journal Entry Options
Field or Control |
Description |
|---|---|
Journal Approval Method | Specify one of the following journal workflow approval methods for general ledger journal entries and standard budget journals:
|
Automatically Approve Non-Anchor BU Journals | Select to indicate that the system only submits the combination of (anchor BU, journal ID, journal date, line BU = anchor BU) for approval. All other combinations of (anchor BU, journal ID, journal date, line BU <> anchor BU) is set to “Approved to Post” (per existing logic, the InterUnit journal can’t be posted until the anchor BU is approved). This way, only one approval instance is assigned to an InterUnit journal, which triggers one set of notifications. This option does not impact non-InterUnit journal approvals. This option is only available when the Journal Approval Method is Approval Framework. This option is hidden when the Journal Approval Method is Virtual Approver. Note: When using Fluid Approvals for Journal Entries, this option determines where to display the Line Business Unit field. If deselected, the line business unit is displayed at the header level. If selected, the line business unit is displayed at the line level. |
|
Automatically Post Journals after Fluid Approval |
Select to automatically post journals that are selected to be approved using PeopleSoft Fluid pages such as the Pending Approvals (summary) Page or the Pending Approvals - Journal Entry Page. This option removes the requirement to run the Post Journals process separately. The post process only runs for approvers who have authority to post journals. |
Journal Delete Method | Select one of the following methods for handling journal deletion:
|
Online Edit / Post Options
Field or Control |
Description |
|---|---|
Execute on Server | Enter a default process scheduler server name for the online journal edit process to use when journals are edited online. If this field is blank, the online journal edit process is scheduled without a process scheduler name. In this case, the process is typically picked up by the primary scheduler and assigned to the next available process scheduler server. |
Sleep Time |
Enter the time interval (in seconds) that the online PeopleCode sleeps between checking the journal edit process status. Once the journal edit process is complete, and after the system checks the status, it refreshes the component to show the edited journal. Supplying the right interval to meet your organization's needs can be an important factor in preventing a bottleneck or deadlock when multiple journal edit processes are continually submitted. The Online Journal Edit does not release the journal entry page until the previous edit process finishes. In prior releases, the interval in seconds that the PeopleCode would check the process scheduler server status was 10 seconds. This may be too long, particularly when using Commitment Control. Select the ideal number of seconds for your organization depending on your environment and your process scheduler server settings. |
Online Mode | Select to indicate that the Journal Edit and Journal Post processes run in online mode, which calls the Application Engine process from the page. Deselect to indicate that the Journal Edit and Journal Post Processes are to run in batch mode. |
Validate Journal Source in Journal Copy | Select this option to receive an error when copying a journal with an inactive journal source. |
Journal Edit Options
Field or Control |
Description |
|---|---|
Bypass IU for Journal Balanced By Base Currency (bypass inter unit for journal balanced by base currency) | Select to bypass InterUnit processing for journals when all journal lines are balanced by base currency. |
Generate IU Lines for Non-Zero Balanced Lines (generate Inter/IntraUnit lines for non-zero balanced lines) | Select this option to generate InterUnit and IntraUnit lines for non-zero-transaction-amount lines in the event that the summarized transaction amount is equal to zero but the summarized base amount is not equal to zero. The fields that are used to group the journal lines to calculate the summarized amounts are: Business Unit, Balancing ChartFields, Other Balancing Fields specified in System Transaction Definition for Inter/IntraUnit processing, Foreign Currency, Base Currency, Rate Type, Rate Divisor, Rate Multiplier, and Account Balancing Attributes (if selected). |
Authorize Delete Journals
Use this section to control who is authorized to delete journals that are created by other users.
|
Field or Control |
Description |
|---|---|
|
Authorize Delete Journals |
Select this check box to indicate that you want to control who is authorized to delete journals that are entered by other users. Deselect this check box to indicate that any user can delete journals that are entered by other users. |
|
Role Name |
Select the role or roles who is authorized to delete journals that are entered by other users. Note: This section is only available when the Authorize Delete Journals check box is selected. |
Mobile Approval Options – GL Journal ChartFields to Display
Use this section to select the ChartFields to display along with the display order for journal Mobile Approvals. You can only display nine active ChartFields. There is no validation of these field values; be careful not to select the same ChartField to display more than once.
Use the Installation Options - Grants page (INSTALLATION_CSR) to define Grants installation options.
Use this page to indicate that you can include optional attachments, to establish cost-sharing analysis types for each feeder system with which you plan to use the Grants cost-sharing features, and to determine the source for calculating unliquidated obligation balances for the Federal Financial Report.
Navigation:
This example illustrates the fields and controls on the Installation Options - Grants page. You can find definitions for the fields and controls later on this page.

Use the Cost Sharing Analysis Types group box to establish cost-sharing analysis types for each feeder system with which you plan to use the Grants cost-sharing feature. Depending on the feeder systems in which the transactions originated, the system automatically assigns a cost-sharing analysis type to a transaction that includes designated cost-sharing ChartFields.
Use the Unliquidated Obligation Source group box to indicate the source for calculating federal and recipient unliquidated obligation balances for the Federal Financial Report.
Field or Control |
Description |
|---|---|
Projects | Select to indicate that PROJ_RESOURCE is the source for calculating balances using these analysis types:
|
Commitment Control | Select to indicate that:
|
Use the Grants Portal page (INSTALLATION_GMPT) to define Grants Portal options.
Navigation:
This example illustrates the fields and controls on the Installation Options - Grants Portal page. You can find definitions for the fields and controls later on this page.

Use this page to set up installation options for the Grants Portal.
Transaction Source
The fields that appear on this page are different depending on the option selected in the Transaction Source group box.
Field or Control |
Description |
|---|---|
Project | Select to indicate that projects are to be used as the source for calculating transaction balances on the summary, detail, and transaction pages. When Project is selected, the Reporting Analysis Group group box appears on this page. In addition, when Project is selected, you should run these processes to maintain transaction data in PROJ_RESOURCE:
|
Commitment Control | Select to indicate that commitment control is to be used as the source for calculating transaction balances on the summary, detail, and transaction pages. When Commitment Control is selected:
|
Group by
Field or Control |
Description |
|---|---|
Budget Group by | If the Transaction Source is Project, select the ChartField that is defined in the PROJ_RESOURCE table. Only values with a PC transaction source are shown. If the Transaction Source is Commitment Control, select the ChartField that is defined in the KK_TRANS_LOG table. Only values with a KK transaction source are shown. Warning! If you choose to use the Activity ChartField, you may receive an unrestricted list of all activities. This unrestricted list of activities can be very large and adversely impact the performance of your system. For example, if your organization is using PeopleSoft for capital projects and IT projects, which can contain thousands of activities, the system will return all of the activities when a user clicks the prompt for the Budget Group By field. |
Third Party Cost Account | Select the account to use to display transactions in the Third Party Cost section of the Expenditure Details Inquiry page. This is an optional field. If you leave this field blank and the transaction source is Commitment Control, the system does not separate third party costs. |
Overlap Award Budget Period
Use the Overlap Award Budget Period group box to set grants portal staging rules for overlapping budget periods within the same award.
Select First if you want the grants portal staging process to set budget periods that fall in the same time period to the earlier budget period.
Select Last if you want the grants portal staging process to set budget periods that fall in the same time period to the later budget period.
Reporting Tree Selection
Field or Control |
Description |
|---|---|
Tree SetID |
Select a SetID to use for calculating actuals balances that appear on the Budget Status tab of the Award Detail and Project Detail pages. |
Reporting Tree | Select the tree to use for calculating actuals balances that appear on the Budget Status tab of the Award Detail and Project Detail pages. Only account-based trees are available. If no reporting tree is selected, or if the account in the transaction data cannot be found in the reporting tree, then the transaction data is summed using UNKNOW as the budget category. |
Reporting Analysis Group
Field or Control |
Description |
|---|---|
Sponsor Expenditures | Select the analysis group for reporting sponsor expenditure balances. The Grants Sponsor Actual Costs (SPACT) analysis group appears as the default. The analysis group that is selected controls the analysis types that are included in the transaction balance calculations, which appear on the award and project summary and detail pages. The analysis types that are included in the SPACT analysis group are ACT, GLE, PAY, and SFA. |
Sponsor Encumbrances | Select the analysis group for reporting sponsor encumbrance balances. The Grants Sponsor Encumbrances (SPENC) analysis group appears as the default. The analysis group that is selected controls the analysis types that are included in the transaction balance calculations, which appear on the award and project summary and detail pages. The analysis type that is included in the SPENC analysis group is COM. |
Sponsor Pre-encumbrances | Select the analysis group for reporting sponsor pre-encumbrance balances. The Grants Sponsor Requisitions (SPREQ) analysis group appears as the default. The analysis group that is selected controls the analysis types that are included in the transaction balance calculations, which appear on the award and project summary and detail pages. The analysis type that is included in the SPREQ analysis group is REQ. |
Third Party Expenditures | Select the analysis group for reporting third-party expenditure balances. The analysis type and analysis group for third-party expenditures is user-defined. Therefore an analysis group does not appear by default. |
Cost Share Expenditures | Select the analysis group for reporting cost share expenditure balances. The Cost Sharing Analysis Group (CSTSH) analysis group appears as the default. |
Cost Share Encumbrance | Select the analysis group for reporting cost share encumbrance balances. The Cost Sharing Commitment Balance (CSCOM) analysis group appears as the default. |
Cost Share Pre-encumbrance | Select the analysis group for reporting cost share pre-encumbrance balances. The Cost Sharing Requisition (CRQ) analysis group appears as the default. |
Budget and Transaction Detail
Select the ChartFields to appear on the Transaction Inquiry pages.
Use the Installation Options - Inventory page (INSTALLATION_INV) to define several settings used by PeopleSoft Inventory; including staged date options, interunit transaction options, unit of measure conversion methods for bar code transactions, methods to number accounting entry lines, search limitations for the Storage Location Search page, and default values for lot IDs, serial numbers, and receiver information.
In addition, use this page to define the default hold code applied to material stock requests when they fail to pass the Screen For Denied Parties process (SCM_FSS).
Navigation:
This example illustrates the fields and controls on the Inventory page. You can find definitions for the fields and controls later on this page.
Field or Control |
Description |
|---|---|
Lot ID, Serial ID, Recv No (receiver number), Recv Line (receiver line), and Default Staged Date | Enter filler values for fields that would otherwise be blank. These values are recorded in your system tables only when an item is not serial-controlled, staged date-controlled, or lot-controlled, or when the receiver ID and line number do not apply or are not known for specific inventory. Once you set lot, serial, and staged date default column values and begin to put stock away, you cannot modify these fields. This restriction preserves the integrity of the transaction tables. |
Staged Date Control | Select to track any of your inventory materials by staged date. This is the date that the stock is received and put away into Inventory. The system uses this setting as the default when items are set up in the Define Item component. Staged date tracking is required for FIFO (first in, first out) and LIFO (last in, first out) picking. |
Initial Search Row Limit | Specify the maximum number of material storage locations to retrieve on the initial display of the Storage Location Search page. If this field is blank or contains zero, then there is no limitation to the number of locations retrieved in the initial search. Several PeopleSoft Inventory pages are linked to the Storage Location Search page by the Storage Location Search icon. This feature enables inventory pages for setup, putaway, fulfillment, and other activities to access a list of material storage locations and select the most appropriate location. However, if the search criteria information on the initial inventory page is incomplete, then a large number of material storage locations could be retrieved resulting in a delay to access the Storage Location Search page. Use the Initial Search Row Limit field to limit the initial display. Once users are on the Storage Location Search page, the search criteria are not limited by this field in order to allow broader searches for the correct material storage location. To prevent performance delays once you are on the Storage Location Search page, be sure to enter enough search criteria before performing another search. |
Set based Sequencing | In the Accounting Line Options group box, select the this check box to generate sequential accounting line numbers for the Accounting Line Creation process in Cost Management. These line numbers are used to number accounting entry lines. In the Fulfillment Engine Options group box, select this check box to generate the sequential transaction history line numbers for the Deplete On Hand Qty process in Inventory. These line numbers are used to number transaction history entries (demand lines) from order fulfillment. Deselect these check boxes to use row-based processing. These fields are hidden unless you are on an Oracle platform or have run the DMS for other database platforms. |
InterUnit Transaction Options | Indicate how the system should derive parameters for InterUnit stock transfers. Options are: Use GL BU Setting Only: The system derives all InterUnit transfer parameters from the centralized accounting model as defined for the InterUnit method on the Installation Options, Overall page. Use IN BU Settings Only: The system derives all InterUnit transfer parameters from the Inventory business unit. Use Both: The system derives InterUnit transfer parameters by first looking at the Inventory business unit. If no parameters are found, the system looks at the centralized accounting model as defined for the InterUnit method on the Installation Options, Overall page. |
Transfer Price Lines Displayed | Enter the chunking size for the Transfer Pricing Definition component. |
UOM Conversion Flag (unit of measure conversion flag) | If your system is bar code-enabled, you can process transactions in one of three ways: Convert to Default Stock UOM (convert to the default stocking unit of measure [UOM]): The system converts the unit of measure on incoming transactions to the default stocking UOM. Convert to Standard UOM (convert to the standard unit of measure): The system converts the UOM on incoming transactions to the item's standard UOM. This option enables you to stock all your inventory in the standard UOM and to perform material movement transactions using any valid UOM for the item. Use Entered UOM (use the entered unit of measure): The system processes transactions using whatever UOM the user enters. |
Hold Code |
Enter the hold code to be automatically applied when a material stock request fails to pass screening by the Screen For Denied Parties process (SCM_FSS). This field must be populated in order to run this financial sanctions process for material stock requests. |
Default RTV Customer ID | Enter a ship-to customer ID to be used when creating a material stock request to return stock to a vendor. This customer ID is placeholder that enables you to ship returned stock to your vendors without having to define each of them as customers on the customer table. When the stock request is created, the RTV customer ID defaults to the customer ID fields, the name of the vendor (from the RTV) is put in the customer name fields, and the vendor address is put in the IN_DEMAND_ADDR record as an override to the stock request. For a return to vendor stock request, the address override is required; the override address can be changed but not deleted. |
Create Requisition for Par Replenishment | The Create Requisition for Par Replenishment option allows you to choose if you want to invoke the Load Requisition process or continue with the existing Create Par Replenishment Requests process (INPGCDMD) to generate orders for items that require replenishment. By default, the option is set to No. If you select Yes, the Par replenishment process(INPGCDMD) invokes the Load Requisition process(PO_REQLOAD) which creates requisition for non-stock items. Select No to proceed with the Create Par Replenishment process(INPGCDMD) for creating requisition for non-stock items. You must select this option to view the Requisition Details tab on the Review Par Location count page. See Review Par Location Count Page. |
Data Retention days in Putaway Staging Record | Enter the number of days for retaining data in the staging record for reprinting Putaway Plan reports. The default value is set to 7 days. You can specify a value between 0-99 days. |
|
Reporting Currency |
Select the currency that will be used across all business units for reporting in the Inventory Insights dashboards. Note: It is recommended not to change the reporting currency frequently. If you change the currency, a full index needs to be run before using the visualizations to get correct values of amount. Incremental index will corrupt the indexed data in the Search Framework with partial data being in one currency and the remaining in another. |
|
Rate Type |
Select the rate type to be used for converting amounts to the defined reporting currency. |
Use the Inventory Counters page (INSTALL_IN_COUNTERS) to define the starting values for your automatically generated numbers.
Navigation:
Field or Control |
Description |
|---|---|
Default InterUnit ID Prefix | Initializes automatically generated InterUnit transfer IDs. Automatic numbering for InterUnit IDs is established at the installation level to ensure that InterUnit IDs are unique throughout your enterprise. |
Auto Reserve Counter | Defines the starting number for new run control IDs created when the Material Reservations process is initiated from the Material Stock Request component. The system only uses this counter if the Auto-Reserve option is selected for the Inventory business unit on the Fulfillment Setup page. |
Auto Confirm Counter | Defines the starting number for new run control IDs created when the Picking Confirmations process is initiated from the Picking Feedback page. The system only uses this counter if the Auto-Confirm option is selected for the Inventory business unit on the Fulfillment Setup page. |
Auto Deplete Counter | Defines the starting number for new run control IDs created when the Depletion process is initiated from the Shipping/Issues component. The system uses this counter only if the Auto-Deplete option is selected for the Inventory business unit on the Fulfillment Setup page. |
InterUnit ID Counter | Defines the sequence number to be used for InterUnit transfers between Inventory business units. |
Use the Installation Options - Lease Administration page (INSTALLATION_RE) to select to enable lease activation for a lease.
If selected, the roles defined can activate leases. Also, set mapping instructions for the Site Map page.
Navigation:
System Defaults
Field or Control |
Description |
|---|---|
Automatic Lease Approval | Select to enable lease activation for a lease. If selected, the roles defined as an Internal Administrator and Internal Manager can activate leases. If deselected, only the roles defined as Internal Manager can activate leases. |
Apply ASC 842, IFRS 16 and GASB 87 Accounting | Select to apply ASC 842, IFRS 16, and GASB 87 accounting standards. Certain functionality such as the identification of initial direct costs and lease incentives becomes available after this check box is selected. This is a one-time selection that cannot be changed after save and should not be selected until the organization is transitioning to the new accounting standard. |
Use the Installation Options - Maintenance Management page (INSTALLATION_WM) to define installation options for Maintenance Management.
Navigation:
Field or Control |
Description |
|---|---|
Work Order Attachment Print Installed |
Select the check box to enable the Print Attachments option on the Work Order Task Detail Report Options (WM_RPT_OPTNS) page. For additional information, see Using the Technician Workbench to Complete Work Order Tasks |
Display Asset Detailed Description | Select the check box to display the asset detailed description. This allows the user to view a detailed description of the asset. |
Use the Installation Options - Manufacturing page (INSTALLATION_MG) to set the calculated quantity per assembly (QPA) rounding precision.
This rounding precision is reflected in PeopleSoft Manufacturing, Engineering, Cost Management, and Supply Planning.
Navigation:
This example illustrates the fields and controls on the Manufacturing page. You can find definitions for the fields and controls later on this page.

Field or Control |
Description |
|---|---|
QPA Rounding Precision (quantity per assembly rounding precision) | Enter any value between 4 and 10 places to the right of the decimal. Setting the quantity rounding precision is especially important when you use a large bill of materials (BOM) quantity and a relatively small quantity per assembly (QPA). When you maintain a BOM and define the QPA or per order, you are limited to a precision of 4 places to the right of the decimal. However, the system will calculate the quantity per by dividing the entered quantity per by the BOM quantity, maintained to the precision defined on the Manufacturing page. So, for example, if a calculated QPA results in 6.54321, and the installation setting is set to 4 places, the system recognizes this as 6.5432. |
PDX Setup
Field or Control |
Description |
|---|---|
Business Unit | Select the value for the Manufacturing business unit that will receive changes from the PeopleSoft Product Lifecycle Management (PLM) system. Note: The PeopleSoft system presumes a single site, so you are defining it here for the PeopleSoft system. |
Standard Unit of Measure | Define a value for all inbound items being added. This is useful if all inbound items will share the same UOM from the PLM system (such as EA). Note: Alternatively, you can maintain a user-defined field in the PLM system for the appropriate Item and map this field from the additional attributes value within the PDX XML to the PeopleSoft Field value, Item Unit of Measure in the User Defined Field Mappings group box on this page. Important! The value in the PLM field must match the field that is defined in the XML. |
Item Status Mappings | Define the item life cycle status mapping for items with a status of:
This value is used when change orders are released to the PeopleSoft system. The PeopleSoft item status (SetID and business unit) is based on the affected item life cycle value for each item on a change order within the PDX XML. Therefore, any valid life cycle status that can be included on a change order sent to the PeopleSoft system must be mapped in this group box. The LifeCycle Phase field on this page can contain commas to define a one-to-many mapping between the PeopleSoft system and the PLM system. For example, the screen shot shows how the life cycle status of Production and Preliminary are to be considered an Active item status for the PeopleSoft system item status. Note: When a new item with an Active status is added from the PLM system with an effective date greater than today's date, the PLM system effective date of the affected item is ignored in the PeopleSoft system and the current date (today) is used at the item level (SetID and business unit). This allows revisions and manufacturing BOMs to be created for the item in the PeopleSoft system. However, future PLM system effective dates are used for the start date of the item or revision, and also for future effective dates associated with a Future item status. For example, if an item is currently active in the PeopleSoft system, you can send a PLM system change order to specify future obsolescence of the item by having a PLM system affected item with a future date and a future status intended to obsolete the item. In this case, the current PeopleSoft system status will remain Active and a future status will be specified as Discontinue. |
Use the Installation Options – Mobile Inventory page (INSTALLATION_MIN) to define installation options for Mobile Inventory Management.
Navigation:
Set Up Financials/Supply Chain, Install, Installation Options, Mobile Inventory
This example illustrates the fields and controls on the Installation Options - Mobile Inventory: Guided Count task flow page. You can find definitions for the fields and controls later on this page.
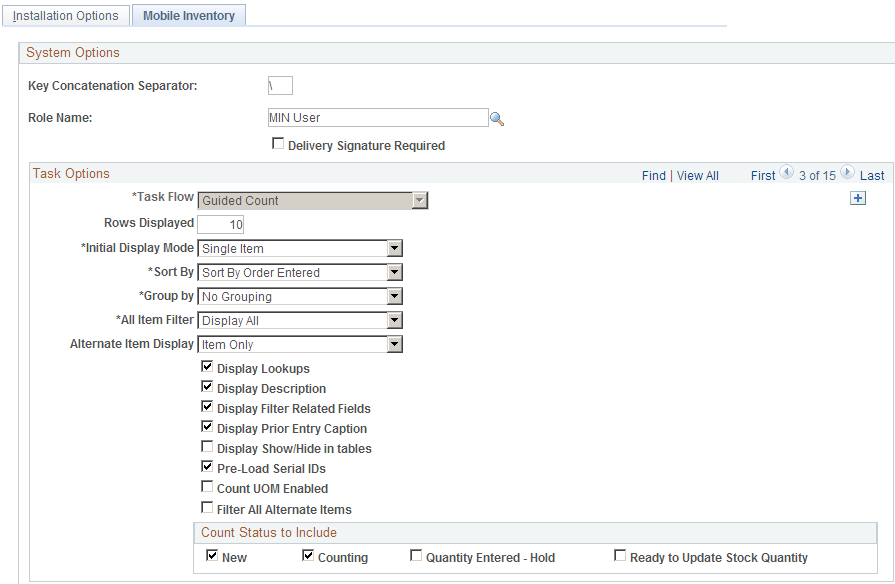
Use Mobile Inventory Management installation options pages to tailor PeopleSoft Mobile Inventory Management task flows for mobile devices. Values for this page are the same values used for user preferences.
You can define installation options these task flows in Mobile Inventory Management:
Adjustments
Bin to Bin Transfer
Delivery, Delivery Cart
Express Issue
Count by Location, Count by Item, Guided Count, and Manual Count
Item Stock Inquiry
Par Count
Perform Putaway
Receiving Ad Hoc and Receiving PO
Use the Payables page (INSTALLATION_AP) to define the posting method and enable federal payment schedule processing, late interest charge calculation, evaluated discount, document association processing options, and Document Content Management Interface options for your Payables application.
Navigation:
This example illustrates the fields and controls on the Installation Options - Payables page (1 of 2). You can find definitions for the fields and controls later on this page.

This example illustrates the fields and controls on the Installation Options - Payables page (2 of 2). You can find definitions for the fields and controls later on this page.
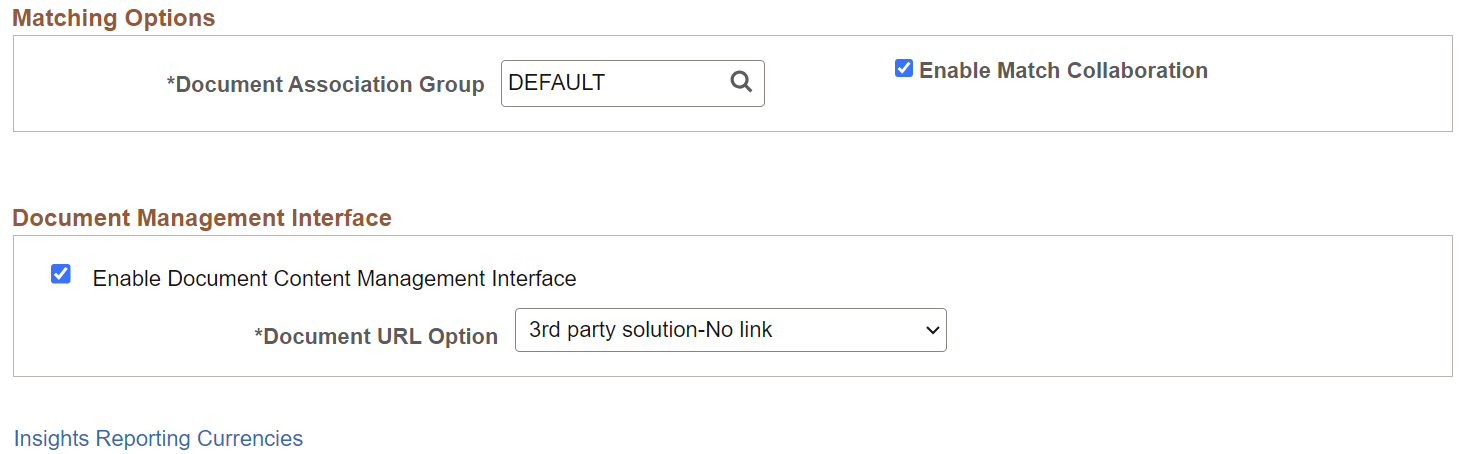
|
Field or Control |
Description |
|---|---|
|
Posting Method |
Select from the following values: Detail Offset Method: Balances each individual distribution line. Offsets to the distribution lines inherit the non-account ChartField values based on the established inheritance rules. Summary Control: Balances the voucher rather than the individual lines. Warning! Select one posting method at implementation and do not change it. If you go back later and select another posting method, there could be ramifications to general ledger journals, such as out-of-balance entries. |
|
Enable Federal Payment |
Select to enable U.S. federal payment schedule generation for the installation. Schedule numbers must be unique, so these ranges cannot overlap. This option is for U.S. federal agencies only. When you select this option, you must enter start and end schedule numbers for Transportation, Other, and Manual schedule types. |
|
Transportation Start Number, Other Start Number, Manual Start Number, and End Number |
Define a schedule number range for various schedule payment types. Enter a beginning transportation, other, and manual number, and an end number for each to define the range for each payment schedule type. |
|
Last ID Number |
For each payment schedule type, enter the last used payment schedule ID. The system automatically begins numbering subsequent payment schedules with the next higher number. The Pay Cycle Application Engine process (AP_APY2015) updates the last ID number. |
|
Enable Date Calc Basis (enable date calculation basis) |
Select to enable Prompt Payment Due Date calculation for the installation. |
|
Enable Late Charge |
Select to enable late charge calculation at the installation level. If you do not select this option, all late charge information is hidden from users. |
|
Evaluate Discount Rate |
Select to have the system compare if it is more beneficial to take a discount by paying a discounted voucher early or by waiting for the due date, earning the interest income during that time. You set up your discount evaluation parameters when you set up bank accounts and pay cycles. |
|
Document Association Group |
Specify the document association group to use in the Matching process. The document association group defines the types of match associations and the sequence that the Matching process performs. |
|
Enable Match Collaboration |
Select to enable match collaboration. Note: Once you enable match collaboration, all notifications will be routed using the PeopleTools notification framework instead of the matching notification (worklist/email). For more information on notification framework, see PeopleSoft: Events and Notifications Framework. Important! Customers using PeopleTools 8.58 and have taken the Match Exception Collaboration from Image 40 will experience new configurable notifications that replace Match Exception Worflow/Email. Customers using PeopleTools release less than 8.58 and have taken the Match Exception Collaboration from Image 40 will continue to use Match Exception Worflow/Email. When they decide to upgrade to a PeopleTools release at or higher than 8.58.00, they can take the Match Exception Collaboration from Image 40 again which will apply the necessary configuration data to run the new configurable notifications. |
|
Enable Document Content Management Interface |
Select to enable the Document Content Management Interface after a third party imaging solution is integrated with PeopleSoft. This ensures that the imaging links are active on the various pages of Payables and eSettlements. |
|
Document URL Option |
Select the option from:
|
|
Insights Reporting Currencies |
Click to access the Accounts Payable Insights Reporting Currencies page. |
This example illustrates the fields and controls on the Accounts Payable Insights Reporting Currencies page. You can find definitions for the fields and controls later on this page.
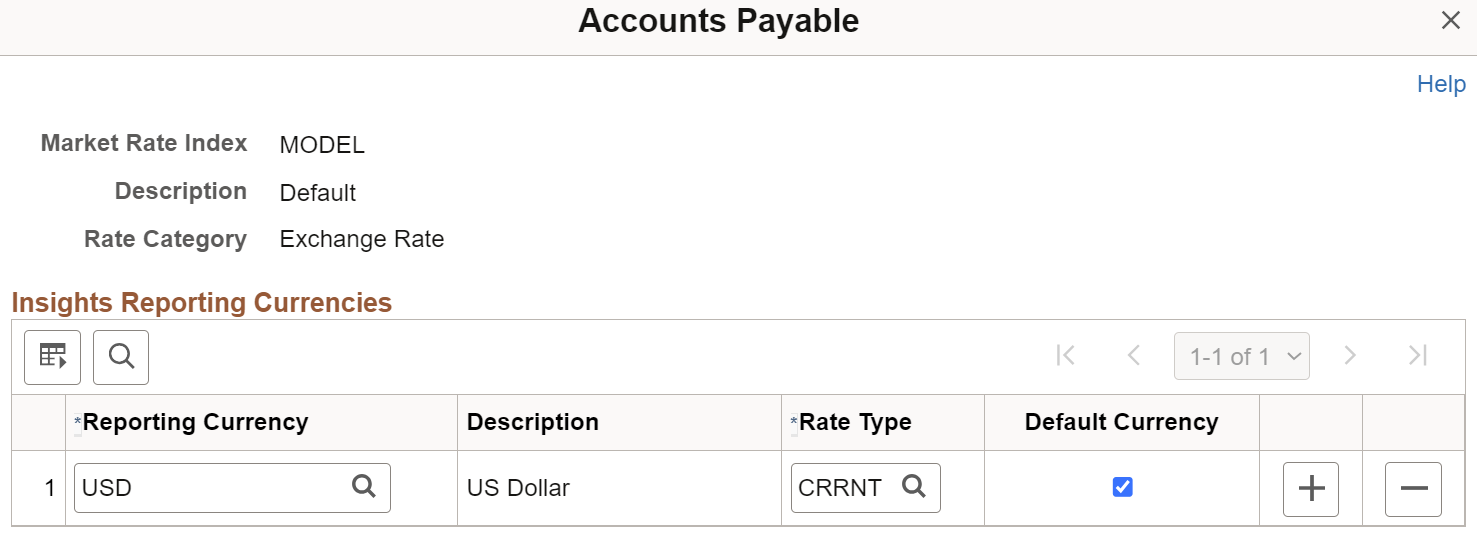
|
Field or Control |
Description |
|---|---|
|
Reporting Currency |
Enter at least one Reporting Currency so that payment data is indexed for the Payable Insights dashboards. You may enter multiple reporting currencies. Note: Each Reporting Currency entered increases the number of rows indexed. |
|
Rate Type |
Select the rate type to be used for converting amounts to the defined reporting currency. |
|
Default Currency |
Select the default currency. The default currency selected here is used if the base currency of the current user’s preferred business unit is not available. |
Use the Installation Options - Planning page (INSTALLATION_PL) to define the message numbers and default planning instance for Supply Planning.
Navigation:
Field or Control |
Description |
|---|---|
Default Planning Instance | Displays a default set of data (business units, items, supplies and demands) constituting the inputs and outputs of a supply plan. |
Message Numbers | Displays numbers used by the system as starting points to automatically number Supply Planning messages for purchase orders, transfer orders, and production orders. |
Use the Installation Options - Program Management page (INSTALLATION_PGM) to establish program management system defaults for workflow and email notification.
Navigation:
This example illustrates the fields and controls on the Installation Options - Program Management page. You can find definitions for the fields and controls later on this page.

System Defaults
Field or Control |
Description |
|---|---|
Project Portfolio Mgt Installed (Project Portfolio Management installed) | Select to indicate that PeopleSoft Project Portfolio Management is installed. When Project Portfolio Management is installed, project requests can begin only in Project Portfolio Management and not in Program Management. |
See PeopleSoft Project Portfolio Management
Project Request
Field or Control |
Description |
|---|---|
Enable Project Request Workflow |
Select to activate the project request workflow options on this page. |
Require Funding Department Manager approval | Select to require that project requests be approved by a funding department manager before projects can be created and assigned resources. |
Project Request - E-Mail Notifications
Field or Control |
Description |
|---|---|
Notify when Project Request is created | Select to indicate that an electronic notification is sent to the appropriate parties when a project request is created. |
Notify when Project Request is updated | Select to indicate that an electronic notification is sent to the appropriate parties when a project request is updated. |
Notify when Detail Plan is created | Select to indicate that an electronic notification is sent to the appropriate parties when a detail plan is created for a project request. |
Notify when Project Request is approved | Select to indicate that an electronic notification is sent to the appropriate parties when a project request is approved and the project can be created. |
Notify when Project Request is denied | Select to indicate that an electronic notification is sent to the appropriate parties when a project request is rejected. |
Program Budgeting
Field or Control |
Description |
|---|---|
Enable Workflow | Select to enable program budgeting workflow. |
Issue Management
Field or Control |
Description |
|---|---|
Enable Issue Management Workflow |
Select to activate the Issue Management workflow options on this page. |
Field or Control |
Description |
|---|---|
Issue Summary | Select to trigger workflow to the appropriate program, project, or activity owner when a user changes the issue summary on the Issue page. |
Field or Control |
Description |
|---|---|
Issue Priority | Select to trigger workflow to the appropriate program, project, or activity owner when a user changes the issue priority on the Issue page. |
Field or Control |
Description |
|---|---|
Resolution Description | Select to trigger workflow to the appropriate program, project, or activity owner when a user changes the issue resolution description on the Issue page. |
Field or Control |
Description |
|---|---|
Issue Notes | Select to trigger workflow to the appropriate program, project, or activity owner when a user changes the issue notes on the Issue - Notes and Attachments page. |
Field or Control |
Description |
|---|---|
Issue Description | Select to trigger workflow to the appropriate program, project, or activity owner when a user changes the issue description on the Issue page. |
Field or Control |
Description |
|---|---|
Issue Status | Select to trigger workflow to the appropriate program, project, or activity owner when a user changes the issue status on the Issue page. |
Field or Control |
Description |
|---|---|
Actual Resolution Date | Select to trigger workflow to the appropriate program, project, or activity owner when a user changes the issue actual resolution date on the Issue page. |
Field or Control |
Description |
|---|---|
Issue Attachments | Select to trigger workflow to the appropriate program, project, or activity owner when a user adds issue attachments on the Issue - Notes and Attachments page. |
Activity Resource
Field or Control |
Description |
|---|---|
Enable Activity Resource Workflow |
Select to activate the Resource Name workflow option on this page. |
Resource Name | Select to enable the ability for project managers to notify resources of new activity assignments from the Resources page. |
Deliverables
Field or Control |
Description |
|---|---|
Enable Deliverables Workflow | Select to activate the Assigned To workflow option on this page. |
Assigned To | Select to provide the project manager the option to trigger email notification to the resource for assigned deliverables. |
Use the Installation Options - Project Costing page (INSTALLATION_PC) to establish default settings for project fields and control fields used across .
Navigation:
This example illustrates the fields and controls on the Installation Options - Project Costing Page (1 of 2). You can find definitions for the fields and controls later on this page

This example illustrates the fields and controls on the Installation Options - Project Costing Page (2 of 2). You can find definitions for the fields and controls later on this page
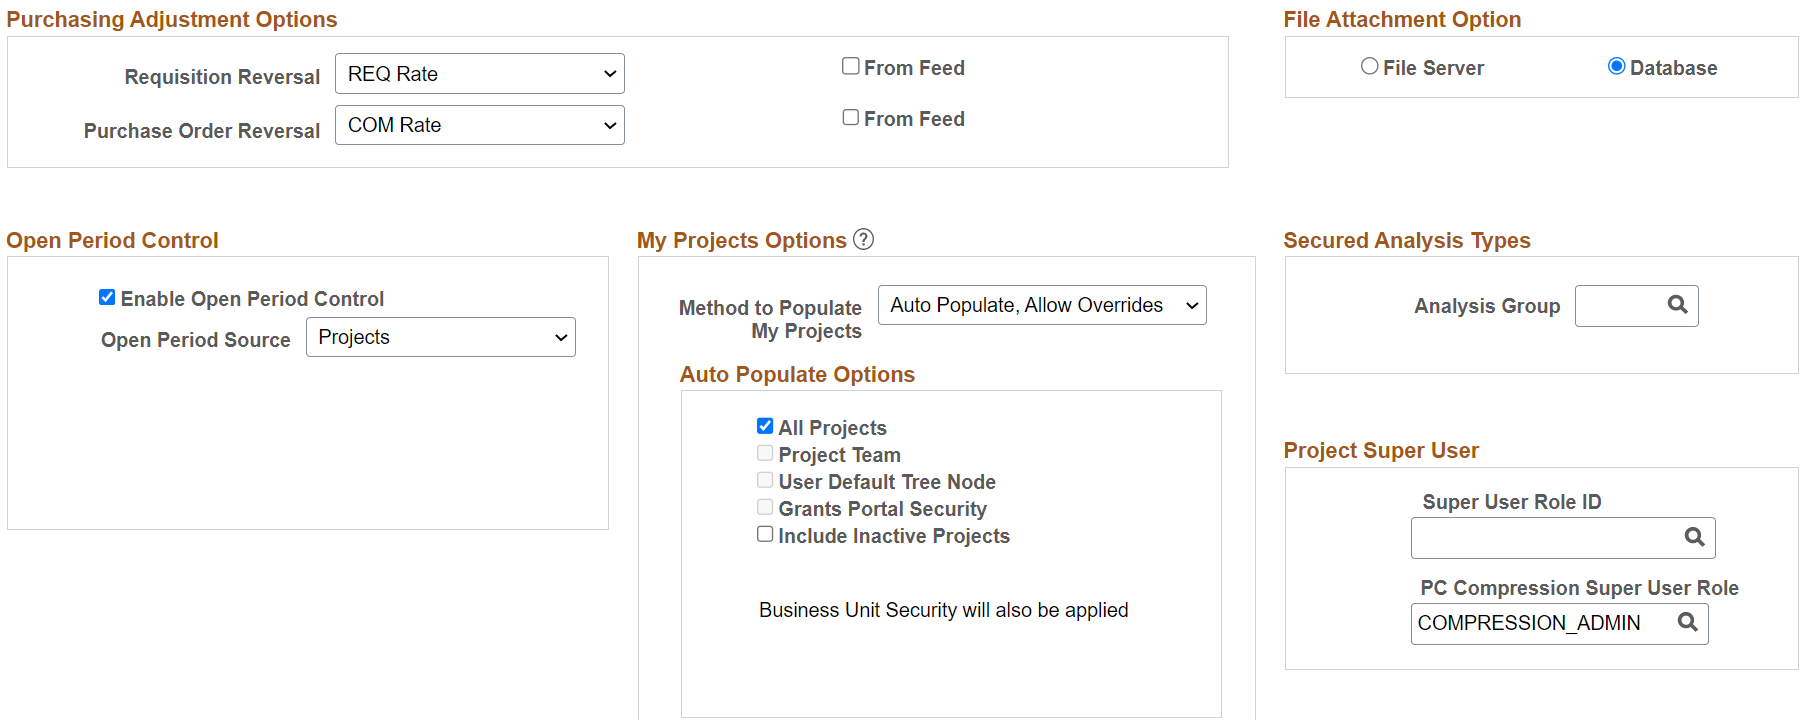
The Installation Options - Project Costing page and Installation Options - Project Costing Integration page are built over core tables that are shared among many PeopleSoft applications. The values entered on these pages affect the table structures that are used to define operational defaults. Because certain tables work together in groups, the order in which they are set up requires that data on some of the tables must be established before others. If you already use other PeopleSoft applications, such as General Ledger to track financial transactions, much of the financial framework is already set up.
Many of the project and control field default values that you set up on the Installation Options - page can be overridden at the individual project and activity level, and in some cases the individual user's Project Preferences.
You must enter at least one record on this page.
Warning! If is installed, do not create projects through the Design ChartFields menu, since it represents a subset of project information and is driven by SetID instead of by business unit.
System Defaults
Field or Control |
Description |
|---|---|
SetID | Enter a SetID that identifies the default control tables tableset. |
Temporary File Path | Enter a file path and directory on the application server that are needed to import a third-party application and project tree into . The Load Projects and Activities Application Engine process (PC_INTF_GEN), which is used to load projects and activities into , stages the project tree as a flat file to this directory and invokes the Projects Tree Integration Application Engine process (PC_TREE_LOAD) to load it into . The default value is c:\temp\. |
Last Project ID | Enter a numeric value that specifies the last project ID issued. |
Last Transaction ID | Enter a numeric value that specifies the last transaction ID issued. The default value is 10000000. |
Enable Separate Debit/Credit | Select to enable separate debit and credit entries for account processing. The default value is deselected. |
Allow Multiple Report Summary | Select to refresh the rows in the Project Transactions Reporting table (PC_RPO) based on the user's operator ID and the security defined for that user. If deselected, the system overwrites the Project Transactions Reporting table each time that the Report Summarization Application Engine process (PC_RPO) runs and is not subject to project-level security. See Creating and Modifying Reports Using the Report Summarization Process. |
Organizational Accounting
Field or Control |
Description |
|---|---|
Enable Organization | Select to enable transorganizational accounting, which is the ability to charge transactions to an organizational entity that differs from that of the resource creating them. |
Enable Sharing | Select to enable cost and revenue sharing between a resource's organization and the organization that owns the project or activity. |
Projects Budgeting Options
Field or Control |
Description |
|---|---|
Enable Projects Budgeting | Select to activate budgeting functionality including the creation of budgets through online pages or integration with Microsoft Project 2002. When this option is selected and you create budget plans, the budgets are stored in the Project Budget Plan (PC_BUD_PLAN) and Project Budget Detail (PC_BUD_DETAIL) tables. Upon finalization of these budgets, transactions are sent to the Project Transaction table (PROJ_RESOURCE) and updated in the Summary Budget Data table (PC_BUD_SUMMARY). The Summary Budget Data table is used for delivered reporting analytics. Deselect this option for the system to send transactions to the Project Transaction table only. The default value is deselected. |
Default Calendar ID | Select a default calendar to use for project budgeting. The default value is MN (monthly period calendar beginning January 1). This field is available only if you select the Enable Projects Budgeting option. If you use Program Management, this field is used as the default budget period when you create budget detail lines by using the Program Budgeting feature. Each plan may use a different budget calendar. |
Default Number of Periods | Enter a default number of time periods to use in budgeting. The default value is 12, and the field is a two–digit field. Therefore, you cannot exceed a value of 99. This field is available only if you select the Enable Projects Budgeting option. |
Allow Get Plan Distribution by Department | Select to enable users to enter one or more general ledger (GL) business units, departments, and distribution percentages during the budgeting process for the system to use to distribute resource costs to budget detail rows. Deselect this option to distribute costs to budget detail rows based on the GL business unit and department from the budget items that are entered on the Resources by Activity page in Program Management. When you select this option, the Distribute Activity Resource Amounts page appears when you click the Get Plan button on the Budget Plan page. This field appears only if you use Program Management. The default value is option selected. |
Max Budget Items to Retrieve | Enter a value to control how many budget items are initially displayed on the Budget Detail Page. A value of 0 (zero) displays all budget items, which is recommended unless the you are experiencing performance issues. This field can be used to improve the time required to initially display the page for budget plans that may have many activities or budget items. This installation level field is the default value when adding new budget plans. However, it can be overridden on the Budget Plan Page, per budget plan. |
Analysis Group Defaults
Field or Control |
Description |
|---|---|
Cost Budget | Select a default analysis group to use for cost budgets in budgeting. The analysis group that you enter in this field appears as a default value for the Cost Budget analysis group on new projects. You can override the default value at the project level. |
Revenue Budget | Select a default analysis group to use for revenue budgets in budgeting. The analysis group that you enter in this field appears as a default value for the Revenue Budget analysis group on new projects. You can override the default value at the project level. |
Actual Cost | Select a default analysis group to use for actual cost transactions throughout the system. The analysis group that you enter in this field appears as a default value for the Actual Cost analysis group on new projects. You can override the default value at the project level. |
Actual Revenue | Select a default analysis group to use for revenue transactions throughout the system. The analysis group that you enter in this field appears as a default value for the Actual Revenue analysis group on new projects. You can override the default value at the project level. |
Billing | Select a default analysis group to use for billing transactions throughout the system. |
Forecast Cost | Select a default analysis group to represent the estimate at completion costs for a project. The analysis group that you enter in this field appears as a default value for the Forecast analysis group on new projects. You can override the default value at the project level. |
Forecast Revenue | Select a default analysis group that appears as the default forecast revenue analysis group on the Definition page. The FREV analysis group is predefined and contains the same analysis types as the PSREV analysis group plus the ETB (billing estimate to complete) analysis type. Users can modify this value to any analysis group that is defined in the system. See Analysis Groups. |
Reporting Roll Up Calendars
Enter the calendar ID that determines how the system summarizes the Project Transaction table by week, month, quarter, and year. The calendars contain the start and end dates of each period.
Purchasing Adjustment Options
Field or Control |
Description |
|---|---|
Requisition Reversal | Select an option that determines the calculation method that the system uses to reduce the balance of purchase requisitions as corresponding purchase orders are dispatched. Available values are: COM Amount: Reduces purchase requisitions by the quantity and amount of corresponding purchase orders when they are dispatched. REQ Rate: Reduces requisitions by using the committed quantity multiplied by the cost per unit on the purchase requisition. This is the default option. REQ Total: Reverses the purchase requisition entirely when any corresponding purchase order is committed. |
From Feed |
Select to automatically run the Purchasing Adjustment process (PC_POADJUST) when the Purchasing to Application Engine process (PC_PO_TO_PC) runs. The Purchasing Adjustment process creates a requisition reversal row in the Project Transaction table. |
Purchase Order Reversal | Select an option that determines the calculation method that the system uses to reduce the balance of purchase requisitions as corresponding vouchers and material requests are processed. Available values are: COM Rate: Reduces the purchase order based on the actual quantity from purchase order vouchers or material requests multiplied by the line cost per unit on the purchase order. This is the default option. ACT Rate: Reduces the purchase order in the amount of the actual quantity and cost. |
From Feed |
Select to automatically run the Purchasing Adjustment process when the Payables to Application Engine process (PC_AP_TO_PC) runs. The Purchasing Adjustment process creates a purchase order reversal row in the Project Transaction table. |
File Attachment Option
A file storage system uses a file transfer protocol (FTP) to store files to either a database or a file server. The system used is determined by the URL that is passed as the first parameter in the attachment built-in function and maintained on the URL Maintenance page.
See PeopleSoft Asset Lifecycle Management, Enterprise Service Automation, Financial Management, Staffing Front Office, and Supply Chain Management Product-Specific Installation Instructions.
Field or Control |
Description |
|---|---|
File Attachment Option | Select a location to store file attachments. Available values are: File Server Select to store files on a file server. This option is a more efficient way to store files; however, it requires that you set up an FTP to the file server. This is the default option. If you select this option, you must enter an attachment directory in FTP Root field. Database Select to store files in a database. Important! If you want to send file attachments in email messages, you must select the File Server option. |
FTP Root |
If you store attachments on a file server, enter the home directory where the attachment files are stored. This field appears only if you select the File Server option. |
Open Period Control
Field or Control |
Description |
|---|---|
Enable Open Period Control | Select to enable open-period validation of newly created project transactions. The system validates the accounting date on project transactions against the open periods or the GL open periods. If the accounting date does not fall within the open period, the system overrides the date with the closest, open-period date. The default value is deselected. Budget transactions are not validated. |
Open Period Source | Select the source against which the system validates the accounting date on project transactions. This field appears only if you select Enable Open Period Control. Available options are: Projects Validates open periods based on a business unit's calendar. This is the default option. General Ledger Validates open periods based on a GL business unit calendar. |
My Projects Options
My Projects is used to filter and secure information in the My Work section of the Fluid Projects WorkCenter and the My Projects page. It must be populated either manually by the project user or by using one of the automation options before the user can view My Work exceptions on the WorkCenter.
Use this section to determine whether the list of My Projects for each user is populated manually by each user individually or auto-populated using the Populate My Projects process (RUN_PC_MY_PRJ) in Populate My Projects Page.
Field or Control |
Description |
|---|---|
Method to Populate My Projects | Select an option to determine whether the system automatically populates the list of My Projects for each user. The method selected impacts options available for users as a User Project Preference too. Options are:
Business Unit and Project Security, if implemented by the organization, will be enforced with all options. |
Auto Populate Options |
Select one or more methods of populating project lists for users.
At least one option must be selected. Options include:
|
Secured Analysis Types
Field or Control |
Description |
|---|---|
Analysis Group | Select an analysis group that contains the analysis types that will be secured. Transaction rows of these analysis types appear as read-only rows on the Transaction List page. You can add or delete transactions that belong to secured analysis types only if you open the page in the Correct History mode. |
Project Super User
Field or Control |
Description |
|---|---|
Super User Role ID | Select suitable role name for the Super User Role. This field is optional. Super users have the following privileges:
|
PC Compression Super User Role | Select an unique Compression Super User Role. This super user will have the privilege to allow users to run or schedule project compression from the Projects WorkCenter page. Users with this privilege can only run or schedule project compression. They cannot edit projects that are approved for compression. |
Use the Installation Options - Project Costing Integration page (INSTALLATION_PCINT) to establish the parameters for integration processes between and other applications.
Navigation:
This example illustrates the fields and controls on the Project Costing Integration page. You can find definitions for the fields and controls later on this page.

System Analysis Types
Enter analysis types to associate with transactions that come into from each of the installed feeder applications. During the integration process, Application Engines use the analysis types that you enter on this page.
Field or Control |
Description |
|---|---|
Proposal Mgmt Bill Estimate (proposal management bill estimate) | Enter the default analysis type for revenue budget rows that are created when you run the Generate process in Proposal Management. The default value is ESB (Bill Estimate). |
Proposal Mgmt Cost Estimate (proposal management cost estimate) |
Enter the default analysis type for cost budget rows that are created when you run the Generate process in Proposal Management. The default value is ESC (Cost Estimate). |
Maintenance Mgmt Tools Usage (maintenance management tools usage) | Enter the default analysis type to identify actual tools usage rows from Maintenance Management. The default value is TUG (Tools Usage). |
SPro Progress Log | Enter the default analysis type for importing deliverables progress log rows from PeopleSoft Services Procurement. The delivered default value is SPL. |
Cost Estimate to Complete | Enter the analysis type that the system assigns to rows that are created when activity remaining work (estimated work − actual work) is multiplied by the activity cost rate. The default value is ETC. This field is available only if you use Program Management. |
Bill Estimate to Complete | Enter the analysis type that the system assigns to rows that are created when activity remaining work (estimated work − actual work) is multiplied by the activity bill rate. The default value is ETB. This field is available only if you use Program Management. |
The PeopleSoft documentation contains separate topics on integration with other PeopleSoft applications that discuss analysis types that the system uses for each integration.
General Integration Options
Field or Control |
Description |
|---|---|
Enable Status Control | Select to enable status control functionality, which enables you to control transactions based on analysis types and effective dates. By using status control options, you can stop transactions from a feeder application if a project or activity status changes on the project Status page or activity Status page. The default value is deselected. |
Assign GL Analysis Types | Select check box to auto-assign General Ledger Analysis Types on the Journal Entry page. |
Set Up GL Analysis Type Assignment | Click to access the Assign General Ledger Analysis Types page where you can define the assignment rules. Based on the values defined on this page, appropriate analysis types will be assigned on the Journal Entry page. |
Restrict Analysis Types | Select check box to restrict particular analysis types to allowable account types. |
Set Up Restricted Analysis Types | Click to access the Restrict Analysis Types page where you can define permissible account types for the restricted analysis types. |
Set Up GL Analysis Type Assignment
Use this page to define the Analysis Type to be populated by the system on the Journal Entry page based on the Account entered on each journal entry line.
This example illustrates the fields and controls on the Assign General Ledger Analysis Types page. You can find definitions for the fields and controls later on this page.
Field or Control |
Description |
|---|---|
SetID | Displays the SetID, which is controlled by the GL Business Unit field on the Journal Entry page. |
Default Analysis Type | Select a default analysis type that will be used if values matching the mapping rules are not found for the journal line. |
Account Type | Select suitable account type. The account types displayed on this page are associated with the journal entry transaction line account. These values are dependent on the definition of Account Types when the accounts are set up. |
Book Code |
Select book code that is associated with the account. Note: This field is visible only if the Book Code check box is selected on the Installation Options — Overall page. |
Cost Sharing Flag | Select check box if the journal entry line transaction is cost sharing. Note: This check box appears only if Grants is installed in the system. |
Analysis Type | Click the prompt button to select the analysis type to be assigned. On clicking the prompt button the analysis types displayed are a list of all analysis types in the GL analysis group. |
Set Up Restricted Analysis Types
Use this page to define the allowable Account Types that can be used when entering transactions from systems that feed into Project Costing for a restricted Analysis Type.
This example illustrates the fields and controls on the Restrict Analysis Types page. You can find definitions for the fields and controls later on this page.
Field or Control |
Description |
|---|---|
SetID | Displays the SetID of the restricted analysis type, which is controlled by PC Business Unit field. |
Analysis Type | Displays the analysis type that is restricted. |
Account Type | Select the account type(s) that is(are) allowable for the restricted analysis type. The account type values are dependent on the definition of Account Types when accounts are set up. |
Note: The Assign GL Analysis Types and Restrict Analysis Types functionalities are applicable only for online transactions and not for batch transactions entered through Project Costing or third party applications.
Integration Analysis Groups
Field or Control |
Description |
|---|---|
General Ledger Analysis Group |
Specify an analysis group that contains analysis types to use for journal entry. |
Receivables Analysis Group | Specify an analysis group that contains analysis types to use for integrating with receivables transactions. See Understanding Transaction-Related Control Data and Setting Up Transaction-Related Information. |
Billing Analysis Group | Specify an analysis group that contains analysis types to use for integrating with manual billing transactions. See Understanding Transaction-Related Control Data and Setting Up Transaction-Related Information. |
Time and Labor Integration
Field or Control |
Description |
|---|---|
Load Time Automatically | Select for PeopleSoft Time and Labor to publish time and labor actual PAY rows to the Project Transaction table (PROJ_RESOURCE) as soon as payroll is complete. If deselected, you must run the Time and Labor to Application Engine process (PC_TL_TO_PC) manually to load the data into the Project Transaction table from a staging table. The default value is deselected. See Reviewing and Loading Data to PeopleSoft Project Costing Tables. |
Pricing/Funds Distribution
Field or Control |
Description |
|---|---|
Date Option | Specify the type of date (accounting or transaction) to use for resolving rates for both pricing and funds distribution. The rates for both of these processes are effective-dated. The default value is accounting date. |
Reprice Deferrals | Select to reprice a row that has been priced but not billed. The default value is deselected. |
Review Required for Billing | Select to review project transactions before they can be billed. You can override this option at the project type level and for individual projects. Conduct reviews by using the Project Manager Review component (PC_PM_REVIEW). The default value is selected. |
Review Required for Period of Performance | Select to separate Period Of Performance exceptions on the Manager Transaction Review page. Note: This check box is enabled only if Review Required for Billing check box is selected. |
Funds Distribution Options
The system uses these settings to determine how to handle fund distribution at the installation level.
Field or Control |
Description |
|---|---|
Enable Funds Distribution | Select to enable the Funds Distribution feature. Use the Funds Distribution page to identify cost transactions that are eligible for distribution, and the Funds Distribution - Target Definition page to define target rows to distribute costs among funding sources. |
Run for Incoming Transactions | Select to indicate that the Funds Distribution (PC_FND_DIST) process should automatically run when processing incoming transactions from the feeder systems that send transactions to . This includes transactions created from the Add Transactions page and the Third Party Loader process. When this option is selected, the Funds Distribution process assumes that the Apply Burden Rates and the Run Pricing After Funds Distribution options are enabled on the Funds Distribution run control page. This option is only enabled if the Enable Funds Distribution option is selected. |
Update Threshold Amounts | Select to allow a threshold amount to be modified on the Distribution Rules page after costs have been processed against the threshold. The threshold may not be lowered below the distributed amount. Deselect to indicate that threshold amounts can not be changed once costs have been processed against the threshold. This option is only enabled if the Enable Funds Distribution option is selected. |
Group Target Definition | Select to indicate that the funding source rules can be grouped manually. Each target definition can be associated to a set of rules. Deselect to indicate that each funding source rule will be associated with separate target definition. This option can be overridden at the business unit level This option is only enabled if the Enable Funds Distribution option is selected. |
Allow Reversals | Select to display a Reversals check box on the Funds Distribution - Target page. Reversal transactions are generated to send through budget checking and balance general ledger entries. Deselect to hide a Reversals check box on the Funds Distribution - Target page. This option is only enabled if the Enable Funds Distribution option is selected. |
Balancing Analysis Type | Select the analysis type that should have the Balancing check box automatically selected when defining Funds Distribution target rows. |
Summarization Options
Use this group box to determine feeder and pricing summarization options. This group box enables you to select the integrating applications (such as Expenses, General Ledger, Third-Party Loader, and so on) and the Pricing engine processes in which you want to invoke transaction summarization.
Field or Control |
Description |
|---|---|
Expenses | Select to invoke the summarization process during the Expenses to Integration process (PC_EX_TO_PC). |
General Ledger | Select to invoke the summarization process during the General Ledger to Integration process (PC_GL_TO_PC). |
Third Party Loader | Select to invoke the summarization process during the Third Party Loader to Integration processes. |
Pricing Engine | Select to invoke the summarization process during the Pricing Engine process (PC_PRICING). |
Variance Pricing | Select to indicate that the Variance Pricing process should use the Summarization engine to net target and history rows. Deselect to indicate that the Variance Pricing process should net rows using a fixed set of fields. These fields are: Business Unit, Project, Activity, Resource ID From, Analysis Type, Resource Type, Category, Subcategory, Contract Number, Contract Line Number, Unit of Measure, General Ledger Business Unit, Account, Department ID, Operating Unit, Product, Fund Code, Class, Program, Budget Reference, Affiliate, Affiliate Intra1, Affiliate Intra2, ChartField1, ChartField2, ChartField3, Foreign Currency, Currency Code, and Currency Effective Date. A Summarization Template for the Variance Pricing product code must also be set up. Otherwise, the fixed set of fields are used. |
Time and Labor | Select to invoke the summarization process during the Time and Labor to Integration process (PC_TL_TO_PC). |
Payables / Purchasing | Select to invoke the summarization process during the Accounts Payable to Integration process (PC_AP_TO_PC), the Purchasing to Integration process (PC_PO_TO_PC), and the Purchasing Adjustment Integration process (PC_POADJUST). |
Project Reporting Tables | Select to indicate that the project resources are to be summarized using the Refresh Reporting Tables process (PC_SUM_PR), the Refresh Summary Tables (PC_SUM_RFSH) process, or using any of the feeder processes. |
For additional information about Feeder and Pricing Summarization:
Time Report Date Option
Field or Control |
Description |
|---|---|
Date Option | Select the date option that the system uses to process time reports that are created in Expenses and brought into . Available options are: Date Under Report: The dates entered on time reports when they are created in Expenses are the same dates that the system uses when the time reports are imported into . This is the default value. Period End Date: The time report end date determines the accounting period to which the system charges time in . This setting is particularly important when the reporting period spans the end of one accounting period and the beginning another accounting period. For example, assume that you use monthly accounting periods and enter weekly time reports. If a month ends in the middle of a week, and therefore the reporting period spans the end and beginning of two accounting periods, the time is charged in to the accounting period for which the reporting period ended—the latter of the two accounting periods. See Setting Up Time and Expense ChartFields for PeopleSoft Project Costing. |
Asset Management Integration
Field or Control |
Description |
|---|---|
Cost Type From Transaction | Select to group and summarize the transactions to send to Asset Management by the cost types of the rows in the Project Transaction table instead of the cost type specified on the Define Assets page. The default value is deselected. See Define Assets Page. |
Department ID from Transaction | Select to group and summarize the transactions to send to Asset Management by the department ID of the rows in the Project Transaction table instead of the department specified on the Define Assets page. The default value is selected. |
Require Asset Approval | Select to require approval of asset capitalization transactions before they are sent to the Asset Management Loader tables. This option applies to assets that you create or adjust in . It does not apply to asset retirement transactions. Deselect the option to enable optional approval of assets. If approval is optional, assets with statuses of New and Approved are eligible to be sent to Asset Management. The default value is deselected. |
Single Currency Summarization | Select this option in a single currency environment if you have no need to send transaction currency detail to Asset Management when you capitalize assets. The capitalization processes ignore the five currency fields—Transaction Currency Code, Currency Effective Date, Rate Multiplier, Rate Divisor, and Rate Type—to achieve a greater level of summarization. Deselect this option if you want to send currency transaction detail to Asset Management when you capitalize assets. |
Third-Party Data Exchange
The system uses these settings to exchange data between and the Microsoft Project 2002 scheduling application.
Field or Control |
Description |
|---|---|
Analysis Group - Budget | Select the analysis group from which to assign an analysis type for budget rows that you import from Microsoft Project. The analysis type from this group is later selected during the Microsoft Project integration process. See Understanding Integration of PeopleSoft Project Costing with Microsoft Project. |
Analysis Group - Actuals | Select the analysis group by which all transaction rows with an analysis type belonging to the group will be sent from to Microsoft Project. Only transactions with analysis types in the specified analysis group will be synchronized between and Microsoft Project. |
Work Analysis Type | Select an analysis type to assign to work transactions (time entries) that are sent from Microsoft Project to the Project Transaction table. The default value is TLX. |
Unit of Measure | Select the unit of measure for budget rows brought into from Microsoft Project. The default setting is hours (MHR). |
Use the Installation Options - Purchasing page (INSTALLATION_PO) to define general purchasing controls, requisition loader parameters, procurement card controls, and vendor attributes.
In addition, you can define the maximum number of rows to display on various PeopleSoft Purchasing pages and select Oracle BI Publisher as the purchase order reporting tool for both PeopleSoft Purchasing and PeopleSoft eProcurement.
Navigation:
This example illustrates the fields and controls on the Installation Options - Purchasing Page. You can find definitions for the fields and controls later on this page.
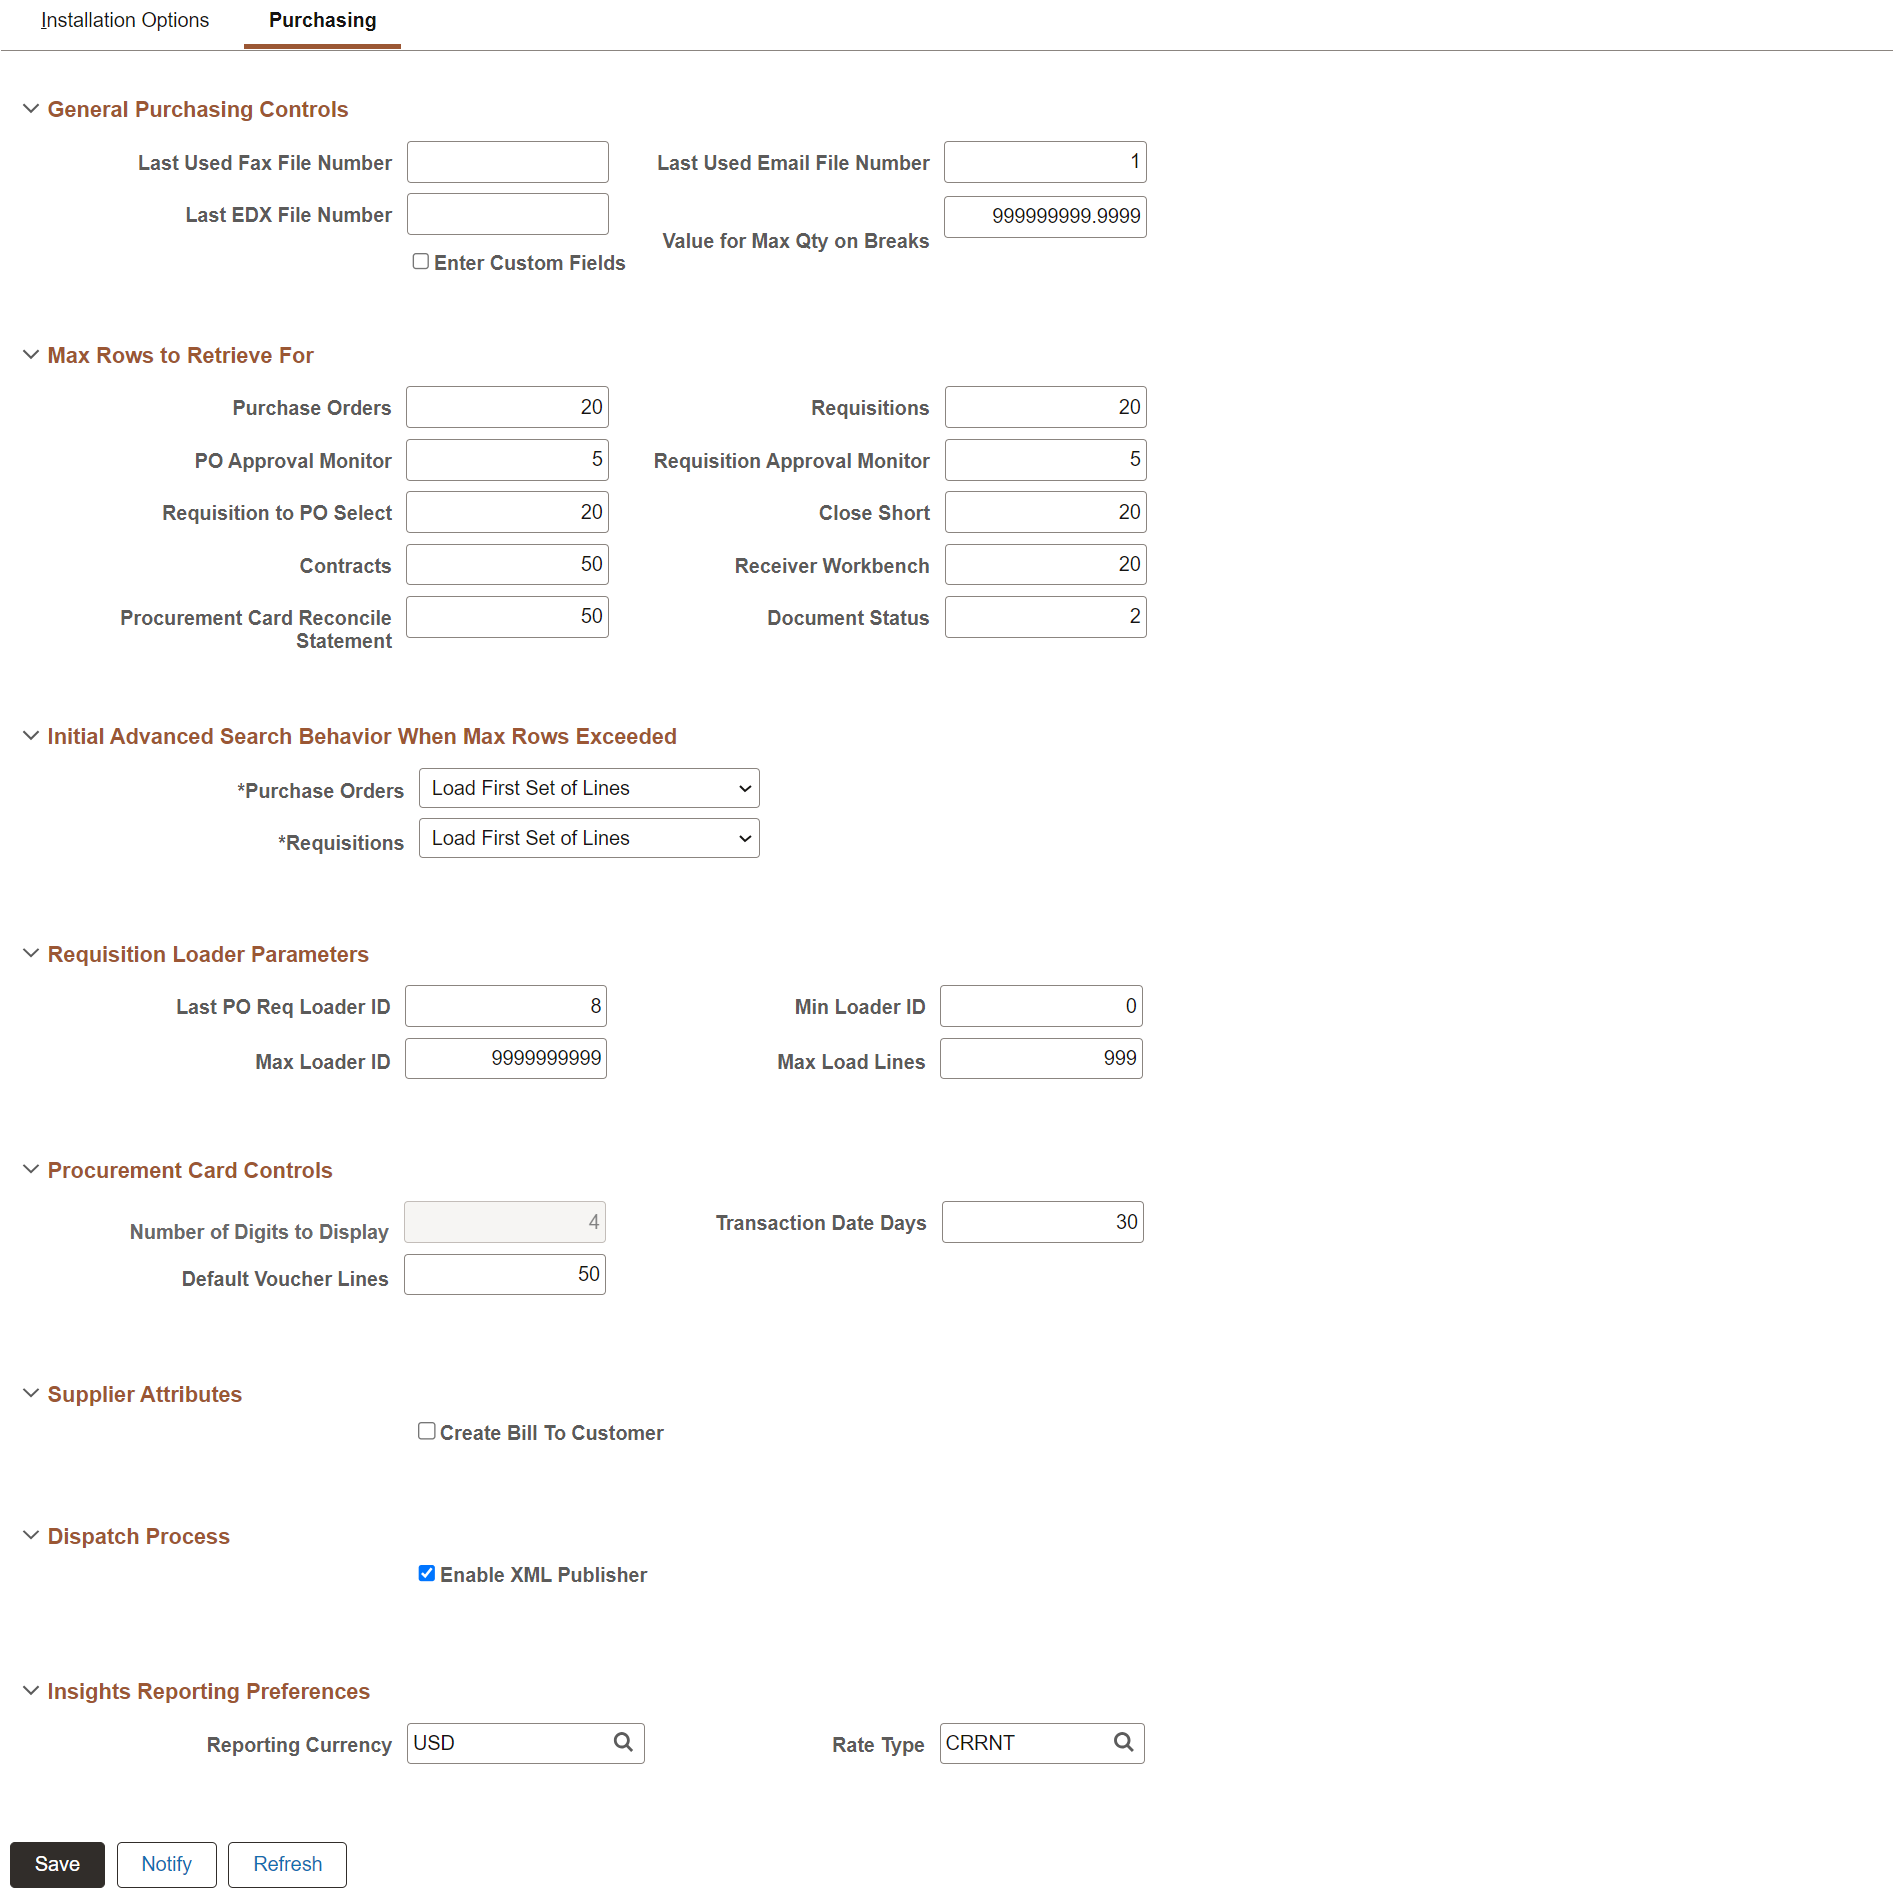
General Purchasing Controls
Field or Control |
Description |
|---|---|
Last Used Fax File Number, Last EDX File Number, and Last Used Email File Number | Displays the last used file number. The system automatically numbers the files with the next sequential number. |
Value for Max Qty on Breaks (value for maximum quantity on breaks) | Displays the maximum quantity to be used for quantity break price calculations. |
Enter Custom Fields | Select the checkbox to make the user defined fields available on the procurement transactions |
Max Rows to Retrieve For
Use this group box to define the number of rows that the system retrieves when you perform a search function. For example, if you are using the PeopleSoft Purchasing application to search for purchase orders, and if there are 500 purchase order lines and the purchase order chunk size is set to 20, then the system only loads and displays 20 purchase order lines at a time when you click the Search button.
Field or Control |
Description |
|---|---|
Purchase Orders |
Enter the maximum number of rows that you want returned when you search for purchase order-related information. |
Requisitions | Enter the maximum number of rows that you want returned when you search for requisition-related information. |
PO Approval Monitor | Enter the maximum number of rows that you want returned when you search for purchase order approval information. |
Requisition Approval Monitor | Enter the maximum number of rows that you want returned when you search for requisition approval information. |
Requisition to PO Select | Enter the maximum number of rows that you want returned when you search for requisitions that have been selected for purchase orders. |
Close Short | Enter the maximum number of rows that you want returned when you search for purchase orders that have been closed with a short amount. |
Contracts | Enter the maximum number of rows that you want returned when you search for contract information. |
Receiver Workbench | Enter the maximum number of receipts that you want returned when you search in the Receiver Workbench. |
Procurement Card Reconcile Statement | Enter the maximum number of rows that you want returned when you search in the Reconcile Statement. |
Initial Advanced Search Behavior When Max Rows Exceeded
Use this region to specify the default method for the system to use to initialize searches for purchase order and requisition lines. Chunking controls the number of lines that the system initially loads when you open a purchase order or requisition. This is a process in which the system places a small subset of transaction lines in a buffer.
Note: A chunk is not the same as a page full of data. It represents all of the rows that are in the scroll at a given point in time.
The system uses the default method when the maximum number of rows defined for chunking has been exceeded. The default methods are specified in the Purchase Orders and Requisitions fields in the Max Rows to Retrieve for region. For example, if the chunk size is 10, and 20 lines are in the purchase order or requisition, the system uses the method that you define on this page to handle the initial search for lines when you open the transaction. Or, if the chunk size is 10, and only two lines are in the purchase order or requisition, then the system does not implement chunking and displays the two lines when the transaction is opened.
Field or Control |
Description |
|---|---|
Purchase Orders | Select the method for the system to use when purchase order lines exceed the chunk size. Values include:
|
Requisitions | Select the method for the system to use when requisition lines exceed the chunk size. The values for purchase orders also apply to requisitions. |
Requisition Loader Parameters
Field or Control |
Description |
|---|---|
Last PO Req Loader ID (last purchasing requisition loader ID) | Displays the number of the last requisition loader request processed by the system. At initial setup, this is probably zero. As the Purchasing Requisition Loader Application Engine process (PO_REQLOAD) handles requests, it automatically numbers them beginning with the number that you enter here. |
Min Loader ID (minimum loader ID) | Enter the lowest number that you want to use to identify requisition loader requests. |
Max Loader ID (maximum loader ID) | Enter the highest number that you want to use to identify requisition loader requests. When the requisition loader reaches this number, it resets request numbering to the number that you enter in Min Loader ID. |
Max Load Lines (maximum load lines) | Enter the maximum number of lines that can be loaded in a requisition loader process instance. Lines that exceed this number are ignored. |
Procurement Card Controls
Field or Control |
Description |
|---|---|
Number of Digits to Display | Enter the number of digits that appear for the procurement card. Note: By default, the system displays only the last four digits of the card. |
Field or Control |
Description |
|---|---|
Default Voucher Lines | Enter the maximum number of procurement card transactions that are created for a voucher. Note: The value from this page appears by default on the Voucher Stage Run Control page. |
Transaction Date Days | Enter the maximum number of days to set the Transaction From Date, when searching for procurement card transactions. |
Vendor Attributes
Field or Control |
Description |
|---|---|
Create Bill To Customer | Select this check box if you want to provide the ability to automatically create the bill to customer when defining a vendor using the Vendor Information - Identifying Information page. When you select this check box, the Create Bill-To Customer group box appears on the Vendor Information - Identifying Information page selected by default so that you can quickly create the bill to customer with default information. |
Dispatch Process
Field or Control |
Description |
|---|---|
Enable XML Publisher (or BI Publisher) |
Select this check box to use Oracle's XML Publisher (BI Publisher) to format and print purchase orders during the dispatch process. Oracle BI Publisher is a Java-based product within the Oracle Fusion Middleware family used for reporting. This check box impacts the dispatch processes within PeopleSoft Purchasing and PeopleSoft eProcurement. If this check box is not selected, then the system uses SQR to format and print purchase orders. |
See the product documentation for PeopleTools: BI Publisher for PeopleSoft.
Insights Reporting Preferences
Field or Control |
Description |
|---|---|
Reporting Currency | Select the currency that will be used across all business units for reporting in the Procurement Insights dashboards. Note: It is recommended not to change the reporting currency frequently. If you change the currency, a full index needs to be run before using the visualizations to get correct values of amount. Incremental index will corrupt the indexed data in the Search Framework with partial data being in one currency and the remaining in another. |
Rate Type |
Select the rate type to be used for converting amounts to the defined reporting currency. |
Use the Installation Options - Receivables page (INSTALLATION_AR) to define the installation options that are particular to your Receivables application.
Navigation:
This example illustrates the fields and controls on the Installation Options - Receivables Page (1 of 2). You can find definitions for the fields and controls later on this page.

This example illustrates the fields and controls on the Installation Options - Receivables Page (2 of 2). You can find definitions for the fields and controls later on this page.
Field or Control |
Description |
|---|---|
Max Number of Rows in Scrolls (maximum number of rows in scrolls) | Some Receivables pages store and display hundreds of rows of information. Use this field to limit the number of rows that can appear in the scroll area and improve performance. |
Track Direct Journal Customer | Select to enable users to enter a customer ID for a direct journal payment on the Regular Deposit - Payments page. This enables users to view the customer for direct journal payments on inquiry pages. |
Enable Unpost Reason | Select this check box , which will require users to select a reason code every time they unpost a PeopleSoft Receivables transaction. If you do not select this check box, user selection of an unpost reason is optional. |
No Mult Pending Item Selection (no multiple pending item selection) | Select to prevent the selection of an item on a transfer, maintenance, draft, or payment worksheet if an unposted pending item exists for that item or if it is already selected on another worksheet. This limitation also applies to Payment Predictor. |
Parallel Processing Options | Click to access the AR Parallel Processing Options page, where you define how many data partitions are generated for the Payment Predictor (ARPREDCT), Receivable Update (ARUPDATE), Aging (AR_AGING), and Statements (AR_STMTS) parallel processes. The parallel processing options are AR_AGE, AR_PGG, AR_POST, AR_PREDICT, and AR_STMT. Enter the maximum partitions for each process. |
Account Overview Balance Display Options | Click to access the AR Account Overview Balances page, where you specify which balances you want to display on the Account Overview - Balances page. |
Statement Number, Dunning Number, and Overdue Charge Number | Enter the last number used on statements, dunning letters, and overdue charge invoices. The system increments the number by one each time that you print the correspondence. |
|
Reporting Currency |
Select the currency that will be used across all business units for reporting in the Receivables Insights dashboards. Note: It is recommended not to change the reporting currency frequently. If you change the currency, a full index needs to be run before using the visualizations to get correct values of amount. Incremental index will corrupt the indexed data in the Search Framework with partial data being in one currency and the remaining in another. |
|
Rate Type |
Select the rate type to be used for converting amounts to the defined reporting currency. |
1099-C Forms | Select if your organization must generate the 1099-C, Cancellation of Debt form. This form is required by the Internal Revenue Service to summarize how much debt has been written off for a specific individual. |
DMS Interface (Debt Management Services interface) | Select if your company is a U.S. federal entity and uses the U.S. Department of Treasury DMS interface. |
Treasury Report on Receivables | Select if your company is a U.S. federal entity and requires the Treasury Report on Receivables (TROR). The TROR serves as a management report that informs Federal decision makers of the gross book value of the non-tax receivables owed by the public to Federal agencies and the status of the Federal Government’s debt portfolio. |
Use Memo Status | Select if your company is a U.S. federal entity to enable users to enter memo status codes that track changes in status for delinquent items. Other organizations, should select this option only if they want to create user-defined memo status codes and track changes. |
AR IPAC Interface (Receivables Intra-Governmental Payment and Collection interface) |
Select if your company is a U.S. federal entity and uses the U.S. Department of Treasury IPAC interface. |
Collection Credit Exposure
The fields in the Collection Management Credit Exposure group box determine how the Condition Monitor process (AR_CNDMON) calculates a customer's outstanding balance. The process uses the adjusted balance to determine whether customers are approaching or have exceeded their credit limits.
Field or Control |
Description |
|---|---|
Include Unapplied Payments | Select to have the process subtract all identified payments from the customer's outstanding balance. |
Include In Process Payments | Select to have the process subtract any express deposit, worksheet, or applied payment associated with a customer item from the outstanding balance. |
Exclude Disputed Items | Select to have the process subtract the balance due on items in dispute from the outstanding balance. |
The following table shows what the available credit and outstanding receivables (AR) balance would be if you select none of the check boxes or if you select a single option when a customer's credit limit is 65,000,000.00:
Type of Amount |
No Selection |
Select Unapplied Payments | Select In-Process Payments | Select Disputed Items |
|---|---|---|---|---|
Credit Limit |
65,000,000.00 |
65,000,000.00 |
65,000,000.00 |
65,000,000.00 |
Open AR Balance |
65,475,343.21 |
65,475,343.21 |
65,475,343.21 |
65,475,343.21 |
Unapplied Payments | not applicable (N/A) | 35,876,525.91 |
N/A | N/A |
In Process Payments | N/A | N/A | 125,000.00 | N/A |
Disputed Items |
N/A | N/A | N/A | 91,276.10 |
Outstanding AR Balance | 65,475,343.21 |
29,598,817.30 |
65,350,343.21 |
65,384,067.11 |
Available Credit |
-475,343.21 |
35,401,182.70 |
-350,343.21 |
-387,067.11 |
Collection Options
The fields in the Collection Options group box define additional options for collection and exception monitoring.
Field or Control |
Description |
|---|---|
Enable Auto Escalation (enable automatic escalation) | Select to establish a new action plan for a collection (COLL) condition when a customer that already has a collection action plan violates a collection rule with a higher priority. |
Allow Business Unit Monitoring | Select if you want to monitor the collection (COLL), entry type/reason code (ETRC), key statistics exceeded (KSTE), and large amount coming due (LACD) conditions by business unit. The Condition Monitor treats each business unit and collection customer combination as a separate customer. Business unit monitoring also affects the assignment of the action owner for these conditions. The Condition Monitor groups all open items for the business unit and collection customer combination together. If all these transactions have the same value in the action owner field, it uses that value for the assigned action owner. Otherwise, it assigns the owner based on the collection customer. Here is an example: Customer FRA01 has transactions in business unit FRA02 and FRA05. You assigned collector DKB to this customer. All of the transactions for this customer in the FRA02 business unit are assigned to collector JKB. All of the transactions in the FRA05 business unit are assigned to collector MLM. If the customer violates the collection criteria in both business units, the Condition Monitor creates two action plans: one for FRA02/FRA01 that it assigns to collector JKB and one for FRA05/FRA01 that it assigns to collector MLM. However, if some of the transactions in the FRA02 business unit are assigned to collector JKB and some are assigned to collector CCC, then the action plan for FRA02/FRA01 will be assigned to the collector for the customer, which is DKB. |
Default Assigned Owner | Select the user ID for the individual in your organization who you want to be the action owner for action list items when the assigned action owner does not have a user ID. You must designate a default owner before you can define conditions for the Condition Monitor process. |
Payment Predictor Options
Field or Control |
Description |
|---|---|
Include Hierarchy | Select this check box to remit payment for all customers in the specified Customer hierarchy tree or Corporate hierarchy tree of a particular customer reference. Two options are available:
Note: The Remit drop-down menu will be available only if the Include Hierarchy check box is selected. |
|
Multiple Payments for One Item |
Select this check box to apply multiple payments to the same item in the same run. When you select this check box, the MULPAY algorithm (from the #REFS algorithm group) is used to apply multiple payments. You can only apply multiple payments when certain criteria is met. For more information about the criteria required to use this field, see Using #REFS to Handle Multiple Payments for a Single Item. Note: This check box is not available for editing when you select the No Mult Pending Item Selection (no multiple pending item selection) check box. |
Authorize Delete Attachments
|
Field or Control |
Description |
|---|---|
|
Authorize Delete Attachments |
If Authorize Delete Attachments check box is selected, only users with the selected roles will be allowed to delete attachments along with the user who has originally attached the file. Once the check box is selected, Roles Authorized to Delete Attachments group box appears to select roles who can delete the attachments. |
Send from Email Options
|
Field or Control |
Description |
|---|---|
|
Override Send from Email |
Select this check box to enable users to override the default system email using the Send from Email Address on the Business Unit Definition Page and Receivables Options - General 1 page. When a dunning letter or statement is associated with a single business unit, the From Email Address specified at the Receivables business unit definition level is used as sender email address. If no email address is specified at business unit definition level, From Email Address specified at the Receivables Option level is used as sender email. If no email address is specified at the Receivables Option level, the default system email address is used as sender email address. When a dunning letter or statement is associated with multiple business units and all business units have the same Receivables Options SetID, the email address specified at Receivables Options level is used as the sender email address, If no email address is specified at the Receivables Option level, the default system email address is used as sender email address. When a dunning letter or statement is associated with multiple business units and all business units have different Receivables Options SetID, the default system email address is used as sender email address. |
Use the AR Account Overview Balances page (ACCT_BAL_SBP) to specify which balances to display on the Account Overview - Balances page.
Navigation:
Click the Account Overview Balance Display Options link on the Receivables page.
The Account Overview - Balances page displays a list of balances for a customer. By default, all balances appear in the list. Deselect the check boxes for the balances that you do not want to display for your organization.
Use the Order Management page (INSTALLATION_OM) to set order, quote, and buying agreement chunking parameters and enable searching, claimback, and feature function security.
Navigation:
Order/Quote Defaults
Field or Control |
Description |
|---|---|
Maximum Lines Displayed | Enter the maximum number of lines to be displayed on the sales order or quote before chunking is used. |
Maximum Schedules Per Line | Enter the maximum number of schedules per order line displayed before chunking is used. |
Maximum Online Pricing Rows | Enter the maximum number of schedules to be priced online. If the sales order number of schedules exceeds the maximum, you are directed to the Order Repricing process (OM_REPRICE). |
Maximum Sources of Supply Rows | Enter the maximum number of rows that can be sources before chunking is used. |
PTSF Search (PeopleSoft Search Framework) | Select to enable PeopleSoft Search Framework to enhance searching capabilities for customers and products during sales order entry. See PeopleTools: PeopleTools Global Technology, Translating Application Definitions |
Process Claimback | Select to process claimbacks. |
Prompt for save when chunking | Select to have the system prompt you to save a chunk. If deselected, the system automatically saves your order when you navigate from chunk to chunk. |
Process Feature Security | Select to enable the system to use feature function security. |
Buying Agreement Defaults
Field or Control |
Description |
|---|---|
Maximum Lines Displayed | Enter the maximum number of lines to be displayed on the buying agreement before chunking is used. |
Hold Workbench Defaults
Field or Control |
Description |
|---|---|
Maximum Hold Workbench Rows | Enter the maximum number of lines to be displayed on the Order Hold Workbench. The rows that display in the Order Hold Workbench depends on the search criteria for the type of rows (header, line, or schedule) that are selected and counted as the maximum. |
RMA Shipment History Defaults
Field or Control |
Description |
|---|---|
Maximum Lines Displayed in RMA |
Enter the maximum number of RMA lines to be displayed on the Customer Shipment History page. If you enter a number lower than the available number of lines, the Customer Shipment History page displays a message indicating that there are more entries available. You can refine your search to view more lines. If you do not specify a number, the system defaults maximum number of RMA lines to 300. |
This section discusses how to set up Resource Management application-specific installation options. The field values that appear by default on this page when you first install Resource Management are required to support demonstration data that is delivered with your application. You must evaluate each option and enter values based on your organization's business structure, practices, rules, and procedures.
The Installation Options - Resource Management page is divided into these regions:
Service Order Options
Organization Structure
Reporting Options - Billing Rates
Reporting Options - Task Categories
Calendar Options
PeopleSoft Services Procurement Integration Options
PeopleSoft Services Procurement Integration Options - Job Defaults for Person
Profile Secure Data Options
Profile Display Options
Capacity Planning Setup - Default UOM Display
Capacity Planning Setup - Default Capacity Planning Region
Capacity Planning Setup - Unit of Measure Conversions
See Understanding PeopleSoft Resource Management and PeopleSoft HCM.
See Resource Matching.
See PeopleSoft Resource Management Implementation.
Installation Options - Resource Management Page
Use the Installation Options - Resource Management page (INSTALLATION_RS) to define the installation options that are specific to your Resource Management application.
Navigation:
This example illustrates the fields and controls on the Installation Options - Resource Management page (1 of 7). You can find definitions for the fields and controls later on this page.

This example illustrates the fields and controls on the Installation Options - Resource Management page (2 of 7). You can find definitions for the fields and controls later on this page.

This example illustrates the fields and controls on the Installation Options - Resource Management page (3 of 7). You can find definitions for the fields and controls later on this page.
This example illustrates the fields and controls on the Installation Options - Resource Management page (4 of 7). You can find definitions for the fields and controls later on this page.

This example illustrates the fields and controls on the Installation Options — Resource Management page (5 of 7). You can find definitions for the fields and controls later on this page.
This example illustrates the fields and controls on the Installation Options - Resource Management page (6 of 7). You can find definitions for the fields and controls later on this page.
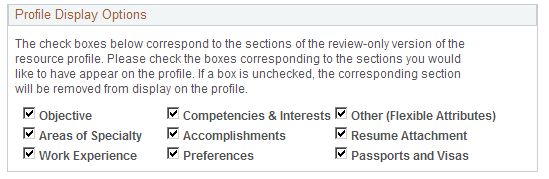
This example illustrates the fields and controls on the Installation Options - Resource Management page (7 of 7). You can find definitions for the fields and controls later on this page.

Service Order Options
Field or Control |
Description |
|---|---|
Service Order Priority | Select the default priority, or importance, to appear on new service orders. Available values are from the Resource Management Priority table (RS_PRIORITY_TBL). Priority is used for information and reporting. It does not control any service order processing. |
Organization Structure
Field or Control |
Description |
|---|---|
Organization Field Name | Enter the field name that represents the organizational unit, which categorizes all resources that are managed in Resource Management. The organizational unit field is used:
Most organizations use departments to organize resources into logical groupings by functional area, in which case the organization field name value is DEPTID. |
Organizational Unit Record | Enter the application record name that defines the organizational unit field. If you use department as the organizational unit field, the organizational unit record is DEPT_TBL, which defines the Department (DEPTID) field. |
Organizational Structure Tree Name | Enter the name of the tree that contains the organizational unit arranged in a hierarchical business structure. The tree represents the organizational structure in the application. The organizational unit tree is available in Resource Management when users:
The organizational unit tree must be one whose foundation is a tree structure built on the record specified in the Organizational Unit Record field. Note: Every resource that is tracked in Resource Management must belong to an organizational unit that is included in the organizational unit tree. |
Employee - Organization Record |
Enter the name of the record that keeps track of the organizational unit to which each resource belongs. If the organizational unit field is the Department field (DEPTID), you can use the Employee-Organization record RS_ORGEMPLBR_VW as delivered. The Employee-Organization record is a view of the Job record (JOB) that identifies the department for every employee. The Job record is the PeopleSoft HRMS record that identifies the department, location, job code, and a variety of other attributes for every employee in the organization. |
Reporting Options - Billing Rates
Field or Control |
Description |
|---|---|
Billing Rate | This field is not used by Resource Management at this time. You can accept the default value, leave the field blank, or enter a value that can be used in the future if you create a configuration that uses a default billing rate. |
Currency Code | Enter the currency code to convert all resource billing rates into one currency for comparison. |
Rate Type |
Select the rate type from the Market Rate Data Types table (RT_TYPE_TBL) that determines the default conversion rate for converting resource billing rates and currency codes. |
Unit of Measure | This field is not used by Resource Management at this time. You can enter a value that can be used in the future if you create a configuration that uses a default billing rate unit of measure. |
Reporting Options - Task Categories
Field or Control |
Description |
|---|---|
Category and Task Chart Color |
Select task categories and corresponding chart colors to appear on the Resource Schedule chart if you enter the chart from the:
|
Calendar Options
Field or Control |
Description |
|---|---|
Upd by Mgr (update by manager) |
Select the nonassignment (appointment) task categories that can be modified by managers with access to resource schedules. This selection applies to managers with access to the Monthly Schedule page. |
Upd by Res (update by resource) | Select the nonassignment task categories that can be modified by resources in their own resource schedules. |
Notify by Mgr (notify by manager) |
Select the nonassignment task categories that trigger a notification message to the resource and the resource manager if a manager with authority to modify resource schedules changes a task in the specified category in the resource schedule. Note: After you select the task categories, you must select the Calendar Email Notification check box to activate workflow. |
Notify by Res (notify by resource) | Select the nonassignment task categories that trigger a notification message to the resource manager if a resource changes a task in the specified category in the resource schedule. Note: After you select the task categories, you must select the Calendar Email Notification check box to activate workflow. |
Category and Task Description |
Displays all nonassignment task category names and descriptions. |
Synchronous Calendar Update | By default this check box is selected. Deselect this check box to decouple the calendar update process from the assignment component. With this check box deselected, the calendar update process is deferred when assignments are created. Therefore, assignments can be created much faster despite the assignment duration. Calendar entries are created or updated only when the “Update Assignment Calendar” option in the Cache Administration process is run. Note: Calendar update for assignment status Cancel or Complete occurs synchronously regardless of the check box selection. |
Calendar Email Notification | Select this check box to activate the Resource Management email notification workflow feature to notify the resource or resource manager of changes to selected task categories. Note: You must select this option to activate workflow notification messages for the selected task categories. |
Synchronize To | Select the Outlook desktop calendar application to synchronize with Resource Management resource schedules, or leave the field blank. You must first separately implement Microsoft Exchange or Microsoft Outlook, and set up your PeopleSoft application to integrate with it, before any synchronization functions can occur. |
Do not schedule assignments on Holidays | Select this option to skip resource holidays that are on the resource's holiday schedule when you create assignments. An assignment is created for a specified date range; however, if you select this option, and there are holidays from the resource's holiday schedule within the date range of the assignment, the system will not schedule the assignment on those dates on the resource's calendar. Deselect this option to schedule assignments on every working day within the assignment date range, including resource holidays. This option appears only if Program Management is not installed. If Program Management is installed, the system always skips holidays when creating Resource Management assignments. Note: Resource calendars and availability will be affected if you change the Do not schedule assignments on Holidays installation option. After you change this option, you must run these two processes in this order: Holiday Load Application Engine process (RS_HOLIDAY) and Cache Administration - Refresh Resource Schedule Cache. |
Default Task Category for Assignments | Select a task category that appears as the default category value on:
Users can change the default value on these pages. Available values are based on task categories that have the Use for Assignment option selected on the Task Categories page in Resource Management. |
PeopleSoft Services Procurement Integration Options
This group box appears only if you install Services Procurement and select the Allow Non-Employees to be established as Resources option on the Resource Setup - Common Installation Options page.
Field or Control |
Description |
|---|---|
Enable PeopleSoft Services Procurement Integration | Select to enable the integration between Resource Management and Services Procurement that allows user to initiate Services Procurement service requisitions from Resource Management to fulfill resource requests, and navigate to requisitions to make updates. If you do not select this option, the Find External Resource icon does not appear on the Staffing Workbench - Fulfill Orders page. |
Enable Requestor Defaults | Select this option for the project manager to be used as the requestor name for Services Procurement service requisitions that initiate in Resource Management. If you do not select this option, users are prompted to enter the name of the requestor when initiating a service requisition. Important! If you select this option, users must associate a project with the service order and assign a project manager to the project, and the project manager must be established as a valid requestor in Services Procurement. When a service requisition is initiated in Resource Management, the project manager name is passed from Resource Management to Services Procurement to use as the requestor name, and users cannot change the requestor name on the service requisition. |
See Understanding Integration with PeopleSoft Services Procurement.
PeopleSoft Services Procurement Integration Options - Job Defaults for Person
If you allow non-employee data to be maintained in the FSCM database, you can create new non-employee data records—automatically or manually—for Services Procurement person IDs that are established as resources. The values that you enter in these fields appear by default on the Convert Person ID to Resource page when you establish a person ID as a resource. Users can modify the values as needed on the Convert Person ID to Resource page or in the Employee Personal Data component (RS_CM_PERSONAL).
Field or Control |
Description |
|---|---|
Business Unit | Select a business unit to serve as the default HR business unit for new non-employee data records (EMPLIDs) that are created for Services Procurement person IDs. This is a required field on the person's data record. |
Department |
Select the default department. This is a required field on the person's data record. |
Location, Supervisor ID, and Job Code | Select a default value for each field. These are not required fields on the person's data record. |
Standard Hours | Enter a default value for standard hours per work day. Standard hours are used by the Resource Match engine to calculate Availability fit scores for each combination of eligible resource-and-open resource request. |
Standard Work Period | Select the default standard work period. Standard work period is used by the Resource Match engine to calculate Availability fit scores for each combination of eligible resource-and-open resource request. |
Holiday Schedule | Select a default holiday schedule to populate resource schedules that are created for new non-employee data records (EMPLIDs). |
Employee ID Prefix | Enter up to three characters to serve as the prefix for new resource employee IDs that are created for Services Procurement person IDs. When a user establishes a person ID as a non-employee resource, the employee ID default value is a concatenation of this prefix and the Last Emplid Used field value. |
Last Emplid Used | Enter a number, up to eight characters, to serve—along with the Employee ID Prefix field value—as the last system-generated employee ID that is created for a Services Procurement person ID. For example, if the employee ID prefix is EXT and the last employee ID used is 500, the system assigns an employee ID of EXT00000501 to the next person ID that is converted to a resource in Resource Management. |
See Establishing PeopleSoft Services Procurement Service Providers as Resources.
Profile Secure Data Options
The Profiles Secure Data Options group box enables you to secure or unsecure data tabs for Resource Profiles. When entering this page, the group box is expanded to display the Enable Secure Data 1 and Enable Secure Data 2 Tab check boxes along with the corresponding Data Field check boxes.
Until you select the Enable Secure Data 1 Tab check box, the corresponding Data Field check boxes are unavailable for selection. Selecting a data field under either column will enable the field to be displayed on the secured tabs in the Resource Profile component.
Note: You can choose one or more fields to appear on either or both tabs. When you select a field to appear on either Secure Data 1 tab or the Secure Data 2 tab or both, it is considered to be a secure field.
Field or Control |
Description |
|---|---|
Job Code | Select this option to secure the resource's job code field |
Address | Select this option to secure the Address lines 1 through 4 for the resource. |
City/Town |
Select this option to secure the city or town of the resource |
Postal | Select this option to secure the post code/zip code of the resource |
Home Phone Number | Select this option to secure the phone number when Phone Type = Home |
Passport and Visa Numbers | Select this option to secure the passport numbers and Visa Numbers |
Areas of Speciality | Select this option to secure the entire Areas of Specialty section |
Licenses and Certificates | Select this option to secure the entire Licenses and Certificates section |
Test Results | Select this option to secure the entire Test Results section |
Note: Passport and visas, and the expiry date of those visas would still be visible to users who do not have access to the secure data. Just the passport and visa numbers will not be visible to users without security access to this data.
Profile Display Options
Field or Control |
Description |
|---|---|
<Resource profile sections> | Select the check boxes that correspond to the resource profile sections that you want to appear on the Resource Profile review-only summary page. Sections that are not selected are hidden from the summary page, but remain visible in the profile to users with security permission to update profiles. |
Capacity Planning Setup - Default UOM Display
Field or Control |
Description |
|---|---|
Hours or Days | Select the unit of measure that determines whether the effort is in hours or days. If you select Hours, all of the capacity planning data appears with the primary display and update fields in hours. |
Capacity Planning Setup - Default Capacity Planning Region
Field or Control |
Description |
|---|---|
Region SetID | Enter the default region SetID that is used in Capacity Planning - Consolidated Scenario analysis. |
Region Code | Enter the default region code that is used in Capacity Planning - Consolidated Scenario analysis. This region is used for:
|
Capacity Planning Setup - Unit of Measure Conversions
Field or Control |
Description |
|---|---|
Standard Hours per Work Day | Displays the number of hours that equal one full work day. The standard hours per work day are specified on the Resource Setup - Common Installation Options page. See Setting Up Resources. |
Standard Work Days per Month |
Enter the number of work days that equal one full month for the purpose of planning capacity. |
Work Days to Full Time Resource |
Enter the number of days per month that equal one full-time resource for the purpose of planning capacity. Typically this value is the same as the standard work days per month. |
Use the Services Procurement Installation Options page (INSTALLATION_SP) to define Services Procurement installation options.
Navigation:
This example illustrates the fields and controls on the Services Procurement Installation Options page. You can find definitions for the fields and controls later on this page.

Field or Control |
Description |
|---|---|
Managed Services Provider Installation | Click to enable the managed services provider (MSP) functionality in Services Procurement. This check box should not be selected unless your organization is an MSP. If selected, the PO Work Order Integration and PO Service Contracts check boxes are disabled. The HCM Integration check box will also be disabled. Conversely, if the PO Work Order Integration or HCM Integration check boxes are selected, the Managed Service Provider Installation check box is disabled. |
SP Fulfillment Enabled (Services Procurement fulfillment enabled) | Select to enable Services Procurement fulfillment, where you can source requisitions to suppliers, receive candidate submittals, and perform bid negotiations. |
SP Administration Enabled (Services-Procurement-administration-enabled) | Select to enable Services Procurement administration so that you can set up procurement base data such as projects and activities. |
SP Expense Enabled (Services-Procurement-expense-enabled) | Select to enable suppliers to submit expenses, which is based on the setting for a particular work order. Note: This option is only available when SP Administration is enabled. |
SP Settlement Enabled (Services-Procurement-settlement-enabled) | Select to enable access to invoicing functionality, which includes the creation, modification, approval, and printing of invoices, as well as integration to Accounts Payables. Note: This option is only available when SP Administration is enabled. |
SP Pay Types Enabled (Services-Procurement-pay-types-enabled) | Select to enable the use of pay types. You use Pay types to break down the total supplier rate into the following rate components : pay rate, fixed cost, vendor markup, and third-party markup. Note: When you select this option, the rate breakdown is available on rate sheets, requisitions, bids, and work orders. |
PO WO Integration (work-order integration with purchase orders) | Select to produce purchase orders from work orders. This option is available only if Purchasing is installed. |
PO Service Contracts Enabled | Select to enable the use of Purchasing service contracts in Services Procurement to validate supplier bid amounts against existing contracts for the specified service. Note: This option is available only if Purchasing is installed and PO WO Integration is enabled. |
Use Region Tree Structure | Select to use a graphical tree structure to associate locations and suppliers to regions. |
Schedule Sourcing Emails | Select to schedule sourcing emails in a batch process. |
Use HCM Terminology? | Select to use HCM terminology throughout Services Procurement. When you select this option, the terms of Service and Service Type are changed to Job Code and Job Family on all labels. |
Recruiting Solutions Integration Enabled |
Select to enable the integration with Recruiting Solutions. When you select this option, all requisitions created in the Recruiting Solutions product can be passed over to Services Procurement for fulfillment. |
HCM Person Integration Enabled |
Select to use the HCM database as the system of record for contingent labor associated to Services Procurement work orders. |
Enable Approval Chunking | Select to enable chunking of Approvals in the sPro Invoice Save Confirmation and View Invoice Approver(s) pages of the Manage Invoices component. If this check box is selected and you set a value in the Invoice Approval Monitor field, then the sPro Invoice Save Confirmation and View Invoice Approver(s) pages display invoice lines in chunks. For example: With this check box selected, if you set a value “3” in the Invoice Approval Monitor field, then the sPro Invoice Save Confirmation and View Invoice Approver(s) pages display invoice lines in chunks of 3. |
Use Service Provider Acceptability Status Reason Code | Enter the reason code that identifies an unacceptable service provider. This code tracks service providers that have been identified as not eligible for new assignments. The system tracks and monitors unacceptable service providers and issues warnings that these service providers should not be selected to fill new work orders. |
Last Expense Report ID Used | Displays a starting number for the expense sheet ID assignment. Click the Sync button to synchronize the displayed number with the current next number in the system. |
Resource ID Last Used | Unique identifier for time sheet, progress log, or expense sheet amounts passed through the integration. Note: This option is only available when is installed. |
Max Search Result to Retrieve (maximum search results to retrieve) | Enter the maximum number of values that the system retrieves on roster page searches. This field applies to projects or activities search pages only. Invoice Approval Monitor field: Enter a value to control the display of invoices lines for approval on the sPro Invoice Save Confirmation and View Invoice Approver(s) pages. Invoice lines are displayed in chunks to make approvals more manageable. The number of invoice lines that must be displayed on the sPro Invoice Save Confirmation and View Invoice Approver(s) pages is determined by the value entered in theInvoice Approval Monitor field. If the Enable Approval Chunking check box is selected and the Invoice Approval Monitor value is set to, for example 3, then the sPro Invoice Save Confirmation page displays invoice lines in chunks of 3. If the Enable Approval Chunking check box is deselected, the Invoice Approval Monitor field is disabled. |
Base Unit of Measure | Enter the standard UOM. Only UOMs that have conversions defined for this standard UOM appear in UOM prompt fields. For example, if you specify hours, the system includes units such as days in UOM prompts, rather than unrelated units such as pounds. |
Base Units Per Week | Select the number of base units that are included in a typical workweek. |
Warning! If your organization uses PeopleSoft Customer Relationship Management and Services Procurement, the source tables containing the PERSON_ID field are not integrated in this release of Services Procurement. Depending on how you implement the use of PERSON_ID in Services Procurement, the values in one table may override the values in the other table.
Use the Installation Options - Staffing Installation page (INSTALLATION_FO) to define Staffing Front Office and Pay/Bill Management installation options.
Navigation:
.
Note: This page is shared by Staffing Front Office and Pay/Bill Management. Some of the options are common to both applications and some apply only to either Staffing Front Office or Pay/Bill Management.
This example illustrates the fields and controls on the Staffing Installation page (1 of 2). You can find definitions for the fields and controls later on this page.
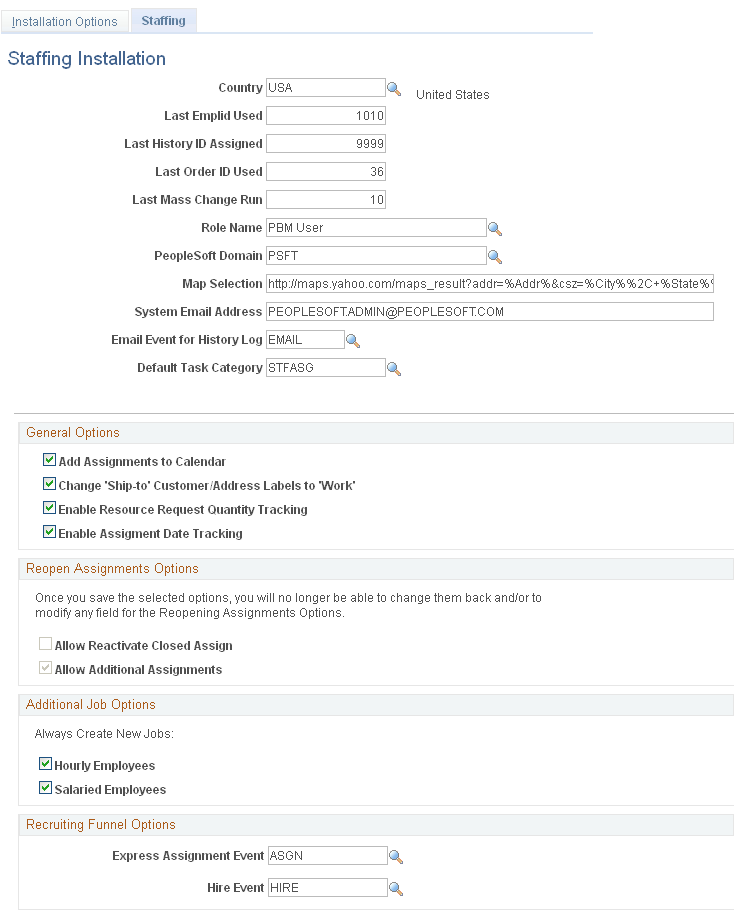
This example illustrates the fields and controls on the Staffing Installation page (2 of 2). You can find definitions for the fields and controls later on this page.

Review the information in the Installation Options table before completing any transactions in the system. The installation options table is global, not driven by SetID. It has only one row of data.
Note: The four organization structure fields are necessary when using Staffing Front Office and when using resource groups to narrow the criteria of PeopleMatch and PeopleSearch. The page shown provides an example of how to populate these fields using a department tree.
Field or Control |
Description |
|---|---|
Country |
Select the default country for Staffing Front Office and Pay/Bill Management. The system uses the entry in this field as a default for formatting addresses on multiple pages throughout these two applications. |
Last Emplid Used(last employee identifier used) | Enter the last employee ID that was given to an employee when hired into Staffing Front Office. This field is only used when Staffing Front Office is installed but Pay/Bill Management is not. If Pay/Bill Management is installed, a similar field from HRMS is used for this purpose. |
Last History ID Assigned | Enter the last history ID number used for creating history items in Staffing Front Office. |
Last Order ID Used | Enter the last order ID used to create orders in Staffing Front Office, Pay/Bill Management, and Resource Management. These three applications share the same order tables and follow the same automatic numbering logic. |
Last Mass Change Run | Enter the last number used for the Mass Assignment Rate Change Request process. |
Role Name |
Select the user role for those who will have manager access to the Review Agenda/History process. |
PeopleSoft Domain | Enter the domain name if you are using 3rd party integrations. This field defines the PSFT domain for mapping processes with 3rd party suppliers. |
Map Selection | Enter the URL string used for mapping addresses. For example: http://maps.mapapplication.com/maps_result?addr=%Addr%&csz=%City %%2C+%State%%2C+%Postal%&country=%Country%&new=1&name=&qty= You must use these values in your string, regardless of what mapping software you use: %Addr%, %City%, %State%, %Postal%, and %Country%. The system uses these variables when launching the map within the Customer component. |
System Email Address | Enter a generic email address to be used when sending system emails. |
Email Event for History Log | Select an event that the system uses when a user logs a history item for sent emails. |
Default Task Category | Select a task category that the system uses when assignments are created in the resource calendar. |
General Options
Field or Control |
Description |
|---|---|
Add Assignments to Calendar | Select this check box to populate the resource calendar whenever an assignment is created. This option is only used when Staffing Front Office is installed. |
Change ‘Ship-to’ Customer/Address Labels to ‘Work’ | Select this check box to enable the system to change the ship to labels to worksite for ship-to addresses and ship-to customers within the Customer Information component. |
Enable Resource Request Quantity Tracking | Select this check box to enable the system to track resource request quantity changes. |
Enable Assignment Date Tracking |
Select this check box to enable the system to track assignment date changes. |
Reopen Assignments Options
Field or Control |
Description |
|---|---|
Allow Reactivate Closed Assign |
Select to enable users with the appropriate permissions to reactivate previously closed assignments. If you select this option, you cannot select the Allow Additional Assignments option. Once you save the page, you cannot change this option. |
Allow Additional Assignments | Select to allow the creation of additional assignments. If you select this option, you cannot select the Allow Reactivate Closed Assign option. Once you save the page, you cannot change this option. |
Additional Job Options
These options apply only when Pay/Bill Management is installed. They enable you to choose to have your system reuse employee job records across different assignments or to always create a new employee job record for each assignment. Even if you decide to reuse job records across assignments, the system still provides the option to power users to force the creation of an additional job for one specific assignment when needed.
When Staffing Front Office is installed but Pay/Bill Management is not, the application will use employee job record number 0 (zero) for all assignments.
Field or Control |
Description |
|---|---|
Hourly Employees | Select this check box to have the system automatically create an additional job for every new assignment for hourly employees. The system attempts to reuse job records unless you select this check box. |
Salaried Employees | Select this check box to have the system automatically create an additional job for every new assignment for salaried employees. The system attempts to reuse job records unless you select this check box. |
Recruiting Funnel Options
Setting up these options allows you to integrate the onboarding process with the assignment and hire process. From the Recruiting Funnel, Candidate Summary page, the system can automatically bring up the Assignment Header or the Applicant – Contact Information page by adding an event type.
Field or Control |
Description |
|---|---|
Express Assignment Event | Enter an assignment event type. This event type provides additional functionality from the Candidate Summary page in the Recruiting Funnel. When you click the assignment event on this page, the system brings up the Assignment Header page. |
Hire Event |
Enter a hire event type. This event type provides additional functionality from the Candidate Summary page in the Recruiting Funnel. When you click the hire event on this page, the system brings up the Applicant – Contact Information page. From here, you can hire the applicant as an employee or a non-employee. |
Organization Structure
These options apply only when Staffing Front Office is installed. They capture information about the tree used to define resource groups. Resource groups can be used to narrow the search criteria in PeopleMatch and PeopleSearch. You can use a tree by candidate department ID or location code to define resource groups.
Field or Control |
Description |
|---|---|
Organization Unit Field | Enter the name of the field that will be used to join with the Organization Unit Tree. |
Organization Unit Record | Enter the table that contains the valid values and descriptions for the organization unit field you entered in the Organization Unit Field field. |
Organization Unit Tree | Enter the name of the tree to use to define your resource groups. |
Employee - Organization Record |
Enter the record that tracks the organizational unit to which the resource belongs through the specified Organization Unit Field. |
Apply Online
These options appear only when Staffing Front Office is installed. The functionality is not available when only Pay/Bill Management is installed.
Field or Control |
Description |
|---|---|
Department SetID | Enter the default department SetID that is to be automatically associated with the candidates who use the Apply Online component. All applicants in the system must have a department. However, this information is not captured in the component used by candidates who use the Apply Online functionality. |
Employee Self Service Deptid(employee self service department identifier) | Enter the default department ID that is to be automatically associated with the candidates who use the Apply Online component. All applicants in the system must have a department. However, this is not an available field for candidates using the Apply Online functionality. |
Default Attachment Type | Select the default attachment type that the system automatically associates with the resumes attached through the Apply Online component. |
Candidate Registration | Select an option that determines whether candidates are required to register. Options include: Optional Registration: Candidates are not required to register but are able to if they want to. Registration Not Required: Candidates are not required to login to the system prior to applying. Registration Required: Candidates must register prior to accessing the Apply Online component. |
After Update Status | Select an option that the system uses to determine the applicant status after the candidates update their records. Options include: Applicant Active and Applicant Pending. |
3rd Party Integrations
Field or Control |
Description |
|---|---|
Resume Parsing Provider | Select to indicate that your organization used a resume parsing provider. |
Supplier ID | Select the resume parsing provider. Suppliers must be setup through the Open Integration Framework before they can be selected here. See PeopleSoft Staffing Front Officeproduct documentation. "Structuring PeopleSoft Staffing Front Office Processing Environment," Understanding Resume Parsing. |
Language Code | Select the language of the resumes being loaded. |
Job Board Distributor Provider | Select this check box to indicate that you are using a job board distribution provider. |
Default Job Board Distributor | Select job board distributor. Distributors must be setup through the Open Integration Framework before they can be selected here. |
Apply Online URL | Enter a valid URL for the Job Board Distributor. |
Use the PeopleTools Options page (PSOPTIONS) to enable multiple jobs.
Doing so will enable the employee record number to appear on the Employees search page and on the Job Data page.
Navigation:
In the General Options group box, select the Multiple Jobs Allowed check box and save the page.
Use the Installation Options - Sourcing Installation Options page (INSTALLATION_AUC) to use to set up award details bid display options and multichannel framework sourcing defaults.
Navigation:
This example illustrates the fields and controls on the Installation Options - Sourcing Installation Options page .You can find definitions for the fields and controls later on this page.

This example illustrates the fields and controls on the Installation Options - Sourcing Installation Options page .You can find definitions for the fields and controls later on this page.
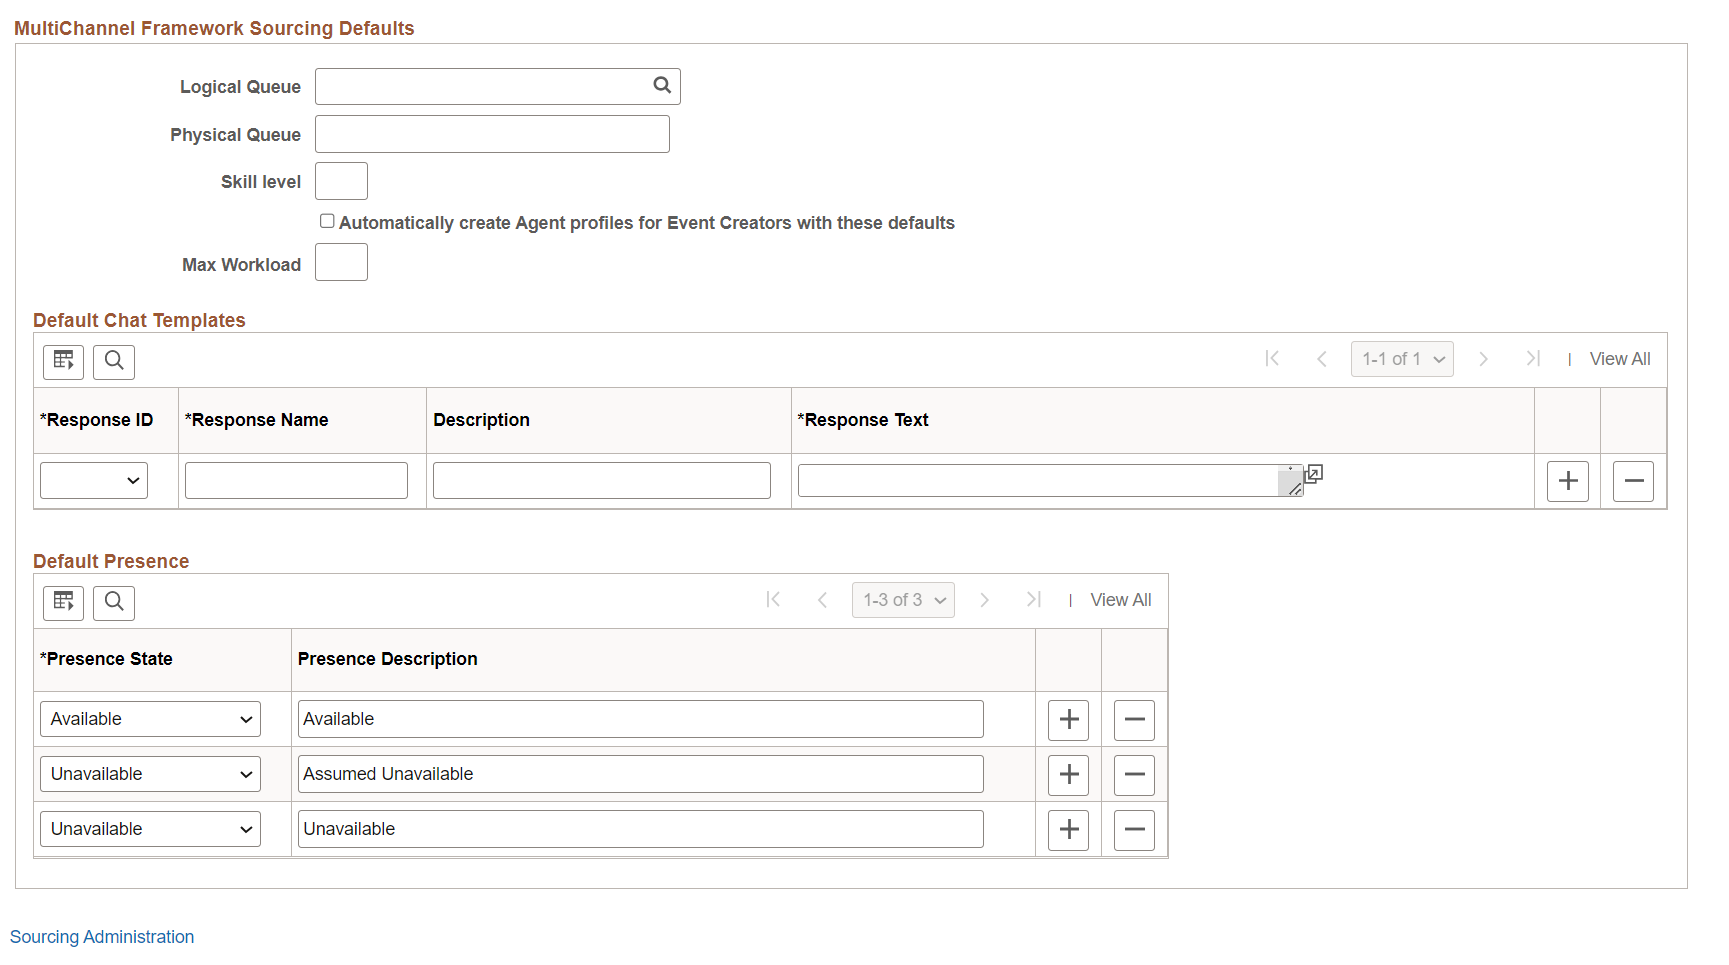
Event Create and Award Options
Field or Control |
Description |
|---|---|
Show award details to bidders | Select to enable displaying award details to bidders. You can choose to:
You can override the values set here on the Award Details page for each sourcing event. |
Field or Control |
Description |
|---|---|
Allow Integration of Events | Select to allow posting of events to third-party sites. When selected, you will be able to configure third party integration of events for a Sourcing Business Unit. |
RFx Document Options
Field or Control |
Description |
|---|---|
Sourcing Event | Select to enable the use of Supplier Contracts to create an RFx document. |
Allow Bidder RFx Edits | Select if the bidder is allowed to edit the RFx document. |
Multi Supplier Access To Bidding Opportunities
Field or Control |
Description |
|---|---|
Allow Supplier User to Access Multiple Suppliers and Bidders | Select the check box to allow a supplier or a representative to access multiple supplier or bidder events based on the Define Supplier User Configuration. Note: You cannot restore to the previous setting once the Allow Supplier User to Access Multiple Suppliers and Bidders check box is selected. |
Bidding Opportunities
|
Field or Control |
Description |
|---|---|
|
Enable Fluid Bidder Response |
Select the respective checkbox to enable the Fluid Bidder Response for the following bidding event types:
Note: By default, Fluid Bidder Response is not enabled for any of the event types. See the Bidder Response. |
MultiChannel Framework Sourcing Defaults
Field or Control |
Description |
|---|---|
Automatically create Agent profiles for Event Creators with these defaults | Entering information here enables event creator to chat with bidders using the MultiChannel Framework chat capabilities. If selected, the system automatically creates users as MCF agents upon posting their first sourcing event. Bidders can then request to chat with the event creator from the bid response pages. Note: Any defaults set here can be overridden for a selected agent on the MCF Agent setup page (MCF_AGENT_PG) in PeopleTools. |
Logical Queue | Complete the MultiChannel Framework default only if you have selected the Automatically create Agent profiles for Event Creators with these defaults check box. A logical queue is an application-level queue that receives work requests (tasks) relating to an application area, such as chat requests regarding sales information, and routes them to agents capable of handling the work. For example, you might configure a logical queue called SOURCING for bidder issues. |
Physical Queue | The system randomly selects this queue so that the tasks in a logical queue are distributed by the framework among all available physical queues for scalability. For example, the SOURCING queue could be serviced by two MCF clusters across two physical queues: SOURCING1 and SOURCING2. |
Skill Level | Specify the minimum agent skill required to handle this task. The queue server assigns this task type to an available agent with the lowest skill level on that queue greater than or equal to the skill level required by the task. The minimum value is 0, and there is no maximum value. The value specified here can be overridden in the EnQueue() or InitChat() built-in function call. |
Maximum Workload | Select the maximum load that this agent can be assigned before tasks are held or assigned to other agents. This is a required field. The cost of each accepted task is added to the agent's current workload. A task is not assigned to an agent if its cost pushes the agent's current workload over the maximum. |
Response ID | Use to create default chat templates for each agent's profile. Chat templates are used to send responses to bidders. Values include: Abandon, Accept, Deny, End, Forward, and Other. For each response ID, you can add a response name, response description, and response text. |
Presence State | Use to define one or more default presence states for each agent's profile. Options include: Available and Unavailable. Add a presence description that appears when checking to see if an agent is available. |
See the product documentation for PeopleTools: PeopleSoft MultiChannel Framework.
Use the Installation Options - Supplier Contract Management page (INSTALLATION_CS) to set up Supplier Contract Management installation options.
Navigation:
This example illustrates the fields and controls on the Installation Options - Supplier Contract Management page (1 of 2). You can find definitions for the fields and controls later on this page.
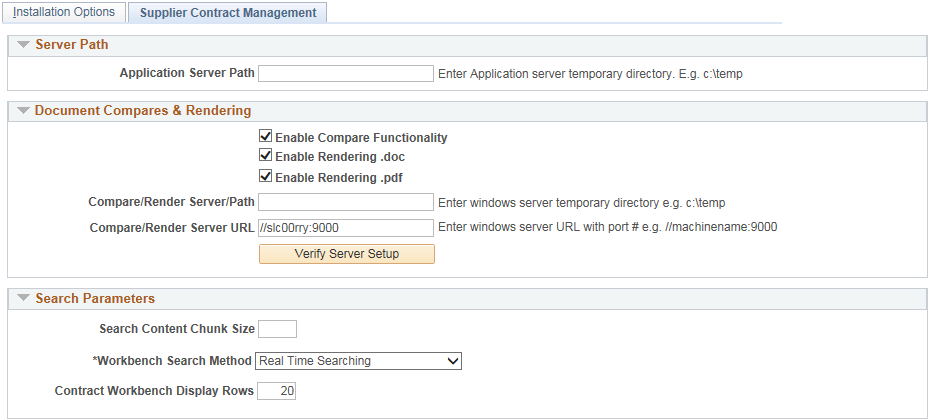
This example illustrates the fields and controls on the Installation Options - Supplier Contract Management page (2 of 3). You can find definitions for the fields and controls later on this page.

This example illustrates the fields and controls on the Installation Options - Supplier Contract Management page (3 of 3). You can find definitions for the fields and controls later on this page.
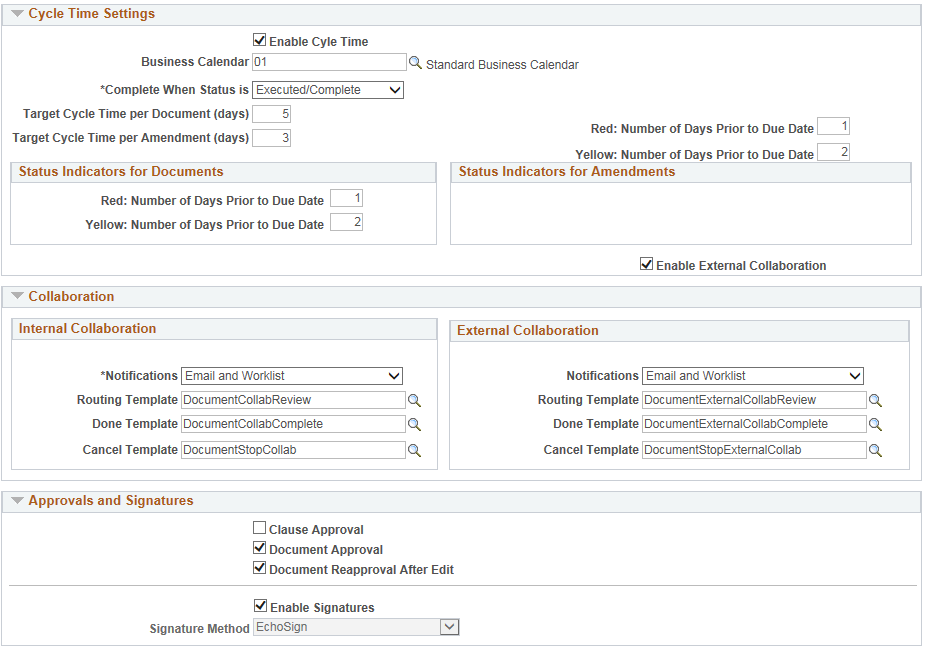
Use this page to define servers, server paths, compare and render options, searching, syndication options, and required approvals.
Server Path
Use this group box to define default server locations for use in the file creation processes within PeopleSoft Supplier Contract Management.
Field or Control |
Description |
|---|---|
Application Server Path |
Enter a directory that is on the server where the system creates temporary server-side files. For example, when the system generates authored documents, it uses this temporary document on the application server to create the file prior to transferring it to the file attachment server. You might want to select a directory such as c:\temp, which exists on Windows application servers. Note: The temporary directory should be operating-system specific if a single operating system is being used in the implementation for all application servers. If multiple operating-system application servers are in the implementation, for example, Unix and Windows, you should leave this field blank. |
Document Compares and Rendering
Use this section to enable server-side Microsoft Word processing. This includes comparisons of the current authored document with a temporarily created version of a refreshed or re-created document. After you enable server-side processing, the system makes a Compare button available on the Document Management page.
Optionally, you can also create a Microsoft Word .doc or Adobe .pdf version of the XML-generated documents to send to suppliers who may be using a version of Microsoft Word that is prior to the Microsoft Word version that is on your system. After you enable rendering, the system displays the correct rendering options on the Send to Contacts and Dispatch to Contacts pages. You can test the URL and gateway settings to verify that they are correct and running.
For additional information about document comparisons and rendering, see Setting Up Document Comparison and Rendering.
Field or Control |
Description |
|---|---|
Enable Compare Functionality |
Select to permit the document administrator to run a server-side comparison of the current authored document against a recreated version or refreshed version of the document. The comparison displays the differences and is for information purposes only. The compare functionality also enables the system to compare a main amended contract with the last executed version. |
Enable Rendering .doc |
Select to permit the generation of a .doc format document when dispatching a document or sending it to contacts. You select this check box in case a supplier does not use the same version of Microsoft Word that your organizations uses and cannot read an .xml version of the file. |
Enable Rendering .pdf |
Select to permit the generation of an Adobe .pdf format document when dispatching a document or sending it to contacts. |
Compare/Render Server/Path |
Enter a directory path name for the Windows application server that serves as a temporary location for document processing for server-side comparisons and document rendering of .xml documents. An example of a temporary location might be c:\temp. Note: If a single operating system is being used in the implementation for all applications servers, then the temporary directory should be operating-system specific. If multiple operating-system application servers are in the implementation (for example, Unix and Windows), then leave the Application Server Path field blank on the Installation Options page. |
Compare/Render Server URL (compare/render server uniform resource locator) |
Enter the machine name of the Windows application server and port that have been set up with Microsoft Word and the CSDOCUTIL.DLL file. The Compare/Render Server URL field does not require a web server. This communication is within PeopleTools and messaging is at the application-server level. The request from the application is sent to the application server specified by the URL. The machine and port are passed as parameters using an internal synchronous message that is interpreted by PeopleTools and ensures that the request is run on the Windows machine where Microsoft Word or Adobe Acrobat is installed so that the comparison or rendering to .doc or .pdf can take place. The port is the Jolt Server Listener port and should be the same port that was set up with the PeopleSoft application server on the Windows machine. |
Verify Server Path |
Click to test the render feature. When you test rendering in DOC or PDF, the system verifies that the application server that you entered in the Compare/Render Server URL field and the gateway are set up correctly and running. The system tests for document rendering setup for Microsoft Word and Adobe PDF formats if those check boxes are selected. The testing assists with establishing the compare and render features for the Document Management component, such as document comparisons, dispatch formats, and digital signatures. During the testing, the system provides information messages related to the server connection. For example, if the Compare/Render Sever URL field is blank, a message appears indicating that data was not found in the field. When the test is complete and successful, the system displays this message if rendering check boxes in the Document Compares and Rendering section are selected: "Connect to application server (SERVER NAME): SUCCESSFUL, Test to render document in .doc format: PASSED, Test to render document in PDF: PASSED." The button name is then updated to Setup is Successful, which you can use to test the connection at anytime. Note: Upon successful testing of each of the features, the system saves the data that you entered. Other conditions for test results include:
|
Setup is Successful |
Click to test the compare and render features again. This button appears after an initial test has been successful. You can use the button to retest the features, for example if you click the Enable Rendering .doc, the system will verify that the rendering setup is correct and running. |
Search Parameters
Use this section to specify search options when using PeopleSoft Search Technology to perform content searches on elements in the library. For example, you can search clauses and sections, the latest versions contract document content, and transactional-related contract data for purchasing contracts.
Field or Control |
Description |
|---|---|
Search Content Chunk Size |
Enter the number of returned rows that you want to retrieve and display when you perform a search. If you do not enter a value, the system retrieves 20 rows at a time. Note: This applies to the Search Content function in Supplier Contracts. |
Workbench Search Method |
You can do either real-time or keyword searches based on the settings on the Installation page. Select Real Time Searching to employ the SQL based where-used search method on the Supplier Contract Workbench. Select Search Engine to employ the PeopleSoft Search Framework search method on the Supplier Contract Workbench. |
Contract Workbench Display Rows |
Enter a numerical value that tells the system how many rows to display when viewing results in the Supplier Contract Workbench. Warning! Use caution when entering this value. A number that is too high may impact system performance. |
Processing Options
Use this group box to determine system processing options for purchasing contract syndication and document preferences on various features. Syndication is the exchange of contract information between PeopleSoft contracts and third-party systems. Using syndication, the system publishes contract information from PeopleSoft Purchasing contracts to third-party systems. This enables the third-party system to create the contract. Using syndication, the system can also receive and consolidate contract performance information from third-party systems.
The syndicate options control additional information that the system might publish with the contract. Depending on the capabilities of the remote system and the consistency of setup data between the two systems, you may not want to syndicate this optional information.
The default value for all check boxes in this group box is deselected. See Understanding Contract Syndication.
Field or Control |
Description |
|---|---|
Allow Contract Syndication |
Select to indicate that you want to include syndication as part of the contract process. When you select this check box, the system shows the Syndication tab on the Contract Entry - Contract Page. If you use contract syndication and the Allow Contract Syndication check box is deselected later, the syndication features appear only for contracts that have already been syndicated. For contracts that have not been syndicated, the system hides the syndication features. |
Syndicate Contract Defaults |
Select to include purchase order defaults as part of the syndicated contracts. The defaults include header and shipping information. To view these defaults, click the PO Defaults link on the Contract Entry - Contract Page. |
Syndicate Miscellaneous Charge |
Select to include miscellaneous charges in the syndicated contract. You can add miscellaneous charges to purchase orders in addition to sales taxes, use taxes, and value-added taxes. Miscellaneous charges can include freight, setup costs, insurance, and a variety of other costs that are incurred to deliver purchased goods to a location. |
Syndicate Milestones |
Select to include milestone information in syndicated contracts. Milestones are points in a contract cycle, such as a specified period of time or a percentage of contract fulfillment, at which an approval or reevaluation is made by contract participants. Often, partial compensation is linked to a milestone. PeopleSoft Supplier Contract Management verifies the release of milestone lines for merchandise amount changes. |
Syndicate Shipping Schedules |
Select to include syndicated shipping schedules in syndicated contracts . The system verifies that the line quantity on the shipping template is greater than the minimum line quantity. |
Syndicate Distributions |
Select to include syndicated distributions in syndicated contracts. During syndication, the system processes distribution percentages and amounts, and verifies that the distribution amount does not exceed the contract line amount. |
Subscriber Node |
Select a default node to which contracts can be syndicated. The system cannot syndicate a contract until you define a subscriber node. This subscriber node is supplied as a default value on the supplier contract if Allow Contract Syndication has been selected. If a node is not defined at the header level, the system generates a message during processing. If you run syndication as a batch process, only those contracts that have nodes defined can be selected for processing. |
Protect Bind Values in Document |
Select to protect bind values in a document. When you protect bind values and the system generates authored documents, Microsoft Word places a protection tag around each transactional or wizard bind value in the document. This can be useful if you do not want bind values to be readily changed within an authored document, but you do want them to be primarily controlled by wizard or transactional changes within the PeopleSoft system. When Microsoft Word protection is in place, bind values cannot be easily changed. Controls for overriding protection exist within Microsoft Word. For more information about protecting documents, see Microsoft Word - Help. |
Use Track Changes in Word |
Select to make Track Changes the default option when the system generates documents. If you do not select this check box, users can manually set the Track Changes feature in Microsoft Word. |
Enforce clause protection during check in |
Select to indicate that the system should protect clauses. This places Microsoft Word protection tags around a specific clause to help prevent users from making any changes to the clause. When you select the check box, the system prevents a document from being checked in if any of its protected clauses have been changed by users within Microsoft Word. If you do not select this check box, the system displays a warning about a protected clause that has been modified; however, it allows the document to be checked in. |
Update Version and Amendment Binds |
Select to indicate that the system should automatically update version and amendment bind values, if they exist, within an authored contract document. The update is performed as part of checking in, re-creating, or refreshing a document or when creating amendments. If you do not select this check box, the system does not automatically update any version or amendment bind values within an authored contract document. |
Use Document Type |
Select to indicate that you want to categorize document types for contract documents. Document types enable you to categorize documents and enables additional functionality within the system. When you select this check box, all new documents that are created in the system will require a document type value to be specified. Using document types, you can define specific settings, defaults, and security that provide better control over the flow of document creation and document life cycles. When you select this check box, the system also makes the Use with PO Requisition check box available. |
Use with PO Requisition (use with purchase order requisition) |
Select this check box if you intend to create documents related to requisitions that require new contracts. In this scenario, you can define a related document and wizard that capture additional information from the requestor. This information can be pulled into the actual purchasing contract document when it is created. Selecting this check box enables you to set up document types that allow this association to requisitions. When a document type is set up for the contract request situation, you can specify that the system use this type with a PeopleSoft eProcurement or Purchasing requisition. In this case, along with the requisition, the requestor can generate a supplemental request document by launching a wizard that captures the information that pertains to the contract request. The requestor then provides the required information in the supporting document. When the requisition is awarded to a contract, the specialist can reference the original request document and make use of any wizard responses within that request document to help drive the content and fill in required data for the actual contract. When this option is selected, the system displays the Add Request Document link on Maintain Requisitions page in Purchasing and on the Create Requisition page in eProcurement . The default value for the check box is deselected. You must select the Use Document Type check box before you can select this option because the Use with PO Requisition feature is enabled on the Document Type Page. If you clear the field, the system validates that no document types are currently enabled for use with purchase order requisitions. If document types are enabled, an error message appears when you attempt to save the update. |
Log at Document Generation |
Select the default method by which you want the system to log errors when it generates a document. The system provides the value as a default value to document configurators when you first create them. Two levels of logging are available. Select Details to indicate that the system should log full error details during the document generation process. Full logging can slow the generation process, but is useful for debugging and testing wizard paths when you create new configurators. Full logging also validates bind variables that the system uses within a configurator and validates the expansion of a configurator by checking rules that are evaluated during document generation. Select Log Warnings and Wizard to log only warnings, such as missing bind values and the summary wizard history for a given document generation. You should use this setting after a configurator is made available for general use. |
Override Attachment Server ID |
Select an attachment server ID. You use this field to override the installed server so that you can define an attachment server specifically for PeopleSoft Supplier Contract Management-related documents and attachments. When you select another server, the system displays a warning message about overriding the installed server. Warning! Overriding an attachment server should be an exception and only performed when absolutely necessary. Overriding the server also affects the use of searching in PeopleSoft Supplier Contract Management. If you choose to use a database server for Supplier Contract Management the Attachment Server Override values must be left blank. See Setting Up Document Comparison and Rendering and Overriding SFTP Attachment Servers. |
Document Retention Option |
Select a document retention option to indicate how you want the system to retain executed documents. Values are:
|
External History Settings |
Select an option that determines the view access for external users of the Supplier Portal. Values are:
|
Notify When Available Template |
Select a notification template that is used with the Notify Me button on the Document Management Page. The Notify Me button is used to indicate that the system should notify you when a document is checked back into the PeopleSoft system. When the document is checked in, the system notifies any users who have asked to be notified for the document. |
Enabled Transactional Sources
Use this section to define whether PeopleSoft Supplier Contract Management users can author contracts using purchasing contracts or the purchase orders in the PeopleSoft Purchasing application.
When you select a check box, the system includes that selection in the list of values for source transactions, such as when you add a document or a document type. You can also perform Search Framework searches based on the transactional source that you select. You do not need to enable the ad hoc source because it is always available.
Field or Control |
Description |
|---|---|
Purchasing Contract |
Select to enable document creation from a transactional purchasing contract using the Contract Entry feature in PeopleSoft Purchasing. The default value for the check box is selected. See Transactional Purchasing Contracts. |
Purchase Orders |
Select to enable document creation or association with transactional purchase orders in PeopleSoft Purchasing. The default value for the check box is deselected. See Transactional Purchase Orders. |
Sourcing Event |
Select to enable document creation or association with transactional sourcing events in PeopleSoft Strategic Sourcing. The default value for the check box is deselected. |
Cycle Time Settings
Use this section to define cycle-time settings for completing contract documents and amendments. For example, you can ensure that contract requirements are achieved in a timely manner by establishing a time frame for completing documents. The settings that you define on this page apply to this installation of PeopleSoft Supplier Contract Management; however, you can override these settings for specific document types using the Document Type feature.
You can also set the number of days before the target cycle time that you want the system to display indicators. Use the Red: Number of Days Prior to Due Date and Yellow: Number of Days Prior to Due Date fields to set the indicators for documents and amendments.
After defining cycle settings, you use the Find Existing Documents page to search for and access documents. Using the results from document searches, you can view which documents and amendments are overdue or pending for collaboration and for approvals. You can also search for documents based on their cycle-time settings using the workbench.
Field or Control |
Description |
|---|---|
Enable Cycle Time |
Select to indicate that cycle times should be enabled for this installation of PeopleSoft Supplier Contract Management. After you select the check box, the system makes the related fields available. |
Business Calendar |
Select the business calendar that you want to use for document and amendment cycle times. You use business calendars to determine the days, such as holidays or weekends, that should be removed from any cycle-time calculations. You can also create a calendar specifically for use with documents. To define a business calendar, select |
Complete when Status is |
Select the status at which you want to stop tracking a document's cycle time. For example, you might want to track document cycles during more critical stages when numerous reviewers or approvers are involved in the cycle and not track it for its entire review cycle. Or, the organization might want to track a critical contract document until it has been signed and executed. You can end document and amendment cycle tracking at these statuses:
|
Target Cycle Time per Document (days) |
Enter the target number of business days that a contract document should take to complete. This cycle begins when you create the document and ends when the document goes into the status that you select in the Complete when Status is field. The system calculates the cycle time using the business calendar so that only official business days are counted based on the calendar. |
Target Cycle Time per Amendment (days) |
Enter the target number of days that a contract amendment should take to complete. |
Red: Number of Days Prior to from Due Date |
Enter the number of days prior to the due date that you want to flag the document with a red flag indicator. When a document falls within the number of days that you enter, the system inserts a red flag indicator on the search results for the Find an Existing Document page. For example if you enter 2 for a document with a due date of March 10, depending on the business calendar, the system inserts the flag on March 8. You use this field to define a more urgent warning, so the number of days that you enter should be fewer than the days that you enter for the yellow flag indicator. You can define the value for documents and amendments. |
Yellow: Number of Days Prior to Due Date |
Enter the number of days prior to the due date that you want to insert a yellow flag indicator in the document workbench. You can define the value for documents and amendments. |
Internal Collaboration
Use this section to define internal and external collaboration settings. Internal and external collaboration are similar; however, with external collaboration, you must set up external users so that they can access documents.
Field or Control |
Description |
|---|---|
Notifications |
Select the method that the system should use to notify internal collaborators that a document has been routed to them for collaboration. Values are:
|
Routing Template |
Select the generic template that the system should use in routing documents for internal collaboration. This template controls the format of information for email notifications when the system routes a document for collaboration. The DocumentCollabReview system-supplied value appears as the default value for the template. See Defining Generic Templates, "Using Notification Templates," PeopleTools: Workflow Technology |
Done Template |
Select the template that the system should use when internal collaboration has been completed for a document. The template controls the information that appears in the email to the administrator when the collaboration cycle is complete. The DocumentCollabComplete system-supplied value appears as the default value for the Done template. |
Cancel Template |
Select the template that the system should use to alert any pending collaborators when internal collaboration has been canceled for a document. The DocumentStopCollab system-supplied value appears as the default value for the Cancel template. |
External Collaboration
Field or Control |
Description |
|---|---|
External Collaboration |
Select to enable external collaboration with suppliers who have access to PeopleSoft Supplier Contract Management documents through the Supplier Portal. To perform external collaboration, Oracle recommends that supplier users use the same Microsoft Word version that your organization uses. This ensures that suppliers can make changes and check in the document as an .xml document. If suppliers do not use the same Microsoft Word version, they can check in a .doc version of the document, but the contract administrator will have to manually reconcile any changes. Note: You must enable external collaboration using this check box before you can enable them for a document type on the Document Type page. See Document Collaboration for External Users in the Understanding Document Collaboration topic. |
Notifications |
Select the method that the system should use to notify external collaborators when they are listed as collaborators in the document collaboration process. Values are:
|
Routing Template |
Select the generic template that the system should use in routing documents for external collaboration. This template controls the format of information for email notifications when the system routes a document for external collaboration. The DocumentExternalCollabReview system-supplied value appears as the default value for the template. See Defining Generic Templates, "Using Notification Templates," PeopleTools: Workflow Technology. |
Done Template |
Select the template that the system should use when external collaboration has been completed for a document. The template controls the information that appears in the email to the administrator when collaboration is complete. The DocumentExternalCollabComplete system-supplied value appears as the default value for the Done template. |
Cancel Template |
Select the template that the system should use to alert the external collaborator when an external collaboration cycle has been canceled for a document. The DocumentStopExternalCollab system-supplied value appears as the default value for the Cancel template. |
Approvals and Signatures
Use this section to indicate whether workflow approvals are required for clauses and documents, and whether internal and external users can electronically sign a document.
Field or Control |
Description |
|---|---|
Clause Approval |
Select to indicate that approvals are required for clauses. When you select this check box, the system enables workflow approvals for clauses. If you do not select this check box, the person maintaining the clause can set the clause status to approved. See Understanding PeopleSoft Supplier Contract Management Workflow, and Understanding Document Approvals. |
Document Approval |
Select to indicate that approvals are required for documents. If you select this check box, the system requires the document administrator to submit documents for approval. If you do not select this check box, the document administrator can click the Approve button to approve the document and to dispatch it to the supplier for a final signature. See Understanding Document Approvals. |
Document Reapproval After Edit |
Select to indicate that a document must be reapproved if the document is edited after it was initially approved. Depending on internal controls for documents in your organization, this may or may not be required. |
For additional information about Digital Signatures, see Understanding Digital Signatures
Field or Control |
Description |
|---|---|
Enable Internal Signatures |
Select to allow internal users to digitally sign a document using Adobe or Microsoft Word signatures. When this check box is selected: .
Typically, an electronic version of a contract can replace a paper-based version. When you enable internal signatures, the Prepare Document for Signing button appears on the Document Management Page. This button enables you to convert a document to a .pdf file, stage it to be signed, and indicate that it is available to be signed. This causes additional buttons to appear on the Document Management page that enable you to convert the document. Note: Because digital signature methods are determined at the installation level, you must enable internal signatures using this check box before you can enable them for a document type on the Document Type Page. |
Signature Method |
Select a method for signing a contract document or for rendering contract documents in PDF. Signature methods include:
Note: You cannot change signature methods while there are documents pending signature. |
Sign Template |
Select a template that you want internal signers to use when a document is routed to them for electronic signatures. The system-supplied value for the Sign template, DocumentSign, appears as the default value for the field. Note: All templates are for Adobe and Word digital signature methods. |
Decline Signing Template |
Select a template that you want internal users to use when they decline to sign a document. The system-supplied value for the Decline Signing template, DocumentRejectSigning, appears as the default value for the field. |
Complete Template |
Select a template that you want internal signatures to use when the routing process is complete. The system-supplied value for the Complete template, DocumentSignComplete, appears as the default value for the field. |
Cancel Template |
Select a template that you want to use to alert pending signers when the routing for internal signatures process is canceled. The system-supplied default value for the Cancel template, DocumentSignCancel, appears as the default value for the field. |
Enable External Signatures |
Select to enable external users to sign documents using digital signatures. When you select this check box, the system makes the external signature templates available. These are generic templates that you can use to define the content of emails for certain actions between document approvers. Note: Because digital signature methods are defined at the installation level, you must enable external signatures using this check box before you can enable them for a document type on the Document Type Page . |
Signed Template |
Select a template that you want to use when an external user has electronically signed a document. The system-supplied value for the Signed template, DocumentSupplierSigned, appears as the default value for the field. |
Cancel Template |
Select a template that you want to use to alert external users when the external signature process is canceled. The system-supplied value for the Cancel template, DocumentStopExternalSignatures, appears as the default value for the field. |
Decline Signing Template |
Select a template that you want to use to alert the contract administrator when an external user declines to sign a document. The system-supplied value for the Decline Signing template, DocumentExternalRejectSigning, appears as the default value for the field. |
Use the Installation Options - Treasury page (INSTALLATION_TR) to define integration options for accounting, JD Edwards General Ledger, and PeopleSoft Financial Gateway functionality.
Navigation:
This example illustrates the fields and controls on the Installation Options - Treasury page. You can find definitions for the fields and controls later on this page.
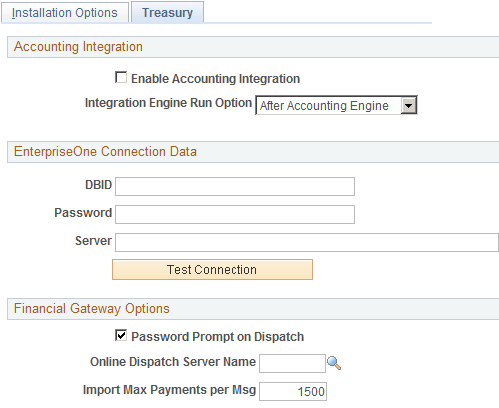
Field or Control |
Description |
|---|---|
Enable Accounting Integration | Select to enable integration of PeopleSoft Treasury applications with JD Edwards (EnterpriseOne) General Accounting. |
Integration Engine Run Option |
Select when the Integration Engine process (TR_JRNL_INT) should run. Values are:
|
EnterpriseOne Connection Data
The fields in the EnterpriseOne Connection Data group box are required only for importing data from Oracle's JD Edwards (EnterpriseOne) General Accounting tables for the purpose of generating a cash position worksheet in Enterprise Cash Management.
Field or Control |
Description |
|---|---|
DBID (database identifier) | Enter the (EnterpriseOne) JD Edwards database from which the data is imported. |
Password |
Enter the password required for logging in the (EnterpriseOne) JD Edwards database specified in the DBID field. |
Server | Enter the (EnterpriseOne) JD Edwards Integration Server. |
See JD Edwards EnterpriseOne Application Integrations with PeopleSoft Enterprise Applications.
Financial Gateway Options
Field or Control |
Description |
|---|---|
Password Prompt on Dispatch | Select this check box to enable a security measure that requires the user to reenter the password when dispatching payments from the Dispatch Payments page. |
Online Dispatch Server Name | Enter the name of the server to run the Dispatch Payment Application Engine process (PMT_DISPATCH). Once entered, Process Scheduler only runs the Dispatch Payment Application Engine process on the selected server, rather than the next available server. This option is available to accommodate the transmission of security-sensitive payment files. |
Import Max Payments per Message |
Enter the number of payments allowed in a PAYMENT_REQUEST application message passed from source systems, such as Payables, to Financial Gateway. Increasing the number of payments per message requires fewer messages to be sent, but it requires more memory to process—a system limitation that can affect performance. The default value is 1,500 payments per message. |