Using the Technician Workbench to Complete Work Order Tasks
To complete work order tasks, use the Technician Workbench (WM_WOE_WB1) component.
This section discusses how to use the Technician Workbench, enter punch time for a work order task, enter elapsed time for a work order task, enter personal (non-work order) time, enter actual labor hours for a work order task, mass change actual hours for multiple work orders, enter materials, enter tool usage, enter meter readings, review procedures, enter causal parts, report crew assignment time, and print work order tasks detail reports.
|
Page Name |
Definition Name |
Usage |
|---|---|---|
|
WM_WOE_WB |
Select, search, update, and print work order tasks. |
|
|
WM_TSK_SRCH_SEC |
Perform ad-hoc views (searches), and save and delete views. |
|
|
Change Status |
WM_WOE_STATUS |
Perform a mass status change. |
|
WM_RPT_OPTNS |
Select specific options and reports that you want to print. |
|
|
Workbench Mass Change |
WM_WOE_MASS_SEC |
Change the actual dates and times, the PCR codes, or both for multiple work order tasks. |
|
Work Order Details |
WM_WOE_DETAIL |
Review the work order header information, work order task details, and dates for a selected task. |
|
Asset |
WM_WOE_ASSET |
Add or modify the asset's offline status, location, area, and effective date. |
|
Asset Warranties |
ASSET_WARRANTY |
Display the warranties associated with the specified asset. If a warranty does not exist, users with update access to the page can create a warranty for the asset using the Warranty template. |
|
Notes |
WM_TSK_NOTES |
Review or add notes about the task. |
|
Supplemental Data |
WM_WOE_SD |
Review or update supplemental data associated with the task. |
|
Downtime Entry |
WM_WO_DOWNTIME |
View, modify, and add downtime for an asset associated with a work order task. |
|
Checklist |
WM_WOE_CKLST |
Select a check box to indicate that the pre-task or post-task step has completed. |
|
WM_ETIME_ENTRY |
Enter elapsed time entries for this work order task. |
|
|
WM_PTIME_ENTRY |
Enter punch time for the work order task. |
|
|
WM_WOE_MTLS |
Review inventory and floor stock scheduled for the task, issue the selected materials to the work order, generate a pick plan, and directly access the Schedules page of a selected work order task. |
|
|
Work Order Task Tools Usage Entry |
WM_TLS_USAGE |
Enter the dates and times a tool was used and the quantity used for a work order task. |
|
WM_WOE_METER |
Enter meter readings and view a meter trend chart for the asset on which the work order task was performed. |
|
|
Advanced Options |
AM_MTR_ADV_OPTIONS |
Review reading details for the selected asset. |
|
WM_WOE_LIST |
Review the work order checklist, instructions, and attachments associated with a task. |
|
|
WM_WOE_CAUSAL_PART |
Enter one or more parts responsible for causing the failure or the need for the task. |
|
|
WM_CS_RPRTHRS_WB |
Enter carryover hours, completed hours, and the completed date for a crew assigned to a task. |
|
|
WO Issue Search |
IN_WO_ISS_SEARCH |
Enter criteria to search for inventory materials scheduled for work orders associated with a specific inventory and work order business unit. |
|
WO Issue Location |
IN_WO_ISS_LOC |
Issue inventory to a technician from a specific inventory location. |
|
WO Issue Summary |
IN_WO_ISS_SUMMARY |
Review the total quantities of an item requested, allocated, and issued in PeopleSoft Inventory for a work order task. |
|
Downtime Entry |
WM_WO_DOWNTIME |
Enter planned and actual downtime for an asset associated with a task. |
|
ESRI Map |
ESRI_MAP_PG |
Locates the selected task locations on an ESRI map. |
|
Asset Information |
WM_WO_ASSET_SEC |
Review detail information concerning the reason that the asset is considered hazardous. |
|
Work Order Failure Tracking |
WM_WO_FAIL_TRACK |
Add a new failure event describing the failure of the asset associated with a work order task, or review an existing failure event. |
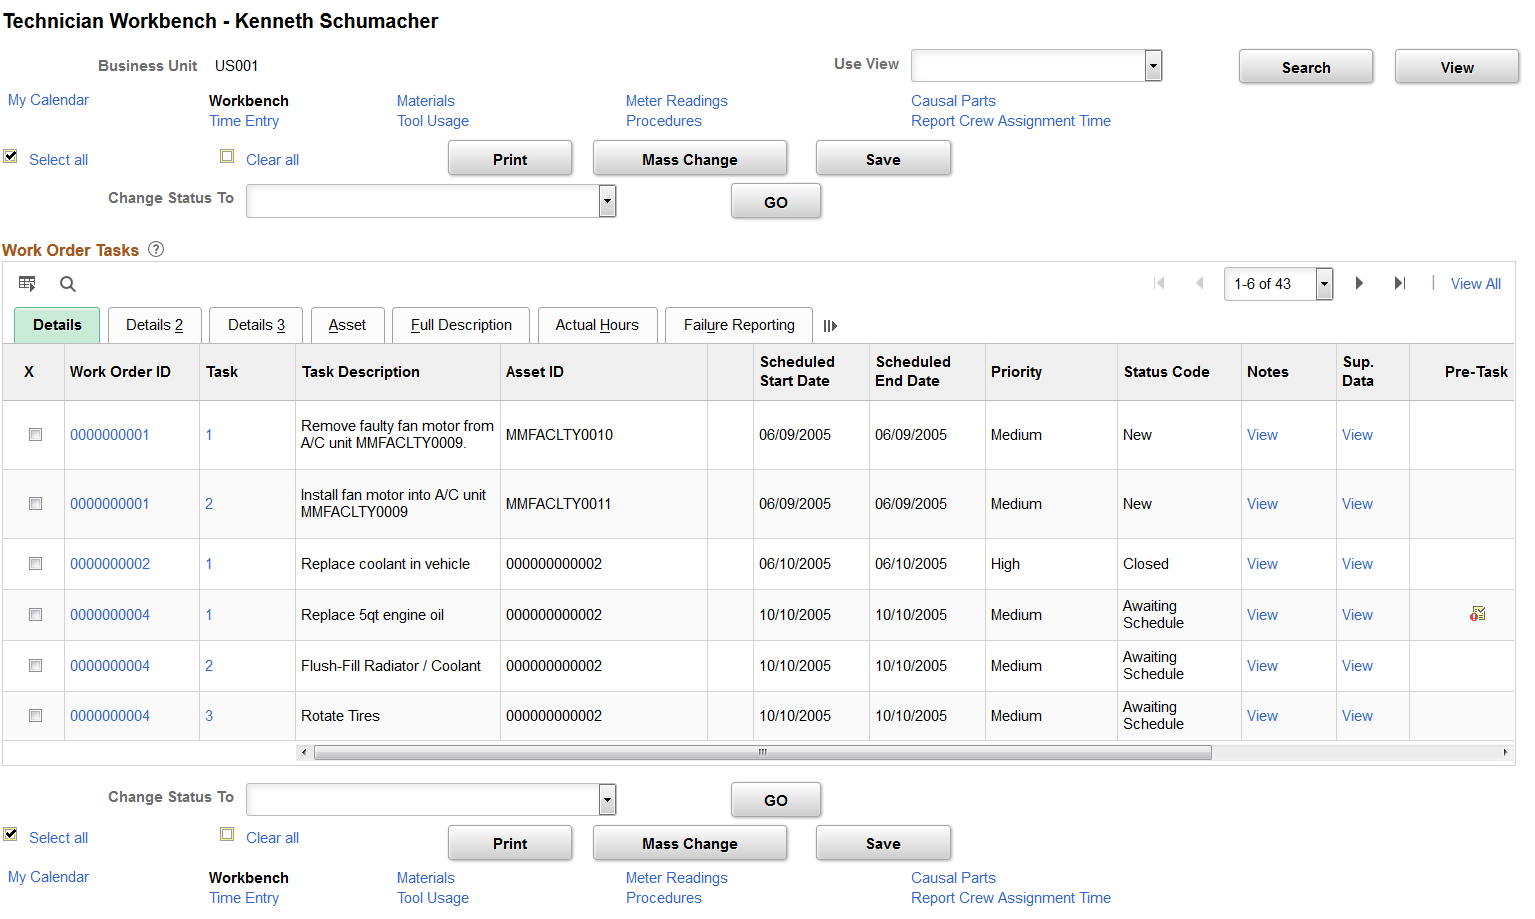
Use the Technician Workbench page (WM_WOE_WB) to select, search, update, and print work order tasks.
Navigation:
This example illustrates the fields and controls on the Technician Workbench. You can find definitions for the fields and controls later on this page.
Field or Control |
Description |
|---|---|
You have "n" Service Request(s) |
Click this link to access the Service Request Inbox page, which lists the service requests assigned to this technician. This list includes service requests associated with a work order and service requests in which the agent assigned the task to a technician without creating a work order. Important! This field only appears on the Technician Workbench page if one or more work orders is associated with a service request. |
Use View and View |
Click the View button to access the Task Search page, where you enter and select criteria to narrow your task search. Note: When you select the Actual Start date and the Scheduled Start or Scheduled End date on the Task Search page associated with the Technician Workbench, the system searches against the actual start date for a labor task line and the scheduled start or end date for a labor task line. When you select these dates on the Work Order Workbench Task Search page or the Work Progress Tracking Task Search page, the system searches against the actual start date for the work order task and the scheduled start or end date of the work order task. |
My Calendar |
Click this link to access the technician's monthly calendar. You must create the technician as a PeopleSoft Maintenance Management resource in PeopleSoft Resource Management. Note: The calendar that appears when you click this link is the calendar of the user who logs into the system. If this person is the technician, then the technician's calendar displays. If this person is an administrator with authorization to enter data for one or more technicians, then the administrator's calendar appears. |
Workbench |
Click this link in other pages that you can access from the workbench, such as the Work Order Task Punch Time Entry page, to return to the Technician Workbench page. |
Time Entry |
Click this link to access either the Work Order Task Punch Time Entry page or the Work Order Task Elapsed Time Entry page to enter work order and personal (non-work order) time for a selected task. Important! You must add all of the general ledger business units that are assigned to employees in the on the Organizational Data page (Travel and Expenses, Update Profile) and the Employee Job page (Maintenance Management, Labor Administration, Manage Employee Data) to the Project Costing Integration template that is associated with the project that was used to create the work order. You must also use the business unit assigned to each employee to set up the Expenses business unit on the Expenses Definition page (Set Up Financials/Supply Chain, Business Unit, Expenses Definition). |
Materials |
Click this link to access the Materials page. See Materials Management. |
Tool Usage |
Click this link to access the Tool Usage page. See Tool Usage. |
Meter Readings |
Click this link to access the Meter Readings page. See Meter Readings. |
Procedures |
Click this link to access the Procedures page. See Procedures. |
Causal Parts |
Click this link to access the Causal Parts page. See Causal Parts. |
Report Crew Assignment Time |
Click this link to access the Report Crew Assignment Time page. |
|
Click this button to access the Work Order Task Detail report options page. |
|
Mass Change |
Click this link to access the Workbench Mass Change page, where you can change the actual dates and times, the PCR codes, or both for one or more work order tasks that you selected on the Technician Workbench page. If the Allow Mass Change Hours check box is selected on the User Preferences page, you can enter the actual hours worked for a group of assets across many work orders at the same time. You can only update tasks that are not canceled or closed. If the PCR codes of the selected work order tasks are the same, the Problem Group, Problem Code, and Cause Code, and Resolution codes are pre-populated in the mass change fields. Otherwise, you need to manually enter values in the fields. Note: To display the Actual Hours field, the Allow Mass Change Hours check box must be selected on the User Preferences page. |
Save |
Click this button to update the actual date and time including the start date, end date, start time, and end time for a task. Actual hours time entries are submitted immediately for posting. Note: Only one actual hours entry type is allowed. If you need to add more entries when posted entries already exist, use the Time Entry option. |
Map Selected Tasks |
Click this button to display the location of selected work order tasks on an ESRI map. Once the map displays, you can click on each location to display additional information about the work order and work order task. Important! This button only displays if you selected the GIS Integration check box on the Integration page of the work order business unit associated with the work order task. |
Change Status To and Go |
Select a status from the drop-down list and click Go to access the Change Status page. |
Important! All of the previously listed links require the selection of at least one task on the Technician Workbench page.
Change Status
Select a status and one or more work order tasks, and click the Go button to access this page, where you can update multiple tasks with the same status at the same time. Optionally, you can leave the Change Status to field blank if you want to change each of the selected tasks individually to a different status. Each task is listed with these fields:
Field or Control |
Description |
|---|---|
Task Status |
Displays the current status of the task. |
Change Status To |
Displays the status that you selected in the Change Status To field on the Technician Workbench page. If the status is canceled, then the field displays a Canceled status that is read-only. All status changes are edited immediately upon being changed. Note: You cannot change the status to Complete until all the items on the checklist are completed and the actual start and end dates and time for the task are entered. |
Notify Scheduler |
Click this check box to send an email and note to the scheduler that you changed the status for a work order task. |
Note |
Enter a note explaining why you changed the status. You can click the Dictionary icon to check your spelling. If a note is entered, that note is added to the Task Notes. If Notify Scheduler is selected, then this note is also sent by email to the scheduler. |
If the Enable Actual Hours check box is selected when you change the status of a work order task to Completed, a warning message is displayed if the work order task has no timesheet, and Actual Start and End dates specified. If you click OK, the status changes to Complete, and the Actual Start and End dates are set to the current day.
If the enable Actual Hours check box is not selected, you must enter the Actual Start Date, Actual Start Time, Actual End Date, and Actual End Time on Technician Workbench - Task Actual Dates/Times tab.
Work Order Task - Details
Select this tab to review and modify task attributes.
Note: You can click the Customize link at the top of this grid and select any columns in any order that you want to appear in the Details grid and the Details 2 grid.
Field or Control |
Description |
|---|---|
Work Order ID |
Select a task and click this link to access the Work Order Details page, where you can review the work order header information, work order notes, some task details, and task dates for the selected task. |
Task |
Click a task number link to access the selected task on the Work Order - Schedules page. The user's access to data in the work order depends on the user's security profile. |
Asset |
Click this link to access the Asset page, where you can add or modify whether the asset is offline, add or modify the asset's location and area, and indicate the date from which these changes are effective. |
Hazardous icon |
Click this hazardous icon, which indicates that the selected asset for the work order task is hazardous, to access the Asset Information page. You can review the Hazardous Asset Codes and Comments group boxes, which provide details concerning the reason this asset is considered hazardous. |
Warranty icon |
This icon indicates that warranties are associated with the selected asset for the work order task. |
Asset Action |
Appears if the asset is being removed, installed, retired, or not changed in the task. |
Notes |
Click the View link to access the Notes page, where you can review notes associated with the selected task. |
Sup. Data (supplemental data) |
Click the View link to access the Supplemental Data page. Supplemental data is often set up by an organization to handle hazardous waste requirements. |
|
Click either the Pre-task checklist button or the Post-task checklist button to access the Checklist page, where you can select a Completed check box to indicate that you completed the task. When you select the check box, your (the technician's) name and the time and date that you completed the task appear on the page. You can override the information in these fields if necessary. |

Work Order Task - Details 2
Select the Details 2 tab to review the name of the technician assigned to a task; the task's resource line number in the Labor Schedules grid; the work order's required start and end dates and times; the Asset Management business unit and task location of the asset; the project information for the work order; the shop; and the names of the lead person, supervisor, and scheduler assigned to the task.
Full Description
Select the Full Description tab to review the full description of the work order and the full description of each work order task that were entered in the Work Order component. If authorized, you can click the Task number link to access the Schedules page of the work order where you can modify both of these work order and the work order task descriptions.
Work Order Task - Actual Hours
Select the Actual Hours tab to enter actual labor hours for a work order task. You can divide the actual hours worked on a group of assets across many work orders and specify the time spent on individual tasks.
Navigation:
Click the Actual Hours tab on the Technician Workbench page.
This example illustrates the fields and controls on the Technician Workbench - Actual Hours Page. You can find definitions for the fields and controls later on this page.
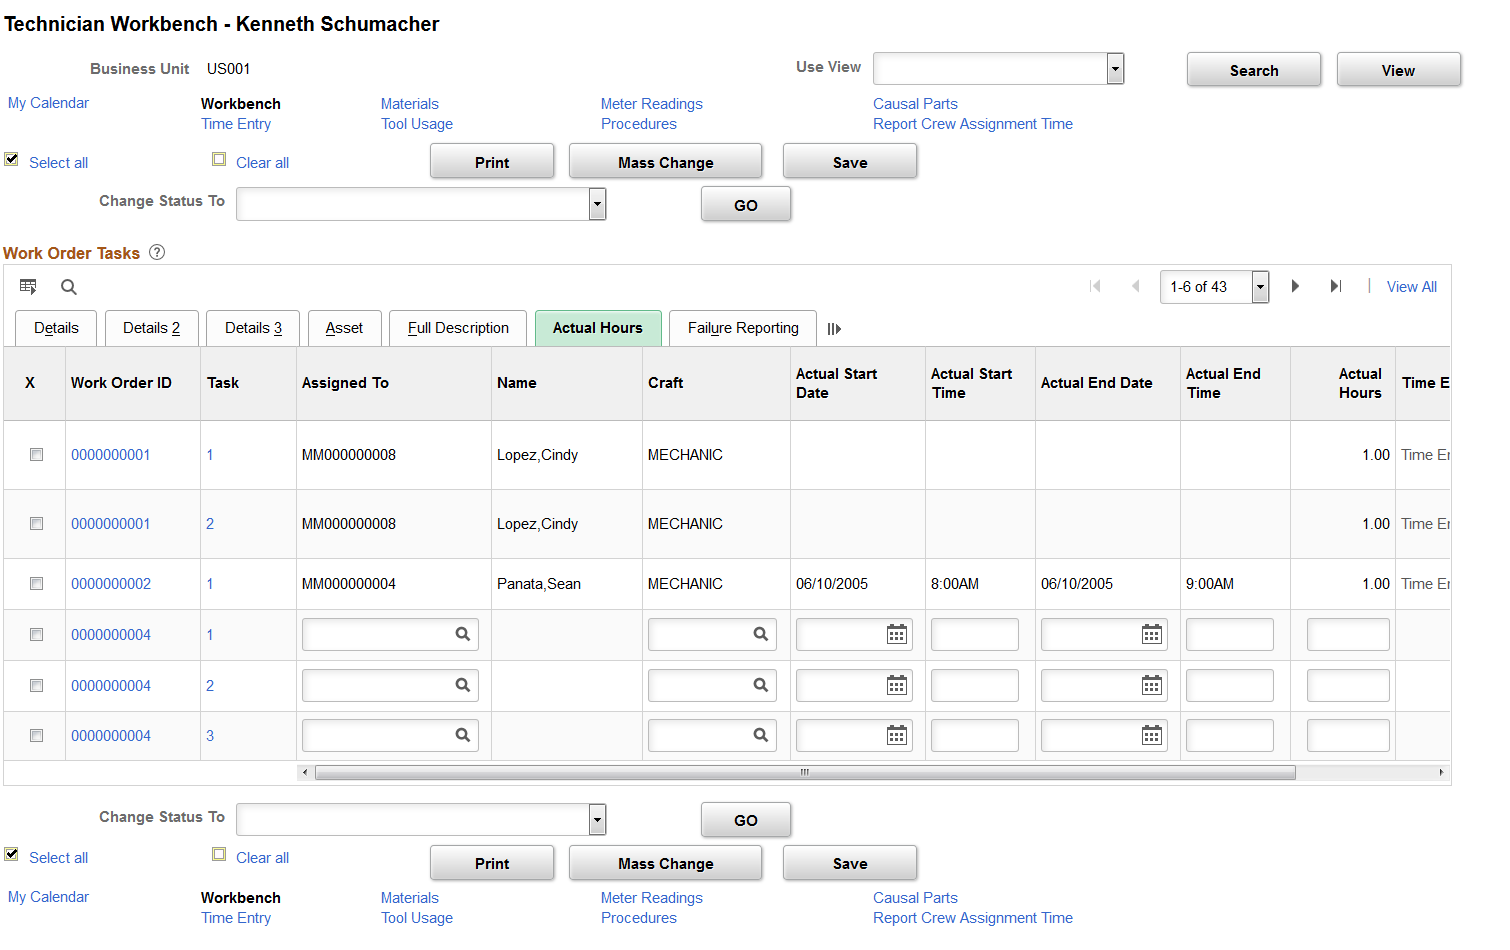
On the Search page, if the Assigned To filed is blank, then the Actual Hours tab displays the last labor resource schedules for the task. If the Assigned To field value on the Search page and that on the Technician Workbench page are the same, then the tab displays the labor schedules assigned to the employee.
Field or Control |
Description |
|---|---|
Assigned To |
Select an employee ID to assign the work order task. This field is read-only if a timesheet already exists for the work order task and resource line number. Note: To enable this field, you must select the Allow Access to Other's Tasks option on the User Preferences page. |
Name |
Displays the selected employee’s name. |
Craft |
Select a craft for the employee. This field is read-only if a timesheet already exists for the work order task and resource line number. Note: To enable this field, you must select the Allow Access to Other's Tasks option on the User Preferences page. |
Actual Start Date, Actual Start Time, Actual End Date, and Actual End Time |
Select the Task Actual Dates/Times tab to enter the start and end dates and times when the task was actually performed. These fields are read-only when you close or cancel a work order task. Note: You can update the actual task dates and times for one or more tasks at the same time by clicking the Mass Change button. These fields are read-only if a timesheet already exists for the work order task and resource line number. |
Actual Hours |
Enter the actual hours worked on the task. Note: This field is enabled only if no timesheet has been created for the employee. |
Time Entry Source |
Displays the source of the timesheet. The available options are:
You can view the time entries by clicking the particular time entry source link. Note: The link is enabled only if you enter multiple time entries for the employee. |
Work Order Task - Failure Reporting
Select the problem group and PCR codes associated with this task. This information is used for searching and for tracking the task. If you selected these values on the Requirements page of the work order, then the default values appear in the Technician Workbench fields. You can override the default values.
You can click a Failure ID link to access the Work Order Failure Tracking page to add or review the failure information for an asset associated with a work order task
Note: You can update the PCR codes for one or more tasks at the same time by clicking the Mass Change button.
Work Order Task – Inspection
Select the Inspection tab to access the instantiated asset inspection for the work order task. This allows the technician to quickly find the newly instantiated inspections and work on the various inspection activities assigned to them.
Click the Inspection ID link to access the Inspection details page, where you can review and work on the inspection activity details.
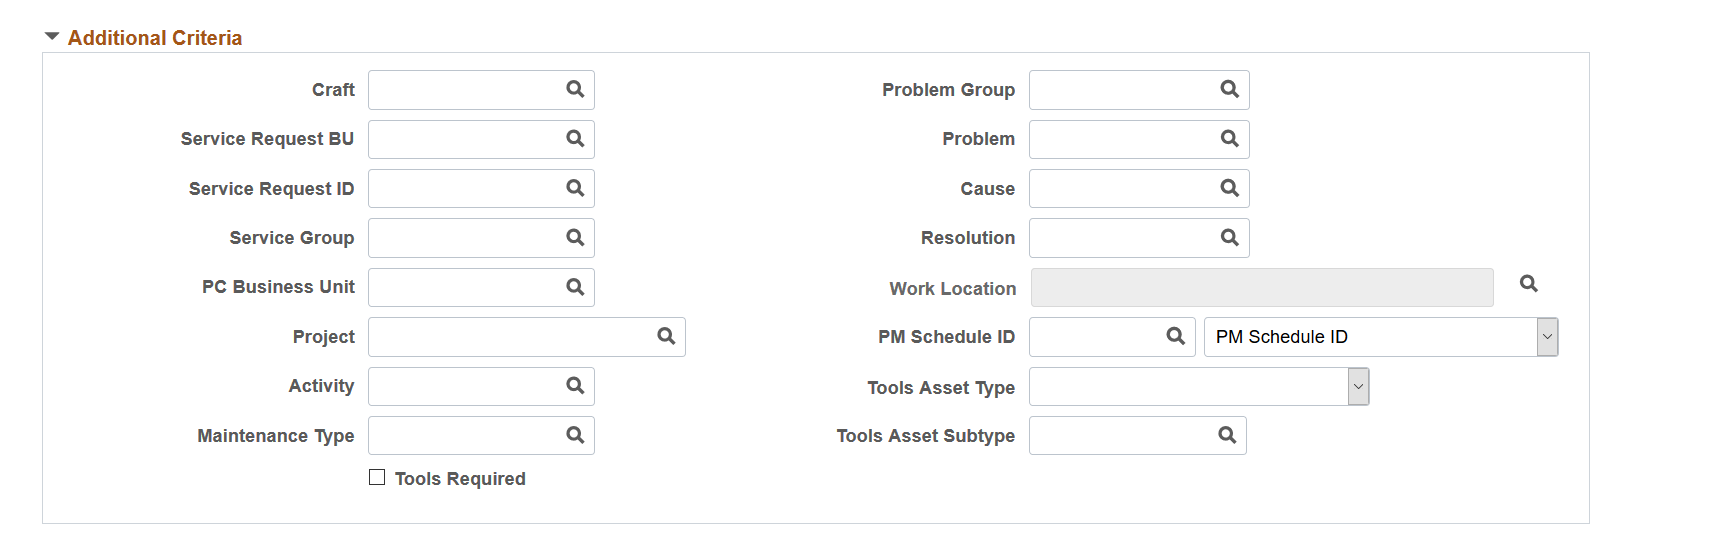
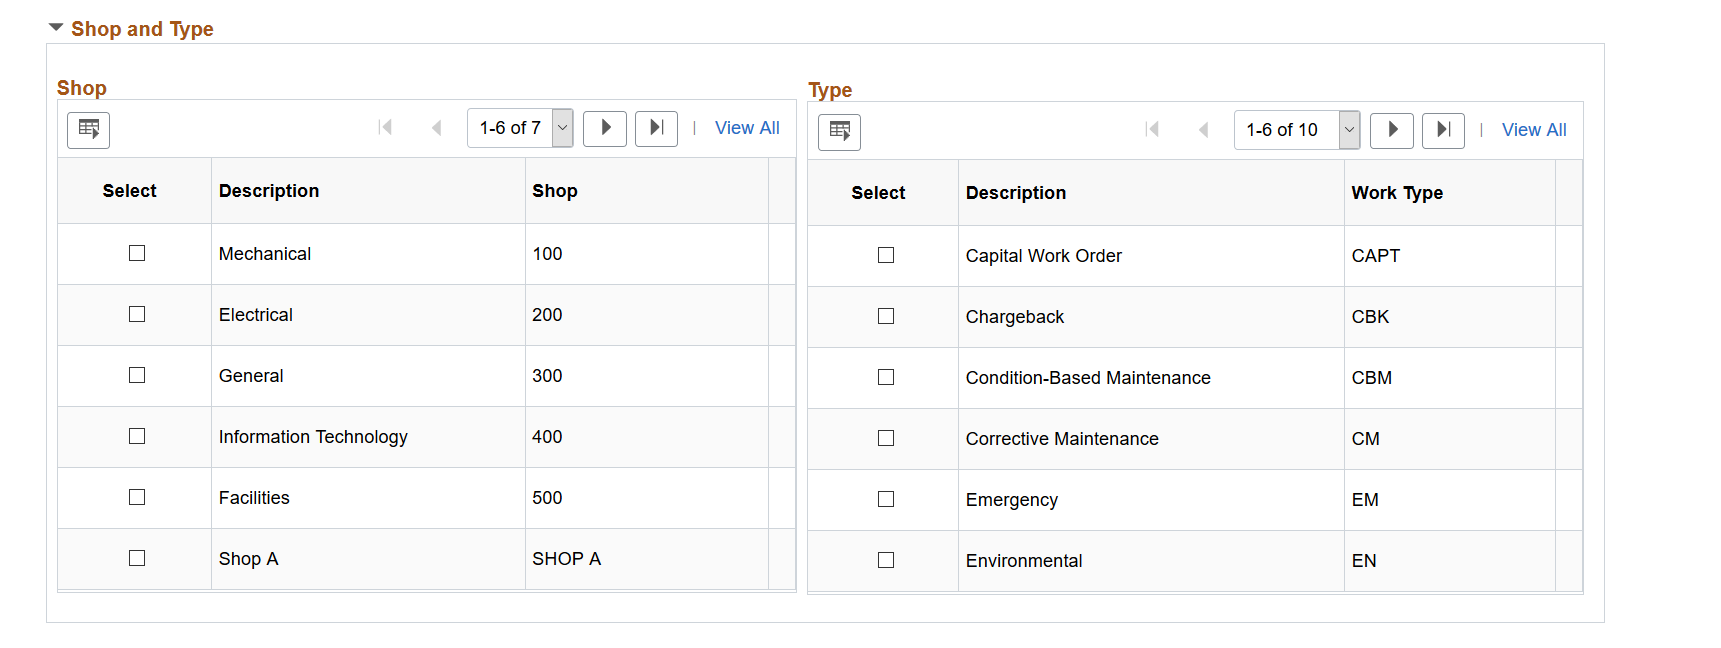
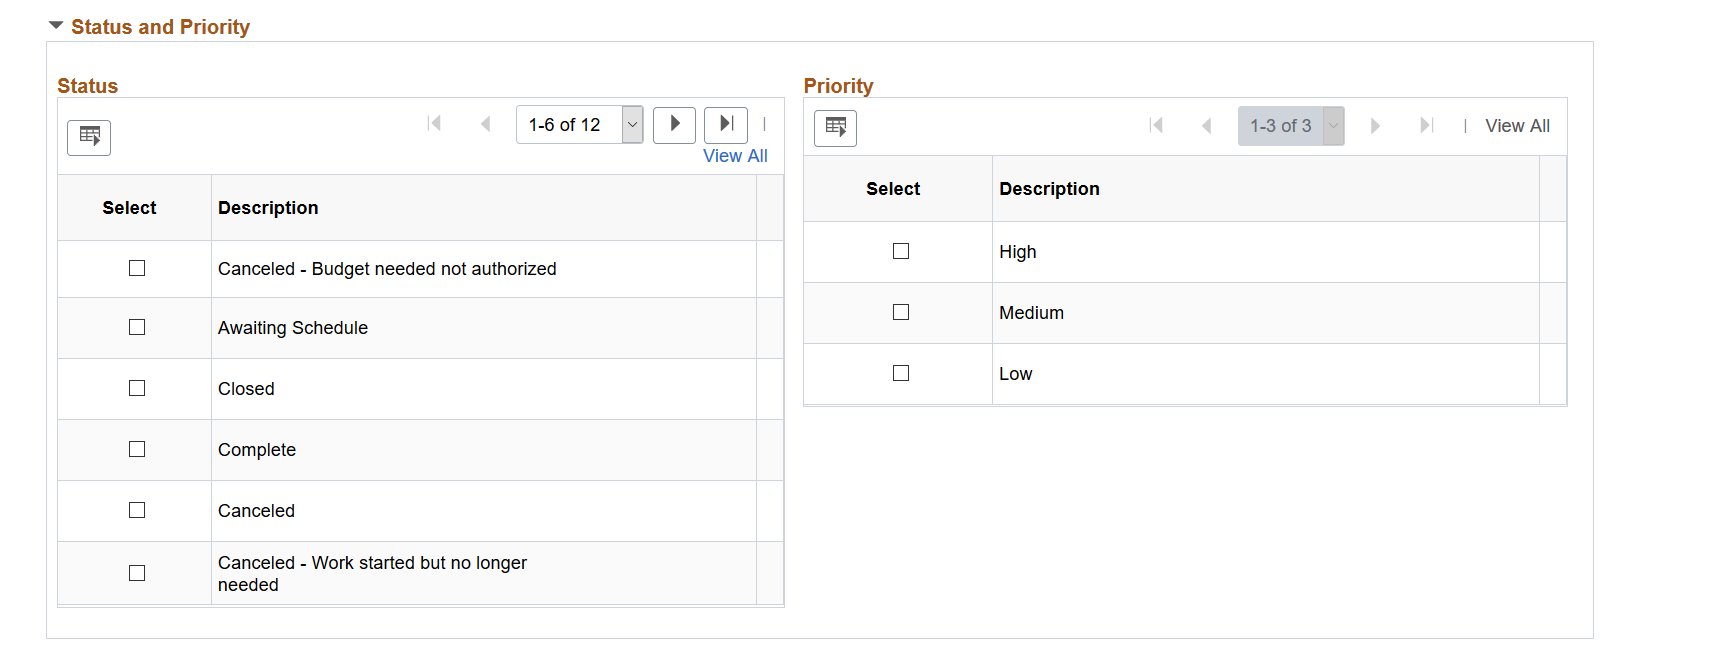
Use the Technician Workbench - Task Search page (WM_TSK_SRCH_SEC) to perform ad-hoc views (searches), and save and delete views.
Navigation:
Click the Search button on the Technician Workbench page.
This example illustrates the fields and controls on the Technician Workbench - Task Search page. You can find definitions for the fields and controls later on this page.
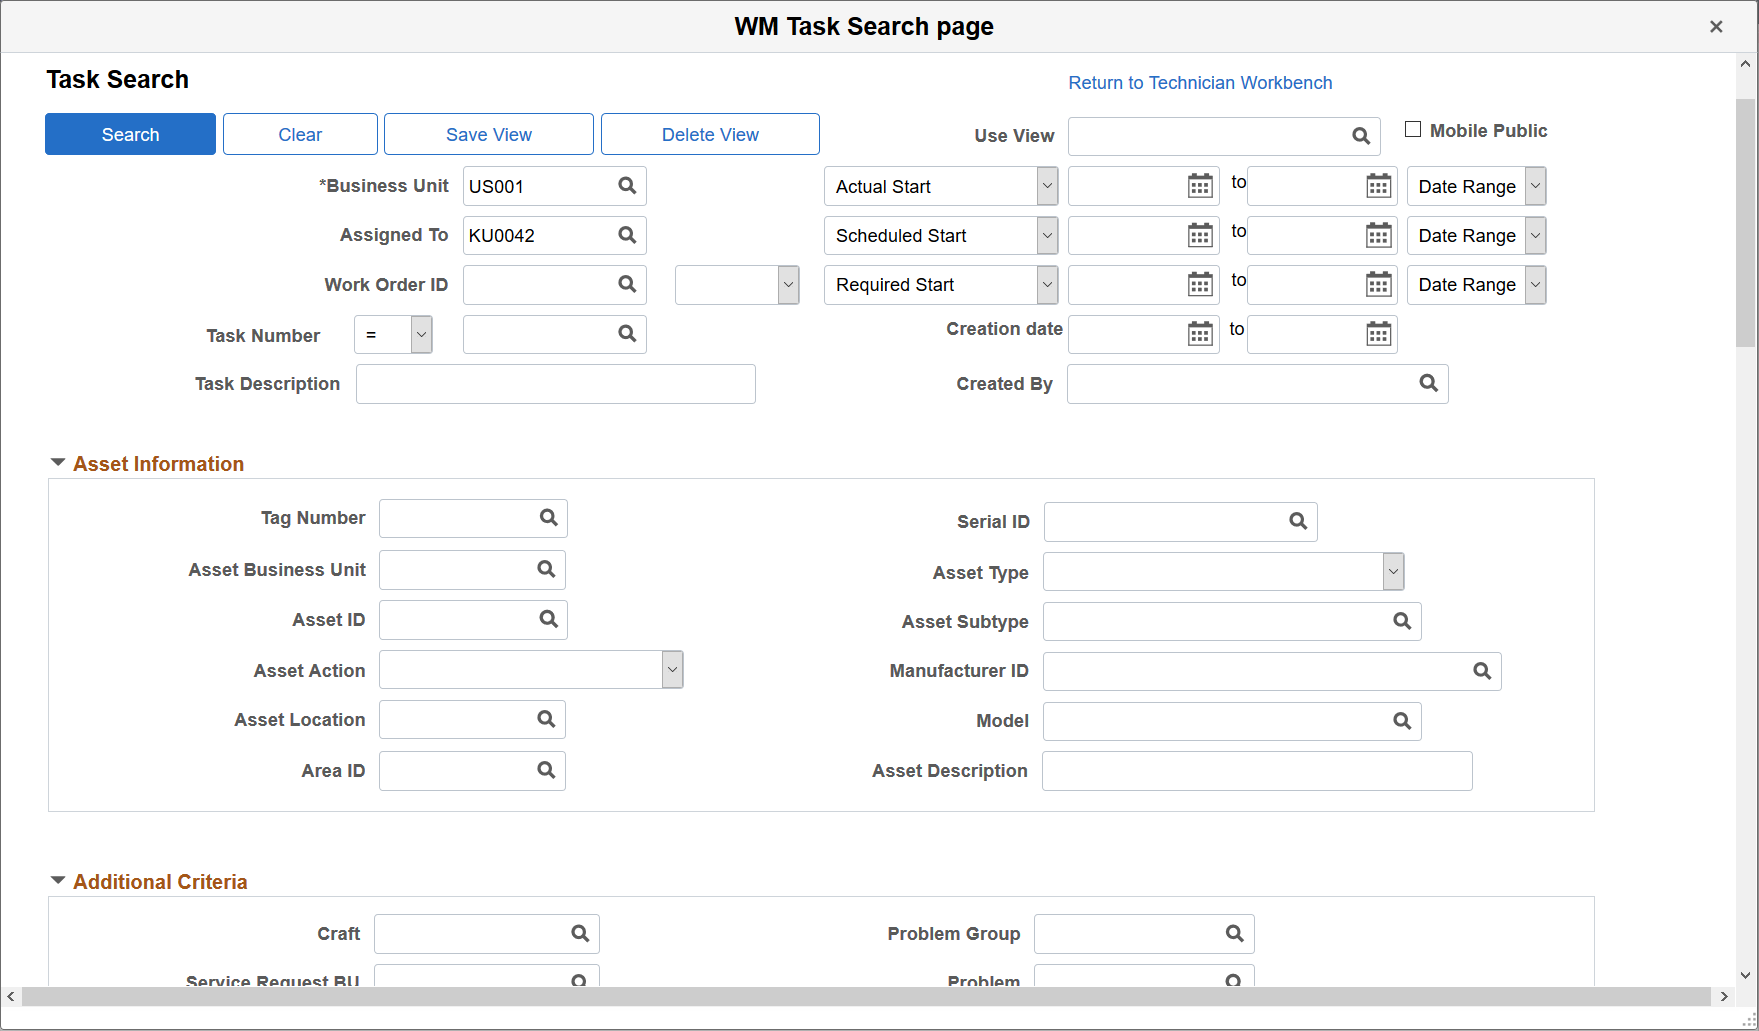
This example illustrates the fields and controls on the Task Search page. You can find definitions for the fields and controls later on this page.
This example illustrates the fields and controls on the Task Search page. You can find definitions for the fields and controls later on this page.
This example illustrates the fields and controls on the Task Search page. You can find definitions for the fields and controls later on this page.
This example illustrates the fields and controls on the Task Search page. You can find definitions for the fields and controls later on this page.
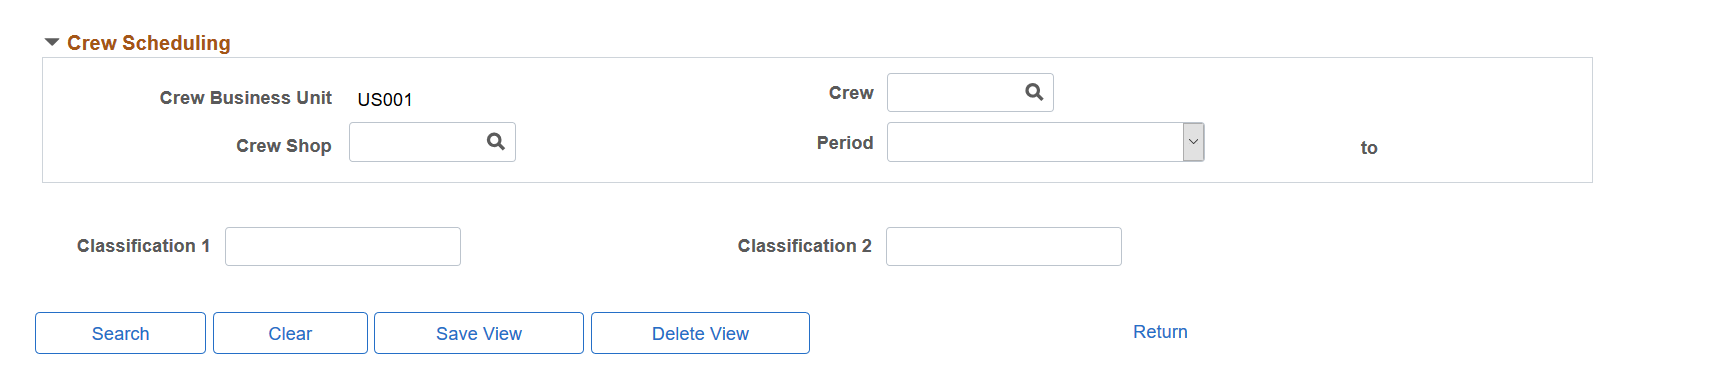
When you click the Save View button, you save the named view for later use. To search for a saved view, select the view name in the Use View field and click the Search button. The resulting tasks will appear in the Work Order Tasks grid. Alternatively, to perform an ad hoc search, enter any search criteria in the Task Search page without saving the view and click the Search button.
Field or Control |
Description |
|---|---|
Search |
Click this button to search for work orders or work order tasks based on the search criteria that you enter on the page. You can select search criteria without saving the view or select search criteria and use Save View button to save that criteria and reuse it. |
Clear |
Click this button to clear any existing search criteria from the page. You can select new search criteria and click the Save View button to reuse this new search criteria. |
Save View |
Select search criteria and click this button to name and save the view for reuse. |
Delete View |
Click this button to delete the current saved view. |
Use View |
Search for a saved view and click the Search button to search for work orders and work order tasks that fall within the search criteria for that view. |
Mobile Public |
Select this option to make the saved view available to all Technicians using Mobile devices. If this option is selected the Assigned To field is replaced with an Assigned To Current Technician check box. If this check box is also selected, then the Mobile Public view will only return tasks that are assigned as a scheduled labor resource to the technician who is executing the Search View. Important! This only applies to technicians who work for organizations that have integrated a third-party mobile device with PeopleSoft Maintenance Management Web Services. |
You can include any of the remaining fields on the Task Search page as search criteria to narrow your search for work order tasks.
Note: Business Unit is not required for searches.
Use the Work Order Task Punch Time Entry page (WM_PTIME_ENTRY) to enter punch time for the work order task.
Navigation:
Click the Time Entry link on the Technician Workbench page.
Field or Control |
Description |
|---|---|
Time Report ID |
Generates the next available unique number when you save the entry. |
Version Number |
Indicates how many times a time entry was submitted. The default value for the first time sheet created is zero. The version number increases by one with each additional submission of a time sheet. Clicking the Save button does not increase the version number; it retains any changes until you are ready to submit the record again. |
Period End Date |
Displays the date based on whether the employee's time is reported daily, weekly, biweekly, or semimonthly. The time period is set up in the employee's data. |
Time Report Status |
The default value is Pending before submission and Approved after you click the Submit for Posting button. |
Time Report Period |
Displays the time reporting period that you selected on the Expenses Definition – Business Unit 2 page These Time Reporting Period values are available for selection on the Expenses Definition – Business Unit 2 page.
|
Expenses Post Status |
Displays Yes if time entry transactions that you submitted to PeopleSoft Expenses are posted, and No if the transactions are not posted. Note: PeopleSoft Maintenance Management does not use the Not Appl (not applied) value. |
Save for Later |
Click this button to temporarily save this time report without submitting it. You can modify the page before you submit it for posting. Note: When you click this button, the system compares the work order and work order task dates, times, and other information with the information entered. It does not let you continue until the time entry rows are corrected. |
Submit For Posting |
Click this button to submit the time report transaction to PeopleSoft Expenses, where accounting transactions are processed and sent to PeopleSoft General Ledger, and costs are generated and sent to PeopleSoft Project Costing. Note: When you click this button, the system compares the work order and work order task dates, times, and other information with the information entered. It does not let you continue until the time entry rows are corrected. Access to this button can be controlled from user preferences. |
|
Click this button to access the Work Order Task Detail Report Options page, from which you can select various reports to print. |
|
Time Quantity |
Displays the total hours entered for this employee. |
Update Total |
Click this button to update the total time entered, which appears in theTotal Work Order Hours field. You can continue to click this button to view a running total of the time entered for an employee. |
Time Sheet
Select the Time Sheet tab in the Enter total hours worked on work order task group box.
Field or Control |
Description |
|---|---|
Business Unit, Work Order ID, and Task Number |
Select these values if this employee was not scheduled in the system to work on this work order. If this employee was scheduled and assigned to various work orders and tasks in the Schedules page of the work order, then all of the assigned tasks and their associated work order IDs and business units are listed for this employee. |
Resource Line |
Displays the line in the Labor Schedules grid on which this resource was assigned in the Schedules page of the work order. |
Craft |
Select a craft for this employee if this employee was not scheduled ahead of time. Displays the employee's craft, if the employee was scheduled ahead of time. You can override this value, which is used to identify the rate by which the hours are multiplied to determine the labor cost. |
Date Worked |
Select the date that this employee worked on the task. |
Start Time and End Time |
Select the start and end times that the employee worked on this task. Note: When you click the Save for Later button or the Submit for Posting button, the system displays messages if the date and times entered here are outside of the dates scheduled for the task or do not reflect the dates and times entered in the Labor Schedules row for this employee. |
Distributions
Select the Distributions tab in the Enter total hours worked on work order task grid to display the ChartField distributions that are associated with the resource line. If this a new resource line (actuals entries only), then default distributions are derived from a distribution template. You can override these values, if necessary.
Use the Work Order Task Elapsed Time Entry page (WM_ETIME_ENTRY) to enter elapsed time entries for this work order task.
Navigation:
Click the Time Entry link on the Technician Workbench page.
This example illustrates the fields and controls on the Work Order Task Punch Time Entry page. You can find definitions for the fields and controls later on this page.
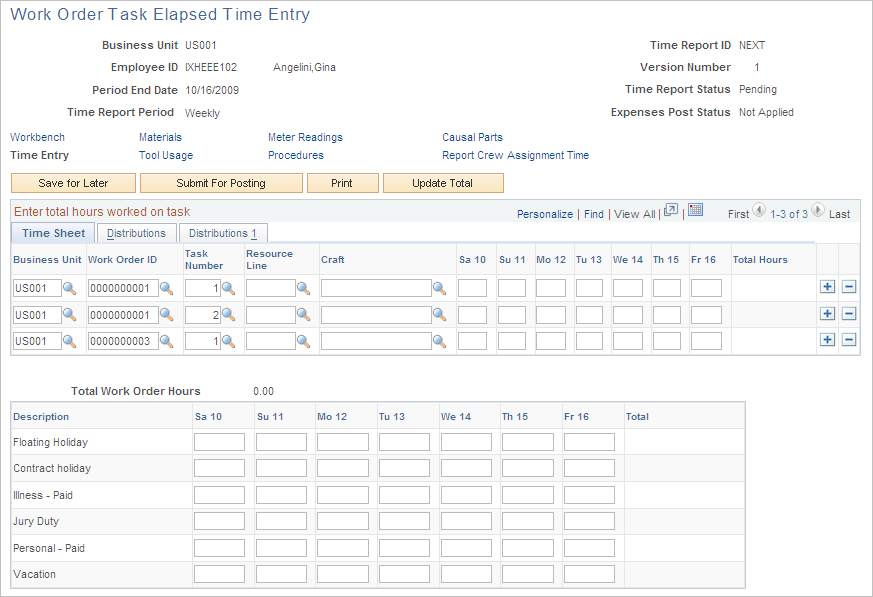
The fields in the header and the buttons on this page work the same way that they do in the Work Order Task Punch Time Entry page.
Time Sheet
Select the Time Sheet tab to enter elapsed time for work order tasks on which this employee worked. In elapsed time entry, you enter the hours worked on specific days of the week based on the Period End Date and Time Report Period.
If Time Report Period is Daily, then a single day appears in the Work Order Task Elapsed Time Entry, Time Sheet grid.
If Time Report Period is Weekly, then the days of the week appear in the Work Order Task Elapsed Time Entry, Time Sheet grid.
If Time Report Period is Biweekly, use the Previous Week and Next Weekbuttons to transfer to the previous week or next week for the week not currently shown.
If Time Report Period is Semimonthly, the time entry is the same as for the biweekly page.
However, you can click the Next button twice from the first week and arrive at the last week, which may have just one day available for time entry, depending on the month.
Distributions
Select the Distributions tab, which displays the ChartField distributions that are associated with the resource line. If this a new resource line (actuals entries only), then the distributions are derived form a distribution template. You can override these values, if necessary.
Navigation:
Click the Time Entry link on the Technician Workbench.
Note: The personal time entry fields appear on this page if you selected either the Both Time Grids or Policy Time Grid Only buttons on the Business Unit 2 page of the Expenses Definition component.
Field or Control |
Description |
|---|---|
Description |
Displays Time Reporting Codes (TRC), which are set up on the Time Reporting Code page (Set Up Financials/Supply Chain, Product Related, Expenses, Mapping, Time Reporting Code). |
Total Personal Hours |
Click the Update Total button to display the total personal (non-work order) hours entered for this employee for this time period. |
Grand Total |
Click the Update Total button to display the sum of the work order task hours plus the (non-work order) personal time hours entered for this Technician. |
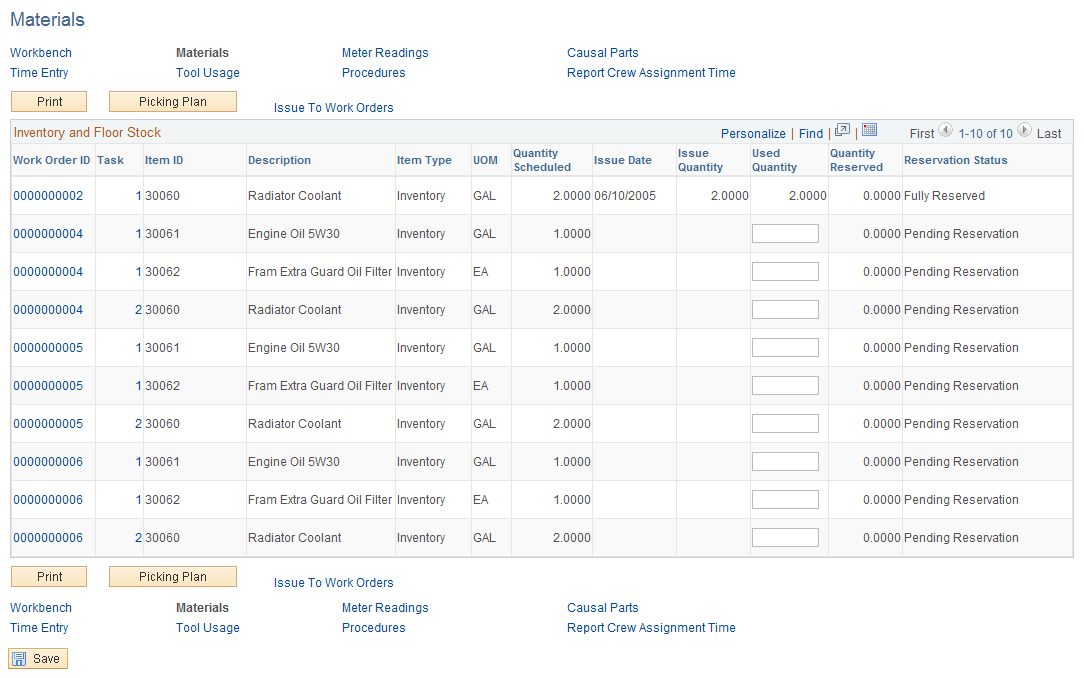
Use the Materials page (WM_WOE_MTLS) to review inventory and floor stock scheduled for the task, issue the selected materials to the work order, generate a pick plan, and directly access the Schedules page of a selected work order task.
Navigation:
Click the Materials link on the Technician Workbench page.
This example illustrates the fields and controls on the Materials page. You can find definitions for the fields and controls later on this page.
Field or Control |
Description |
|---|---|
|
Click this button to print reports from the Work Order Task Report Options page. |
|
Picking Plan |
Click this button to generate a picking plan for selected materials for PeopleSoft Inventory based on the predefined Picking Plan run control in user preferences. |
Issue To Work Orders |
Click this link to access the Issue to Work Order Search page, where you enter details to issue the item to the work order task. Once the item is issued, the Issue Date and Issue Quantity fields appear in the Inventory and Floor Stock grid. |
Inventory and Floor Stock
This grid displays each inventory item or floor stock item that was entered for the selected work order tasks.
Field or Control |
Description |
|---|---|
Used Quantity |
Enter the quantity of this item that was used. |
Delivery Truck icon and Delivery Instructions |
Displays delivery instructions informing PeopleSoft Inventory which materials to deliver and where to deliver them. Delivery instructions, along with the Delivered Y/N flag (appears as a delivery truck icon) for materials, are updated by the planner or scheduler to indicate where materials need to be delivered. These instructions might also include special handling instructions (such as a fork lift is needed). The Delivered Y/N flag indicates which materials are typically delivered to the work location. You can indicate how you want the materials delivered in the Inventory Schedules grid and the Purchase/On-Hand Schedules grid of the work order task. |
Purchase Order and On Hand Materials
This grid appears on the Materials page of the Technician Workbench if you selected any materials that need purchasing or are on hand for a work order task. The grid displays the Resource Type, UOM (unit of measure) and Quantity Required for the task and the Due Date or date the materials are needed.
Field or Control |
Description |
|---|---|
Used Quantity |
Enter the quantity that was used for the task. If the UOM for the selected item is EA (each), you will receive an error if you enter a partial quantity (quantity value with a decimal) in this field. This field is informational only. However, a query was established for this field, which enables your organization to add it to your customized reports. |
This grid also defines the staging status of the requisition or the purchase order that may have been created for materials selected for a task, and indicates if the material is on hand.
Use the Work Order Task Tools Usage Entry page (WM_TLS_USAGE) to enter the dates and times a tool was used and the quantity used for a work order task.
Navigation:
Click the Tool Usage link on the Technician Workbench page.
This example illustrates the fields and controls on the Tool Usage page. You can find definitions for the fields and controls later on this page.
Field or Control |
Description |
|---|---|
Asset ID |
Select or override the asset ID (Serial ID, VIN, or Asset Tag Number) for the tool. A default value appears if a value was selected in the Tool Schedules grid of the work order task. A description of the tool also appears. The selected asset must be flagged as a tool. Note: For unplanned tool usage (tool requirements were not defined or scheduled), when you select this value, default values are applied to the Asset Type, Subtype, Manufacturer ID, and Model fields, if applicable. These fields are not visible from the Technician Workbench page. |
Quantity Used |
Enter the quantity used. For example, if the cost to use a truck is 10 cents per mile and the truck traveled 20 miles during the task, then the quantity used is the total number of miles (20) that the truck traveled for the task. This quantity is multiplied times 10 cents per mile to arrive at the total cost of the tool usage: 2.00 USD. |
Actual Start Date, Start Time, Actual End Date, and End Date |
Enter the actual start and end dates and times in which the tool was used for a work order task. |
Actual Duration |
Displays the actual duration of the task based on the actual start dates and time values converted to hours divided by the Quantity Used value. This calculation depends on the unit of measure (UOM) that applies to the tool. |
Tools Cost
Select the Tools Cost grid on the Tool Usage page.
Field or Control |
Description |
|---|---|
Tool Cost Rate and Tool |
Override the default Tool Cost Rate and Tool Bill Rate values, as necessary. The default value is derived from the values entered on the Tool Rates page of the shop. |
Transaction Date |
Override the default system date, as necessary. |
Distribution |
Click this link to access the ChartField distribution page for tools to be processed in PeopleSoft Project Costing. |
Use the Meter Readings page (WM_WOE_METER) to enter meter readings and view a meter trend chart for the asset on which the work order task was performed.
Navigation:
Click the Meter Readings link on the Technician Workbench page.
Technicians update the meter readings of an asset to reflect usage information.
Field or Control |
Description |
|---|---|
|
Click this icon to activate the fields in a row of the Current Reading grid. |
Date and Time |
Enter the date and time of the meter reading for the asset of the work order task. |
Meter Type |
Select the type of meter from which you took the reading, such as an odometer. |
Reading and UOM (unit of measure) |
Enter the meter reading. The UOM value is determined by the asset and the type of meter that you select. |
Change |
If a prior meter reading exists, the difference between the current reading and the prior reading appears in this field. |
Prior Reading |
This value appears if a prior meter reading was available in the PeopleSoft Asset Management Meter Reading History for the selected meter and asset. |
Advanced Options |
Click this link to access the Advanced Options page. |
|
Click this icon to access the Meter Readings Trend Chart. |


Advanced Options
Use the Advanced Options page (AM_MTR_ADV_OPTIONS) to review reading details for the selected asset.
Navigation:
Click the Advanced link in the Current Meter Readings grid of the Meter Readings page.
Field or Control |
Description |
|---|---|
Rollover |
Select this check box only if this is the first meter reading performed after a rollover. |
Replaced |
Select this check box only if this is the first meter reading performed after the meter was replaced (for example, a new odometer in a company car). If you select this check box, you must enter a value for the accumulated reading. |
Accumulated Reading |
Enter a value in this field if you selected Replaced. You must enter the previous reading on the old meter to track the actual overall mileage. |
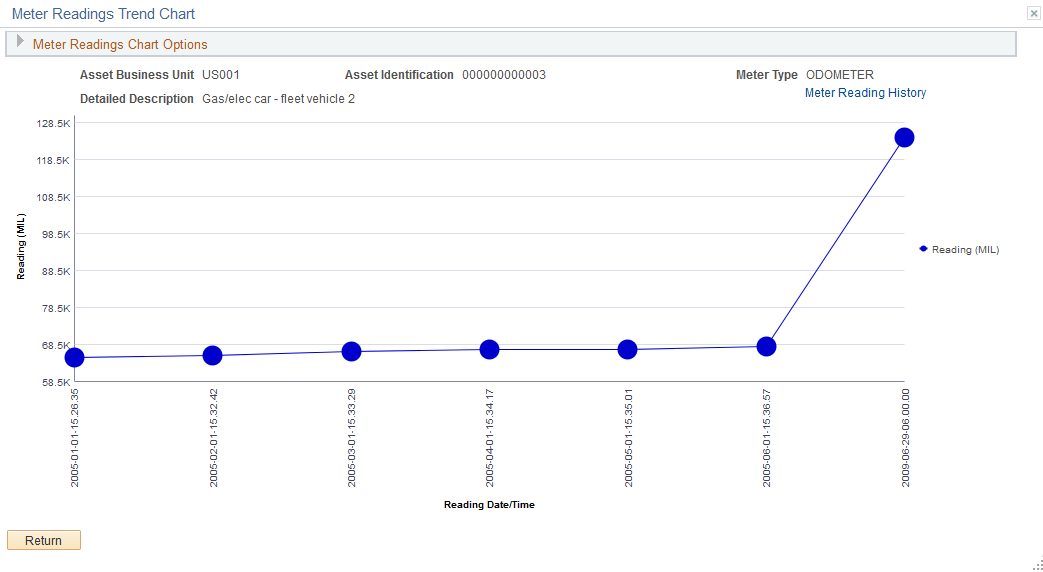
Meter Readings Trend Chart
Navigation:
Click the Chart icon on the Meter Readings page
This example illustrates the fields and controls on the Meter Reading Trend Chart page. You can find definitions for the fields and controls later on this page.
Field or Control |
Description |
|---|---|
Start Date |
Select the beginning date for the meter readings that you want to appear on the Meter Readings Trend Chart. |
Upper Limit for Chart Y Axis |
Enter the upper limit (Readings/KWH) that you want to appear on the Y axis of the Meter Readings Trend Chart. |
End Date |
Select the last date for the meter readings that you want to appear on the Meter Readings Trend Chart. |
Upper Limit for Chart X Axis |
Enter the upper limit (Reading Date/Time) that you want to appear on the X axis of the Meter Readings Trend Chart. |
Last Readings to Chart |
Indicates the total number of readings that appeared on the chart starting with the latest readings. |
Chart Readings |
Click this button to display the Meter Readings Trend Chart based on the values you entered for the Meter Readings Chart Options. |
Clear |
Click this button to clear the Meter Readings Chart Options fields. |
This chart compares the meter readings that were read on the odometer of this vehicle every 200 miles, and each date and time the meter readings were taken.
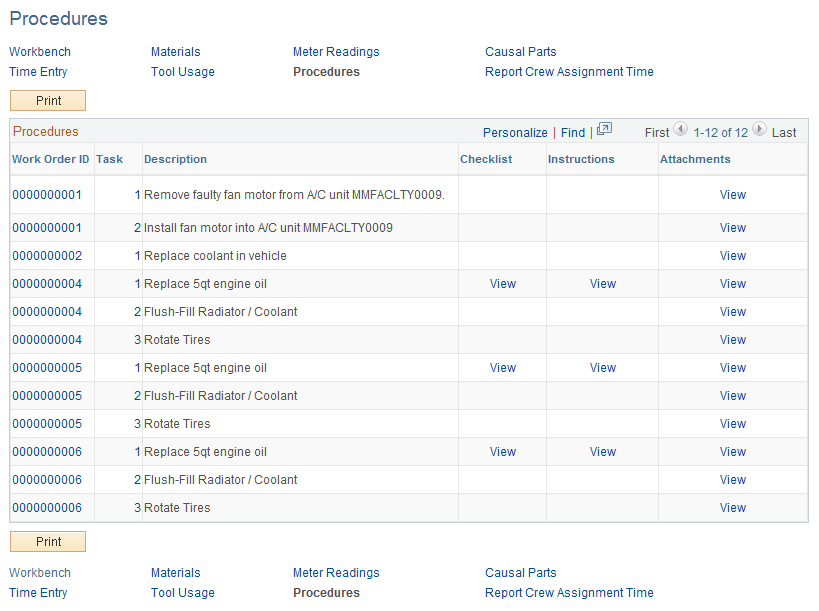
Use the Procedures page (WM_WOE_LIST) to review the work order checklist, instructions, and attachments associated with a task.
Navigation:
Click the Procedures link on the Technician Workbench page.
This example illustrates the fields and controls on the Procedures page. You can find definitions for the fields and controls later on this page.
Field or Control |
Description |
|---|---|
Checklist, Instructions, and Attachments |
Select to access the checklist, instructions, and attachments pages associated with the work order task. If the work order is associated with a service request, you can view the service request attachments. You can also access the task and add instructions or checklist items via the Work Order component. You must call up the task again to access the view links for any additional procedures that you added to the task. |
Use the Causal Parts page (WM_WOE_CAUSAL_PART) to enter one or more parts responsible for causing the failure or the need for the task.
Navigation:
Click the Causal Parts link on the Technician Workbench page.
This example illustrates the fields and controls on the Causal Parts page. You can find definitions for the fields and controls later on this page.
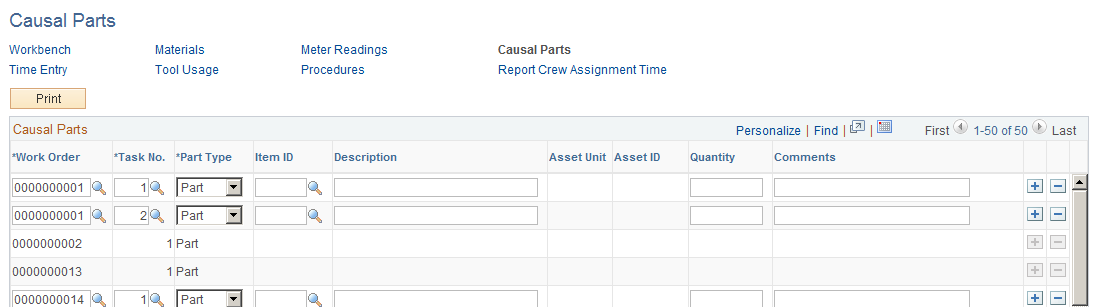
Field or Control |
Description |
|---|---|
Part Type |
Select if this causal part is either an inventory item, an asset, or a description. Values are:
|
Quantity |
Enter the number of parts or assets that caused the problem. |
Use the Report Crew Assignment Time page (WM_CS_RPRTHRS_WB) to enter carryover hours, completed hours, and the completed date for a crew assigned to a task.
Navigation:
Click the Report Crew Assignment Time link on the Technician Workbench page.
Field or Control |
Description |
|---|---|
Action |
Select the rows that you want to affect with this action, and then select one of these actions:
|
Crew Assignments
Click the Crew Assignments tab on the Report Crew Assignment Time page.
Field or Control |
Description |
|---|---|
Work Order, Task No, Task Line, Task Descriptions, Task Status, Asset ID, Craft, Estimated Man Hours, and Crew |
The field values for each row are derived from the work order and from the Crew Scheduling Workbench. |
Carryover Hours |
Displays the carryover hours. If you enter a completed date, then the carryover hours are zero. You can enter a value in each row or you can update the carryover hours for one or more rows by selecting the Update Carryover Hours action. |
Completed Hours |
Enter the number of hours of work completed for each row. You can also select the row and the Update Completed Man Hours action to update one or more rows at the same time. |
Completed |
Select the date on which the hours were completed for each row. You can also select one or more rows and the Report Completed Date action to perform this activity. When this field is populated, the carryover hours in the row are set to zero. |
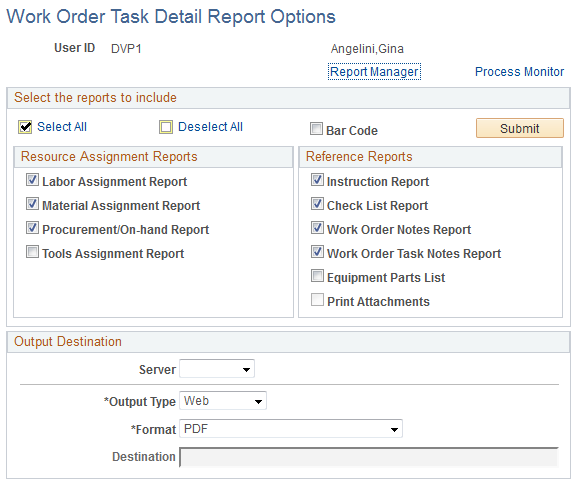
Use the Work Order Task Detail Report Options page (WM_RPT_OPTNS) to select specific options and reports that you want to print.
Navigation:
Click the Print button on the Technician Workbench page.
This example illustrates the fields and controls on the Work Order Task Detail Report Options page. You can find definitions for the fields and controls later on this page.
Field or Control |
Description |
|---|---|
Bar Code |
Select this option to print work order information such as the work order business unit, the work order ID, the task ID, and the resource line number for materials in bar code format for selected reports. For inventory items, the barcode is printed in the Scheduled Materials section. The storeroom clerk can then scan a resource line directly from the materials list and match it with the items committed to the work order task. |
Server |
Select the Process Scheduler server on which to run the report process. If left blank, the default Process Scheduler server will be used. When the Print Attachments check box is selected, you must choose a Server that has an additional component application for attachment printing installed for the attachments to print correctly. |
Output Type |
Select the Output Type of the report. Typically, the Output Types of Printer or Web will be used. When the Print Attachments check box is selected, the Output Type will default to Printer option and will be disabled. |
Format |
The available list of report formats depends on the Output Type selected. When the Print Attachments check box is selected, the Format will default to the report format for Printer option and will be disabled. |
Destination |
Specify the destination for the selected Output Type. For Output Type option of Printer, specify the destination printer name. You can select a printer name from the list of configured printers. The printers can be setup on the Work Order Options Page. Work Order Options are specific to a SetID and hence the printer names displayed can be restricted by the business unit. Printer setup is optional. Note: An incorrectly entered printer destination will result in an error in the Work Order Task Details report process. The process will then need to be submitted again. Use the printer setup option on the Work Order Options page to avoid entering an incorrect printer name. |
Note: The Work Order Task Detail Report Options are automatically retained from the last successful request. These options appear as the default values when the user returns to the page.
Printing Attachments
The Work Order Print Attachment option allows you to print many different types of Work Order and Work Order Task attachments. The Print attachment feature utilizes an additional component application to print a wide array of attachment document types.
For additional information, refer PeopleSoft Financials / Supply Chain Management 9.1 Feature Pack March 2011 Installation, Installing PeopleSoft Maintenance Management 9.1 Work Order Attachment Print set of topics.
To enable the Print Attachments option, you must select the Work Order Attachment Print Installed option on the Installation Options – Maintenance Management page (Set Up Financials/Supply Chain, Install, Installation Options – Maintenance Management) after successfully installing an additional component application for attachment printing.
To Print Work Order and Work Order Task attachments, select the Print Attachments check box. This option will print all Work Order and Work Order Task attachments for the given Work Orders and Work Order Tasks.
Select your Server (a Process Scheduler server with the additional component application for attachment printing installed) and enter the printer name in the Destination field. Press the Submit button to submit the Work Order Task Details report request process. One report process instance is generated per Work Order and all its tasks. After the request has been successfully submitted the last report process instance is displayed under the Output Destination box.
Click on the Process Monitor link to view the Run Status of the report processes.
The process name for the Work Order Task Details report with attachments is WMONLATT. For grouping and printing your Work Order and Work Order Task attachments in the appropriate order, each Work Order and its tasks selected will generate a separate Process Scheduler report process. Each process will run in sequential order with all the other processes remaining in Blocked status until the previous process completes.
The following SQL code will be useful in identifying which Work Orders and Tasks have processes that are yet to complete successfully in case of any issues with the Work Order Task Details report process:
SELECT P.PRCSINSTANCE, P.RUNSTATUSDESCR, R.BUSINESS_UNIT, R.WO_ID, R.WO_TASK_ID
FROM PS_WM_WOE_RPT_CRIT R, PS_PMN_PRCSLIST P
WHERE R.PROCESS_INSTANCE = P.PRCSINSTANCE
ORDER BY P.PRCSINSTANCE DESC, R.BUSINESS_UNIT, R.WO_ID, R.WO_TASK_ID;