Configuring Business Units for PeopleSoft Expenses
To set up business units and SetIDs for PeopleSoft Expenses, use the following components:
Expenses Definition (BUS_UNIT_TBL_EX.GBL)
Expenses Options (BUS_UNIT_OPT_EX.GBL)
Use the BUS_UNIT_TBL_EX component interface to load data into the tables for the PeopleSoft Expenses Definition component.
|
Page Name |
Definition Name |
Usage |
|---|---|---|
|
BUS_UNIT_TBL_EX1 |
Define a PeopleSoft Expenses business unit. |
|
|
BUS_UNIT_TBL_EX2 |
Designate business unit specifications for journal templates, time reporting, automatic approval thresholds, project time options, and grace periods. |
|
|
EX_BU_PRIV |
Assign privilege templates to a business unit. |
|
|
BUS_UNIT_TBL_EX3 |
Establish VAT parameters for the business unit. |
|
|
BUS_UNIT_TBL_EX4 |
Determine expense receipt requirements for the business unit. |
|
|
BUS_UNIT_TBL_EX5 |
Allow organizations to setup a Twilio account and the text message format that should be used to send to Twilio. |
|
|
BUS_UNIT_OPT_EX |
Establish payment defaults, Commitment Control options, and approval preferences for a SetID. |
Use the Expenses Definition - Business Unit 1 page (BUS_UNIT_TBL_EX1) to define a PeopleSoft Expenses business unit.
Navigation:
This example illustrates the fields and controls on the Expenses Definition - Business Unit 1 page. You can find definitions for the fields and controls later on this page.

This example illustrates the fields and controls on the Expenses Definition - Business Unit 1 page. You can find definitions for the fields and controls later on this page.

Field or Control |
Description |
|---|---|
Update Open Periods |
Click to display the Open Period Update (OPEN_PERIOD_SINGLE) page and define open period beginning and ending dates for PeopleSoft Expenses that are different from open period date ranges in PeopleSoft General Ledger. This feature enables you to control the transactions created and submitted with a specific accounting date. The accounting date of the transaction is checked against the begin and end dates of the open period defined for the fiscal year to verify whether the transaction is eligible for submission. |
Default Information
Field or Control |
Description |
|---|---|
Base Currency |
Displays the primary currency for a general ledger business unit, which can have only one base currency. |
Country |
Select a country for PeopleSoft Expenses to use as the default country for the general ledger business unit. PeopleSoft Expenses refers to this field for VAT and distance rates. |
Template |
Select an accounting entry template that specifies what ChartFields to charge for accounting entries from your expense system. |
Enable India GST |
Select this check box to enable India GST for a Business Unit in Expenses. Once selected, all the Expenses functionality for India GST will be available to the users belonging to the business unit. |
Advance Options
Field or Control |
Description |
|---|---|
Allow Advance |
Select if this business unit uses cash advances. If this option is selected, enter a value in the Max Advance Amount for BU (maximum advance amount for the business unit) field. If you do not select the Allow Advance check box, the system prevents employees in this business unit from creating cash advances. If you change the Allow Advance or Max Advance Amount for BU field, PeopleSoft Expenses automatically updates the employee profiles. |
Twilio Integration
Field or Control |
Description |
|---|---|
Text Message |
Select to allow an employee belonging to the business unit to send text message via Twilio. If this check box is not selected, the Text Message tab will not be displayed on the Business Unit 1 page. For more information on Twilio, see https://www.twilio.com |
Payment Information
Field or Control |
Description |
|---|---|
DUNS Number |
Dun & Bradstreet assigns this optional field for tracking purposes. |
Location |
Select a business unit address to print on payment forms. |
Total Amount Limits
Field or Control |
Description |
|---|---|
Prepayment Amount and Post-Payment Amount |
Enter a maximum amount for an expense report. If the Amount Exceeded refinement is selected on the Approval Refinement Template page, PeopleSoft Expenses directs expense reports that exceed this amount to the auditor. The prepayment amount applies to all approvers types before payment. The system default is 0 for both fields, which means that no limits are placed on these values. |
Change Expense Type from My Wallet Download
Field or Control |
Description |
|---|---|
Allow Changes to Expense Type |
Select this check box to allow changing the expense type on the expense report for expense entries imported from My Wallet. |
Require a Reason Code |
Select this check box to set the requirement to enter a reason code on the expense report whenever an expense type is modified on expense entries imported from My Wallet. |
Receipt Amount
Field or Control |
Description |
|---|---|
Minimum Receipt Amount |
Specify the minimum expense amount for which a receipt is required. For example, if you enter 75 EUR, employees from this business unit must provide receipts for expenses over 75 EUR. Note: This filed may be hidden if you are using the Receipts Required feature. For information about the Receipts Required feature, see Understanding Receipt Options for Expense Reports. |
Payroll Gross Up Estimate
Field or Control |
Description |
|---|---|
Gross Up Percent |
Enter a percentage to use for tax calculations. For example, if an employee is to receive a net amount of 1,000 GBP and the gross up estimate for taxes is 20 percent, you would pay the employee 1,200 GBP. When your organization agrees to pay a taxable lump sum for expenses such as moving costs, you can ensure that the employee receives the correct amount by estimating the percentage of tax and adding the amount to the committed amount. The percentage that you enter in this field is an estimate of the liability to your organization. The payroll system determines the actual grossed up amount. |
Expense Report Doc Type (Expense Report Document Type)
Field or Control |
Description |
|---|---|
Post, Unpost, and Close |
If you use document sequencing, select a document type to generate document numbers for expense reports. If you do not require various sets of document numbers, use the same document type for all three processes. |
Cash Advance Doc Type (Cash Advance Document Type)
Field or Control |
Description |
|---|---|
Post and Close |
If you use document sequencing, select a document type to generate document numbers for cash advances. If you do not require various sets of document numbers, use the same document type for both processes. |
Period End Accruals
Field or Control |
Description |
|---|---|
Accrue Unprocessed Expenses |
Select to enable period end accrual processing for expense sheets. Note: A journal generator template for period end accruals must be established on the Expenses Definition - Business Unit 2 page to enable this functionality. |
Accrue Wallet Entries |
Select to enable period end accrual processing for My Wallet transactions. Note: A journal generator template for period end accruals must be established on the Expenses Definition - Business Unit 2 page to enable this functionality. |
Accrue for Billable Expenses |
Select to enable period end accrual processing for billable expenses. |
Commitment Control for Accrual |
Select to enable commitment control for accrual processing. When this option is selected, expense and encumbrance relief entries are created during the Period End Accruals process for PeopleSoft Expenses. |
See Understanding Period End Accrual Processing for PeopleSoft Expenses.
Override
Field or Control |
Description |
|---|---|
Override Authorized Amounts |
Select to allow anyone in this business unit to ignore location amounts associated with expense types. If this option is not selected, employees in this business unit can enter amounts up to the authorized amount plus the benchmark tolerance for any expense type. If employees enter amounts above the authorized amount plus the benchmark tolerance, the system requires them to enter an exception comment. |
Override Per Diem |
Select to allow an employee in this business unit to enter any amount for an expense type that is a per diem expense type. If he or she exceeds the authorized amount plus the benchmark tolerance, the system requires the employee to enter an exception comment. If this option is not selected, employees in this business unit can enter an amount up to the authorized amount plus the benchmark tolerance for an expense type that is a per diem expense type. If an employee tries to enter an amount above the authorized amount plus the benchmark tolerance, the system displays an error message. |
Override Loc Amt Group |
Select to allow anyone in this business unit to ignore location amounts associated with an expense type group. If this check box is not selected, employees in this business unit can enter amounts up to the authorized amount for any expense type group. If employees enter amounts above the authorized amount, the system requires them to enter an exception comment. |
Disable DCAA (disable Defense Contract Audit Agency) |
Select to disable the requirement to enforce DCAA audit requirements for a general ledger business unit. Note: PeopleSoft Expenses displays this check box if DCAA Enabled is selected on the Installation Options - Expenses page. |
Payment Destination
|
Field or Control |
Description |
|---|---|
|
Option |
Select one of these options, which is used during the Stage Payments process:
For more information about the Stage Payments process, see Staging Payments. |
Use the Expenses Definition - Business Unit 2 page (BUS_UNIT_TBL_EX2) to designate business unit specifications for journal templates, time reporting, automatic approval thresholds, project time options, and grace periods.
Navigation:
. Select Business Unit 2.
This example illustrates the fields and controls on the Expenses Definition - Business Unit 2 page. You can find definitions for the fields and controls later on this page.

Journal Generator Templates
Select the templates for the business unit to use for accruals, payments, closes, period end accruals, and cancels. Your system may have different templates if you use different accounting entry journals for PeopleSoft Expenses. Use the Journal Generator Template - Defaults Page to define journal generator templates.
Note: The template that is selected for the Period End Accruals field cannot create reversal entries.
Grace Period
Establish the number of days after which employees must submit expense transactions for processing:
Field or Control |
Description |
|---|---|
Cash Advance Overdue |
The default is 90 days. This number applies to cash advances that have not been processed and reconciled. |
Credit Card Data Overdue |
The default is 30 days. This number applies to credit card data loaded into the expenses system but not processed in an expense report. |
Inactive Employee SubmissionsTime Report and Expense Report |
Enter the number of days to allow an authorized employee to enter time reports or expense reports on behalf of an inactive employee. The number of days refers to the time since the employee became inactive (using employee status and action date). At submit time, PeopleSoft Expenses checks the employee status and action date. If the employee is inactive, PeopleSoft Expenses verifies whether the grace period has been exceeded and, if so, issues an error message to prevent further processing of the expense transaction. |
Exception Comments Required for Transactions Older Than number of days |
Select to indicate that transaction that are older than the number of days specified in the days field require the employee to enter a comment. The comment should explain why the expense transaction is being submitted after the number of days specified. If you leave the days field blank, then system does not check for this feature and does not require a comment, regardless of how long it has been since the transaction occurred. For more information about entering Exception Comments on Expense Reports, see Common Elements Used to Create or Modify Expense Reports |
Disallow Transactions Older Than number of days |
Select to indicate that your organization does not accept expense transactions that are older than the number of days specified in the days field. If you leave the days field blank, then system does not check for this feature regardless of how long it has been since the transaction occurred. |
Time Reporting Options
Field or Control |
Description |
|---|---|
Time Report Period |
Select the frequency with which employees in this business unit report their work hours. This parameter is used for time reports to determine the number of days to display for time entry. The default is Weekly; you can also select Daily, Bi-Weekly, or Semi-Monthly. |
Ending Day of Period |
The default is Friday. This field signifies the ending day for the time reporting period. This field applies only to weekly and biweekly time collection frequencies. Note: If you use PeopleSoft Forecast Collection, the forecast collection ending day on the Forecast Configuration page must match this ending day. |
Hours Per Day |
Enter the number of hours that make up a work day for the business unit. The default value is eight, but the value can be overridden to enter a longer or shorter work day. When an employee enters his or her time on the Time Report Summary page, the system uses the value entered in this field to calculate the employee's overtime each day. |
Import Time from Primavera to |
Select Expenses or Project Costing. This field is not available if Program Management is not installed. |
Time Grid Display
Select to display the project grid, the policy grid, or both on time reports. If you select to display the project or policy grid, PeopleSoft Expenses hides the other grid and the totals and functionality in the hidden grid will be inaccessible on time reports.
Project Time Options
Field or Control |
Description |
|---|---|
Select Project ChartFields Display |
Select to display PeopleSoft Project Costing ChartField codes or descriptions on time reports. |
Disable Future Entry |
Select to prohibit employees in the general ledger business unit from entering time against projects on a time report that has not yet been worked. |
Allow Entry of ETC (estimate to complete) |
PeopleSoft Expenses displays this check box if PeopleSoft Program Management is installed. Select to enable employees in the general ledger business unit to view remaining work hours for their projects and enter a new estimate of hours to complete projects on their time reports. If you do not select the check box, PeopleSoft Expenses does not display the Remaining Work and New Estimate fields on the Time Report Summary page. |
Time Report Thresholds
Establish thresholds for PeopleSoft Expenses to issue warnings or error messages if employees submit time reports over or under the required number of hours for a time reporting period. You can set time reporting thresholds by general ledger business unit or by employee.
See Maintaining Employee Organizational Data.
Field or Control |
Description |
|---|---|
Alert Actions |
Select to issue warnings or errors for employees who submit time reports that are less than the minimum number of hours or greater than the maximum number of hours for a time reporting period. |
Per Period Thresholds |
Enter the minimum and maximum number of hours for a time reporting period for PeopleSoft Expenses to use to issue warnings or errors. |
Process Time to Project When
Use this section to indicate when time sheets can be sent to Project Costing when the Stage Time to Project Costing option is selected on the Expense Processes page.
Field or Control |
Description |
|---|---|
Entire Timesheet is Approved |
Select to indicate that the system can send timesheets to Project Costing only when the timesheet is approved. |
Entire Line is Approved |
Select to indicate that the system can send timesheet lines to Project costing when an individual timesheet line is approved. Note: If a timesheet line is approved and sent to Project Costing, the line will not be available to edit if the timesheet is sent back to the employee by a different approver. If a timesheet line is approved and sent to Project Costing, and an approver tries to deny the timesheet report, then a message is displayed indicating that some lines have been sent to Project Costing and those lines cannot be denied. |
For more information about expense processes, see Running Expense Transaction Processes
Auto Approval Thresholds
The options in this group box are active only when the Auto Approve option is selected on the Transaction Definition page for the expense report, travel authorization, and cash advance transaction type.
Field or Control |
Description |
|---|---|
Monetary Amount Threshold |
If the total amount of the expense report, travel authorization, or cash advance is less than or equal to the monetary threshold amount, PeopleSoft Expenses automatically approves the transaction. If you do not enter an amount in this field, PeopleSoft Expenses does not automatically approve the transactions, even if you enabled the automatic approval functionality. |
% Variance from Travel Auth (percent variance from travel authorization) |
Enter a variance percentage for PeopleSoft Expenses to automatically approve expense reports created from travel authorizations. PeopleSoft Expenses calculates the difference between the expense report total amount and the travel authorization total amount as a percentage. If the percent difference is less than or equal to the percent variance, PeopleSoft Expenses automatically approves the expense report. If you do not enter a percent variance, PeopleSoft Expenses does not automatically approve expense reports based on its variance from the travel authorization, even if you enabled the automatic approval functionality. If the amount of the expense transaction exceeds the variance, but is within the monetary amount threshold, PeopleSoft Expenses automatically approves the expense report. |
Note: If PeopleSoft Commitment Control is enabled, PeopleSoft Expenses does not automatically approve expense reports if the option to require a valid budget checking status prior to approval is enforced and the budget status is set to require budget checking.
The Monetary Amount Threshold and % Variance from Travel Auth fields are not available if you disable automatic approval for all transaction types.
Field or Control |
Description |
|---|---|
Auto Approve Only If No Risk |
Select to indicate that transactions can be approved automatically only when no risk is involved. The use of this option depends upon whether your business unit uses risk templates and you must enter a value in the Monetary Amount Threshold field. |
Distance Accumulation Calendar
PeopleSoft Expenses enables you to accumulate automobile distance based on a fiscal or calendar year. When employees enter an automobile mileage expense on an expense report and specify the distance traveled, PeopleSoft Expenses looks at the calendar specified for the employees' business unit to determine which year to add the distance to.
When employees enter an expense date for an automobile mileage expense on expense reports and the distance rate is variable, PeopleSoft Expenses validates the date against the calendar that you establish on the Expenses Definition - Business Unit 2 page and updates the accumulated distance for the appropriate year.
Field or Control |
Description |
|---|---|
Use Calendar Year |
Select to use the calendar year (January through December) to accumulate automobile distance. |
Use Specified Calendar |
Select to specify a detail calendar defined on the Calendar Periods page (DETAIL_CALENDAR1). The calendar that you specify determines how PeopleSoft Expenses accumulates automobile distance for employees within the business unit. Warning! If you change options and employees in the business unit have accumulated miles or kilometers, PeopleSoft Expenses displays a warning that the change could invalidate the existing accumulated distance data. |
GPS Calculator Options
GPS Calculator allows you to set the options to automatically calculate distance by capturing the starting and ending points for a trip. Once the distance is calculated, the trip is associated to a mileage reimbursement rate based upon mapping rules, and the amount is then calculated and the relevant expense line details are populated.
GPS Calculator uses Oracle Maps and eLocation Services to calculate mileage distance.
Field or Control |
Description |
|---|---|
Display Distance Calculator |
Select to display the GPS Distance calculator in the Expense Entry Page and My Wallet page to automatically calculate the distance for mileage reimbursements. |
Require Comments to Override |
Select to indicate if comments are required when expense users makes changes to the calculated GPS distance in the Expense Entry Page. |
Road Preference |
Select an option to set the road preference. The option that is set here will be used by the GPS Distance calculator to calculate the distance. |
Route Preference |
Select an option to set the route preference. The option that is set here will be used by the GPS Distance calculator to calculate the distance. |
Use the Expenses Definition - Business Unit Privileges page (EX_BU_PRIV) to assign privilege templates to a business unit.
Navigation:
. Select Business Unit Privileges.
This example illustrates the fields and controls on the Business Unit Privileges page. You can find definitions for the fields and controls later on this page.
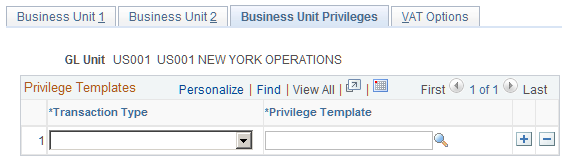
Use this page to assign a privilege template to a business unit for each transaction type.
Field or Control |
Description |
|---|---|
Transaction Type |
Select a transaction. Options include Expense Report, Time Report, and Travel Authorization. |
Privilege Template |
Select a template for the transaction. This template is used as the default template for all employees in the business unit. |
Use the Expenses Definition - VAT Options page (BUS_UNIT_TBL_EX3) to establish VAT parameters for the business unit.
Navigation:
. Select VAT Options.
This example illustrates the fields and controls on the Expenses Definition - VAT Options page. You can find definitions for the fields and controls later on this page.

VAT Fields
Field or Control |
Description |
|---|---|
Physical Nature |
Select Goods or Services for VAT treatment. |
Record Foreign VAT (record foreign value-added tax) |
Select to record foreign VAT on expense sheets, regardless of whether you enabled VAT at the business unit level. This is for customers who want to record and reclaim foreign VAT. |
Prorate Non-Recoverable VAT (prorate nonrecoverable value-added tax) |
PeopleSoft Expenses generates an accounting line for nonrecoverable VAT. If this check box is deselected, nonrecoverable VAT is charged to the nonrecoverable VAT account designated in the VAT code definition. When this option is selected, nonrecoverable VAT is charged as an expense to the general ledger ChartFields that are indicated in the expense report accounting detail page. |
Allocate Non-Recoverable VAT (allocate nonrecoverable value-added tax) |
If this option is selected, the accounting comes from the VAT template. If deselected, the accounting comes from the VAT accounting template. Note: The Allocate Non-Recoverable VAT check box is active only if the Prorate Non-Recoverable VAT check box is deselected. |
VAT Default |
Click to access the VAT Defaults Setup page. The VAT Default Setup page is a common page used to set up VAT defaulting for all PeopleSoft applications that are processing VAT transactions. On this page you can define the PeopleSoft Expenses business unit defaults, as applicable. |
Use the Receipts Required (BUS_UNIT_TBL_EX4) page to determine expense receipt requirements for the business unit.
Navigation:
This example illustrates the fields and controls on the Receipts Required page.

This example illustrates the fields and controls on the Receipts Required page, No Receipt Comments tab.
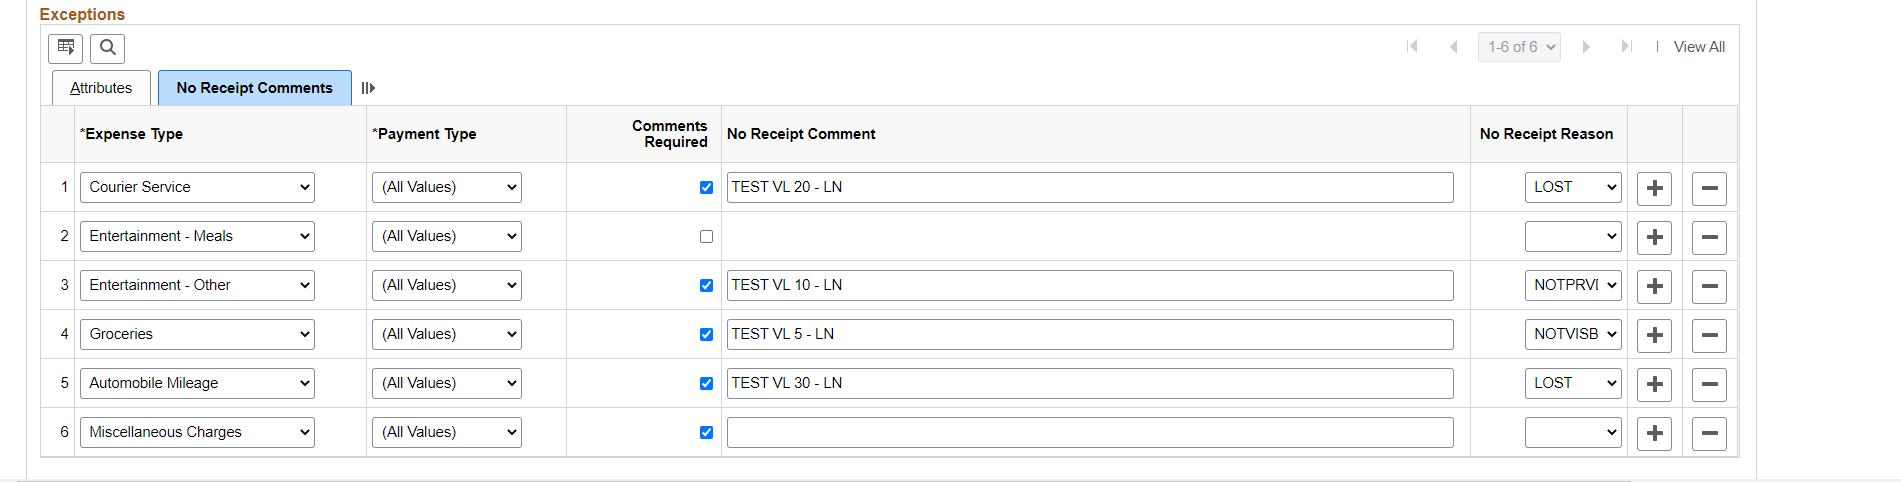
Use this page to determine the minimum receipt requirements for the business unit, or for a combination of business unit, expense type, payment type, receipt required, and minimum receipt amount.
For additional information about receipt options, see Understanding Receipt Options for Expense Reports.
Note: The fields and sections that are available on this page are determine by the values selected in the Receipts Configuration section of the Installation Options - Expenses Page.
Receipts Configuration Section
Use this section to determine whether receipts are required for all expense reports at the header and line levels. If receipts are required, then enter the general rule to be used when requiring receipts. This should be the required parameters that apply to most expense lines for your organization.
Field or Control |
Description |
|---|---|
Receipt Required |
Select an option that determines whether receipts are required for all expense reports in the business unit. This field appears when Header Level, Line Level, or Header and Line is selected in the Attachment Location field of the Installation Options - Expenses Page. Options include:
|
Minimum Receipt Amount |
Enter an amount that determines the minimum amount that a receipt is required for each line. This field appears when Header Level, Line Level, or Header and Line is selected in the Attachment Location field of the Installation Options - Expenses Page. If the amount of an expense line is greater than or equal to this amount, the system may require a receipt depending on the value selected in the Receipt Required field. Any amount that is less than this amount, does not require a receipt. If a line amount exceeds this amount and a receipt is required, the system displays an error on the Expense Entry Page. See Understanding Expense Report Errors in PeopleSoft Fluid. When the Receipt Required field is:
The currency that appears next to this field comes from the base currency determine on the Expenses Definition - Business Unit 1 Page. |
Enforce Receipt Preferences Section
This section appears only when Header Level or Header and Line is selected in the Attachment Location field of the Installation Options - Expenses Page.
|
Field or Control |
Description |
|---|---|
|
Enforce Receipt |
Select to indicate that receipts MUST be attached to all expense reports when the Receipt Required value is Always. If a receipt is not attached, you can add a comment to explain why. If you do not attach a receipt or enter a comment, the system displays an error and you cannot submit the expense report. |
|
Header Receipt for All Lines |
Select to indicate that one or more receipts must be attached at the header level and optional at the line level. |
No Receipt Default Comment Section
This section is active only when Header and Line is selected in the Attachment Location field of the Installation Options - Expenses Page.
Field or Control |
Description |
|---|---|
Comments Required (check box) |
Select this check box to indicate that the employee must enter a comment if they don’t have a receipt for an expense line that requires a receipt. When this option is selected, a user must enter a comment in the Exception Comments section on the Expense Entry page. If no comment is entered, the system provides an error. Deselect when receipts are required but comments are not required from employees. As an alternative, you can enter default text in the Comments Required field, which can be pulled into the Exception Comments section by the user. Exception Comments field for the system to pull in the default Comment (entered in the next, open text field) into the transaction. After viewing the default comment and selecting Done the error goes away. |
|
Comments Required (open text field) |
Enter default text that appears in the No Receipt Comment field of the Expense Entry Page. This text appears when the Comments Required check box is selected above, and an employee does not attach a document to an expense line. When entering an expense report that requires a receipt, you must select the comment field, in the Exception Comments section to activate this comment. |
|
No Receipt Reason |
Select a pre-defined Reason Code that appears by default in the No Receipt Reason field on the Expense Entry Page. This value appears when receipts are required but no receipt is attached at the header or line levels. The user can change the reason code if needed. This field is active only when the Attachment Location is Header and Line on the Installation Options - Expenses Page. |
Exceptions - Attributes
Use this section to enter exceptions to the general rule that is entered in the Receipts Configuration section of this page. This section allows you to determine receipt requirements based on the combination of fields selected.
This section appears only when Line Level or Header and Line is selected in the Attachment Location field of the Installation Options - Expenses Page
Field or Control |
Description |
|---|---|
Expense Type |
Select an expense type for the exception row. See Setting Up Expense Types. |
Payment Type |
Select a payment type for the exception row. See Payment Type Page. |
Receipt Required |
Select an option that determines whether receipts are required for the combination of the expense type and payment type that is indicated on the exception line. Options include:
|
|
Minimum Receipt Amount |
Enter an amount that determines the minimum amount that a receipt is required for the expense type and payment type combination. If the amount of an expense line is greater than or equal to this amount, the system may require a receipt depending on the value selected in the Receipt Required field. Any amount that is less than this amount, does not require a receipt. If the line amount is greater than this value, the system displays an error on the Expense Entry Page. When the Receipt Required field is:
The hierarchy is to check the value entered in the Minimum Receipt Amount field at the top of this page first, then the value entered in this field. The currency that appears next to this field comes from the base currency of the Expenses business unit. |
|
Enforce Receipt |
Select to indicate that a receipt is required for this exception combination. |
Exceptions - No Receipt Comments
Field or Control |
Description |
|---|---|
Comments Required |
Select this check box to indicate that the employee must enter a comment if they don’t have a receipt for an expense that requires a receipt. Deselect when receipts are required but comments are not required from employees. |
No Receipt Comment |
Enter a general comment, which appears by default on all expense lines that require a comment, in the No Receipt Comment field when an employee creates an expense report. |
|
No Receipt Reason |
Select a reason code that appears by default when a receipt is required, but no document is attached to the line that has this combination. The reason code appears by default on the Expense Entry page and the Approval Line Detail page. |
Use the Expenses Definition - Text Message Page (BUS_UNIT_TBL_EX5) page to allow organizations to setup a Twilio account and the text message format that should be used to send to Twilio.
This Text Message page is displayed only if you have selected the Text Message check box on the Business Unit 1 page.
Navigation:
This example illustrates the fields and controls on the Text Message page. You can find definitions for the fields and controls later on this page.

Twilio Account
Use this section to setup account information with Twilio.
Field or Control |
Description |
|---|---|
Twilio Account Name |
Displays the account name in Twilio. |
Twilio Account ID |
Displays the account ID in Twilio. This acts as a user name. |
Authorization Token |
Displays the Authentication Token ID provided by Twilio. This acts as a password and is used to verify the integration with Twilio. |
Twilio Phone
Use this section to record Twilio phone number(s) used by employees to send the text message. Depending on how the Twilio account has been setup, there can be multiple Twilio phone numbers assigned. Organization may choose to assign one or more numbers to be used for the business unit.
The system uses the Business Unit, Twilio Account ID and Twilio phone number combination to extract the text message data from Twilio.
If the same account with the same phone number is used for multiple Business Units, when one Business Unit runs a process, all messages will be retrieved from Twilio. Messages will be processed for all Business Units having the same account and phone number.
Field or Control |
Description |
|---|---|
International Prefix |
Enter the prefix number for a phone number. |
Twilio Phone Number |
Enter the phone number including the area code. The E.164 number formatting must be used. This format is an internationally standardized format for all phone numbers. E.164 numbers have a maximum of fifteen digits and are usually written as: [+][country code][subscriber number including area code]. |
Last Message Received |
Displays the date and time of the last message received from Twilio. |
Last Delete Request |
Displays the date time of the last message deleted from Twilio. |
Text Message Options/Fields
Use this section for organizations to specify if the expense data should be entered as a text message, and which expense data elements must included in the message.
Field or Control |
Description |
|---|---|
Date Format |
Select a date format. |
Field Separator |
Separates the messages sent by an employee. |
Field Order |
Enter number in a sequence to organize the fields on the message. |
Expense Data |
Select the Expense data elements. The following expense data elements are accepted:
|
Include |
Select a check box to include an expense data elements in the message. You skip the data elements in the text message. If the data elements needs to be entered prior to the expense type and amount, the field separator needs to be included. If the data elements are entered after expense type and amount, no field separator required. Note: The data elements Expense Type and Amount are selected by default, and cannot be deselected. |
Here is a sample text message when one or more options in the Text Message Options/Fields are selected. The following text messages are acceptable:
These sample data elements includes date, expense type, amount and description.
4/15/2017; Dinner; 50 USD; Dinner with client
; Dinner; 50 (If date is not included, the current date will be used. If currency is not included, the employee's base currency will be used).
Use the Expenses Options page (BUS_UNIT_OPT_EX) to establish payment defaults, Commitment Control options, and approval preferences for a SetID.
Navigation:
This example illustrates the fields and controls on the Expenses Options page. You can find definitions for the fields and controls later on this page.
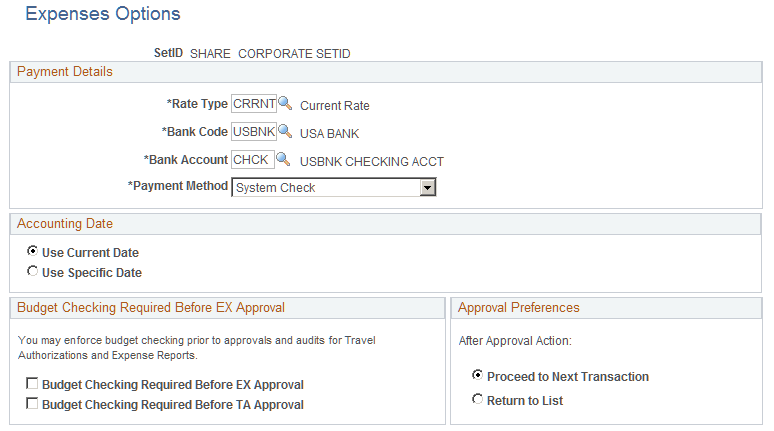
Payment Details
Select a rate type to perform exchange rate calculations.
If a business unit associated with this SetID makes expense payments to employees, the Bank Code, Bank Account, and Payment Method fields establish defaults.
Accounting Date
Select Use Current Date as your accounting date or select Use Specific Date to open a field and enter a date.
Budget Checking Required Before EX Approval
These options apply to Fluid and Classic (+) expense reports and travel authorizations.
Field or Control |
Description |
|---|---|
Require budget checking prior to approval for Expense Reports |
If this option is selected, you cannot approve expense reports until you budget check the transactions and they pass with a valid budget status. If multiple approvers exist, only the first approver is required to budget check successfully prior to approval. If an approver modifies any of the accounting details, budget checking is required again to reflect the changes. This option applies only to business units that are enabled for commitment control. |
Require budget checking prior to approval for Travel Authorizations |
If this option is selected, you cannot approve travel authorizations until you budget check the transactions and they pass with a valid budget status. This option applies only to business units that are enabled for commitment control. |
Approval Preferences
Note: This feature applies to Classic(+) only.
Select a preference for how you want PeopleSoft Expenses to behave when approving expense transactions. Although approvers can approve transactions at a summary level, they can also drill down to individual transactions to perform their approval actions. The approval preference determines the behavior of the system after approvers perform their approval actions.
Field or Control |
Description |
|---|---|
After Approval Action |
Select Proceed to Next Transaction to access the next expense transaction that is available for approval action, or select Return to List to return the approver to the Summary Approvals page from which he or she drilled down. |