Creating and Modifying Expense Reports
|
Page Name |
Definition Name |
Usage |
|---|---|---|
|
EX_SHEET_ENTRY |
Create expense reports. |
|
|
EX_EXPENSE_SUBMIT |
Review, analyze, and submit expense reports. |
|
|
EX_DEPT_ANALYTIC |
View all expense lines, one week at a time. |
|
|
Analytics - Totals by Department Page |
EX_DEPT_ANALYTIC |
View totals based on the department IDs entered in the Accounting Detail section of the expense report. |
|
Analytics - Totals by Project/Activity Page |
EX_DEPT_ANALYTIC |
View totals based on the projects entered in the Accounting Detail section of the expense report. |
|
EX_SUBMIT_CONF_ER |
Confirm and submit expense reports. |
|
|
Attendees Page |
TE_SHEET_ATT |
Add, view, or modify attendees for the expense transaction. |
|
No Receipt Included Page |
EX_NORCPT_COMMENT |
Add, view, or modify comments about why a receipt for an expense is not included with the expense report. |
|
Preferred Merchant Explanation Page |
EX_SH_PRFMRCH_CMNT |
Add, view, or modify comments about why a preferred merchant was not used. |
|
Credit Card Selection Page |
TE_CC_LOOKUP |
Select a credit card to use for the expense item. This button only appears when a credit card merchant is selected as the payment type on the Overview tab and when more than one credit card is active from the same merchant, such as Visa and MasterCard, in the user’s profile. |
|
Exchange Rate Detail Page |
EXCH_RT_DTL |
View the exchange rate information that the system used for an expense. |
|
Expense Report Project Summary Page |
TE_PROJ_SUMMARY |
View summary of expense line items. |
The Create Expense Report page enables you to easily add expense lines and provide general information as well as other details that are specific for expense types. You can use the Employee Profile component to set up default values for location, purpose, description, payment method, and distributions. These defaults are used to automatically populate the expense report when it is initially created, but you can override these defaults during creation. Expense transactions can be directly entered or can be imported into your expense report from My Wallet if your organization is using a credit card feed. Expense transactions that are uploaded to the online system from a personal digital assistance (PDA) will appear in My Wallet and will be ready for use in an expense report.
Field or Control |
Description |
|---|---|
Attachments |
Select to access the Expense Report Attachments page. Use this page to add, delete, or view expense report attachments for the entire expense report. A paperclip and + sign appear if your organization allows line level attachments and there are not attachments. When an attachment is added, the + sign is not displayed. Instead, you can hover your mouse over paperclip and the system displays how many attachments are associated with the line. This link is available only when Attachments Only or Both Imaging and Attachments is selected in the Option field in the Receipts Confirmation group box on the Installation Options - Expenses Page. |
|
Click the Embedded Help icon to open up a secondary window with information about this page or section. Embedded help can provide information about specific fields and point the user to additional help. See PeopleTools PeopleBook: PeopleSoft Application Designer Developer's Guide for more information on creating and modifying embedded help. |
|
Click the Missing or invalid information was found icon to access theExpense Report Line Errors Page, which displays all the issues associated with the expense line. This page displays missing or invalid information pertaining to the expense transaction line. This icon appears only after you select the Insert Line icon to add a new expense line, click the Save for Later link, or select the Submit Expense Report button on the Create Expense Report - Summary and Submit page. All missing or invalid information must be added before you can submit an expense report. When you correct the missing or invalid information, the system automatically re-edits the field and removes the red flag if it is valid. |
|
Click the Exception Comments icon to view comments entered for these exceptions:
|
|
Click the Exception Comments icon to enter comments for these exceptions. This icon appears next to the field that trigger the exception.
|


Use the Create Expense Report page (EX_SHEET_ENTRY) to create expense reports.
Use the Modify Expense Report page (EX_SHEET_ENTRY) to modify expense reports.
Navigation:
This example illustrates the fields and controls on the Create Expense Report page.
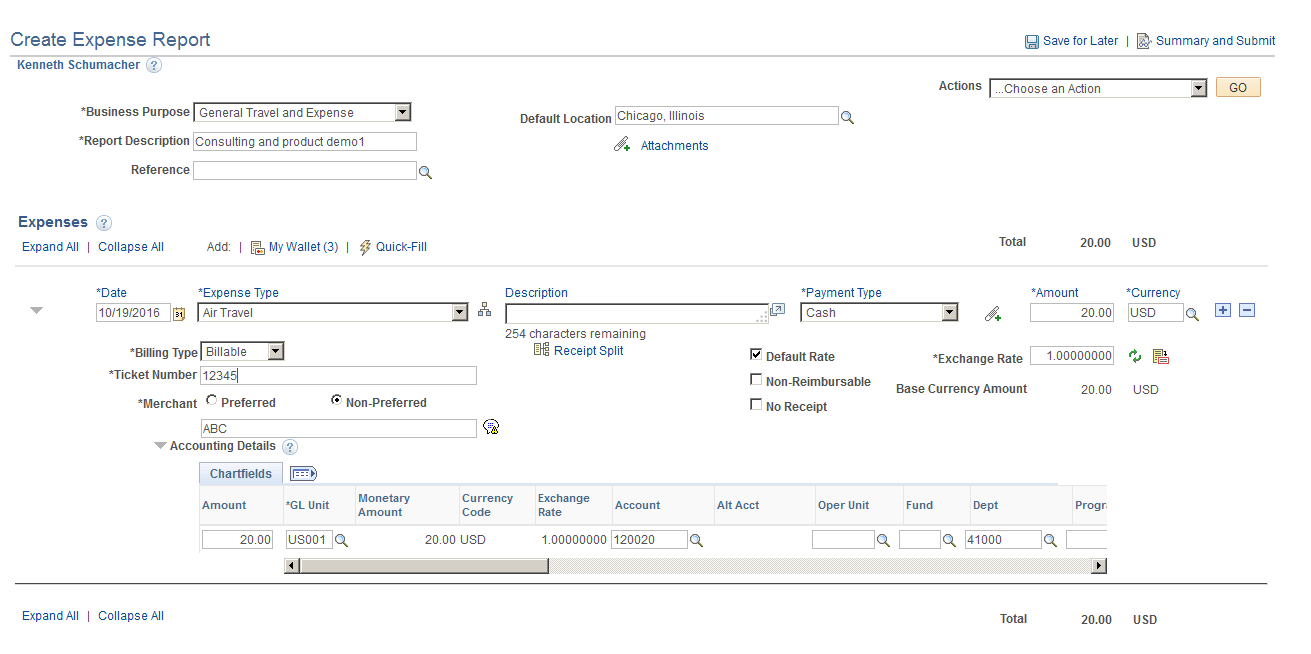
General Expense Report Information
The Create Expense Report page allows you to define general information about the expenses incurred for the report. PeopleSoft Expenses populates most of these fields with information that you set up on the Employee Profile - User Defaults Page. PeopleSoft Expenses also enables you to attach a travel authorization to your expense report. Only one travel authorization can be attached to an expense report at one time. A detach travel authorization feature enables you to remove the travel authorization from the expense report. You can only select travel authorizations that are not already attached to an expense report.
Field or Control |
Description |
|---|---|
Save for Later |
Select to save the expense report without submitting it for approval. This option enables employees to create an expense report as they’re incurring expenses, and save it for a later time when they are ready to submit it. |
Home |
Select to return to the Travel and Expense Center. |
Summary and Submit |
Select to access the Summary and Submit page to view a summary of expense lines. |
Quick Start |
Select from these values:
Note: After you select an option from this drop down box or select an expense type, this drop down box changes from Quick Start to Action. |
Business Purpose |
Select a purpose from a predefined list that was created when you implemented the expense system. Because tax laws require a business purpose for business expenses, this field is required. |
Default Location |
Enter a city, country, or geographical area where the expenses were generally incurred (which you establish during system setup). This location appears on each expense line where applicable, and you can change it throughout the expense report process. If you change the default location, PeopleSoft Expenses applies the new location to newly added expenses; the change does not affect existing expense lines. Note: If value-added tax (VAT) is enabled, you must enter a default location so that PeopleSoft Expenses can determine the VAT treatment. |
Report Description |
Enter a description to identify the expense report. |
Authorization ID |
Displays the travel authorization number that is either associated with the expense report or used to create an expense report. Click the link to access the Travel Authorization Details page to view information about the travel authorization. |
Reference ID |
Enter free form text or select a reference id that has been pre-defined on the Reference Page. This field is used for tracking or identification. |
Detach TA (detach travel authorization) |
Select to detach a travel authorization that was associated with the expense report. This check box does not apply when a travel authorization is used to create an expense report by copying travel authorization lines to a new expense report. After selecting the Detach TA check box, the system detaches the travel authorization from the expense report after the expense report is saved. The detached travel authorization is available to associate with another expense report. |
Actions |
Select from these options:
|
Expenses
Initially, this section displays the Date, Expense Type, Description, Payment Type, Amount, and Currency fields. When you select an expense type, the fields adjust based on the options selected on the Expense Type component.
The column header in this section enable users to sort the lines in ascending and descending order. Click the column header one time to sort the column in ascending order. Click the column header two times to sort the column in descending order.
Deferred processing is turned off on fields that are validated so that when the missing or invalid information is corrected, the system removes the red flag.
Field or Control |
Description |
|---|---|
My Wallet |
Select the My Wallet link to access the Create Expense Report - My Wallet page and add entries from My Wallet. The number in parenthesis indicates how many active entries are available in the user’s wallet. |
Quick Fill |
Select this link to access the Quick Fill Page where you can select multiple expense types and whether the expense type was incurred for one day or all days of the date range. |
Total (# lines) |
Displays the sum of the expense Base Currency Amount values for all transaction lines. The number of transaction lines is displayed next to the field label. |
Date |
Enter the date when the transaction began or occurred. |
Expense Type |
Select an expense type to add an expense item. The system expands the section and displays the fields associated with the expense type after this field is selected. If an expense entry has been imported from My Wallet, you can change the expense type if you have configured the Business Unit to allow changes to expense types imported from a Wallet. See the section Change Expense Type from My Wallet Download in Expenses Definition - Business Unit 1 Page If you have allowed changes to expense types imported from a wallet, you can optionally enter a reason code to indicate the reason for the change in expense type. The option to set the requirement of a reason code is configured in the Expenses Definition - Business Unit 1 Page. Changes to the expense type after the expense entry was imported from a wallet is tracked and stored in PeopleSoft tables (EX_CHNG_TYPE). Note: The expense type is not in deferred mode so that PeopleSoft Expenses can determine which fields to apply and which fields to hide. |
|
Click the Select Expense Type icon to access the Select Expense Type by Category page, which displays a list of all the Expense Type Categories. Select an Expense Type Category on the left side, and the corresponding expense types appear on the right side of the page. The expense types that are available to you are based on an employee’s role and transaction date. Expense types that are not allowed for a role or are not active on the transaction date are not listed in the Select Expense Type by Category page. Furthermore, the expense type category that does not include any available expense types for this role are not listed. Expense types that are not assigned to an expense type category are grouped as Uncategorized . If one expense type category is marked as Inactive, then all the expense types assigned to that expense type category are grouped and listed in the Uncategorized expense type category. When you create or modify an expense report, the Select Expense Type button is displayed at the right side of expense type field. This button is displayed only if you select the Use Expense Type Category check box on the Installation Options page for Expenses. |
Description |
Enter a description about the expense transaction. You can click the Display Description in window icon to view all lines of a long description. |
Payment Type |
Enter how you paid for the expense, such as with a credit card or cash. This value may appear by default if a payment type is entered in the Expense defaults group box on the Employee Profile - User Defaults page. |
Amount |
Enter the amount that you spent for the expense line. This field is grayed out when the expense type is associated with the Automobile expense type. |
Currency |
Displays the currency associated with the transaction amount spent. The default for this field is the employee's base currency; however, it can be changed. |
|
Click the Insert Line icon to add a new expense line. When you add a new line, the system validates the data on the previous expense line. If an error is detected by the system, a red flag will appear next to the previous line, which must be fixed prior to submitting the expense report. |
|
Click the Del (delete) icon to delete an expense line. When you delete a line, the system displays a Delete Confirmation page. If you select the Do not show this confirmation again check box and click the OK button, the system will not display the Delete Confirmation page again, until you leave the component. This enables you to delete multiple lines in an expense report without getting the message. If you do not select the Do not show this confirmation again check box and click the OK button, the system displays the Delete Confirmation page each time you click this icon. Note: If you import enhanced data (Hotel/Lodging expense type) from credit card vendors, and you delete a transaction detail line, then all of the detail transaction lines that were imported are deleted for the transaction. You cannot delete individual detail lines that are enhanced data. If you delete an enhanced data detail line, a message is issued that all lines associated with the Hotel/Lodging expense type will be deleted. |
Billing Type |
Select the appropriate billing type for the expense transaction. Access to this field depends how the Employee Privilege Template Page is set up for the user. If you use PeopleSoft Project Costing, the system requires billing codes to identify project costs that are billable and charged to project costing ChartFields. PeopleSoft Expenses sends the information to Project Costing, and Project Costing passes the data to PeopleSoft Billing for processing. The billing type determines the billing code that is used by Project Costing . |
|
Click the Receipt Split icon to access the Receipt Detail for Expense [expense type] Page (Splitting Receipts) where employees can itemize the charges on this receipt into multiple expense types. |
Default Rate |
Select to indicate if system rate exchange tables or user-defined exchange rates are being used. If selected, PeopleSoft Expenses uses the current market exchange rate that is defined in the system rate tables. If not selected, PeopleSoft Expenses uses a user-defined exchange rate. |
Exchange Rate |
PeopleSoft Expenses populates this field with the current market rate that is defined in the system rate tables. You can override the system-supplied exchange rate. |
|
Click the Reset Rate icon to change a user-defined exchange rate to the system-defined exchange rate. |
|
Click the Exchange Rate Detail icon to access the Exchange Rate Detail page and view the exchange rate information that the system used. |
Location |
Select the location where you incurred the expense. PeopleSoft Expenses populates this field if you enter a default location in the general expense report information section or if you have entered a previous line with a location. |
|
Click the Add Additional Attendees icon to access the Attendees page and enter names (lastname,firstname), companies, and titles for an expense type that requires a list of attendees on your expense report. |
Non-Reimbursable |
Select if charges are neither business related nor subject to employee reimbursement. |
Base Currency Amount |
Displays the amount and currency that the employee spent will be reimbursed based on the values in the Amount, Currency, Exchange Rate fields, and the currency for the employees business unit base currency. |
|
Click the Credit Card Selection icon to access the Credit Card Selection page. If the user profile contains more than one credit card, select a credit card to use for the expense item. The credit card numbers appear in a masked format in which only the last four digits of the credit card number are visible. |
No Receipt |
Select if no receipt is available to substantiate an expense item that requires a receipt. PeopleSoft Expenses compares the expense to the minimum amount that is required for a receipt. . If a receipt is required, you may need to provide an explanation on the No Receipt Included page for not having a receipt. Requiring Receipts can be defined two ways:
|
Merchant |
This field displays only if Merchant is selected as required fields for the expense type selected. See Setting Up Expense Types If a non-preferred merchant is selected, you must enter the non-preferred merchant that you used for this expense type. This field is free-form text. Click the icon next to the Non-Preferred field and provide a justification for not using the company’s selected preferred merchant. Select an option that describes why you used a non-preferred merchant. If the list of justifications don’t apply, the select Other (please specify).
|
 (select expense type)
 (delete)


Accounting Details
Use this section to view or modify the accounting ChartFields for the expense line. Expense items are charged to a set of ChartFields that represent the business unit or department of the employee who is submitting the expense report.
If you are using employee privilege templates, access to this section depends on the value in the Distributions field, and access to these fields is dependant on the value in the GL ChartFields and PC ChartFields fields for the expense transaction on the Employee Privilege Template Page
The Accounting Detail Default View field on the Employee Profile - User Defaults Page determines if this section is collapsed or expanded when a user enters the expense type.
Field or Control |
Description |
|---|---|
|
Click the VAT Accounting Detail icon to access the VAT Information for Expense <type> page. |

Expense Type is Air Travel or Hotel Lodging
These fields appear when Air Travel or Hotel/Lodging is selected as the expense type:
Field or Control |
Description |
|---|---|
Ticket Number |
Enter the unique airline ticket number. PeopleSoft Expenses verifies that the ticket number is unique and prompts you if the system detects that the ticket number was used previously. |
Merchant |
Select whether the merchant that was used for the expense type is a preferred or not a preferred merchant. If you select the Preferred radio button, then you must select from a list of merchants with whom your organization has contractual agreements. The merchant list varies according to the expense type. If you select the Non-Preferred radio button, then you must enter the merchant used in the open text area below the radio buttons. The system may prompt you to enter an explanation about why you did not use a preferred merchant. |
Number of Nights |
Enter the number of nights that the expense covers. |
|
Click the Itemize Hotel Bill icon to access the Itemize Hotel Bill Page and itemize the hotel receipt into more specific charges, such as room and telephone charges. Once itemized, PeopleSoft Expenses populates the main expense grid with each itemized charge. You may itemize the entire bill or only part of it if some expenses are non-reimbursable. PeopleSoft Expenses supports the ability to itemize lodgings with different room rates. |

Expense Type is Automobile Mileage
Field or Control |
Description |
|---|---|
Originating Location and Destination Location |
Enter the originating and destination locations. In the Originating Location field, select the location (which you establish during system setup) from where you began your business travel. PeopleSoft Expenses prepopulates this field if you enter an originating location on the Employee Profile - User Defaults page. |
Transportation ID |
Select a transportation ID. This field is active if the distance rate for expense type Auto Mileage is Varied. This field does not appear if the distance rate for expense type Auto Mileage is Standard. |
Miles |
Enter the miles from the originating to the destination locations. When you exit this field, the system calculates the Amount field using the mileage rate |
(mileage rate) |
Displays the mileage rate to the right of the Miles field. This rate is used to calculate the reimbursement amount for the distance traveled. |
Expense Type is Per Diem
Field or Control |
Description |
|---|---|
Per Diem Range |
Select a per diem range that defines the number of days at a specific location. PeopleSoft Expenses uses this information for per diem calculations. The system looks at the employee's base country to determine whether to display the Per Diem Range field or the Start Time and End Time fields. |
Start Time and End Time |
Enter the start and end times for the day. The system looks at the employee's base country to determine whether to display the Per Diem Range field or the Start Time and End Time fields. |
Amount Spent |
Displays the calculated per diem amount based on the location and other per diem setup rules. You can override the Amount Spent field if you are authorized to do so. |
Currency |
Displays the employee's base currency. |
|
Click the Refresh Per Diem Amounts icon to calculate the amount. |
|
Click the Per Diem Deductions icon to access the Per Diem Deductions page and deduct qualified expense types from the per diem amount. |
Per Diem Deductions |
Click the Per Diem Deductions icon to access the Per Diem Deductions page and select the qualified deduction percent, amount, or calculation code for the expense type. The option selected is applied to the per diem amount. If a deduction percent or amount results in an amount greater than the original per diem amount, then the per diem amount is set to 0.00 (zero) and a message is displayed by the system. |


VAT Fields
The VAT fields appear only if you enable the Record Foreign VAT option on the VAT Options page or if the employee's business unit is associated with a VAT entity.
Field or Control |
Description |
|---|---|
|
Click the Calculate VAT icon to have PeopleSoft Expenses calculate the VAT. |
Calculated VAT(calculated value-added tax) |
Displays the calculated VAT unless the option has been set to hide for your organization. |
|
Click the VAT Information icon to access the VAT Information page for the expense item. |
No VAT Receipt(no value-added tax receipt) |
Select if the employee did not submit a receipt for a VAT expense item that requires a receipt. You can set up approval and audit rules so that expenses with VAT but without receipts require approval and auditing because in many countries you cannot claim tax credits for the VAT without a receipt. When you select this option, PeopleSoft Expenses sets the recovery percentage and rebate amount fields to zero. |
Override VAT (override value-added tax) |
Enter an amount to override the calculated VAT. |


See Setting Up VAT Driver Defaults for PeopleSoft Expenses and Entering VAT Information on Expense Reports.
Use the Create Expense Report - Summary and Submit page (EX_EXPENSE_SUBMIT) to review, analyze, and submit expense reports
Navigation:
. Select the Summary and Submit link.
. Select the Summary and Submit link.
Select the Summary and Submit link.
This example illustrates the fields and controls on the Create Expense Report - Summary and Submit Page. You can find definitions for the fields and controls later on this page.
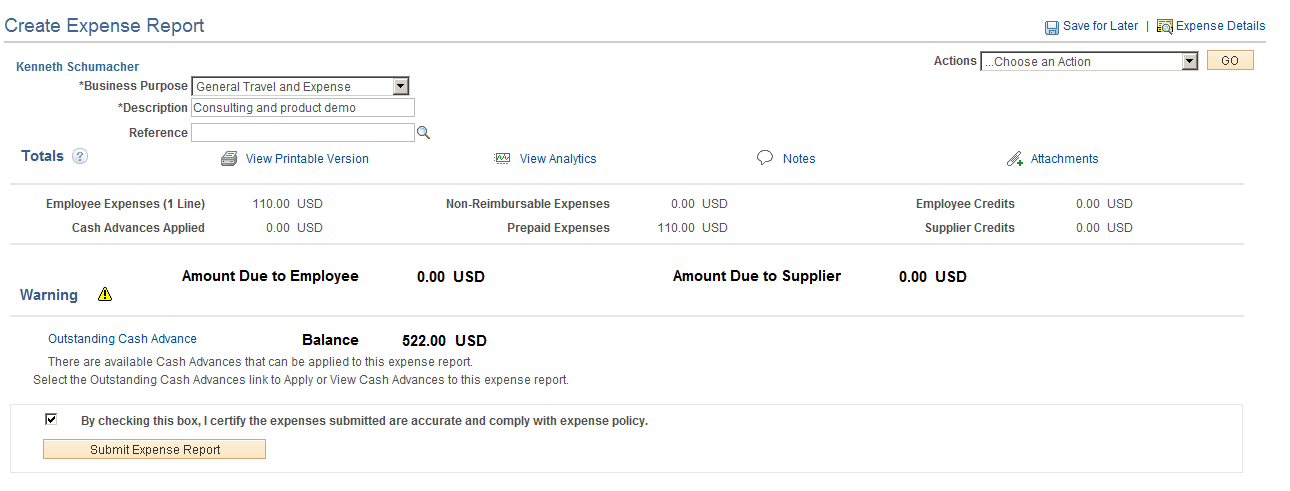
Most of the fields in the general heading of this page have the same meaning as those on the Create Expense Report page. Exceptions are listed in this topic.
Field or Control |
Description |
|---|---|
Expense Details |
Click to return to the Create (or Modify) Expense Report page. |
Action |
Click the drop down box to access the same options that appear on the Create Expense Report page with the exception to the Copy Expense Lines and Default Account For Report options. |
Totals |
Use the Embedded Help icon to view a description of all total fields. |
View Printable Version |
Click to view a printable version of the expense report. A Print Expense Report icon is available on the page. Click the Print Expense Report link to launch BI Publisher (also known as XMLP or XMLPublisher) and print Expense Report EXC4500. You must save the report before printing it to have the changes appear in the printed document. |
View Analytics |
Click to access a page where you can view three tabs: Expense by Day, Totals by Department, and Totals by Project / Activity. |
Notes |
Click to access the Expense Notes page for this expense report. Use the Expense Notes page to add notes or view notes from other users. When viewing notes from other users, the system displays the note, name, role, date, and time. |
(Check box) |
Select the check box to indicate that you agree with the certification statement. After you select this check box, the Submit Expense Report button becomes active. |
Submit Expense Report |
Click to submit your expense report for approval. After you submit the expense report, you cannot modify it. You can only view expense reports after you have submitted them. |
Note: If there is any cash advance balance available, a warning message displays informing the employee that they can apply the outstanding cash advance balance on the expense report.
Use the Analytics page to view expenses by day, totals by department, and totals by project and activity.
Navigation:
From the Create Expense Report - Summary and Submit page, click the View Analytics link.
This example illustrates the fields and controls on the Analytics - Expense by Day page.
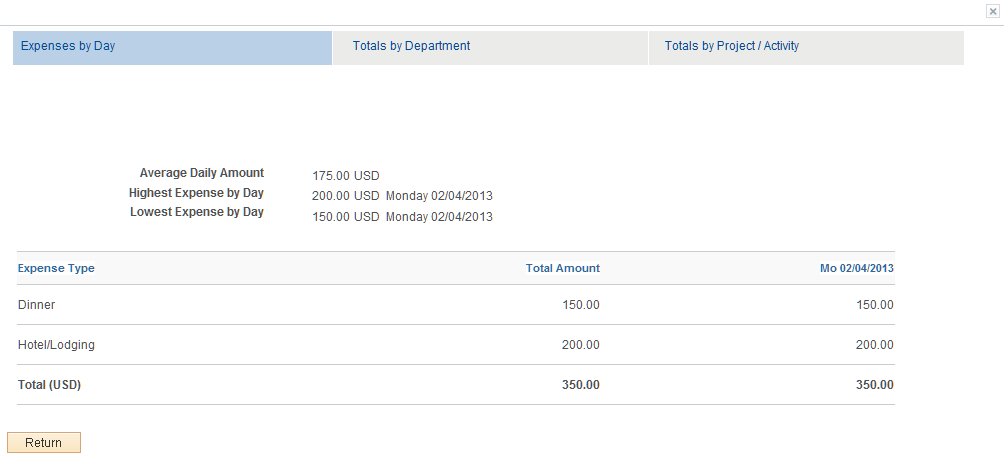
Expense by Day
This page displays all expense lines, one week at a time. If the expense report encompasses more than seven days, use the First, Previous, Next, and Last links to view all days.
Field or Control |
Description |
|---|---|
Average Daily Amount |
Displays the total of the expense report monetary amount divided by the number of days in the report |
Highest Expense by Day |
Displays the highest total expense day in the entire expense report. |
Lowest Expense by Day |
Displays the lowest total expense day in the entire expense report. |
Totals by Department
This example illustrates the fields and controls on the Analytics - Totals by Department page.
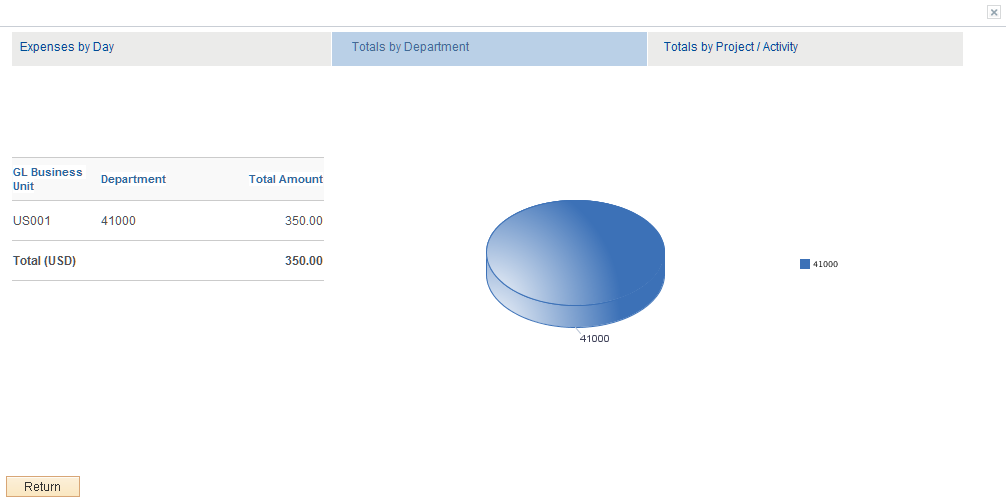
This page displays totals based on the department IDs entered in the Accounting Detail section of the expense report. If a user does not have privileges to general ledger ChartFields, these totals are not visible.
If there is more than one general ledger business unit with the same department, the general ledger business units are displayed twice in the pie chart; once for each business unit. The system displays percentages when you hover your mouse pointer over the department number. If there are no departments in all distribution rows, this page displays No Department.
Totals by Project / Activity
This example illustrates the fields and controls on the Analytics - Totals by Project / Activity page.
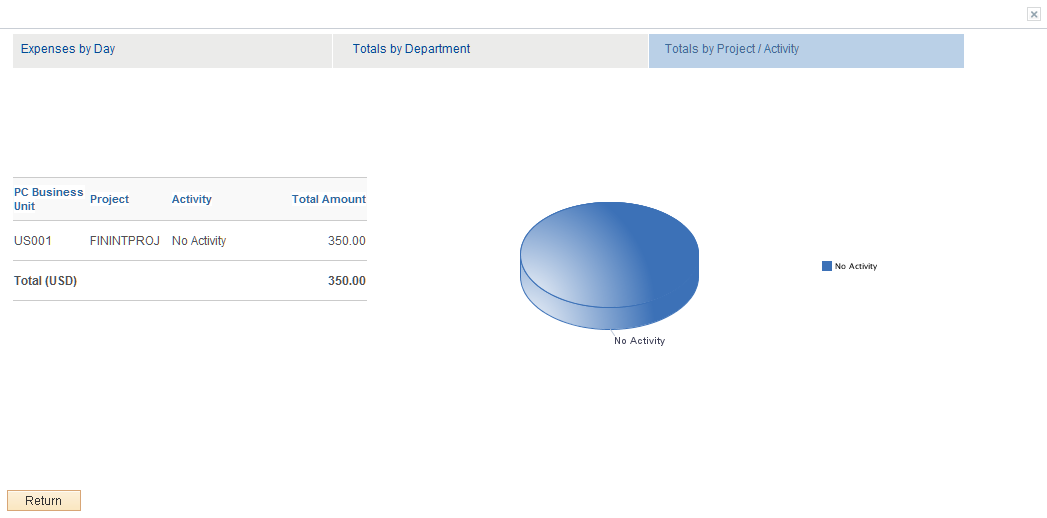
This page displays totals based on the projects entered in the Accounting Detail section of the expense report. If a user does not have privileges to Project Costing ChartFields, these totals are not visible.
The system displays percentages when you hover your mouse pointer over the activity. If there is no activity for a project, this pie piece displays No Activity.
Use the Create Expense Report - Submit Confirmation page (EX_SUBMIT_CONF_ER) to confirm and submit expense reports.
Navigation:
. Select the Summary and Submit link. Select the certification check box and click the Submit Expense Report button.
. Select the Summary and Submit link. Select the certification check box and click the Submit Expense Report button.
From the Create (or Modify) Expense Report page, click the Summary and Submit link. Then select the certification check box and click the Submit Expense Report button.
This example illustrates the fields and controls on the Create Expense Report - Submit Confirmation Page.
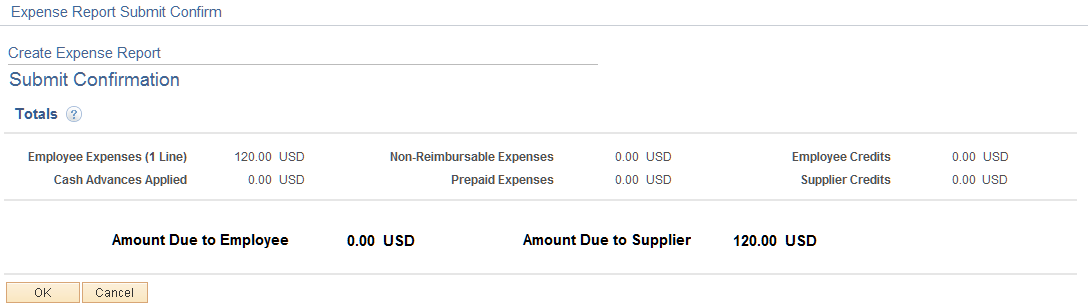
Use this page to review the amount due to the employee and the amount due to the supplier. Users can click the OK button to submit the expense report or click the Cancel button to return to the Create Expense Report - Summary and Submit page. After clicking the OK button, the system returns the user to the View Expense Report page with a message indicating that the expense report has been submitted and displaying the expense report number.