Creating Procurement Contracts
The PeopleSoft Classic and Classic + user interface can be used to create Procurement contracts. The PeopleSoft Fluid User Interface can be used to create contracts such as Group Single Supplier, Group Multi Supplier, and Special Purpose. This topic discusses how to create Procurement Contracts in general and provides common information about expandable sections, fields, and links.
Use these links to see more information about:
|
Page Name |
Definition Name |
Usage |
|---|---|---|
|
(not applicable) |
Create a contract. |
|
|
(not applicable) |
Define search criteria to retrieve a contract. |
|
|
CNTRCT_HDR |
Enter procurement contract information. |
|
|
CNTRCT_COPY_SEC |
Copy from an established or expired contract. This page is available only in Add mode. |
|
|
CNTRCT_CHNG_REASON |
Define change reasons for contracts. |
|
|
CNTRCT_CMNTS_SEC |
Enter comments for a transaction. You can enter your own comment, or you can select from predefined standard comments. |
|
|
STD_COMM_SEC |
Copy or add comments that are standard comments used by an organization, such as shipping comments. |
|
|
CNTRCT_DFLT1_SEC |
Set default information for order contracts for each business unit. If no other defaults appear in the default hierarchy, the information that you set up on this page appears by default in each release schedule that you define for the specified combination of order contract and business unit. This page applies to order contract releases only. |
|
|
CNTRCT_PRC_ADJ_SEC |
Enter price adjustments that apply to items that reference the contract as an open item contract. The Add Open Item Price Adjustments link becomes available only if the Allow Open Item Reference check box is selected on the Contract page. Open item references are applicable to Purchase Order and General contracts with purchase order releases only. |
|
|
CNTRCT_PRC_ADJ_SEC |
Define price adjustment templates. |
|
|
CNTRCT_HDRMISC_SEC |
Enter miscellaneous charge and landed cost information for the contract. |
|
|
CNTRCT_HDR_RET_SEC |
Define retention payments for all lines on a contract. You can set up rules to have the system place a portion of a payment on hold until a certain condition is met. |
|
|
DISPATCH_OPTIONS |
Enter dispatch options for the contract and to dispatch a contract to the supplier. For this page to be available, the contract must be saved, it must have the status Approved, and it must be an order contract. Dispatching applies only to order contracts. |
Use the Contract Entry page - Add a New Value to create a contract.
Navigation:
This example illustrates the fields and controls on the Contract Entry Page - Add a New Value.

Field or Control |
Description |
|---|---|
Style ID |
Select a style ID. Style IDs are created using the Contract Style page. |
Contract Process Option |
Select a contract process option. For more information about contract process options, see Contract Process Options |
Use the Contract Entry page - Find an Existing Value to define search criteria to retrieve a contract.
Navigation:
This example illustrates the fields and controls on the Contract Entry Page - Find an Existing Value.

You can search for existing contracts using a variety of criteria that include the contract ID, version, contract style, process option, and version status. For example, if you are using version control, you can limit a contract search to only those contracts at version two. You can further limit the search by searching for only the Current version of a contract.
After entering search criteria, click the Search button. The system retrieves those contracts that match the search criteria. The search also provides high-level details about the contracts. To view details about a contract, click the contract link. If you are using contract versions, you can view any version of the contract. When you open a contract, all fields are protected unless the selected version is the Draft version or the selected version is the Current version and the contract status is Open. If version control is not in use, you can open the Current version to make changes.
This page also provides a way to view prior versions of the contract if you are using version control. To view a prior version, select a contract version that is in a History version status.
Use the Contract page (CNTRCT_HDR) to enter procurement contract information.
Navigation:
This example illustrates the fields and controls on the Contract Entry - Contract Page (Purchase Order) (1 of 3).

This example illustrates the fields and controls on the Contract Entry - Contract Page (Purchase Order) (2 of 3).

This example illustrates the fields and controls on the Contract Entry - Contract Page (Purchase Order) (3 of 3).

Use the Contract Entry - Contract page to enter header and line information for the transactional purchasing or voucher-based contracts. When you create a contract, the system uses the value in the Contract Process Option field to determine the fields that appear on the page. For more information about process options, see Contract Process Options.
The description of this page is divided into sections that describe contract header and contract line fields along with links to other contract features. Depending on the contract style and status, sections that may be available are:
Basic information about the contract
Contract Version - when version control has been implemented
Authored Documents - when you are using PeopleSoft Supplier Contract Management
Header information.
Invoice Options
Amount summaries.
Contract Open Item Reference
Contract items.
Contract categories.
Note: To adjust value-added tax (VAT) on the voucher header after it has been created from the contract, use the VAT Header page on the voucher.
Field or Control |
Description |
|---|---|
Dispatch Method |
Select the dispatch method for this contract. Values are Email, Fax, Phone, and Print. This value appears by default from the default supplier location. The system displays this field when you are using a PeopleSoft Supplier Contract Management contract. Note: This option is only available when Supplier Contract Management is not installed. |
Field or Control |
Description |
|---|---|
Copy from Contract |
Click to access the Copy Contract ID Page where you can create a new contract by copying an existing contract. This link is only available after clicking OK on the Contract Entry Page - Add a New Value. When you copy a contract, you must copy a contract with the same processing option as the contract that you are creating. The system sets the copied contract to an Open status so that you can make further changes prior to getting contract approval. |
Status |
Select the status of the contract. Values are Approved, Canceled, Closed, On-Hold, Open, and Pre-Approved. When you create a contract, the status appears by default as either Open or Approved based on the settings for the user on the User Preferences - Contracts page. Only contracts with an Approved status are eligible to have releases created against them, or to be referenced by other transactions. Only contracts in Add mode or in Open status can be modified. You cannot set the status to Closed or Canceled if open lines or staged releases against the contract exist. If a contract's status for the Current version is returned to Open, purchase orders that reference that contract version are not available for change until the contract is approved again. This is necessary to maintain data integrity. When vouchers exist for a contract and the contract is closed, all vouchers that are eligible for closure are also closed. Eligible vouchers include those that have not been posted, paid, matched, or budget checked. If the contract is later reopened, releases can be created for these vouchers again, and a new voucher ID is assigned. If the contract originated from an RFQ (request for quote) and the contract is canceled, you can return quantities to the RFQ. If you are using contract versions, you can update the status to finalize the Draft version to Current. When you select the Approve status and click Save, the system updates the Draft version to the Current version and updates the Current version to the History version. When you are using the Full Life Cycle option as a document type setting, the system also notifies you if a PeopleSoft Supplier Contract Management contract document is associated with the contract and that the document is not in an Executed status. This is just a reminder that the corresponding document should be finalized as well. Contracts with a Pre-Approved status are available only for users with access to Approve Contracts, which is determined on the User Preferences - Contracts Page. The status, along with the value of the approval due date, can be used to schedule the date when the contract is automatically approved. If the contract status is Pre Approved, you can update the approval due date. The system displays an error if the approval due date is not updated, or if it’s prior to the current date. You cannot modify contracts that have a Pre- Approved status. Only contracts that are being created initially, or have an Open status, can be modified. Note: The Pre Approved status is only available on a draft version of the contract. You cannot change the status of an approved contract when a Draft version exists for the contract. Instead, you can either make the change in the Draft version or delete the Draft version. |
Administrator/Buyer |
Select a user who serves as the contract administrator or buyer. These terms are different:
|
Contract Version
Use this section to manage and review versions of a contract. Contract versions enable you to create and maintain multiple versions of the contract in the system. Versions facilitate viewing information in older contract versions. You can modify a forward-looking version (Draft version) of the contract while keeping the Current version active and available for transactions in the system.
Versions are available only if the Use Version Control check box is selected on the Contract and Vendor Rebate Controls Page.
To create a new contract version, you must have the authority to create the version. You establish the authority by selecting the Enter Contracts/New Version check box on the Contract Process Page.
The system manages contract versions for PeopleSoft Purchasing contracts and Supplier Contract Management contract documents:
If you are using only PeopleSoft Purchasing, you manage version information using the Contract Version section
If you are using only PeopleSoft Supplier Contract Management, you track the version for documents using the Document Version section.
If you are using both Supplier Contract Management and Purchasing contracts, the system process includes warnings and updates for both types of versions.
Field or Control |
Description |
|---|---|
Version |
Displays the version of the contract that you are currently viewing. Version numbers are increased by one each time you create a new version. When you create a new contract, the system sets the version number to one (1) and sets the version status to Draft. You cannot change these settings. |
Status |
Displays the status of the contract version. Values include:
|
New Version |
Click to create a new Draft version of a contract. The New Version button is available only when the Current version is in an Approved status and a Draft version does not exist. In addition, the Use Version Control check box must be selected on the Contract and Vendor Rebate Controls Page. If you click the New Version button, the system enables you to save your changes and continue, or cancel and go back to the Current version. When you create a new Draft version, the system creates change transactions that show the new version as a change transaction to the old version. In other words, the change is recorded using the prior version as a change, not the new version. Note: After a contract has been approved, and you prefer not to create a new version of a contract, you can update the Current version and select Open in the Status field as long as a Draft version does not exist. When you create a new Draft version, the system copies all contract information from the Current version to the new version and sets the new version status to Draft. It also increments and displays the new Draft version number, and sets the contract status for the Draft version to Open. In addition, the system enables the Delete button and displays the Approval Due Date field. If contract releases are pending for the Current version, you cannot create a Draft version of the contract. You must first process the release for the contract line or delete the release before adding a Draft version. There is one approval notification cycle per version. Therefore, if you approve the first version of a contract then later open it again, the approval notification is not enabled. However; if you later create a new Draft version, the approval notification is enabled. Note: If you are using change tracking, and have change tracking set up for the version status, the system creates change tracking records for the new version. |
Delete Version |
Click to delete the Draft version. The Delete button is available only when you are viewing a Draft version. When you select to delete the version, the system displays a message to verify that you want to delete the version and provides you the option to proceed or cancel. During the deletion process, the system removes the Draft version and returns to the Current version. Note: The system deletes all corresponding change transactions so that history for the deleted Draft version no longer exists. |
Approval Due Date |
Enter the date on which this contract version should be approved. This field is available when the contract status is Open and the version has never been approved. When you approve a contract, the system updates the field with the approval date and displays the Approved Date field. You can set up workflow notifications for approvals to remind approvers when this date approaches. |
Approved Date |
Displays when the contract version was approved. For upgraded contracts, the date is set to the contract begin date. |
Add Document |
Click to access the Add a Document Page. This button is available if PeopleSoft Supplier Contract Management is installed. After you save the information on the Contract Entry - Contract page, click this button to access the PeopleSoft Supplier Contract Management document authoring system, where you can create a document and link it to this contract. This document is different than the PeopleSoft Purchasing document inquiry, which enables you to cross-reference documents, such as requests for quotes, or requisitions that are associated with a purchase order. For additional information about document life cycles, see Understanding Document Life Cycles. |
Authored Document
This section appears when PeopleSoft Supplier Contract Management is installed and a contract document is associated with the contract.
Authored documents are those that are created and maintained in Supplier Contract Management as opposed to documents created in the Supplier Relationship Management system.
Note: The fields in this section are copied from the document in Supplier Contract Management. They provide important information to prevent you from having to navigate to the Document Management page.
Field or Control |
Description |
|---|---|
Maintain Document |
Click to access the Document Management Page, which is the contract document associated with this contract. |
Header
This table lists the fields in the Header section:
Field or Control |
Description |
|---|---|
Contract Style |
Select to search for a contract style. The Contract Style is entered on the Contract Entry - Add a New Value page and can be changed when initially creating the contract. The contract style works with the process option and can be changed, but only to another contract style using the same process option. Contract Styles are defined using the Contract Style page. |
Process Option |
The process option displays the value selected when the contract was created. For more information about process options, see Contract Process Options. |
Supplier |
Select the supplier for this contract. After you enter lines, create releases, or reference this contract on a requisition or purchase order, the supplier cannot be changed. This is a required field. Supplier IDs are returned when you click the Look Up Supplier button; the system provides a listing based on the short supplier name. Note: If a supplier is selected from the look-up option, the Supplier ID field is automatically populated based on your selection. |
Supplier Search |
Click to access the Supplier Search page (VENDOR_LOOKUP_SEC). If the supplier does not exist in the system, you can access a page where you can add a supplier. To enter supplier information into the system, your user ID must have the proper authorizations selected on the User Preferences - Procurement: Supplier Processing Authority page. The Search Results grid provides information about the supplier and indicates whether withholding is applicable to the supplier. To access the Supplier Detail Page, click the Supplier Detail link on the Supplier Search page. Class: Select the class of suppliers. Options are A (attorney), E (employee), H (HCM [Human Capital Management]), and R (outside party). Type: Select the type of supplier. Options are ADV (advertising), CNS (consultant), CNT (contractor), ENT (entertainment), FRG (foreign supplier), GVT (government agency), MNR (minority supplier), PR (public relations), TRD (tradesman), TRN (transportation), and TRV (travel related services). Max Rows (maximum rows): Enter the maximum number of rows that you want the system to retrieve. Using this field could improve search performance. |
Supplier ID |
Select the supplier ID for the contract. Note: If a supplier ID is selected from the look-up option, the Supplier field is automatically populated based on your selection. |
Primary Contact |
Select the supplier contact for the contract. If a contact is specified and an address is associated with this contact, that address appears on the dispatched contract. Otherwise, the system uses the address from the default supplier location. To use this field, you must have already set up supplier contact information in the Supplier Information component. See Entering Supplier Contact Information. |
Supplier Contract Ref (supplier contract reference) |
Enter a reference to identify a supplier contract number or some other identifier by which the supplier identifies this contract. The value can be used in searching for contracts. |
Description |
Enter the contract description. This is an optional field. |
Master Contract ID |
Select a master contract ID, if applicable. |
Begin Date |
Select the start date for use with the contract. The default value is the current system date. If you create staged releases and the user changes either the beginning date or the expiration date of the contract, the system checks the dates to ensure that they are within the range of the purchase order or invoice dates. If you change the purchase order date on a purchase order that references a contract, the system checks the date against the beginning and expiration dates. When you select a contract on a purchase order or when the PO Calculations process validates a contract that is specified on a line, the system checks the date against these beginning and expiration dates. You can have multiple contracts for the same item-supplier relationship, and you can have multiple open-item reference contracts as long as they have different beginning dates or the Auto Default setting is turned on for, at the most, only one of the contracts. |
Expire Date |
Select the end date of the terms and conditions of the contract. The expire date cannot be earlier than the begin date. The system can notify you if you want to be warned when the expiration date approaches. You use the Thresholds & Notifications link to set up this notification. |
Renewal Date |
Enter a contract renewal date. This is an optional field that indicates when a contract is up for renewal. If you enter a renewal date, it should be later than the current date, and if a contract expiration date exists, then the renewal date should be before or equal to the expiration date. The system can notify you if you want to be warned when the renewal date approaches. You use the Thresholds & Notifications link to set up this notification. |
Control Type |
Select a control type, which is available for Manufacturer and standard (General, Purchase Order, and Single to Release Purchase Order) contracts. The option that you select determines the grid in the Contract Control section below. When creating a contract, you can enter specific Purchasing business units, contract domains, ship to’s, or a combination of all three. However, when specifying this field on a standard contract, it eliminates all other standard contracts where the control type doesn’t match. Therefore, adding another level of control. For Standard Contracts:
Control Types are pre-defined using the Contract and Vendor Rebate Controls Page. For Manufacturer Contracts see Creating Distributor and Manufacturer Contracts. |
Punchout Pricing Option |
Select an option to indicate how the contract pricing must be applied for contract lines that are matched to transaction lines. This field is available only when the Line Matching options are selected in the Contract and Vendor Rebate Controls Page Select from the following values:
|
Tax Exempt |
Select if the contract is tax exempt. This field applies to both voucher contracts and order contracts. If you select this option for an order contract, enter the tax exempt ID in the text box for this option. The tax exempt ID is not used for voucher contracts. |
Auto Default |
Select to make this contract available to automatically supply a purchasing requisition and purchase order transaction. When enabled, the system enforces that the procurement contract is unique such that the system may select one unique contract onto the purchasing requisition and purchase order transaction. This check box is selected by default. If you deselect the check box, requesters and buyers must manually select the contract on transactions, rather than have the system find them automatically. In addition, the business unit setup must enable automatically supplying a contract to a requisition, purchase order, or both. Select the Default Contract on Req and Default Contract on PO check boxes to enable the automatic default. The system searches for and ensures that the current, approved contract is selected for use with the transaction. The contract process option must be purchase order, general, or release-to-single PO only and the supplier on the contract must match the supplier on the transaction. Note: Although you select the Auto Default check box, the contract will not be supplied by default on a transactional requisition or purchase order unless the corresponding business unit flag for defaults is also selected. See Understanding How to Apply Procurement Contract Prices to Transactions and Understanding Procurement Contract Default Rules |
Lock Chartfields |
Select to prevent changes to purchase order ChartFields at the purchase order distribution level that are released from this contract. When this check box is selected, you cannot manually reference this contract on requisitions and purchase order lines. Purchase orders that reference contracts with the Lock Chartfields check box selected must be created as releases from the contract or created by copying the contract The following rules also apply to this option:
Note: This option is enabled only when the Commitment Control feature is used. |
Corporate Contract |
Select if you want this contract to apply to all business units within the specified SetID. If you do not select this option, you must enter a list of valid business units for this contract on the PO Defaults page. At the time of release, the release business unit must be defined on the Contract Defaults page. This option is selected by default for order contracts. This option does not apply to voucher contracts. The system supplies the business unit of the purchase order that is associated with the contract. The field value cannot be changed. You cannot insert additional business-unit default rows. |
Currency |
Select the currency and exchange rate type that apply to the contract. The currency changes after the supplier is selected if the supplier currency is different. The currency that is identified here is the currency that the system uses to maintain the amount limits and the released amounts of the contract. This currency does not prohibit prices in other currencies on this contract for order releases. After you enter lines, create releases, or reference this contract on a requisition or purchase order, the currency cannot be changed. The currency that you select here is the currency that must be used for voucher releases and for the purchase order that is associated with a recurring purchase order voucher. |
Rate Date |
If you select the Must Use Contract Rate Date check box, enter the rate date that you want to use. The rate date is the date that the system uses to determine the correct currency conversion rate to use on the purchase orders that are created to satisfy the contract. The default value for this field is the current system date. |
Must Use Contract Rate Date |
Select to have any purchase orders that are created against this contract use the rate date on this contract for currency conversions. This check box becomes available for selection if you select the Allow Multicurrency PO check box. |
Allow Multicurrency PO (allow multicurrency purchase order) |
Select to indicate that the purchase order that you create to satisfy the contract can be in a currency other than the one that is specified on this supplier contract. If so, the currencies from the contract are converted to the currency of the purchase order. |
Header Links
This table lists the potential links that can appear in the Header section:
Field or Control |
Description |
|---|---|
Add Comments or Edit Comments |
Click to access the Contract Comments - Header Comments Page, where you can enter comments about the contract, define comment actions, and attach associated documents. You can also select to add standard comments. If comments already exist for the contract, the Edit Comment button appears. |
Contract Activities |
Click to access the Contract Activities page (CNTRCT_ACTVTY_SEC), where you can create and maintain notations for an activity associated with this contract. The information on this page can be used as a To-Do list. You can organize activity comments by logging the due date and selecting the Done check box. |
Primary Contact Info (primary contact information) |
Click to access the Supplier Contact Information page, where you can maintain contact information for the contact. You must select a contact in the Primary Contact field before accessing the page. |
Contract Header Agreement |
Click to access the Contract Header Agreement Assignments Page, where you can define agreement requirements. |
Contract Releases |
Click to access the Create Releases page, where you can create and maintain releases, review release details and release comments. The page provides release details for all versions of the contract if version control is in use. |
Retention |
Click to access the Voucher Retention Page, where you can determine the retention amount and percent. Use this page to define retention payments for all lines on a contract. You can set up rules to have the system place a portion of a payment on hold until a certain condition is met. |
Activity Log |
Click to access the Activity Log page (PO_MAINT_POP), where you can review a log of activities for a contract including the dates on which the log was entered, modified, and approved. |
Document Status |
Click to access the Document Status page (PRCR_DOCSTAT_INQ), where you can view information about documents associated with the contract. |
Thresholds & Notifications |
Click to access the Thresholds & Notifications Page, where you can view and update contract expiration and renewal dates, spend threshold, and maximum amount notifications and contract amount summaries. |
Price Adjustment Template |
Click the access the Template Price Adjustments Page, where you can define a set of standard price adjustments that you can copy to the contract line item, open item, and category levels. Price adjustment templates are available only for contracts with Purchase Order, General, and Release-to-Single PO Only processing options. |
View Changes |
Click to access the Contract Change History - Contract Header Page, where you can view changes that have been made to a contract. The page contains the change history across the contract versions. This link is available when you select to track contract changes using the Set Controls-Contracts option in Purchasing procurement options setup and when change history records exist for the contract. |
Current Change Reason |
Click to access the Change Reason page, where you can view the most recent reason change code used to update the contract. Reason codes are available when the system is tracking contract changes. You can update the change reason when you click the Save button after making a change to a contract that has been approved in the past, even if the contract is not currently in an Approved status. You define reason codes for contracts using the Reason Codes page. Select to use a Procurement Contract reason type to define the code. If you select the Use Same Reason code field, the system uses the reason code again during subsequent saves. For example, while you are working on a contract with numerous changes, you save multiple times. Instead of having this page appear each time that you save, the system uses the current reason code when you save the contract and includes the code with the change history. The system requires a reason code and comments if the Reason Code Required and Comments Required check boxes are selected on the Contract and Vendor Rebate Controls Page. For additional information on Reason Codes see Sourcing by Region. |
Purchase Order BU Details |
Click the access the Contract Defaults by BU - PO Defaults Page. |
Group Contracts |
Click this link to access the Group Contracts Page in inquiry mode. This link appears if the procurement contract is a related contract on at least one Group Contract. The Group Contract modal page displays the current Group Contracts. |
Contract Control
Use this section to identify the Purchasing business units, contract domains, or ship to locations that are used with this contract. Depending on your selection in the Control Type field, a different grid appears.
Amount Summary
Released amounts are not version controlled. The released amounts displayed reflect current released amounts to date on all contract versions.
Field or Control |
Description |
|---|---|
Maximum Amount |
Enter a total amount that this contract should not exceed. The total released amount of all lines and the total amount for all category lines plus the amount released for open items must not exceed this amount. This value is expressed in the contract header currency. |
Line Item Released Amount |
Displays the sum of released amounts for all contract line items on the contract. The amount is expressed in the contract header currency. |
Category Released Amount |
Displays the sum of released amounts for all contract category lines on the contract which is expressed in the contract header currency. |
Open Item Released Amount |
Displays the amount that is released for open items in an open item contract which is expressed in the contract header currency. This amount is updated during the PO Calculations process or online purchase order creation when the purchase order is linked to the contract using the open item reference. |
Total Released Amount |
Displays the amount that has been released for this contract, including the line item, category, and open item amounts. The value is expressed in the contract header currency. |
Remaining Amount |
Displays the amount remaining on this contract: (maximum amount – total released amount = remaining amount). This amount is expressed in the contract header currency. This amount appears only if the maximum amount is greater than zero. |
Remaining Percent |
Displays the percentage of the amount that has been released for this contract. |
Contract Open Item Reference
This section displays when the process option is:
General Contract
Purchase Order
Recurring PO Voucher
Release to Single PO Only
Field or Control |
Description |
|---|---|
Allow Open Item Reference |
Select to enable items that are not specified on the contract to be purchased against it. Whether you're defining an open or fixed-item contract, this check box enables you to reference the contract for any requisition and purchase order item that is ordered from this supplier within the terms and limits of this contract. This check box also enables you to add open-item price adjustments to the contract. This check box is available only for PO and General contract process options with purchase order releases. If you do not select this check box, you must enter at least one contract line item, or category line, before you can save the contract. Requisitions, the PO Calculations process, and online purchase orders can use the Allow Open Item Reference check box. If a contract is set up for open item reference, you can select a contract ID on a requisition without specifying a contract line or category number, regardless of whether the requisition line contains an item ID or an ad hoc item (description-only). This functionality is also available for online purchase orders. |
Adjust Supplier Pricing First |
If you're defining price adjustments for open items and supplier adjustments also apply, you can specify which adjustments the system applies first. To apply supplier adjustments before the contract adjustments, select this check box. If you do not select this check box, the system applies supplier adjustments after the contract adjustments. This option applies only if the calculation type is Increment Adjustments. Note: If both a supplier adjustment and contract adjustment exists with the same sequence number and different calculation methods (Increment Adjustments or Sum All Adjustments), then the system uses the calculation method from the last adjustment. |
Price Can Be Changed on Order |
Select if you want the capability to change the system-calculated prices on purchase orders for this contract. This field setting applies only to open items that are referenced on a purchase order. If you do not select this check box, the price fields on the purchase order are unavailable for entry. |
Add Open Item Price Adjustments or Edit Open Item Price Adjustments |
Click to access the Open Item Price Adjustment page, where you can enter price adjustments that apply to items that reference the contract as an open-item contract. This link appears when an open-item price adjustment does not exist on the contract. Click this link to access the Open Item Price Adjustments Page where you can maintain price adjustments that apply to items that reference the contract as an open item contract. This link is only available if the Allow Open Item Reference check box is selected. |
Invoice Options
This section displays when the process option is:
General Contract
Prepaid Voucher
Prepaid Voucher with Advanced PO
Recurring PO Voucher
Recurring Voucher
Field or Control |
Description |
|---|---|
Invoice Number |
(Optional) Enter an invoice number that is associated with every voucher in the contract. The invoice number must be no longer than 12 characters. For voucher contracts, the system adds an ID extension consisting of a hyphen and one to three digits to uniquely identify the exploded vouchers. For example, for a contract with four release vouchers, an invoice number of 500 can be calculated as 500–001, 500–002, 500–003, and 500–004. |
AP Business Unit (Accounts Payable business unit) |
Select the business unit that you want to use for voucher contract refund processing. |
Accounting Template |
Select the accounting template for offsetting entries of transactions for this contract. Accounting templates are set up on the Accounting Entry Template page. |
Payment Terms ID |
Select the payment terms that are expected for the vouchers corresponding to any purchase orders or vouchers that are generated from this contract. Payment terms are defined on the Payment Terms pages. This value appears by default from the default supplier location. |
Basis Date Type |
Select to determine the date used to calculate the voucher due date and discount due date, if applicable. This is a voucher-related field that is used in combination with payment terms. Note: If you have specified a specific payment term for the supplier in the Supplier Information component, the Basis Dt Type field displays the default value. Payment terms can also be specified at the business unit level, but they do not appear as default values here because the contract is defined at the SetID level, not the business unit level. |
Prepayment |
(Optional) Enter a prepayment reference for the contract. Note: This field is available only if the Prepaid Voucher or the Prepaid Voucher with Advance PO Contract process option is selected. |
Gross Amount |
Enter the gross amount for the contract. This is required for voucher contracts and is applicable only to voucher and general contracts. The sum of all contract line amounts, plus miscellaneous charges and voucher contract charges (freight, sales tax, and VAT amount) must equal the gross amount. If you enter the gross amount before you enter a value in the Merch Amt (merchant amount) field, the field is updated with the gross amount. If you change the merchandise amount and insert a new line, the merchandise amount on the new line appears automatically so that the total is equal to the gross amount. For example, if you enter a gross amount of 100.00 USD, this value becomes the default merchandise amount. If you then add 10.00 USD of freight, the merchandise amount is updated to 90.00 USD. If you then change the merchandise amount to 40.00 USD and add a new line, the merchandise amount on the second line appears automatically as 50.00 USD. |
The freight, sales tax, and VAT amounts are allocated on the voucher based on the defaults that are set on the Procurement Acctg Control - General Controls page for the PeopleSoft Payables business unit.
Field or Control |
Description |
|---|---|
Freight Amount |
Enter the freight amount to be included on the voucher. |
Misc Charge Amount (miscellaneous charge amount) |
Displays the miscellaneous charges that are applied to a voucher contract. You define miscellaneous charges on the Voucher Misc. Charges page. |
Miscellaneous Charges link |
Click to access the Voucher Misc. Charges Page where you can enter miscellaneous charge and landed cost information for the contract. |
Sales Tax Amount |
Enter the sales tax amount to be included on the voucher. |
VAT Amount (value-added tax amount) |
Enter the VAT amount to be included on the voucher. |
Purchase Order Information
This section displays when the process option is:
Prepaid Voucher with Advance PO
Release to Single PO Only
Recurring PO Vouchers
Field or Control |
Description |
|---|---|
PO Business Unit (PeopleSoft Purchasing business unit) |
Enter the Purchasing business unit that is associated with this contract. A Purchasing business unit is required before you can save this page. |
PO ID (purchase order identifier) |
Enter the purchase order ID that is associated with this contract. Note: This option is available only if the Prepaid Voucher with Advance PO process option is selected and a supplier ID is entered. When this option is selected, the system checks to ensure that this purchase order is not referenced on any other prepaid voucher with advance PO contract. A PO ID is required before you can save this page. |
Buyer |
Select the buyer for the purchase order. For these contract process options, you can create a contract without completing the Buyer field. You'll eventually need to complete the Buyer field so that the system can continue to process the purchase order. |
See Differences Between Contract Default Values and PeopleSoft Purchasing.
Contract Items
Use this section to search for and add items to the contract. This section is not available for group, distributor, and special purpose contracts.
You define a variety of details, including schedules, release amounts and quantities, and item details.
Contract Categories
Use this section to define information for contract categories and line items, including item adjustments, exclusions, and category agreements.
The Contract Categories - Lines section is used to determine the categories that you want to include in the contract. Contract categories enable you to specify groups of items on a contract, rather than entering items one at a time. Contract categories enable you to add categories to a contract, along with item exclusions, upper and lower limits, and price adjustments. When you create requisitions and purchase orders, the system automatically locates and verifies that it uses the appropriate contracts. You can use categories in conjunction with contract lines and open items, but you cannot create contract releases using category contracts.
Along with categories, you define a variety of details, release amounts, and category details. You can also assign agreements for contract categories. Click the Contract Agreement button in the Lines section to add contract agreements for individual categories at the line level. The button is represented by a blue hand-shake icon.
This section is not available for group and special purpose contracts.
Use this group box to define information for contract categories.
Use the Copy Contract page (CNTRCT_COPY_SEC) to copy from an established or expired contract.
This page is available only in Add mode.
Navigation:
Click the Copy From Contract link, next to the Set ID on the Contract Entry - Contract page, after adding a new value.
This example illustrates the fields and controls on the Copy Contract ID Page.

The default status of a copied contract is Open. All contract information including defaults, line items, comments, and price adjustments is copied to the new contract. Staged releases are not part of the actual contract and are not copied. If you are using version control, the current copy of a contract is the version that the system copies.
When you copy a contract and the selected source contract contains more contract lines than the number defined for the maximum number of rows to retrieve on the Purchasing Installation Options page, the system automatically copies the contract using a batch process.
When you select a contract to copy and click the OK button to copy the contract, the system displays the message Would you like to wait until the Contract copy process is completed?
If you click No, the system displays a message that the contract has been scheduled for copying with the process instance for the batch job.
If you click Yes, the system creates the new contract.
Field or Control |
Description |
|---|---|
Contract ID |
Select the contract to use as a template. If you leave this field blank, the system returns all contracts that have the same process option as the contract that you are creating. |
Use the Change Reason page (CNTRCT_CHNG_REASON) to define change reasons for contracts.
Navigation:
Click the Save button on the Contract page after making a change to a contract.
Field or Control |
Description |
|---|---|
Reason Code |
Select a reason code for the changes that you made to the contract. These codes provide a basis for why a change was made. Reason codes are assigned to reason types. Reason codes that are assigned to the Procurement Contract reason type appear in the list of values. Use the Reason Codes Page to create new reason codes. |
Comment |
Enter additional details about the change. You can access the current change comment by clicking the Current Change Reason link on the Contract page. You can also set up reusable comments when you define the reason code. |
Use Same Reason Code |
Select to use the same reason code for future changes to the contract. The code that you define remains as the default value until you deselect the check box. |
Use the Contract Comments - Header Comments page (CNTRCT_CMNTS_SEC) to enter comments for a transaction.
Navigation:
Click the Add Comments link on the Contract page.
This example illustrates the fields and controls on the Contract Comments - Header Comments page.
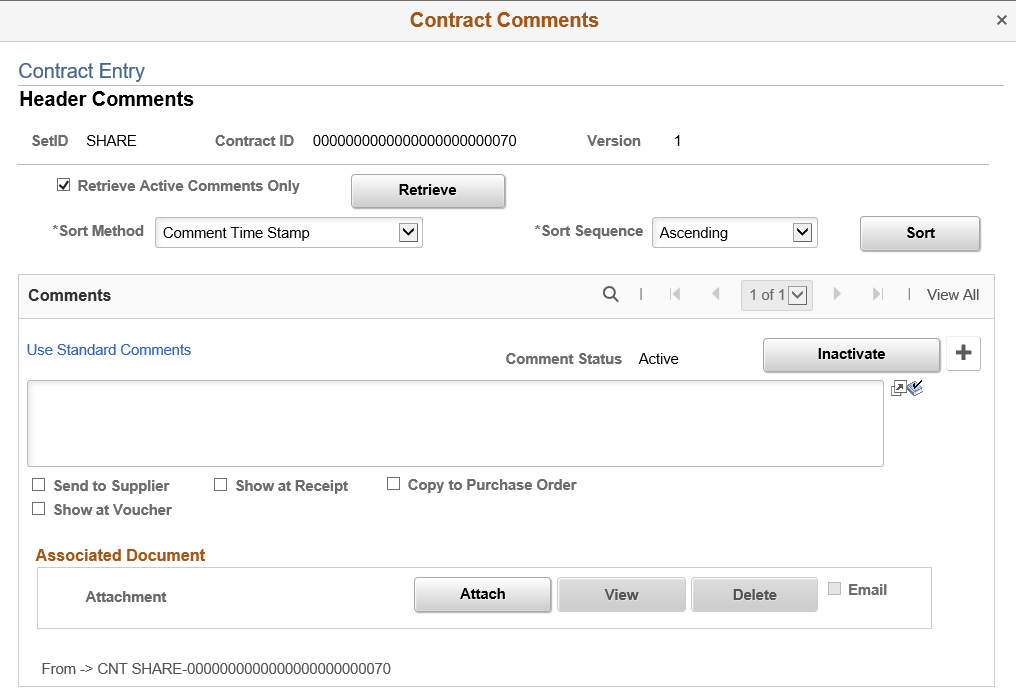
You can enter your own comment, or you can select from predefined standard comments.
After you enter comments on this page, you must save the contract before the comments are entered into storage for later use with the Header Comments page.
Comments can be included in information sent to suppliers, or added to Purchase Orders. Comments are also added to contract search indexes and can be searched for relevance.
Field or Control |
Description |
|---|---|
Retrieve Active Comments Only |
Select to retrieve only active comments. After you inactivate a line using the Inactivate button, save and then reenter the transaction. The line cannot be accessed when this check box is selected. Deselect this check box to retrieve the inactive comment line in addition to active comment lines. This check box appears only after you save the contract. |
Retrieve |
Click to retrieve comments. You can retrieve active or inactive comments depending on whether you select the Retrieve Active Comments Only check box. Inactive comments are those that have been inactivated by means of the Inactivate button. If comments already exist, retrieving comments again overrides all comments that may have been added or updated since the last time the contract was saved. This button appears only after you save the contract. |
Sort Method |
Select the method that you want to use to sort the retrieved comments. Options are: Comment Time Stamp: Select to sort the comments by the time stamp that the system assigns when comments are created. Supplier Flag: Select to sort by comments that are flagged for sending to the supplier. |
Sort Sequence |
Select the order in which you want header comments to appear. Valid values are Ascending and Descending. |
Sort |
Click to sort comments according to the selections that you make in the Sort Method and Sort Sequence fields. |
Copy Standard Comments |
Click to load predefined comments into the comments text box. This link appears only if standard comments have been defined. When you click the link, the system displays the Standard Comments page, where you can select from defined comments to add to the Header Comments page. |
Comment Status |
Displays whether the comment is in an Active or Inactive status. |
Inactivate |
Click to inactivate the current comment. The comment is not actually deleted, but is set to an inactive status. You must deselect the Retrieve Active Comments Only check box to be able to access inactive comments. If you inactivate a comment, you must click the Retrieve button to select the comment again. |
Undo |
Select to undo the inactivate action and make the comment active again. |
Send to Supplier |
Select if you want comments to appear on purchase orders that are dispatched to suppliers. If the comments are for internal use only, leave the check box deselected. The Send to Supplier check box applies to comments in the comment text box only, not to the documents that you attach using the Associated Document fields. |
Shown at Receipt |
Select if you want comments to appear on receipt documents. |
Shown at Voucher |
Select if you want comments to appear on vouchers. |
Copy to Purchase Order |
Select if you want comments to copy over to the purchase order. This check box is available only on contract comments pages. |
Associated Document
Use the fields in this group box to attach files to a transaction. You can attach any type of file. The documents that you attach are not transmitted to the supplier with the purchase order.
Field or Control |
Description |
|---|---|
Attachment |
Displays the attachment ID. This field is unavailable for entry because the attachment is automatically assigned. |
Attach |
Click to attach a document to the comments. When you click this button, the system prompts you to select a file for uploading. Select the file and then click the Upload button. |
View |
Click to display an attachment that has already been linked to the comments. |
Delete |
Click to delete an attachment for a comment. |
|
Select if you want to send an e-mail of the attachment with the dispatched documents. Attachments are sent only as part of the purchase order e-mail if the E-mail check box is selected and the dispatch method is e-mail. The attachment e-mail process requires the system to download the attachment to a temporary directory. The temporary directory is c:\temp by default, but you can modify it using the File Locations page. |
|
Go To Source |
If the transaction's comments originated with another transaction, you can click this link to view the originating source transaction. This link is available only if a source is available. For example, if the purchase order is sourced from a requisition containing these comments, you can click this link to view the originating requisition. |
Use the Standard Comments page (STD_COMMENTS_PO) to define frequently used comments.
Navigation:
From the Contract Comments - Header Comments Page, click the Use Standard Comments link.
This example illustrates the fields and controls on the Standard Comments page.

You must have already defined standard comment types on the Standard Comment Type page. See Setting Up Standard Comments.
Field or Control |
Description |
|---|---|
Action |
Select the action that you want to perform on the standard comments. Options are:
|
Comment Type |
Select a standard comment type code. Standard comment types are defined on the Std Comm Type (standard comment type) page. |
Comment ID |
Enter a standard comment ID. Different IDs are available depending on the selected standard comment type. These comment IDs are defined on the Standard Comments page. |
Use the Contract Defaults by BU - PO Defaults (purchase order defaults) page (CNTRCT_DFLT1_SEC) to set default information for order contracts for each business unit.
If no other defaults appear in the default hierarchy, the information that you set up on this page appears by default in each release schedule that you define for the specified combination of order contract and business unit. This page applies to order contract releases only.
Navigation:
Click the Purchase Order BU Defaults link on the Contract page.
This example illustrates the fields and controls on the Contract Defaults by BU - PO Defaults page.

If the Corporate Contract option is selected on the Contract page, this page is optional. If the option is not selected, setting up business units on this page is required, and you can create order releases only for these business units.
If a contract originates from an RFQ, this information appears by default when the contract is created from the RFQ.
If the contract originates from a requisition, you cannot delete the business unit row or change the business unit.
Note: Specification of default values on this page for related purchase order contracts affects only contracts with a contract processing option of General Contract, Purchase Order, Recurring PO Voucher, or Release to a Single PO.
Although default values appear from the purchasing default hierarchy, you can override those values on the Contract Entry component.
Header
Field or Control |
Description |
|---|---|
Business Unit |
Select the business unit to which the defaults apply. |
Copy from BU Defaults (copy from business unit defaults |
Click to access the Copy Defaults from Business Unit Page (CNTRCT_COPY_BU_SEC), where you can copy the purchasing business-unit default values from one business unit to another. |
Supplier Loc (supplier location) |
Select the supplier location for the address that appears on the purchase order for the supplier. |
Buyer |
Select the buyer to be assigned to the purchase order releases against the contract. |
Currency |
Select the currency and exchange rate type. These values appear by default from the selected business unit. |
Payment Terms ID |
Select the payment terms that are expected for the vouchers corresponding to any purchase orders or vouchers that are generated from this contract. |
Shipping Information
Field or Control |
Description |
|---|---|
Ship To |
Select the shipping location that you're defining for the item. Ship-to location codes are established on the Ship To Locations page. |
Ship To Address |
Click to access the Contract Ship To Address page (CNTRCT_ADDRESS) where you can view contract ship-to address details. |
IN Unit (PeopleSoft Inventory business unit) |
Select a default PeopleSoft Inventory business unit for which you are purchasing the items. |
Freight Terms |
Select the freight terms code for the Set ID. Values are defined on the Freight Terms page. |
IN Unit (inventory unit) |
Select a default PeopleSoft Inventory business unit for which you are purchasing the items. |
Charge By |
Select to charge by amount or quantity. You can charge only by amount for amount-only contract lines. |
Ultimate Use Code |
Enter an ultimate use code to override the default tax rate for a location. In most cases, sales tax is computed as a use tax based on the tax code that is applicable to the ship to or usage destination. However, the way that merchandise is ultimately used can also affect the tax rate within the same ship to or usage destination. |
Field or Control |
Description |
|---|---|
Where Performed |
Select the default location where a service is physically performed most often. Options are Buyer's Location, Ship From Location, Ship To Location, and Supplier's Location. |
Additional Link
Field or Control |
Description |
|---|---|
Add Comments |
Click to access the Release Comments page (CNTRCT_DFL_COM_SEC) where you can view and enter free–form text for the order contract. These comments are used as release reminders and remain with the contract. They do not carry over to the purchase order. You can review and modify these comments on the Review Staged Releases page. |
Use the Open Item Price Adjustments page (CNTRCT_PRC_ADJ_SEC) to enter price adjustments that apply to items that reference the contract as an open item contract.
Navigation:
Click the Add Open Item Price Adjustments link on the Contract page.
This example illustrates the fields and controls on the Open Item Price Adjustments page. You can find definitions for the fields and controls later on this page.

You use the Open Item Price Adjustments page to maintain price adjustments for open item contracts. The Allow Open Item Reference check box must be selected for you to view this page. Price adjustments that you enter will apply to requisition or purchase order lines that use the open item contract reference. This means that no contract line or category number reference exists.
The Add Open Item Price Adjustments link becomes available only if the Allow Open Item Reference check box is selected on the Contract page. Open item references are applicable to Purchase Order and General contracts with purchase order releases only.
Header information on this page displays the SetID, contract ID, and version and line numbers if they apply to the contract.
Price Adjustments
Field or Control |
Description |
|---|---|
Effective Date |
Select the date on which price adjustments are effective for this contract. The system uses the calculation method for the effective date to process price rules and adjustment details. You can create a template for only one effective date at a time and can apply item price adjustments into the future by adding a template with a future effective date. |
Status |
Select an open item adjustment status. Values include: Active: Select to make the adjustment value active. As long as the adjustment is within the effective date, the system applies the open item price adjustments. Inactive: Select to make the adjustment values inactive. This means that the system does not apply the adjustments even when they are within the effective date. |
Calculation Method |
Select the method that the system uses to calculate adjustments. Options are: Increment Adjustments: Each valid adjustment is made against the current (base or adjusted) price. For example, if you have a base price of 100 USD and two percentage adjustments (price rules) of 10 percent each, then the first adjustment is deducted from the base price of 100 USD, for a current adjusted price of 90 USD. The second adjustment of 10 percent is deducted from 90 USD for a final adjustment price of 81 USD. Sum All Adjustments: Adjustments are summed and made against the original base price. For example, if you have a base price of 100 USD and two percentage adjustments of 10 percent each, the system takes the total adjustment of 20 percent and deducts it from the base price of 100 USD for a final adjusted price of 80 USD. |
Price Rule
Price rules enable you to set pricing criteria and define the adjustment method, restrictions, and details. These values are processed according to how you define the calculation method.
Field or Control |
Description |
|---|---|
Sequence |
Enter the sequence number for the ascending sequence that the system follows when applying price adjustments. The order is in an ascending sequence. The sequence distinction is important if percentage adjustments exist. The amount that the percentage represents can vary depending on the order in which the adjustments are applied. You cannot change the sequence number of system-calculated adjustments for the base price. |
Supplier Loc (supplier location) |
Displays the supplier price location to use for pricing on this contract line. |
Currency |
Displays the supplier currency that appears by default from the Contract page. The default value for the field is the business unit currency. |
General Adjustment |
Select if this is a general or normal adjustment that is not used as a unit of measure or ship to adjustment. When you select General Adjustment, the Match Shipto and Ship to check boxes become unavailable for entry. Note: You must select either the General Adjustment or Match Shipto method. |
Match Shipto |
Select if this adjustment is based on the ship to ID. For example, if the supplier gives you an additional 5 percent discount if you purchase items within your own state, you could define a price adjustment for each ship to location within your state. |
Ship To |
Select a ship to ID for which the adjustment is to be applied. This field becomes available for entry if you select the Match Ship check box. For the ship to adjustment to be applied by the system, the ship to ID that you enter here and the ship to ID on the purchase order must match. All ship to IDs are available. This field is required when the Match Shipto check box is selected. |
Hard Price |
Select to have the system apply the price resulting from an adjustment regardless of any other adjustments it finds. |
Ignore If Other Adjustments |
Select this adjustment restriction to create a price adjustment scenario in which the system ignores this price adjustment if the contract qualifies for another adjustment. If another adjustment does not apply, this adjustment will apply even if the Ignore If Other Adjustments check box is selected. |
Stop Price Calculation Here |
Select to have the adjustment that you defined set a final price. If the check box is selected, the system does not calculate any further adjustments. |
Adjustment Details
Only one detail row can exist for open-item price adjustments.
Field or Control |
Description |
|---|---|
Method |
Open items can be adjusted by percentage only. Percentages can be either positive or negative. A negative adjustment means that the price or schedule value is reduced by the adjustment, that is, a discount is applied. A positive adjustment means that the price or schedule value is increased by the adjustment, that is, a surcharge is applied. |
Adjust Percentage (adjustment percentage) |
Enter the percentage of the adjustment. |
Use the Template Price Adjustments page (CNTRCT_PRC_ADJ_SEC) to define price adjustment templates.
Navigation:
Click the Price Adjustment Template link on the Contract page.
Use the Template Price Adjustments page to define a set of standard price adjustments that you can copy to the contract line item, open item, and category levels. Price adjustment templates are available only for contracts with Purchase Order, General, and Release-to-Single PO Only processing options. The contract must be in an Open status for you to make updates to the template and you must be in Correct History mode to make changes.
You use the Copy Template Actions group box to copy a template to the line, category, and open-item levels. The system does not copy an adjustment to a lower-level record if an adjustment already exists for the same effective date. After you copy the template, you can review the price adjustments at the lower levels and modify them as necessary. Later, if you add new lines or categories to the contract, the template is not applied to them unless you use this page to copy the template again.
The system records changes that you make to the template in the template's change history.
Fields for defining price adjustment templates are similar to those for defining open-item price adjustment templates. See Open Item Price Adjustments Page.
Adjustment Details
Field or Control |
Description |
|---|---|
Method |
Displays the percent method that the system uses to process the price adjustment. The system makes the adjustment to either the base price or calculated price. The Percentage field appears with this method. Percent adjustments can be either positive (surcharge) or negative (discount). |
Percentage |
Enter an adjustment percentage. The system applies the value for the adjustment method to arrive at a final adjusted price. |
Amount |
Enter an adjustment amount. The system applies the value for the adjustment method to arrive at a final adjusted price. |
Copy Template Actions
Use this section to copy the values that you enter for the header price adjustment template to the open item, category, and line levels for this contract. When you click the Copy Template button, the system validates that you can apply the rules and adjustments to the selected open item, categories, and contract line items. You can select any or all of the check boxes.
In applying the adjustments, the system checks for effective date conflicts. Template adjustments do not replace existing price adjustments that have the same effective date. You can change the effective date for the template or update the individual price adjustment on those records with the same effective dates.
You can define a sequence of price adjustments that enable you to apply price adjustments across the life of a contract for its lower-level open items, categories, and contract lines. Suppose that you have a contract with three contract lines that have three different effective dates. The current price adjustment template has an effective date of 10/01/2009.
|
Sequence Line and Effective Date |
System Action |
|---|---|
|
Line 1 - 09/01/2009 |
The system copies the template to the line item price adjustments. |
|
Line 2 - 10/01/2009 |
The system does not copy the template and issues a general warning message about the lines that are in conflict. The effective date is already in use. |
|
Line 3 - 11/01/2009 |
The system copies the template to the line item price adjustments. |
Field or Control |
Description |
|---|---|
Copy to Open Items |
Select to copy the price adjustments defined for this template to the Open Item Price Adjustments page for this contract. The system applies the values when you click the Copy Template button. |
Copy to Categories |
Select to copy the price adjustments defined for this template to the Price Adjustments for Category Line page for this contract. The system applies the values when you click the Copy Template button. |
Copy to Line Items |
Select to copy the price adjustments defined for this template to the Line Item Adjustments page for this contract. The system applies the values when you click the Copy Template button. |
Copy Template |
Click to copy the values defined for this price template to price adjustment pages for the selected copy locations defined by the check boxes. When you copy the template, the system saves the template and then verifies and applies the template to each of the selected template copy locations. The system prevents the replacement of templates with duplicate effective dates. |
Use the Voucher Misc. Charges (voucher miscellaneous charges) page (CNTRCT_HDRMISC_SEC) to enter miscellaneous charge and landed cost information for the contract.
Navigation:
Click the Miscellaneous Charges link on the Contract page.
Details
Field or Control |
Description |
|---|---|
Prorate |
Indicates whether the miscellaneous charge is prorated. This information appears by default from the Misc Charge/Landed Cost Defn page and cannot be changed here. |
Misc Chg (miscellaneous charge) |
Select a miscellaneous charge code that is defined on the Misc Charge/Landed Cost Defn page. |
Charge Amount |
Enter the amount of the miscellaneous charge. |
Use the Voucher Retention page (CNTRCT_HDR_RET_SEC) to define retention payments for all lines on a contract.
Navigation:
Click the Retention link on the Contract page.
You can set up rules to have the system place a portion of a payment on hold until a certain condition is met.
When a voucher is created from a contract with retention rules defined, the payment amount is split on the voucher. The retained amount is placed on hold, while the remainder is scheduled for payment by the PeopleSoft Payables Batch Voucher process. The retained amount must be released through the Voucher Payments page. The scheduled date is the same for both payments based upon the payment terms.
Field or Control |
Description |
|---|---|
Retention |
Select the type of retention for the contract. The system calculates retention based on the total released amount. For example, if line 1 is for 30.00 USD, line 2 is for 50.00 USD, and line 3 is for 10.00 USD, the retention is based on 90.00 USD. If the retention is 10 percent, the retention amount is 9.00 USD. Options are: No Retention: No amount or percentage is retained for the contract. Retain on Each Payment: An amount or percentage is retained for every payment. Retain on First Payment: An amount or percentage is retained for the first payment only. Retain on Last Payment: An amount or percentage is retained for the last payment only. When you are applying retention to milestone releases, the retention applies to each milestone. For example, if you select Retain on First Payment and you have specified four milestones for the line, retention is applied only to the first milestone line. |
Retention Amount and Retention Percentage |
Select to retain by either amount or percentage, and enter an amount or percentage value. |
Use the Dispatch Options page (DISPATCH_OPTIONS) to enter dispatch options for the contract and to dispatch a contract to the supplier.
Navigation:
Click the Dispatch button on the Contract page.
Note: the Dispatch button is only available when Supplier Contract Management is not installed.
For this page to be available, the contract must be saved, it must have the status Approved, and it must be an order contract. Dispatching applies only to order contracts.
Field or Control |
Description |
|---|---|
Fax Cover Page |
This field is unavailable for entry for contracts. |
Server Name |
Select the name of the server on which you want the print request to be processed. |
Output Destination Type |
Select the destination to which you want the transaction document dispatched. Options include PRINTER, WEB, and FILE. |
Output Destination Format |
Select the appropriate format for the dispatched file based on how you plan to send the file to the supplier. |
Test Dispatch |
Select this option to perform a test dispatch without actually dispatching the document to the supplier. The word Unauthorized is printed at the bottom of the transaction document. |
Print Duplicate on PO (print duplicate on purchase order) |
Select this option if you want to print Duplicate on the transaction document. |
Print Copy |
Select this option to print a copy of the dispatched document. |