Defining Additional Common Information
Use the following components to define additional common information:
Accounting Entry Template (ACCOUNTINGENTRY)
Activity Monitor Registry (PV_WL_REGISTRY)
Attachments (ATTACHMENT_TBL)
Automatic Numbering (AUTO_NUM_PNL)
Commodity Code (COMMOD_CODE)
Distribution Network (DS_NETWORK)
Freight Terms (FREIGHT_TERMS)
Tax Vendor Geo Code Update (RUN_TAXGEOUPD)
Harmonized Tariff Code (HRMN_TARIFF_CD)
Image Location (IMAGE_LOCATION)
Notices and Announmements (MBL_NOTICES)
Personal Data (Edit) (EX_PERSONAL_DATA2)
Planner Code (PLANNER_CODE)
Reason Codes (REASON_CD)
Ship Via Codes (SHIP_VIA_CD)
Ship To Locations (SHIP_TO_CODES)
Ultimate Use Code (SUT_USE_CD)
Units of Measure (UNITS_OF_MEASURE)
Use the following component interfaces to load data into the respective component tables:
Use the COMMOD_CODE_CI component interface to load data into the tables for the Commodity Code component.
Use the HRMN_TARIFF_CD_CI component interface to load data into the tables for the Harmonized Tariff Code component.
Use the SHIP_VIA_CD_CI component interface to load data into the tables for the Ship Via Codes component.
Use the SUT_USE_CI component interface to load data into the tables for the Ultimate Use Code component.
The pages described in this section do not represent all of the pages in the Common Definitions menu. Additional common pages are described as part of the business processes that include them.
|
Page Name |
Definition Name |
Usage |
|---|---|---|
|
ATTACHMENT_TBL |
Define attachment types. |
|
|
ACCTG_TEMPLATE_AP |
Define or modify an accounting entry template. |
|
|
PV_WL_REGISTRY |
Select which worklist entries can appear on the buyer's Activity Monitor pagelet. |
|
|
AUTO_NUM_PNL |
Define automatic numbering specifications for PeopleSoft fields, such as a unique prefix for regular customers or for customers who are also vendors. The system automatically increments numbers by one. |
|
|
AUTO_NUM_BU_PAGE |
Define automatic numbering specifications at the business-unit level for PeopleSoft fields. |
|
|
COMMOD_CODE |
Define commodity codes. Commodity codes, also called freight classes, are used on bills of lading to group and identify shipped products for freight rating and insurance purposes. |
|
|
DS_NETWORK |
Define distribution network codes. |
|
|
FORECAST_SET |
Define versions of forecasts for PeopleSoft Supply Planning. |
|
|
FREIGHT_TERMS |
Set up freight terms. |
|
|
RUN_TAXGEOUPD |
Update geocodes for tax-related transactions, locations and addresses using the GeoCodes Mass Update Process Application Engine process (TAXGEOUPD). Generate a report listing any errors that occurred during the GeoCodes Mass Update Process using the GeoCodes Mass Update report, TAXXGEOX0 (BI Publisher). |
|
|
HRMN_TARIFF_CD |
Set up harmonized tariff codes. These codes are required on various documents that accompany shipments across international and Canadian borders. The codes are pre-established for all commodities by the United States Commerce Department. |
|
|
IMAGE_LOCATION |
Set location for storing images. |
|
|
FILE_DIR_FS |
Define file extensions that you want the system to recognize, system locations for transaction attachments, email and fax file extensions, and file server directories. |
|
|
MBL_NOTICES |
Add or modify notices for display for various products. |
|
|
EX_PERSONAL_DATA2 |
Add or edit employee name and address information. |
|
|
Personal Data Page |
EX_PERSONAL_DATA |
Review employee name and address information. |
|
PLANNER_TBL |
Enter planner codes. |
|
|
REASON_CD |
Define reason codes to provide explanations for various activities performed in the system. You can also define return and reject reason codes for items received in PeopleSoft Purchasing. |
|
|
SHIP_VIA_CD |
Define ship via codes (also called shipping method codes) to use in multiple features in PeopleSoft Inventory, Purchasing, and Order Management. Ship via codes describe the dimensions and options of a shipping vehicle. |
|
|
SUT_DFLT_TBL |
Enter default sales and use tax information for each ship-to location. The sales and use tax rates are normally based on the final destination of the shipment (the ship-to location). |
|
|
SIC_CODE_PNL |
View, modify, or add SIC codes for vendors. This page offers you various methods for finding particular codes. You can search by SIC code or by parent SIC code. |
|
|
SUT_ULTIMATE_USE |
Define ultimate use codes for vendors. Ultimate use codes are used to determine tax applicability. |
|
|
UNITS_OF_MEASURE |
Establish units of measure for your resources. |
Use the Attachment Type page (ATTACHMENT_TBL) to define attachment types.
Navigation:
Enter the Attachment Type, Description, and Short Description for the attachment you are defining.
Use the Accounting Entry Template page (ACCTG_TEMPLATE_AP) to define or modify an accounting entry template.
Navigation:
This example illustrates the fields and controls on the Accounting Entry Template page. You can find definitions for the fields and controls later on this page.
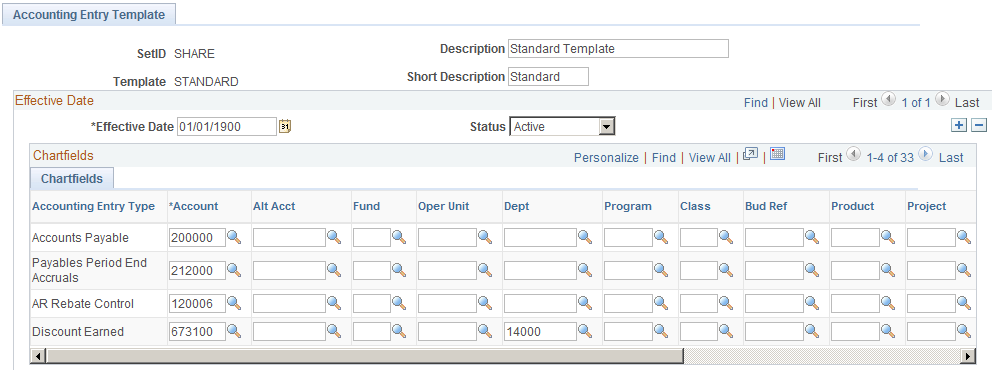
Note: The data that is entered using this page can also be loaded as an Application Data Set using the Data Migration Workbench. For more information about ADS and the Data Migration Workbench for FSCM applications, see below, “Understanding the Data Migration Workbench for the Accounting Entry Template”.
Although users enter individual expense line items on the voucher, the system generates additional accounting entry lines based on the accounting entry templates that you define and associate with individual vouchers. These additional accounting entry lines include the offset to accounts payable, or freight and tax expense entries.
The PeopleSoft Payables voucher and payment posting processes apply the accounting entry templates to individual vouchers to create balanced accounting entries. You set up accounting entry templates by SetID so that multiple business units can share the same (or different) accounting entries.
When you create a new template, the system presents you with a list of accounting entry types that includes standard types such as Accounts Payable, Cash Distribution, and Employee Advances. This list is delivered with the system, but you must add the specific account values that your organization uses for the offset.
Field or Control |
Description |
|---|---|
Account |
Specify the associated account value for each accounting entry type. |
You can also specify other ChartField values such as Alternate Account, Fund Code, Operating Unit, and so on. There is one row for each account type, which tells the system what ChartField values to use when it performs posting. An account value for each is mandatory; values for other ChartFields are optional.
When setting up inheritance for PeopleSoft Payables, if you select Don't Inherit as the inheritance option for an inheritance group, the system uses the ChartField values established on the accounting entry template to generate the appropriate accounting entry lines.
If you are using PeopleSoft Payables and Project Costing; if you leave the Project ID field blank on the accounting entry template and select the Discount Allocation Policy field on the General Controls page in PeopleSoft Payables, then you should use ChartField inheritance for the project ID. This allows you to book discounts against same project as the original source amount.
After you have set up accounting entry templates, you can generate a report that displays the data that you have entered for each accounting entry template. The Accounting Entry Template report (APY0012) includes a description as well as a listing of the accounting entry templates that you have defined for your system.
Understanding the Data Migration Workbench for the Accounting Entry Template
PeopleSoft uses Accounting Entry Templates to generate accounting entries for Payables and Payment Processing . As there are several fields to be entered to create a new Accounting Entry Template, it is advantageous to create the Accounting Entry in a development database and use Application Data Set (ADS) definitions to migrate this data between development environments, test environments, and ultimately to a production environment.
|
Delivered ADS to Support PeopleSoft Allocations |
Application Data Set (ADS) Usage |
|---|---|
|
ACCOUNTINGENTRY |
This data set includes all the records of Accounting Entry setup. Select this data set on the Data Migration Workbench - Project Definition page to move accounting entries from one database to another. |
All relevant records are delivered in the Query Access Tree (QUERY_TREE_AP) within the AP TABLES access group (PeopleTools, Security, Query Security, Query Access Manager).
PeopleSoft delivers an ADS Administrator permission list. For access, the AP TABLES access group should be included on the Data Migration page within the Access Group Permissions and access is given on the Copy Compare Permissions.
PeopleTools: Security Administration.
Use the Register Worklists for Activity Monitor page (PV_WL_REGISTRY) to select which worklist entries can appear on the buyer's Activity Monitor pagelet.
Navigation:
Use the Auto Numbering page (AUTO_NUM_PNL) to define automatic numbering specifications for PeopleSoft fields, such as a unique prefix for regular customers or for customers who are also vendors. The system automatically increments numbers by one.
Navigation:
This example illustrates the fields and controls on the Auto Numbering Page. You can find definitions for the fields and controls later on this page.
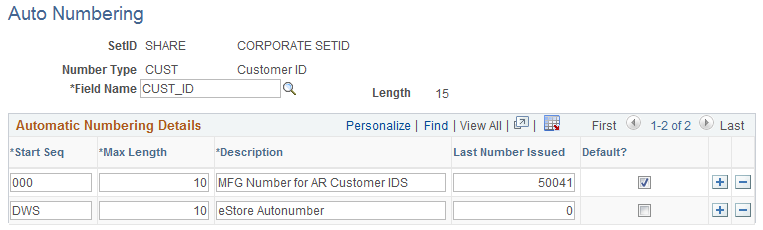
Field or Control |
Description |
|---|---|
Field Name |
Select a field for automatic numbering. |
Start Seq (start sequence) |
Enter a prefix using up to three characters. For example, for the CUST_ID field, you may want to use a unique prefix of CST for regular customers and VND for regular customers who are also vendors. |
Max Length (maximum length) |
Enter a maximum length of number. |
Last Number Issued |
If you enter the last number assigned, automatic numbering starts by incrementing the last number issued by one. If you leave this field blank, the system uses automatic numbering by default. |
Default |
Select if you want the system to use automatic numbering by default. |
Note: Default flag on the Autonumber Table does not apply for Purchase Orders, Requisitions, Receivers, Return to Vendor(Suppliers).
Use the Auto Num BU page (AUTO_NUM_BU_PAGE) to define automatic numbering specifications at the business-unit level for PeopleSoft fields.
Navigation:
This page is similar to the Auto Numbering page that you use for automatic numbering; however, auto numbering by business unit limits auto numbering to one sequence for each field. Using the page, you can setup a single, auto-numbering sequence for a field across the business unit. This provides broader control of numbering within the business unit. The Default field value is always selected because there is only one numbering sequence for a given field in a business unit.
See the previous topic, Setting Up Automatic Numbering, for descriptions of fields on this page.
Use the Commodity Code page (COMMOD_CODE) to define commodity codes.
Commodity codes, also called freight classes, are used on bills of lading to group and identify shipped products for freight rating and insurance purposes.
Navigation:
Use the Distribution Network page (DS_NETWORK) to define distribution network codes.
Navigation:
A distribution network consists of a prioritized list of inventory business units. When a customer orders a product, distribution networks are used to determine the warehouse from which the stock should ship.
You can specify a distribution network code for each of your ship-to customers on the General Information - Ship To Options page. This code then appears by default on the customer's sales order shipment schedules.
When using PeopleSoft Order Management, you can elect to establish a default ship from Inventory business unit on the Order Management business unit Shipping and Returns page. You can use this as the default Inventory business unit for all order lines and schedules. This option is useful if you don't have a complicated distribution network, or if you always ship from one location. The other option on the Shipping and Returns page is to select a default distribution network code that the system uses on orders for ship-to customers who don't have an assigned distribution network code. You are allowed one or the other.
Field or Control |
Description |
|---|---|
Inventory Unit |
Enter the Inventory business units that you want to be included in the distribution network. |
Use the Forecast Sets component (FORECOST_SETS) to set up forecast sets.
Use the Forecast Sets page (FORECAST_SET) to define versions of forecasts for PeopleSoft Supply Planning.
Navigation:
You can define different versions of forecasts for PeopleSoft Supply Planning. For example, you might have three different versions of a forecast; conservative, most likely, and optimistic. For each case, you can define forecast quantities by product or item to create what-if scenarios with different versions of the material and capacity plan based on different forecasts. You associate forecast sets with product forecasts in PeopleSoft Order Management and with item forecasts in PeopleSoft Inventory.
You might want to create two unique forecast sets—for example, OPTIMISTIC and LIKELY. Each item or product forecast record that you define in the system ties to one of these sets. This enables multiple versions of a forecast to exist for the same item or product. This table gives an example of how this works:
|
Optimistic Forecast |
Likely Forecast |
|---|---|
|
Item: 1000 |
Item: 1000 |
|
Date: 12/1/00 |
Date: 12/1/00 |
|
Qty: 3500 |
Qty: 2500 |
|
Forecast Set: Optimistic |
Forecast Set: Likely |
Use the Freight Terms page (FREIGHT_TERMS) to set up freight terms.
Navigation:
Freight terms determine when the title passes for shipments. PeopleSoft Order Management passes freight term information to PeopleSoft Inventory along with requests for stock fulfillment. Freight term codes and descriptions print on quotations, order acknowledgments, packing lists, bills of lading, shipping manifests, and invoices.
Field or Control |
Description |
|---|---|
Delivery Terms 1 |
Values are used in Intrastat reporting for European Union member states. |
Intermediate Consignee |
Select if you use a freight company that assumes responsibility for goods in transit. |
Use the Tax Provider Geo Code Update page (RUN_TAXGEOUPD) to update geocodes for tax-related transactions, locations and addresses using the GeoCodes Mass Update Process Application Engine process (TAXGEOUPD).
Generate a report listing any errors that occurred during the GeoCodes Mass Update Process using the GeoCodes Mass Update report, TAXXGEOX0 (BI Publisher).
Navigation:
This example illustrates the fields and controls on the Tax Provider Geo Code Update Page. You can find definitions for the fields and controls later on this page.
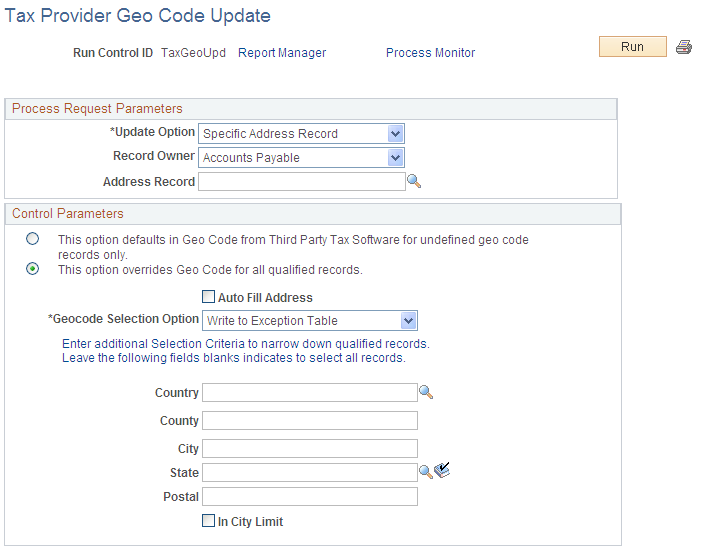
Field or Control |
Description |
|---|---|
Update Option |
Choose Specific Address Record to update the geocodes in a single table. Choose All Tax Address Records to update the geocodes in all tables containing tax-related addresses. You can also limit the tables updated to those owned by a specific PeopleSoft application using the Record Owner control. |
Record Owner |
Select the PeopleSoft application that owns the address tables to be updated. Leave blank to process all tax address tables (when Update Option is set to All Tax Address Records). |
Address Record |
Specify the application table that contains the addresses to be updated. The Address Record field is enabled when Update Option is set to Specific Address Record. |
Control Parameters |
Select the option labeled , "This option defaults in Geo Code from Third Party Tax Software for undefined geo code records only," when you want the system to update the geocodes for all rows that are matched with the selection criteria and for which the geocodes are currently unassigned. Select the option labeled, "This option overrides Geo Code for all qualified records," when you want the system to update the geocodes for all rows that are matched with the selection criteria. |
Auto Fill Address |
Select to have the system populate the address data with information from the selected geocode. |
Geocode Selection Option |
Choose whether the GeoCodes Mass Update Process should use the first geocode record encountered or flag the address record as an error when more than one geocode entry is found for an address. Run the GeoCodes Mass Update report (TAXGEOX0 or TAXXGEOX0) to view a list of geocode update errors. |
Additional Selection Criteria |
Set the additional selection criteria fields to limit the addresses processed |
Note: Refer to your Taxware or Vertex documentation for recommendations on how often you should update your geocodes. The GeoCodes Mass Update Process Application Engine process (TAXGEOUPD) can be scheduled to run accordingly.
Use the Harmonized Tariff Code page (HRMN_TARIFF_CD) to set up harmonized tariff codes.
These codes are required on various documents that accompany shipments across international and Canadian borders. The codes are pre-established for all commodities by the United States Commerce Department.
Navigation:
Use the Image Location page (IMAGE_LOCATION) to define file extensions that you want the system to recognize, system locations for transaction attachments, email and fax file extensions, and file server directories.
Navigation:
Use the File Locations page (FILE_DIR_FS) to review and edit employee address data.
Navigation:
Use the Notices/ Announcements page (MBL_NOTICES) to add or modify notices and announcements the display for various products.
Navigation:
.
When adding a new notice or announcement, be sure to select the Expenses value from the Product field and select the Add button:
When adding a notice, select Expenses as your product. Enter a Title, Priority, Start and End Date, and Description for your notice or announcement.
The text that you enter in the Title field is the text that appears on the Expenses homepage. Optionally, select the Update Image link to add an icon that appears in the Notices section of the Expenses homepage
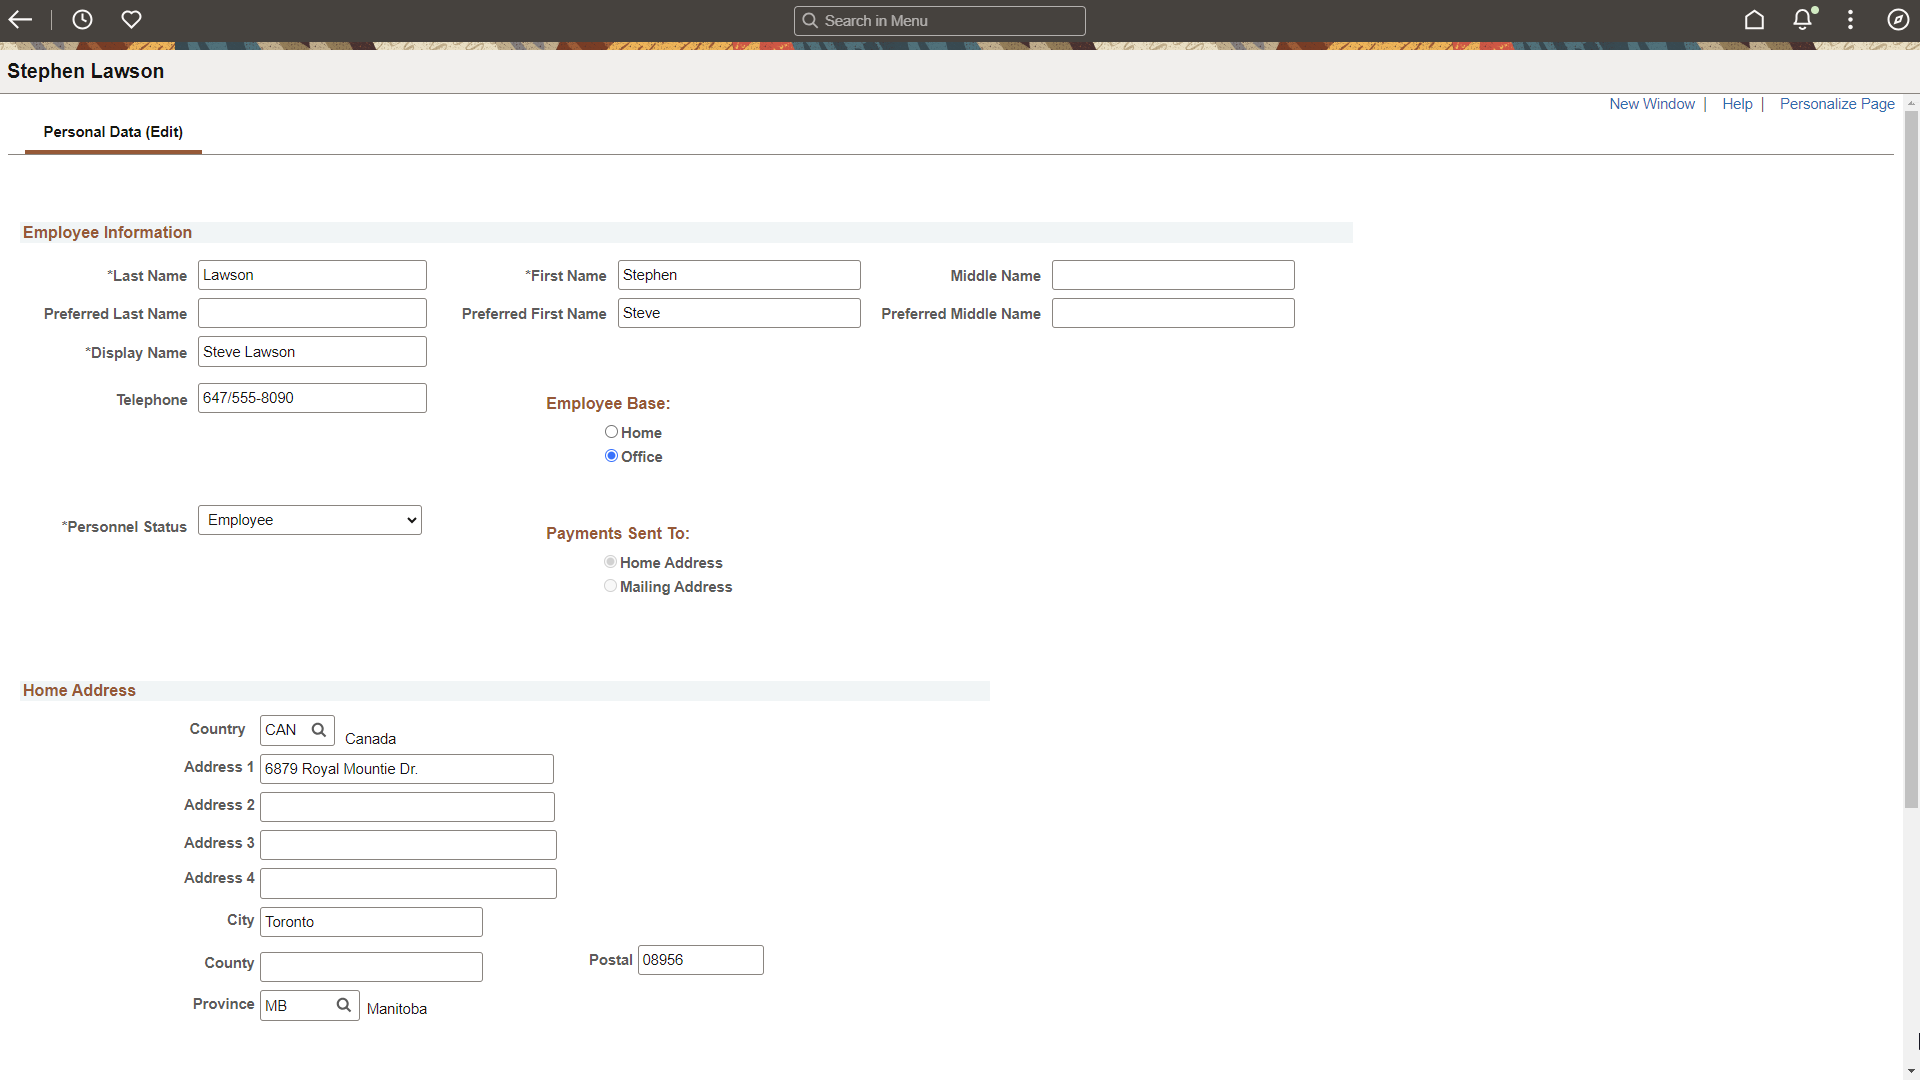
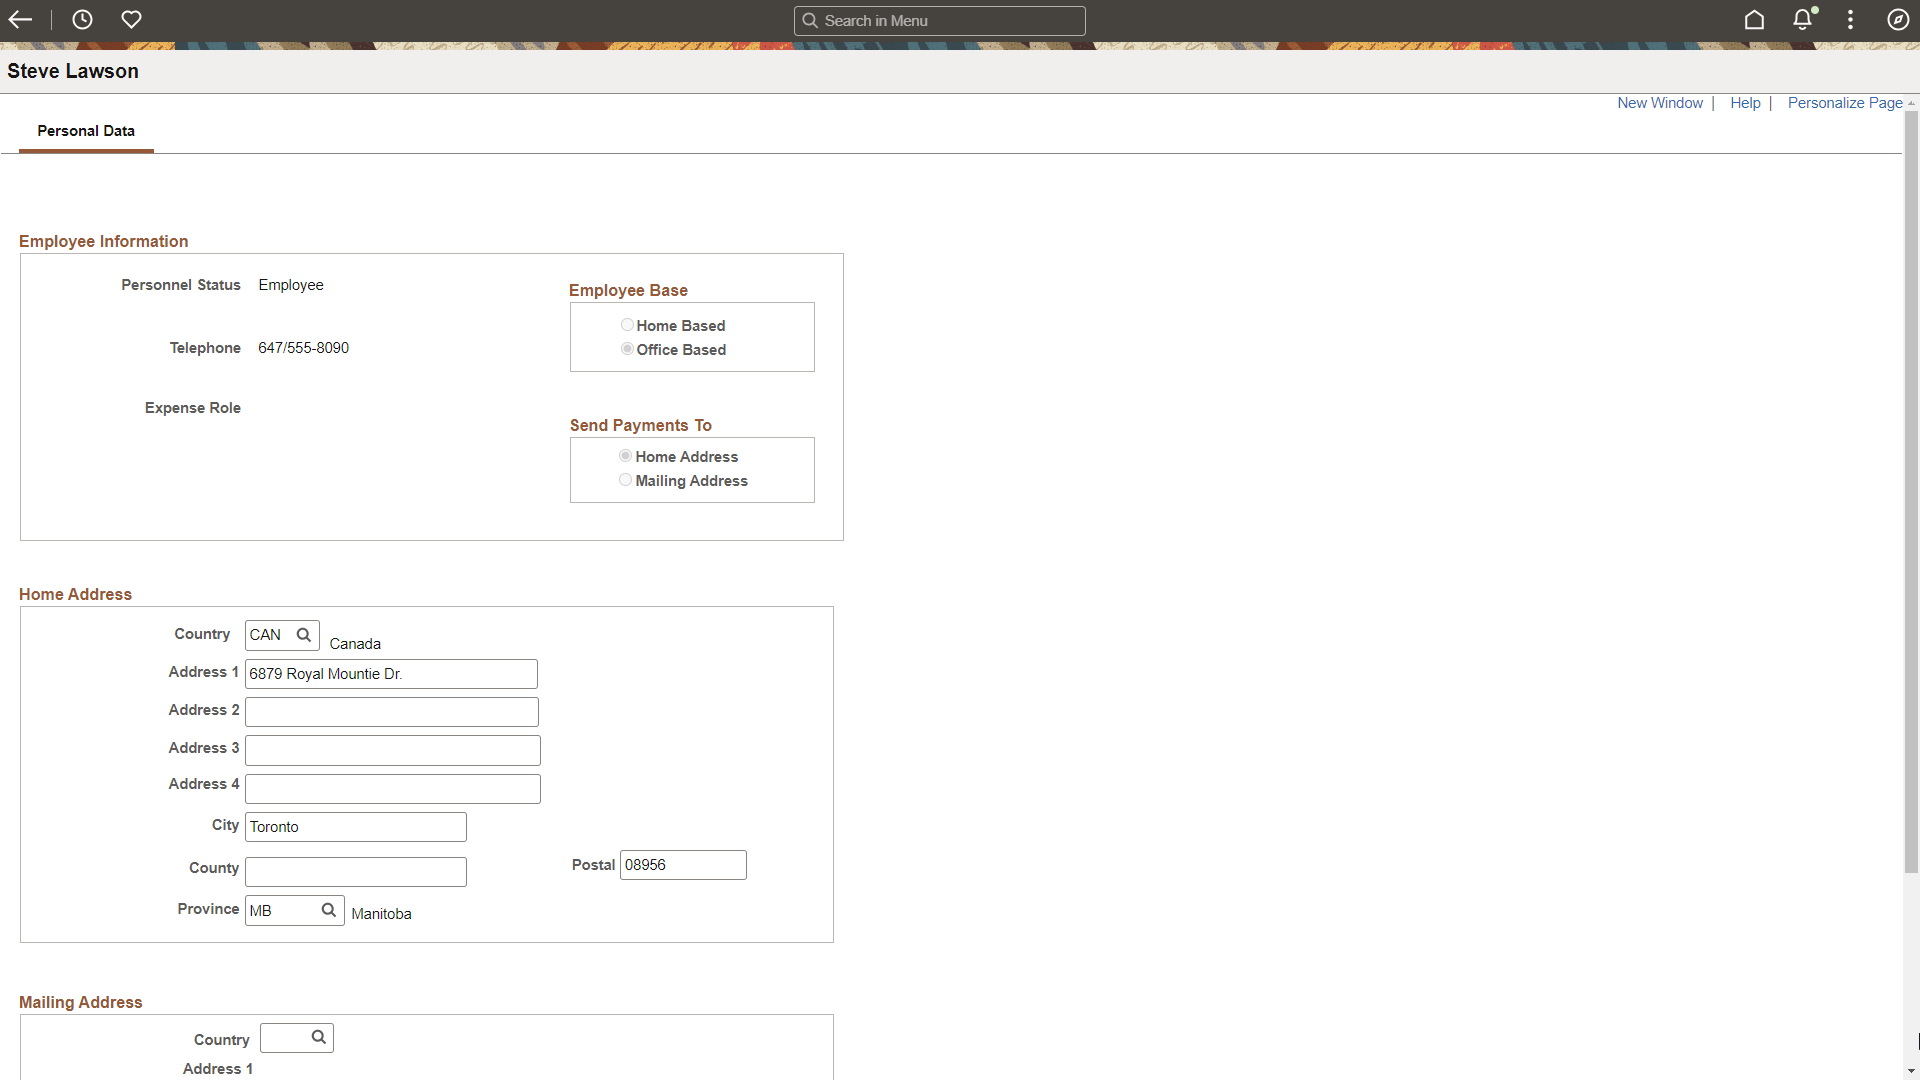
Use the Personal Data (Edit) page (EX_PERSONAL_DATA2) to add or edit employee name and address information.
Navigation:
This example illustrates the fields and controls on the Personal Data (Edit) page.
|
Field or Control |
Description |
|---|---|
|
Last, First, and Middle Name |
Enter the employee last, first, and middle names. The system considers this the legal name of the employee. |
|
Preferred Last, First, and Middle Name |
Enter the employee's preferred last, first and middle names if the employee wishes to be referred to as something other than their legal names. |
|
Display Name |
Enter the employee's name as they want it to appear on most transaction pages and reports. This typically includes Preferred Name information. The value in the Display Name field is required and shown on most pages in PeopleSoft Financials when the Display Preferred Name check box is selected on the Installation Options - Overall Page. If the page requires a <Last name, First name> format, then the page shows the values in the Preferred Last Name, Preferred First Name fields, as long as those fields are populated. If the Preferred Name fields are not populated then the system uses the Last Name and First Name fields. If a page or process requires a legal name, then the Last Name and First Name fields are used. For organizations who integrate employee data with PeopleSoft HCM, the information might include additional attributes such as suffixes and prefixes as configured in HCM. For non-HCM employees and resources:
|
Displaying Preferred Name
Some employees may ask to be identified by a preferred name rather than their legal name. The Display Preferred Name check box (Installation Options - Overall Page) allows this capability.
When this check box is selected, the system uses the Display Name to identify an individual and typically includes Preferred Name information. Most PeopleSoft Financial pages show the Display Name and Preferred Name fields. Pages and processes that require the legal name continue to do so. See Personal Data (Edit) Page (Common Definitions) to view an image showing the Display Name and Preferred Name fields used in FSCM.
The Personal Data record is the source of name information and can be updated using an interface with PeopleSoft HCM, or manually using navigations under Common Definitions, Travel and Expenses, Resource Management, Maintenance Management, Grants or a third-party interface.
If your organization uses PeopleSoft HCM, it is recommended that you update employee tables in your human resources system first, and then load the employee data into your PeopleSoft FSCM database using the PERSON_BASIC_SYNC or PERSON_BASIC_FULLSYNC messages. After the synchronization process completes, you may need to add or edit employee profiles in the FSCM database. Employee information is sensitive. Therefore, it is suggested that you carefully authorize access to these pages. Any changes you make in your FSCM database using Personal Data pages may be overwritten in subsequent HCM synchronizations.
Navigations to Update Name: Name information can be viewed and updated from several different navigations in FSCM. Your use of these navigations is largely dependent on the products installed and whether an employee or resource is sourced from and synchronized using PeopleSoft HCM.
|
Controls for Updating Name Information |
||
|---|---|---|
|
Source Page and Navigation |
Employees and Resources Sourced from PeopleSoft HCM |
Employees and Resources Not Sourced from PeopleSoft HCM |
|
Editable |
Editable |
|
|
Editable |
Editable |
|
|
Not Editable |
Editable |
|
|
Not Editable |
Editable |
|
|
Editable |
Editable |
|
Use the Personal Data page (EX_PERSONAL_DATA) to review employee name and address information.
Navigation:
This example illustrates the fields and controls on the Personal Data page.
The fields and controls on the Review Personal Data - Personal Data page are similar to the Personal Data (Edit) page.
Use the Planner Codes page (PLANNER_TBL) to enter planner codes.
Navigation:
Use the Reason Codes page (REASON_CD) to define reason codes to provide explanations for various activities performed in the system.
You can also define return and reject reason codes for items received in PeopleSoft Purchasing.
Navigation:
Field or Control |
Description |
|---|---|
SetID |
Set up reason codes with a SetID on the Add a New Value page so that they can be accessed by multiple applications and multiple business units. |
Reason Type |
Enter information that categorizes the Reason Code. For example, there are three reasons codes set up with the Reason Type Prenote Reasons to indicate that the code is used with direct debit prenotes. Another example is Sales Contracts, to indicate that the reason code is used in relationship with sales contracts. |
Reason Code |
Enter a code that best represents the reason that you are defining, such as BANKEFT to indicate that the status of a direct debit prenote was changed by the Bank EFT File process; or, you might set up a reason code called CUST-CA for orders that have been cancelled at the customer's request. Reason codes provide explanations for returned stock, changes to order headers, lines, or schedules, direct debit prenote confirmations and more. Note: Reason codes are effective dated to enable you to make and track changes by date. |
Description |
Enter a short and long descriptions defining what the reason code stands for. |
Email Long Description |
Select this check box to generate an email based on workflow. You use PeopleSoft Workflow Administrator to access, monitor, analyze, and control workflow in your organization. See PeopleTools: Workflow Technology |
Include in Quality Metric |
Select this check box for the system to automatically include this reason code in the quality metric that tracks the percentage and actual number of vendor shipment quantities that are inspected, accepted, rejected, and returned by period. If you leave this check box blank, you can exempt (or include) certain receiving reject or return reason codes from the percentage of defectives that your supplier performance metrics reflect. For example, you may not want to use incomplete shipments as a performance measurement for product quality. You can use the Return/Reject Reasons page to remove the Include in Quality Metric flag from that particular reason code. Note: This field only appears reason codes defined for quality metrics related to supplier performance in PeopleSoft eSupplier. |
Use the Ship Via Codes page (SHIP_VIA_CD) to define ship via codes (also called shipping method codes) to use in multiple features in PeopleSoft Inventory, Purchasing, and Order Management.
Ship via codes describe the dimensions and options of a shipping vehicle.
Navigation:
This example illustrates the fields and controls on the Ship Via Codes page. You can find definitions for the fields and controls later on this page.
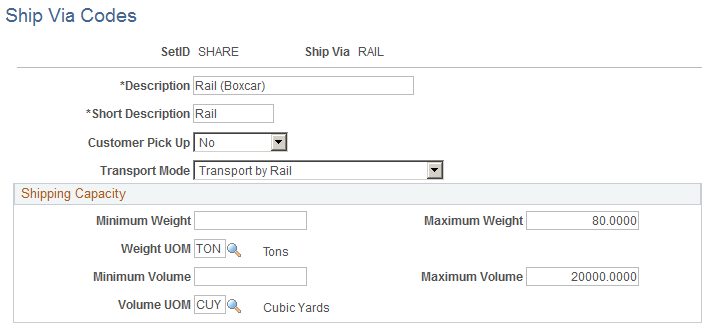
Define ship via codes (also called shipping method codes) to use in multiple features in PeopleSoft Inventory, Purchasing, and Order Management. Ship via codes describe the dimensions and options of a shipping vehicle.
Field or Control |
Description |
|---|---|
Customer Pick-Up |
Select Yes to note that the customer will be picking up the order instead of the order being shipped from the warehouse. This field is used with the counter sales feature in PeopleSoft Order Management. You would most likely establish a separate ship via code for counter sales. The ship via code can default from the ship-to customer (or short-term customer template), the order group, or the buying agreement. |
Transport Mode |
Select the method that the order will be transported. |
Minimum Weight, Maximum Weight, Minimum Volume, Maximum Volume, Weight UOM, and Volume UOM |
The system uses this information to monitor shipment capacity in PeopleSoft Inventory when it establishes delivery ID, load IDs, routes, and shipping IDs. |
Use the Standard Industry Codes page (SIC_CODE_PNL) to view, modify, or add SIC codes for vendors.
This page offers you various methods for finding particular codes. You can search by SIC code or by parent SIC code.
Navigation:
Standard Industrial Classification (SIC) codes identify different types of industries. These SIC codes are organized in a hierarchical structure that, at its most detailed level, contains thousands of different industry types. The PeopleSoft system delivers the standard hierarchy of codes from Canada, Germany, France, the United Kingdom, the United States, and Australia.
You can use the SIC identifiers as an additional means of classifying your vendors or customers. You can also use the parent SIC code for reporting your vendor transactions by industry groups if you need to analyze your purchases based on the industrial classifications of your vendors.
Search Criteria
Field or Control |
Description |
|---|---|
SIC Code |
Enter or select a SIC code to search the system for existing values by SIC code. To find all existing SIC codes for the selected SIC code type, click the Search button without entering any data. |
Parent SIC Code |
Enter or select a parent SIC code to search the system for existing values by parent SIC code. |
Standard Industrial Classification Codes
Field or Control |
Description |
|---|---|
SIC Code |
Displays the SIC codes that you selected for your search. If you are adding a new SIC code, enter the new code in this field. |
Parent SIC Code |
Displays the parent SIC code that you selected for your search. If you are adding a new SIC code, select the parent SIC code to which the new SIC code belongs. |
Use the Ultimate Use Codes page (SUT_ULTIMATE_USE) to define ultimate use codes for vendors.
Ultimate use codes are used to determine tax applicability.
Navigation:
Field or Control |
Description |
|---|---|
Ultimate Use Code |
Enter the ultimate use code and its description. The PeopleSoft system uses ultimate use codes as qualifiers for sales and use tax (SUT) applicability. For each ship-to location, you can associate these codes with a tax rate and other criteria—such as item ID and vendor ID—to set up alternate tax rates that depend on the ultimate use of an item. You can enter any ultimate use code defined for a voucher's ship-to location directly on a voucher in the Voucher component. For example, if you buy a computer for personal or office use, you may be charged a 5% tax rate. If you buy the same computer and use it to manufacture something else, you may only be charged a 3% tax rate. If you set up your ship-to location sales and use tax defaults with an ultimate use code defined at the 3% tax rate, you can assign that ultimate use code to the voucher to retrieve the 3% rate instead of the 5% rate. |
Use the Ship To Locations - Sales/Use Tax Info page to attach ultimate use codes to a ship to location.
Navigation:
Click the Sales/Use Tax link.
This example illustrates the fields and controls on the Ship To Locations - Sales/Use Tax Info Page. You can find definitions for the fields and controls later on this page.
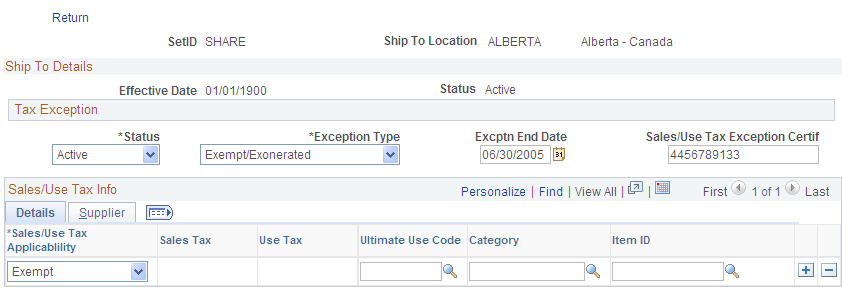
At the ship-to location level you have five options:
Enter an ultimate use code, select Taxable in the Sales/Use Tax Applicability field, and enter a tax code in the Sales Tax field.
This allows you to have an alternate tax rate based on how the item being purchased will be used.
Enter an ultimate use code and select Exempt in the Sales/Use Tax Applicability field.
When you select this ultimate use code on a voucher for this ship-to location, it will be tax exempt.
Enter an ultimate use code and attach it to a specific vendor and vendor location.
The default tax code for vendors and vendor locations shipping to this ship-to location will be the one that you enter here, unless you override it on the voucher.
Enter an ultimate use code and attach it to a specific item category.
Items in that category for the ship-to location will be taxed at the rate indicated by the tax code, unless you override it on the voucher.
Enter an ultimate use code and attach it to a specific item.
For the ship-to location, the default tax rate for this item will be the one indicated by the tax code that you enter here.
Use the Units of Measure page (UNITS_OF_MEASURE) to establish units of measure for your resources.
Navigation:
To assign a default conversion rate between this UOM and another unit of measure, select a convert-to UOM and enter a conversion rate. The system automatically calculates the inverse conversion rate.
You can view information about units of measure and the resources to which they are assigned in the Units of Measure report.