Using the Comprehensive Supplier Secure Portal in PeopleSoft Fluid User Interface
|
Page Name |
Definition Name |
Usage |
|---|---|---|
|
PTGP_USER_PERS_FL |
Configure the default values and preferences such as time buckets, to display on the Secure Portal pages. |
Supplier User: Use the User Preferences tile to open the Preference page and configure the default time values and time buckets displaying on the various Secure Portal pages.
Navigation:
.
This example illustrates the fields and controls on the My Preferences page. You can find definitions for the fields and controls later on this page.

Display Options
Field or Control |
Description |
|---|---|
Suppress trailing zeros for Quantity field |
Select to suppress any extra zeros. This setting is applicable to all transactions. |
Suppress trailing zeros up to the currency decimal position for Price field |
Select to suppress extra zeros till currency decimal position. Decimal Positions setup for the currency will be used to determine the number of decimal positions that will be displayed for price. This is no rounding off done for Price. |
Field or Control |
Description |
|---|---|
Purchase Order |
Enter the number of days for including the dispatched purchase orders. For example, if you enter the value as 90 days, the system lists the POs dispatched in the past 90 days from today. |
Receipts |
Enter the number of days for including the dispatched receipts. |
Advance Shipment Notice |
Enter the number of days for including the dispatched Advance Shipment Notices. |
Request for Quotes |
Enter the number of days for including the dispatched Request for Quotes. |
Bidding Opportunities |
|
Purchase Order With Overdue Shipment
Field or Control |
Description |
|---|---|
Include POs Dispatched in Last |
Enter the number of days for including the dispatched POs. |
Overdue Shipment Time Buckets |
Enter values to display the time bucket for PO Overdue Shipment, based on the number of days entered. Note: This field appears only for single supplier shipments, and you can enter a maximum of four rows. |
Purchase Order Acknowledgement
Field or Control |
Description |
|---|---|
Default View by Option |
Select a View By option:
On the Purchase Order Acknowledgement Landing page, the View By field displays the selected option. |
Acknowledge With Pending Review Lines |
Select an option to display when you acknowledge a PO with a few or all lines pending for review:
|
Acknowledgement Due View Buckets |
Enter the time period to display the POAs due. Note: If you enter a negative value in the From field, the system automatically updates the Label Description as Past Due. Warning! Pay close attention to the values you enter here. The system uses these values to display the time buckets of POA Due-in information and group the pending Purchase Order acknowledgements under various time buckets as defined in this section. |
Notice of Intent to Award (NOIA)
Field or Control |
Description |
|---|---|
Display NOIA Sent To |
Select All Events if you want to send NOIA to all the events. If you select Participated Events, you can send NOIA for only the events that the logged in bidder has participated in. |
Display NOIA Sent in Last |
Enter number of days to display the dispatched NOIA. Default value is 90 days. |
Include Closed Notice |
Select Yes for the event notices on the NOIA page to display all the events, including notices that are closed. This is the default selection. Select No for the event notices on the NOIA page to display only open notices. |
Warn Prior To Notice End Date |
Enter the number of days for displaying the warning message. A warning icon with a message appears on the NOIA page for notices that are going to end within the specified number days. Default value is 10 days. |
Notice of Award (NOA) & Awarded Events
Field or Control |
Description |
|---|---|
Display Awarded Events In Last |
Enter the number of days to display the Awarded Events. Default value is 90 days. |
Include Non Awarded Events |
Select Yes to list all the notices for the logged in bidder, including the non-awarded events. This is the default selection. Select No to list only the awarded events for the logged in bidder. |
|
Page Name |
Definition Name |
Usage |
|---|---|---|
|
PT_LANDINGPAGE |
Access various pages on the portal. |
|
|
SCP_SEC_BIDOPP_FL |
View a list of bidding events. |
|
|
SCP_SEC_BIDLST_DFL |
View the details of the event. |
|
|
AUC_GEN_DTL_PG1_FL |
Access the event bid package, view related details, and respond to general questions for the event. Bidders and suppliers can also add comments or attachments related to their bid. |
|
|
AUC_LINE_BID_FL |
Respond to line details such as quantity, price, and bid factors related to each bid line. Bidders and suppliers can also add comments and attachments related to the event line. |
|
|
AUC_BIDVALIDATE_FL |
Review your responses to the event and submit the bid. You can also review and correct errors. |
|
|
AUC_BID_CONF_FL |
Confirm that the bid was successfully submitted and review bid event details. |
|
|
AUC_RESP_COMH_SCF |
Enter comments or attachments for the bid event. |
|
|
SCP_SEC_ASN_PG_FL |
Create a new Advanced Shipping Notice (ASN) |
|
|
PT_LANDINGPAGE |
Access Quotes and POs tiles. |
|
|
SCP_SEC_QUOT_PG_FL |
View all the quotes either that are awaiting a response or those Quotes that already have responses. |
|
|
SCP_SEC_PO_PG_FL |
View all your Suppliers along with the details of the Purchase Orders awaiting acknowledgement, and the orders that may need to have an ASN generated. |
|
|
SCP_SEC_RCPT_PG_FL |
View all your Suppliers along with the details of the rejected and accepted receipt lines. |
|
|
PT_LANDINGPAGE |
Access the POs with Overdue Shipments tile, the Unacknowledged PO tile, and the Contracts Pending Review tile. |
|
|
SCP_SEC_ALRT_SH_FL |
View Suppliers having overdue shipments of orders placed by the Buying Organization. |
|
|
SCP_ALR_SCH_DTLSCF |
View the overdue Schedule details of the selected Purchase Order. |
|
|
SCP_SEC_ALRTPO_FL |
View the list of Purchase Orders that are awaiting your acknowledgement. |
|
|
SCP_SEC_UNACKPO_FL |
View the list of Purchase Orders that are awaiting your acknowledgement. |
|
|
SCP_POA_TRAN_PG_FL |
View the selected Purchase Order and choose to acknowledge, save, reject, or reset it. |
|
|
SCP_SEC_NOA_FL |
View the awarded and non- awarded events and the relevant details about each event. |
|
|
SCP_SEC_NOIA_FL |
View the notice of intent to award for events from the buying organization. |
|
|
SCP_S_CNTRCT_PG_FL |
View the documents pending review or signature. The tile displays the total count of those documents. |
|
|
SCP_DELIVER_PG_FL |
View the contract deliverables. |
Field or Control |
Description |
|---|---|
Tile |
Tiles also act like buttons. Click a tile to go to an application page to complete your business transactions or view data to guide your interactions in the Portal. |
|
Every Homepage and application page has a banner at the top of the page that includes the page title and standard buttons. |
|
On application pages, the banner includes a back button. The button label includes the Homepage title you navigated from. Clicking this back button returns to the prior page or the page you navigated from. |
|
You can return to the Homepage you came from by clicking the Home button in the banner and bypass the steps to return page by page to your original point of entry. |
|
Click to refresh the page and view the page with latest updates. |
|
The notifications button shows the number of pending actions and alerts. |


Supplier User: Use the Supplier Secure Home Page to access various pages on the portal, by clicking a tile. You must have verified user credentials (User ID and Password) to access this area of the Comprehensive Supplier Portal.
Navigation:
This example illustrates the fields and controls on the Supplier Secure Home Page.

Click a tile to open a new page and view the corresponding detailed information.
This Tile is displayed only if Strategic Sourcing is implemented.
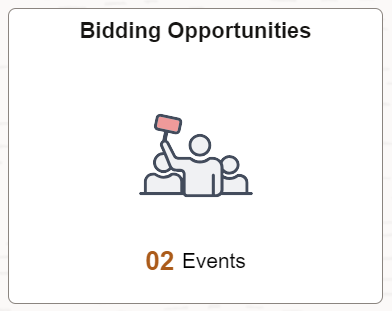
Supplier User: Use the Bidding Opportunities tile to open a new page and view a list of bidding events. The Bidding Opportunities tile displays a count of the events available for bidding, which includes public events as well as invitation-based events submitted by both suppliers and bidders. You use your Bidder ID or Supplier ID to participate in a Bidding Event.
Navigation:
This example illustrates the fields and controls on the Bidding Opportunities tile.
This example illustrates the fields and controls on the Bidding Opportunities Page.
The left pane display varies based on the selected View By option. By default, the All option displays both the suppliers and bidders based on the Define Supplier page configuration. Against each supplier or bidder, you can see the number of bidding events.
Field or Control |
Description |
|---|---|
Time zone |
Select a time zone for the bids. Leave the field blank to display the list of bids in the time zones that were used while creating the events. Note: The Time Zone values are PeopleTools delivered. The default value is taken from the preferences set up on the My Preferences page under General Settings. |
Date Format |
Select a date format for the bids:
|
Apply |
Click to apply the Time Zone and Date Format selections to the bids. |
View By |
Select the required option from the View By drop down. The options are Bid Status, Buying Status, and Supplier and Bidder. The Supplier and Bidder view option is available only to the Multi Supplier users. |
Invited Events |
View a list of events for which you have been invited to participate. |
Public Events |
Click to view a list of all events available for bidding that are open to the general public. |
 |
If you are searching for a specific bidding event, you can use the Filter capability to narrow down the list of events. Click the Filter icon to access the Filters page and search events based on various fields on the event:
|
|
Event Name |
Displays the event name. |
Buying Organization / Event ID |
Displays the Buying Organization and the Event ID associated to the event. |
Format / Type |
Displays whether the event is a Sell event or a Buy event.
Also displays the type of event:
|
Start Date / End date |
Displays the period for which the bidding is open. |
Ends In |
Displays the time after which the bidding opportunity ends. |
|
Displays warning based on the Warn Events Ending Prior To x days setting on the My Preference page. |
Bid Status |
Displays whether you have accepted or declined to participate in an Event, as well as any new Events.
|
Event Details |
Click the > button to open the Event Details page. |

Supplier User: Use the Event Details page to view the details of the event. This page is displayed only if Strategic Sourcing is implemented.
Navigation:
Click an event line on the Bidding Opportunities page.
This example illustrates the fields and controls on the Event Details page.
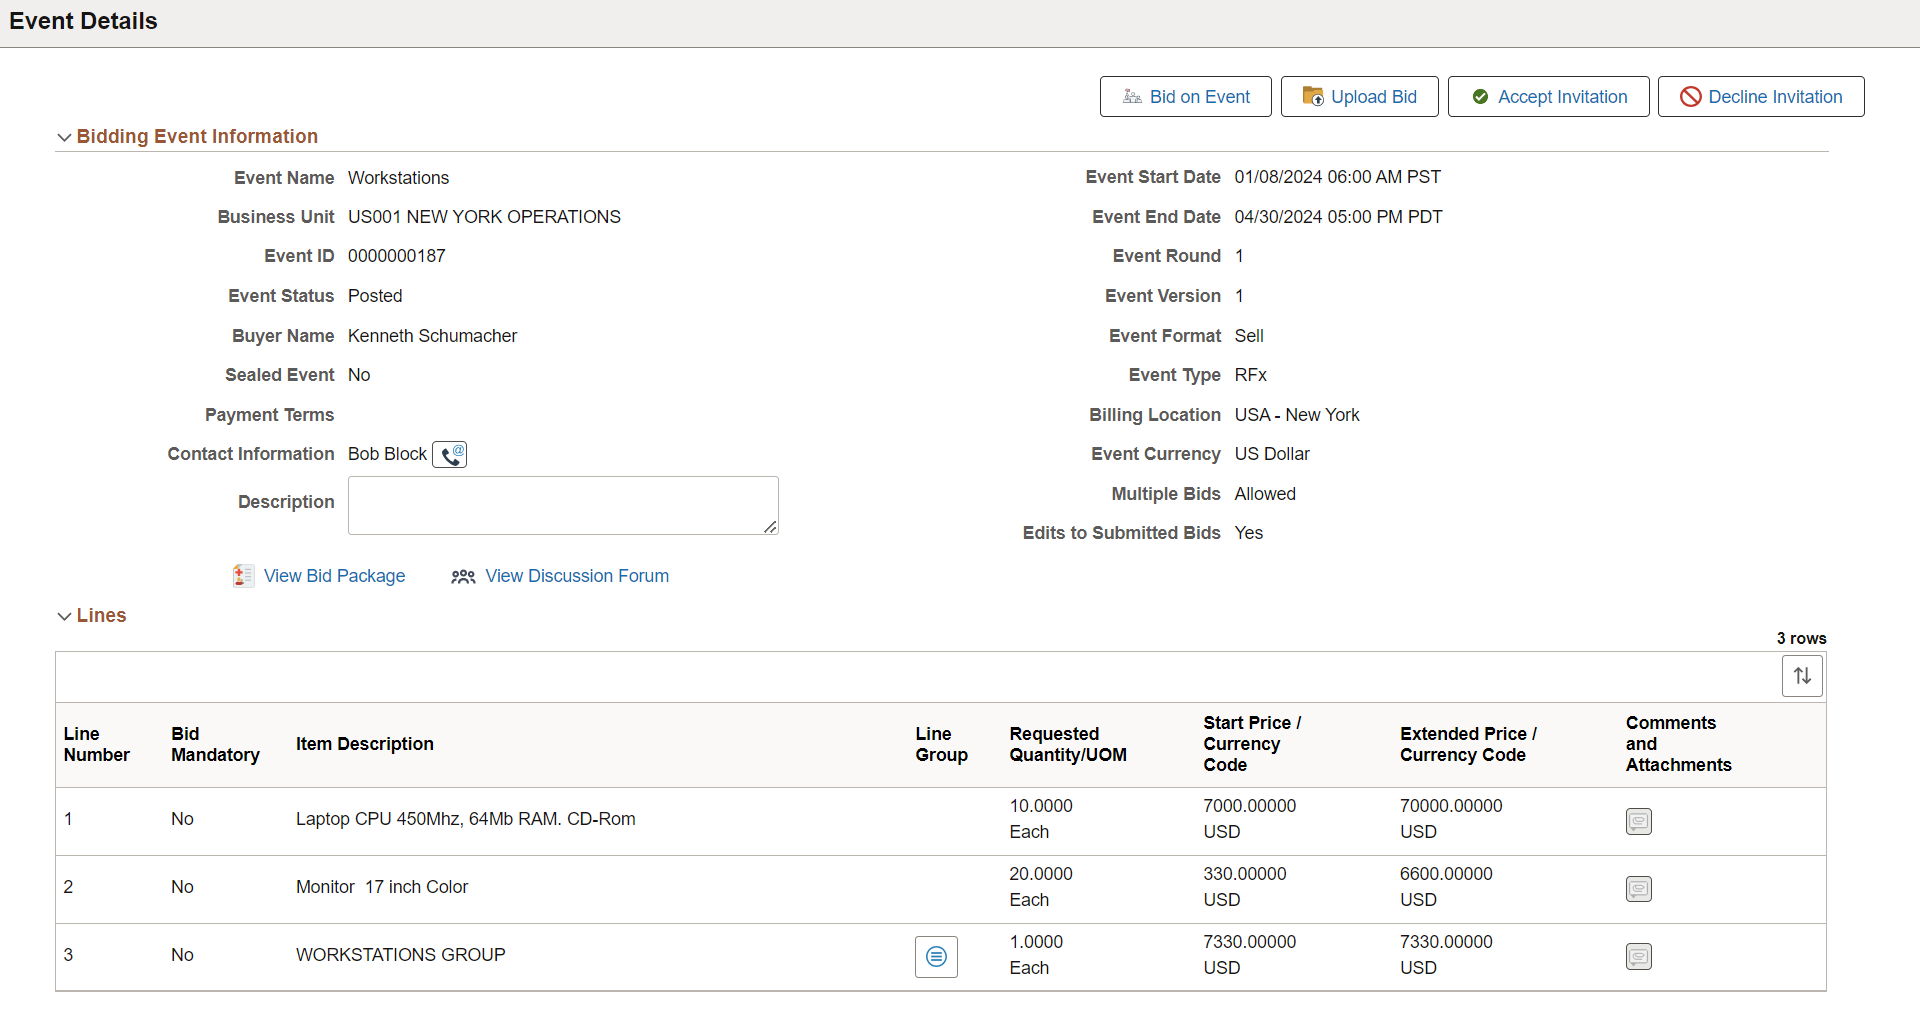
Note: The fields on this page are displayed from the Event, and are based on the Event transactions in Strategic Sourcing, set up at the time of creating the event.
Field or Control |
Description |
|---|---|
Enter Bid on Behalf of |
The Enter Bid on Behalf of label indicates that the supplier user or representative is entering, editing, or viewing the bid on behalf of another Supplier or Contact. For Public events, a supplier or representative can select a contact from Bid on Behalf of drop down to submit the bid on behalf of another user. |
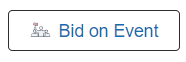 |
Click to open the Bidder Response - General Information Page to enter your bid response. This button is displayed for New and Multiple Events. You can use this button to enter multiple bids if Multiple bids are allowed. When you select this button, the page displays the selected bidder’s or contact’s name that the supplier or representative is entering the bid on behalf of. Note: Enable the Fluid Bidder Response feature using the Enable Fluid Bidder Response check box on the Installation Options - Sourcing Installation Options Page. |
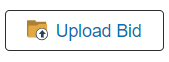 |
Click to open the Upload Bid Page to upload the bid in XML format. Note: This button is displayed only when Allow Bidder XML Downloads is selected on the Event Settings and Options Page. You can use this button to enter multiple bids if Multiple bids are allowed. |
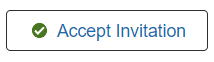 |
Click to accept the invitation to bid on this event. Use this to indicate that you are interested in participating in the bid. You can prepare for the bid after accepting the invitation. Accepted invitations display the Submitted For column, which display the name of the supplier or contact. Note: This button is displayed only if the status is New or Declined. |
 |
Click to decline the invitation to bid on this event and enter a reason code. You can accept the invitation at a later time and enter a bid for the event in case you have reconsidered and decide to participate in the bidding event. Note: This button will not be displayed if the status is Accepted. |
Counter Bid |
Click to enter a bid response. This button is displayed if there are multiple rounds of bidding for an auction and you would like to continue participating by entering a new bid. |
Multiple Bids |
Displays if you can enter multiple bids for the Event. |
Edits to Submitted Bids |
Displays if you can make changes to the bid using the Related Actions. |
Invitation Accepted |
Displays to indicate that the Event is accepted. |
Invitation Declined |
Displays to indicate that the Event is declined. |
View Discussion forum |
Click to open the Event Discussion Page to view the Event message and to post a reply. |
|
Click to perform event related actions:
Note: If multiple bids are not allowed, and Edits to Submitted Bids is “No” then the only options available are View Bid and Cancel Bid. |

See Contact Information Page, View Bid Package Page, and Line Comments and Attachment Page.
Bid Information
The Bid information section appears once you submit a bid using the Bid on Event button. In case the event is of the type Auction, additional fields appear along with the Bid History link. Clicking the link will open the Event Bid History Page to view the bid invitation status and bidding history for the specified event.
Bidder Response page appears when you click the Bid on Event button on the Event Details Page. On this page you can view the details, respond to general questions, respond to line details, review, and submit the bid.
The fields on this page and steps to submit the bid are displayed from the Event, and are based on the Event transactions in Strategic Sourcing, set up at the time of creating the event.
This example illustrates the fields and controls on the Bidder Response page for the RFx events.
This example illustrates the fields and controls on the Bidder Response page for the Auction events.

This example illustrates the fields and controls on the Bidder Response page for the RFI events.
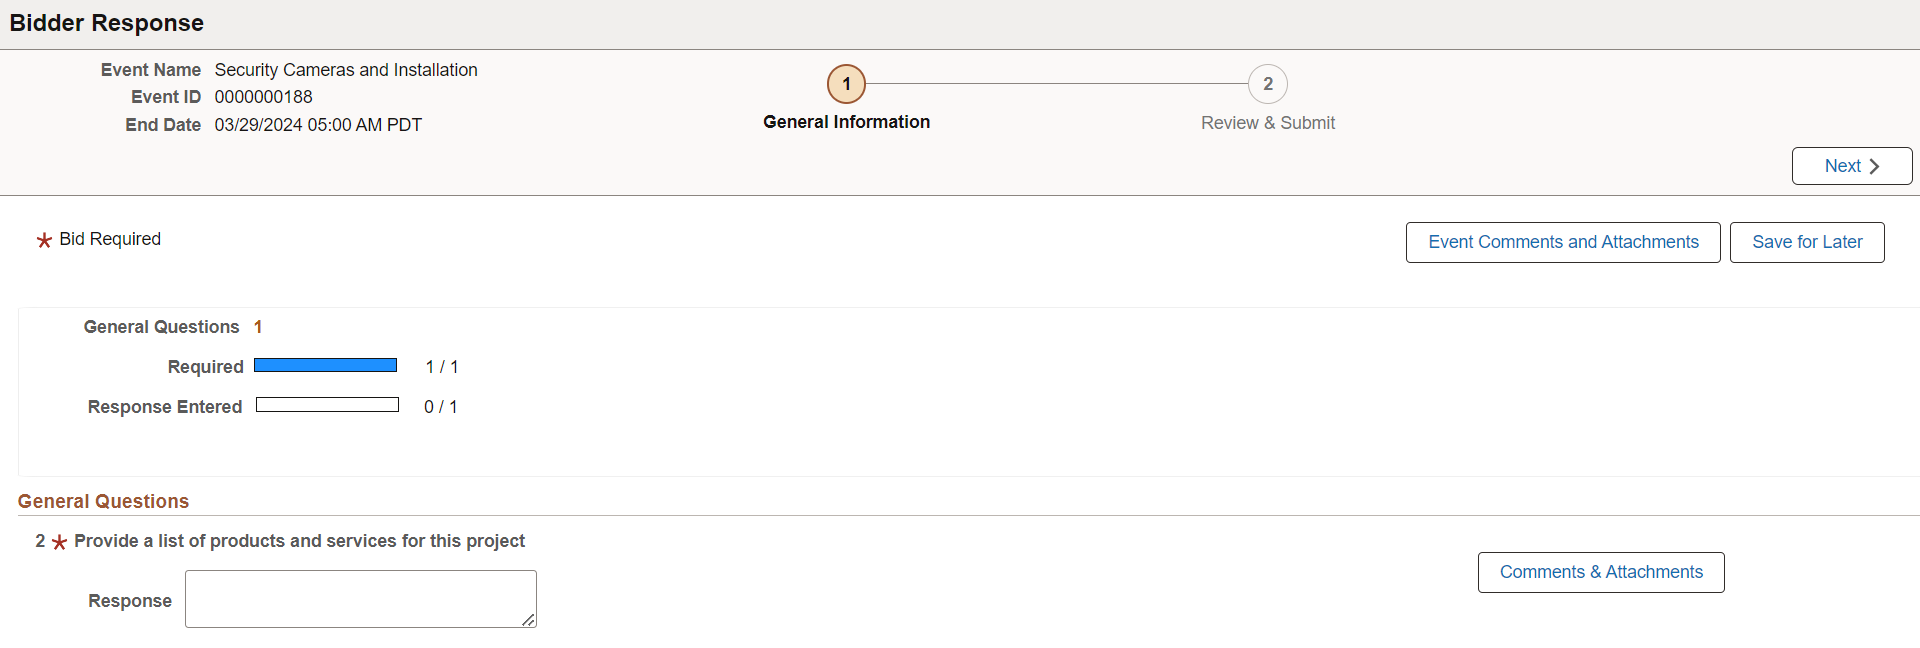
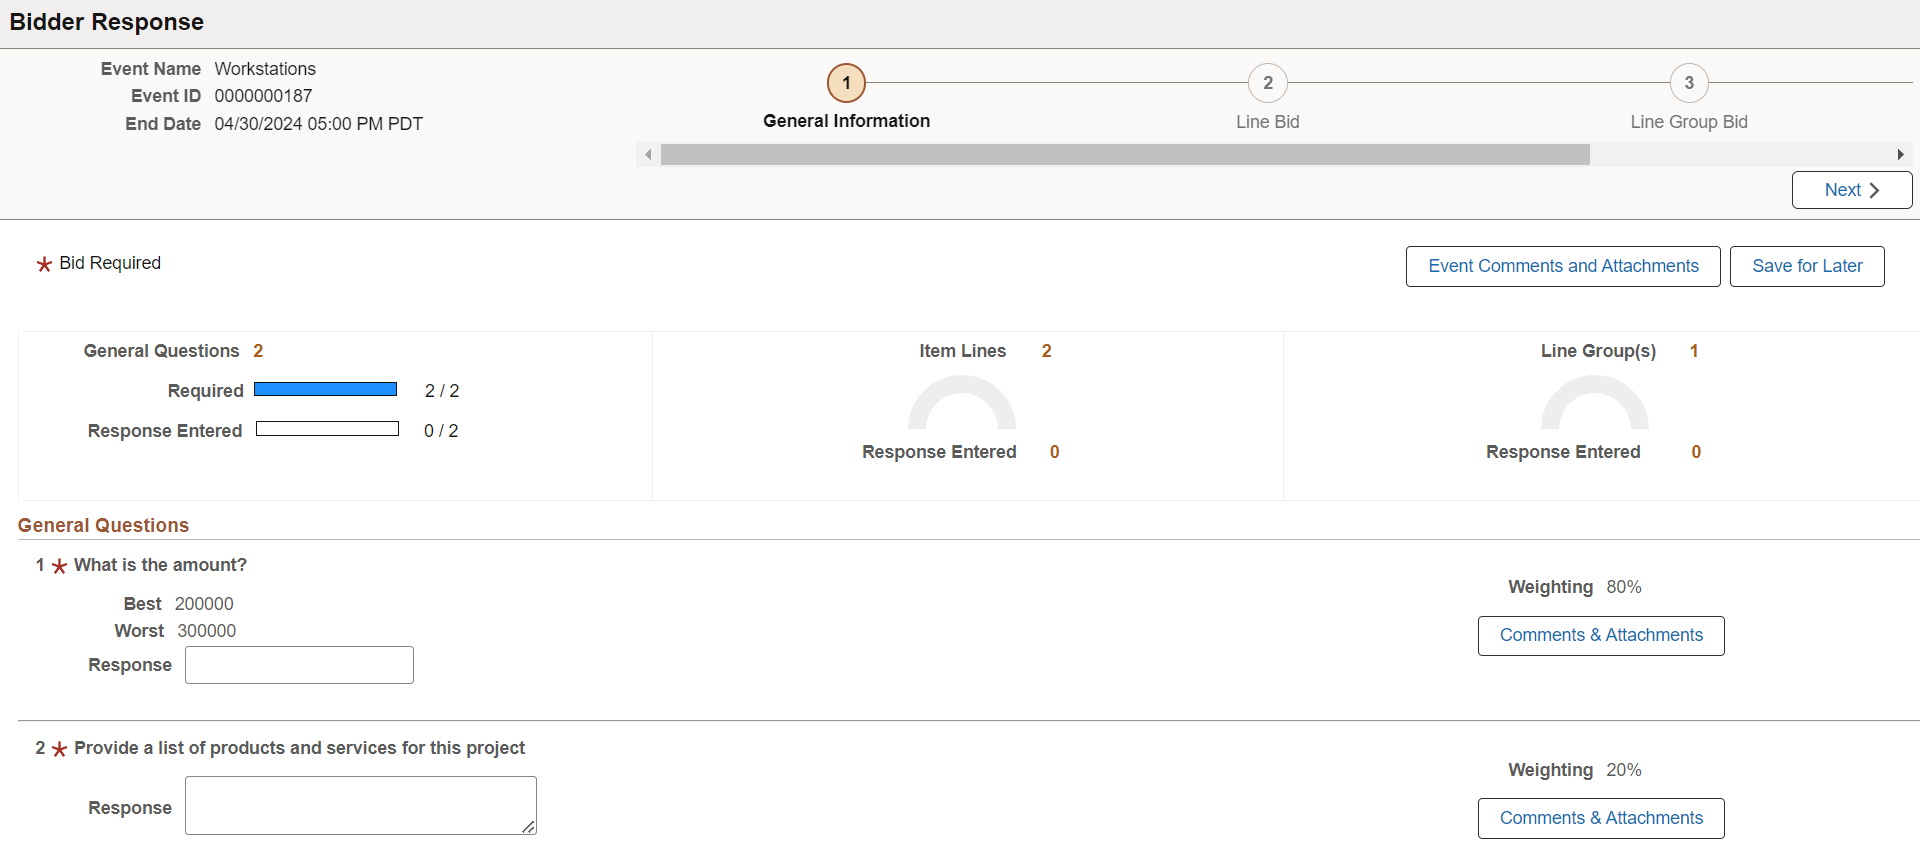
Use the Bidder Response - General Information page (AUC_GEN_DTL_PG1_FL) to access the event bid package, view related details, and respond to general questions for the event. Bidders and suppliers can also add comments or attachments related to their bid. This page supports line group event bids.
Navigation:
Select the Bid on Event button in the Event Details Page
This example illustrates the fields and controls on the Bidder Response - General Information page.

|
Field or Control |
Description |
|---|---|
|
Event Name |
Displays the name of the event. |
|
Event ID |
Displays the event ID. |
|
End Date |
Displays the bidding end date. |
|
Next |
Select to advance to the next step in the bid process, Bidder Response - Line Bid Page. |
|
Recalculate Scores |
Click to recalculate the score after updating all the fields. Note: This button will be available only for Auction events when On the Basis Of option is Scores. |
|
Event Comments & Attachments |
Select to access the Event Comments and Attachments Page, and enter comments or attachments for the event. |
|
Save for Later |
Select to save the bid in its current state and complete at later time. |
|
General Questions |
Displays the total number of general questions in the bid. |
|
Required |
Displays the total number of required questions in the bid. |
|
Response Entered (General Questions) |
Displays the total number of completed questions in the bid. |
|
Item Lines |
Displays the total number of item lines in the bid. |
|
Response Entered (Line Bids) |
Displays the total number of completed line bids. |
General Questions
Use this section to answer general questions related to the event. Questions are created using the Event Bid Factors Page.
|
Field or Control |
Description |
|---|---|
|
Response |
Enter or select a response to the question. |
|
Weighting |
Displays a percentage for the question, which indicates its importance relative to the other questions. |
|
Comments and Attachments |
Select to add individual comments or attachments for a question. |
Use the Bidder Response - Line Bid page (AUC_LINE_BID_FL) to respond to line details such as quantity, price, and bid factors related to each bid line. Bidders and suppliers can also add comments and attachments related to the event line.
Navigation:
Select the Next button on the Bidder Response - Line Bid Page.
This example illustrates the fields and controls on the Bidder Response - Line Bid page.
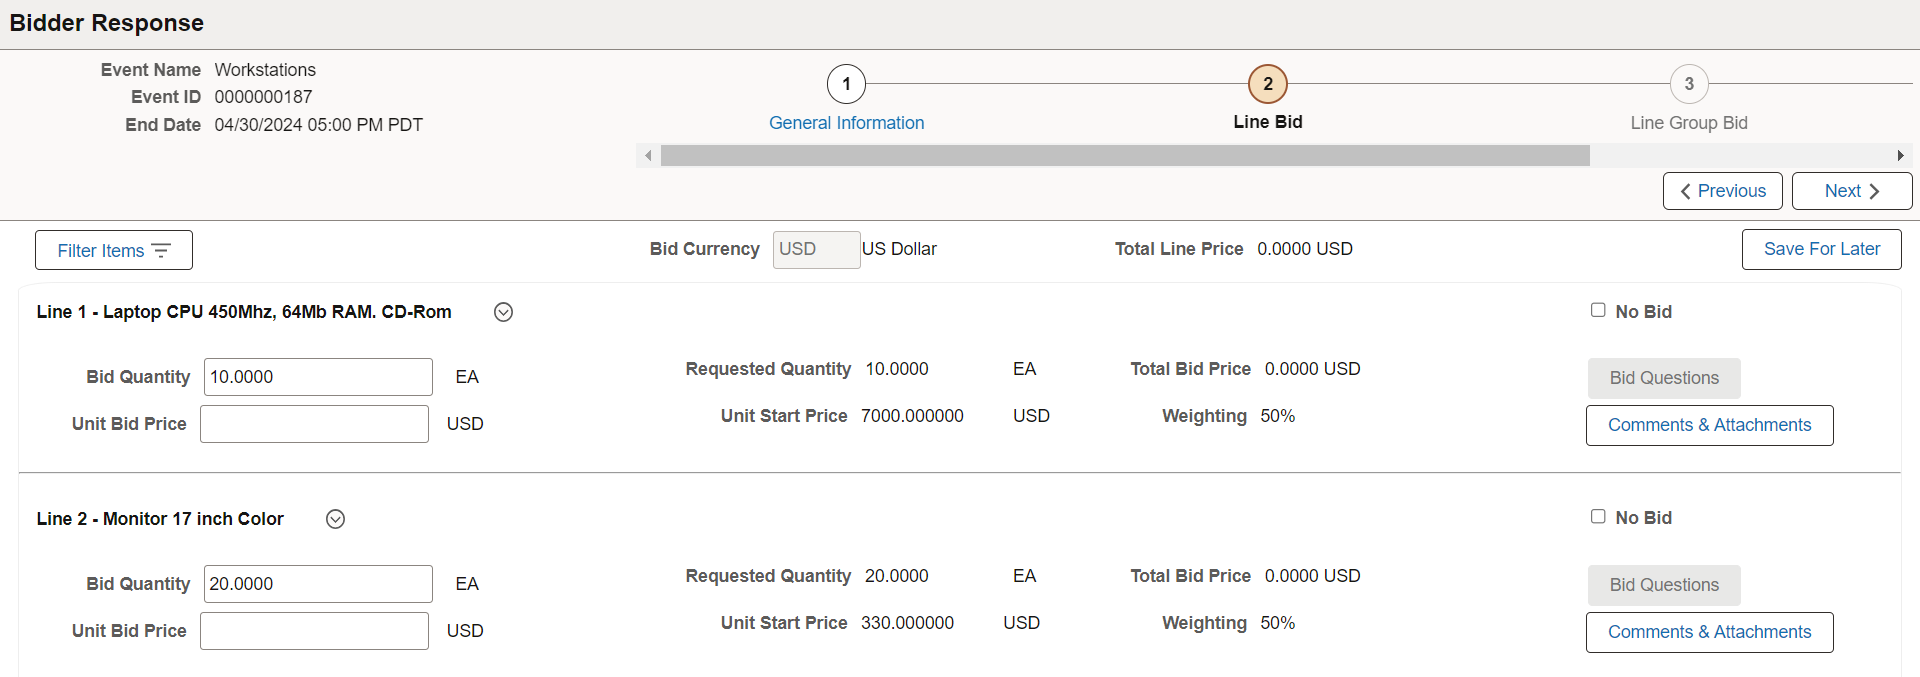
|
Field or Control |
Description |
|---|---|
|
Next |
Select to advance to the next step in the bid process, Bidder Response - Line Group Bid Page. Note: If Line Group Bid page is not available, click Next to access the Bidder Response - Review & Submit Page. |
|
Filter Items |
Select to access the Filters page and filter bid item results based on Item ID, All Lines, Pending, and so forth. |
|
Recalculate Scores |
Click to recalculate the score after updating all the fields. Note: This button will be available only for Auction events when On the Basis Of option is Scores. |
|
Bid Currency |
Displays the currency of the bid, such as U.S. dollars. |
|
Total Line Score |
Indicates the sum of the bidder's scores for the bid factor responses for this line. Note: This field will be available only for Auction events when On the Basis Of option is Scores. |
|
Total Line Price |
Displays the total price of the line. |
|
Save for Later |
Select to save the bid in its current state and complete at later time. |
|
Actions |
Select one of the following actions for a line:
|
|
No Bid |
Select this option if you do not want to bid on the item. |
|
Bid Quantity |
Enter the bid quantity for the bid line. If the requested quantity is required, the quantity is automatically populated with the requested line quantity and cannot be changed. |
|
Requested Quantity |
Displays the requested quantity for the bidding event. |
|
Total Bid Price |
Displays the total bid price for the bid line. |
|
Unit Bid Price |
Enter the unit bid price for the bid line. |
|
Unit Start Price |
Displays the amount at which the bidding must start. |
|
Weighting |
Displays a percentage for the bid line, which indicates its importance relative to the other bid lines. |
|
Bid Questions and Required Bid Questions |
Select to access the Line Questions page and view the general question related to this bid line. You can also answer the question using this page. |
|
Comments and Attachments |
Select to add individual comments or attachments for a bid line. |
|
Total Score |
Indicates the total score of the line. Note: This field will be available only for Auction events when On the Basis Of option is Scores. |
|
Weighted score |
Displays a percentage for the bid response, which indicates its importance relative to the other bid responses. Note: This field will be available only for Auction events when On the Basis Of option is Scores. |
|
Proxy Bid |
Select this check box if the price entered in the Your Unit Bid Price field is to be used as your proxy bid price for this line. You can also indicate if this bid is a proxy bid on the Line Detail page. Note: This field will be available only for Auction events when On the Basis Of option is Price with Proxy option enabled. |
|
Current Price |
Displays the current price of the line item. Note: This field will be available only for Auction events when On the Basis Of option is Price with Proxy option enabled. |
Use the Bidder Response - Line Group Bid page (AUC_LN_GRP_BID_FL) to respond to group and line details such as quantity, price, and bid factors related to the group and group member - lines. Bidders and suppliers can also add comments and attachments related to the event line.
Navigation:
Select the Next button on the Bidder Response - Line Bid Page.
This example illustrates the fields and controls on the Bidder Response - Line Group Bid page.
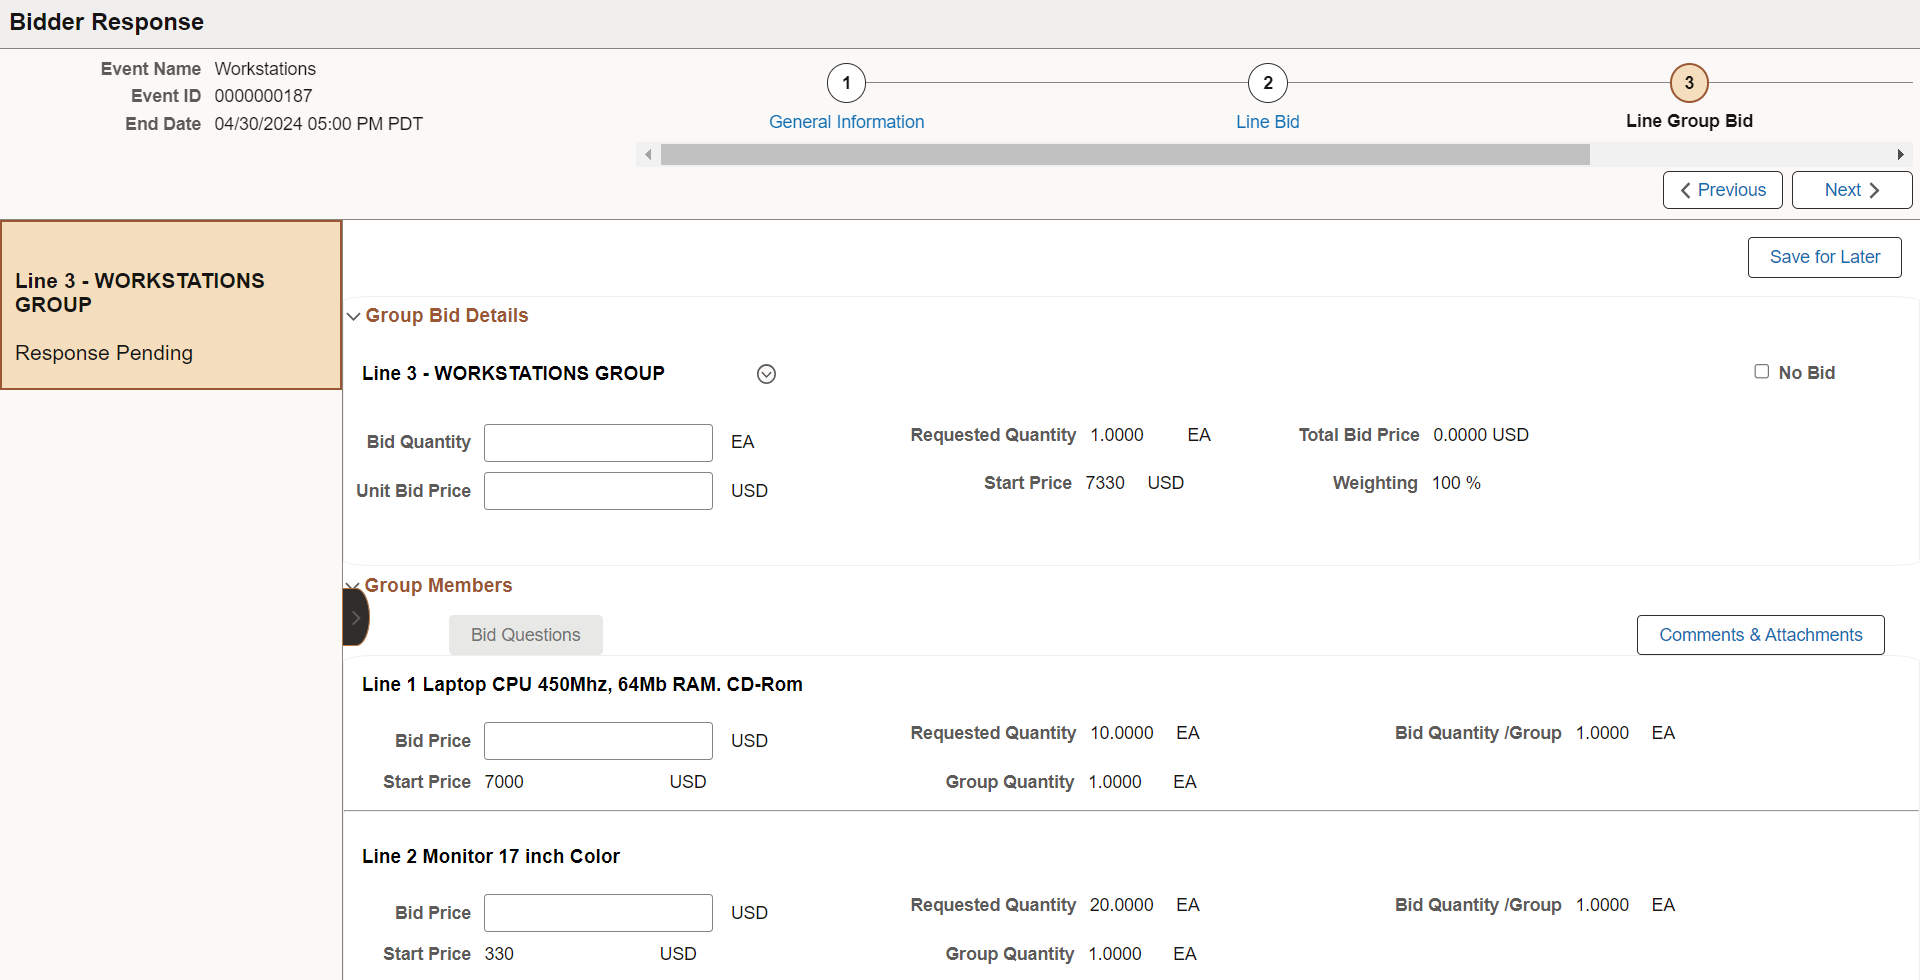
For more information about the fields and controls, see Bidder Response - Line Bid Page.
Click Next to access the Review & Submit page.
Use the Bidder Response - Review and Submit page (AUC_BIDVALIDATE_FL) to review your responses to the event and submit the bid. You can also review and correct errors. This page supports line group event bids.
Navigation:
Select the Next button on the Bidder Response - Line Bid Page.
This example illustrates the fields and controls on the Bidder Response - Review and Submit page (I of 2) when no errors exist.
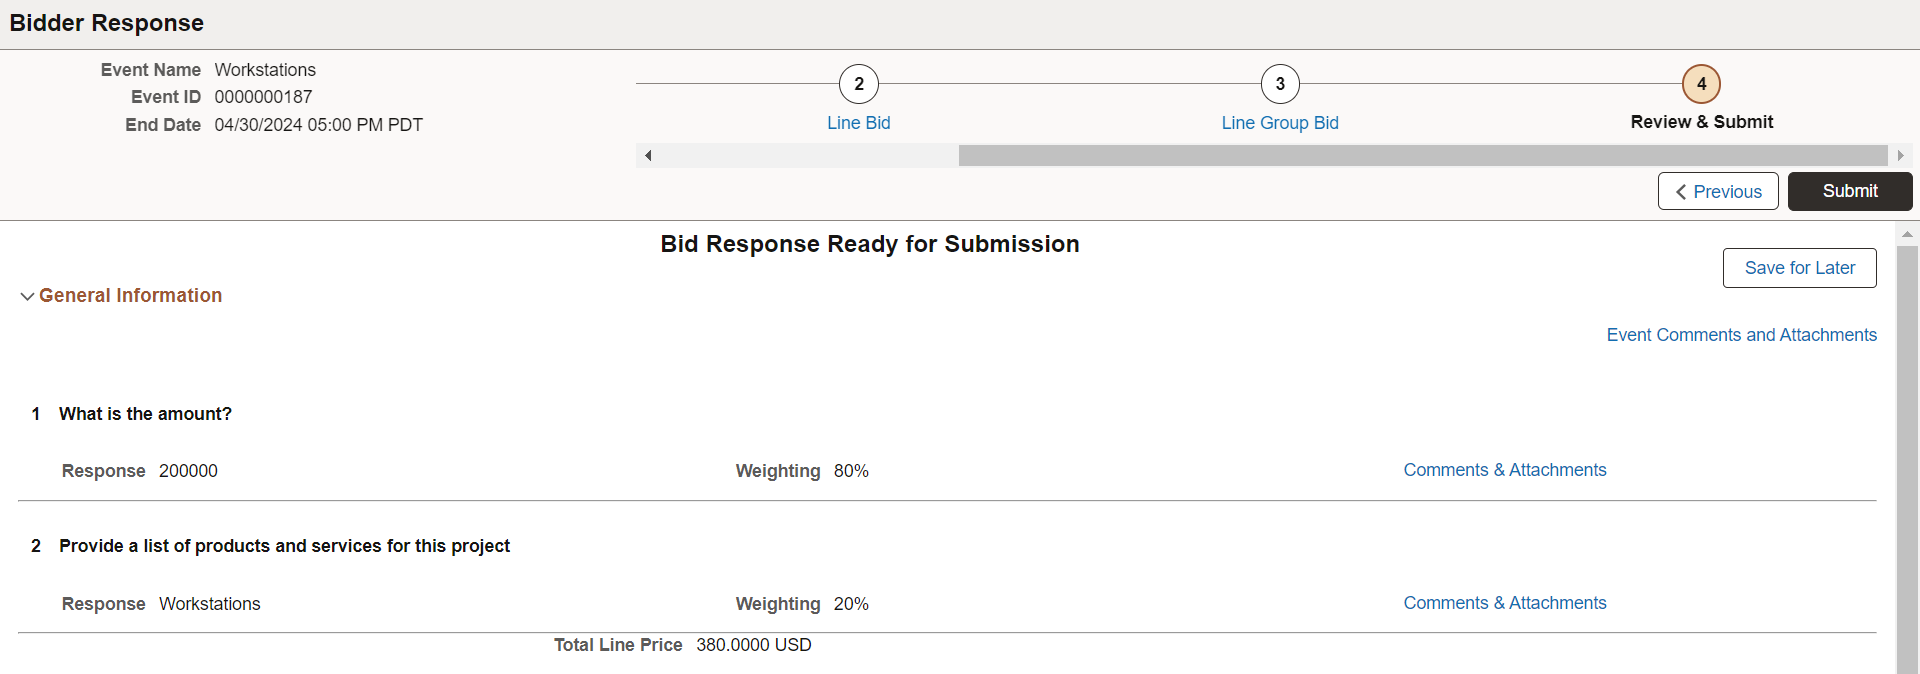
This example illustrates the fields and controls on the Bidder Response - Review and Submit page (2 of 2) when no errors exist.
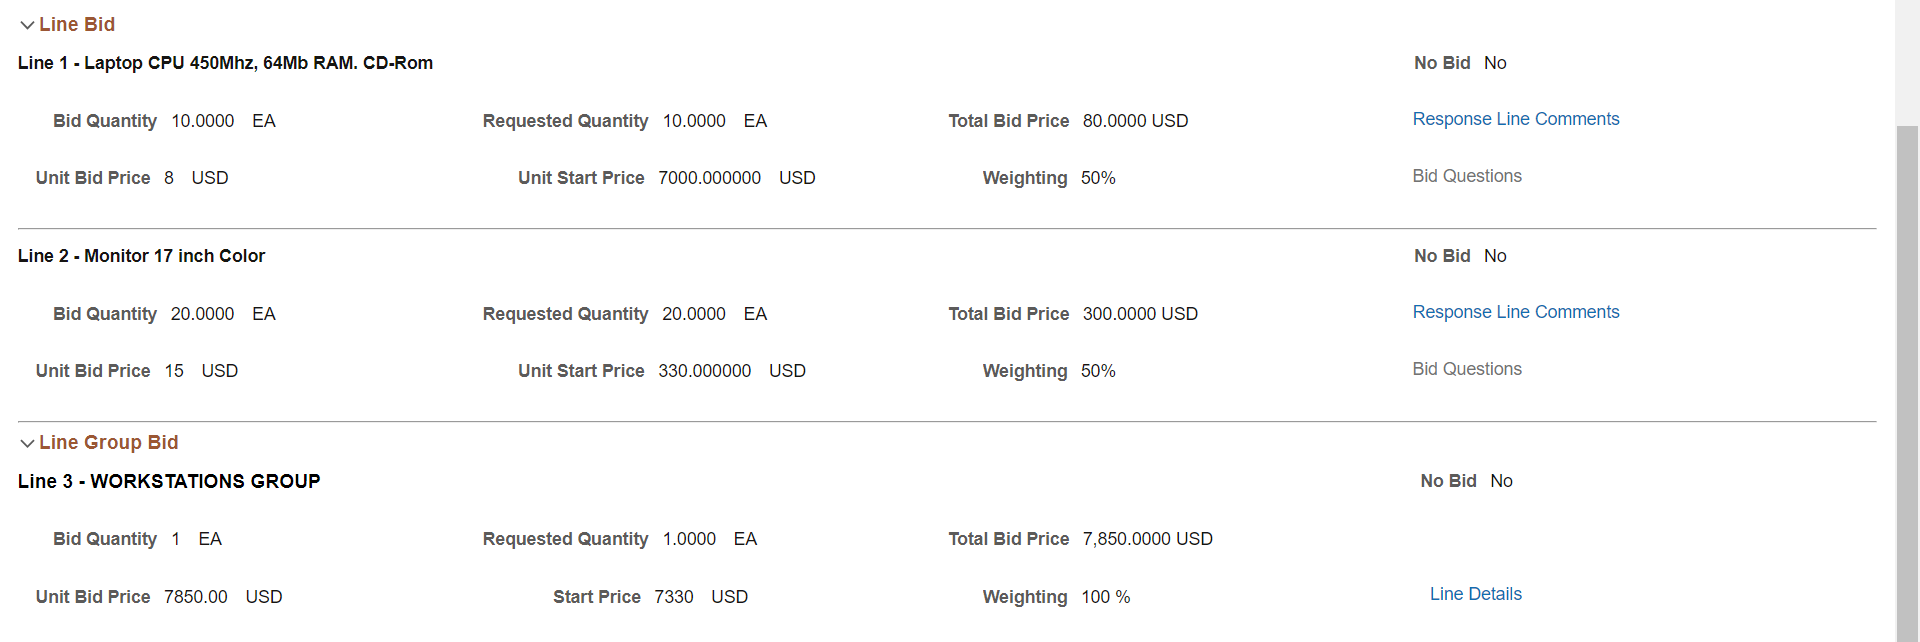
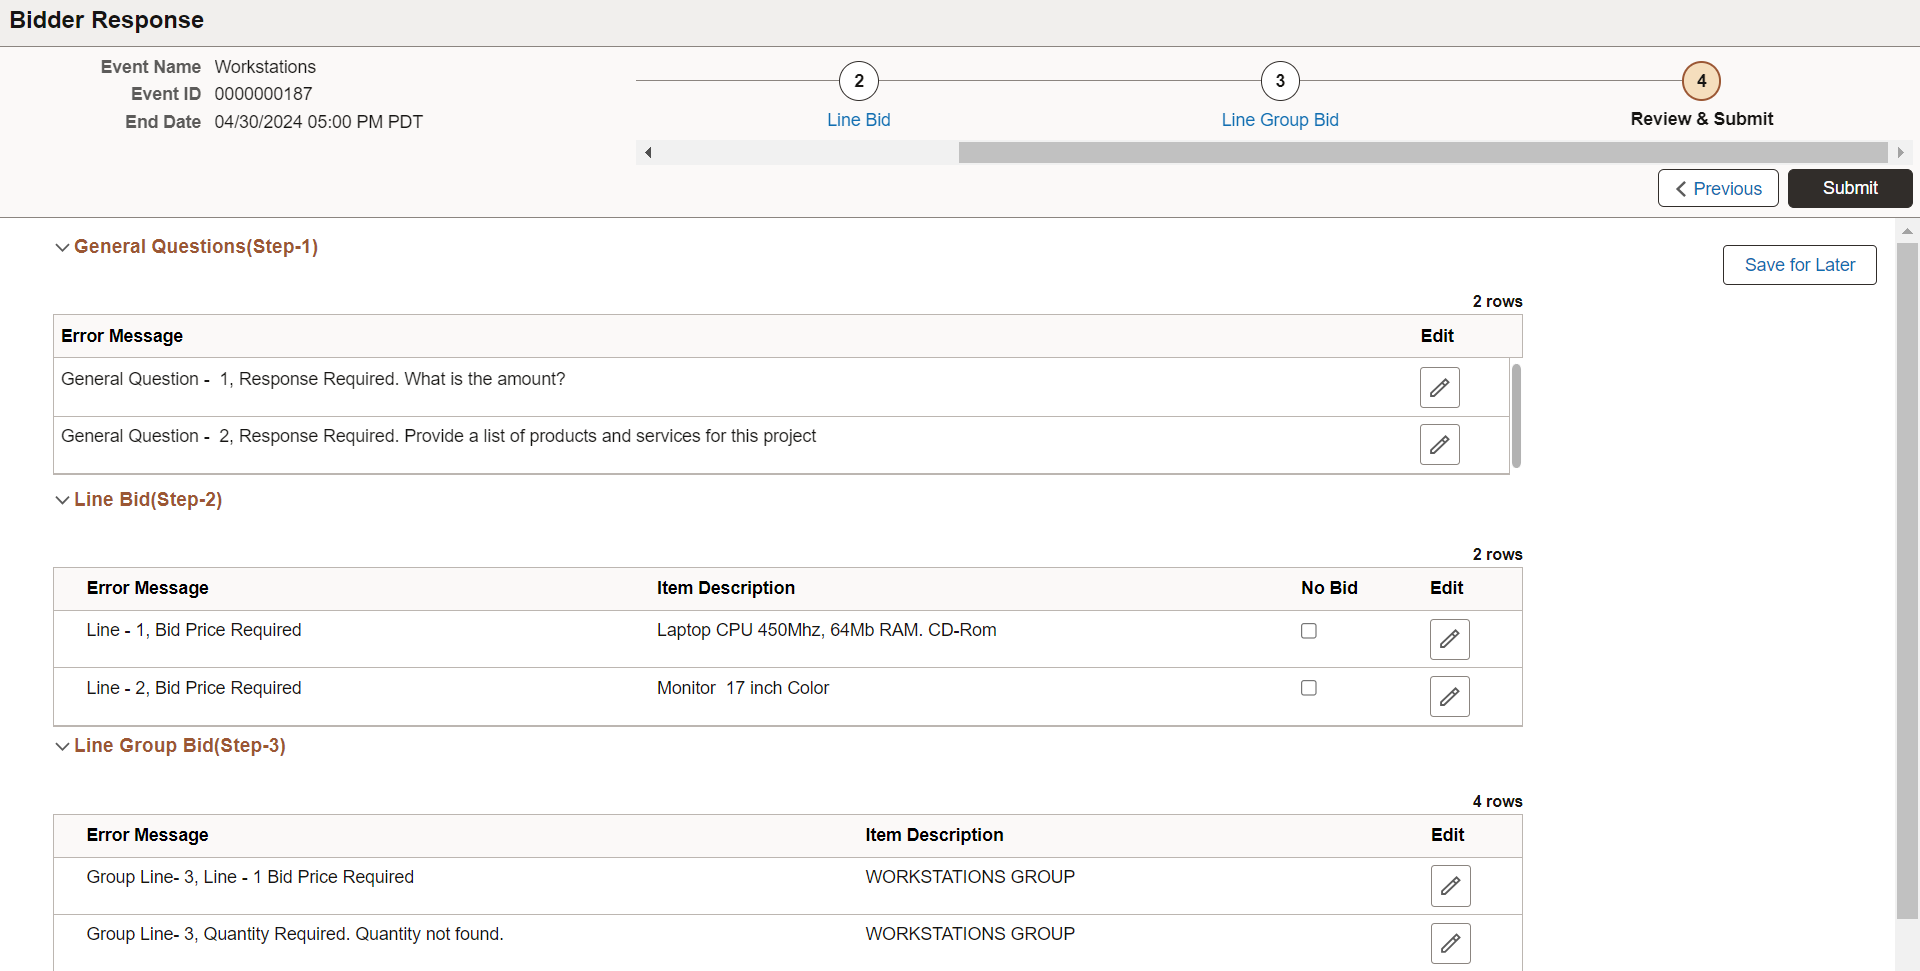
This example illustrates the fields and controls on the Bidder Response - Review and Submit page with errors .
|
Field or Control |
Description |
|---|---|
|
Submit |
Select to submit your bid for consideration. This button is available only when no errors exist for general questions and line bids. Once the bid is submitted, you are directed to the Bid Confirmation Page. |
|
Save for Later |
Select to save the bid in its current state and complete at later time. |
|
Event Comments and Attachments |
Select to view comments and attachments entered for the event. |
General Questions (Step 1)
Use this section to review general question information completed for the event.
If the Fluid Bidder Response component identifies errors with general question information, this section displays those errors. You can use the Edit button to access the question in error and modify your response.
Line Bid (Step 2) and Line Group Bid (Step 3)
Use this section to review line bid information completed for the event.
If the Fluid Bidder Response component identifies errors with line bid information, this section displays those errors. You can use the Edit button to access the line bid in error and modify your response. If you do not wish to bid on the line item, select the No Bid option.
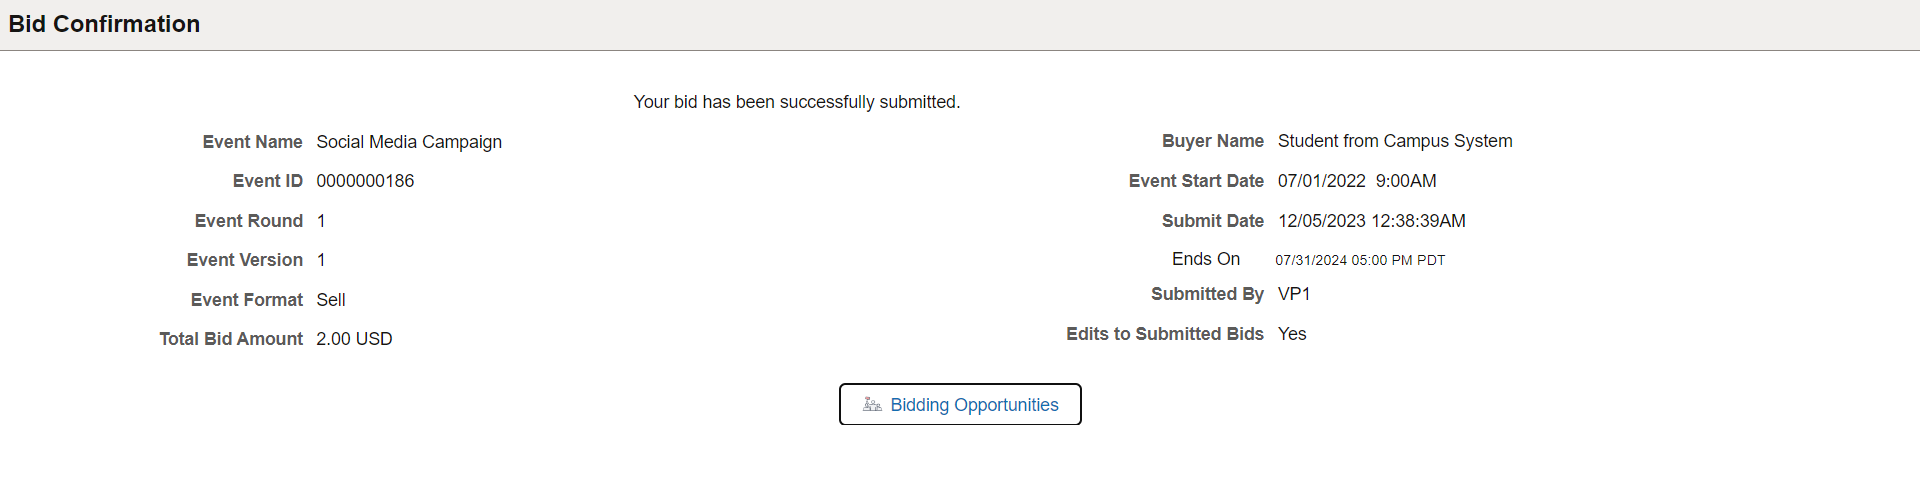
Use the Bid Confirmation page (AUC_BID_CONF_FL) to confirm that the bid was successfully submitted and review bid event details.
Navigation:
Select the Submit button on the Bidder Response - Review & Submit Page.
This example illustrates the fields and controls on the Bid Confirmation page.
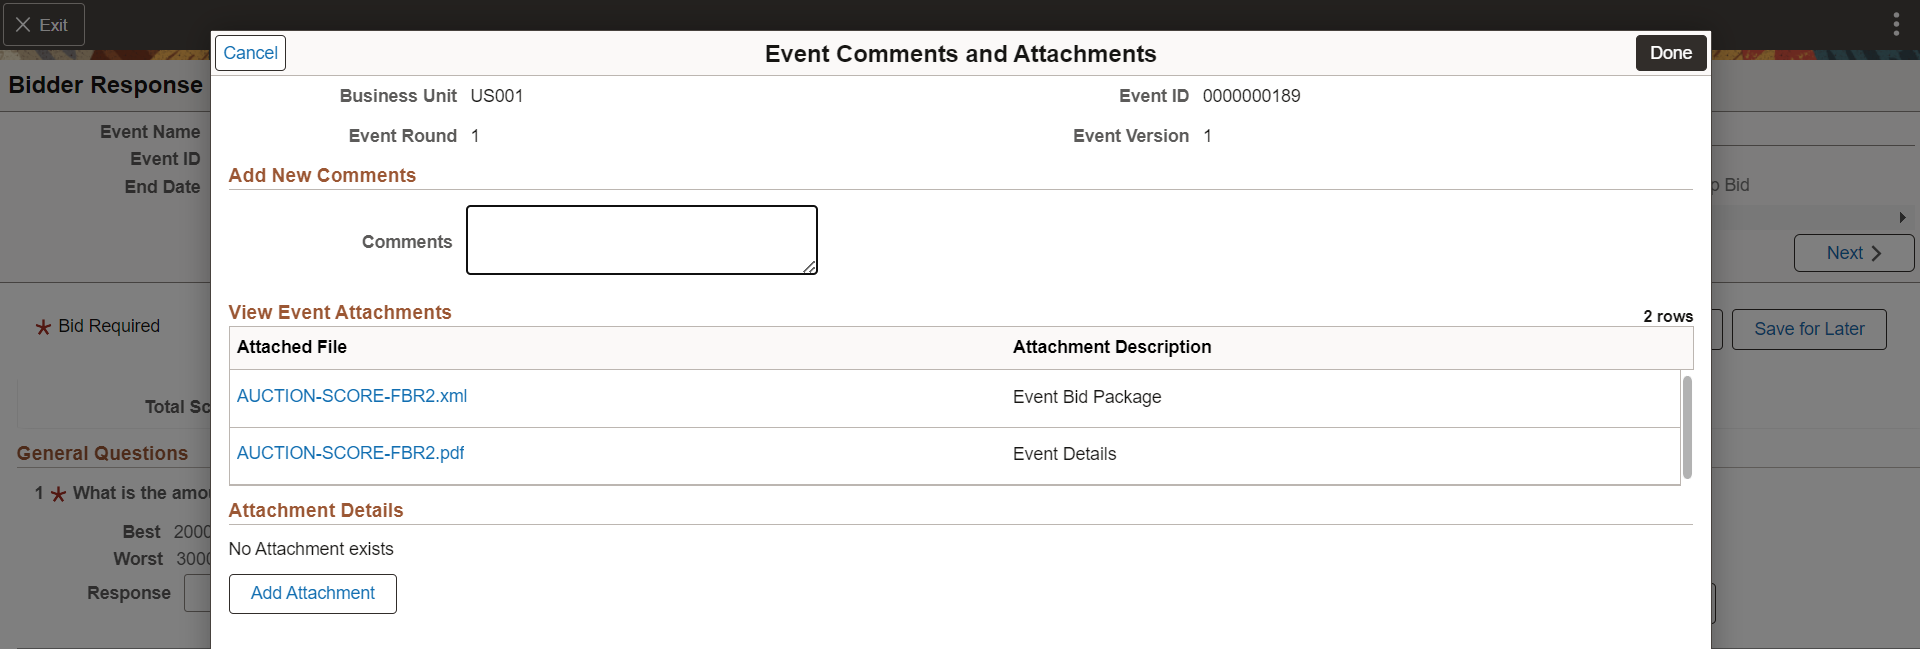
Use the Event Comments and Attachments page (AUC_BID_CONF_FL) to enter comments or attachments for the bid event.
Navigation:
Select the Event Comments & Attachments button on the Bidder Response - General Information Page.
This example illustrates the fields and controls on the Event Comments and Attachments page.
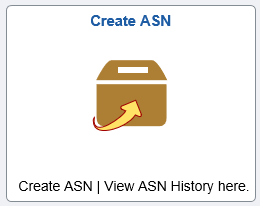
Supplier User: Use the Advanced Shipping Notices tile to open a new page to create a new Advanced Shipping Notice (ASN). You can also view a history of Advanced Shipping Notices.
Navigation:
This example illustrates the fields and controls on the Advanced Shipping Notices tile.
This example illustrates the fields and controls on the Advanced Shipping page
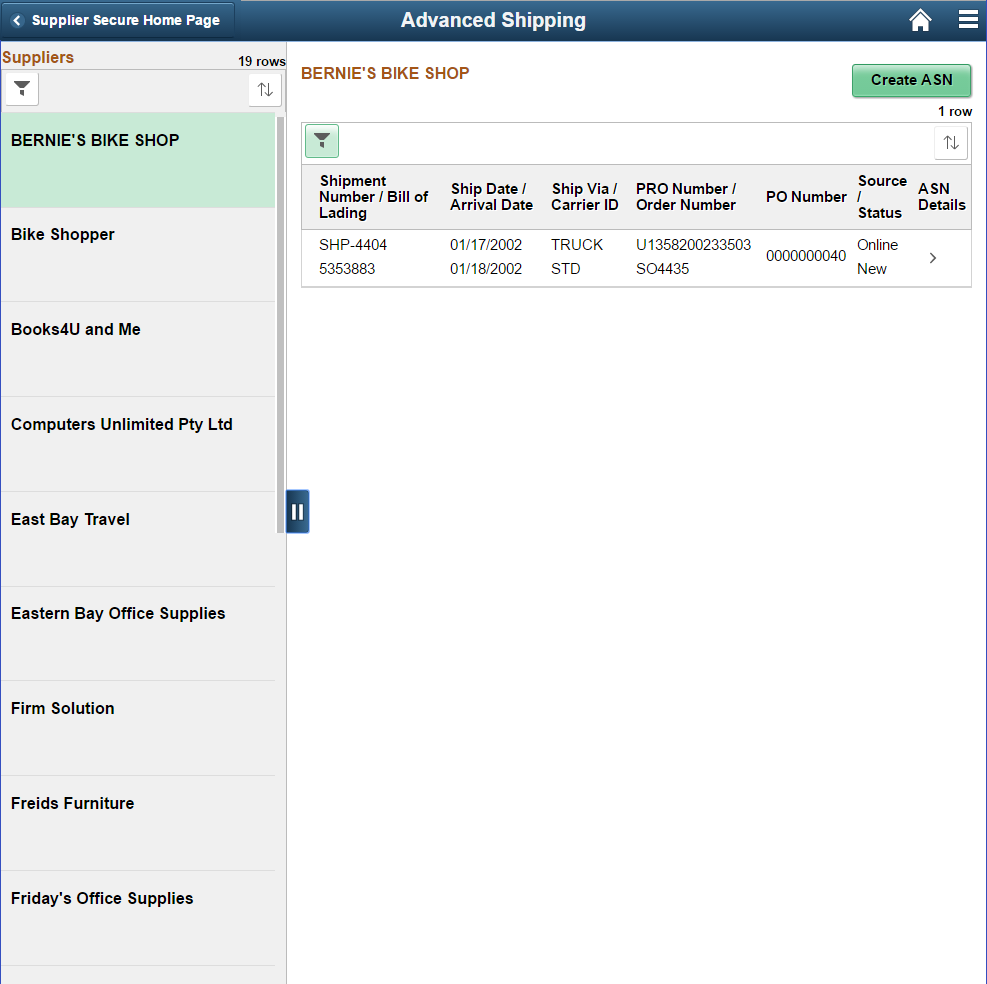
Suppliers
The left pane lists all the supplier organizations that you may manage. This view appears if you are a manufacture's representative and transacting on behalf of other organizations. The right pane displays the ASN history, which is a list of shipments delivered for the selected Supplier associated with the registered user that has logged in, based on the number of days you have specified in the Advanced Shipment Notice field on the My Preferences page. Similarly, the same specifications apply for the Filter page to filter Advanced Shipping information.
If you are transacting on behalf of your own organization, the left pane does not appear, and the Supplier information is displayed at the top followed by its ASN history below in a grid.
Field or Control |
Description |
|---|---|
|
Click to open the Filters page and filter Suppliers based on Supplier name. |
|
Click to sort the list of Suppliers based on your Supplier name. |


Field or Control |
Description |
|---|---|
|
Click to open the Advance Shipment Notification - Advance shipment Creation page to create a new ASN. Note: The links ASN History and Return to Vendor (Supplier) List are not displayed on the Advance Shipment Notification - Purchase Order Schedule Selection Page if you access the page using the Fluid interface. See Advance Shipment Notification - Advance Shipment Creation Page |
|
If you are searching for a specific shipment you can use the Filter capability to narrow down the list of notices. Click the Filer icon to access the Filters page and search shipments based on:
|
ASN Details |
Click any row to open the Reviewing ASN History By Suppliers, ASN History - Line Details Page and view the line details of the ASN. Note: The links Set Filter Options and ASN History – Summary are not displayed on the ASN History - Line Details Page if you access the page using the Fluid interface. |
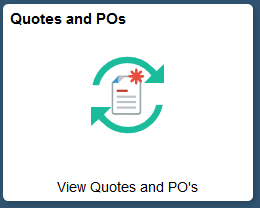
Supplier User: Use the Quotes and POs tile to open the Quotes and POs page, which contains the Quotes tile and the Purchase Orders tile.
Navigation:
. Click the Quotes and POs tile.
This example illustrates the fields and controls on the Quotes and POs tile.
This example illustrates the fields and controls on the Quotes and Purchase Orders page
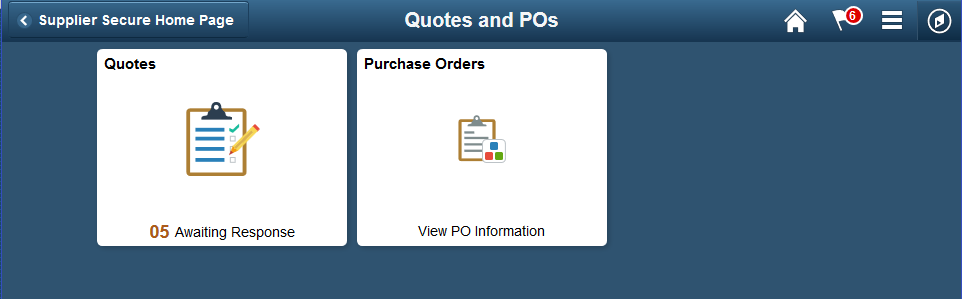
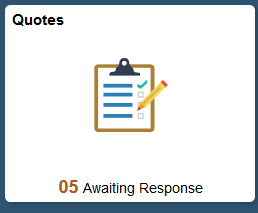
Supplier User: Use the Quotes tile to open the Quotes page and view all the quotes either that are awaiting a response or those Quotes that already have responses. If you are managing multiple Suppliers and bidding on behalf of these Suppliers, you will see a list of the Suppliers on the left side of the page with a count of those RFQs awaiting a response. On the Secure Homepage, the Quotes tile displays a count of the total Quote lines awaiting a response.
Navigation:
This example illustrates the fields and controls on the Quotes tile.
This example illustrates the fields and controls on the Quotes page.
Suppliers
If you are managing multiple Supplier organizations and submitting bids on behalf of these Suppliers, the left pane lists all the Suppliers with a count of RFQ lines for each Supplier that are awaiting a response. The right pane displays the details of the RFQ lines awaiting response and the details of those RFQ lines for the selected Supplier, based on the number of days you have specified in the Request for Quotes field on the My Preferences page. Similarly, the same specifications apply for the Filter page to filter Quotes information.
In the case where you are the single Supplier, the left pane does not appear, and the Supplier information is displayed at the top followed by the RFQ information.
Field or Control |
Description |
|---|---|
|
Click to open the Filters page and filter Suppliers based on Supplier name. |
|
Click to sort the list of Suppliers based on the Supplier name or sort by the number of RFQs awaiting response. |
Quotes
Field or Control |
Description |
|---|---|
|
Click to open the Filters page and filter Quotes based on the options:
|
Start Date |
Displays the date on which the quote was created from the Buying Organization’s Quote system. |
End Date |
Displays the date on which the RFQ will end, after which the row will not be displayed. |
|
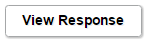
Respond to Quote: Click to open the Request for Quotes - Request for Quote List Page and submit your response. Once the response is submitted, the button changes to display View Response. |
|
View Response: Click to open the Request for Quotes - Request for Quote List Page and view the response you have submitted. |
|
Click to open the Request for Request for Quotes - Request for Quote Details Page and review RFQ details for a specific item. |


Supplier User: Use the Purchase Orders tile to open the Purchase Orders page and view all your Suppliers along with the details of the Purchase Orders awaiting acknowledgement, and the orders that may need to have an ASN generated. You can create an acknowledgement for the Purchase Orders you have received.
Navigation:
This example illustrates the fields and controls on the Purchase Orders tile.

This example illustrates the fields and controls on the Purchase Orders page
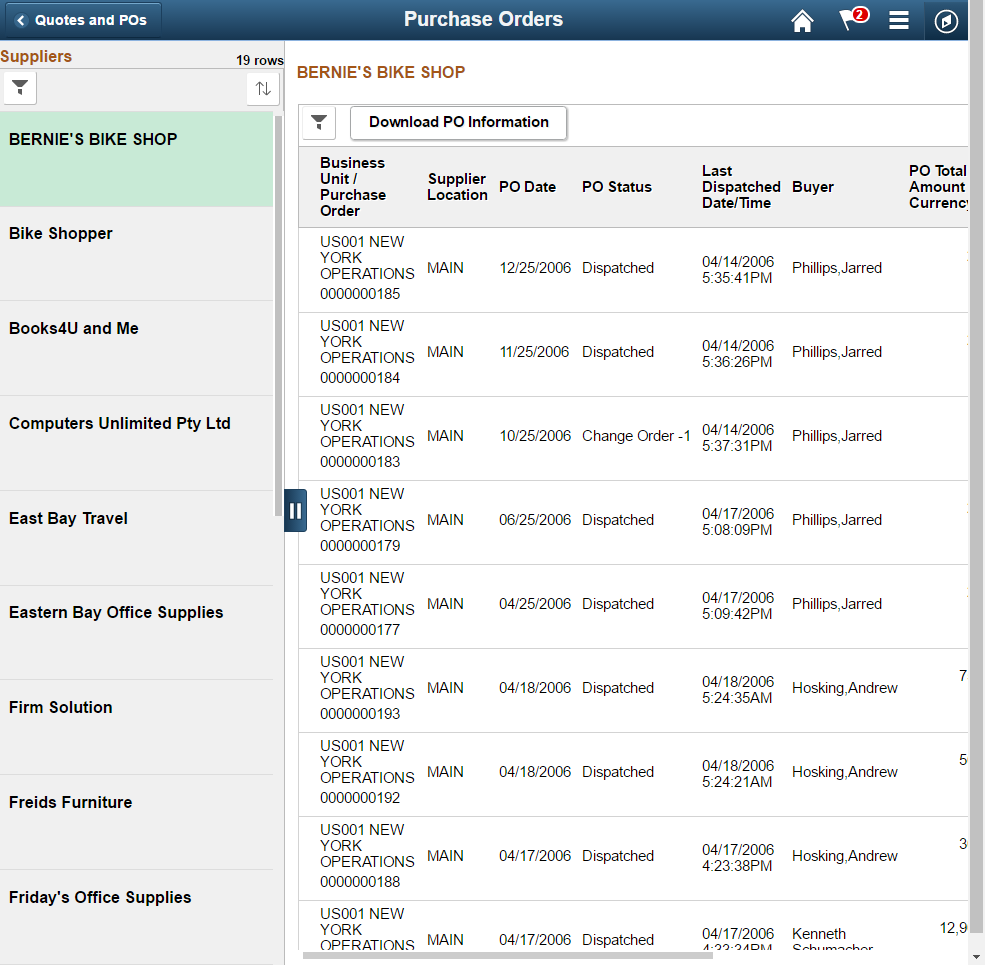
Suppliers
The left pane lists all your supplier organizations that you may manage. This view appears if you are a manufacture’s representative and transacting on behalf of other organizations. It displays the number of Purchase Orders awaiting your acknowledgement. The right pane displays the Purchase Order information for the selected Supplier, based on the number of days you have specified in the Purchase Order field on the My Preferences page. Similarly, the same specifications apply for the Filter page to filter Purchase Order information.
If you are transacting on behalf of your own organization, the left pane does not appear, and the Supplier information is displayed at the top followed by its Purchase Order information below in a grid.
POs Awaiting Acknowledgement
Field or Control |
Description |
|---|---|
|
Displays to indicate that the Supplier has at least one Purchase Order awaiting acknowledgement. |
|
Click to open the Filters page and filter Suppliers based on Supplier name. |
|
Click to sort the list of Suppliers based on your Supplier name or Purchase Orders awaiting acknowledgements. |

Purchase Orders
Field or Control |
Description |
|---|---|
|
Click to open the Filters page and filter Purchase Orders based on:
|
|
Click to view and choose from the list of fields by which you can sort the Purchase Orders. |
Download PO Information |
Click to open the Download Purchase Orders page and download the Purchase Order information in XL format. See Purchase Orders - Purchase Order List Page. |
Acknowledgement Status |
Displays the status of the acknowledgement:
|
|
Click to choose an action for the Purchase Order from the options:
|
|
Click to open the Purchase Orders - Purchase Order Details Page and view the details of the Purchase Order. |
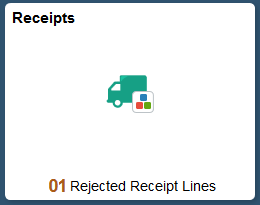
Supplier User: Use the Receipts tile to open the Receipts page and view all your Suppliers along with the details of the rejected and accepted receipt lines. The Receipts tile displays a count of the Rejected Receipt Lines that may need you to work with the Buying Organization on creating a Return Material Authorization (RMA).
Navigation:
This example illustrates the fields and controls on the Receipts tile.
This example illustrates the fields and controls on the Receipts page.
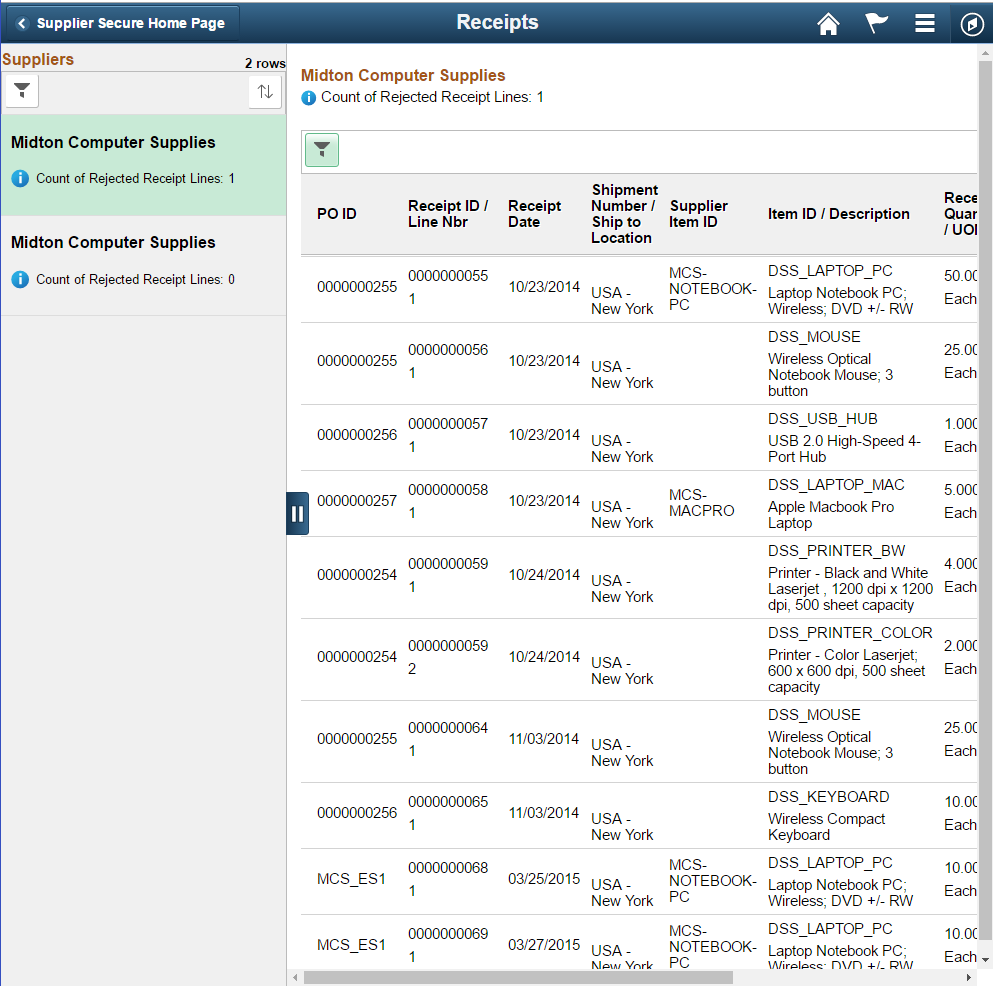
Suppliers
The left pane lists all your supplier organizations that you may manage. This view appears if you are a manufactures’ representative and transacting on behalf of other organizations. It displays the number of receipt lines that were rejected for each Supplier’s orders. The right pane displays the information of rejected receipts for the selected Supplier, based on the number of days you have specified in the Receipt field on the My Preferences page. Similarly, the same specifications apply for the Filter page to filter Receipt information.
If you are transacting on behalf of your own organization, the left pane does not appear, and the Supplier information is displayed at the top followed by its receipt information below in a grid.
Field or Control |
Description |
|---|---|
|
Displays to indicate that the Supplier has at least one rejected Receipt line. |
|
Click to open the Filters page and filter Suppliers based on Supplier name. |
|
Click to sort the list of Suppliers based on the Supplier name or sort by the highest number of rejected receipts. |
Receipts
Field or Control |
Description |
|---|---|
|
Click to open the Filters page and filter receipts based on:
|
|
Click to view and choose from the list of fields by which you can sort the receipts for the Supplier. |
Receipt Status |
Displays the status of the receipt:
|
|
Click to open the Review Receipts - Receipt Details Page to review receipt line details for the line. |
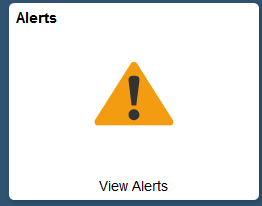
Supplier User: Use the Alerts tile to open the Alerts page, which contains the POs with Overdue Shipments tile, the Unacknowledged PO tile, the Contracts Pending Review tile, and the Secure Notice Of Intent to Award tile.
Navigation:
. Click the Alerts tile.
This example illustrates the fields and controls on the Alerts tile.
This example illustrates the fields and controls on the Alerts page.
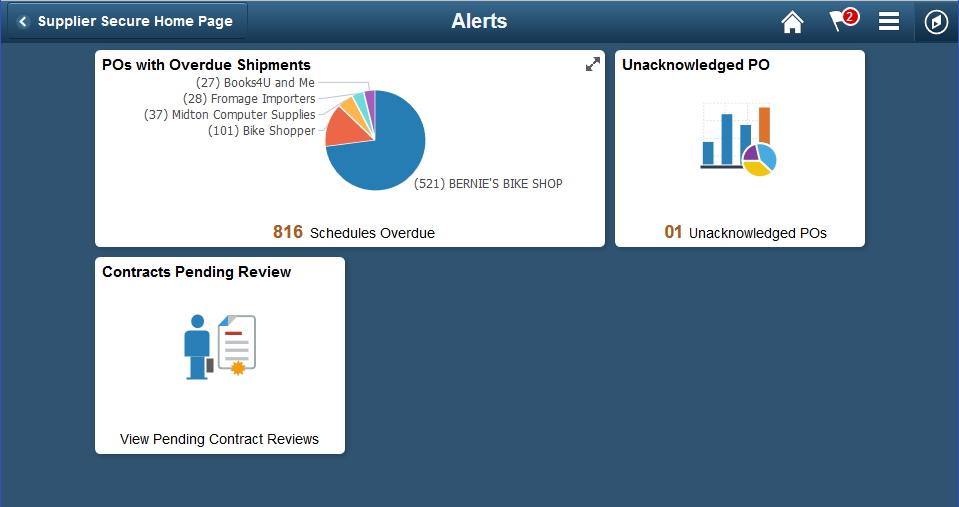
Supplier User: If you are managing multiple Supplier organizations, this information will show at a glance which Suppliers have overdue shipments of orders placed by the Buying Organization. The top 5 offenders are shown on the chart on the Tile. Click the Tile to open the POs with Overdue Shipments page and view all the Suppliers you manage along with a list of Purchase Orders with overdue PO Schedules. If you are only representing your own organization, the Alerts Tile displays a count of the PO Schedules that are overdue.
Navigation:
This example illustrates the fields and controls on the POs with Overdue Shipments tile.
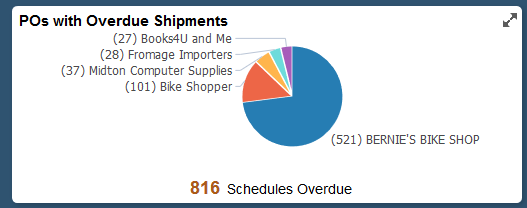
This example illustrates the fields and controls on the POs with Overdue Shipments page.
Suppliers
The left pane lists all the Supplier organizations you manage with a count of overdue PO Schedules and POs with overdue Schedules for each Supplier organization. The right pane displays the list of Purchase Orders with overdue Schedules for the selected Supplier.
In case where you are representing your own organization, the left pane does not appear, and your Company information is displayed at the top followed by the PO information below.
Field or Control |
Description |
|---|---|
|
Displays the number of POs that are overdue |
|
Displays the number of POs with overdue Schedules. |
|
Click to open the Filters page and filter Suppliers based on Supplier name. |
|
Click to sort the list of Suppliers based on the Supplier name, POs with overdue Schedules, or overdue Schedules. |
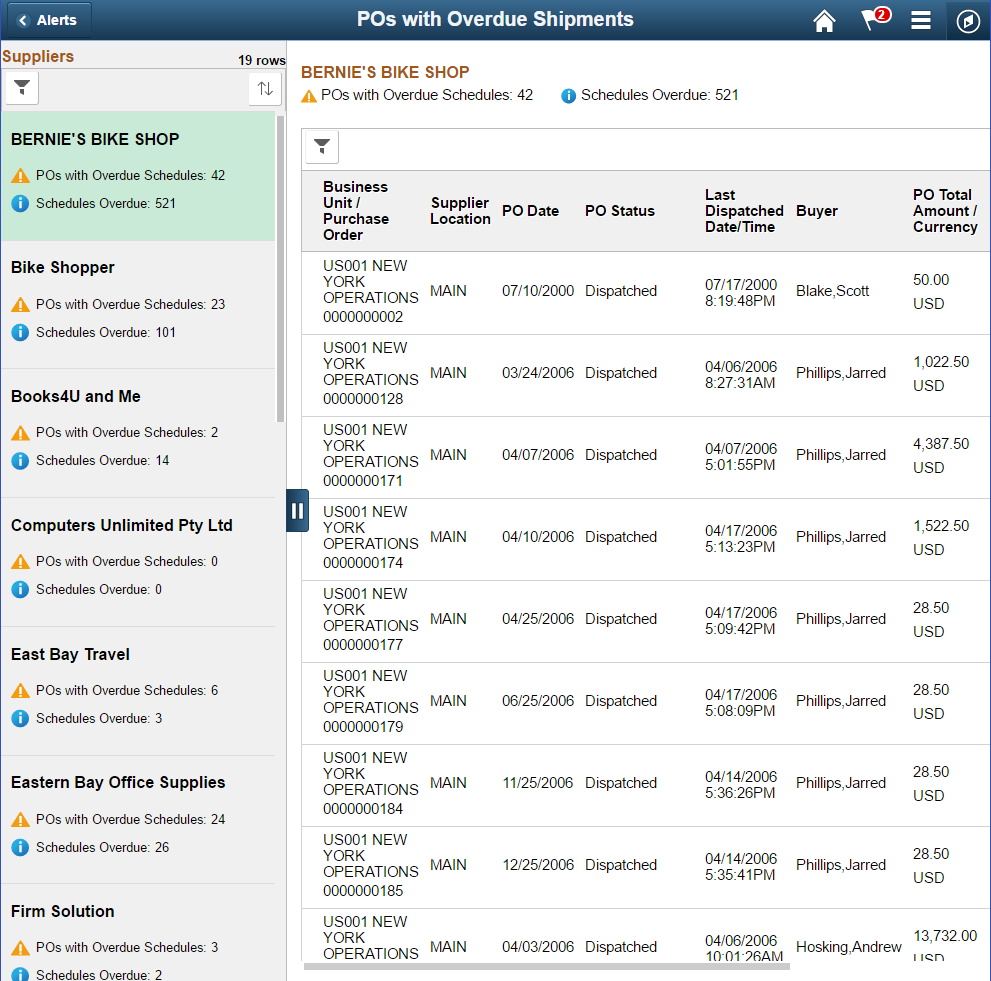
POs with Overdue Shipments
Field or Control |
Description |
|---|---|
|
Click to open the Filters page and filter Purchase Orders based on options:
|
PO Status |
Displays the status of the Purchase Order:
|
|
Click to open the Overdue Schedules Page. The count represents the number of Schedule Lines for the selected Purchase Order. |
|
Click to sort the Purchase Orders and related fields. |

Supplier User: Use the Overdue Schedules page to view the overdue Schedule details of the selected Purchase Order. This page lists all the Schedules that are overdue for the PO line.
Navigation:
Click the Overdue Schedules button for a row on the POs with Overdue Shipments page.
This example illustrates the fields and controls on the Overdue Schedules page.
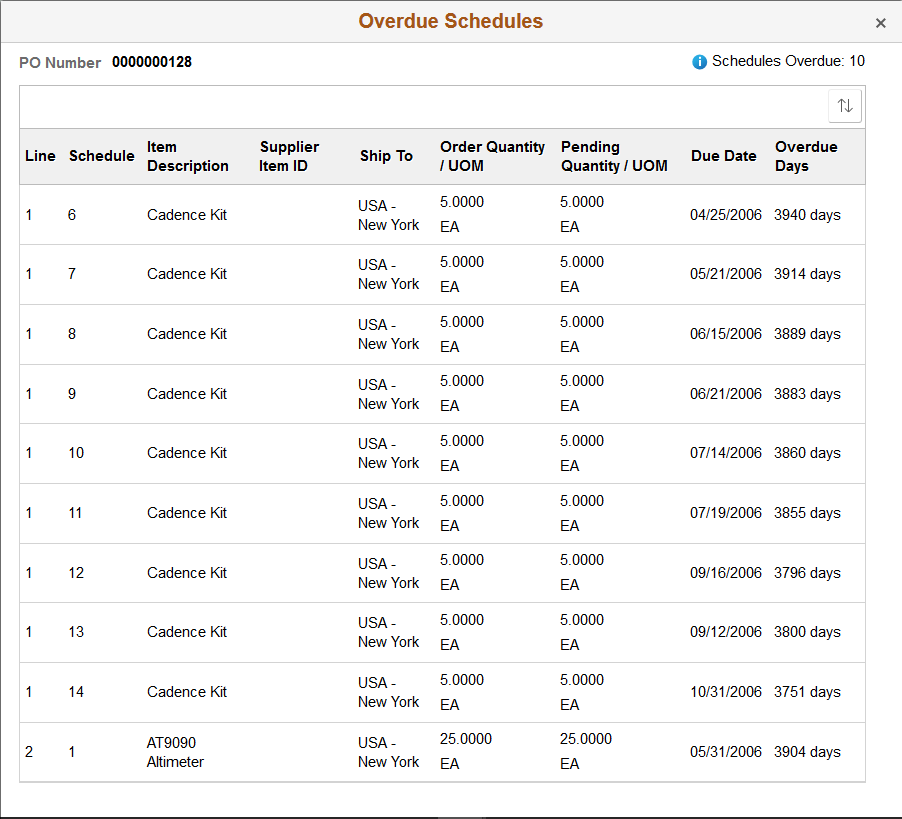
Field or Control |
Description |
|---|---|
|
Displays the number of Schedules that are overdue for the PO |
|
Click to sort the Schedule Lines based on a particular field. |
Overdue Days |
Displays the number of days by which the PO Schedule is overdue. |
Supplier User: Use the Unacknowledged POs tile to view the list of Purchase Orders that are awaiting your acknowledgement. The count on the tile represents the total number of Purchase Orders that are marked as POA Required on the PO attributes.
If Fluid POA is implemented, the Unacknowledged PO tile and the corresponding Unacknowledged PO page will appear, as discussed in the next topic.
Navigation:
This example illustrates the fields and controls on the Unacknowledged PO tile.
This example illustrates the fields and controls on the Unacknowledged PO page.
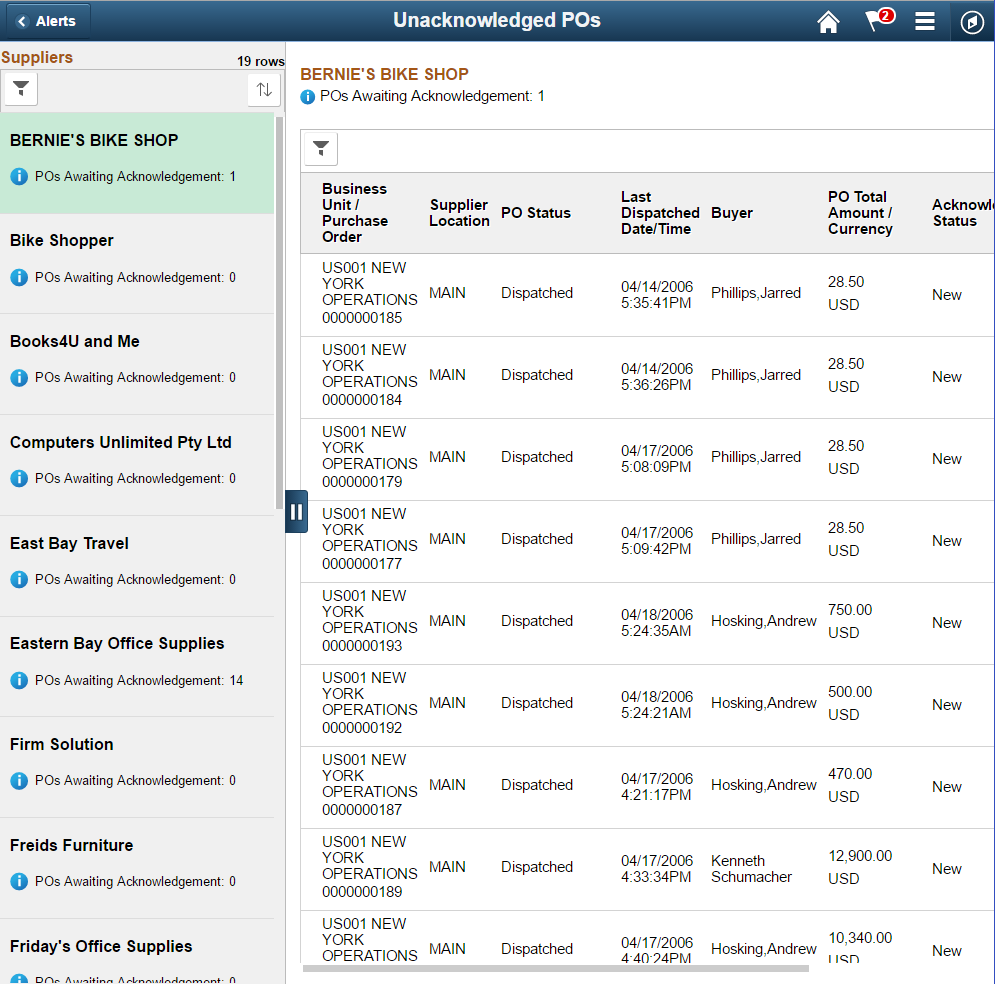
Suppliers
If you manage multiple Supplier Organizations, the left pane lists all the Supplier Organizations with Unacknowledged POs, along with a count of the POAs that are required. The right pane displays the list of Purchase Orders for the selected Suppliers indicating which in the list are required to be acknowledged.
In case where you are representing your own Organization, the left pane does not appear, and your Company information is displayed at the top followed by the PO information below.
Field or Control |
Description |
|---|---|
|
Displays the number of POs that are not yet acknowledged. |
|
Click to open the Filters page and filter Suppliers based on Supplier name. |
|
Click to sort the list of Suppliers based on the Supplier Name, or POs awaiting acknowledgement. |
Field or Control |
Description |
|---|---|
|
Click to open the Filters page and filter POs based on:
|
PO Status |
Displays the
|
Last Dispatched Date/Time |
Displays the most recent POs at the top, sorted in descending date order. |
|
Click to choose an action for the Purchase Order Line from the options:
|
|
Click to view and choose from the list of fields by which you can sort the POs for the Supplier. |
See Contracts Pending Review Tile and the Contracts Pending Review Page.
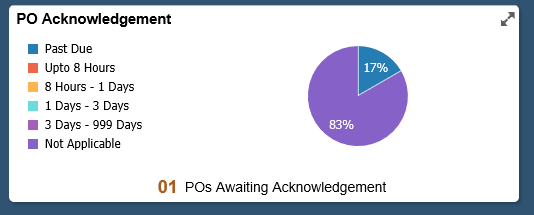
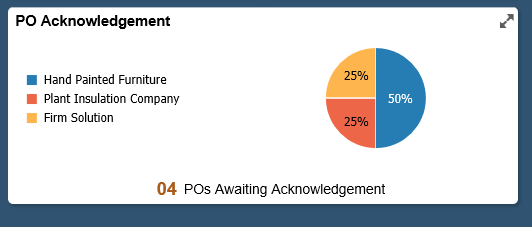
Supplier User: Use the PO Acknowledgement tile to view the list of Purchase Orders. The count on the tile represents the total number of Purchase Orders that are marked as POA Required, and are awaiting acknowledgement.
The tile displays two types of charts – one for single supplier scenario and the other for multiple supplier scenario. For single supplier, a pie chart shows the acknowledgement due time buckets with the corresponding number of POs awaiting acknowledgement. In case of multiple supplier scenario, the pie chart shows the top five suppliers with POs awaiting acknowledgement. If there are more than five suppliers associated with the logged in user the system shows the top four suppliers, and the rest of the supplier acknowledgements are combined and labelled as ‘others’.
Navigation:
.
This example illustrates the fields and controls on the PO Acknowledgement tile — Single Supplier Chart style.
This example illustrates the fields and controls on the PO Acknowledgement tile — Multiple Supplier Chart style.
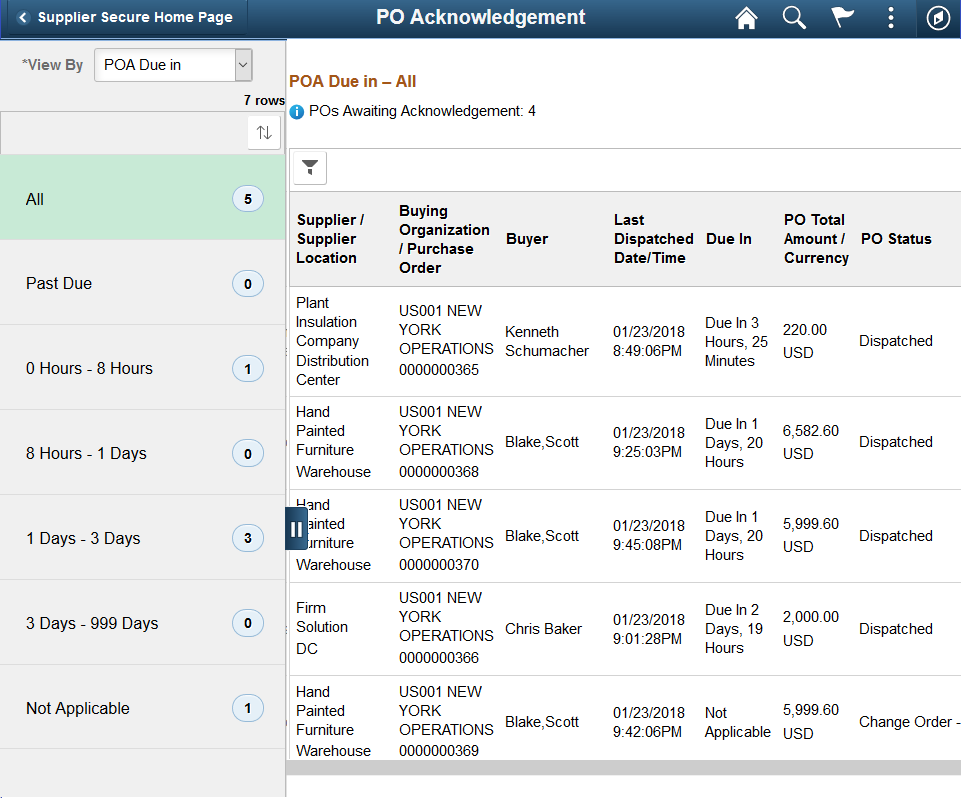
This example illustrates the fields and controls on the PO Acknowledgement page (1 of 2). You can find definitions for the fields and controls later on this page.
This example illustrates the fields and controls on the PO Acknowledgement page (2 of 2). You can find definitions for the fields and controls later on this page.
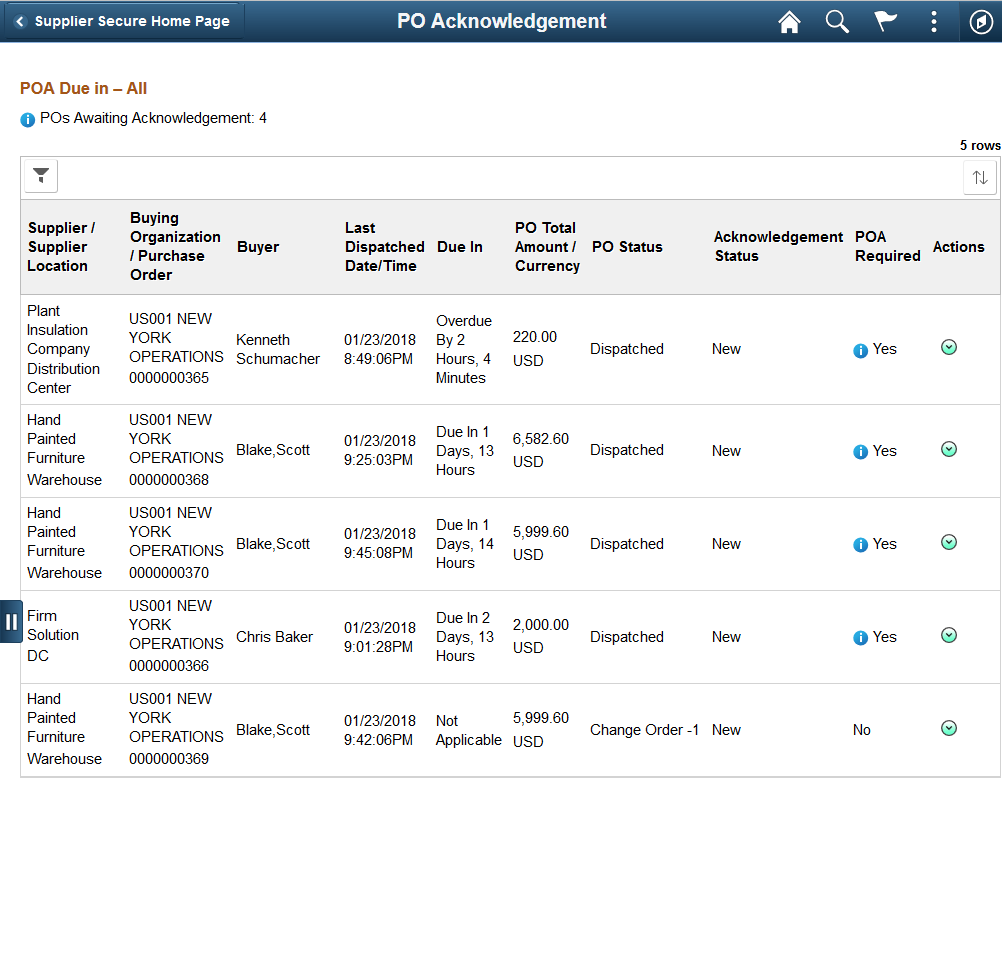
The left pane lists options based on the option you select from the View By drop down list, along with a count of the POs awaiting acknowledgement.
Field or Control |
Description |
|---|---|
View By |
Select an option from the drop down list, based on which you can view a list of Purchase Orders awaiting acknowledgement. The options are:
|
|
Click to sort the list of purchase orders awaiting acknowledgement based on the View By option you have selected or by the POs awaiting acknowledgement. |

The right pane displays the list of Purchase Orders for the selected option, indicating which in the list are required to be acknowledged. See My Preferences Page.
POs Awaiting Acknowledgement
Field or Control |
Description |
|---|---|
Last Dispatched Date/Time |
Displays the date and time of the Purchase Order dispatch. The list displays the Acknowledgements overdue, followed by the Acknowledgements sorted by the date on which they are due. Purchase orders that are not having due date information are listed at the bottom, as NA (Not Applicable). |
Due in |
Displays the POA due information. Acknowledgement Due is calculated based on the settings in:
|
Acknowledgement Status |
Displays the acknowledgement status:
|
|
Click to choose an action for the Purchase Order from the options:
|
|
Click to open the Unacknowledged PO Filter page and narrow down the list of POs based on the fields:
Additional Search Criteria include:
|


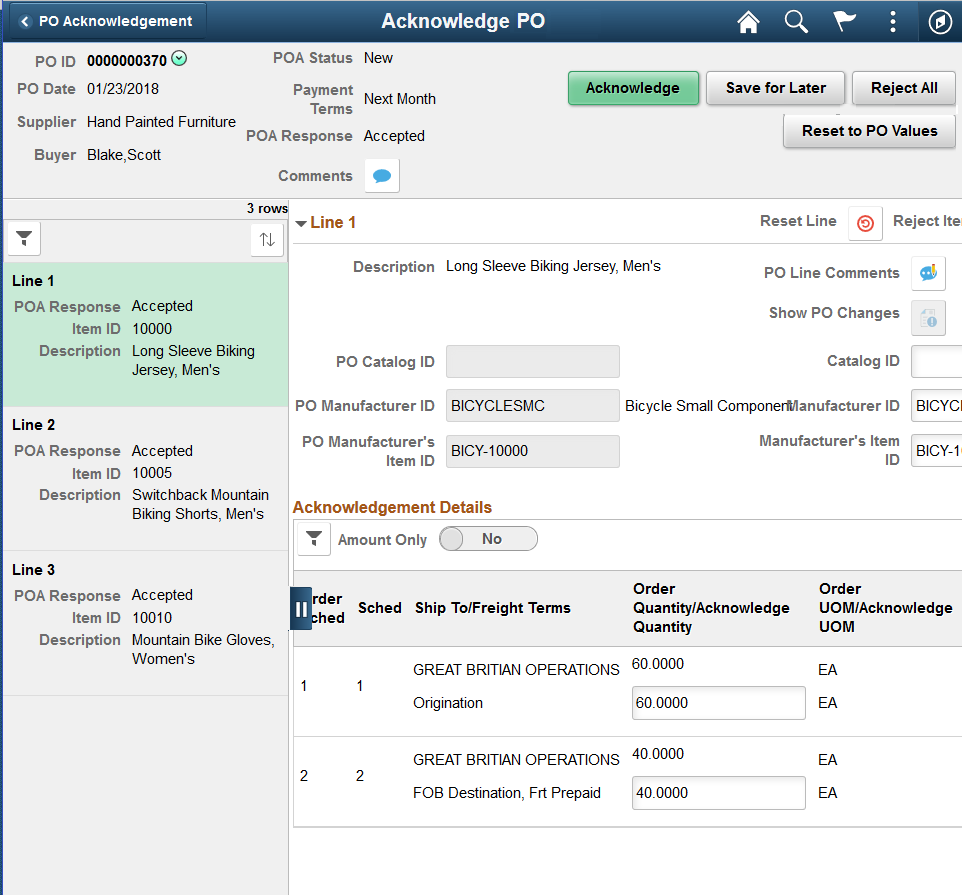
Supplier User: Use the Acknowledge PO page to view the selected Purchase Order, and choose to acknowledge, save, reject, or reset it.
Navigation:
Click the Related Action button on the Purchase Order Acknowledgement page and select Acknowledge PO.
This example illustrates the fields and controls on the Acknowledge PO page (1 of 3). You can find definitions for the fields and controls later on this page.
This example illustrates the fields and controls on the Acknowledge PO page (2 of 3). You can find definitions for the fields and controls later on this page.
This example illustrates the fields and controls on the Acknowledge PO page (3 of 3). You can find definitions for the fields and controls later on this page.
See Understanding Online POAs.
The header displays the PO number, PO date, Supplier name, acknowledgement status, payment terms, and POA response. You use the action buttons to perform a desired action.
Field or Control |
Description |
|---|---|
|
PO Header Comments: Click this related action to display any purchase order header comments or attachments associated with the selected purchase order. If there are no header comments or attachments, the system does not display this related action. Buying Organization Comments: Click this related action to view any comments that are associated to the Buying Organization (PeopleSoft Purchasing business unit). If there are no Buying Organization (Business Unit) comments, the system does not display this related action. |
|
Click the button to enter comments for the buyer, and in subsequent sessions, view any buyer responses. |
Acknowledge |
Click this button to save any changes and:
|
Save for Later |
Click to save the current session and return at a later time to perform appropriate actions. The PO acknowledgement status will be set to Supplier Review. |
Reject All |
Click to reject the entire Purchase Order. POA will set the acknowledgement status as Cancelled. When the POs are rejected by the supplier during PO acknowledgement they will be further picked up by PO change order process to cancel the PO lines. |
Reset to PO Values |
Click to override the acknowledged values with the original PO values. |

The left panel lists all the purchase order lines. Each line displays the POA response, item ID, Supplier item ID (if available) and the description for the line. Every line also indicates whether it has been reviewed, based on the Supplier user’s confirmation using the Reviewed switch.
Field or Control |
Description |
|---|---|
|
Click to filter the list of purchase order lines based on:
|
|
Click to sort the list of purchase order lines based on the available values. |
|
Displays to indicate that the line has been reviewed by the Supplier user, after the Supplier user toggles the Reviewed switch to Yes. You can sort or filter purchase order lines based that are in Reviewed status. |

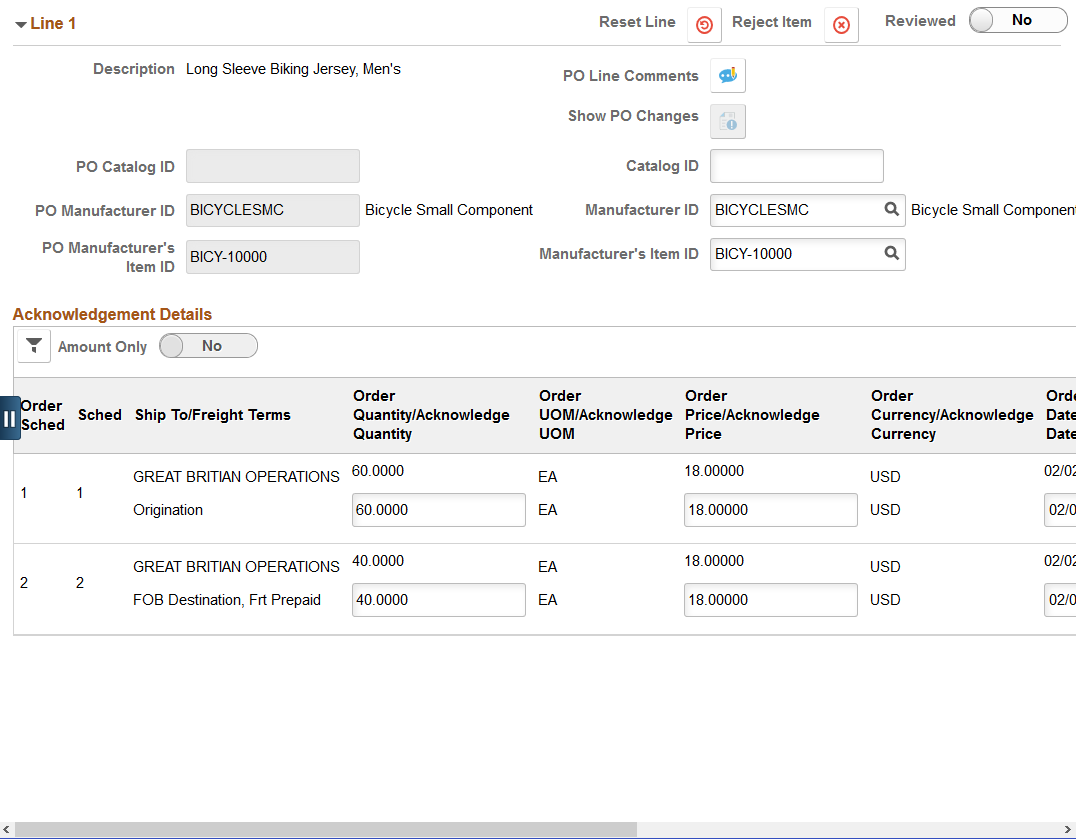
The right panel provides details of the selected Purchase Order line. Description, Supplier Item ID, Amount Only, PO catalog ID, PO manufacturer ID, and PO manufacturer’s item ID are display-only fields. While the values for the PO Catalog ID, PO Manufacturer ID, and PO Manufacturer’s Item ID display what was entered in the purchase order, you can enter the acknowledged values for these fields in the right panel.
Line Details
Field or Control |
Description |
|---|---|
Reviewed |
Click to toggle the switch to Yes to indicate that you have reviewed the purchase order line. |
Catalog ID |
Enter the acknowledge PO catalog ID. |
Manufacturer ID |
Enter the acknowledge PO manufacturer ID. |
Manufacturer’s Item ID |
Enter the acknowledge PO manufacturer’s item ID. |
|
Click this button to view the details of the changes made from the last time this purchase order was dispatched. For example, if this Purchase Order is on change order 3, it shows the changes made from change order 2 to change order 3. This button is enabled only when viewing the purchase order with revision. |


Acknowledgement Details
Field or Control |
Description |
|---|---|
|
Click to filter the schedule lines based on the schedule status, Ship To location, or freight terms. |
Order Sched |
Displays the scheduled order. |
Ship To |
Displays the business unit to which the item is being shipped. |
Freight Terms |
Displays the freight terms. |
Order Quantity |
Displays the sum of all schedule quantities for this line on the purchase order that is being requested. |
Acknowledge Quantity |
The system displays a default quantity for the Purchase Order. Suppliers can modify the quantity for the line/schedule to indicate a change. Note: This field is disabled for Amount Only purchase order lines. |
Order Price |
Displays the total price of the order. |
Acknowledge Price |
Enter the price. |
Order Due Date |
Displays the default due date for the schedule. This is the date the item is due at the ship to location. |
Acknowledge Due Date |
The system displays a default due date for the Purchase Order. Suppliers can modify the due date for the line/schedule to indicate a change. |
Order Ship Method |
Displays the shipment method for the item. |
Acknowledge Ship Method |
The system displays a default Ship Method for the Purchase Order. Suppliers can modify the method for the line/schedule to indicate a change. |
POA Status |
Displays the action the supplier has taken; applies to the selected schedule, and indicates the following:
|
|
Click to create an additional row to add an additional schedule with a different delivery due date, quantity, and other acknowledgement details. You can initiate a back order request for a different delivery date and quantity. The system sets the POA Status to New. Back Order will create a new schedule to the PO line after the buyer initiates a change order based on this acknowledgement feedback. Note: This button is disabled for Amount Only purchase order lines. |
|
Click to delete the Back Order line. |
|
Click this button to restore all POA values to the values specified on the current Purchase Order line, forgoing any changes made on the POA. |
|
Click to reject the PO line item. The editable fields on the Acknowledgement Details page are reset to the current Purchase Order values and the quantity is reset to zero. If approved by the buyer this will cancel the Purchase Order line. |


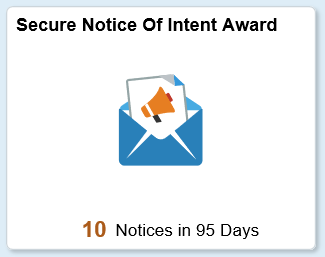
Supplier User: Use the Notice Of Intent To Award tile to view the notice of intent to award for events from the buying organization. By default, the Notice of Intent to Award tile displays a count of the open notices in the last 90 days. You can modify the days on the My Preferences page if required. After checking the details on the Notice of Intent to Award page, supplier user can submit protest, if any, to the buying organization outside the PeopleSoft system.
Navigation:
This example illustrates the fields and controls on the Notice of Intent to Award tile.
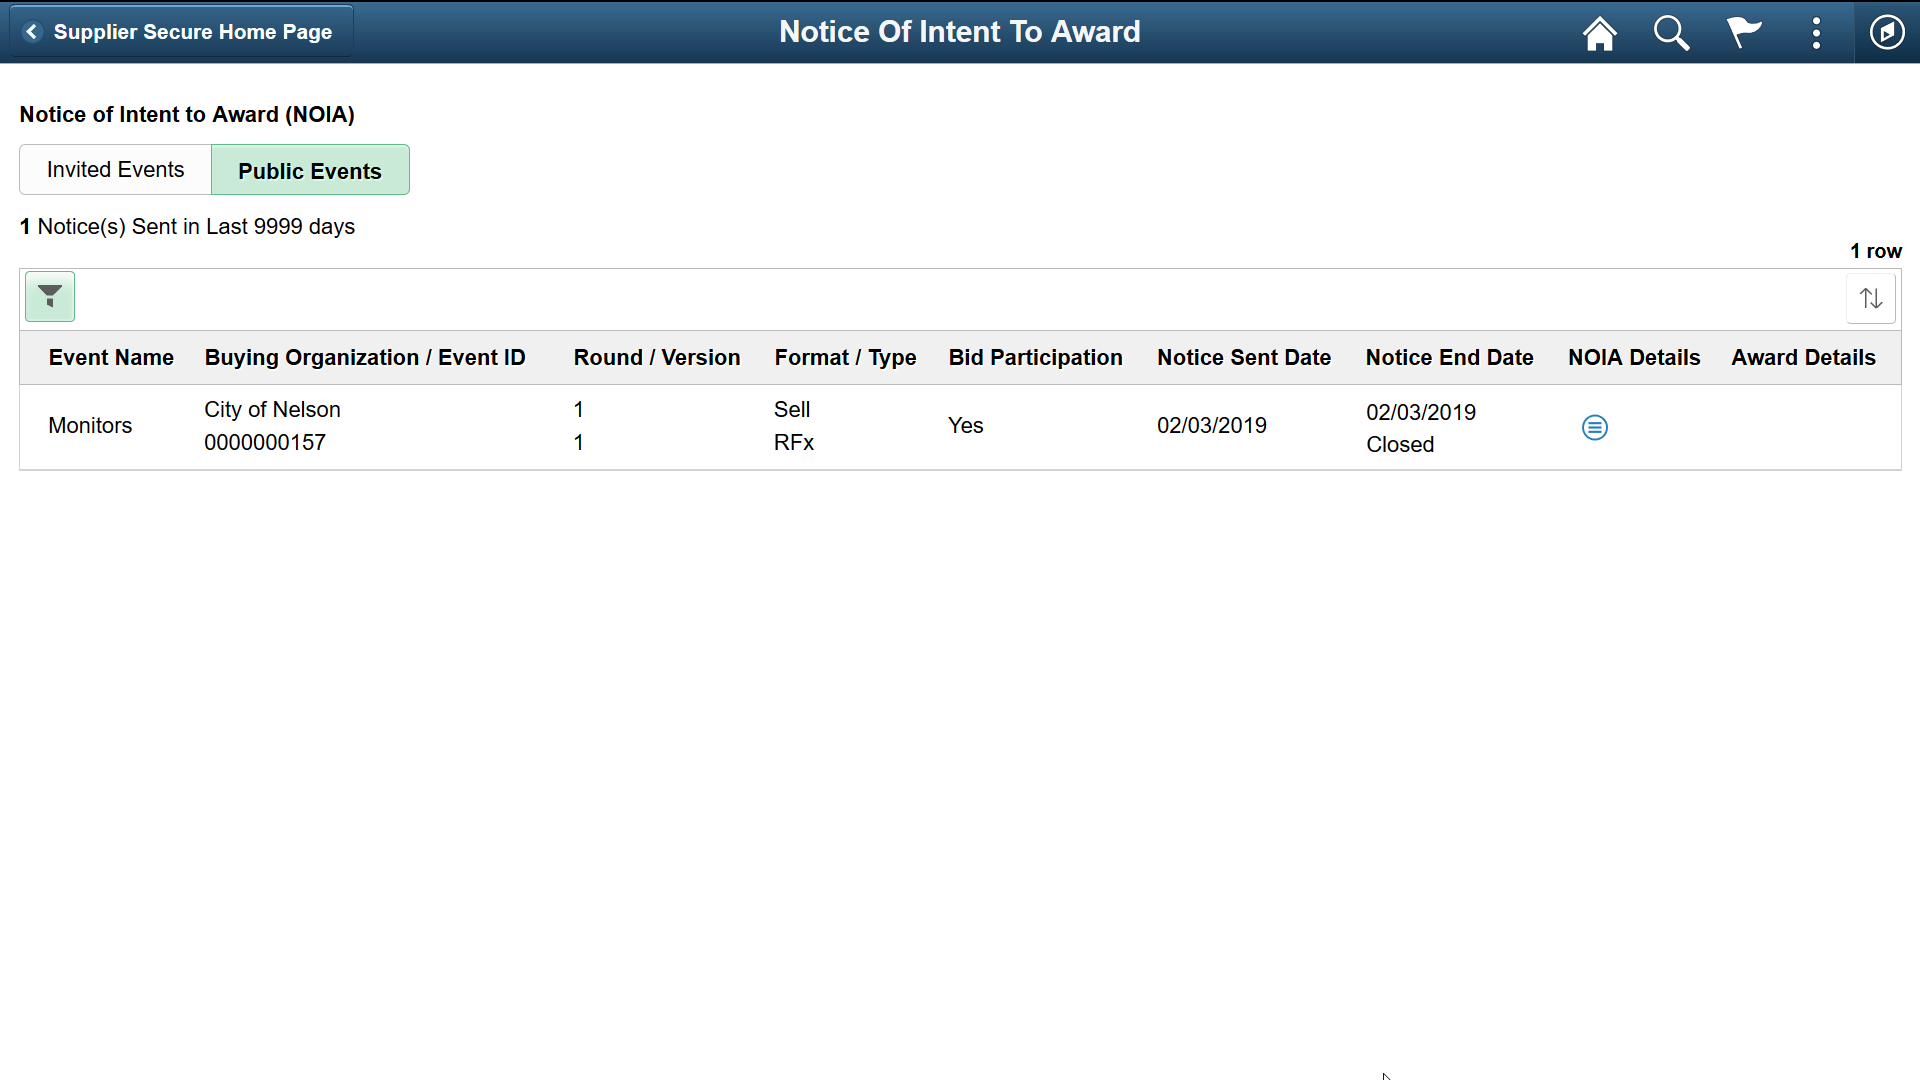
This example illustrates the fields and controls on the Secure Notice Of Intent To Award – Invited Events page. You can find definitions for the fields and controls later on this page.

By default, the page displays the list of events for which you are invited to participate. Based on the settings on the My Preferences page, the page displays the number of open notices issued and the number of notices nearing closure.
Field or Control |
Description |
|---|---|
Bid Participation |
Displays Yes if at least one bid is posted to the event. Displays No if the invited bidder has not posted any bids yet. |
Notice Sent Date and Notice End Date |
Displays both start date and end date of the notice. |
Filter icon |
Select to open the Filters page and filter the events based on:
|
This example illustrates the fields and controls on the Secure Notice Of Intent To Award – Public Events page.
The page displays the list of intent to award notice for public events.
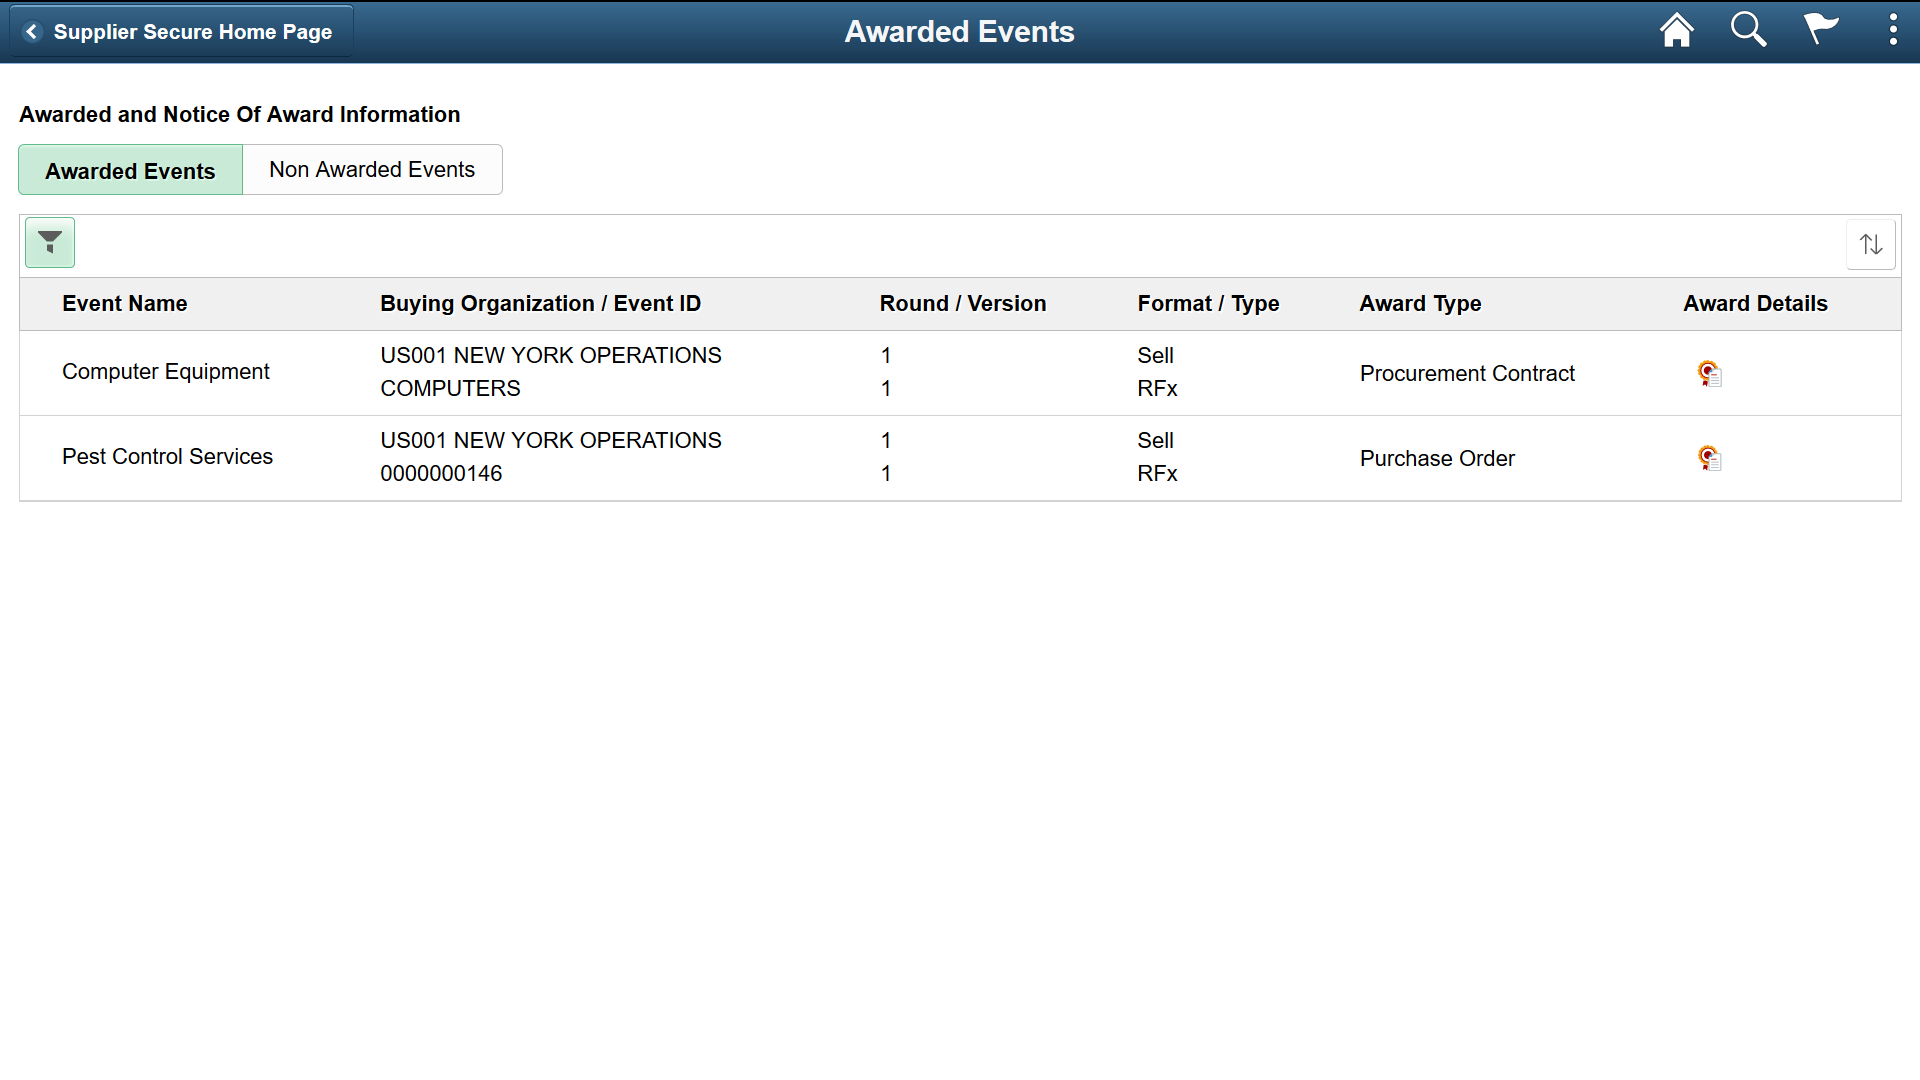
Supplier User: Use the Awarded Events tile to view the Awarded Events page, which lists the awarded and non-awarded events. The tile displays the number of awards and non-awards for the participated events in a given period of time. Use the User Preferences page to change the number of days from the default value that is 90. On the User Preferences page, you can also enable or disable the option to display the non-awarded events.
Awarded events can include partially awarded and completely awarded events. It’s possible that a bidder achieves a partial award, and a different bidder gets the rest of it.
Navigation:
This example illustrates the fields and controls on the Awarded Events tile.

This example illustrates the fields and controls on the Awarded Events page. You can find definitions for the fields and controls later on this page.
Field or Control |
Description |
|---|---|
Filer icon |
Click to open the Filters page and filter the events based on:
|
Event Name |
Displays the event’s name. |
Buying Organization/Event ID |
Displays the buying organization’s name and the particular event ID that the supplier has participated. |
Round/Version |
Displays the awarded event round and the version of the awarded event. |
Format/Type |
Displays the event’s format and type. |
Award Type |
Displays the type of award achieved by the event. An event can have multiple awards types. |
|
Click to view the details of award. The Award Details page displays the following information:
|
sort icon |
Click to sort the list of events. |

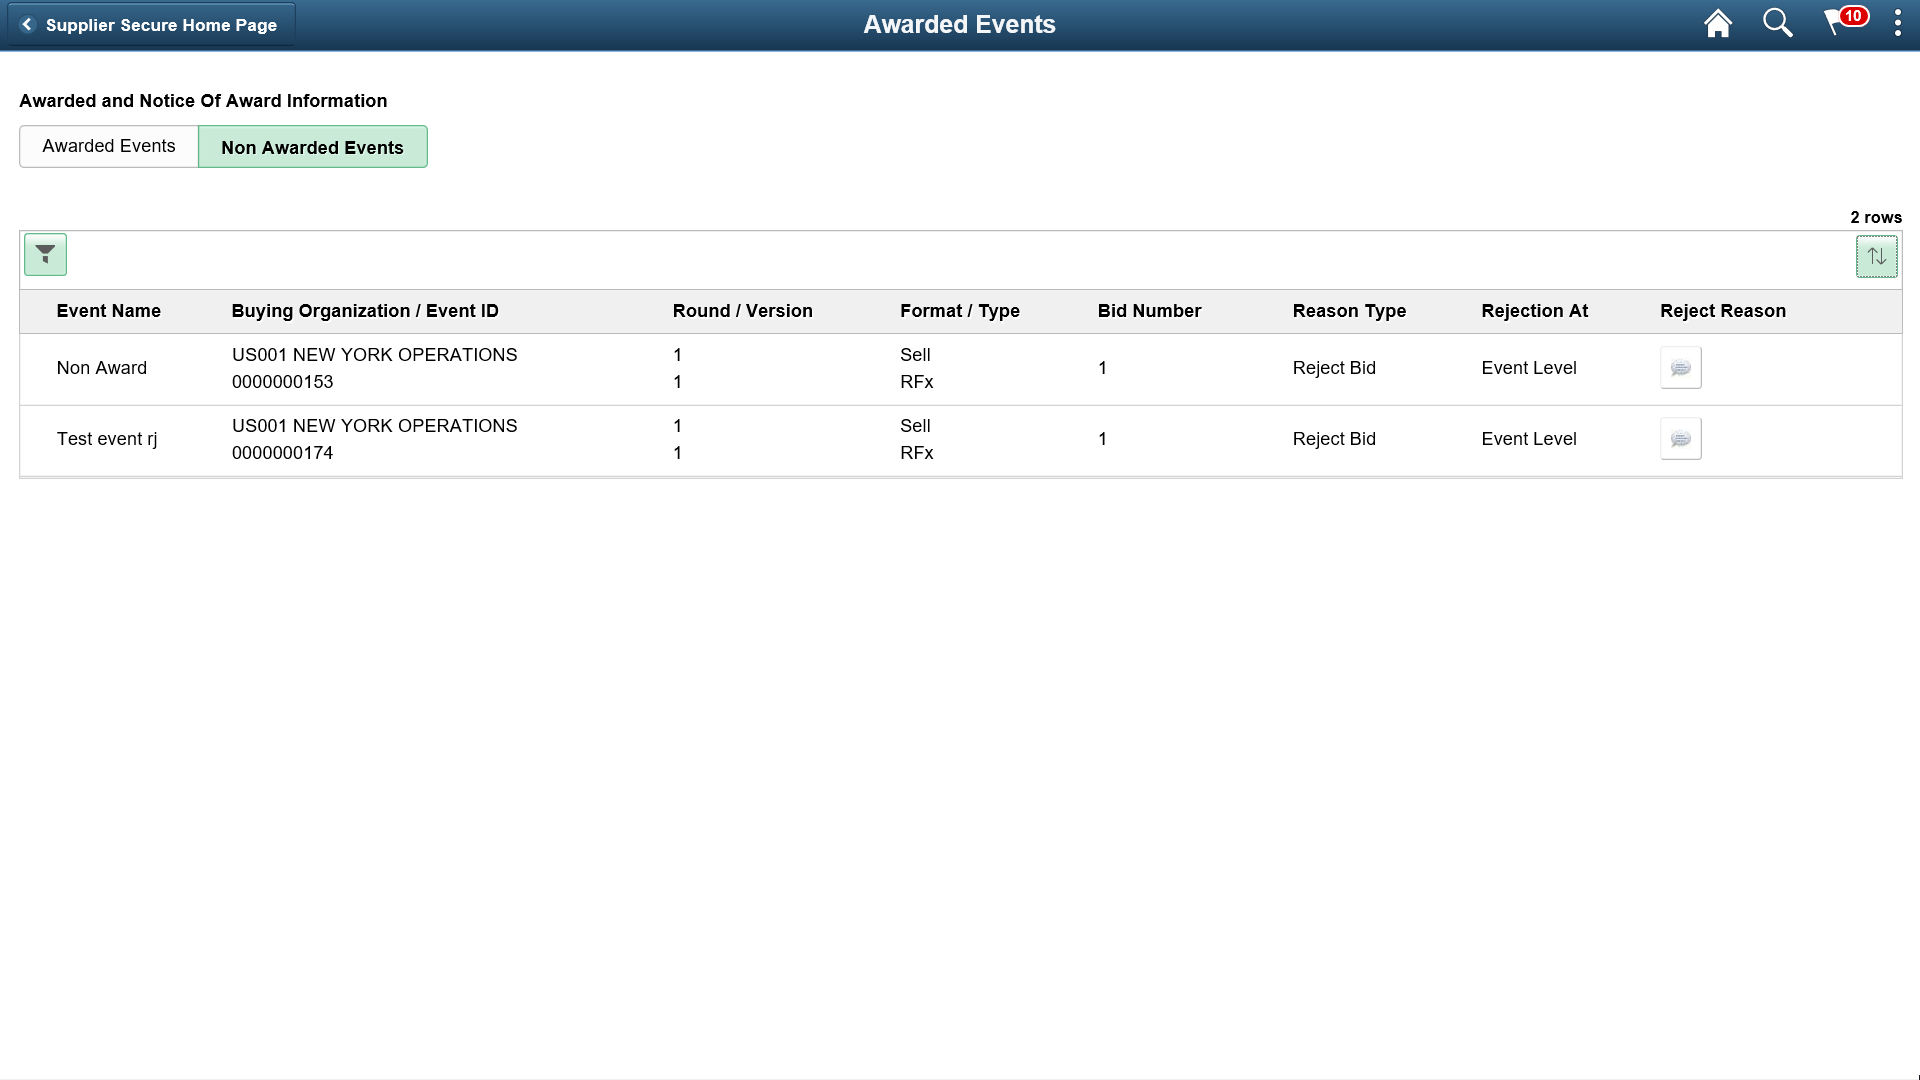
This example illustrates the fields and controls on the Non Awarded Events page. You can find definitions for the fields and controls later on this page.
Field or Control |
Description |
|---|---|
Bid Number |
Displays the bid number. |
Reason Type |
Displays the possible options, which are Reject and Disallow. |
Rejection At |
Displays the level of rejection. |
|
Click to view the reason for rejecting the event. For Line level rejection, the line number, item description, and a note describing why the line item was rejected are displayed. For Event level rejection, a note saying why the event was rejected is displayed. |

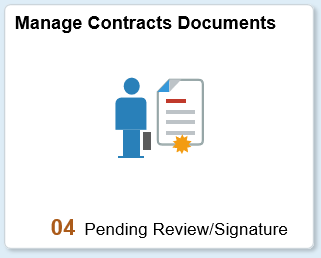
Supplier User: Use the Manage Contract Documents tile to view the documents pending review or signature. The tile displays the total count of those documents.
Navigation:
This example illustrates the fields and controls on the Manage Contract Documents tile.
This example illustrates the fields and controls on the Manage Contract Documents page. You can find definitions for the fields and controls later on this page.
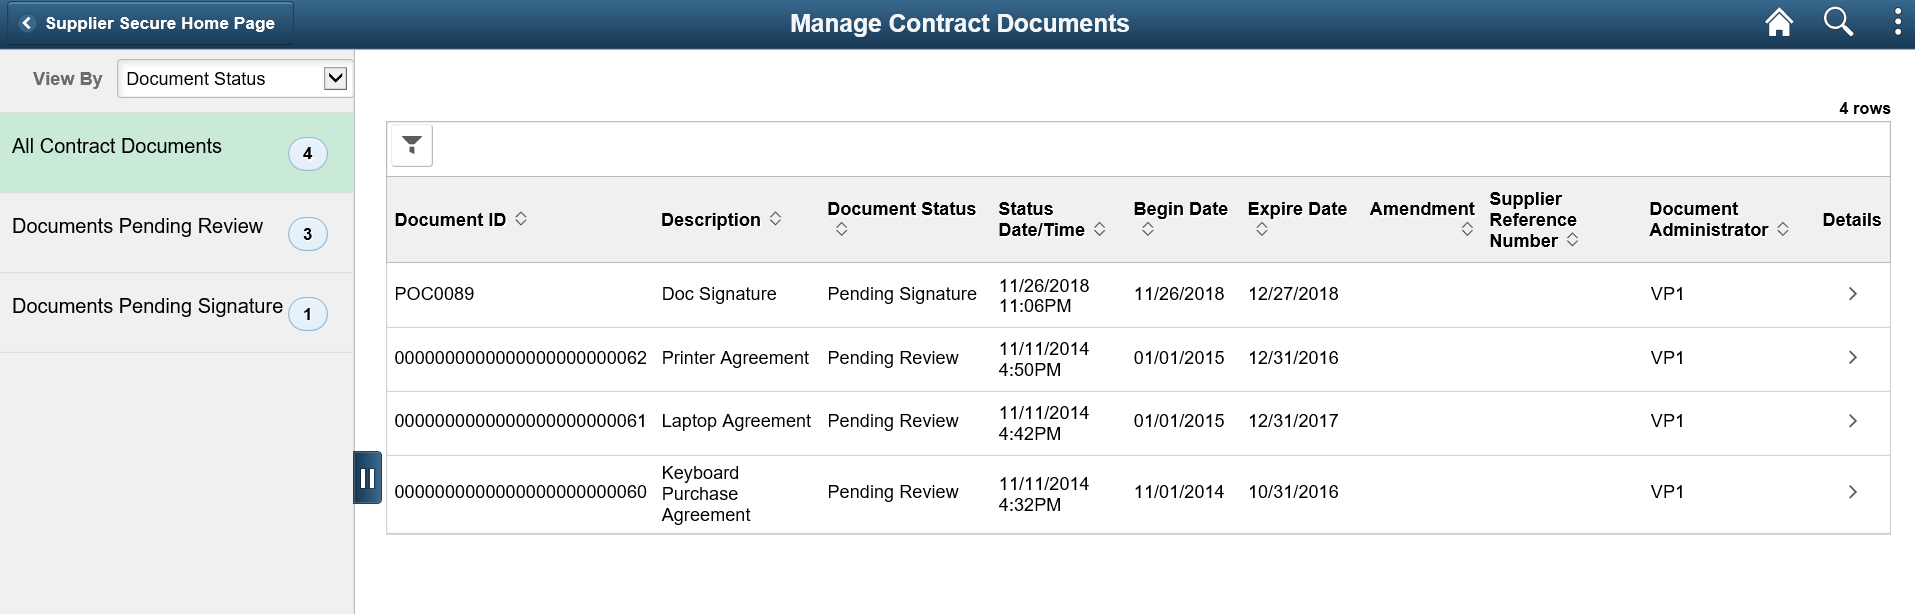
Field or Control |
Description |
|---|---|
View By |
Select the View By drop down to select the required display options. The options are:
|
Document Status |
Displays the status of documents as Pending Review or Pending Signature. Select the Details icon to review the document details or sign the document. For additional information on available functionality for reviewing documents and signing documents, see Signing External Documents and Reviewing and Collaborating on External Documents. |
Supplier User: Use the Manage Deliverables tile to view the incomplete contract deliverables. The tile displays the total count of those deliverables.
Navigation:
This example illustrates the fields and controls on the Manage Deliverables tile.

This example illustrates the fields and controls on the Manage Deliverables – Review Contract Deliverables page. You can find definitions for the fields and controls later on this page.
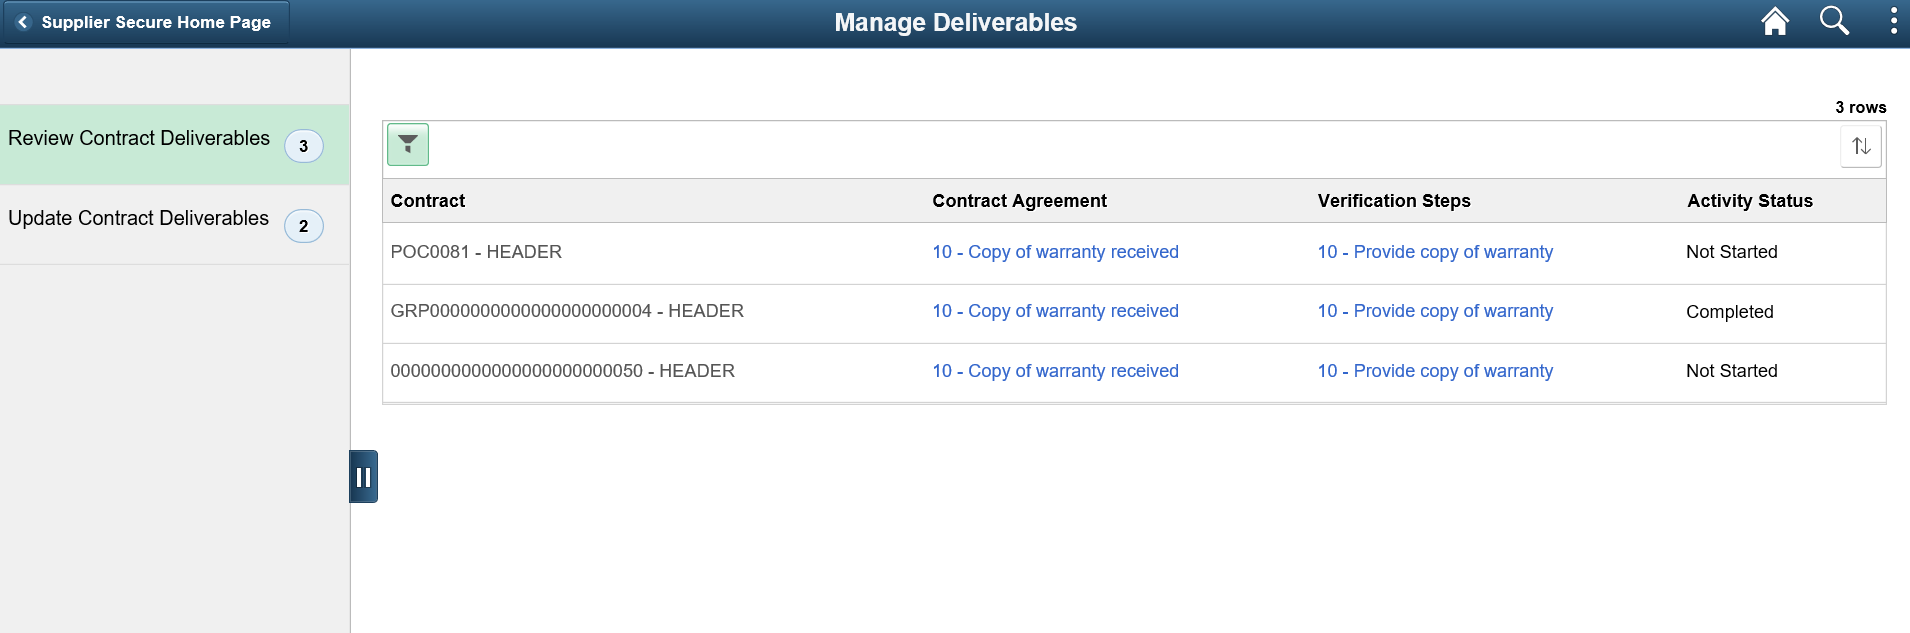
By default, the Review Contract Deliverables page is displayed along with the deliverables count.
Field or Control |
Description |
|---|---|
Contract Agreement |
Select the contract agreement link to view the Review Contract Deliverables – Review Agreement page. The page displays the changes to a contract agreement. |
Verification Steps |
Select the link to view the Review Contract Deliverables – Review Verification page. On the page, you can review the changes to the contract agreement verification steps. |
Activity Status |
Indicates if the Activity is Completed or Not Started. |
This example illustrates the fields and controls on the Manage Deliverables – Update Contract Deliverables page. You can find definitions for the fields and controls later on this page.
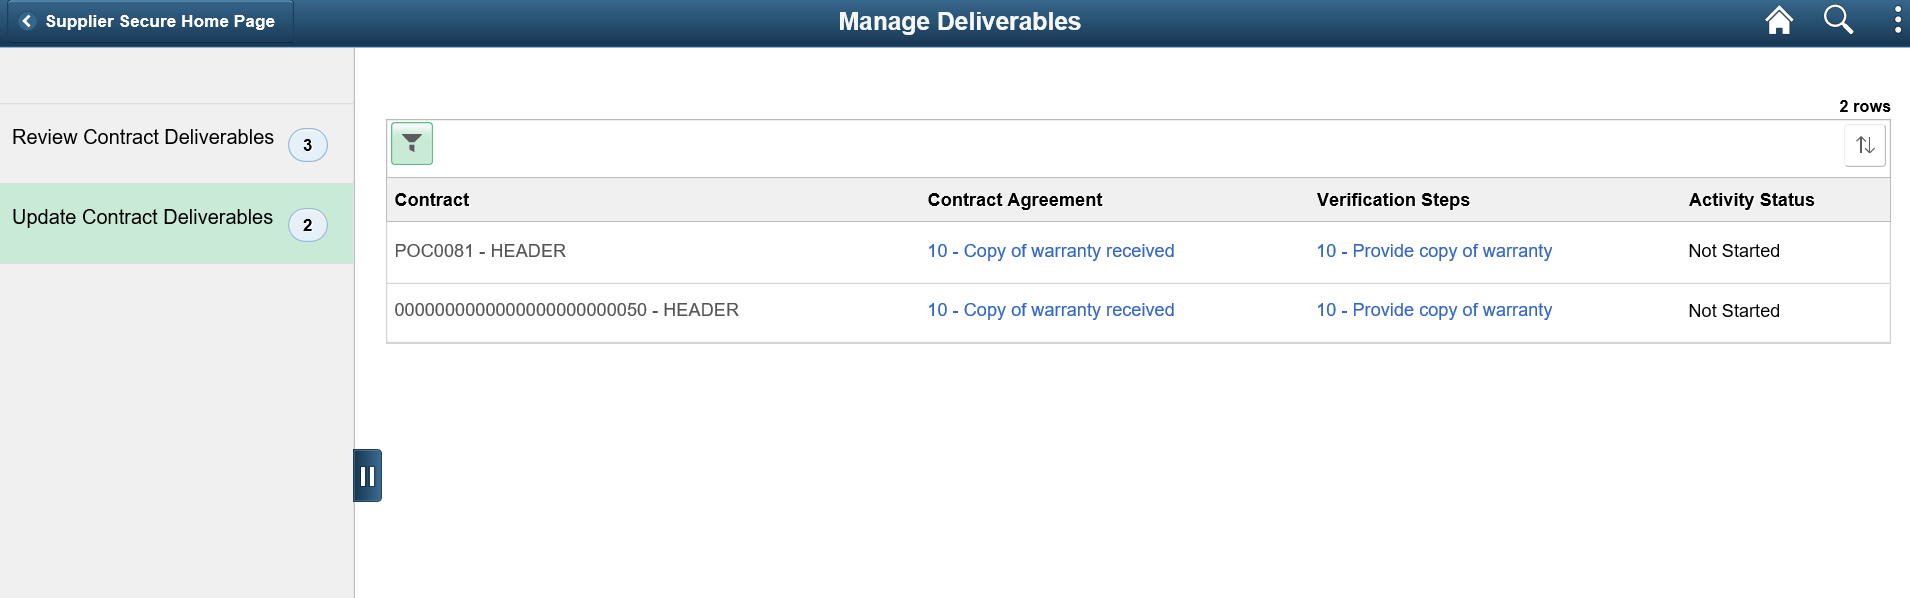
Field or Control |
Description |
|---|---|
Contract Agreement |
Select the Contract Agreement link to view the Update Contract Deliverables – Review agreement page. The page allows you to update the contract agreement. |
Verification Steps |
Select the Verification Steps link to view the Update Contract Deliverables – Update Verifications page, where you can update the contract agreement verification steps. |
Activity Status |
Indicates if the Activity is Completed or Not Started. |