Creating and Defining Budget Plans
To create and define budget plans, use the Budget Plan (PC_BUD_GENERAL) and Project Budget Detail (PC_BUD_DETAIL) components.
Budget plans define the budget type (cost or revenue), status, currency, and time span. They also specify the analysis type for all budget transactions that you create for the plan.
|
Page Name |
Definition Name |
Usage |
|---|---|---|
|
PC_BUD_GENERAL |
Create and view all budget plans associated with a project. |
|
|
PC_BUD_DETAIL |
Enter a high-level budget adjustment for the project and then distribute the budget adjustment down the WBS to costing activities. If all budget adjustments are distributed across budget items, use this page to distribute the budget adjustments evenly across budget periods. |
|
|
PC_BUD_ITM_DST_SEC |
Distribute budget amounts to budget items for costing activities. |
|
|
PC_BUD_PER_DST_SEC |
Distribute budget amounts to budget periods for costing activities and budget items. |
|
|
Calculate Amount From Quantity Page |
PC_BUD_CALC_RT_SEC |
Select a rate by employee ID, project role, or job code to use to calculate a budget row amount. |
|
PC_BUD_COPY |
Copy budget amounts from another plan, or copy previous versions of a budget plan to the current one. |
|
|
PC_BUDGET_COPY_SEC |
Copy budget items from another project to the current one. |
Use the Budget Plan page (PC_BUD_GENERAL) to create and view all budget plans associated with a project.
Navigation:
This example illustrates the fields and controls on the Budget Plan page. You can find definitions for the fields and controls later on this page.
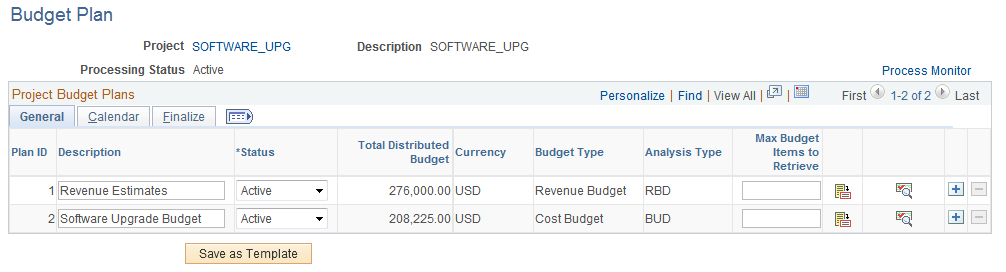
You can create one or more budget plans for a project; however, you can finalize only two plans on this page—one cost budget and one revenue budget.
Field or Control |
Description |
|---|---|
Project |
Click the project ID link to access the Project Definitions - General Information page for the project in a new browser window. Close the new browser window to return to the Budget Detail page. |
General
Select the General tab.
Field or Control |
Description |
|---|---|
Plan ID |
Enter the identifier for this budget plan for the project. You cannot edit this field after the plan is saved. |
Status |
Select a status of Active or Inactive for each budget plan. Only two budget plans can be active at any given time—one cost budget plan and one revenue budget plan. You can finalize only active plans. Note: Changing the status of a budget plan does not trigger a process to load the budget rows into the Project Transaction table. The Project Transaction table contains budget rows from the most recent finalized budget plan, regardless of the budget plan status. |
Total Distributed Budget and Currency |
Displays the sum of the budget items that is distributed down to the period level. |
Currency |
Select the budget plan currency. The default value is based on the currency code defined on the Project Costing Definition page. You can override the default value at the budget plan level. You can modify the currency only if no detail budget rows exist for the budget plan. |
Budget Type |
Select the type of budget to create. Available options are: Cost: Select to create a cost budget to track actual costs associated with the project. Revenue: Select to create a revenue budget for projected revenue. You can modify the budget type only if no detail budget rows exist for the budget plan. |
Analysis Type |
Enter the cost or revenue analysis type for the system to use to select transaction rows from the Project Transaction table to summarize and use on project analysis pages. Available analysis types are based on the analysis groups defined in the Cost Budget field (AN_GRP_ACTV_BUD) and Revenue Budget field (PC_REV_BUD_AN_GRP) in the Analysis Group Options group box on the Project Costing Definition page. You can change the analysis type only if no detail budget rows exist for the budget plan. Note: If Commitment Control is required, you cannot finalize another plan of the same budget type (cost or revenue) and analysis type. |
Max Budget Items to Retrieve |
Enter a value to control how many budget items are initially displayed on the Budget Detail Page. A value of 0 (zero) displays all budget items, which is recommended unless the you are experiencing performance issues. This field can be used to improve the time required to initially display the page for budget plans that may have many activities or budget items. A value can default into this field if it is defined on the Installation Options - Project Costing Page. |
|
Click the Budget Detail icon to access the Budget Detail page for the corresponding plan. |
|
Click the Budget versus Actual icon to access the Budget versus Actual page. |
Get Plan |
Click to use the Distribute Costs to Budgets process to create budget details based on the amounts on the Resources by Activity page in PeopleSoft Program Management. This button appears only if you use PeopleSoft Program Management |
Refresh Analytics |
Click to trigger the Refresh Budget Summary process to run in the background and update the Summary Budget Data table so that the latest budget information is available for reports and analytics before the budget is finalized. This button appears only if you use PeopleSoft Program Management. Note: The Refresh Budget Summary process runs automatically during the Project Costing budget finalization process. |


Calendar
Select the Calendar tab.
Field or Control |
Description |
|---|---|
Calendar ID |
Select the calendar that represents the interval in which the budget plan will be tracked based on the PeopleSoft General Ledger calendar that you are using. The default value is based on the Default Calendar ID field in the Projects Budgeting Options group box on the Installation Options - Project Costing page. Note: You cannot save the budget plan if the number of calendar periods between the budget plan start and end dates is less than the value that you enter in the Number of Periods field. |
Start Date |
Enter the start date of the budget plan. The default value is based on the project start date, which you can override when you create the budget plan. |
Number of Periods |
Select the number of periods in the budget plan. The default value is based on the Default Number of Periods field in the Projects Budgeting Options group box on the Installation Options - Project Costing page. This number is unlimited. Note: You cannot save the budget plan if the selected Calendar ID has fewer periods between the budget plan start and end dates than the value that you enter in this field. |
Commitment Control
Select the Commitment Control tab. This tab appears only if you enable Commitment Control for Project Costing on the Installation Options - Project Costing Integration page.
Field or Control |
Description |
|---|---|
Security Status |
Displays the security status that is invoked during the budget finalization process. Values are: None: Indicates that there are no security errors. Security Error: Indicates that a security error occurred during the finalization process. For more information about Commitment Control Security, see Understanding Commitment Control Security. |
Exceptions |
Click the Exceptions icon in the corresponding row to access the Review Commitment Control page and correct the transactions that created an error during the submission to Commitment Control. After the budget transactions successfully post to Commitment Control, they are deleted from the Commitment Control staging tables and are no longer accessible on the Review Commitment Control page. |
Finalize
Select the Finalize tab.
Field or Control |
Description |
|---|---|
Finalized Amount |
Displays the amount finalized and sent to Commitment Control (if Commitment Control is required) or to the Project Transaction table. |
Finalize |
Click to save the data and finalize the budget plan. This updates the Project Transaction Interface table and triggers the Load Third-Party Transactions Application Engine process to determine if the transactions must go through Commitment Control. The system:
To modify a budget plan:
|
Use the Budget Detail page (PC_BUD_DETAIL) to enter a high-level budget adjustment for the project and then distribute the budget adjustment down the WBS to costing activities.
Navigation:
Click the Budget Detail icon on the Budget Plan page.
If all budget adjustments are distributed across budget items, use this page to distribute the budget adjustments evenly across budget periods.
Note: If the project was created using the Fluid Project Request, then the approved budgeted amount is shown at the top of the page as Project Request Budget.
This example illustrates the fields and controls on the Budget Detail page (1 of 2). You can find definitions for the fields and controls later on this page.

This example illustrates the fields and controls on the Budget Detail page (2 of 2). You can find definitions for the fields and controls later on this page.

Field or Control |
Description |
|---|---|
Distribute Budget |
Click to perform the action in the Distributed Budget field (Add To/Subtract From or Replace) to calculate the Target Budget field. |
Distributed Budget |
Add To/Subtract From: Select to add (if you enter a positive budget adjustment) or subtract (if you enter a negative budget adjustment) the budget adjustment amount to the distributed budget to calculate the target budget. This value is the default when you enter the page. Add To/Subtract From is the only valid option if Commitment Control is enabled for the business unit and the selected budget plan is already finalized, because you cannot modify existing budget rows. With Commitment Control, you can only add additional adjustment rows by using the Budget Items page. Replace: Select for the budget adjustment amount to replace the entire target budget amount when you click the Distribute Budget button. The distributed budget amount, which is the amount that has already been distributed down to the period level, changes to zero for all affected rows. |
Expand |
Select a specific WBS level for activities in that level to appear in the Project Budget Details grid. When you first enter the page, the WBS is expanded to the activity costing level and all budget item rows that are associated with activities are collapsed. Available options are: All Subtasks: Select for all activities and budget items associated with those activities to appear in the grid. Level 1 through Level 9: Select for costing activities in a specific WBS level to appear in the grid. Click the Expand icon (the + symbol) or the Collapse icon (the − symbol) to collapse or expand individual rows. |
Filter Budget Item |
Select a budget item and click Search for only the selected budget item to appear in the grid. This field applies only when the WBS level is expanded to display budget items. The available budget items are based on the budget items that are associated with activities on the project. Note: If you use this option, activity totals can appear out of balance if they include budget items that do not appear in the grid. |
Copy From Another Plan |
Click to access the Copy From Another Plan page to copy budget items from a previous, saved version of a budget plan. You can copy from another plan only if this budget plan is not finalized. |
|
Copy From Another Project |
Click to access the Copy From Another Project page to copy budget items from the budget plan of another project. You can copy from another project only if this budget plan is not finalized. |
Budget Plan |
Click to access the Budget Plan page. |
Budget Items |
Click the Budget Items link at the bottom of the page to access the Budget Items component (PC_BUD_ITEMS) in a new browser window to create new budget items. |
Budget vs. Actual |
Click to access the Budget vs. Actual page for the project. |
Budget Periods
Select the Budget Periods tab.
Field or Control |
Description |
|---|---|
Status |
Displays an icon on the project row and budget item rows that indicates if budget adjustments are fully distributed to the activity, budget item, and period level. |
|
Appears in the Status column of a budget item row if the budget adjustment for this budget item is fully distributed down to the period level. Appears in the Status column of a project row if all budget item amounts are distributed down to the period level and the budget plan is ready to be finalized. Budget items with a zero amount are not considered in the finalization process, but remain in the budget details. |
|
Appears in the Status column of a budget item row if the budget adjustment for this budget item is not fully distributed down to the period level. Appears in the Status column of a project row if the budget plan amount is not greater than zero, or if all budget item amounts are not distributed down to the period level |
Activity Name/Budget Item |
The first row displays information about the total project, which represents WBS level 0. Summary activities (in a bold font) and detail activities (in a normal font) appear in subsequent rows based on the WBS. |
Budget Items |
Click the icon in the Budget Items column to access the Project Budget Items - Adjust Budget Items page to distribute an activity's budget adjustment amount to budget items and view additional attributes, such as ChartFields. |
Spread Option |
Select an option to spread the Budget Adjustment amount to activities. The appearance of the columns on this page is based on your selection. Available values are: Adjust by Amount Adjust by Percentage Clear Values Even Spread Percentage Spread These options are discussed in more detail later in this section. If the spread option at the child level is different than the spread option of the parent level, the parent level spread option takes precedence when you click the Distribute Budget option. For example, assume that you want to adjust a summary activity budget adjustment of 10,000 USD with a spread option of Even Spread and a detail activity budget adjustment of 5,000 USD with a spread option of Adjust by Amount. When you click Distribute Budget, the system evenly spreads the summary activity amount of 10,000 USD across activities that belong to the summary activity and ignores the detail activity spread option. When you choose a spread option at a WBS level that contains children, the system performs an Even Spread at the child level. For example, assume that you select an Adjust by Amount spread option at a summary activity level. When you click the Distribute Budget button to spread the amount, the system also evenly spreads the amount to the detail activities that belong to the summary activity. |
Percent |
Enter a percentage at the project or summary activity level for the system to use to distribute the budget adjustment amount. Alternatively, enter percentage adjustments to individual costing activities. This field is editable if you select the Adjust by Percentage spread option or percentage spread. |
Budget Adjustment |
Enter an amount or view the result of the budget adjustment distribution based on the spread option that you selected. This amount has not been distributed to periods. |
Distributed Budget |
Displays budget adjustments that have been distributed to periods. When a budget adjustment is distributed to periods, the Distributed Budget value is updated with that amount and the Budget Adjustment value changes to zero. |
Target Budget |
The sum of the budget adjustment and distributed budget. |
Undistributed Adjustment |
The amount of the budget that has not been distributed to periods. |
Even Spread |
Click to spread the amount in the Undistributed Adjustment column evenly across all budget periods and update the Undistributed Adjustment amount. |
Other |
Click to access the Project Budget Periods - Adjust Budget Periods page and distribute budget adjustments to the period level. |
<Budget Period> |
View the budget distribution amount for each budget period. The budget period columns are based on the calendar ID, start date, and number of periods specified for the budget plan. The system determines the number of periods to display based on the calendar periods per year. If the number of periods per year is less than or equal to 26 then the system displays the number of periods in the calendar year. If the number of periods per year is 52, the system displays 26 periods. For any other number of periods per year, the system displays 15 periods. Use the horizontal scroll buttons to view additional budget periods. The horizontal scroll buttons appear only when the number of periods exceed the space on the page. |


General Ledger Detail
Select the General Ledger Detail tab to view the GL business unit and other GL-related ChartField values that you select on the Project Budget Items - Adjust Budget Items page.
Commitment Control Detail
Select the Commitment Control Detail tab to view the ledger group, ledger, budget entry type, parent budget entry type, entry event, and other Commitment Control-related options that you select on the Project Budget Items - Adjust Budget Items page.
Adjust by Amount Spread Option
Select the Adjust by Amount spread option on the Budget Detail page to enter adjustment amounts at the project or summary activity level and spread the adjustments to each child costing activity under that project or summary activity by amount. Alternatively you can directly adjust specific activities. Select the Adjust by Amount option on the parent row of the costing activities that you want to adjust, and the Budget Adjustment fields for the selected project or activity and its children become editable.
If you select the Adjust by Amount spread option at an activity level where budget items exist, and the amount entered at the activity level is different from the sum of the budget items, the sum of the budget items takes precedence. For example, assume that you enter an activity budget adjustment value of 30,000 USD, and the sum of the individual budget item budget adjustments for the activity is 50,000 USD. The amount of the budget items overrides the value of the parent when you click Distribute Budget.
A warning appears if the sum of the budget adjustments that you enter at the child level do not match the budget adjustment amount at the parent level. You can either override the value at the parent level or return to the Budget Detail page and change a budget adjustment amount.
Adjust by Percentage Spread Option
Select the Adjust by Percentage spread option on the Budget Detail page to enter percentage adjustments at the project or summary activity level and spread the adjustments to each child costing activity under that project or summary activity by percentage. Alternatively you can directly adjust specific activities. Select this option on the parent row of the costing activities that you want to adjust. The Percent fields for the selected project or activity and its children become editable. Adjust by Percentage is not a valid option on rows with a distributed budget amount of zero.
Clear Values Spread Option
To clear the amounts in the Budget Adjustment column and leave the existing amounts in the Distributed Budget column:
Select a distributed budget option of Add To/Subtract From on the Budget Detail page.
Select a spread option of Clear Values on the Budget Detail page.
Click the Distribute Budget button.
To clear the amounts in the Budget Adjustment column and the Distributed Budget column, and change the value in the Target Budget column to zero:
Select a distributed budget option of Replace.
Select a spread option of Clear Values.
Click the Distribute Budget button.
The system clears the values for the row in which you selected the Clear Values option, and all rows below it. For example, if you select the Clear Values option for a summary activity, the system clears the values for the summary activity and all of its detail activities.
The Clear Values option is valid if either of these scenarios exist:
Commitment Control is enabled and the budget plan is not finalized.
Projects Budgeting is enabled without Commitment Control for finalized or nonfinalized budgets.
Even Spread Option
Select the Even Spread spread option on the Budget Detail page to enter adjustments at the project or summary activity level and spread the adjustments evenly to each child costing activity under that project or summary activity.
Percentage Spread Option
Select the Percentage Spread spread option on the Budget Detail page to enter adjustments at the project or summary activity level and spread the adjustments based on the percentages entered for each child costing activity under that project or summary activity.
Use the Project Budget Items - Adjust Budget Items page (PC_BUD_ITM_DST_SEC) to distribute budget amounts to budget items for costing activities.
Navigation:
Click the Budget Items icon on the Budget Detail page.
This example illustrates the fields and controls on the Project Budget Items - Adjust Budget Items page. You can find definitions for the fields and controls later on this page.

If Commitment Control is enabled and the selected budget plan is already finalized, you can modify budget amounts only by inserting additional adjustment rows on this page.
The Clear Values spread option is the only method that you can use on this page to adjust budget amounts that have been distributed down to the period level.
Field or Control |
Description |
|---|---|
Spread Option |
Select an option to spread the budget adjustment amount to budget items. The appearance of the columns on this page is based on your selection. Available values are: Adjust by Amount Adjust by Percentage Clear Values Even Spread Percentage Spread These options are discussed in more detail later in this section. |
Distribute Budget |
Click the Distribute Budget button to apply the selected spread option to calculate the budget adjustments. The system adds the budget adjustment and the distributed budget to arrive at the target budget. |
OK |
Click to return to the Budget Detail page and distribute the budget adjustments to periods. Important! When you return to the Budget Detail page, click Save to update the database with the changes that you made on the Budget Items page. |
Cancel |
Click to clear distributions from this page and return to the Budget Detail page. |
Budget Items
Select the Budget Items tab to enter budget adjustments and view the distributed, total, and undistributed budgets for each budget item on the activity.
Field or Control |
Description |
|---|---|
Project Budget Item |
Enter project budget items to which you want to distribute budget amounts for this activity. |
Seq # (sequence number) |
Displays the sequence number that increments by one each time that you enter a specific budget item for this activity. |
Project Detail
Select the Project Detail tab to modify project-related ChartField values for source type, category, and subcategory.
General Ledger Detail
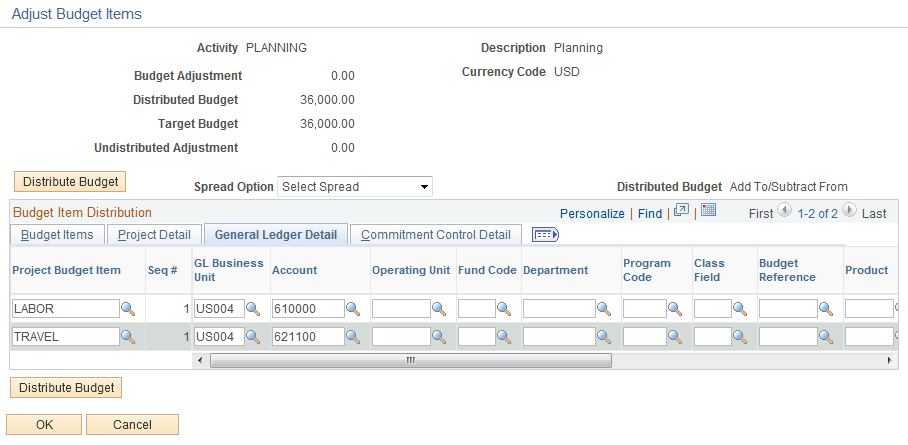
Select the General Ledger Detail tab to modify the GL business unit and other GL-related ChartField values. You can budget to a finer level of detail by entering ChartField values on the budget rows. This example shows the PLANNING activity with two labor budget items—one for department 153000 and one for department 154000:
This example illustrates the fields and controls on the Example of setting up specific ChartField values on the Project Budget Items - Adjust Budget Items page. You can find definitions for the fields and controls later on this page.
To budget down to the ChartField level:
On the Project Budget Items - Adjust Budget Items page, create as many budget item rows as needed for the activity.
On the General Ledger Detail tab of the Project Budget Items - Adjust Budget Items page, enter the specific ChartField combinations for each budget item.
Distribute each budget item separately.
Note: Multiple budget items do not roll up to a single budget item on the Budget Detail page.
Combination editing is not available through project budget creation in Project Costing.
Commitment Control Detail
Select the Commitment Control Detail tab to modify the Commitment Control-related information.
Field or Control |
Description |
|---|---|
Ledger Group |
Select a ledger group that is based on the GL business unit of the integration template that is associated with the project. You can override the GL business unit at the budget item level on the Commitment Control Detail tab. To select a ledger group for a budget item, the budget plan calendar ID must match the calendar ID of the Commitment Control budget definition that is associated with the specified ledger group. If no calendar is specified for the control budget definition, the system does not restrict you from specifying a ledger group based on the budget calendar. |
Ledger |
Select a detail ledger that belongs to the specified ledger group. The default value is based on the first ledger that is listed in the specified ledger group definition. |
Budget Entry Type |
Select the budget entry type of Original or Adjustment. The default value is Original if the plan has not been finalized. When the budget plan is successfully finalized, the system changes the budget entry type and parent budget entry type to Adjustment, but the value remains editable. If you create a project from a template and the template has a budget plan, the default value is a budget entry type of Original and a parent budget entry type of Original. |
Generate Parent Budgets |
Select for Commitment Control to automatically roll up budgets to create parent budgets. If the budget definition that is associated with the selected ledger group contains a value in the Parent Control Budget field, the Generate Parent Budgets field default value is enabled (checked), and is editable by the budget creator. If the budget definition that is associated with the selected ledger group does not contain a value in the Parent Control Budget field, the Generate Parent Budgets field is not available for selection on the Project Budget Items - Adjust Budget Items page because the system assumes that the budget definition that is associated with the ledger group is a parent budget. |
Parent Budget Entry Type |
Select a parent budget entry type if you select Generate Parent Budgets. If the budget definition that is associated with the specified ledger group contains a value in the Parent Control Budget field, the Parent Budget Entry Type field is editable. If the budget definition that is associated with the specified ledger group does not contain a value in the Parent Control Budget field, the Parent Budget Entry Type field is not available because the system assumes that the budget definition that is associated with the ledger group is a parent budget. The default value is Original if the budget plan has not been finalized. When the budget plan is successfully finalized, the system changes the Budget Entry Type and Parent Budget Entry Type to Adjustment, but the field remains editable. The Parent Budget Entry field is not available for selection if the Generate Parent Budget option is not enabled. If you create a project from a template and the template has a budget plan, the default value is a budget entry type of Original and a parent budget entry type of Original. |
Use Default Event Entry |
Select this option to use the entry event default value that is specified on the Control ChartField page in Commitment Control budget definition as the entry event code for the parent budget. This option is applicable if you select the Generate Parent Budgets option to automatically create the parent budget when you create a child budget. Note: If entry events are required for the Commitment Control ledger group for the parent budget, the system uses the default entry event code on the parent budget regardless of the Use Default Entry Event option on this page. This option not available for selection if you specified No EE (no entry event) for General Ledger on the Installation Options - Entry Event page. |
Entry Event |
Enter an active entry event code that is applicable for the budget row. After the budget plan is saved and finalized, the Entry Event Generator Application Engine process (FS_EVENTGEN) can create additional accounting entries. You must enter an entry event code on a budget detail row for a ledger group if you specified entry events as required for the Commitment Control ledger group on the Ledgers For A Unit - Commitment Control Options page. This validation occurs during the Project Costing to Commitment Control integration process. You must also must enter an entry event code if you specified entry events as required for PeopleSoft General Ledger on the Installation Options - Entry Event page. This validation occurs online when you enter budget details. Regardless of whether you specify entry events as required or optional for the ledger group, the Project Costing Budget Entry Event Processor (PC_TO_EE) will generate entry event journal entries for both the child and parent budget if you specify an entry event code on the budget detail row. If you select an inactive entry event code and try to finalize the budget, the system will not proceed with the finalization process. A message appears on the Review Commitment Control page in the Error column for the corresponding budget detail row indicating that the row contains an invalid value. You must change the event entry code and refinalize the budget plan. This field not available for selection if you specified No EE (no entry event) for General Ledger on the Installation Options - Entry Event page. |
Set Options |
Click to access a page where you can view the business unit and ledger group for the budget, and modify budget status, and budget control options. Note: This button is only enabled when the ledger group is a Commitment Control type ledger group. |
Adjust by Amount Spread Option
Select the Adjust by Amount spread option on the Project Budget Items - Adjust Budget Items page to spread the budget adjustment for a costing activity to budget items manually by entering the desired amounts. You can also adjust specific budget items directly. The fields in the Budget Adjustment column become editable.
A warning appears if the sum of the budget adjustments that you enter for the budget items do not match the budget adjustment amount for the costing activity. You can either override the value at the activity level or return to the Project Budget Items - Adjust Budget Items page and modify a budget adjustment amount.
In this example, the budget adjustment of 3,000,000 USD for the PLANNING activity is spread by the amount of 2,000,000 USD to the LABOR budget item and 1,000,000 USD to the TRAVEL budget item:
This example illustrates the fields and controls on the Example of adjusting by amount on the Project Budget Items - Adjust Budget Items page. You can find definitions for the fields and controls later on this page.

After you click the Distribute Budget button, the system:
Replaces the previous value in the Budget Adjustment field with the new adjusted amount.
Updates the Undistributed Adjustment field in the page header.
Updates the Target Budget column in the Budget Item Distribution grid.
Changes the Budget Adjustment column to read-only.
Changes the Spread Option value to Select Spread.
Adjust by Percentage Spread Option
Select the Adjust by Percentage spread option on the Project Budget Items - Adjust Budget Items page to adjust particular budget items by percentage. The fields in the Percentage column become editable.
The system calculates the budget adjustment for each budget item as the (distributed budget) × (percentage).
A value in the Distributed Budget column for a budget item indicates that the amount is distributed down to the period level. If an activity has budget items with both distributed budget amounts and budget adjustment amounts, the system ignores the budget adjustments.
In this example, assume that the PLANNING activity has a 1,000 USD budget adjustment and a 36,000 USD distributed budget:
This example illustrates the fields and controls on the Example of adjusting by percentage on the Project Budget Items - Adjust Budget Items page. You can find definitions for the fields and controls later on this page.

The system disregards the existing budget adjustment amount when performing an adjustment by percentage on this page. In this example, the system calculates a new budget adjustment amount for the LABOR budget item of (10 percent) × (24,000 USD) = (2,400 USD), and a new TRAVEL budget adjustment of (15 percent) × (12,000 USD) = (1,800 USD).
Note: You cannot copy budget item distribution percentages from one activity to another, or from one budget item to another.
Even Spread Option
Select the Even Spread spread option on the Project Budget Items - Adjust Budget Items page to spread the budget adjustment evenly across the budget items for the selected costing activity.
The calculations that the system uses to determine the budget adjustment for each item are based on the budget adjustment amount on the Budget Detail page. For example, assume that three budget items exist for a costing activity with a total budget adjustment amount of 24,000 USD. At the budget item level, the adjustment amounts are 8,000 USD for one budget item, zero adjustment amount for the second budget item, and 16,000 USD for the third budget item. The system divides the 24,000 USD evenly between the three activities, for a result of 8,000 USD each.
If you enter the Project Budget Items - Adjust Budget Items page with a zero value in the Budget Adjustment field for the activity, and select a spread option of Even Spread, the Budget Adjustment field in the page header becomes editable for you to enter a budget adjustment value at the activity level. The Budget Adjustment field changes to read-only when you click Distribute Budget.
Percentage Spread Option
Select the Percentage Spread spread option on the Project Budget Items - Adjust Budget Items page to spread the budget adjustment amount for the activity to budget items based on the percentages that you enter. The sum of the percentages must equal 100 percent. When you select this option the fields in the Percentage column become editable.
Similar to the Even Spread option, the calculations that the system uses to determine the budget adjustment for each item are based on the budget adjustment amount on the Budget Detail page. For example, assume that two budget items exist for a costing activity with a total budget adjustment amount of 24,000 USD. At the budget item level, the adjustment percentages are 30 percent for one budget item and 70 percent for the second budget item. The system multiplies the 24,000 USD by 30 percent and 70 percent to arrive at the budget distribution amount.
If you enter the Project Budget Items - Adjust Budget Items page with a zero value in the Budget Adjustment field for the activity, and select a spread option of Percentage Spread, the Budget Adjustment field becomes editable for you to enter a budget adjustment value at the activity level. The field changes to read-only when you click Distribute Budget.
Use the Project Budget Periods - Adjust Budget Periods page (PC_BUD_PER_DST_SEC) to distribute budget amounts to budget periods for costing activities and budget items.
Navigation:
Click the Other link on the Budget Detail page.
This example illustrates the fields and controls on the Project Budget Periods - Adjust Budget Periods page. You can find definitions for the fields and controls later on this page.

This page contains additional spread methods that you can use to adjust budgets to the period level. Budget amounts that you distribute on this page roll up to the budget item, activity, and project level.
Field or Control |
Description |
|---|---|
Spread Option |
Select an option to spread the budget adjustment amount to periods. You must select a spread option before you can take action on this page. If you change the spread option, the system clears any existing amounts in the Budget Adjustment field. |
Budget Period |
Lists the budget periods in the budget plan. |
Quantity |
Enter a quantity that the system uses to calculate budget adjustments by period for labor resources based on a quantity x rate calculation. |
Unit of Measure |
Enter the unit of measure that the system uses with the quantity to calculate budget adjustments by period for labor. The unit of measure must have conversion data defined from the unit of measure on the Budget Periods page to the unit of measure that appears on the Calculate Amount From Quantity page. |
Calculate Amount |
Click to access the Calculate Amount From Quantity page to select a rate calculation basis of Employee ID, Job Code, or Project Role. This button appears only if the budget item resource class is Labor or blank. |
Calculate Amount From Quantity Page
Use the Calculate Amount From Quantity page (PC_BUD_CALC_RT_SEC) to select a rate by employee ID, project role, or job code to use to calculate a budget row amount.
Navigation:
Click the Calculate Amount button on the Project Budget Periods - Adjust Budget Periods page.
The Calculate Amount From Quantity page appears when you select the Adjust by Amount spread option on the Project Budget Periods - Adjust Budget Periods page, enter the quantity and unit of measure, and click the Calculate Amount button.
This example illustrates the fields and controls on the Calculate Amount From Quantity page. You can find definitions for the fields and controls later on this page.

Field or Control |
Description |
|---|---|
Rate Calculation Basis |
Select one of these options: Employee ID: Select for a list of employee cost data to appear in the Rates by Employee ID grid. Job Code: Select for a list of job code cost data to appear in the Rates by Job Code grid. Project Role: Select for a list of project role cost data to appear in the Rates by Project Role grid. After you select the rate calculation basis, the list of detailed rate rows appears in the grid. Select the row that contains the desired rate for the system to use to calculate budget adjustments by period for labor. |
Rate Type |
This field appears only for rates that require multicurrency conversion. If the rate that you select on the Calculate Amount From Quantity page uses a different currency code than the budget plan currency code, enter the rate type that the system uses to convert the rate to the budget plan currency code. |
OK |
Click to return to the Project Budget Periods - Adjust Budget Periods page. Any amount that exists in the Distributed Budget field for the period will be overridden with the new calculated amount. |
Adjust by Amount Spread Option
Select Adjust by Amount in the Spread Option field on the Project Budget Periods - Adjust Budget Periods page to spread the budget adjustment for the budget item to periods manually by entering the desired amounts, or adjust a particular periods directly. Fields in the Budget Adjustment column become editable.
To use the Adjust by Amount option, the undistributed adjustment amount that appears in the Budget Periods grid on the Budget Detail page must equal zero. You can change the undistributed adjustment amount in the Budget Periods grid to zero and only distribute the budget adjustments by the amount that appears in the Period Distribution grid on the Project Budget Periods - Adjust Budget Periods page. Alternatively, you can evenly spread the undistributed adjustment amount across budget periods and also distribute the budget adjustments by the amount that appears in the Period Distribution grid.
The budget amount calculation is based on the selected distributed budget option:
Add To/Subtract From: Direct entry of budget adjustment amounts against a specific budget period. Upon distributing these budget adjustments, this amount is added to or subtracted from any existing distributed budget adjustment for that specific period.
Replace: Direct entry of budget adjustment amounts against a specific budget period. Upon distributing these budget adjustments, this amount replaces any existing distributed budget adjustment for that specific period.
Adjust by Percentage Spread Option
Select the Adjust by Percentage option on the Project Budget Periods - Adjust Budget Periods page to adjust particular budget periods by percentage directly. The fields in the Percentage column become editable.
The budget amount calculation is based on the selected distributed budget option:
Add To/Subtract From: (Budget adjustment of period) × (Percentage entered for budget period) = (Distributed budget at period level).
Note: Any existing distributed budget amounts are added to this calculation.
Replace: (Budget adjustment of period) × (Percentage entered for budget period) = (Distributed budget at period level).
Note: Any existing distributed budget amounts are overridden with this calculation.
Even Spread Option
Select the Even Spread option on the Project Budget Periods - Adjust Budget Periods page to spread the budget adjustment evenly across the budget periods for the selected costing activity and budget item.
The budget amount calculation is based on the selected distributed budget option:
Add To/Subtract From: (Budget adjustment at item level) ÷ (Number of periods) = (Distributed budget at period level).
Note: Any existing distributed budget amounts are added to this calculation.
Replace: (Budget adjustment at item level) ÷ (Number of periods) = (Distributed budget at period level).
Note: Any existing distributed budget amounts are overridden with this calculation.
Percentage Spread Option
Select the Percentage Spread option on the Project Budget Periods - Adjust Budget Periods page to spread the budget adjustment amount for the activity to budget items based on the percentages that you enter. When you select this option the fields in the Percentage column become editable.
The budget amount calculation is based on the selected distributed budget option:
Add To/Subtract From: (Budget adjustment at item level) × (Percentage entered for each budget period) = (Distributed budget at period level).
Note: Any existing distributed budget amounts are added to this calculation.
Replace: (Budget adjustment at item level) × (Percentage entered for each budget period) = (Distributed budget at period level).
Note: Any existing distributed budget amounts are overridden with this calculation.
Use the Copy From Another Plan page (PC_BUD_COPY) to copy budget amounts from another plan, or copy previous versions of a budget plan to the current one.
Navigation:
Click Copy From Another Plan on the Budget Detail page if the budget plan is not finalized.
To copy budget items from another plan:
Save the existing plan before you copy budget rows from another plan.
Select a budget plan to copy other than the current plan.
If you want to copy budget amounts, then the currency, calender, and the budget periods of the plan that you are copying must be the same as the current plan. If you copy budget amounts from a plan that has a different period, or a different currency code, then you must manually add budget period values that don’t match the current plan.
(Optional) Select an activity to copy budget item amounts by period from a specific activity on the selected plan to the current plan.
Leave the Activity field blank to copy all activity budget item amounts by period from the selected plan to the current plan.
Select Overwrite existing values to delete existing budget rows in the current plan before copying new budget amounts into the plan.
Deselect this option to append existing budget rows with new budget amounts.
For example, if you copy plan ID 1 and activity row 1 to plan ID 2, and you select the Overwrite existing values option, the system replaces activity row 1 in plan ID 2 with row 1 in plan ID 1.
When you copy budget rows from another plan, the system populates the existing plan with the accounting date of the copied plan, and the transaction date of the current date, and generates a new resource ID.
Use the Copy From Another Project page (PC_BUDGET_COPY_SEC) to copy budget items from the budget plan of another project to the current one.
Navigation:
Click Copy From Another Project on the Budget Detail page if the budget plan is not finalized.
This example illustrates the fields and controls on the Copy From Another Project page

To copy budget items from the budget plan of another project:
Save the existing plan before you copy budget items from the budget plan of another project.
Select a source project to copy from.
Note: If the project was created using copy functionality in the Fluid Project Request, then the source project will default to the source project used to create the project request, and changes can be made.
Select a budget plan from the source project.
Select Overwrite existing values to delete existing budget rows in the current plan before copying new budget items into the plan.
Deselect this option to append new budget items to the existing budget items in the project.
The activities grid is populated with source activities on selection of budget plan id for the source project.
If the target activity matches the source activity then it will be populated and the Allow Copying field is checked by default.
If Target Activity is not auto-populated then select an unused activity in the prompt. A target activity must be selected to perform the copy. De-select the Allow Copying Check-box to prevent the source activity's budget from being copied.
Access the Budget Plan page.
Click the Finalize button on the Finalize tab of the Budget Plan page to finalize a project budget plan. Only active budget plans can be finalized. All other plans of the same type (cost or revenue) for the same project must be inactive. Only one budget plan of each type can be finalized per project. You can adjust budget plans and refinalize the budget.