Adding and Maintaining Asset Information
This topic discusses how to maintain Asset Information.
|
Page Name |
Definition Name |
Usage |
|---|---|---|
|
ASSET_GENERAL_01 |
Add asset basic information manually, or modify existing asset information. |
|
|
COST_HISTORY2 |
To view complete asset cost history information. |
|
|
Asset R&D Information (asset research and development information) Page |
ASSET_RD_SP |
Enter information about R&D assets. In Australia, this information is used for tax reporting purposes; otherwise, it is informational only. |
|
Warehouse Mapping Page |
AM_WH_MAP_ASSET |
Enter transfer information defaults for assets used in component changeout for PeopleSoft Maintenance Management. This page is used by PeopleSoft IT Asset Management and PeopleSoft Maintenance Management to transfer assets to a defined warehouse. Custodian, Location, and Employee ID are also available. Custodian will inherit the ChartFields defined for the warehouse. |
|
Asset Management - Attachments Page |
AM_ADD_ATTACH_SEC |
Add relevant supporting documents to an asset transaction. |
|
Fair Value Page |
AM_FMV_DEFN |
Update fair value (FV) information for each asset. The data is stored on the AM_FMV record and is used for revaluation of the asset in accordance with statutory requirements. |
|
(JPN) Local Tax Return Page |
LTAX_ADD_INFO_SEC |
Enter local tax information when you acquire depreciable fixed assets. Report local tax return information for Japan. |
|
ASSET_GENERAL_02 |
Enter detailed physical information |
|
|
Work Order Management Page |
AM_WOM_OPT_ASSET |
Enter Work Order–related information relevant to the asset. |
|
ASSET_FSC |
When an asset is defined as hazardous, describe it by selecting at least one hazardous code from the list. |
|
|
ASSET_ACQ_DETAIL |
Store information about how the asset was acquired and keep track of the separate costs and acquisition details of components that make up an asset. If PeopleSoft Asset Management is integrated with PeopleSoft Payables, PeopleSoft Receivables, PeopleSoft Purchasing, or PeopleSoft Project Costing, these source systems will enter the information automatically. |
|
|
Acquisition Details Page |
ASSET_ACQ_DET_AP |
View or enter information about assets acquired through other PeopleSoft applications. If Asset Management is integrated with other PeopleSoft applications, the source systems send the asset information through delivered interfaces. If not, you can add the information here. |
|
Acquisition Detail Chartfields Page |
ASSET_ACQ_DET_CF |
Enter acquisition ChartField details for the asset. |
|
AM_DOC_SEQ |
Enter document sequencing information. |
|
|
ASSET_ACQ_DET_VAT |
Enter tax information for the asset. This feature is available only if the business unit is activated for value-added tax (VAT) processing. |
|
|
ASSET_IMAGE |
Record the location and physical properties of the asset (such as color, height, and weight) and store comments about it; view a stored image of the asset. |
|
|
Assets by Location - Parameters |
RUN_AMAS2200 |
Generate a report of assets sorted by location. |
|
ASSET_CUSTODIAN |
Record custodial information, maintain license information, and store manufacturer-related information. |
|
|
License Address Page |
ASSET_LIC_ADDR_SEC |
Enter address information associated with an asset license. |
|
License Information - Parameters |
RUN_AMAS1700 |
Generate a report of asset licenses. |
|
ASSET_PROPERTY |
Enter details to manage property assets and to maintain property-specific attributes such as identifying information, asset hierarchy, area and occupancy, and legal descriptions. This page tab appears when the asset type of Property is selected; however, if Lease Administration is not a selected product within Installation Options and Space Management Installed is not selected within the Asset Management Installation Options, the Property page is disabled. |
|
|
ASSET_PROP_TAX |
Enter property tax details including due dates, taxing authorities, and payments. |
|
|
AM_ASSET_SD |
Record additional data based upon asset business unit, asset type, subtype, manufacturer, and model. |
|
|
AM_IOT |
Assign Oracle Internet of Things attributes to your asset. |
|
|
ASSET_EFS |
Associate an asset with an external funding source. |
Use the General Information page (ASSET_GENERAL_01) to add asset basic information manually or modify existing asset information.
Navigation:
This example illustrates the fields and controls on the General Information page. You can find definitions for the fields and controls later on this page.

Field or Control |
Description |
|---|---|
Related Content |
Click to view the asset cost history for this asset. For more information, see Cost History Page. This button appears next to the main screen (upper right corner of every page within the Basic Add component). PeopleSoft Asset Management delivers the Related Content functionality as enabled for the Basic Add component. To manage related content, see Working with Related Content in Asset Management. |
Unit |
Displays the business unit in which the asset is defined. |
Asset ID |
Select the default value Next to have the system automatically assign the next available number. You can also enter an alphanumeric value of your own. Note: When entering joint venture assets that are shared among several business units, it is recommended that you assign a unique asset ID. This ensures that the assets created at the participant level all have the same ID as the assets created at the joint venture business unit level. For example, you might use the prefix JV, which would generate an asset ID such as JV000022. |
Tag |
Displays the tag number for assets already entered. |
Asset Status |
Displays of the current status of the asset, such as In Service. |
Description and Short Description |
Enter identifying and descriptive information about the asset. The short description can be an abbreviated description. |
CAP # (capital acquisition plan number) and Seq # (sequence number) |
Enter a capital acquisition plan number and associated sequence number, if applicable. The capital acquisition plan number ties the asset to a capital acquisition plan. Only valid numbers set up in the Capital Acquisition Plan table are accepted. The sequence number defines the detailed elements of the capital acquisition plan. |
Taggable Asset and Tag Number |
If you use tags to track assets, enter the tag number assigned to the asset. This automatically selects the Taggable Asset check box. Asset Management performs physical inventory using the asset tag number. If the business unit for this asset is set up to allow a default tag number based on the asset ID, the default tag number appears here. Note: You must use tag numbers to perform physical inventory with the Asset Management physical inventory application. |
Asset Class |
If you use classifications to define assets within categories, enter the asset class code here. The asset class enables you to identify assets for reporting purposes. The asset class is also used as a VAT driver. |
Auction Status |
Displays the status of an asset that has been submitted to Strategic Sourcing for auction. |
Asset Type |
Select a value to indicate a type of asset. The available options are: Equipment Facility Fleet Furniture Hardware Intangible Machinery Other Property Software |
Asset Subtype |
Select a value to indicate a subset of asset type. Subtypes are optionally user-defined and directly related to the asset type. Only asset subtypes of the selected asset type are available when defining the asset. |
Asset Status |
Select the appropriate asset status from the following options:
|
Acquisition Date |
Enter the date when the asset was acquired. This field is automatically populated if the asset was added from a feeder system, such as Purchasing or Payables. |
Placement Date |
Enter the date that the asset is placed in service for physical purposes. |
(JPN) Collateral Asset |
Japanese accounting principles require that assets offered as collateral be treated according to financial reporting regulations under the commercial law. If this asset is such a collateral asset, select one of the available options that comply with Japanese requirements. See (JPN) Using PeopleSoft Asset Management Options to Meet Japanese Requirements. |
Capitalized Asset |
Indicates whether the asset has been capitalized. This check box is display-only. |
New Asset |
Select this option if the asset is new. |
Available For Use |
Select this option if the asset is available to be used. |
In Physical Use |
Select this option to resolve discrepancies between the asset repository and IT asset discovery. Changes made to this page are incorporated in the main asset record within the asset repository. The physical use indicator is affected when adding, transferring, retiring or reinstating hardware assets within PeopleSoft Asset Management. Only those assets that have the physical use indicator selected are included in the ITAM comparison process. |
IoT Asset (Internet of Things Asset) |
Select this option to synchronize the asset with Oracle Internet of Things (IoT) Asset Monitoring Cloud Service. In addition, the fields in the IoT page become available for editing. This field is only available if you select the IoT Installed option on the Installation Options - Asset Management Page. See: Understanding the Integration with Oracle Internet of Things Asset Monitoring Cloud Service |
Acquisition Code |
The acquisition code indicates how you acquired the asset. Select one of the following options:
|
|
Lease Number |
Select to access the Maintain Lease component on the General Information page. |
FERC Code (Federal Energy Regulatory Commission code) |
The FERC Code is used to identify depreciation according to FERC guidelines. This field is used in the U.S., usually to identify group assets, such as telephone poles, highway signs, or other assets used in mass quantities. |
Financing Code |
Enter the code as you have defined it. Financing codes enable you to analyze debit and credit relationships for capital-intensive and government projects. |
Fair Value |
This display-only field indicates the FV of the asset as updated from the Fair Value page. The FV is used in the calculation of asset revaluation. |
Appraisal Date |
This display-only field indicates the date when the current FV was updated. When the asset is added to the database, the appraisal date is the same as the acquisition date by default. |
Replacement Cost |
Indicates how much it would cost to replace the asset. When the asset is added to the database, the replacement cost is equal to the total base cost of the asset by default. The replacement cost can be derived by associating the asset to a cost index, such as the consumer price index (CPI) or inflation index. The association of the replacement cost index can be applied by default from the asset profile; the replacement cost is then calculated considering the base cost and the index amounts. The result is displayed here. |
Last Update |
If you are calculating the replacement cost using an index, the date that you performed the last update appears here. When the asset is added, this date is the accounting date. |
Index Name and Subindex Name |
Enter the adjustment of the replacement cost using an index, such as the consumer price index. When you calculate the replacement cost, the original replacement cost is adjusted by the index and subindex that you specify. Enter valid codes. These are established on the Indexes page during implementation. |
Parent/Child and Parent ID |
For a parent or child asset, select the appropriate option in the Parent/Child field. If it is a child asset, enter the parent ID with which it is associated. The default value is None. Parent and child assets cannot also be composite or group assets. |
Profile ID |
Enter a profile ID. Asset profiles are set up in the Asset Profile component. |
Region Code |
Select a region to categorize property assets by regions. Used for reporting. |
Composite Asset and Composite Asset ID |
Composite asset processing enables you to group assets so that their total cost is carried by one asset and depreciated that way. By selecting this option, you indicate that this single asset is a composite asset, and associated assets are known as composite members. This feature is frequently used by utility companies, and it meets the requirements to use the Japanese Composite Depreciation Method. When you select the Composite Asset check box on the Asset Information page, an Asset ID field appears. Associate the composite member by selecting the asset ID of a composite asset. |
Threshold ID |
If you want to define capitalization thresholds based on asset, select the Threshold ID to use as the default value for the assets within the selected profile. This field is available for editing only when:
|
Asset Retirement Obligations |
Select to identify an asset that is subject to asset retirement obligation (ARO) treatment in accordance with Financial Accounting Standards. This field appears only when you have enabled ARO on the Installation Options – Asset Management page and enabled ARO at the business unit level. If you created an asset profile with ARO defaults, you can select that Profile ID value for the asset. In addition to the other defaults associated with the profile, the Asset Retirement Obligation check box is automatically selected if you select an ARO Profile ID when adding an asset. When you select this check box, the ARO Identification field appears. |
ARO Identification (asset retirement obligation identification) |
Once you identify an asset as being subject to ARO treatment (Asset Retirement Obligations check box selected), the ARO Identification field appears. The system assigns this identification number sequentially, beginning with the number following the one that is designated on the AM Business Unit Definition page within the Last ARO Id field. |
(JPN) Reporting Life |
Enter the reporting life for Japanese composite assets. This life is used for calculating average life of the composite asset. |
(JPN) Local Tax Information |
Click to access the Local Tax Return page. This link is visible when establishing setup options for Japan tax reporting. See (JPN) Using PeopleSoft Asset Management Options to Meet Japanese Requirements. |
(AUS) Schedule Type Code |
If this is an Australian business unit, select a schedule type code. |
(AUS) Calculate Last Date of Review |
Click to generate the last date of mandatory review for the asset. Note: You cannot access the Schedule Type Code field, the Calculate Last Date of Review button, or the Last Date of Mandatory Review field if the last date of mandatory review has already been calculated, unless you are in correction mode. |
(AUS) Last Review DT |
Displays the last date of mandatory review for the asset. The last date of mandatory review is stored at the asset level. See (AUS) Using PeopleSoft Asset Management Options to Meet Australian Requirements. |
Book Page |
Click to save the component and access the Book (ASSET_BOOK_01) page. |
Set R and D Info (set research and development information) |
Click to access the Asset R&D Information page, where you can enter identifying information for the asset. |
Asset Warehouse Mapping |
Click to access the Warehouse Mapping page. |
Attachments |
Click to view or add relevant supporting documents to an asset. |
Fair Value Details |
Click to update fair value information for each asset. |
External Funding Source |
Click to access the External Funding Source Page and associate the asset with an external funding source. |
(AUS) Asset R&D Information Page
Use the Asset R&D Information (asset research and development information) page (ASSET_RD_SP) to enter information about R&D assets.
In Australia, this information is used for tax reporting purposes; otherwise, it is informational only.
Navigation:
Click the Set R and D Info link on the General Information page.
Asset Management enables you to identify assets for the purpose of calculating research and development deductions.
Field or Control |
Description |
|---|---|
R and D Plant (research and development plant) |
Select to identify the asset as specifically allocated for research and development. |
R and D Start Date (research and development start date) |
Enter the start date for the asset. |
Use NBV (use net book value) |
Select to use net book value for your tax reporting purposes. Click the OK button to return to the Asset Information page. |
See (AUS) Using PeopleSoft Asset Management Options to Meet Australian Requirements.
(JPN) Local Tax Information Page
Use the (JPN) Local Tax Return page (LTAX_ADD_INFO_SEC) to enter local tax information when you acquire depreciable fixed assets.
Navigation:
Click the Local Tax Return link on the General Information page.
This example illustrates the fields and controls on the Local Tax Information page. You can find definitions for the fields and controls later on this page.
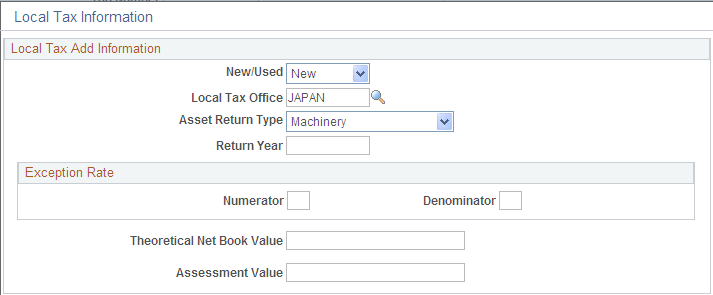
Asset Management enables you to calculate and run reports as required by Japanese local tax laws, including all required information for the local depreciable asset tax return. When the Localization Country field on the User Preferences - Overall Preferences page is set to JPN, the Establish Business Units component for PeopleSoft Asset Management includes the Business Unit Info for Japan page. If you select Use JPN Local Tax from the AM Business Unit Definition page (JPN Info link) , you enable access to the Local Tax Return page from the General Information page.
Complete the fields as necessary to generate the Japanese local tax return.
See (JPN) Using PeopleSoft Asset Management Options to Meet Japanese Requirements.
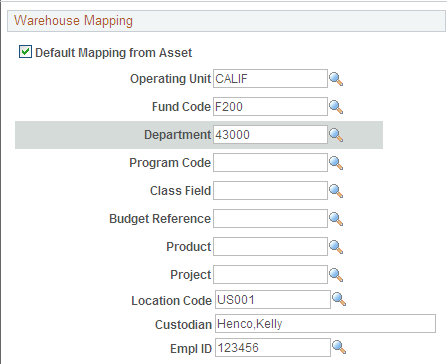
Warehouse Mapping Page
Use the Warehouse Mapping page (AM_WH_MAP_ASSET) to enter transfer information defaults for assets used in component changeout for PeopleSoft Maintenance Management.
This page is used by PeopleSoft IT Asset Management and PeopleSoft Maintenance Management to transfer assets to a defined warehouse. Custodian, Location, and Employee ID are also available. Custodian will inherit the ChartFields defined for the warehouse.
Navigation:
Click the Asset Warehouse Mapping link on the General Information page.
This example illustrates the fields and controls on the Warehouse Mapping page. You can find definitions for the fields and controls later on this page.
Field or Control |
Description |
|---|---|
Default Mapping from Asset |
Select to apply the asset ChartFields, location and custodian from the asset ID. The option displays as not selected (unchecked) by default. If the option is not selected, the system will use the ChartFields mapped at the business unit level. |
Operating Unit, Fund Code, Department, Program Code, Class Field, Budget Reference, Product, and Project |
Displays the ChartField account codes to be used for the transferred component (asset). Only the active ChartFields for your system appear. |
Location Code |
Select the location code where the replaced or transferred asset will be physically stored. |
Custodian |
Select the custodian or physical "owner" of the asset. |
EmplID (employee ID) |
Enter the employee ID assigned to the asset. |
Basic Add – Attachments Page
Use the Basic Add - Attachments page (AM_ADD_ATTACH_SEC) to view or add relevant supporting documents to an asset.
Navigation:
Click the Attachments link on the General Information page.
This example illustrates the fields and controls on the Basic Add - Attachments page.

Field or Control |
Description |
|---|---|
Add Attachment |
Click this button to attach files as supporting documentation for an asset. Supply a description of the file or files that you attach. |
File Name |
Displays the attached file. Click the file-link to access the file. |
User, Name, and Date/Time Stamp |
Displays the user ID, name, and date/time stamp related to the user who added the attachment. |
Fair Value Page
Use the Fair Value page (AM_FMV_DEFN) to update fair value (FV) information for each asset.
The data is stored on the AM_FMV record and is used for revaluation of the asset in accordance with statutory requirements.
Navigation:
Click the Fair Value Details link on the General Information page.
This example illustrates the fields and controls on the Fair Value page. You can find definitions for the fields and controls later on this page.

Fair value is used in establishing revaluation of assets. PeopleSoft Asset Management stores this information for each asset and allows you to add a new fair value (FV) on a regular basis, leave it blank, or let it stay as original cost, depending upon your business requirements.
Search Audit Logs Page
Navigation:
Access the Search Audit Logs page (click the Audit Logs link on the General Information page).
This example illustrates the fields and controls on the Search Audit Logs page. You can find definitions for the fields and controls later on this page.

The Audit Logs link on the General Information page appears only if you have enabled audit logging for Asset Management and after you have saved the asset. Click the link to access the audit logs that pertain to this particular asset. The search results present all events for this asset that you have selected for tracking when you enabled audit logging.
PeopleSoft delivers the ability to view complete asset cost history information for an asset from the Basic Add and Review Depreciation components.
Navigation:
Access any page of the Basic Add or Review Depreciation component and select the Related Content drop-down. Select the Cost History link.
This example illustrates the fields and controls on the Related Content Cost History Page. You can find definitions for the fields and controls later on this page.

For more information regarding these pages, see Viewing Archived Data
To manage related content, see Working with Related Content in Asset Management
See also PeopleTools documentation: PeopleTools Portal Technologies, Developing and Configuring Related Content Services.
Use the Operation/Maintenance page (ASSET_GENERAL_02) to add or update:
Manufacturer information
Resource information
Maintenance information
Hazardous materials information
Navigation:
This example illustrates the fields and controls on the Operation/Maintenance page. You can find definitions for the fields and controls later on this page.

Asset Structure
This section discusses how to define the asset structure. Assets can be catalogued as assets of a certain type, with sequential subtypes, assets that are components of a higher level asset, or clustered assets, multiple assets that combine to establish a whole asset.
Field or Control |
Description |
|---|---|
Asset Type |
Displays the asset type for this asset from a list of valid definitions. |
Asset Subtype |
Displays the asset subtype to this asset type. Only one asset subtype can be applied to an asset type. |
Component Of |
Enter the asset ID that this asset is a component of. |
Begin Date |
Enter the date when the relationship begins. This field is only visible when a component is assigned or updated. |
Clustered Asset |
Select to indicate that the asset is part of a larger entity or cluster. A clustered asset is similar to a group asset. This field is used for reporting purposes only. |
Work Order Options for Components |
Go to the Work Order Options for Components page to define options for work orders. |
Manufacturer Information
This section provides information to define asset manufacturer information.
Field or Control |
Description |
|---|---|
Serial ID |
Enter the asset serial number ID, if available. The serial ID is required for asset type hardware. |
Mfg ID (manufacturing ID) |
Enter the asset manufacturing ID, if available. |
Model |
Enter the asset model information or ID, if available. |
Version |
Enter the asset version information or ID, if available. |
More Manufacturer Info (more manufacturer information) |
Click this link to go to the Asset Manufacture/License/Custodian (ASSET_CUSTODIAN) page. |
Asset Resource Information
This section provides information to define the asset as a resource.
Field or Control |
Description |
|---|---|
Schedulable |
Select if the asset can be scheduled by users. For example, a crane extension can be used on multiple cranes at multiple project sites. It may require separate inspections and certifications from the crane. It could be used to replace a similar extension in use on another crane that must be taken out of service for repairs or inspection. Because it can be used on more than one crane, it may be considered a schedulable asset. Only schedulable assets can be checked out using the asset checkout feature. |
Allow Overbooking |
Select if the asset schedule of the asset can be overbooked. |
Use As Tool |
Select if the asset is used as a tool in another event. This requires that an asset subtype be associated with the asset. |
Charge Back |
Select if the asset can be charged back to a department, operating unit, project or other cost expensing entity. |
WO Unit (work order unit) |
Enter the associated work order business unit accessing the asset. This option is available if PeopleSoft Maintenance Management is installed. |
Shop |
This option is available if PeopleSoft Maintenance Management is installed. It is used for defaulting the location where the asset needs to be worked on during repair. |
Crew |
Select the crew name from the list of crews associated with the work order unit and shop that you previously selected. Note: This option is available if PeopleSoft Maintenance Management is installed. |
Maintenance Information
This section provides maintenance information about the assets.
Field or Control |
Description |
|---|---|
Repairable |
Select if the asset can be repaired as needed. |
Repair Status |
Select a repair status of the asset. This field is available when the Repairable option is selected. Values are Needs Repair, In Repair, and None. Repair status can be updated from PeopleSoft Maintenance Management if the Repairableoption is selected. |
Parts List |
Select a corresponding equipment parts lists (EPL) established for this asset. It is important to be sure that all the criteria match in order to assign an EPL template to the asset (Asset Type, Subtype, Manufacturer ID, Model, and Product Version.) |
WO Location (work order location) |
Select the work order location for the asset. This location designates where the repair will take place. The values are Asset, Shop or Other. |
Criticality |
Select the appropriate level of criticality for the asset. Criticality levels are defined on the Asset Criticality page (AM_CRIT_LVL). Select You can establish meaningful levels of criticality for your organization when defining the criticality code and associated description. |
Offline |
Designate whether the asset is available or offline. (The field is informational only.) |
Other Information
Field or Control |
Description |
|---|---|
Hazardous Asset |
Select if the asset is considered a predominant or significant hazardous material. Note: The federal government of the United States defines hazardous materials and waste to include: "Solid, liquid, or gaseous waste, or combination of these wastes, which because of its quantity, concentration or physical, chemical, or infectious characteristics may cause significantly to an increase in mortality or an increase in serious irreversible or incapacitating illness or pose a substantial present or potential hazard to human health or the environment when improperly treated, stored, transported, disposed of, or otherwise managed." |
Hazardous Code Info (hazardous code information) |
Click to access the Hazardous Code Information page, where you can indicate hazardous material information by selecting assigned codes. The PeopleSoft system is delivered with the U.S. Federal Supply Class (FSC) codes, or you can select from codes that are created during implementation to suit your specific needs. See Hazardous Codes Page. |
Non-Owned Asset |
Select if this asset is not owned. |
Replacement Asset and Asset ID |
Select if this is a replacement asset. When an asset (or asset component) has been replaced by another in PeopleSoft Maintenance Management, this field automatically displays the associated new asset ID. Note: The asset ID displayed here shows the replaced asset ID. The new asset that replaced this asset has a new asset ID on the General Information page. |
Asset is Available, Contact, and Phone # (phone number) |
Select and complete contact information if the asset is available for reassignment to another person. |
Linear Asset |
Identify an asset as linear within the Asset Repository. These are assets that have coordinates for their start and end points, such as a pipeline, train track, or a highway. You can identify linear assets at the asset subtype level when defining subtypes. In this way, when you select a subtype for the asset, the Linear Assetcheck box automatically inherits the designation that was made for the asset subtype. You can, however, override the subtype linear designation here at the individual asset level. Note: Identification of linear assets facilitates potential integrations with third-party products. |
IT Asset Related Information
This section discusses how to define IT asset–related information.
Field or Control |
Description |
|---|---|
IP Address |
Enter the IP address of the asset. |
CPU |
Enter the CPU identifier. |
Work Order Management Page
Use the Work Order Management page (AM_WOM_OPT_ASSET) to enter Work Order–related information relevant to the asset.
Navigation:
Click the Work Order Options for Components link on the Operation/Maintenance page.
This example illustrates the fields and controls on the Work Order Management page. You can find definitions for the fields and controls later on this page.

This page defines the transfer include and exclude rules for components swapped out and interunit transfer options. It is available when PeopleSoft Maintenance Management is installed. It is also available on the business unit, asset type, and subtype pages. You can define the rules at this level as an exception. If the Default Rules from Asset check box is not selected, the options are unavailable for selection as the options will be taken from other levels unless you specifically select the option to use it at the asset level.
Field or Control |
Description |
|---|---|
Default Rules from Asset |
Check to enable rules from asset. If you leave this check box deselected, the system will take the default from a higher level and the other two fields will be unavailable for selection. |
Retire Assets Components |
Select to allow asset subcomponent disposal when the asset component is retired. |
Transfer Out Asset Components for Reuse |
Select to allow transfer of subcomponents when the asset component is transferred. |
Asset Warehouse Mapping |
Click to view the Warehouse Mapping page. |
Field or Control |
Description |
|---|---|
InterUnit Transfer Defaults Options |
Select the asset information to include with the transfer when there is an interunit transfer. |
Hazardous Asset Codes Page
Use the Hazardous Asset Codes page (ASSET_FSC) to when an asset is defined as hazardous, describe it by selecting at least one hazardous code from the list.
Navigation:
Click the Hazardous Code Info link on the Operation/Maintenance page.
This example illustrates the fields and controls on the Hazardous Asset Codes page. You can find definitions for the fields and controls later on this page.

When an asset is defined as hazardous, describe it by selecting at least one hazardous code from the list. This feature supports U.S. FSC codes, which are delivered with PeopleSoft Asset Management. When you mark an asset as hazardous and associate a descriptive code with it, you can also provide additional information about its location and custodian and other pertinent data (in the Basic Add component). You can use this information to generate a report to monitor or track hazardous assets.
Field or Control |
Description |
|---|---|
Hazardous Code |
Select a code number. |
Hazardous Type and Items Contained |
These fields display the values contained in the definition for the code from the Hazardous Codes table established at implementation. |
Use the Asset Acquisition Detail page (ASSET_ACQ_DETAIL) to store information about how the asset was acquired and keep track of the separate costs and acquisition details of components that make up an asset.
You can enter costs before they have been approved for capitalization. Once they are approved, you can then capitalize them. The total capitalizable costs entered here appear by default in the Capitalize Information collapsible section.
You can enter multiple transactions and adjustments for an asset without exiting the component. When you enter the first acquisition line, the page displays the Capitalize button once the To be Capitalized field value is selected as the Capitalize option. Click the Capitalize button and save. Without leaving the page, click the Add a New Row button (plus button) to add the next transaction: You may also add a non capital transaction for the next row. Once you select the Never Capitalize field value, the Non-Capitalize button appears. Click the Non-Capitalize button and save the transaction.
For additional information on entering multiple adjustments for an asset, see Entering Multiple Cost Adjustments. Understanding Adjusting, Transferring, Reversing, and Evaluating Assets, “Entering Multiple Cost Adjustments”.
Navigation:
.
This example illustrates the fields and controls on the Asset Acquisition Detail page. You can find definitions for the fields and controls later on this page.

Use the Asset Acquisition Detail page to enter costs before they have been approved for capitalization. Once they are approved, you can then capitalize them. The total capitalizable costs entered here appear by default in the Capitalize Information collapsible section.
You can enter multiple transactions and adjustments for an asset without exiting the component. When you enter the first acquisition line, the page displays the Capitalize button once the To be Capitalized field value is selected as the Capitalize option. Click the Capitalize button and save. Without leaving the page, click the Add a New Row button (plus sign) to add the next transaction: You may also add a non capital transaction for the next row. Once you select the Never Capitalize field value, the Non-Capitalize button appears. Click the Non- Capitalize button and save the transaction.
See For more information on entering multiple adjustments for an asset, see Note ID 1357360.1 on My Oracle Support website (https://support.oracle.com).
Enter the following information for each acquisition detail line:
Field or Control |
Description |
|---|---|
Asset ID |
This is the asset value that was entered on the General Information page (or Express Add page) when adding the asset. |
System Source |
This field indicates the source system from which the acquisition detail was derived for PeopleSoft Asset Management. The default system source value when entering assets manually is AM Online Entry Page. This applies to the Express Add component, the Define Asset Operational Information component, as well as the Basic Add component .that you enter must be valid in the PeopleSoft Financials and Distribution Source table, and is typically Purchasing (PO), Payables (AP), or Project Costing (PC). |
Incentive ID |
Enter an investment incentive ID. This field is informational only. |
Capitalize |
Select the capitalization status of a new asset, or modify the status of an existing asset. The possible values are:
If an asset has not already been capitalized, you can assign it a status of To be Capitalized or Never Capitalize. PeopleSoft Asset Management enables you to associate books with non capitalized assets with the Never Capitalize status. If the status of an asset is set to Disposed, this field is unavailable for editing and you cannot capitalize the asset. Note: Based on the option that you select, either the Capitalization Information section or the Non Capitalization Information section appears on the page. |
Interfaces Info (interfaces information) |
Click to access a separate page where you can enter acquisition details information. |
Acquisition Detail Chartfields |
Click to access a separate page for storing ChartField information. Enter the operating unit, department, product, and project ID that you want to associate with the acquisition detail line. |
Acquisition Details Page
Use the Acquisition Details page (ASSET_ACQ_DET_AP) to view or enter information about assets acquired through other PeopleSoft applications.
If Asset Management is integrated with other PeopleSoft applications, the source systems send the asset information through delivered interfaces. If not, you can add the information here.
Navigation:
Click the Interfaces Info link.
This example illustrates the fields and controls on the Acquisition Details Page. You can find definitions for the fields and controls later on this page.

Procurement Group
Field or Control |
Description |
|---|---|
Procurement Group ID |
Displays the Procurement Group ID for the asset. A procurement group ID is an identifier that is used to associate multiple related purchased items for an asset. The Procurement Group ID can be assigned to a group of procurement transaction lines on a single purchase order or across multiple purchase orders. See Consolidating Requisition and Purchase Order Lines for Asset Components. |
Seq (sequence) |
Displays the Procurement Group Sequence number. Each transaction within a procurement group ID is assigned a procurement group sequence number. |
Primary Unit |
Displays the item that is the designated primary unit for the asset. The primary unit for the procurement group ID is assigned on the Procurement Group page. When an item is flagged as a primary item, a separate transaction is inserted into INTFC_PRE_AM in increments of the unit allocation quantity or amount and has its own sequence number. |
Acquisition Detail Chartfields Page
Use the Acquisition Detail Chartfields page (ASSET_ACQ_DET_CF) to enter acquisition ChartField details for the asset.
Navigation:
Click the Acquisition Detail Chartfields link on the Asset Acquisition Detail page.
Capitalization Information and Non Capitalization Information
Use the Capitalization Information section to capitalize assets using the book information provided by the asset profile. Enter cost information into asset books. This section only displays when adding an asset.
Use the Non Capitalization Information section to add non capitalized costs associated with an asset at book level. This group box displays only when selecting the Never Capitalize option for the Capitalize field.
Local tax legislation may require capital gains tax in relation to the disposal of assets. Non capitalized costs may need to be included in resultant capital gain (or loss) calculations.
Field or Control |
Description |
|---|---|
Profile ID |
Identifies a profile that is set up in the Asset Profile table. The current asset automatically displays all financial and tax depreciation information defined in that profile. You must enter a profile ID for each asset that you capitalize. |
Accum Depr in Current Pd (accumulated depreciation in current period) |
Select and add accumulated depreciation for the asset to be booked to the current period. Otherwise, accumulated depreciation is booked to the previous period. This check box appears only if you are capitalizing an asset. |
Transaction Date and Accounting Date |
By default, these fields display the current date or the dates specified as user defaults. Transactions in Asset Management are entered after they have occurred. The Transaction Date field reflects the accrual date that the event took place, while the Accounting Date field reflects when it was booked or sent to accounting in the system. The transaction date must be earlier than or equal to the accounting date. For capitalized assets, note that any difference between accounting and transaction dates affects depreciation as well as posting or booking. |
Transaction Code |
Identifies which accounting entry template is used for the asset. The system accepts only a valid combination of asset category, transaction code, cost type, and transaction type for which accounting entry templates exist. |
Capitalize |
Click the Capitalize button to capitalize the asset and add cost rows for all books in the profile ID. The cost rows that appear by default equal the total of all capitalizable acquisition detail rows. You can change this amount. The Capitalize button is no longer present once all of the To be Capitalized lines are capitalized. If one of the To be Capitalized lines is not yet capitalized, the Capitalize button is still visible and available. If you try to save the asset when there are amounts that have not yet been capitalized, you receive a warning; you can save anyway and capitalize the amount remaining to be capitalized at a later time. |
Non-Capitalize |
Click the Non-Capitalize button to add rows for all books in the profile ID. The cost rows that appear by default equal the total of all non capitalizable acquisition detail rows. This button appears only when the Never Capitalize field value is selected from the Capitalize options. If one of the non capital lines still has a status of Never Capitalize, the Non-Capitalize button is still visible and available. |
Left to Capitalize |
After capitalization, all capitalizable cost rows on the Asset Acquisition Detail page are marked as capitalized. Therefore, the amount left to be capitalized is 0 until you add more capitalizable cost rows to the Asset Acquisition Detail page. |
Left to Non Capitalize |
After capitalization, all non-capitalizable cost rows on the Asset Acquisition Detail page are marked as non capitalized. Therefore, the amount left to be non capitalized is 0 until you add more non-capitalizable cost rows to the Asset Acquisition Detail page. |
Accum Depr(accumulated depreciation) |
For capitalized assets, enter the amount of depreciation already recognized. If you are adding assets that have depreciation from prior years or prior periods, enter that amount in this field. |
Note: As long as all acquisition detail lines are for the same set of ChartFields (Product, Project, Department) and for the same category and cost type, you can enter them all at once and capitalize them later by clicking the Capitalize button. However, if you enter acquisition detail lines for more than one set of ChartFields and for more than one category and cost type, you must enter and capitalize the acquisition detail lines for each set of ChartFields and for each category and cost type separately.
To enter multiple transactions and adjustments for an asset without exiting the component, access the Asset Acquisition Detail Page.
Navigation:
Asset Management, Asset Transactions, Owned Assets, Basic Add, Asset Acquisition Detail.
This example illustrates the fields and controls on the Asset Acquisition Detail (1 of 6). You can find definitions for the fields and controls later on this page.

In the example pictured, the first acquisition line is entered (ACQ1 in this example). The page displays the Capitalize button once the To be Capitalized field value is selected as the Capitalize option.
Click the Capitalize button and save. Without leaving the page, click the Add a New Row button to add the next transaction:
This example illustrates the fields and controls on the Asset Acquisition Detail (2 of 6). You can find definitions for the fields and controls later on this page.

Add a non-capital acquisition line for the asset (ACQ2 in this example) as follows:
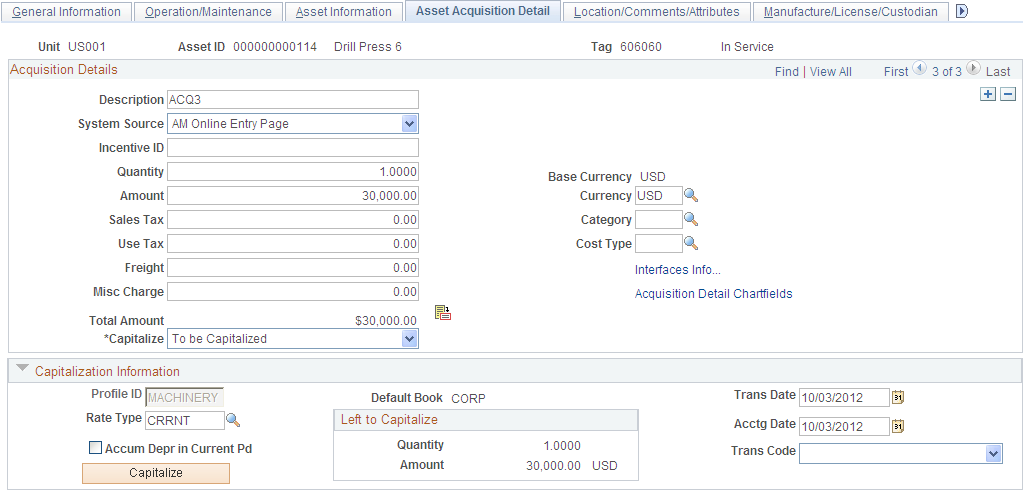
This example illustrates the fields and controls on the Asset Acquisition Detail (3 of 6). You can find definitions for the fields and controls later on this page.

Once you select the Never Capitalize field value, the Non-Capitalize button appears. Click the Non-Capitalize button and save the transaction:
This example illustrates the fields and controls on the Asset Acquisition Detail (4 of 6). You can find definitions for the fields and controls later on this page.

Add a third transaction row, to be capitalized. Stay on the page and click the Add a New Row button. For the third row (ACQ3 in this example), select the To be Capitalized field value. Note that the Capitalize button is available, and the Left to Capitalize amount correctly reflects the amount remaining to capitalize for the asset:
This example illustrates the fields and controls on the Asset Acquisition Detail (5 of 6). You can find definitions for the fields and controls later on this page.
Click the Capitalize button and save:
This example illustrates the fields and controls on the Asset Acquisition Detail (6 of 6). You can find definitions for the fields and controls later on this page.

In this example, if one of the To be Capitalized lines were not yet capitalized, the Capitalize button is visible and available. If you proceed to save, you are presented with a warning reminding you that you have amounts to be capitalized that have not yet been capitalized. You can choose to save anyway or go back and capitalize those amounts.
If one of the non capital lines still has a status of Never Capitalize, the Non-Capitalize button is visible and available.
Use the Tax page (ASSET_ACQ_DET_VAT) to enter tax information for the asset.
This feature is available only if the business unit is activated for value-added tax (VAT) processing.
Navigation:
Click the Tax link on the Asset Acquisition Detail page.
Note: This link appears only when the business unit is activated for value-added tax (VAT) processing.
This example illustrates the fields and controls on the Tax page. You can find definitions for the fields and controls later on this page.

Enter tax information for the asset.
Note: This information is optional except where VAT is applied. The system only validates the tax amounts entered; it does not store them.
Use the Doc Sequencing (document sequencing) page (AM_DOC_SEQ) to enter document sequencing information.
Navigation:
This example illustrates the fields and controls on the Doc Sequencing page. You can find definitions for the fields and controls later on this page.
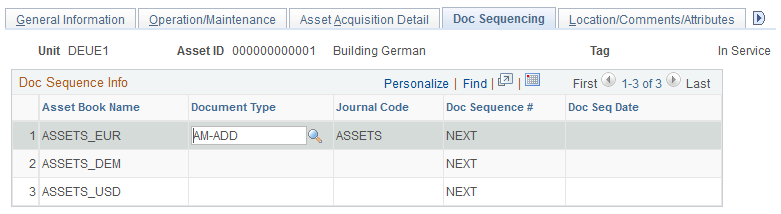
Document sequencing is enabled at the general ledger business unit level. Rows are editable or not depending upon the Keep Ledgers in Sync option defined at the ledger group level. If it is enabled, then only the primary ledger is editable; if it is not enabled, all the books that post entries to General Ledger are editable.
Use the Location/Comments/Attributes page (ASSET_IMAGE) to record the location and physical properties of the asset (such as color, height, and weight) and store comments about it; view a stored image of the asset.
Navigation:
This example illustrates the fields and controls on the Location/Comments/Attributes page. You can find definitions for the fields and controls later on this page.

This example illustrates the fields and controls on the Location/Comments/Attributes page. You can find definitions for the fields and controls later on this page.
This example illustrates the fields and controls on the Location/Comments/Attributes page. You can find definitions for the fields and controls later on this page.

Record an asset's location and physical properties (such as color, height, and weight), enter comments, a detailed description, and associate user-defined custom attributes. You can also use this page to attach and view an image of the asset.
Field or Control |
Description |
|---|---|
Map It |
Click the Map It button from the Location/Comments/Attributes page to view the location of the asset on a map. This button appears on this page when you select the GIS Integration Enabled check box from the Installation Options - Overall Page and enable the integration at the Asset Management business unit level from the Asset Management Definition - Interface Options Page. Once enabled you can map assets using the Asset Map Dashboard and from the Basic Add component. |
Note: PeopleSoft does not automatically update the Latitude or Longitude fields in the location definition. These must be entered manually.
Map It - Asset Location Map
Visual assistants, such as maps, significantly improve the performance of locating and viewing assets for planning maintenance and deployment. Integration with ESRI ArcGIS Online enables the display of assets on a map from the Basic Add - Location/Comments/Attributes page. Access the Asset Location Map by clicking the Map It button:
This example illustrates the fields and controls on the Map It - Asset Location Map. You can find definitions for the fields and controls later on this page.

A callout box appears when you click the location dot in the modal window (once you click the Map It button). This callout shows asset information and a link where you can access the Express Work Order page to create an express work order for the asset, if needed.
To enable the map functionality, see the Map It field description on the Location/Comments/Attributes Page. The GIS integration uses ArcGIS Web Mapping JavaScript APIs to embed maps in PeopleSoft. The ArcGIS JavaScript API is owned by ESRI and is subject to Terms of Use.
Use the Manufacture/License/Custodian page (ASSET_CUSTODIAN) to record custodial information, maintain license information, and store manufacturer-related information.
Navigation:
Or click the More Manufacturer Info link on the Operation/Maintenance page.
This example illustrates the fields and controls on the Manufacture/License/Custodian page (1 of 2). You can find definitions for the fields and controls later on this page.

This example illustrates the fields and controls on the Manufacture/License/Custodian page (2 of 2). You can find definitions for the fields and controls later on this page.

Record custodial information, maintain license information, and keep track of manufacturer-related information.
Physical Life Information
Use this section to track the physical life of an asset, determine the life expectancy of equipment, and plan for equipment replacement.
The fields in this section are physical asset attributes only and are not used to calculate and record the accounting of asset cost or depreciation.
Field or Control |
Description |
|---|---|
In Service Date |
Displays the in-service date from the asset record. This date is used in the life expectancy and replacement date calculations, and is defined using the General Information Page. It is labeled as Placement Date. |
Life Expectancy Yrs (Life Expectancy Years) |
Enter the life expectancy of the asset in years. This is the physical life expectancy, not the depreciation (accounting) expectancy. |
End of Life |
Enter the end of life date for the asset. |
End of Life Reason |
Select a reason for the end of life. Values for this field are defined on the End of Life Reason Definition Page. |
Replacement (Date) |
Displays the estimated date in which the asset should be replaced. Replacement date is determined in this way:
|
Life Expectancy % (Life Expectancy Percent) |
Displays the current age expressed as a percent of life expectancy. Life Expectancy Percent is determined in this way: Asset Age (Current Date - In Service Date) / Life Expectancy Years * 100 For example, asset age 2.5 years / life expectancy 7 years * 100 = 35.71% of total life expectancy. |
Note: The Define Asset Operational Information - Asset Information Page has the same physical life fields included on this page. When you make an update to the physical life fields on that page, the changes are reflected here.
Use the Asset Property page (ASSET_PROPERTY) to enter details to manage property assets and to maintain property-specific attributes such as identifying information, asset hierarchy, area and occupancy, and legal descriptions.
This page appears when:
the Property asset type is selected.
the Enter Property Details option is selected on the Installation Options - Asset Management page for users licensed for Asset Management only.
Navigation:
This example illustrates the fields and controls on the Asset Property page. You can find definitions for the fields and controls later on this page.
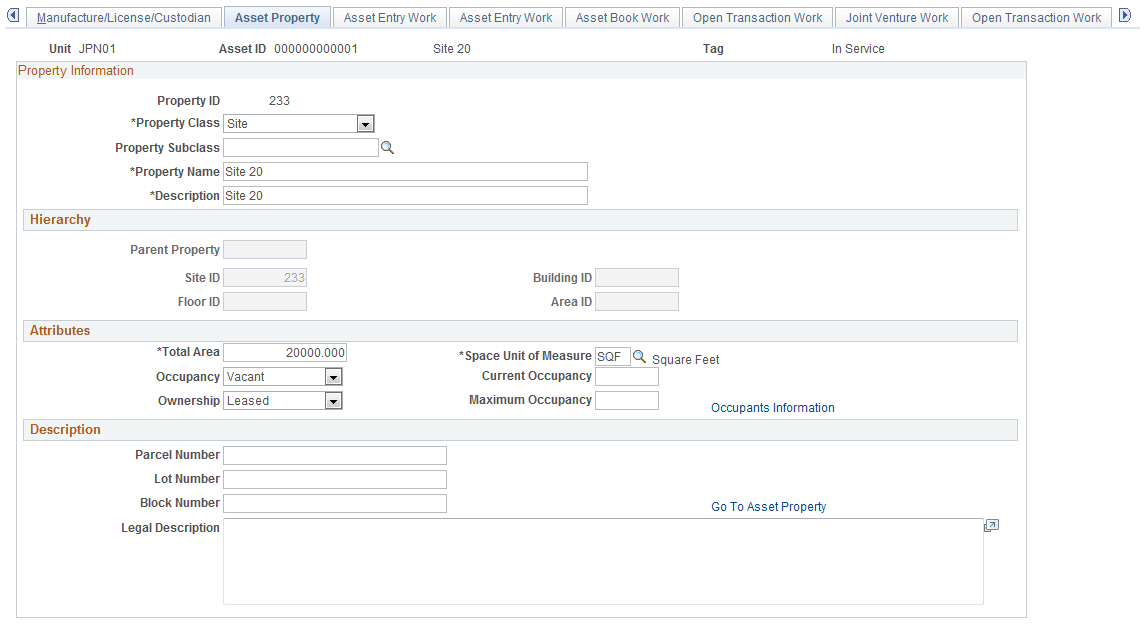
Property Information
This page appears when the asset type of Property is selected; however, if Lease Administration is not a selected product within Installation Options or Space Management Installed is not selected within the Asset Management Installation Options, the Property page does not appear.
Field or Control |
Description |
|---|---|
Property ID |
The property asset ID is displayed after the record is saved. |
Property Class |
Select the property class from the available options. PeopleSoft delivers the following hierarchy of property classes: Site Building Floor Area Space |
Property Subclass |
Select the property subclass from the available user-defined options, if any. |
Property Name and Description |
Enter the property name and descriptions. If these are entered on the General Information page, they will follow to this page. |
Hierarchy
Field or Control |
Description |
|---|---|
Parent Property |
Select the parent property ID. Only the property asset IDs within this business unit are available. |
Site ID |
Enter the site property ID. |
Building ID |
Enter the building property ID. The field is available when the site property ID has been populated. The system performs an edit to check that higher level hierarchical fields are populated. |
Floor ID |
Enter the floor property ID. The field is available when the site property ID and the building property ID have been populated. The system performs an edit to check that higher level hierarchical fields are populated. |
Area ID |
Enter the area property ID. The field is available when the site property ID, building property ID, and floor property ID have been populated. The system performs an edit to check that higher level hierarchical fields are populated. |
Note: The last hierarchical definition for a property is Space. The space property ID is the same as the Property ID and is not displayed at this level.
Attributes
Field or Control |
Description |
|---|---|
Total Area |
Enter the total measurement of the area of the property. |
Unit of Measure |
Enter the unit of measure for the total area. If this field is unavailable for selection, the unit of measure is populated by default from the information selected when the asset was entered. |
Occupancy |
Select the occupancy status of the property from the available values: Occupied or Vacant. |
Current Occupancy |
Enter the current number of occupants for the property. |
Ownership |
Select the ownership status of the property from the available options: Owned or Leased. |
Maximum Occupancy |
Enter the maximum number of occupants for the property. This may be a legal definition. |
Occupants Information |
Click this link to access the Maintain Property Occupants page. On this page, you can add property occupant details such as occupant type, occupant ID, move in and move out dates, as well as asset components. |
When no hierarchy is established, the default values for Unit of Measure is Feet, for Occupancy, Occupied, and for Ownership is Owned.
When a parent property ID is established, then unit of measure, occupancy, and ownership values are inherited from the parent property.
When the parent property ID changes, however, only the unit of measure is inherited from the parent. This is because ownership and occupancy values do not usually change from parent to parent asset. For example, if Property A is leased but the parent ID changes, the property does not change ownership. It is still leased. Similarly, if a parent property changes, it does not automatically change from occupied to vacant.
Note: If you have defined custom attributes on the Asset Attributes page to be associated with an asset, the asset attributes will display with a unit of measure field. You can select the appropriate attributes from your user-defined attributes for this property as needed.
Description
This section is available only if the asset is a property defined as a site or building.
Field or Control |
Description |
|---|---|
Parcel Number |
Enter the parcel number, usually provided within the grant or deed of trust. |
Lot Number |
Enter the lot number, usually provided within the grant or deed of trust. |
Block Number |
Enter the block number, usually provided within the grant or deed of trust. |
Legal Description |
Enter the legal description, usually provided within the grant or deed of trust. |
Use the Record Property Taxes page (ASSET_PROP_TAX) to Enter property tax details including due dates, taxing authorities, and payments.
Navigation:
Click the Enter Property Taxes link on the Asset Property page.
This example illustrates the fields and controls on the Record Property Taxes page. You can find definitions for the fields and controls later on this page.

If the asset property is defined as Site or Building, the Enter Property Taxes link is available on the Asset Property page. Click the link to display the Record Property Taxes page where informational data can be entered for taxes applicable to the property.
Use the Asset Supplemental Data page (AM_ASSET_SD) to record additional data based upon asset business unit, asset type, subtype, manufacturer, and model.
Navigation:
This example illustrates the fields and controls on the Asset Supplemental Data page. You can find definitions for the fields and controls later on this page.

Supplemental data is used within PeopleSoft Maintenance Management for additional asset attribute details. The attribute groups displayed for each asset depend upon the values that are selected for the asset type, asset subtype, manufacturer, model, and business unit. The attributes displayed are user-defined and reflect how the attribute groups work.
Use the IoT (Internet of Things) page (AM_IOT) to assign Internet of Things attributes to your asset and monitor changes to the asset. This page only displays when you select the IoT Installed option on the Installation Options - Asset Management page.
Navigation:
This example illustrates the fields and controls on the IoT (Internet of Things) page.

Field or Control |
Description |
|---|---|
Organization |
Select an IoT organization attribute to assign to this asset. Note: You can also specify IoT organization using the Upload Assets to IoT (Oracle Internet of Things) Page. |
Asset Name |
Displays IoT asset name assigned to this asset. IoT asset name is not the same as the PeopleSoft asset name. The IoT asset name is derived using PS + business unit name + asset ID. |
Place Name |
Select an IoT place name attribute to assign to this asset. When an asset move is detected by IoT, this field automatically updates with the correct effective-dated IoT location. Note: You can also specify IoT place name using the Upload Assets to IoT (Oracle Internet of Things) Page. |
Asset Type |
Select an IoT asset type attribute to assign to this asset. Note: IoT asset type is not the same as PeopleSoft asset type. Note: You can also specify IoT asset type using the Upload Assets to IoT (Oracle Internet of Things) Page. |
Description |
You can edit the IoT description for this asset if you wish to do so. Note: This description defaults from the Basic Add - General Information page. You can also specify IoT asset description using the Upload Assets to IoT (Oracle Internet of Things) Page. |
See also:
Understanding the Integration with Oracle Internet of Things Asset Monitoring Cloud Service
Use the External Funding Source page (ASSET_EFS) to associate an asset with an external funding source. In this way you can identify and closely monitor assets that must meet specific sponsor requirements and internal policies.
Navigation:
Click the External Funding Source link on the General Information page.
This example illustrates the fields and controls on the External Funding Source page.

Field or Control |
Description |
|---|---|
External Funding Source |
Select an external funding source to associate with the asset. External funding sources are defined on the External Funding Source (Setup) Page. |