Running and Managing Pay Cycles
This section discusses how to process and manage pay cycles.
|
Page Name |
Definition Name |
Usage |
|---|---|---|
|
PYCYCL_MGR |
Run and manage the Pay Cycle process, from Payment Selection through output processing (printing checks and advices, producing EFT files, and so forth). Transfer to pay cycle exceptions pages and pay cycle detail and summary data pages, where you can handle exceptions and hold, exempt, or separate payments. View Pay Cycle processing status and results. |
Use the Pay Cycle Manager page (PYCYCL_MGR) to run and manage the Pay Cycle process, from Payment Selection through output processing (printing checks and advices, producing EFT files, and so forth).
Transfer to pay cycle exceptions pages and pay cycle detail and summary data pages, where you can handle exceptions and hold, exempt, or separate payments. View Pay Cycle processing status and results.
Navigation:
This example illustrates the fields and controls on the Pay Cycle Manager page before processing payment selection and creation. You can find definitions for the fields and controls later on this page.
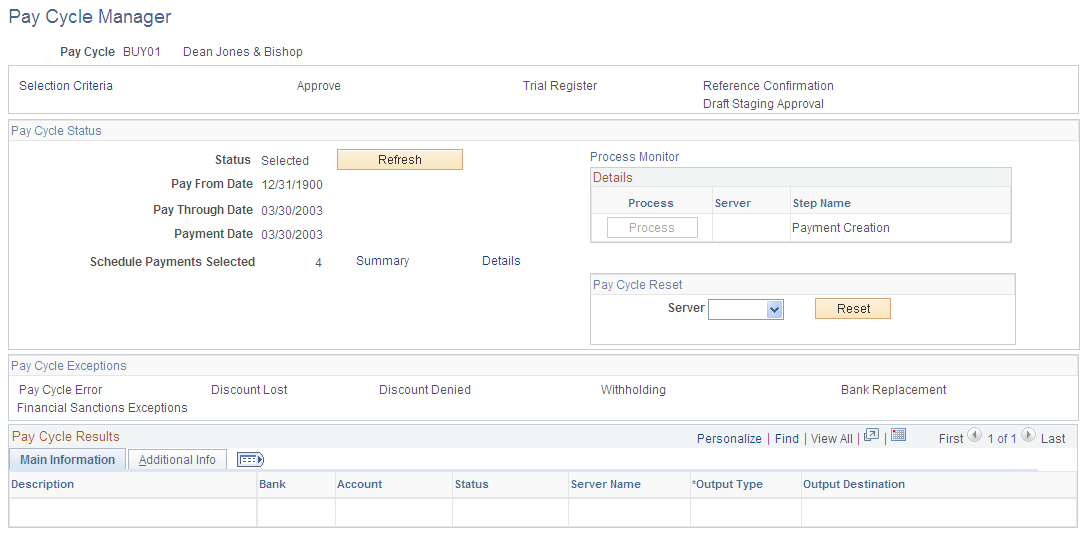
This example illustrates the fields and controls on the Pay Cycle Manager page after processing payment selection and creation and before processing output processes. You can find definitions for the fields and controls later on this page.

Starting the Pay Cycle
Start the pay cycle by clicking the Process button for either Payment Selection or Payment Selection & Creation. The Pay Cycle Manager searches for all banks and payment methods defined for the pay cycle. Each type of output is placed in a row in the Pay Cycle Results grid after the Payment Creation process has finished. You can enter an output destination for each row or accept the output destination that is supplied by default from the User Preferences.
Pay Cycle Processes and Output Processes
Pay cycle processes are the applications that must run before you start receiving output from each bank account or payment method. These processes can consist of Payment Selection, Draft Staging, and Payment Creation, individually. You can run them all together by selecting Payment Selection & Creation. Click the Process button next to the process that you want to perform.
After all pay cycle processes are run, the pay status changes to Created or Approved, depending on whether user approval is required. If approval is required, you perform approval at this point. You are now ready to produce an output file. All output processes are listed in the Pay Cycle Results grid near the bottom of the page. A process button exists for each output process that can be generated for the pay cycle (for example, printing a check for a different bank account, printing an advice, or generating EFT files). After you have run the output process once, the Process button changes to Recreate, which links you to the Recreate Checks page, where you can re-create payments. The Pay Cycle status does not change to Complete until you have finished running all output processes.
Note: (USF) If you are a U.S. Federal customer who requires payment schedule certification, this certification must occur after Payment Selection. This means that you must run Payment Selection and Payment Creation separately.
Note: When you run multiple pay cycles in parallel and in large volume, Oracle recommends that you set up different business units and banks in pay cycles to avoid contention issues. Running several pay cycles in parallel for the same bank may cause processing issues.
Common Page Information
Field or Control |
Description |
|---|---|
Selection Criteria |
Click to access the Payment Selection Criteria component (PYCYCL_DEFN) where you can create or update a pay cycle. |
Approve |
Click to access the Pay Cycle Approval component (PYCYCL_APPROVAL). The link is active when the pay cycle requires user approval and the pay cycle status is Created. |
Trial Register |
Click to access the Register run control component (RUN_APY2030). This link is active after you run both the Payment Selection and Payment Creation subprocesses. |
Reference Confirmation |
Click to access the Payment References page, where you can confirm that the system reference number matches the reference number on your preprinted check stock. |
Draft Staging Approval |
Click to access the Draft Staging Approval page, where you can approve or reject a draft payment before running Payment Creation. The link is active after you process Draft Staging. |
Field or Control |
Description |
|---|---|
(USF) Pay Cycle Certification |
Click to access the Pay Cycle Certification page, where you can certify or reject a payment schedule before running Payment Creation. For U.S. Federal agencies only. You must enable certification for the pay cycle on the Payment Selection Criteria - Preferences page. |
Pay Cycle Status
Field or Control |
Description |
|---|---|
Status |
Displays the current status of the pay cycle. A New status indicates that this is the first time that the pay cycle is being run. See Pay Cycle Statuses. |
Pay Through Date |
Displays the last scheduled payment date that a voucher can have to be included for payment in the pay cycle. |
Payment Date |
Displays the date that prints on checks or shows on other payment methods in the pay cycle. It can differ from the pay through date. |
Schedule Payments Selected |
Displays the number of scheduled payments to be processed. |
Refresh |
Refreshes the Pay Cycle Manager page, displaying the most current status. Some Pay Cycle processes must be complete before the next process can start. While these processes are running, the status for the pay cycle is Running. Clicking the Refresh link updates the page so that you can see whether the pay cycle is ready to advance to the next step. |
Update Payment Advice |
This button appears if you run a pay cycle with EXPN defined as a source. Clicking this button will encrypt the credit card number for EXPN transactions listed in the payment advice table and remove any related information from the temp table. After you click this button, a message will appear. Click OK to update the Payment Advice table with encrypted credit card numbers, if any, and remove any related information from the temp table. After you click the Update Payment Advice button, it will no longer appear on the page. If you do not click this button, the unencrypted credit card data will be saved to the Payment Advice table. When this paycycle is run again, users can click the button to clean all of the current and previous data. |
Summary |
Click to transfer to the Pay Cycle Summary page, where you can view payment information about scheduled payments, summarized by bank account and payment method. This link becomes available after Payment Selection is complete. |
Details |
Click to transfer to the Pay Cycle Details page, where you can search scheduled payments by various search criteria, such as business unit, invoice, or supplier ID. You can also hold individual scheduled payments, exempt them from pay cycle processing, or flag them as separate payments. This link becomes available after Payment Selection is complete. |
Process
Each row contains a Process button, a Server field, and a display-only description of an available pay cycle process. Some processes are available only if you are creating certain types of payments. For example, Draft Staging is available only if you are processing draft payments.
Processes are not available and no longer appear after they have been completed.
To run a process, select a server and click the process button for the process row. The server drop-down list box shows only servers that have a status of Running on the Process Monitor Server List page. The system performs validation before a process is initiated to ensure that the Process Scheduler server is currently running.
The standard processes are:
Field or Control |
Description |
|---|---|
Payment Selection |
Runs the Payment Selection process only, so that you can review and handle pay cycle exceptions, take action on individual scheduled payments using the Pay Cycle Details page, and certify payment schedules (for U.S. Federal agencies only) before you run the Payment Creation process. If you are processing drafts, run the Payment Selection process alone to enable you to then run the Draft Staging process alone. This enables you to use Draft Staging Approval before you run the Payment Creation process. |
Payment Selection & Creation |
Runs all processes in one step, including Payment Selection, Draft Staging (if necessary), and Payment Creation. You cannot perform any exception handling, take action on individual scheduled payments, certify payment schedules (U.S. Federal only), or use draft staging approval. Note: This option is unavailable for U.S. Federal agencies or for PeopleSoft eSettlements users if Pay Cycle Payment Approval is enabled at buyer registration. |
Draft Staging |
Runs the Draft Staging process. Draft staging groups the draft payments, then performs draft rounding and draft optimization, according to your payment selection criteria. You can approve or reject the draft payments on the Draft Staging Approval page. You must either approve or reject draft payments before the Payment Creation process. This option is active only if you are processing draft payments and you have run the Payment Selection process. |
Payment Creation |
Runs the Payment Creation process to prepare payments for output processing. This option is available only after you have run the Payment Selection process—or, if draft payments are in your pay cycle, after you have run the Draft Staging process. |
Pay Cycle Reset
Field or Control |
Description |
|---|---|
Server |
Select a server on which to run the pay cycle reset process. |
Reset |
Click to initiate a process to clear all of the scheduled payments currently being processed in the pay cycle. This button is active during Payment Selection if the pay cycle is rejected or if a system error occurs, such as a server running out of storage memory or a power failure. The button remains active until the Pay Cycle status is Approved. |
Pay Cycle Exceptions
The links in this group box become active only if pay cycle exceptions exist after the Payment Selection, Payment Creation processes, or both have been run. If a payment is marked with an exception (except for discounts lost exceptions), it is rejected for further processing within the pay cycle. You must either correct or override the exception and run the payment as part of another pay cycle.
Field or Control |
Description |
|---|---|
Pay Cycle Error |
Click to access the Pay Cycle Error page, where you can view errors encountered during this pay cycle run. |
Discount Lost |
Click to access the Lost Discount Alert page, where you can review and handle potential lost discounts calculated during the Payment Selection process. |
Discount Denied |
Click to access the Discounts Denied page, where you can review discounts that were not taken because they failed discount evaluation (that is, the bank interest earned on the net voucher amount is greater than the amount of the discount that you would gain by paying early). |
Withholding |
Click to access the Withholding Exception page so that you can review and handle withholding exceptions generated during pay cycle processing. |
Bank Replacement |
Click to access the Bank Replacement Exceptions component, where you can review bank replacement exceptions generated during pay cycle processing. Some bank replacement exceptions appear after Payment Selection; others appear only after Payment Creation. |
Financial Sanctions Exceptions |
Click to access the Pay Cycle Financial Sanction Warnings page, where you can review financial sanctions exceptions generated during pay cycle processing. If the system validates the suppliers during the Selection process and the supplier's financial sanctions status changes to Review, the system creates payment validation errors for this supplier's payments. The system also adds this supplier to the Financial Sanctions Validation Log page. |
Pay Cycle Results - Main Information tab
When the Payment Creation process is complete, the Pay Cycle Results grid displays a row of data for each output process that must be run to generate payment files and negotiable documents. For EFT payments, because all payments regardless of bank account run as one output process, only one EFT row can appear. For checks, advices, positive payment files, and file copies, each bank account and payment method combination runs as a separate output process. This means that multiple check rows, positive payment rows, and so forth can appear in the grid.
Field or Control |
Description |
|---|---|
Process |
Click to initiate an output process, such as creating an EFT file or printing checks or advices. Note: Depending on the output process, you may need to click the Process button repeatedly when each subprocess within the output process is run. |
Recreate |
Click to access the Recreate Checks page, where you can re-create an EFT file or reprint checks. When the button is labeled Recreate Positive Pay, you can click it to re-create a positive payment file. |
Server Name |
Select a specific Process Scheduler server from which to run the pay cycle output process. |
Output Type |
Displays the resulting output type. Values are: File: Specifies that the pay cycle output is created in a file format. This is used for electronic payment formats, such as EFT or ACH payments. Printer: Specifies that the output is printed on the selected printer. This is used for printed payment formats, such as for system checks or advices. Web: Specifies that the output file is sent to the Report Repository and authorized users can download the output file using the Report Manager. You do not need to specify an output destination if you select this option. If you distribute output files using the Web option, you must set up distribution options using the Process Schedule Manager. When the report or output file is generated in the report repository, select the View link on the Report List page in the Report Manager to access the Report/Log Viewer. Click the report link on the Report/Log Viewer and you will have the option to open the file online or download the report file. Note: The Pay Cycle report for the APY2021X1 process is generated and named using a format that contains the form ID, bank name, bank account, and the payment method involved. |
Output Destination |
Specifies the output file directory or the printer name for the output file creation. If File is selected, the Output Destination value is supplied by default from the server file destination specified on the User Preferences - PayCycle page. You can override the default with a valid directory path, but remember that a meta string (such as %%OutputDirectory%%) is not permitted. You must specify a full directory path with a backslash at the end (for example: C:\TEMP\). |
Pay Cycle Results - Additional Info tab
Field or Control |
Description |
|---|---|
Instance |
Displays the process instance for the latest process that you initiated for the row. |
Payment File |
Displays the name of the payment output file that is created. |
Form ID |
Displays the form ID specified on the bank account definition for the document formatting. |
Positive Pymnt (positive payment) |
Specifies the positive payment form ID on the bank account definition for formatting the positive payment file. This applies only to system checks. |
File Copy Form |
Displays the form ID specified on the bank account definition for formatting check copy files. You enable file copying and specify the file copy form ID on the External Accounts - Payment Methods page. |
First Payment |
Displays the beginning payment reference number for the pay cycle. |
Resetting Pay Cycles
You can reset a payment cycle in the Pay Cycle Manager if you decide against creating any payments for the selected vouchers. This option enables you to deselect vouchers for payment after you run a pay cycle, but before you print the checks. You can reset a pay cycle after Payment Selection, but to reset after Payment Creation requires extra steps. To reset after Payment Creation, go through Pay Cycle Approval to reject the pay cycle. Then perform the reset.
Note: PeopleSoft Payables marks vouchers as selected when Payment Selection runs. No other transactions can occur on the selected vouchers. If you decide not to produce payment files or print checks for these vouchers, reset the selection so that a later pay cycle can reselect the vouchers.
Note: Resetting a pay cycle that is using bank account replacement reverses the bank replacement. For example, assume that a payment is coming from bank account A, and that during the pay cycle, bank account B replaces bank account A. If you reset the pay cycle for this payment, the payment reverts to the original account, which is bank account A.
Note: If EFT and ACH prenotes are included in the pay cycle, the system reverses the prenote status on the Supplier Information component (VNDR_ID) from Pending to New when you reset a pay cycle.
Completing the Pay Cycle
When you have successfully selected your payments, viewed and processed any exceptions, generated payments, approved the pay cycle, produced payment outputs, confirmed payment reference numbering, and formatted and produced the positive payment file (if required), the Pay Cycle Manager shows a status of Completed.
Note: While running the pay cycle in case the payment reference number value exceeds the check digit length specified in the bank payment methods, then the pay cycle process excludes those payments and lists them as errors. Click the Pay Cycle Errors link on the Pay Cycle manager page to access the Pay Cycle Errors Page and view the error details. You can also view the details in the process monitor message section.