Using Worksheets to Approve or Reject Drafts
|
Page Name |
Definition Name |
Usage |
|---|---|---|
|
DRAFT_IDENTIFY_IC |
Select items to be paid by a customer-initiated draft, and build a draft worksheet that you use to approve a single draft. |
|
|
Filter Items Page |
WS_ITEMSRCH_SEC |
Enter advanced selection criteria for items to include in the worksheet. See the Draft Worksheet Selection Page for more information. |
|
DRAFT_WORKSHEET_IC |
Select items to include in the draft, and approve one draft at a time. |
|
|
Currency Conversion Page |
EU_CUR_CNV_WS_SEC |
Select the currency code, rate, and date of conversion for the display currency on the worksheet. See the Draft Worksheet Application Page. |
|
AR_MRL_SEC |
View or update multiple revenue line entries. If you change an amount on this page, the change overrides the amount on the worksheet. |
|
|
Activity Page |
DRAFT_STATS_IC |
View a list of all activities for the draft, including the activity date and posting status. See the Draft Worksheet Application Page. |
|
Draft Notes Page |
DRAFT_NOTES_SEC |
View or add notes about a draft. Assign the draft to a physical location. See the Draft Worksheet Application Page. |
|
Document Sequence Page |
AR_DOC_SEQ_SEC |
Enter a document sequence number if the document type is set up for manual numbering. Also, change the document type for document sequencing. See the Draft Worksheet Application Page. |
|
DRAFT_WS_IC_DTL |
View or update details about a selected draft on a worksheet. Also copy, write off, or edit drafts. |
|
|
Currency Exchange Aid Page |
DR_CURR_EXCHG_SEC |
Use as an aid in converting the payment amount to the currency of a selected item making a partial payment. See the Draft Detail View Page. |
|
VAT Header Page |
DRAFT_ITEM_VAT_HDR |
View VAT header defaults. Manually override values, if applicable. See the Draft Detail View Page. |
|
VAT Detail Page |
DRAFT_ITEM_VAT_LN |
View VAT line defaults, including the VAT amounts. Manually override values, if applicable. |
|
Item Activity Detail Page |
ITEM_ACTIVITY_DRILL |
View all activities for an item. See the Draft Detail View Page. |
|
Item in Other Groups Page |
ITEM_DGROUP_SEC |
View other worksheet groups that have the selected item or any pending item groups that are not posted that have the item. See the Draft Detail View Page. |
|
Additional Customer Information Page |
CUST_INFO_SEC |
View additional customer information. See the Draft Detail View Page. |
|
DR_APROV_SEL_IC |
Build a draft approval worksheet used to approve multiple drafts. |
|
|
DR_APROV_WORKS_IC |
Approve multiple drafts. |
|
|
Draft Details Page |
DR_APROV_ITEM_SEC |
View details about items in a draft. See the Draft Approval Worksheet Page. |
This documentation discusses how to:
Build a draft worksheet.
Use a draft worksheet to approve one draft.
Distribute multiple revenue lines.
View item details.
Build a draft approval worksheet for approving multiple drafts.
Use a draft approval worksheet to approve multiple drafts.
Use worksheets to record the customer's approval and make any necessary modifications to the draft. Worksheets are cumulative. As long as you do not clear the worksheet, you can continue to expand it by selecting additional criteria. Each time you build a worksheet, the items you previously selected remain and the system adds items that meet the new criteria.
Use the draft worksheet to select items to be paid by the draft and approve drafts. You can also create deductions, advance payments, write-offs, and adjustments using the draft worksheet.
Use the draft approval worksheet if you want to approve multiple drafts at once. This worksheet is useful for organizations in which the approver is not the individual who applies the drafts to individual items.
Use the Draft Worksheet Selection page (DRAFT_IDENTIFY_IC) to select items to be paid by a customer-initiated draft, and build a draft worksheet that you use to approve a single draft.
Navigation:
This example illustrates the fields and controls on the Draft Worksheet Selection page. You can find definitions for the fields and controls later on this page.

If you are working with a supplier-initiated draft, the Create Drafts process creates the worksheet; you do not need to build it.
The draft Status is Identified until you build the worksheet. If you already built a worksheet for the draft, the status is Pending Acceptance.
The information that you enter about customers and items determines what data appears on the worksheet. The more information you provide, the more focused your worksheet will be.
Note: If you enter no customer or item information, then the system creates a blank worksheet.
Customer Criteria
Field or Control |
Description |
|---|---|
Customer Criteria |
Indicates the type of customer that you want to include in the worksheet: Corporate Items, Customer Items, or Remit From Items. If you select None, the system creates a worksheet based on your other selection criteria and does not limit items to specific customers. If you select None, the Customer Reference fields are not available. |
Cust ID (customer ID) and Business Unit |
Enter a customer ID and business unit. Note: If you select Corporate Items or Remit From Items from the Customer Criteria drop-down list box, you must enter a business unit. The system needs a business unit to determine the SetID of corporate and remit-from customers. The resulting worksheet displays all open items having the specified corporate or remit-from customer across all business units, not just the business unit that you selected. |
Accounting Date |
Displays the default value from the Accounting Date field on the Draft Entry page. You can override this value, if necessary. If you override this value, ARUPDATE will edit the date for the open period and items selected on the worksheet and will apply this date to the accepted draft on the Draft Entry page. |
Reference Criteria
Field or Control |
Description |
|---|---|
Reference Criteria |
Specify whether you will use Detailed References, Specific Value, None, or a Range of References. If you select either Range of References or Specific Value, you work with the Item Reference fields. Note: The only instance in which you can use reference criteria independently of customer criteria is when the value in the Restrict To field is All Customers. |
Restrict to |
Qualify items by customer by selecting All Customers, Corporate Cust Only, Customer Only, or Remit Cust Only. |
Match Rule |
If you selected Specific Value in the Reference Criteria field, specify whether the item information is an Exact Match or a Like Match. A Like Match enables you to use a percent (%) wildcard to identify the reference, as long as you provide the beginning letters or numbers. For example, if you enter a PO number of 24% and select Like Match, the worksheet will contain all items having PO numbers beginning with 24xx, but it will not catch a PO number of x24x. |
Qual Code (qualifier code) |
Enter the type of reference, such as documents, items, purchase orders, or any other criteria that you set up on the Reference Qualifier page. Note: When you enter a reference number, the default qualifier code appears. |
Reference and To Reference |
Do one of the following:
The values that you enter are case-sensitive. |
Item Inclusion Options
Field or Control |
Description |
|---|---|
All Items, Deduction Items Only, or Items in Dispute Only |
Select one of these options to indicate the type of items to include in the worksheet. |
Exclude Collection Items, Exclude Deduction Items, and Exclude Dispute Items |
If you select All Items, you can also select one or more of the check boxes to exclude collection, deduction, and dispute items. |
Advanced Inclusion Options |
Click this link to access the Filter Items secondary page (WS_ITEMSRCH_SEC), where you can create, edit, and save selection criteria for items to include in the worksheet. You can filter items using values in the following categories:
|
Worksheet Action
Field or Control |
Description |
|---|---|
Build |
Click to create a new worksheet or to add items meeting your selection criteria to an existing worksheet. |
Clear |
Click to remove all items from an existing worksheet. |
Use the Draft Worksheet Application page (DRAFT_WORKSHEET_IC) to select items to include in the draft, and approve one draft at a time.
Navigation:
This example illustrates the fields and controls on the Draft Worksheet Application page . You can find definitions for the fields and controls later on this page.

Using the draft worksheet consists of these basic tasks:
Use the item display or sort controls to adjust the view.
Select the items to pay.
Handle underpayments, overpayments, and discounts.
Approve, hold, or reject the draft.
You cannot approve a draft until the entire amount of the draft is accounted for, either applied to an item, deemed a prepayment, held on account, deducted from the customer's balance, or considered an adjustment.
Selecting Items and Item Actions
The item selection controls enable you to work with all items in the worksheet at once or a specified range of items at once.
Field or Control |
Description |
|---|---|
Entry Type and Reason |
Select the entry type for the activity that you want to perform for the selected items. You must enter a valid entry reason in the field if you have entry reasons set up for the write-off entry type. Valid entry types are: Create A Deduction: Select to create a deduction item for the selected items. Pay an Item: Select to apply the draft to all the selected items. Write-off an Item: Select to write off selected items. The system issues a message if you try to write off more than the write-off tolerances permit. If approval framework is activated, then the system requires the approval of write-off amounts entered on the worksheet that are below the write-off tolerances but above the approval-needed limit. Note: If you select an item that is in use, you will get an error message. A setting on the Installation Options - Receivables page—No Mult Pending Item Selection—determines whether the system checks groups to see if an unposted pending item exists for the item that you selected or if the item has been selected in another group. To see where the item is in use, select Items in Other Groups on the Draft Detail View page for the item. |
Choice and Range |
Select an option to select or deselect multiple items at a time. Valid values are: Select All, De-Select All, Select Range, De-Select Range, and none. If you select Select Range or De-Select Range, enter the range in the Range field. For example, enter (4-7). |
Go |
Click to apply your selections to the items in the grid and to update the worksheet balances. |
Using Item Display Information
Use the fields in the Item Display Control group box to adjust the view and contents of the Item List grid.
Field or Control |
Description |
|---|---|
Display |
Specify which items to display in the grid, such as All Items, New Items, Unselected Items, or Selected Items. |
Go |
Click to refresh the list of items in the grid. |
|
Click the Currency Conversion Panel icon to access the Currency Conversion page (EU_CUR_CNV_WS_SEC), where you select a display currency for the Conversion Amount - Currency column and specify whether to use today's date, the accounting date for the item, or a date that you specify to determine which exchange rate to use. |
Sort All |
Select a value to sort all items in the worksheet, not just the items that appear in the scroll area. This field is not available if the number of rows does not exceed the maximum chunk size. Options are: Due Date or Item. Then, click Go to resort all items in the worksheet. |
Item Display Set Control |
Use the arrows to view different chunks of data. For better performance, you can limit the number of rows that appear in the scroll area on the Installation Options - Receivables page. Oracle suggests a maximum chunk size of 100 rows, although larger chunks may perform satisfactorily. |

Reviewing Item Summary Information
Use the Customize link to sort by column, reorder, hide, and freeze columns. This functionality enables you to put the key fields that you want to review on the Detail 1 tab and to sort your data.
Field or Control |
Description |
|---|---|
|
Click the View Detail icon to view or update details for a selected item on the worksheet and to copy, write off, or edit items. |

Field or Control |
Description |
|---|---|
Remit Seq (remit sequence number) |
This sequence number relates to the order in which the items were entered on the Worksheet Selection page. Initially, the items appear in this order. If you sort the worksheet based on the value in another column, this number stays with the item, but the displayed order of the grid changes. Sort the worksheet using this column to return the list of items to the original order. |
Amount |
This field initially displays the open amount for the item. Change the amount to make a partial payment. |
Type and Reason |
Enter the entry type and reason for the item. For preexisting items, valid entry types are Payment, Write-off, or Deduction. For new items, all entry types except Payment and Write-off are valid. Note: If you are applying a payment to a vendor rebate claim or claimback item interfaced from PeopleSoft Purchasing or PeopleSoft Order Management and the business unit for the item requires VAT, then you must split the item by entering the base amount of the item in the Amount field for one row and the VAT amount for the item in the Amount field for the other row. Use the DM - 01 (Pay an Item) entry type for each item. You must enter the appropriate entry reason for each row to indicate whether the amount is the base amount or the VAT amount. You also must enter the reference number for the claim item in the Document field on the Draft Detail View page. |
Add with Detail |
Click to add an item to handle overpayments, underpayments, and write-offs. If a new item was created in error, clear the item by clearing the Sel (select) column. |
Revenue Distribution |
Click to manually distribute amounts for control budgets across multiple revenue lines if you are making a partial payment. This link is available only if you have enabled commitment control processing and you have enabled the input of multiple revenue lines for the business unit. |
Activity |
Click this link to view a list of all activities for the draft, including the activity date and posting status, on the Activity page (DRAFT_STATS_IC). |
Notes |
Click this link to view or add notes about a draft, or assign the draft to a physical location, on the Draft Notes page (DRAFT_NOTES_SEC). |
Document Sequencing |
Click this link to enter a document sequence number if the document type is set up for manual numbering, or change the document type for document sequencing, on the Document Sequence page (AR_DOC_SEQ_SEC). |
Handling Exact Payments
The draft payment usually matches the total of the items. Select items that match the payment. If a customer has no items in the worksheet, you can still put a payment on account or treat it as a prepayment.
Handling Underpayments
To apply an underpayment, do one of the following:
Treat the entire amount as a partial payment against an item.
Change the Amount field for the item to the amount of the draft.
Pay off an item and create an adjustment or a deduction item for the remainder of the item amount.
Create a new item, enter a positive amount for the remainder of the item amount, and enter an entry type and reason.
Place the entire amount on account or create a prepayment without referencing any items.
Create a new item, enter a negative amount for the amount of the draft amount, and enter an entry type and reason.
Partially pay for an item and write off the remaining item balance.
When you partially pay an item, the item splits and a new line with that item ID appears with the remaining balance for the item. Select the write-off entry type and reason for the split item.
Handling Overpayments
To apply an overpayment, do one of the following:
Pay off the item and create a new on account, adjustment, or prepay item with the remainder.
Create a new item, enter a negative amount for the overpayment payment amount, and enter an entry type and reason.
Pay off one or more items entirely and treat the remainder as a partial payment on another item.
Change the Amount field for the item to the remaining amount of the draft.
Place the entire amount on account, without referencing any items.
Create a new item, enter a negative amount for the remaining amount of the draft, and enter an entry type and reason.
Pay off one or more items and write off the remaining balance.
Create a new item, enter a negative amount for the overpayment payment amount, and enter an entry type and reason.
Handling Remaining Draft Amounts
If you do not see an open item to apply the draft to, add an item to the worksheet, and enter a negative value equal to the remaining draft amount. Select an entry type such as Adjust Overpayment, Write-off Overpayment, Prepayment, or On Account.
You can write off an amount only up to the user's authorized limit over the lifetime of an item (not per transaction). Check these amounts on the User Preferences - Receivable Data Entry 2 page. The system compares the item amount to the user's write-off limit in the format currency selected on the Receivables Data Entry 2 page. If approval framework is activated, then the system requires the approval of write-off amounts entered on the worksheet that are below the user's authorized limit but above the approval-needed limit.
Note: If you selected the Partial Payment Disabled option on the Receivables Options - Payment Options page, no partial payments can be processed.
Approving, Holding, or Rejecting a Draft
As you select open items, you need to check the balance information. The system updates the amounts whenever you click the Refresh button. If the Difference is not zero, you need to adjust the payment amounts or select additional items before you approve a draft.
Field or Control |
Description |
|---|---|
Hold |
Click to place the entire draft on hold so that it cannot be processed by any other activity. The items in the draft are available for selection in other worksheets. If approval workflow is enabled and the write-off status is Pending Approval, this button is disabled until the write-off is approved or denied. |
Reject |
Click to cancel the draft. The items selected for payment in the draft become available for selection in another draft. If approval workflow is enabled and the write-off status is Pending Approval, this button is disabled until the write-off is approved or denied. |
Approve |
Click to approve the draft and change the status to Accepted. This button is available only if the worksheet is balanced. If approval workflow is enabled, this button will only be visible once write-off is approved. |
Attachments |
Specifies the attachment count. By clicking the link, you can review existing attachment and add new attachments. See Installation Options - Multiple Attachments Page to define the maximum attachment upload limit for various products. |
Write Off Approval Workflow
If approval workflow for write off is enabled and you created write-offs on the Draft Worksheet, the write off amounts must be approved before you can approve the draft or after a draft approval is denied. These approval options will appear on the page once you select the Submit for Writeoff Approval button.
Field or Control |
Description |
|---|---|
Submit for Write off Approval |
This button will be visible if approval workflow is enabled. Once the draft write-off is submitted for approval, this button will be hidden and will be visible again if write-off is denied. |
Pending Write Off Approval |
Identifies the write-off is submitted for approval and awaits for action from approving parties. If draft is in this state, the Hold and Reject buttons are disabled. |
Approved Write Off |
The write-off has been approved and all the Draft action buttons are now enabled. |
Denied Write Off |
The write-off has been denied. Modify write-off conditions or amounts then resubmit for approval. |
Use the Multiple Revenue Line Distribution page (AR_MRL_SEC) to view or update multiple revenue line entries.
If you change an amount on this page, the change overrides the amount on the worksheet.
Navigation:
Click the Revenue Distribution link on the Draft Worksheet Application page.
See Distributing Amounts for Multiple Revenue Lines for Control Budgets.
Use the Draft Detail View page (DRAFT_WS_IC_DTL) to view or update details about a selected draft on a worksheet, as well as copy, write off, or edit drafts.
Navigation:
Click the View Detail icon on the Draft Worksheet Application page.
This example illustrates the fields and controls on the Draft Detail View page. You can find definitions for the fields and controls later on this page.

View item details to help you identify the item or change the details, as needed.
Field or Control |
Description |
|---|---|
Document |
If you are applying the payment to a vendor rebate claim or claimback item that you interfaced from PeopleSoft Purchasing or PeopleSoft Order Management, you must enter a reference ID. When you run the Rebate Notification process, the process sends the reference ID to PeopleSoft Purchasing and PeopleSoft Order Management so that you can reconcile the claims on the claims management workbench. This field is available only if you enter entry reasons on the AR Integration page. |
Deduction Reason |
If you are creating a new deduction, enter the reason why the customer took the deduction. You define reason codes on the Deduction Reason page. |
AR Specialist (receivables specialist) |
The system populates the AR Specialist field for deduction items based on the default specialist that you assigned to the business unit. If you overrode the default specialist for the deduction reason or customer, the system uses that value. |
Location |
Enter the address sequence number for new items. You must enter a value in this field to include the item in correspondence if you selected the Item Address option for the correspondence customer on the Correspondence Options page. |
Copy |
Click to copy the item and add a new row to the worksheet. You must add the amount and entry type to the new row. |
Write Off |
Click for a new item to write off an overpayment or underpayment amount. |
Item Activity |
Click this link to view all activities for an item on the Item Activity Detail page (ITEM_ACTIVITY_DRILL). |
Item in Other Groups |
Click this link to view other worksheet groups that have the selected item or any pending item groups that are not posted that have the item, on the Item in Other Groups page (ITEM_DGROUP_SEC). |
Additional Cust Information |
Click this link to view additional customer information on the Additional Customer Information page (CUST_INFO_SEC). |
Currency Exchange Aid |
Click to open the Currency Exchange Aid page (DR_CURR_EXCHG_SEC), which can aid you in converting the draft amount to the currency of a selected item to make a partial payment. |
Add VAT Information |
Click this link to view VAT header defaults, or manually override values, if applicable, on the VAT Header page (DRAFT_ITEM_VAT_HDR). |
Use the Draft Approval Selection page (DR_APROV_SEL_IC) to build a draft approval worksheet used to approve multiple drafts.
Navigation:
This example illustrates the fields and controls on the Draft Approval Selection page. You can find definitions for the fields and controls later on this page.
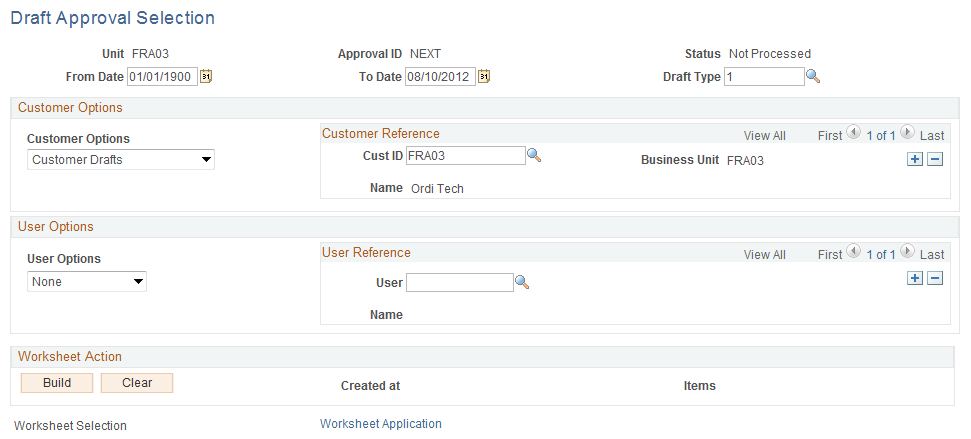
Note: Before you can build a draft approval worksheet, apply the drafts to items using a draft worksheet.
Field or Control |
Description |
|---|---|
From Date and To Date |
Enter dates to select drafts using specific dates. |
Draft Type |
Enter a draft type to limit the worksheet to drafts of a specific type. |
Customer Options |
Indicate the type of customer that you want to include in the worksheet. Options are: Customer Drafts or None. Select None to create a blank worksheet. This selection saves time if you merely need to place the draft payment on account, or if the reference information that you entered is almost complete, and you do not need to include all the customer account information. |
Cust ID (customer ID) |
Displays the customer's ID or business unit. |
User Options and User |
Select ID for the user option and enter the user ID. Use to limit the worksheet to drafts applied to items by a specific user. |
Build |
Click to build the worksheet. |
Clear |
Click to remove all drafts from the worksheet. |
Use the Draft Approval Worksheet page (DR_APROV_WORKS_IC) to approve multiple drafts.
Navigation:
This example illustrates the fields and controls on the Draft Approval Worksheet page. You can find definitions for the fields and controls later on this page.

The system automatically selects the check boxes next to each draft. If you do not want to approve a draft, deselect its check box.
Field or Control |
Description |
|---|---|
Details |
Click to access the Draft Details page, where you can view a list of the items included in a particular draft. |
Complete |
Click to approve the selected drafts and change the status to Accepted. |
Cancel |
Click to cancel the selected drafts. The items selected for payment in the drafts become available for selection in another draft. |
Amount and Count |
Displays the total amount and number of the drafts that you have selected. |