Using the Collections Workbench
This topic discusses how to populate the Collections Workbench, personalize content, and use the action list.
|
Page Name |
Definition Name |
Usage |
|---|---|---|
|
COLLECTION_WRKBNCH |
Track and manage customer data, contracts data, and collections. |
|
|
Customer Notes Page |
CUST_NOTES |
Click the Notes icon next to the select Customer ID on the Collections Workbench page to display any notes associated with a selected customer. See General Information - Notes Page for more information. |
|
Conversations Page |
CONVER_DATA1_SS |
Click the Add Conversation link on the Conversations tab or in the header region of the Collections Workbench to add and update conversations with an active customer. See Reviewing Conversations and Promises for more information. |
|
AR_CWB_USER_OPTION |
Click the Personalize Content link on the Collections Workbench page to personalize the content and tabs in the Customer Details Section. |
|
|
Reassign Action Page |
ACTION_REASSIGN |
Click the Reassign Action link in the Action List section to reassign an action's owner to another owner. See Using the Action List on the Collections Workbench for more information. |
|
AR_ALISTFILTER_SEC |
Select the Add Filter link in the Activity List group box to add, name, and save a filter that narrows your search for action items. |
Use the Collections Workbench page (COLLECTION_WRKBNCH) to track and manage customer data and collections, as well as contracts.
Navigation:
Searching By Customer
You can populate the Collections Workbench detail tabs with customer data by entering search criteria in the header fields.
This example illustrates the fields and controls in the header search on the Collections Workbench page, for customer information only. You can find definitions for the fields and controls later on this page.

Field or Control |
Description |
|---|---|
SetID |
Select a SetID. If a default SetID appears in this field, it is derived from User Preferences. You must select at least a SetID and customer ID to return data on the Collections Workbench detail tabs. |
Unit |
Select a business unit or leave the field blank to search all business units associated with a customer ID. If a default business unit appears in this field, it is derived from the Default Business Units group box on the User Preferences - Receivables Data Entry 1 page. |
Customer |
Select a customer. You must select at least a SetID and customer ID to return data on the Collections Workbench detail tabs. |
|
Click the Customer Messages (exclamation mark) icon to display any notes or documents associated with the selected customer. If there are no notes associated with the selected customer, this icon will not appear on the page. |
Level |
Select one of these customer relationship options to display on the Hierarchy tab the remit from, correspondence, or corporate multilevel hierarchy that was set up from the customer's General Information page. If a multilevel hierarchy was set up for the selected customer relationship, data for all customers associated with each level of the hierarchy display on each of the Customer Workbench tabs. If you select No Relationship, then the data will display only for the selected customer or customers, but no multilevel hierarchy will apply to any of the Collections Workbench tabs.
|
Display Currency |
Shows the currency used to display the amounts in the Collections Workbench. Its default value is default currency for the SetID in the Receivables Options component, the default currency in the Receivables business unit, the default currency in the Customer definition, or Personalize Content page. |
Add Conversation |
Click this link to access the Conversations page, where you can add a new conversation. The SetID, Business Unit, and Customer ID fields are populated based on the selected customer. You can add new conversation entries by clicking the Add Conversation Entry button on the Conversation page. You can add new conversations for active customers only. |
Personalize Content |
Click this link to access the Personalize Content page where you can personalize the way the Customer Details fields and the tabs appear on the Collections Workbench page. |

Searching By Contract
If you have PeopleSoft Contracts installed, you can search by values for contracts parameters only, or by both customers and contracts.
This example illustrates the fields and controls in the header search on the Collections Workbench page - including Contracts search criteria. You can find definitions for the fields and controls later on this page.

Field or Control |
Description |
|---|---|
Contract |
Also known as Contract Number, enter a unique identifier for a contract. |
Contract Line |
Also known as Line, select a distinct contract line number associated with a contract product or product details. Contract Line values are not used to populate the Conversations tab. |
Contract Type |
Select a value for the contract category. |
Billing Specialist |
Select a user name to identify the Billing Specialist. |
Billing Authority |
Select a user name to identify the Billing Authority. |
Reference Award Number |
Select a purchase order (PO) or award reference number. |
See also the product documentation for PeopleSoft Contracts.
You can see contracts on the Contracts tab when searching by customer ID only. However, to search data by contract, you need to include one of these fields:
Contract
Billing Specialist
Billing Authority
Reference Award Number
These Collections Workbench detail tabs will display data for contracts:
Contracts
Payments
Items
Aging
Conversations
Because Conversations are associated with Contracts at the header level, a Contract Line search value is not used to retrieve matching Conversations.
Use the Personalize Content page (AR_CWB_USER_OPTION) to personalize the content and tabs in the Customer Details Section.
Navigation:
Click the Personalize Content link on the Collections Workbench page.
This example illustrates the fields and controls on the Personalize Content page (1 of 2), showing Overall Options and the Personalize Customer Details Section. You can find definitions for the fields and controls later on this page.

This example illustrates the fields and controls on the Personalize Content page (2 of 2), showing the Personalize Tabs grid. You can find definitions for the fields and controls later on this page.

Overall Options
Field or Control |
Description |
|---|---|
Action List |
Select one of these values:
|
Customer Details |
Select from the same options that appear for the Action List to determine how you want the Customer Details group box to appear or not appear in the Collections Workbench. |
View Customer Messages Alert |
Select this check box to display the Notes icon next to the customer ID to enable you to access Customer Notes page (CUST_NOTES) to review any notes regarding the selected customer. |
Display Currency Option
If the Display Currency Option fields on the Personalize Content page are empty, and the Business Unit or Customer criteria are not entered in the Collections Workbench header search, the system will not be able to populate any of the detail tabs. An error message on the detail tabs directs you to enter currency values on the Personalize Content page.
Field or Control |
Description |
|---|---|
Currency and Rate Type |
Enter both a Currency and a Rate Type value, or leave both fields empty. |
Used as default only |
Select this option to use the Currency value entered here only if a display currency cannot be derived from either the Business Unit or Customer. |
Always used |
Select this option to use the Currency value entered here and override the display currency defined for the business unit or customer. |
When you enter a customer but no Business Unit value in the Collections Workbench header, and then you click a Display Currency link and select the Business Unit Currency Option, the display currency is determined as follows:
If all the open items have the same base currency, this base currency will appear as the display currency.
If any of the open items have different base currencies, the system uses the Currency value that you specify on the Personalize Content page as the display currency.
Personalize Customer Details Section
Field or Control |
Description |
|---|---|
Category |
Select from one of these categories:
|
Personalize Tabs
Use the Tabs grid on the Personalize Content page.
Field or Control |
Description |
|---|---|
Display |
Select the check box next to each tab's row to indicate that you want the tab to appear on the Collections Workbench page. |
Order |
Enter the numerical order that you want the tabs to appear on the Collections workbench page. Important! You must enter a different number to order each of the tabs even if you left the Display check box unchecked, which indicates that you do not want to the tab to appear on the Collections Workbench page. For example, if you number the tabs 1,2,6,4,5,3,7,8, leave the Display check box for tabs 3 and 4 unchecked, and save the page, the tabs 1, 2, 6, 5, 7, and 8 will appear on the Collections Workbench page in that order. |
Description |
Displays the system-defined description of each tab. |
Name Display |
Enter a name for each tab that you want to display on the Collections Workbench page. If you do not enter a name and you select the Display check box for that tab, a blank tab will appear on the Collections Workbench page. You can enter any name for the tab. However, Oracle recommends that the name of the tab corresponds with the page content of the tab. Note: The default values in the Name Display field are the labels entered during setup on the Collections Workbench Tabs page (Set Up Financials/Supply Chain, Product Related, Receivables, Workbench, Tabs, Collections Workbench Tabs). |
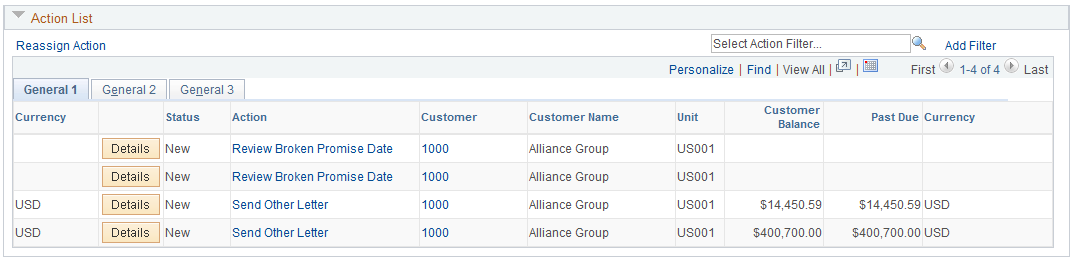
Use the Action List group box on the Collections Workbench page (COLLECTION_WRKBNCH) to view any actions assigned to you (based on your user ID) that apply to the selected customer.
Navigation:
Expand the Action List section on the Collections Workbench page.
This example illustrates the fields and controls in the Action List section (General 1 tab) on the Collections Workbench page. You can find definitions for the fields and controls later on this page.
This example illustrates the fields and controls in the Action List section (General 2 tab) on the Collections Workbench page. You can find definitions for the fields and controls later on this page.

This example illustrates the fields and controls in the Action List section (General 3 tab) on the Collections Workbench page. You can find definitions for the fields and controls later on this page.

Field or Control |
Description |
|---|---|
Reassign Action |
Select the Reassign Action link to reassign an action to another owner on the Reassign Action page (ACTION_REASSIGN). See Reassign Action Page. |
Select Action Filter |
Click the Search icon to select an action filter from a list of one or more action filters that you previously set up using the Add Filter link. When you select an action filter, a list of actions appear in the Action List group box based on the criteria you selected and saved on the Filter Action List page (AR_ALISTFILTER_SEC). |
Add Filter |
Select this link to access the Filter Action List page. Refer to the Adding Filters sub-section following this section. |
General 1 |
Displays a list of any actions that have been for each customer in the list. You can click the Action link to view details about the action. You can also click the customer link to view details about this customer. See Customer Action Page. |
General 2 |
Displays the items and their amounts affected by the action, the promise date information from the Conversations page, the customer's risk score, the action owner, the supervisor and location information. An Item icon appears only if the action is associated with an item condition, such as a deduction or an online action. Click to access the Item Maintenance page, where you view or update details for an item and access the item action list. If the item is associated with the conversation actions CPDB or CPDR after Condition Monitor runs, clicking the Item icon opens the Conversation Item References page, which lists the items. Click item ID links on the secondary page to view detail on the Item Maintenance page. |
General 3 |
Displays the conditions related to the action, the priority of the condition, the action parameter, the user ID assigned to the action, and the user's role. |
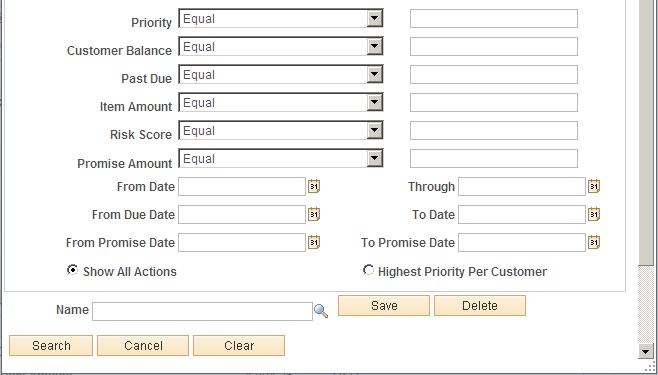
Use the Filter Action List page (AR_ALISTFILTER_SEC) to add, name, and save a filter that narrows your search for action items.
Navigation:
Click the Add Filter link on the Collections Workbench page in the Activity List group box.
This example illustrates the fields and controls on the Filter Action List page (1 of 2). You can find definitions for the fields and controls later on this page.

This example illustrates the fields and controls on the Filter Action List page (2 of 2). You can find definitions for the fields and controls later on this page.
Field or Control |
Description |
|---|---|
Show All Actions |
Select this radio button to display a list of all actions for each customer. The default sort order is Customer, Priority, and Condition. It is not necessary to enter a value in the Priority field on this page to use this option. |
Highest Priority Per Customer |
Select this radio button to display only the highest priority action for each customer. The default sort order is Customer, Priority, and Condition. Actions that you define on the Item Action page have the lowest priority. It is not necessary to enter a value in the Priority field on this page to use this option. |
Name |
Enter a name for the action filter that you want to create and save. You can also click the Search icon next to the field and search for and display an existing action filter. |
Filter By group box |
Select action criteria listed in this group box that will narrow your search for action items that you want to appear in the Action List group box on the Collections Workbench page. You can use this filter criteria to display action items assigned to more than one owner. |
Save |
Click this button to save your selection of filter options by the filter name that you entered or selected in the Name field. The system adds this action filter name and its settings to the list of available action filters. |
Delete |
Select the name of an action filter that you want to delete and click the Delete button. The selected action filter will be removed from your list of action filters. |
Search |
Click the Save button and then click this button to search for any actions that fall within the Filter By criteria that you selected for this action filter. When you click the Search button, the system searches for actions based on your filter criteria and displays those actions in the Action List group box on the Collections Workbench page. The name of the filter that you used to perform the search replaces Select Action Filter field value in the field next to the Search icon. |
Cancel |
Click this button to cancel the Filter Action List page and return to the Collections Workbench page. If you already saved the action filter and its search criteria and select the Cancel button, the Collections Workbench page appears and the saved action filter appears in the list of saved action filters. |
Clear |
Click this button to clear any values entered or selected in the Filter By group box. If an action filter name appeared in the Name field, it is replaced by the field value Select Action Filter. However, the action filter that originally appeared in the Name field still appears on the list of action filters as long as you saved it before clicking the Clear button. |