Adding General Customer Information
To add general customer information, use the General Information (CUSTOMER_GENERAL), Customer ID Nbrs and SIC Codes (CUST_ALT_INFO), Customer Attachments (CUST_ATT), Customer Carriers (CUST_CARRIER), Customer Hierarchy (CUST_HIERARCHY), Customer Messages (CUST_MSG), Customer Product Aliases (CUST_PROD_ALIAS), Customer Product Catalogs (CUST_PROD_CATALOG), Customer Region Codes (CUST_REGN_CODE), and Customer Ship Date Exceptions (CUST_SHIP_EXCPT) components.
This section provides overviews of adding customers, enterprise integration points (EIPs), and staffing pages.
|
Page Name |
Definition Name |
Usage |
|---|---|---|
|
CUST_GENERAL1 |
Add or review customers' names and level information, and assign associated roles. You can also enter one or more addresses for customers and assign descriptions to each location. |
|
|
Phone Information Page |
CUST_ADDR_PHONEPOP |
Enter customers' phone information. |
|
Alternate Character Type Page |
CUST_ACNAME1_SEC |
Enter customer names in alternate characters. This option is available only if you enable alternate character sets for the user on the User Preferences - Overall Preferences page. |
|
CUST_BILLTO_SELECT |
View role designations for bill to customers and associated sold to customers. |
|
|
CUST_SHIPTO_SELECT |
Enter indirect customer information for ship to customers and view associated sold to customers. |
|
|
CUST_SOLDTO_SELECT |
View or modify additional role designations for sold to customers. Associate ship to, bill to, and broker customers. View customer relationships and customer correspondence groups. |
|
|
CUST_CRSPD_OPT1 |
Select name and address information to use in statement, invoice, and letter headers. You can also override remit-to-location default values from the business unit and tailor Dunning letters, finance charge invoices, and statements for individual customers. |
|
|
CUST_GENERAL2 |
Enter optional customer data. |
|
|
CUST_CREDIT_PRFL1 |
Set up and review customer credit profiles. You can also enter credit limits and additional credit parameters for bill to and corporate customers. |
|
|
Risk Score Details Page |
AR_RISK_DETAIL |
Review details of risk score calculation. |
|
General Information - Region Code Info Page |
CUST_REGION_CODE |
Associate customers with multiple regions for multiple purposes, such as pricing, sales analysis, and transit lead-time calculations. |
|
CUST_GROUP_INFO |
Assign individual customers to customer groups. Group customers with similar traits and define processing criteria for the entire group instead of individual customers. Customers can share the same account distribution, pricing arbitration plan, pricing structures, reports, sales contracts, transportation lead times, and taxes. |
|
|
CUST_TAXEXMPT_INFO |
Set up tax-exempt certificate information. |
|
|
CUST_VAT_INFO |
Enter customer VAT information. |
|
|
CUST_NOTES |
Enter information for standard notes to reuse for multiple customers or for custom notes with unique messages. For example, you might have a standard note announcing a seasonal promotion or a note thanking a customer for a particularly large order. |
|
|
CUST_ATTACHMENTS |
Attach multimedia files, such as PowerPoint presentations, Word documents, ScreenCams, or Excel spreadsheets, to customers. |
|
|
CUST_MESSAGES |
Associate messages with customers to communicate timely news and process the action associated with the message. |
|
|
CUST_BILLTO_OPT |
Enter additional billing and purchasing options for bill to customers. You can also enter customer payment options and payment terms as well as default write-off tolerances for customer account maintenance in PeopleSoft Receivables. |
|
|
CUST_SHIPTO_OPT1 |
Enter delivery and shipping parameters. You can also enter domestic and export shipping options. |
|
|
Carrier Account Numbers Page |
CUST_3RD_PARTY_IN |
Enter account numbers for customers' carriers. |
|
CUST_SHIPTO_EXCPT |
Set up standard times when shipments should not be delivered to customers. |
|
|
CUST_SOLDTO_OPT |
Enter pricing and product information. |
|
|
CUST_SOLD_HIERARCH |
Select a classification, set up customer hierarchies, assign syndicated data types, and establish channels. The customer hierarchy is, from highest to lowest level, division, region, and territory. Currently PeopleSoft standard processing does not use the fields on the Hierarchy page. |
|
|
VMI Options (Supplier managed inventory options) Page |
CUST_SHIPTTO_OPT2 |
Specify VMI ship to options. |
|
CUST_SOLD_PRODCTLG |
Specify available catalogs. You can modify product offerings for sold to customers by creating product catalogs that contain only those products that each customer requires. You can create two types of catalogs: inclusive catalogs, which contain all of the products that are available to customers, and exclusive catalogs, which contain the products to withhold from customers. |
|
|
CUST_SOLD_PRDALIAS |
Set up product aliases. You can enter products on orders or quotations using the sold to customer's part number (product alias) or system product IDs. Both numbers appear on the order line. |
|
|
CUST_SOLDTO_OPT2 |
Specify VMI sold to options. |
|
|
CUST_GENERAL_MISC |
Enter web addresses, stock symbols, currency codes, rate types, support team codes, and subcustomer codes. |
|
|
CUST_VENDOR_INFO |
View supplier information for the supplier whom you specify on the General Information - Additional General Info page. |
|
|
DMS_CUSTOMER_1 |
Enter DMS agency information for individuals or corporations. |
|
|
DMS_CUSTOMER_2 |
Enter individual debtor information for DMS. |
|
|
DMS_CUSTOMER_3 |
Enter individual debtor employment information for DMS. |
|
|
DMS_CUSTOMER_4 |
Enter employee debtor bank information such as the bank name, address, and account type. This page is available only if you enter employer information on the DMS Customer 3 page. |
|
|
CUST_STAF_INFO |
Enter customer information that is specific to Staffing Front Office, including customer owners and related contacts. |
|
|
FO_CUST_QUALIFS |
Enter the target qualifications of the resources that this customer normally requests. This information can be used for opportunity searches. |
|
|
RS_SELQUALPROFILE |
Add target qualifications from a qualification profile. |
|
|
RS_QUALIF_SRCH |
Add target qualifications from the qualifications list. |
|
|
RS_SO_COMP |
Add target qualifications from a competency tree. |
|
|
FO_CUST_JOBTITLE |
Enter job titles of the resources that customers commonly request. This information can be used for opportunity searches. |
|
|
FO_CUST_CAR_MASTR |
Enter information about how the customer is billed for career placements and who conducts interviews and reference checks. |
|
|
FO_CUST_BENEFITS |
Enter benefits information that the customer offers its employees. |
|
|
FO_CUST_SALES_DATA |
Enter information about the customer for the purpose of supporting the Staffing business development process. |
|
|
FO_CUST_SALES_PROF |
Enter any additional sales information for this customer. |
|
|
FO_CT_SLS_LOC_PROF |
Enter any additional sales information for this customer location. |
|
|
FO_CUST_COMPETITRS |
Enter information about other staffing firms with which you compete for the customer. Alternatively, you can enter information to identify competitors of customers. |
|
|
FO_CUST_SRVC_AREA |
Enter the lines of business in which the customer operates. |
|
|
FO_CUST_JOB_SUPP |
Enter additional information about certain job descriptions. |
|
|
FO_CUST_FORMS |
Use this page to review forms currently associated with the customer record. From this page you can also click the Add New Form button to associate more forms with the customer record. |
|
|
FO_CUST_FORMS_DTL |
Associate additional forms with customer records. Forms can be configured to capture extra information about the customer that is not already captured in the delivered fields in the application. |
|
|
CUST_WRKSTE_MSTR |
Enter additional information about a customer worksite by associating forms with a customer work address. |
|
|
FO_CUST_EVL |
Define default event lists to use on PeopleSoft Staffing Front Office job orders. |
|
|
FO_MC_RATES |
Capture pay rate, bill rate and markup %, which have been negotiated and agreed upon by the staffing company and the customer. |
|
|
|
CUST_CSF |
Select the Customer Field Definition templates that you can use when creating orders and assignments for a customer. These templates enable you to capture additional information in the order and assignment that can be sent to PeopleSoft Billing and used for invoice printing or reporting purposes. |
|
Prenote History Page |
CUST_PRENOTE |
Set up prenote requirements for the direct debit payment method. |
When adding new customers to the database, begin by entering the required information in the Customer component.
Use the CUSTOMER_MAIN_CI component interface to load the main customer information, customer teams, and addresses into the component tables. Use the CUSTOMER_BILLTO_CI component interface to load billing-related data such as bill to options, customer correspondence, and customer credit into the component tables. Use the CUSTOMER_SOLDTO_CI component interface to load sold to-related information such as sold to options, product catalogs, customer hierarchy, customer product aliases, and brokers into the component tables. Use the CUSTOMER_SHIPTO_CI component interface to load ship to-related information such as ship to options, customer exception calendars, carrier account information, and indirect customers into the component tables. Use the CUSTOMER_MISC_CI, component interface to load miscellaneous information such as customer group, standard industry codes, VAT information, notes, attachments, and messages into the component tables and the CUSTOMER_REGION_CI component interface to load region codes.
You can also use the following component interfaces: Use the CUSTOMER Component Interface with EIP messaging to load specific customer information for setting up a customer. The CUSTOMER Component Interface uses all of the records within the CUSTOMER_GENERAL component.
Enter information that applies to one or more customer roles. You can override many of these settings at other points in the system.
When you add a customer, the customer ID might be NEXT by default. You can enable the system to assign the next number in sequence, as determined by the automatic numbering option that you set on the Automatic Numbering page. You can override the incremental assignment of IDs by entering another character combination in its place, or you can manually assign a customer ID.
Note: You can quickly create customers using Quick Customer Create.
PeopleSoft software is delivered with many enterprise integration points (EIPs) to send and receive customer and customer group data with a third-party system or another PeopleSoft application, such as CRM. These EIPs are implemented by means of service operations within PeopleSoft Integration Broker.
Oracle delivers the service operations in PeopleSoft Integration Broker with a default status of Inactive. You must activate each service operation before attempting to send or receive data from a third-party source or another PeopleSoft system, such as CRM.
If you are integrating with PeopleSoft CRM databases, Oracle recommends that you synchronize the customer table by performing a full batch publish to the subscribing system and provide updates to the subscribing system with incremental messages. Customers may be maintained in both PeopleSoft SCM and CRM. When this situation occurs, customer ID auto numbering should be maintained in the SCM database.
Use the information in the following table and refer to the setup instructions in the PeopleSoft Supply Chain Management Integrations Documentation, "Implementing Integrations," Setting Up Service Operations section.
|
Service Operation |
Direction and Type |
Handlers |
Chunking Available? |
Integrates With |
|---|---|---|---|---|
|
CUSTOMER_FULLSYNC |
Inbound/Outbound Asynchronous |
CustomerFullSync |
No |
CRM, Third-party |
|
CUSTOMER_FULLSYNC_EFF |
Inbound/Outbound Asynchronous |
NA |
No |
CRM, Third-party |
|
CUSTOMER_GROUP_FULLSYNC |
Inbound/Outbound Asynchronous |
CustomerGroupFullSync |
No |
CRM, Third-party |
|
CUSTOMER_GROUP_FULLSYNC_EFF |
Inbound/Outbound Asynchronous |
NA |
No |
CRM, Third-party |
|
CUSTOMER_GROUP_SYNC |
Inbound/Outbound Asynchronous |
CustomerGroupSync CustomerGroupSyncEff |
No |
CRM, Third-party |
|
CUSTOMER_GROUP_SYNC_EFF |
Outbound Asynchronous |
NA |
No |
CRM, Third-party |
|
CUSTOMER_GROUP_SYNC_REQ CUSTOMER_GROUP_SYNC_REQ_CALLBACK |
Inbound/Outbound Asynchronous, Request/Response |
CustomerGroupSync |
No |
Customer Data Hub, Third-party |
|
CUSTOMER_SYNC |
Inbound/Outbound Asynchronous |
CustomerSync CustomerSyncEff |
No |
CRM, Third-party |
|
CUSTOMER_SYNC_REQ CUSTOMER_SYNC_REQ_CALLBACK |
Inbound/Outbound Asynchronous, Request/Response |
CustomerSync |
No |
Customer Data Hub, Third-party |
|
CUSTOMER_SYNC_EFF |
Inbound/Outbound Asynchronous |
NA |
No |
CRM, Third-party |
See the product documentation for PeopleTools: Integration Broker
The pages, which are described in this section, are applicable only for staffing use. Most of the pages are used by the Staffing Front Office application; the Customer Field Definition page is used by PeopleSoft Pay/Bill Management.
This table lists comments for some of the Staffing Front Office pages:
|
Page |
Comments |
|---|---|
|
Career Master |
Enables you to record information about how career placements should be processed for a customer including, placement fee schedules, reference checks, and interviews. |
|
Job Supplement |
Provides additional information about the safety precautions or equipment that is used for a specific job. You can also use the job supplement to store information about the nature of a particular type of job. The question and answer fields that appear on the Worksite Master page are set up during system implementation. Note: You do not need to enter a job supplement every time that the customer places a similar job order. Add a new job supplement to the customer record only if the safety precautions, equipment, or physical requirements of a job are substantially different from the other job supplements that are on record for the customer. |
|
Forms |
Enables you to collect information about customers. This could include additional information about the safety precautions, physical requirements, or equipment that an applicant or employee uses for a specific job order, or any information that organization may want to collect. |
|
Worksite Master |
Stores additional information about the customer's physical plant, office environment, or campus, and helps to describe work opportunities to candidates and to orient employees to assignments that they have accepted. To create a worksite master record, you must first create customer and contact records. The question and answer fields that appear on the Worksite Master page are set up during system implementation. To make any changes to the list of available forms or to the content of the forms, contact the system administrator. |
|
Default Customer Event Lists |
Configure a Standard Event List as their default event list to be used for all user defined order types and then configure another unique event list to be used for specific user defined order types. So if the order type is listed specifically, the system will default the event list associated to that specific user defined order type. |
|
Contract Rates |
Enable the staffing system user to capture pay rate, bill rate and markup %, which have been negotiated and agreed upon by the staffing company and the customer. Ultimately, the rates entered here will be used to default on assignments. The rates established here will be used as the corresponding default values on the Billing tab of the Order. |
Use the Customer Information - General Info page (CUST_GENERAL1) to add or review customers’ names and level information and assign associated roles. You can also enter one or more addresses for customers and assign descriptions to each location.
Navigation:
This example illustrates the fields and controls on the Customer Information - General Info Page. You can find definitions for the fields and controls later on this page.

Field or Control |
Description |
|---|---|
Customer Status |
Select from the available options: Active: No restrictions are placed on how the customer can be used in the system. Inactive: You cannot post pending items to inactive customer accounts in PeopleSoft Receivables. Additionally, prompt lists exclude inactive customers. Their account information, however, appears on the customer pages and remains part of historical information. You cannot create item actions for inactive customers Template: The status designates that the customer will be used as a template customer for counter sales orders. The template can be added to the PeopleSoft Order Management business unit so that it will be the counter sales by default. Templates enable you to add customer information quickly during counter sales. |
Use Template Address |
This field appears if you selected Template in the Customer Status field. Select this option if you want to use the address on the template for the order. This option is typically used for counter sales or cash sales. |
Does Not Expire |
This field appears if you selected Template in the Customer Status field. Use this option if you do not want the short-term customer that is created by means of the template to expire. |
Days Until Expiration |
This field appears if you selected Template in the Customer Status field. Use the field if you want to limit the time that you can use the short-term customer that was created by means of the template customer. If you enter an order or quote for a customer and the expiration date has expired, you will get a warning message during the transaction. In the case of orders, you will be able to save the order, but you will need to update the date for the customer. |
Copy From Customer |
Click to access the Copy Customer page and copy attributes from an existing customer or customer template. This option is available only in add mode. |
Level |
Select a level to indicate the level of processing that can occur for the customer: Valid values are New: Indicates that the customer was recently added to the system. All processing is the same as at the Regular level. Prospect: Indicates that the customer ID does not appear in customer ID prompts within PeopleSoft Receivables and cannot be entered on an invoice or sales order. You can enter a quote and a conversation for a prospect customer. Regular: Indicates that the customer ID does appear in customer ID prompts within PeopleSoft Receivables and can be entered on an invoice or sales order. Short-Term: Indicates that the customer is not expected to be a long-term customer. Short-term customers can be used for cash sales and counter sales. An expiration date may be set for the short-term customer, which is used to display a warning message when an order is being created for an expired short-term customer. Temporary: Indicates that the customer may not be a long-term customer. All processing is the same as at the Regular level. |
Date Added and Since |
Enter the date when you established this customer in the system. You can also specify that the customer has been a customer since a certain date, which may be the date added. The current date appears by default for both fields. In add mode, you can change the effective date for all matching effective-dated customer records by changing the Date Added field. |
Type |
Select a type to identify customer categories in reports. For example, User 1 might represent manufacturing customers, User 2 might represent retail customers, and so forth. Each label can be up to 10 characters long. You can modify or add translate values for this field using PeopleSoft Application Designer. |
Name 1 |
Enter the customer's primary name. Enter the customer's standard name in the Name 1 field on this page. You can enter an alternate name in the Name 2 field on this page if the customer has a different doing business as (DBA) name. A third name field, Name 3, appears on the Miscellaneous General Information page, in addition to the Name 1 and Name 2 fields. Note: The system uses only the Name 1 value as a search key. When a customer's name changes, you can enter the new name and still maintain a record of the previous name. You can change a customer name up to two times. When you change the name for the first time, a previously unavailable field called Former Name 1 appears on the Miscellaneous General Information page and contains the previous Name 1 field value. When you change the value in the Name 1 field a second time, Former Name 2 appears adjacent to the Name 3 field on the Miscellaneous General Information page and contains the previous Name 1 field value. |
Short Name |
Enter a name to appear on pages no room is available for the full name. The system populates this field with the first ten characters of the Name 1 field. |
Alt Name 1 (alternate name 1) and Alt Name 2 (alternate name 2) |
Click to access the Alternate Character Type page and enter customer names in alternate characters. This link appears next to the Name 1, Name 2, and Name 3 fields when you enable alternate character sets for the user on the User Preferences - Overall Preferences page. |
Currency Code |
Select a currency code. The system uses this code as the default currency for the Credit Profile page, for displaying credit amounts, and as the transaction currency for quotations, sales orders, and Returned Material Authorizations (RMA). Orders and RMAs use this currency when the system generates invoices and credit memos. For multicurrency customers, the system uses this currency for multiple-currency open accounts-receivable items in business units that use this customer. |
Rate Type |
Enter a rate type to convert all transaction currencies to the currency code that you select on this page. |
See Understanding Counter Sales.
Financial Sanctions
Financial sanctions screening validates customer information with a variety of national and security lists.
Field or Control |
Description |
|---|---|
Confirmed |
Select this check box to indicate that the customer is not a match with a list used for financial sanctions screening. When a new customer is added, the address is changed, or the Screen for Denied Parties process is run, and the name and address fields are validated against the list that is used for financial sanctions screening. If the customer is a match, the check box remains deselected. After contacting the agency and determining that the customer is not a match, select the check box. You can also deselect the check box if you think the customer would be on the security list and the lists have not been updated yet. By doing so, you ensure that any orders entered for the customer are placed on hold. |
Reason Code |
Enter a code after selecting or deselecting the Confirmed check box. |
Do not screen for |
Enter the number of days that you want the system to not validate the customer against the list used for financial sanctions screening. |
Next screening |
After saving the changes in the Do not screen for field, the date appears when the customer will be validated against the list used for financial sanctions screening. |
Roles
Field or Control |
Description |
|---|---|
Bill To Customer |
Select if the customer receives invoices. When you select this check box, the system designates the customer as a correspondence and a remit from customer, and makes those check boxes available. Only bill to customers can be correspondence or remit from customers. To change the correspondence or remit from assignments for this customer, deselect the corresponding check boxes. Two additional fields appear for entry of the SetID and the customer ID of the new correspondence or remit from customer. PeopleSoft Billing and Receivables use these roles. |
Ship To Customer |
Select if the customer receives order shipments. Note: This is labeled Worksite Customer when Staffing Front Office or Pay/Bill Management are being used based on installation options. |
Sold To Customer |
Select if the customer places orders. |
Broker Customer |
Select to associate a broker with a sold to customer. A broker can act as a representative for a specific product line for this customer and negotiate product discounts or order goods on the customer's behalf. The broker might also receive sample goods or courtesy copies of various documents. The broker customer is the ordering body for the sold to customer. Brokers can place orders on behalf of a customer and receive documents such as order acknowledgements, quotation responses, and courtesy copies of sales acknowledgements and invoices. A broker can belong to many sold to customers, and you can associate more than one broker with a sold to customer. |
Indirect Customer |
Select to associate an indirect customer with a ship to customer. Processing for indirect customers is not available at this time. |
Correspondence Customer |
Correspondence customers are, by default, associated with a bill to customer. The information that you establish for the correspondence customer defines processing options, send to information, and remit to address information for customer correspondence, such as statements, finance charge invoices, and Dunning letters. If the Correspondence Customer check box is selected for this customer identifying this customer as a correspondence customer, then when you click the Correspondence Selection link to view the Correspondence Customer Hierarchy, only the selected customer will appear at the top of the hierarchy. To build a multilevel correspondence customer hierarchy, the Correspondence Customer check box must not be selected. If this check box is not selected a field appears with the SetID of the current customer as the default value. You can override this value and select another SetID. Next to the SetID field is a blank field with a search icon, which you can click to select the customer that you want to appear as part of the Correspondence Customer Hierarchy on the Customer Hierarchy page once you save the page. You then click the Correspondence Selection link to view this new hierarchy. You can view this hierarchy with balances for this customer in the Collection Workbench when you select Correspondence as the level for the customer you are reviewing in the workbench. Note: If you select a customer as a correspondence customer and then decide to deselect it, you must first delete the correspondence options that you set for the customer. |
Remit From Customer |
A remit from customer is the paying entity. All customers are their own remit from customers by default, unless you assign the customers to remit from groups in the General Information component. If the Remit From Customer check box is selected for this customer identifying this customer as a remit from customer, then when you click the Remit From Selection link to view the Remit From Customer Hierarchy, only the selected customer will appear at the top of the hierarchy. To build a multilevel remit from customer hierarchy, the Remit From Customer check box must not be selected. If this check box is not selected, a field appears with the SetID of the current customer as the default value. You can override this value and select another SetID. Next to the SetID field is a blank field with a search icon, which you can click to select the customer that you want to appear as part of Remit From Customer Hierarchy on the Customer Hierarchy page once you save the page. You then click the Remit From Selection link to view this new hierarchy on the Customer Hierarchy page. You can view this hierarchy with balances for this customer in the Collection Workbench when you select Remit From as the level for the customer you are reviewing in the workbench. Note: Remit from customer groups are valid only for bill to customers. |
Corporate Customer |
Select to designate a new customer as a corporate customer, or deselect to assign this customer to a different corporate customer. If the Corporate Customer check box is selected for this customer, which identifies this customer as a corporate customer, then when you click the Corporate Selection link to view the Corporate Customer Hierarchy, only the selected customer will appear at the top of the hierarchy. To build a multilevel remit from customer hierarchy, the Corporate Customer check box must not be selected. If this check box is not selected, a field appears with the SetID of the current customer as the default value. You can override this value and select another SetID. Next to the SetID field is a blank field with a Search icon, which you can click to select the customer that you want to appear as part of Corporate Customer Hierarchy on the Customer Hierarchy page once you save the page. You then click the Corporate Selection link to view this new hierarchy on the Customer Hierarchy page. You can view this hierarchy with balances for this customer in the Collection Workbench when you select Corporate as the level for the customer you are reviewing in the workbench. |
Consolidation Customer |
Select to enable the customer to receive consolidated bills in PeopleSoft Billing. This check box is available only for bill to customers. When you select consolidation customer, you must also define a Consolidation Business Unit. The Billing Interface process (BIIF0001) uses this information to determine which business unit to use on consolidated bills. Individual bills that are attached to a consolidated bill often originate from different business units. |
Grants Management Sponsor |
Select to indicate that the customer is a Grants sponsor. This enables the customer information that you enter on these pages to be included in other Grants pages and processing. |
Note: When you define customers who participate in intercompany transfers, you must select the Bill To, Ship To, and Sold To customer roles.
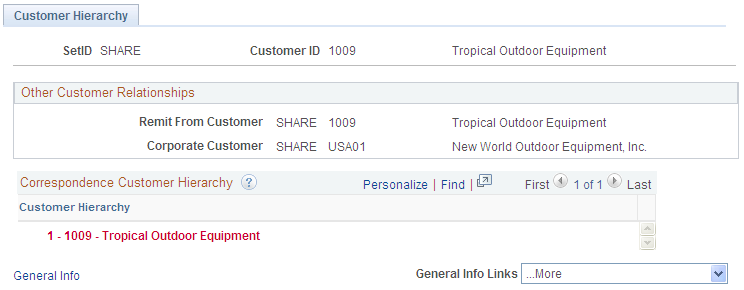
Customer Hierarchy Page
Use the Customer Hierarchy page (CUST_CORP_SELECT) to view related information about various customers.
Click the Correspondence Selection link, Remit From Selection link, or the Corporate Selection links on the Customer - General Information page.
This example illustrates the fields and controls on the Correspondence Customer Hierarchy - Customer Hierarchy page. You can find definitions for the fields and controls later on this page.
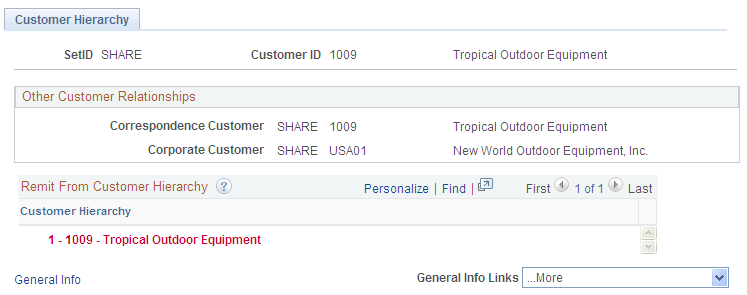
This example illustrates the fields and controls on the Remit From Customer Hierarchy - Customer Hierarchy page. You can find definitions for the fields and controls later on this page.
This example illustrates the fields and controls on the Corporate Customer Hierarchy – Customer Hierarchy page. You can find definitions for the fields and controls later on this page.

When you add or update a customer, you can select the check box next to the Correspondence Customer, Remit From Customer, and Corporate Customer on the Customer Information – General Information page to indicate that this customer is a parent customer in for each of these roles when you on of the selection links. You have the option to select one, two, or all three of these customer roles as parents. When you click the selection link next to each role, the Customer Hierarchy page appears with the selected role's hierarchy. You can set up or update customers that you want to belong to the 1001 hierarchy for all three customer roles.
Important! Even if there are multiple SetIDs associated with the customers that appear in the customer hierarchy, only one SetID appears on the Customer Hierarchy page or the Collections Workbench - Customer Hierarchy tab. This SetID appears based on the setup on the
Federal Attributes
Field or Control |
Description |
|---|---|
Federal Customer |
Select if the customer is a federal entity. |
Trading Partner Code |
Enter a two-digit code only for federal customers. This field is required if you select the Federal Customer check box. |
Disbursing Office |
This field is updated by the SAM process. |
Appropriation Symbol Not Required for Reimbursable Agreements |
Select to determine whether an appropriation symbol is required for a particular customer. |
Contracts Options
Field or Control |
Description |
|---|---|
Hold Billing on Unpaid Cost |
The value of this check box defaults from the Contracts - Installation Options page. The value selected here will default to the new contract that is created. See Understanding the Contracts Billing Process, Updating Hold Billing and Revenue on Unpaid Cost Options. |
Support Teams
Field or Control |
Description |
|---|---|
Team Code |
Designates the team that supports the ship to customer. Set up support team codes on the Support Team Members page. |
Default |
Specify the support team to be referenced on sales orders and quotes. This is a required field. |
Address Locations and Details
All customer roles must have an associated primary address, as well as Name1, Short Name, Currency Code, Currency Rate Type, and Default Support Team field values. You can enter one address for all of the customer roles or separate addresses for each role.
The address type check boxes are available when you select the corresponding customer role on the General Information - Ship To Options page. Select any of the address types.
Field or Control |
Description |
|---|---|
Customer |
If you are adding a new customer, NEXT appears until you save the page. Or you can override NEXT and manually enter a value. |
Location |
Enables you to indicate an organization's different address types. For example, you can specify one address to receive bills, another for shipping, a third for postal deliveries. Each address has a different location number. Every customer role must have a primary location, which the system uses on all pages where a customer address appears. The primary location, indicated by a 1, is the address that you use most often when you contact the customer, and may be different from the customer's main address. |
Staffing Hot List |
Select to indicate that this customer should appear on the Customer Hot List pagelet. |
Bill To |
Select at least one address as a bill to address if the customer is a bill to customer. You must also select one address as the primary bill to address by selecting the Primary check box. |
Ship To |
For intercompany transfers, the primary ship to address appears by default on the Material Stock Request - General Info page and the Express Issue page. You can only view the value on those pages; you cannot override it. Note: Ship to addresses are called Worksite addresses when Staffing Front Office or Pay/Bill Management is installed based on installation options. |
Sold To |
Enter the address that receives the order, quote, RMA, and buying agreement renewal letter documents. If you select the Primary check box, the sold to address is the address location that appears by default on the sales order, quote, and RMA when you select this customer ID. |
RFID Enabled |
Select to indicate that orders that are shipped to this destination require RFID tags. |
Broker |
Enter an address for the broker who receives sample goods and courtesy copies of sales order acknowledgements and invoices. |
Indirect |
You can associate indirect customers with ship to customers. |
Correspondence Address |
Enter the address that receives correspondence. |
VAT Default |
Click to access the VAT Defaults Setup page. The VAT Defaults Setup page is a common page for setup of defaults for all PeopleSoft applications that process VAT transactions. On this page, you can define customer defaults as applicable. |
VAT Service Treatment Setup |
Click to access the Services VAT Treatment Drivers Setup page. The Services VAT Treatment Drivers Setup is a common page used to set up VAT services treatment for all PeopleSoft applications processing VAT transactions. If you are required to implement special handling for services, you can specify customer service treatment defaults on this page as applicable. |
Effective Date and Status |
Within each location number, you can enter multiple addresses that are keyed by effective date and status. |
Language Code |
Enter a code for the system to use as a default value for this location. |
Tax Code |
This value appears by default on bill lines in PeopleSoft Billing and on sales order lines in PeopleSoft Order Management. The value is available only for ship to customers; if the address that you are viewing is not a ship to address, this field is unavailable. Note: This field is used for PeopleSoft-provided taxation coding. |
Physical Nature |
Select the default physical nature for transactions. Options are Goods and Services. |
Where Performed |
Select the default location where a service is most often physically performed. Options are Buyer's Location, Ship From Location, Ship To Location, and Supplier's Location. |
Address 1, Address 2, and Address 3 |
These are dynamic fields that the country selection determines. Enter location identifiers, such as Printing Division or Western Annex. |
View Map |
Click to view a map of the specified address. Note: This option is available if the mapping information has been defined on the Staffing Information Installation Options page. |
View Phone Information |
Click to access the Country - Address Format page and enter phone information for the customer. |
City |
Enter the name of the city (for U.S. addresses) or town (for international addresses). |
In City Limit |
Select to enable third-party tax providers to determine additional city taxes for products as applicable. |
Geocode |
If you are using a third-party tax provider, you must click the Geocode Lookup link to retrieve the geocode. |
Note: On the Country - Address Format page, select the fields that appear for each country and then assign user-defined labels. Consequently, the fields that appear on this page might not match the fields that are described.
Use the General Information - Bill To Selection page (CUST_BILLTO_SELECT) to view role designations for bill to customers and associated sold to customers.
Navigation:
Click the Bill To Selection link on the General Info page.
Field or Control |
Description |
|---|---|
Bill To Customer and Associate Roles |
View the customer roles that you select on the General Info page in these group boxes. |
Sold To Customer |
View sold to customers (in the Sold To Customer and Name fields) who have the customer ID as their designated bill to customer. |
Use the General Information - Ship To Selection page (CUST_SHIPTO_SELECT) to enter indirect customer information for ship to customers and view associated sold to customers.
Navigation:
Click the Ship To Selection link on the General Info page.
Click the Ship to Selection link on the General Info - Ship To page.
Field or Control |
Description |
|---|---|
Ship To Customer |
Indicates the designation that you make on the General Info page. Note: The ship to customer is called the Worksite customer when Staffing Front Office or Pay/Bill Management is being used based on installation options. |
Indirect Customer |
Appears if you select the Indirect Customer check box on the General Info page. |
Sold To Customer |
The sold to customer who is associated with the ship to customer. The sold to customer name appears in the Name field. |
Indirect ID |
Select a value if you use indirect customers. Also, select a Ship to Priority code. Specify indirect customers on the General Info page. |
Use the General Information - Sold To Selection page (CUST_SOLDTO_SELECT) to view or modify additional role designations for sold to customers.
Associate ship to, bill to, and broker customers. View customer relationships and customer correspondence groups.
Navigation:
Click the Sold To Selection link on the General Info page.
Field or Control |
Description |
|---|---|
Sold To Customer |
Indicates the designation that you make on the General Info page. |
Broker Customer |
Appears if you select the Broker check box on the General Info page. |
Bill to Customers, Ship To Customers, and Broker Customers |
Use the fields in these grids to assign the corresponding customers to the sold to customer. Select a customer ID from the available Bill To, Ship To, or Broker ID fields. Also, enter a priority value for each. The broker who is associated with the sold to customer and designated as the sold to priority 1 appears by default in the Ordered By field on the sales order and quote header. In all cases, a priority 1 designation indicates the primary customer to use for the sales order, quote, and returned material request created for the sold to customer. |
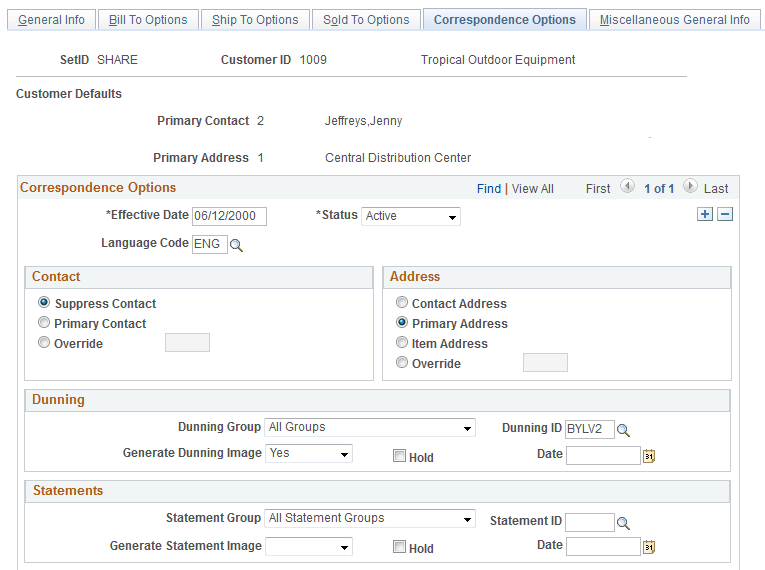
Use the General Information - Correspondence Options page (CUST_CRSPD_OPT1) to select name and address information to use in statement, invoice, and letter headers.
You can also override remit-to-location default values from the business unit and tailor Dunning letters, finance charge invoices, and statements for individual customers.
Navigation:
Click 0040 –Correspondence Options in the More field on the General Info page.
This example illustrates the fields and controls on the General Information - Correspondence Options page (1 of 2). You can find definitions for the fields and controls later on this page.
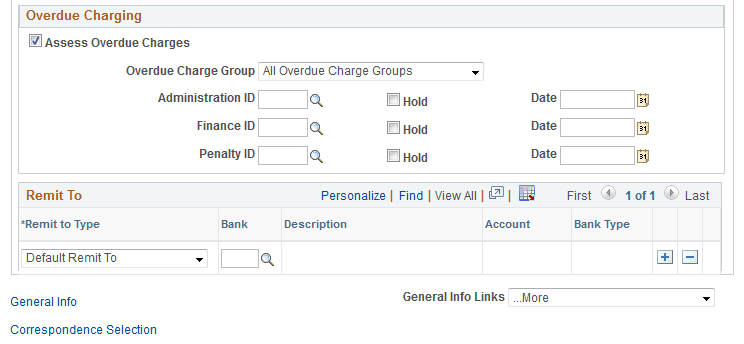
This example illustrates the fields and controls on the General Information - Correspondence Options page (2 of 2). You can find definitions for the fields and controls later on this page.
Customer Defaults
Field or Control |
Description |
|---|---|
Primary Contact and Primary Address |
View the field values with their corresponding sequence numbers. |
Effective Date and Status |
The system supplies these values from the General Information - Correspondence Options 1 page by default. |
Contact
Field or Control |
Description |
|---|---|
Suppress Contact |
Select to prevent letters from being addressed to the primary contact. |
Primary Contact |
Select to have correspondence addressed to the primary contact. |
Override |
Select to correspond with someone other than the primary contact. Then select the sequence number of the other contact person from the available values |
In correspondence, the contact name appears as the first line of the address and is the salutation for Dunning letters.
Address
Field or Control |
Description |
|---|---|
Address |
Select a customer correspondence address:
|
The item address is an item-based correspondence approach, in which items for a customer are divided among letters, statements, and invoices according to the address that is associated with the item. Assign an address to individual items in the Location field on the Completing the Pending Item 2 page.
Remit To
Field or Control |
Description |
|---|---|
Remit to Type |
Select a remit to type: Default Remit To: Use as the remit to address for open item statements. Balance Forward: Use as the remit to address for balance forward statements. |
Bank and Account |
Select the preferred bank code and account. The system populates the corresponding bank type. |
Dunning, Statements, Overdue Charging
Field or Control |
Description |
|---|---|
Dunning ID, Overdue Charging, and Statements |
The options in these group boxes enable you to override the default IDs that you set at the business unit level. Dunning and statement IDs determine when to exclude items from correspondence and when not to send the letter or statement. Overdue charging generates overdue charge documents for a customer, creates new overdue charge items that you can post to a customer's account, or both. To apply different guidelines to a customer, select a valid ID and group in each of the three sections of this page. If you override the default value, the ID appears here; if you accept the default value, it doesn't appear here. |
Dunning Hold, Assess Overdue Charges, and Statement Hold |
Select any of these check boxes to prevent the system from creating letters, finance charges, or statements for this customer. These check boxes are useful when, for example, a customer's account is in dispute and you don't want to send any correspondence until you resolve the issue. The associated hold date appears when you apply a document hold to a customer. The current date appears as the hold date by default. Note: The system ignores document holds when you request a statement, finance charge, or Dunning letter for a single customer or a single correspondence customer. |
Dunning Group, Overdue Charge Group, and Statement Group |
Select to group customers for statement, Dunning letter, and overdue charge processing. When you run the Statements process (AR_STMTS), the Overdue Charge process (AR_OVERDUE), or the Dunning process (AR_DUNNING), specify to generate only statements, overdue charge invoices, or Dunning letters for customers in a specific group. Select one of the options for assigning a customer to a group. |
Generate Statement Image |
Select Yes to generate statement images for this customer and display them on the Collections Workbench, Correspondence tab, or No to turn off the functionality. The value you select in this field overrides the setting at the Receivables business unit level. If this field is blank, the system uses the selection on the Receivables Options - General 1 Page . See alsoCorrespondence Tab. |
Generate Dunning Image |
Select Yes to make dunning images available on the Collections Workbench, Correspondence tab, or No to turn off this functionality. The value you select in this field overrides the setting at the Receivables business unit level. If this field is blank, the system uses the selection on the Receivables Options - General 1 Page. See alsoCorrespondence Tab. |
Use the General Information - Additional General Info page (CUST_GENERAL2) to enter optional customer data.
Navigation:
Select 0020 - Additional General Info in the More field on the General Info page.
Alternate Customer Information
Field or Control |
Description |
|---|---|
Standard ID Qualifier |
Select a translate value that lists credit and reporting services in various countries. If you use trade credit organizations other than those provided, you can add field values to accommodate that information. Consult the PeopleTools documentation when making that change. The ID number that is associated with the qualifier appears. DUNS Number (with edit): (Dun and Bradstreet number with edit) The system prompts you to select a SetID and Dun and Bradstreet (D&B) number. DUNS Number (no edit): (Dun and Bradstreet number no edit) This option is for companies that do not have the D&B interface installed or do not use the D&B component and want to maintain the information manually. Additionally, this option has a Credit File check box that you can use as you want. DUNS +4 Suffix: Use this option is used individual credit entities within a larger organization using the entity's Dun and Bradstreet number followed by a 4-digit suffix. Note: You may want to inactivate a DUNS number translate value that you are not using. Electronic Address ID: A number given by the national Hub to uniquely identify the participant’s bill to sites or sub-organization’s final recipient of the invoice. For some countries, this is a required field. |
Return to Previous Panel |
Click to access the Dun and Bradstreet component to view or enter D&B information for the customer or to purchase a report. This button is active only if you select DUNS Number (with edit) in the Standard ID Qualifier field and you accessed the page from the Dun and Bradstreet component. |
SIC Codes
Field or Control |
Description |
|---|---|
SIC Type (standard industry classification type) |
Select a value to specify the classification format that is used in Canada, France, Germany, the U.K., or the U.S. Major industry types and subsets within industries use standard industry classification codes in various countries to group and facilitate reporting and analysis. |
SIC Code (standard industry classification code) |
Select a value to specify the industry classification that is appropriate to the customer. Industry codes are listed by type in the appropriate categories and language. You can add rows to include this customer in additional types and classifications. |
Use the General Information - Credit Profile - General page (CUST_CREDIT_PRFL1) to set up and review customer credit profiles.
You can also enter credit limits and additional credit parameters for bill to and corporate customers.
Navigation:
Click the Go To Credit page link on the Dun and Bradstreet page.
Select 0030 - Credit Profile in the More field on the General Info page.
Credit Profile
Field or Control |
Description |
|---|---|
Effective Date |
Additional customer credit information is keyed by this date to enable you to keep a history of changes that you make to the customer's terms and to enter changes that go into effect on a future date. |
Credit Class |
Select to group customers by defining additional credit categories. |
Risk |
Select as an indicator of the customer's past credit history. |
Risk Score |
Displays the risk score that was calculated for this customer based on the set up of a risk score rule and running the Risk Scoring Application Engine program. Click the risk score link to display the Risk Score Details page, which displays the Risk Scoring ID, the Risk Scoring Element, the number of business units, the Customer Data, the Range Value, and the Scoring Weight (%) that were used by the AR_RISK program to calculate and display this risk score. |
Currency Code |
Enter a currency to use for credit information. This value appears by default from the Miscellaneous General Info page. For multicurrency customers, the system uses this currency for multiple-currency open accounts-receivable items in business units that use this customer. The system converts all open items to this common currency for credit checking. |
Rate Type |
Enter a type to convert all transaction currencies to the currency code that you select on this page. |
Collection Information
Field or Control |
Description |
|---|---|
Collection |
PeopleSoft Receivables uses this check box for informational purposes only. Changing a customer's status to Collection has no effect on item or payment processing. |
Status |
Select a status (from those that you define on the Collection Status page) when you turn over a customer for collection. Status codes vary according to business practices; for example, they might represent different collection agencies that you use. |
Dispute Information
Field or Control |
Description |
|---|---|
Dispute |
PeopleSoft Receivables uses this check box for informational purposes only. Changing a customer's status to Dispute has no effect on item or payment processing. |
Status elements, description status (general customer information) |
Select a status (from those that you define on the Dispute Status page) when you place a customer in dispute. As with collection status codes, dispute status codes vary by business. They usually indicate the cause for dispute, such as a pricing error or an incorrect shipment. |
Amount |
Enter the disputed amount. This value can be the customer's account balance, the amount of a single item, or some other amount. It can be a negative or positive value. |
Credit Check Information
Field or Control |
Description |
|---|---|
Enable Credit Checking |
Select to have the system check this customer's credit and reject orders when the customer exceeds the credit limit. The system includes only open orders in the credit-checking calculations; it ignores orders in any other status. Important! The Credit Check check box on the Order Group Terms page takes precedence over the Credit Check check box at the customer level. When you deselect the Credit Check check box on the Order Group Terms page, the system will not perform credit checking regardless of how you set credit checking on this page. If you select the Credit Check check box, then you must also select it at the customer level. This enables credit checking on a per customer basis. Note: If the PeopleSoft Order Management business unit has credit checking enabled, then all bill to customers using that business unit are expected to have credit profiles. A missing credit profile will result in the orders for that customer in the business unit being put on hold. Note: All fields except the Credit Limit Review Date are unavailable until you select this check box. These fields, except the Range % field, are applicable only when the system runs credit checks through PeopleSoft Order Management. |
Credit Limit Review Date |
Enter the date on which to reevaluate the credit limit. This date applies to both the credit limit and the corporate credit limit. |
Maximum Order Amount |
Enables you to set a limit on individual orders for this customer. |
Corporate Credit Check Algorithm |
The user can use the existing algorithm or the new advanced corporate credit algorithm at the corporate customer level. The corporate customer option will override the installation default if a value is present. Values from the drop-down list box are Basic, Advanced, and Installation Default. This drop-down list box is displayed only if the Allow Credit Profile to Override check box is selected on the order management installation record. |
Use Corporate Summary Table |
The user can use the summary table for the corporate credit check calculation. The summary table is updated each time the credit check process is run and will store old credit balance, sales order backlog and pending payment and deposit information. The corporate customer option will override the installation default if a value is present. Values from the drop-down list box are Yes, No, and Installation Default. This drop-down list box is displayed only if the Allow Credit Profile to Override check box is selected on the order management installation record. |
Backlog Days |
Select the number of backlog days to include in the credit-available calculations. For example, if you select 60, when the system calculates credit available, it subtracts order lines that are scheduled to ship within 60 days. This part of the credit-checking algorithm is sometimes referred to as potential accounts receivable. The system calculates potential accounts receivable (backlog due to ship within a specified number of days) only for bill to customers. |
Credit Limit
Field or Control |
Description |
|---|---|
Credit Limit |
Applies to the bill to customer, and workflow processes used in PeopleSoft Receivables can reference it. When a bill to customer exceeds the credit limit, for example, the system adds this customer to the worklist of the workflow user who is assigned to the customer, indicating that the user should review this customer's account. Note: A blank Credit Limit field represents unlimited credit, even if you select the Credit Check check box on this page and establish credit checks on the Credit Processing page. To indicate that a customer does not have unlimited credit, enter an amount, which could be as little as .01 or as high as the customer's credit worthiness allows. |
% Over Limit (percentage over limit) |
Enter a percentage by which you allow customers to exceed their credit limits before hold processing takes effect. If you enter 2%, for example, the system adds two percent of the customer's credit limit to the available credit amount. Depending on the percentage that you enter, the credit limits might be higher than those that you originally established for the customer. |
Range % (range percentage) |
Enter a percentage to represent a comfort level that is relative to this customer's credit limit. You can flag some customers, for example, when they get within 80 percent of their credit limits; alternatively, you can allow other customers to use 110 percent of their credit limits. |
Date |
Enter the credit limit date. This date is distinct from the effective date so that changes to the credit limit or other credit information remain independent of each other. |
Corporate Credit Limit
Field or Control |
Description |
|---|---|
Corporate Credit Limit |
Enter an amount if the customer is a corporate customer. The credit limit amount appears by default, but you can override that value. You can also enter a percentage over limit, a range percentage, and a date. |
% Over Limit (percentage over limit) |
Enter a percentage by which you allow corporate customers to exceed their credit limits before hold processing takes effect. |
Range % (range percentage) |
Enter a percentage to represent a comfort level that is relative to this corporate customer's credit limit. PeopleSoft Receivables uses this value. |
Date |
Enter the credit limit date. |
Note: Corporate Customers need not be Bill-To customers to use corporate credit checking. Hence, corporate level credit check calculation is allowed for all corporate customers, regardless of the corporate customer role.
Hold If Outstanding AR Balance
Field or Control |
Description |
|---|---|
Aging ID and Aging Category |
If a customer has an outstanding balance in the specified aging ID at the specified aging category or older, the system might place all orders for that customer on hold, even if the customer has not reached the credit limit. The system places these orders on hold only if you assign a hold code for the Outstanding AR (outstanding accounts receivable) field on the Credit Processing page in PeopleSoft Order Management. Regardless of the aging ID and aging category that you specify on this page, PeopleSoft Receivables uses all of the applicable aging IDs and aging categories to calculate a customer's outstanding items. Note: Even if you elect to forego credit checking for a customer, the system checks for values in the Aging ID and Aging Category fields and places orders on hold if open receivables exist that meet or exceed the specified parameters. |
1099-C Reporting |
Click this link to access the 1099-C Reporting Details Page, where you must enter a customer's cancellation of debt details before generating the 1099-C form to submit to the IRS. This link appears when the 1099-C Reporting option is selected in the installation options for Receivables. |
Use the General Information - Customer Group Info page (CUST_GROUP_INFO) to assign individual customers to customer groups.
Group customers with similar traits and define processing criteria for the entire group instead of individual customers. Customers can share the same account distribution, pricing arbitration plan, pricing structures, reports, sales contracts, transportation lead times, and taxes.
Navigation:
Select 0070 - Customer Group in the More field on the General Info page.
Field or Control |
Description |
|---|---|
Customer Group |
Associate customers with multiple groups. |
Group Type |
Associate multiple Customer Group values with these types: Accounting, Allocation Group, Alternate Sources of Supply, Backorder/Reservations, Claimback Contract, Buying Agreements, Collection, Direct Debit, Draft, Forecasting, Freight, Pricing, Pay/Bill Management, Pricing Arbitration Plan, Reporting, Tax, or Transportation. Note: A customer cannot be assigned to more than one of these customer groups: Forecasting or Pricing Arbitration Plan. |
Use the General Information - Tax Exempt Certificate Info page (CUST_TAXEXMPT_INFO) to set up tax-exempt certificate information.
Navigation:
Select 0080 - Tax Exempt Certificates in the More field on the General Info page.
Field or Control |
Description |
|---|---|
Exemption Certificate and Issuing Authority |
Record multiple tax exemption certificates for each customer and select an authority type to classify the issuing authority. For each exemption certificate, enter an effective date, status, issued date, and expiration date. |
Tax Exempt Category |
Specify the exemption category for which the customer qualifies with this purchase: Blanket: Exemption category exists for all purchases of this type. Single Purchase: Exemption category exists for the specified purchase only. Other: You have defined another exemption category. |
Exempt License Exists elements, descriptionsexempt license exists (general customer information) |
Select to denote that a tax-exempt license is issued to the customer. |
Note: In PeopleSoft Billing, you can include the certificate information on the customer's invoice.
Use the General Information - Customer VAT Info page(general information - customer value-added tax information) page (CUST_VAT_INFO) to enter customer VAT information.
Navigation:
Select 0090 - VAT Info in the More field on the General Info page.
VAT Registration
Field or Control |
Description |
|---|---|
Country and Home Country elements, descriptionshome country (general customer information) |
Add rows for as many countries as you need to define, and then select one country as the home country. |
VAT Registration ID (value-added tax registration ID) |
Define for each country. |
Exception Data
Field or Control |
Description |
|---|---|
Effective Date and Status |
Specify the effective date and status for each exception that you enter. |
End Date |
Enter the date that the exoneration or suspension ends, if applicable. |
Exception Type |
Select the type of exception. Options are: Exonerated: Select if the VAT entity is permanently excused from paying VAT. Suspended: Select if the VAT entity is temporarily excused from paying VAT. |
VAT Certificate ID (value-added tax certificate ID) |
Sometimes a government issues a certificate to show proof of an exception. Use this field to enter the VAT certificate ID that was issued. |
Note: If the country that you select on the VAT Country Definition page does not allow VAT suspensions, then you cannot select S (suspended) as an exception type.
VAT Defaults
Field or Control |
Description |
|---|---|
VAT Default (value-added tax default) |
Click to access the VAT Defaults Setup page. This page enables you to set up VAT defaults for all PeopleSoft applications that process VAT transactions. On this page, you can define customer defaults as applicable. |
VAT Service Treatment Setup (value-added service treatment setup) |
Click to access the Services VAT Treatment Drivers Setup page. This page is a common page that you use to set up VAT services treatment for all PeopleSoft applications that process VAT transactions. If you are required to implement special handling for services, you can specify customer service treatment defaults on this page as applicable. |
Use the General Information - Notes page (CUST_NOTES) to enter information for standard notes to reuse for multiple customers or for custom notes with unique messages.
For example, you might have a standard note announcing a seasonal promotion or a note thanking a customer for a particularly large order.
Navigation:
Select 0100 - Notes in the More field on the General Info page.
Customer Notes
Field or Control |
Description |
|---|---|
Sequence |
Determines the order in which notes are printed on the selected documents. |
Classification |
Select a value: Standard: Assigns a standard note. For this value, select a standard note code. Standard notes are created on the Common Definitions Standard Notes page. Custom: Creates a custom note. For this value, select a note type, and then enter the custom note in the text field. |
Use Predefined Standard Note |
Select to use a predefined note for a customer note. |
Note Code |
Enter the note code for this note. If you are using predefined standard notes, select the standard note to assign to this page or enter the note code. The note type, note text, key words, and print on documents appear. |
Note Type |
For custom notes, select the note type for the note. |
Document To Print The Note On |
For custom notes, enter the print location for notes from the available options. You can print notes on invoices, bills of lading, order acknowledgements, picking plans, and quotations without additional configuration. |
Note: If you bill multiple sales orders on one invoice, use line notes. Header notes might contradict one another or be duplicates.
Use the General Information - Attachments page (CUST_ATTACHMENTS) to attach multimedia files, such as PowerPoint presentations, Word documents, ScreenCams, or Excel spreadsheets, to customers.
Navigation:
Select 0110 - Attachments in the More field on the General Info page.
Attachment Information
Field or Control |
Description |
|---|---|
Add |
Click to browse for and add an attachment. |
View |
After you upload an attachment, click the View button to view it. |
Attached File |
After you upload an attachment, its name appears here. |
Attachment Type |
Enter the file type, and add a description of the multimedia item that you're attaching. Note: Attachment type is not a file extension, but a categorization of the attachment defined through system configuration. |
Use the General Information - Messages page (select 0120 − Messages in the More field on the General Info page).to identify and work with messages
Field or Control |
Description |
|---|---|
Sequence Number |
Identifies each message. You can attach multiple messages to each customer. The system assigns a sequence number of 1 to the first message. Up to three messages at a time appear on this page. |
Sanctions Match |
Indicates whether the message is used for Financial Sanctions Screening. |
Message |
This field is blank if you select a customer for whom no messages are entered. In this case, select a message code to assign to the customer. The full message description appears in the text box. |
Start Date and End Date |
Indicates the date on which the message goes into or out of effect. The current date appears by default as the start date. The date 12/31/2099 appears by default as the end date. You can change either of the default dates. |
Action |
Indicates the action (None, Reject, or Hold) that you assign to the message on the Messages page. |
Hold Code |
Indicates the code that you associate for the hold action. The hold codes are controlled by role security. If the user associated with the role does not have authority to modify the hold code associated with the message, the fields are unavailable for entry. If the user associated with the role can add the hold code but cannot release the hold code, the user can release and delete messages with holds up until the user leaves the Customer_Msg component. You also cannot attach a message to the customer if it has a hold code associated with it that you do not have security for. Similarly, you cannot delete an existing message that has a hold code unless you have the security for the hold code. |
Note: Message codes with an action of Reject apply only to the sold to customer. Message codes with an action of Hold create holds on the sales order.
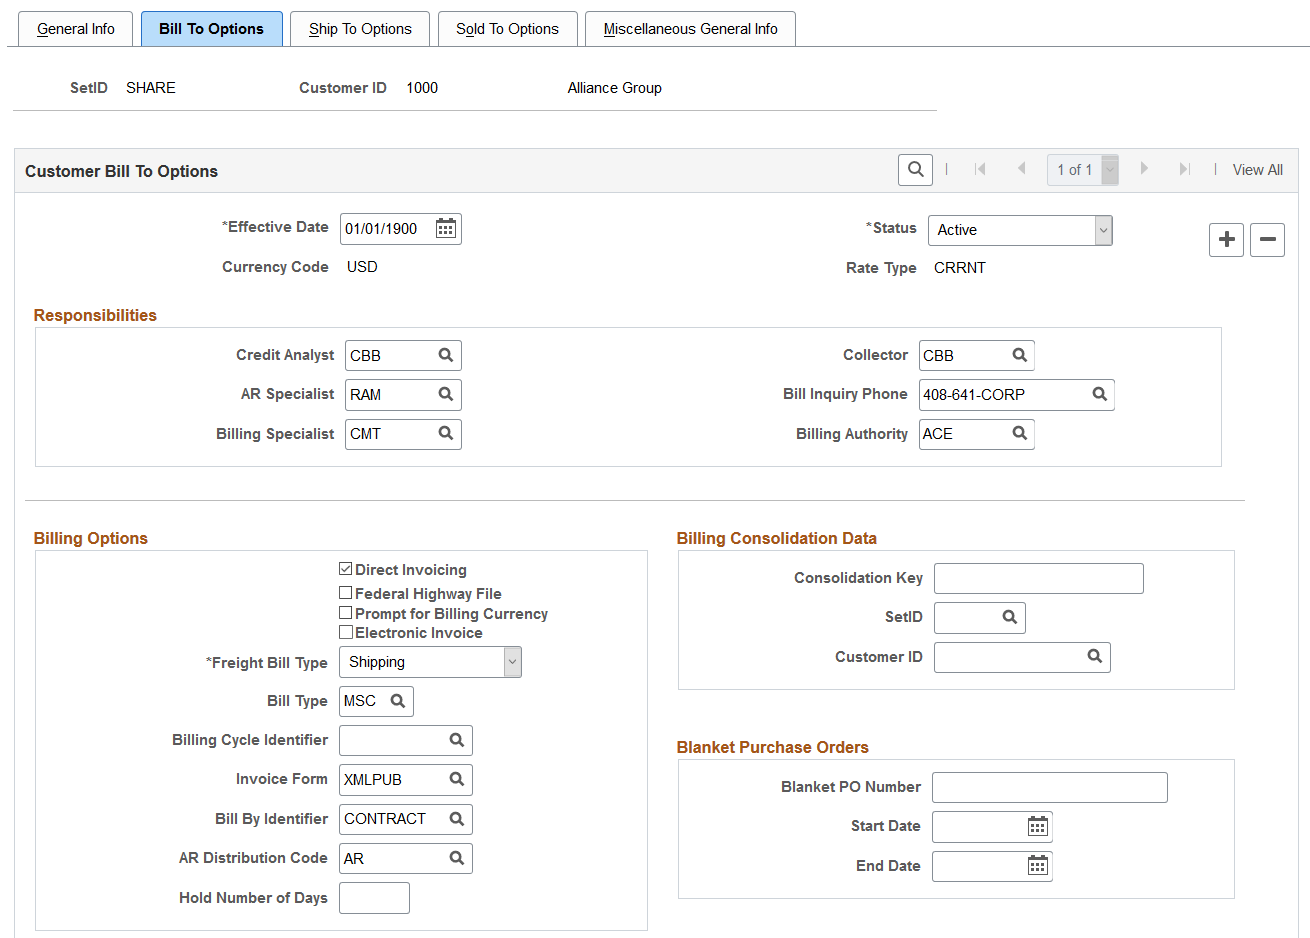
Use the General Information - Bill To Options page (CUST_BILLTO_OPT) to enter additional billing and purchasing options for bill to customers.
You can also enter customer payment options and payment terms as well as default write-off tolerances for customer account maintenance in PeopleSoft Receivables.
Navigation:
This example illustrates the fields and controls on the Bill To Options page. You can find definitions for the fields and controls later on this page.
This example illustrates the fields and controls on the Bill To Options page. You can find definitions for the fields and controls later on this page.
This example illustrates the fields and controls on the Bill To Options page You can find definitions for the fields and controls later on this page.
Field or Control |
Description |
|---|---|
Effective Date |
Bill to options are keyed by the effective date to enable you to keep a history of any changes that you make to the billing options, and to enter changes that go into effect on a future date. |
Responsibilities
Field or Control |
Description |
|---|---|
Credit Analyst, Collector, Billing Specialist, and Billing Authority |
Select predefined personnel codes for those who will work with this customer. PeopleSoft Billing and Receivables uses these fields. Credit Analyst and Collector are required fields for bill to customers. |
AR Specialist (accounts receivables specialist) |
Select the code for the person whom PeopleSoft Receivables assigns as the initial owner for the customer's deductions and disputed items. If you do not enter a value, the system uses the AR specialist whom you assign to the Receivables business unit. If you assign an AR specialist to an entry reason on the Automatic Entry Type - Selection page, the system uses that specialist. |
Bill Inquiry Phone |
The number that is printed on customers' invoices for them to call with questions about their bills. PeopleSoft Billing uses this field. |
Note: The system stores collector, credit analyst, and team member (formerly salesperson) codes on the Receivables item record; when you change these personnel assignments for a customer, existing open items retain the previous collector, credit analyst, and team member or salesperson.
Billing Options
Field or Control |
Description |
|---|---|
Direct Invoicing |
Select for PeopleSoft Billing to provide a streamlined process that extracts sales order, project resource lines, and intercompany transfer information for subsequent processing in PeopleSoft Billing. In PeopleSoft Order Management and Inventory, this processing occurs immediately after shipping depletion; in PeopleSoft Project Costing, this processing occurs after you click the Generate Invoice or Generate Pro Forma button on the Manage CA/PC Bills page. Subsequent processing includes calculating VAT (for project resource lines and intercompany transfers), printing invoices, creating accounting entries, and initiating vouchers. |
Federal Highway File |
Select to have the Federal Highway billing format. |
Prompt for Billing Currency |
Select to have the system prompt you for the billing currency when adding a new bill for the customer. You can add the new currency in any decimal precision. If in bill entry you change to a customer with a different currency, and you select this check box, the system prompts you to enter the desired currency. You can enter a new currency or keep the customer's default currency. You are not required to enter a new value. |
Electronic Invoice |
Select to use Electronic Invoice File as the default invoice media when adding a new bill for the customer. You can override the default value for invoice media in bill entry. |
Print Product Alias Description on Invoice |
Select this option for the invoice to display the entered product alias description. |
Freight Bill Type |
Select to designate the time to bill freight. |
Bill Type |
Select a bill type identifier other than the one that you define on the Accounting and Billing page. Set up a bill type at the customer level to control processing in PeopleSoft Billing by customer and order versus at the PeopleSoft Order Management business unit level. The bill type appears by default on the Bill To section of the Order Entry Form page during order entry. If you have not set up a bill type on this page, the bill type identifier appears by default on the Accounting and Billing page. |
Billing Cycle Identifier |
Used in PeopleSoft Billing to group billing activity by a common invoicing schedule. For example, a cycle might represent a monthly or weekly schedule for invoicing. |
Invoice Form |
Enter an identifier for the formatting options to use to determine the sorting and summarization levels for invoice information. |
Bill By Identifier |
Enter a value to determine the criteria that the system uses to group billing activity into a single bill. The system uses this value for billing activity imported through the Billing Interface from an external source. For intercompany transfers, select a bill by identifier that you set up for this purpose on the PeopleSoft Billing Bill By Identifier page. Note: The system requires at least one bill by if you use PeopleSoft Billing and the Billing Interface. |
AR Distribution Code (accounts receivable distribution code) |
Select the code that is associated with the valid combination of ChartField values to use when generating accounting entries for PeopleSoft Receivables. The system enters the Receivables ChartField values on the bill according to the code that you select. If you do not have PeopleSoft Billing installed, this field is unavailable. |
Billing Consolidation Data
Field or Control |
Description |
|---|---|
Consolidation Key |
Assign a value to associate groups of bills to consolidate. This free-form field enables you to create labels that best suit business needs. |
Customer ID |
Select a value to determine which consolidation customer (defined on the General Info page) receives the consolidated bill for this bill to customer. |
Note: Use the Customer ID and Consolidation Key fields to enable the PeopleSoft Billing Interface to consolidate bills for bill to customers. To determine consolidation on a case-by-case basis, leave these fields blank and enter consolidation information through the Billing Interface.
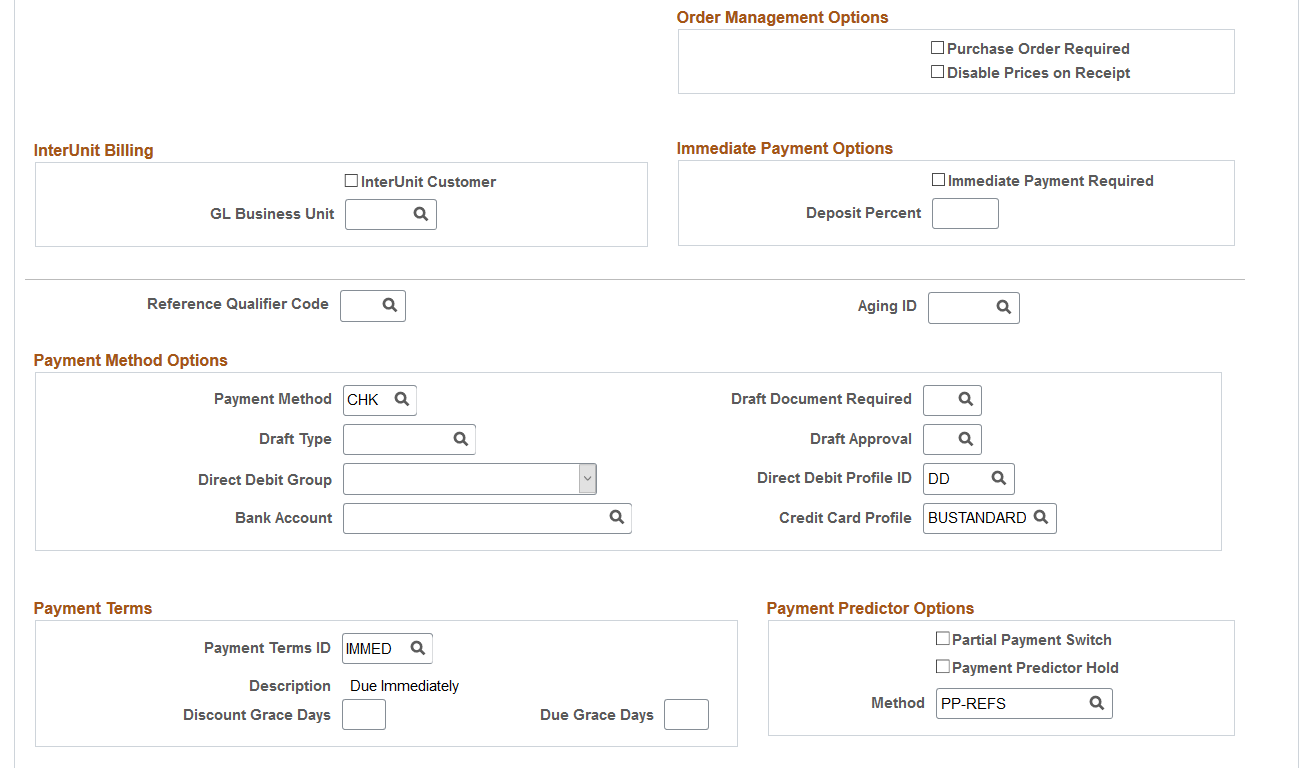
Interunit Billing
Field or Control |
Description |
|---|---|
InterUnit Customer |
Select to establish a customer for interunit transactions that are defined as intercompany transfers in PeopleSoft Inventory. Leave this field blank for all other customers. |
General Ledger Unit |
Enter the unit that this PeopleSoft Billing interunit customer represents. The value that you enter here appears by default on the bill to General Ledger business unit on the Standard Billing - Header - Info 1 page. If you do not select a value, you must enter a General Ledger business unit on the bill at bill entry. For PeopleSoft Inventory intercompany transfers, however, the system requires that you enter a value here. If the customer is an interunit customer and is identified as a supplier on the Additional General Info page, both should have the same General Ledger Unit option or affiliate. |
Receivables Options
Field or Control |
Description |
|---|---|
Reference Qualifier Code |
Select a default value for lockbox processing and online-entry payment reference information in PeopleSoft Receivables. |
Aging ID |
Enter an aging ID that will be associated with this customer for aging processing in PeopleSoft Receivables. The aging process uses the aging ID from customer setup, however, if not defined, the system uses the aging ID defined at the business unit level. See Setting Up Aging for more information. See also Defining Business Unit Defaults by SetID for information about setting up the business unit–level aging ID. |
Blanket Purchase Orders
Field or Control |
Description |
|---|---|
PO Number (purchase order number) |
Enter a default number to use for all orders that this bill to customer places. When the end date passes, the blanket purchase order (PO) number no longer appears by default on the sales order header when you select this bill to customer. |
Order Management Options
Field or Control |
Description |
|---|---|
Purchase Order Required |
Select if the customer requires a purchase order on all orders. PeopleSoft Billing does not use this field, yet PeopleSoft Order Management does. |
Disable Prices on Receipt |
Select to mask prices on a goods receipt generated from a counter sales order. |
Immediate Payment Options
Field or Control |
Description |
|---|---|
Immediate Payment Required and Deposit Percent |
Select this option if you want to force a payment at the time of the order for the goods that the customer is taking with them. When this option is enabled, the Deposit Percent field on the customer record is 100% by default, which requires the customer to pay in full for the goods that the customer is not taking with them at order time, for example, a backorder or special ordered item. The deposit percent can be modified on the customer record as necessary. |
Payment Method Options
Field or Control |
Description |
|---|---|
Payment Method |
Select the customer's default payment method. Important! If you select direct debit (DD) as the payment method, a Prenote for Direct Debit group box appears to enable you to require the transmission and confirmation of prenotes prior to processing the associated direct debit transaction. |
Draft Type |
Select a draft type that you previously defined on the Draft Type page. |
Direct Debit Group |
Specify the group to which the customer belongs. The system uses direct debit groups to identify groups of customers to process simultaneously. The group names are predefined. |
Bank Account |
Indicates the bank account from which the system collects direct debits for this customer. You can change this value on the direct debit worksheet. This magnetic ink character recognition (MICR) ID serves as the primary direct debit account from those accounts that you assign to the remit from customer on the MICR Information - Address page. |
Draft Document Required |
Specifies whether you will create a draft document for the customer if the payment method is by draft. When you create a document, the system prints a draft document for the customer. If you do not create a document, the system prints only a draft statement. |
Draft Approval |
Select a value: Preapproved: Submits the draft to the customer's bank for payment without the customer's sign-off. Approval Required: Sends a draft document to the customer for review and approval before submitting the draft document to their bank. |
Direct Debit Profile ID |
Select a value if Direct Debit is the payment method. Direct debit profiles establish parameters, such as item exclusions, customer exclusions, approval limits, and processing options. Set up profiles on the Profile page. |
Credit Card Profile ID |
Select the profile used to control batch processing of credit card payment worksheets and settlements. |
Payment Terms
Field or Control |
Description |
|---|---|
Payment Terms ID |
Select a default ID for the customer. You can override this value by entering payment terms directly on the Pending Item 1 page. If you do not set payment terms for the customer, the system uses the terms that you associate with the business unit on the Receivables Options - Payment Options page. Establish codes during setup on the Payment Terms page. |
Discount Grace Days and Due Grace Days |
Enter the number of additional days, beyond agreed payment terms, that you allow the customer to take the discount or to pay the invoice. The leeway is taken into account for the earned discount calculations on payment worksheets and by the Payment Predictor process. If you do not enter values in these fields, the system uses the default values that you set for the business unit on the Receivables Options - Payment Options page. |
Prenote for Direct Debit
A direct debit prenote is a zero-amount electronic payment, which is sent to the customer's bank to confirm the accuracy of the customer's bank information with the information that is set up in the PeopleSoft application. You need to populate the fields in Prenote for Direct Debit for the Create Direct Debits process in PeopleSoft Receivables to create prenotes, which are sent to the customer's bank for confirmation.
Field or Control |
Description |
|---|---|
Prenote Required |
Select to enable you to create, transmit, and receive confirmation of direct debit prenotes. The PeopleSoft Receivables Direct Debit application engine (AR_DIRDEBIT) processes these prenotes, which help to eliminate additional processing or handling fees due to the transmission of incorrect customer account information to the customer's bank. Prenotes also reduce any delays in receivable collections. |
Prenote Status |
Displays the current prenote status, which you can change manually. If this field is blank, select the status New. The prenotes statuses are:
|
Status Updated by |
Identifies the last user to change the status of the prenote. |
Confirm After _ Days |
Enter the number of days that can elapse before the system automatically changes the prenote status to Confirmed. |
Reason |
Select a reason code, which represents the reason for a status change. |
Date |
Displays the date that the status was last changed. Originally displays the current system date as the default value. |
View Prenote History |
Click to view the status history of a prenote. |
Payment Predictor Options
Define rules for the Payment Predictor process (ARPREDCT) for the customer.
Field or Control |
Description |
|---|---|
Partial Payment Switch |
Select to allow partial payments for underpayments and to take unearned discounts when you use the #DTL_TLR algorithm group. You must also select a Payment Predictor method that runs #DTL_TLR. If you deselect this check box, the system uses the values that you specify on the Receivables Options - Predictor Detail page to determine whether to create a write-off or adjustment item for underpayments and overpayments when Payment Predictor runs the #DTL_TLR algorithm group. |
Payment Predictor Hold |
Select to prevent Payment Predictor from processing a customer's items. |
Method |
Specify the Payment Predictor method to use when the system applies payments from the customer. If you don't enter a method here, Payment Predictor uses the method that you specified for the business unit on the Receivables Options - Payment Options page. You can specify that the Payment Predictor method overrides only for bill to customers who are also remit from customers. If you enter a Payment Predictor method for a customer who is not a remit from customer and then attempt to save the record, the system issues an error message. |
Payment Plan Options
|
Field or Control |
Description |
|---|---|
|
Maximum Installments |
Enter the maximum number of payment plan installments allowed for the business unit. See: |
|
Default Plan Type |
Select a default payment plan type for the business unit. Values are:
|
|
Minimum Source Balance |
Enter the minimum source balance required to create a payment plan. |
|
Default Processing Fee |
Select a default processing fee for the business unit. Values are Fixed Amount or Percentage of Plan Balance. |
Bank Holiday Options
Field or Control |
Description |
|---|---|
Holiday Options |
Define default rules that the system uses to change the due date for the customer when the date falls on a bank holiday. The system uses the bank account that you assign to the correspondence customer to determine bank holidays. If you do not set up bank holiday rules for the customer, the system uses the rules that you define for the business unit on the Receivables Options - General 1 page. Select a value: Not Applicable: Does not change the due date. Due After Holiday: Changes the due date to one day after the holiday. Due Before Holiday: Changes the due date to one day before the holiday. |
Days |
The number of days to move the due date to accommodate the holiday. |
Allow due date in next month |
Select to permit the new due date to fall in the next month if you select Pay After Holiday as the holiday option. If you do not select this check box, the system adjusts the due date to the last business day prior to the original due date. |
Note: Define holidays on the Business Calendar page, and then assign a calendar to a bank account on the External Accounts - Account Information page.
Write-Off Info
Change the default tolerances that the Automatic Maintenance process (AR_AUTOMNT) and maintenance worksheet use to write off items for a customer, if needed. The default is no limit.
Field or Control |
Description |
|---|---|
Maximum Write-Off Amount |
Enter the maximum amount that you can write off for either an individual item or for the remaining balance for a match group. The system writes off an amount below the maximum amount if it does not exceed the percentage of the item's original amount or the percentage of the remaining balance for a match group. For example, if you enter an amount of 25.00, the process writes off amounts up to 25.00 AUD. However, if you enter a maximum write off percent of 10 percent and the item's total original amount is 240.00 AUD, the system writes off more than 24.00 AUD. For no limit, enter all 9s. Enter 0 or leave the field blank to have no write-offs for the customer. |
Maximum Write-Off Percent |
For the maintenance worksheet, enter the maximum percentage of the item amount that the system can write off. The write-off percent applies only to write-offs for individual items, not for remaining amounts for items or match groups. For the Automatic Maintenance process, enter the maximum percentage that the remaining balance can be for a match group. The process adds the total debits or total credits and divides the higher amount by the remaining balance for the match group to determine the percentage that can be written off. The maximum percentage that you can enter is 100. For no limit, enter 100. |
Days Until Write-Off |
Enter the minimum age of items before the system automatically writes them off. For example, if you enter 30, the system cannot write off an item until it has been in the system for 30 days. For no limit, enter 0. |
eBill Payment Options
Field or Control |
Description |
|---|---|
Store Most Recent Statement Image |
The statements will be displayed only for Contact Customer defined with the Bill To option and View Statement selected on the Self Service Security tab. Only the three most recent statement images are retained. Hence, existing statement files for the customer will be replaced with the most recent statement files. |
Use the General Information - Ship To Options page (CUST_SHIPTO_OPT1) to enter delivery and shipping parameters.
You can also enter domestic and export shipping options.
Navigation:
Ship To Customer Options
Field or Control |
Description |
|---|---|
Effective Date |
Ship to customer options are keyed by effective date to enable you to keep a history of any changes that you make to the customer's rules and to enter changes that go into effect on a future date. |
Ship To Options
Field or Control |
Description |
|---|---|
Distribution Network Code |
Enter the appropriate code for the customer. If you leave this field blank, enter a default distribution network code or Ship From Inventory business unit on the Shipping and Returns page for the PeopleSoft Order Management business unit. |
Store Number |
Enter a value to help identify the location. This value appears by default on the order header; you can use this value as an alternate search criterion when you enter a quote or sales order. |
Single Ship Flag |
Select Yes to ship all of the schedules that make up an order together. If you use single shipments, the Yes value is not available for the Partial Order field. |
Carton Label Format ID and Ship Container Label Format ID |
(Optional) Used in PeopleSoft Inventory to generate bar-coded shipping labels. Note: You can also use the Overview of the Source of Ship From Inventory business unit to enter format IDs for sold to customers. If you establish format IDs for both sold to and ship to customers, the system uses the ship to values. If you enter values only at the sold to level, the system uses those values for all ship to customers who are associated with the sold to customer. |
Allow Overpick |
Select to pick more than you requested. |
Max Picking Tolerance |
Select a maximum picking tolerance for the system to pick in PeopleSoft Inventory if you select Allow Overpick. |
Just In Time Parameters
Field or Control |
Description |
|---|---|
Ship Prior To Request Date |
If you select Yes, then enter a value in the Number of Days Early and Days Allowed After Request Date fields; do not leave them blank. A blank field for either of these fields equals 0 and has no effect on processing. You can use those fields to manage shipping options. |
Days Allowed After Request Date |
Enter the number of days beyond the requested arrival date that a customer accepts a delivery. |
Number of Days Early |
Specify the number of days before the scheduled arrival date that the customer accepts delivery if the customer accepts early shipments. The system calculates the early ship date by subtracting the number of days early from the scheduled ship date on the schedule. |
Demand Fulfillment Options
Field or Control |
Description |
|---|---|
Partial Schedules |
Indicates whether the customer accepts partial shipment schedules. |
Partial Order elements, descriptionspartial order (general customer information) |
Indicates whether the customer accepts partial orders. |
Cancel Backorder elements, descriptionscancel backorder (general customer information) |
Select Yes if the customer prefers not to receive backorders. |
Note: PeopleSoft Inventory considers partial schedules and cancel backorder requirements when it processes demand for the customer. For example, if you select Yes in the Cancel Backorder field, the PeopleSoft Inventory system does not create an automatic backorder after an initial partial shipment.
Domestic and Export Shipment Options
Field or Control |
Description |
|---|---|
Ship Via, Freight Terms Code, Carrier ID and Priority elements, descriptionspriority (general customer information) |
Specify which shipment method to use for domestic and export shipments for this customer. You can use shipping priority codes as the final sort option for fulfilling orders on the General Information - Ship To Options page. |
Required Documents
When documents are required for all shipments outside of the U.S. for a particular ship to customer, select the check boxes in this group box for the required documents.
Field or Control |
Description |
|---|---|
Canadian Customs Invoice |
Select for shipments from the U.S. to Canada to include the required invoice. |
Shippers Export Declaration |
Select to include the reporting document for the U.S. Department of Commerce that details all freight moving from the U.S. to other countries. |
Certificate of Origin |
Select to include the U.S. certificate that guarantees that goods are of U.S. origin (purchase or manufacture). |
NAFTA (North America Free Trade Agreement certificate of origin) |
Select to include the NAFTA Certificate of Origin. |
Export Flags
Field or Control |
Description |
|---|---|
Insurance Required |
Select if orders for the customer need to be insured when exported. |
Flag Orders for Export |
Select to note that orders for the customer require export documentation. Note: Select this check box to create bills of lading for sales orders and intercompany transfers. This setting appears by default on the Stock Request Summary page, where you can override it. |
AERP (automated exporter reporting program) |
Enter the AERP that the U.S. Bureau of Census assigned. The system uses this setting in a future interface to a third-party export compliance system. |
Military |
Select to note that the customer is either in the military or sells to customers who are part of the military. The system uses this setting in a future interface to a third-party export compliance system. |
Use the Ship Exception Dates page (CUST_SHIPTO_EXCPT) to set up standard times when shipments should not be delivered to customers.
Navigation:
Click the Exception Ship Dates link on the General Information - Ship To Options page.
Field or Control |
Description |
|---|---|
Copy |
Click to copy exception shipment schedules. |
Block Exceptions
Field or Control |
Description |
|---|---|
From Date and Time and To Date and Time |
Enter dates to specify a time frame to prevent deliveries from being made. |
Standing Exceptions
Field or Control |
Description |
|---|---|
Day of Week |
Enter the weekday on which you plan to restrict deliveries. You can specify the entire day for exception or define a time frame during which deliveries should not be made. |
Use the General Information - Sold To Options page (CUST_SOLDTO_OPT) to enter pricing and product information.
Navigation:
Sold To Customer Options
Field or Control |
Description |
|---|---|
Effective Date |
Sold to customer options are keyed by effective date to enable you to keep a history of any changes that you make to the customer's rules and to enter changes that go into effect on a future date. |
Allow Product Substitutions |
Select to indicate that the customer will consider alternate products if the requested product is not available at order entry. The customer can also select substitute products during the picking process from PeopleSoft Inventory. Important! If you do not select this check box, alternate products do not appear during order entry, even if you set up product alternates on the Alternates page. Also, product substitutions cannot occur during the fulfillment process if you do not select this check box. |
Restocking Fee |
Select to charge the customer restocking fees for returned goods. The setting appears by default on the RMA Form page, where you can modify it. |
Freight Charge Method |
Select a method if you use PeopleSoft Order Management freight charge calculations. |
Carton Label Format ID and Ship Container Label Format ID |
(Optional) Used in PeopleSoft Inventory to generate bar-coded shipping labels. Note: You can also use the General Information - Ship To Options page to enter format IDs for ship to customers. If you establish format IDs for both sold to and ship to customers, the system uses the ship to values. If you enter values only at the sold to level, the system uses those values for all ship to customers who are associated with the sold to customer. |
Order Number Preference
Select how you want the product ID field to be populated. The system product ID appears along with the other values on the order, buying agreement, and RMA.
Field or Control |
Description |
|---|---|
System Product ID |
Select to use the product ID defined on the product. |
Customer Product ID |
Select to use the customer's product ID. To make customer part numbers available at order entry, set up product aliases by customer on the General Information - Product Aliases page. |
UPC (universal product code) |
Select to use the UPC code during order entry. The UPC code is established in the Define Items component on the Classifications page. |
Universal Item ID |
Select to use the universal code during order entry. The universal code is established on the Universal Identifiers page. |
Pricing Options
Field or Control |
Description |
|---|---|
Grace Pricing Discount Days |
Designate the number of days to extend discounts on prices that have reached their expiration dates. |
Exclusive Pricing ID |
Enter a default value for the customer during order entry. The exclusive pricing ID is an arbitration plan that applies specific price rules to a sales order. |
Weight and Volume |
Enter a value to use weight and volume pricing. This is an arbitration plan defined specifically for weight and volume pricing. |
Arbitration Plan |
Determines the sequence in which the system applies discounts or surcharges in the price rule to base or list prices. If you do not associate an arbitration plan with a sold to customer, the system uses the default arbitration plan that you designate on the Arbitration Plan page. The exclusive pricing ID takes precedence over the arbitration plan. If the system finds no price adjustments for the exclusive pricing ID, it searches for price adjustments using the arbitration plan. |
VMI Options
Field or Control |
Description |
|---|---|
VMI Order Consolidation (supplier managed inventory order consolidation) |
Specify how to group the sales order requests that are generated in VMI replenishments. The options are: None: Select to instruct the VMI replenishment process to generate a separate order for every replenishment request. Ship To Customer: Select to instruct the VMI Replenishment process to combine all replenishment requests for the same ship to customer on the same sales order or material stock request. Sold To Customer: Select to instruct the VMI Replenishment process to combine replenishment requests for the same sold to customer on the same sales order. This applies only to sales orders for nonconsigned customers. |
Receipt Verification |
Select this option if you perform receipt verification in which you acknowledge receipt of goods at the VMI location. Shipments will be assumed in-transit until the verification is received. Note: If the check box is deselected, you will not be sending receipt acknowledgements and, therefore, the autoputaway feature for interunit shipments will be invoked. |
Order Verification |
If the check box is selected and the VMI hold code is defined on the Hold Processing page for the PeopleSoft Order Management business unit, all orders will be created with VMI hold assigned. Orders should be reviewed and approved before they are released to PeopleSoft Inventory. |
Use the Hierarchy page (CUST_SOLD_HIERARCH) to select a classification, set up customer hierarchies, assign syndicated data types, and establish channels.
The customer hierarchy is, from highest to lowest level, division, region, and territory. Currently PeopleSoft standard processing does not use the fields on the Hierarchy page.
Navigation:
Click the Hierarchy link on the General Information - Sold To Options page.
Sold To Hierarchy
Field or Control |
Description |
|---|---|
Classification |
Classify customers as major or minor customers based on their priority or profitability, for example. |
Hierarchy
Field or Control |
Description |
|---|---|
Division |
Represents the highest level in the hierarchy. |
Region |
The sold-to region allows regions with a region category of Pricing only. |
Territory |
Define a territory to further establish a customer hierarchy. |
Syndicated
Field or Control |
Description |
|---|---|
Syndicated Data Type |
Enter syndicated data information about customer activity. |
Syndicated Number |
Select a number for each customer. |
Customer Channel |
Segments customers for reporting, trade spending, and integration with PeopleSoft Demand Planning. The customer channel is also known as a class of trade. Examples of channels include:
|
Primary Channel |
Select a primary channel if you use multiple channels. |
Use the Product Catalog page (CUST_SOLD_PRODCTLG) to specify available catalogs.
You can modify product offerings for sold to customers by creating product catalogs that contain only those products that each customer requires. You can create two types of catalogs: inclusive catalogs, which contain all of the products that are available to customers, and exclusive catalogs, which contain the products to withhold from customers.
Navigation:
Click the Product Catalog link on the General Information - Sold To Options page.
Field or Control |
Description |
|---|---|
Catalog Number |
Insert or delete as many catalogs as necessary to establish a list of catalogs that are available to the customer during order entry. |
Include Type |
Indicates whether this is an inclusive or exclusive catalog, as defined on the Product Catalogs page. This check box is available for entry for inclusive catalogs only. If you have a product set up on an exclusive and inclusive catalog that is linked to the same customer, the system ignores the inclusive catalog. Note: You can include a product group in a catalog only if you designate the catalog as a Product Catalog group type on the Product Group page. |
Use the Product Aliases page (CUST_SOLD_PRDALIAS) to set up product aliases.
You can enter products on orders or quotations using the sold to customer's part number (product alias) or system product IDs. Both numbers appear on the order line.
Navigation:
Click the Product Aliases link on the General Information - Sold To Options page.
Field or Control |
Description |
|---|---|
Customer Product ID |
Enter the part number (or name) that this customer uses to reference the system product ID. The option to use a customer product ID is established on the Sold To Options page. |
Product ID |
Select the product ID from the lookup table. |
Description |
Displays the description of the product for each product ID. The Description field can be edited by the user. The description will be displayed with the Product ID on the Sales Order Line when the Product Source is Customer. |
Use the VMI Options (Supplier managed inventory options) page (CUST_SOLDTO_OPT2 ) to specify VMI sold to options.
Navigation:
Click the VMI Options link on the General Information - Sold To Options page.
VMI Options
Field or Control |
Description |
|---|---|
VMI Enabled Customer (Supplier managed inventory enabled customer) |
Indicates that the Ship-To is used for supplier managed inventory. Note: This check box should not be selected until the proper value for the Goods Consigned at Customer check box is known. |
VMI Manager (supplier managed inventory manager) |
Enter the employee who is responsible for approving and overseeing orders generated for the VMI customer; this should be a role. |
Goods Consigned at Customer |
Indicates that goods are not owned by the customer and are not paid for until they are consumed. They are not billed at shipment. Note: The Goods Consigned at Customer check box cannot be deselected if the customer is associated with either an open storage location or a VMI item. |
Customer Order Defaults
Field or Control |
Description |
|---|---|
Source Business Unit |
Identifies which PeopleSoft Inventory business unit generally supplies the customer. |
Customer PO Number (customer purchase order number) |
This PO ID can be included on the sales order acknowledgement. |
Customer Item Tracking
Field or Control |
Description |
|---|---|
Lot Control, Serial Control, Container Control and Staged Date Control |
Check the appropriate flags to indicate whether lot, serial, container, or staged date information is maintained at the VMI business locations. If lot, serial, or container information is maintained at the VMI customer, all transactions received from that customer will contain this item detail. If lot, serial, or container information is not maintained at the customer, this information will not be included on the transactions, and this inventory will need to be depleted using FIFO logic. If the consignment flag is selected, these flags will also be selected. These flags cannot be updated if inventory is on hand or in transit to the Ship-To Customer. |
Replenishment Parameters
Field or Control |
Description |
|---|---|
Stock-In Rate |
The percentage of time that you want to have stock on hand for an item. Used to calculate some of the replenish parameters. |
Reorder Range Check |
The request process creates a request if the supply quantity is above the reorder point but below a given percentage. |
Reorder Quantity Option |
Indicates the request order size: EOQ, Min/Max, or Static. |
Reorder Range Percentage |
Used if Range Check is selected. |
Replenishment Calculation Period |
The number of days prior to the current date to search for history for calculating the replenishment parameter. |
Use the Miscellaneous General Info page (CUST_GENERAL_MISC) to enter web addresses, stock symbols, currency codes, rate types, support team codes, and subcustomer codes.
Navigation:
Miscellaneous General Information
Field or Control |
Description |
|---|---|
Name 1, Name 2, and Name 3 elements, descriptionsname 3 (miscellaneous general information) |
Enter customer names. The system uses the primary name in the Name 1 field on the General Info page as the search key. Also, Former Name 1 and Former Name 2 appear when a former name 1 exists and subsequently a former name 2. |
Tax ID |
The corporate equivalent of a social security number. Some export documents in PeopleSoft Order Management require this information. |
Supplier SetID and Supplier ID |
Select values to associate customers and suppliers. If you installed both PeopleSoft Receivables and Payables, you can generate a report that includes combined receivables and payables balances. Suppliers and customers have a one-to-one relationship. To maintain that relationship, the system ensures that any changes that are made to a supplier-customer association are updated on the customer record and the supplier record. When you assign a PeopleSoft Receivables customer to a particular supplier or when you change a supplier assignment, the system handles the request in this way:
|
Supplier Information |
Click to access the General Information - Supplier Info page and view details about the supplier-customer relationship. |
Workflow User |
Indicates who in the organization receives workflow items for this customer. Any worklist entries that are associated with this customer appear on the worklist of the person whom you indicate. |
Customer Website (web uniform resource locator) |
Opens the customer's URL. Include http:// in the URL to activate the link. |
Stock Symbol |
Click to view the stock quotation of a customer. You must establish the connection on the URL Maintenance (uniform resource locator maintenance) page. |
DMS Information (debt management service information) |
Click to access the DMS Customer (Debt Management Service customer) component on which you enter debtor information for DMS processing. This link appears only if you have enabled DMS processing on the Installation Options - Receivables page. The information that you enter in this component is used for the DMS outbound file. |
Sub Customer Information
Field or Control |
Description |
|---|---|
SubCustomer |
Select, for individual customers, to activate the appropriate number of subcustomer fields. You must set default values for each active field. You cannot modify this option if a customer has open items in PeopleSoft Receivables. In PeopleSoft Receivables, you can override subcustomer default values on item pages. However, when Payment Predictor creates a new item, such as an on-account payment, the system uses the default values and prevents you from overriding them. If you select this check box and a customer has subcustomer data, the system enters this information on the sales order and passes it to PeopleSoft Billing. You can also add subcustomer information during sales order entry. |
Note: The number of subcustomer fields that are available in this group box, which may include SubCustomer 1, and SubCustomer 2, depends on the number of qualifiers (one, two, or none) that you enable during installation on the Installation Options - Overall/GL page.
Use the DMS Customer 1 (Debt Management Service customer 1) page (DMS_CUSTOMER_1) to enter DMS agency information for individuals or corporations.
Navigation:
Click the DMS Information link on the Miscellaneous General Info page.
This link appears only if you have enabled DMS processing on the Installation Options - Receivables page.
Field or Control |
Description |
|---|---|
Agency Debtor ID |
Enter a name that can be applied to the customer to uniquely identify the customer. The outbound interface uses the customer ID if no agency debtor ID is available. |
DMS Debtor Type (debt management service information) |
Select the type of customer with which the delinquent debt is associated. Values are Individual, Corporation, Joint Venture, Other, Partnership, Sole Proprietorship, and State/Local Government. |
Taxpayer Information |
Select Social Security Number for individuals or Employee Identification Number. |
Date of Incorporation |
For corporations, enter the date on which the corporation was formed. |
State of Incorporation |
For corporations, select the state in which the corporation was formed. |
Agent Name |
Enter the agent name, if applicable. |
DUNS Number |
Enter the Dun and Bradstreet number that is associated with this customer. |
Alias Business Name |
Enter an alias name for the business, if applicable. |
Contact Name |
Enter a contact name, if applicable. |
Attorney Name |
Enter the attorney name, if applicable. |
Use the DMS Customer 2 (Debt Management Service customer 2) page (DMS_CUSTOMER_2) to enter individual debtor information for DMS.
Navigation:
Click the DMS Information link on the Miscellaneous General Info page.
This link appears only if you have enabled DMS processing on the Installation Options - Receivables page.
Enter the name, gender, and birth date.
Field or Control |
Description |
|---|---|
Generation |
Select as applicable: Jr., Sr., I, II, III, IV, or V. |
Enter any alias name information as appropriate.
Field or Control |
Description |
|---|---|
Alias Type |
Select the type of alias, as applicable:
|
Property Type |
Select the property type, Real or Personal, for the individual. |
Property Name |
Enter a descriptive name for the property. |
Use the DMS Customer 3 (Debt Management Service customer 3) page (DMS_CUSTOMER_3) to enter individual debtor employment information for DMS.
Navigation:
Click the DMS Information link on the Miscellaneous General Info page.
This link appears only if you have enabled DMS processing on the Installation Options - Receivables page.
For individual debtors, enter the employer's name and address information.
Field or Control |
Description |
|---|---|
Federal Military Emp (federal military employee) |
For federal military employees, select the employment status. Values are Active, Retired, and Neither. |
For individual debtors, enter the phone information for the place of employment. Enter the individual's job title and salary.
Field or Control |
Description |
|---|---|
Gross or Net |
Select whether the specified salary is at Gross or Net. |
Salary Cycle |
Select the appropriate salary payment frequency. Values are Annually, BiWeekly, Monthly, Other, and Weekly. |
Federal Civilian Emp (federal civilian employee) |
For federal civilian employees, select the employment status. Values are Active, Retired, and Neither. |
Use the DMS Customer 4 (Debt Management Service customer four) page (DMS_CUSTOMER_4) to enter employee debtor bank information such as the bank name, address, and account type.
This page is available only if you enter employer information on the DMS Customer 3 page.
Navigation:
Click the DMS Information link on the Miscellaneous General Info page.
This link appears only if you have enabled DMS processing on the Installation Options - Receivables page.
Field or Control |
Description |
|---|---|
Description |
Enter the name of the bank. |
|
1st Account Number2nd Account Number and 3rd Account Number |
Enter employee debtor bank account numbers. If you set up bank account encryption, account numbers are masked when you select Apply. You can edit the bank account numbers using the Unmask button. For more information about bank account number encryption and the National Automated Clearing House Association (NACHA) data security requirements, see Understanding Bank Account Encryption and Setting Up Bank Account Encryption. |
1st Account Type, 2nd Account Type, and 3rd Account Type |
Enter the types of bank accounts. Values are Checking, Savings, and Money Market. |
|
Unmask |
Select to unmask the bank account number. |
Use the Staffing Information page (CUST_STAF_INFO) to enter customer information that is specific to Staffing Front Office, including customer owners and related contacts.
Navigation:
Select 0180 - Staffing Information in the General Info Links drop-down list box.
Customers Owners
Field or Control |
Description |
|---|---|
User ID |
Enter the IDs of the individuals who are most closely related to and responsible for acquiring or servicing the customer. |
Owner Type |
Enter Other, Sales User, or Service User to define the role of the individuals |
Percentage |
Enter the percentage of ownership each individual has in the customer. |
Owner Priority |
Select the priority for this owner. |
Contact
The Contact group box is read-only.
Field or Control |
Description |
|---|---|
Contact ID |
The ID for the contact associated with the customer. |
Name 1 |
The contact name. |
Use the Target Qualifications page (FO_CUST_QUALIFS) to enter the target qualifications of the resources that this customer normally requests.
This information can be used for opportunity searches.
Navigation:
Select 0180 - Staffing Information in the General Info Links drop-down list box.
Select 0090 - Target Qualification in the Staffing Links drop-down list box.
Field or Control |
Description |
|---|---|
Type |
The category of the qualification, such as Competency, Language, License, or Membership. |
Description |
Description of the qualification. |
Profile |
Click the Profile button to add qualifications from a profile. These profiles can be set up by users for personal use, or by system administrators for public use. |
List |
Click the List button to add qualifications from a list. |
Competency Tree |
Click the Competency Tree button to add qualifications from a competency tree. The system administrator can define the tree during system setup. |
Use the Resource Qualifications - Select Qualification Profile page (RS_SELQUALPROFILE) to add target qualifications from a qualification profile.
Navigation:
Click the Profile button on the Target Qualifications page.
Select a qualification profile and click the OK button to populate the Target Qualification page with a set of predefined qualifications. The profiles can be set up by a system administrator for public use, or they can be set up by individual users for personal use.
Use the Resource Qualifications - Search for Qualifications page (RS_QUALIF_SRCH) to add target qualifications from the qualifications list.
Navigation:
Click the List button on the Target Qualification page.
The Currently Selected Qualifications group box appears when you access the page and reflects what qualifications are already entered on the Target Qualifications page.
Search Criteria
Field or Control |
Description |
|---|---|
Select search type |
Select the type of qualification for which you would like to search: Any Type, Competency, Degree, Language, License, Membership, or Other. |
Search by |
Select Code or Description. |
Keyword |
Enter any keyword to further narrow the search results. |
Search |
Click the Search button to return records that match the criteria. |
Search Results
The Search Results group box appears only after you define search criteria and click the Search button.
Field or Control |
Description |
|---|---|
Description |
Select the associated check box to the left of the Description column for each qualification type that you want to add and then click the Add Selection button. The system then adds the selected qualifications to the Currently Selected Qualifications group box. Click the OK button at the bottom of the page to add the qualifications to the Target Qualifications page. |
Qualification Type |
Categories include Competency, Degree, Language, License, Membership, and Other. |
Code |
The qualification code that is associated with the qualification description. |
Attribute / Major Code |
The code for degree qualification types. |
Currently Selected Qualifications
The qualifications already selected, including any qualifications that you added from the Search Results group box, appear here. To add these to the Target Qualifications page, click the OK button.
Use the Resource Qualifications - Select Competencies page (RS_SO_COMP) to add target qualifications from a competency tree.
Navigation:
Click the Competency Tree button on the Target Qualification page.
Competencies
Expand a competency folder to view the child categories within, and click any of the child folders to view the individual competencies. Click a competency to add it to the Currently Selected Qualifications group box, and click the OK button to add the competencies to the Target Qualification page.
The competency tree is set up by a system administrator through Tree Manager.
Use the Target Job Title page (FO_CUST_JOBTITLE) to enter job titles of the resources that customers commonly request.
This information can be used for opportunity searches.
Navigation:
Select 0180 - Staffing Information in the General Info Links drop-down list box.
Select 0110 - Target Job Titles in the Staffing Links drop-down list box.
Field or Control |
Description |
|---|---|
Job Category |
Select a category that represents the general classification for which the customer is looking. Each job category has multiple job titles associated with it. For example, if you select a job category of Secretaries, only the job titles belonging to that category appear. |
Job Title Code |
Select a job title that is frequently requested by the customer. Only the job titles that belong to the category selected appear in the search results. |
Use the Career Master page (FO_CUST_CAR_MASTR) to enter information about how the customer is billed for career placements and who conducts interviews and reference checks.
Navigation:
Select 0180 - Staffing Information in the General Info Links drop-down list box.
Select 0120 - Career Master in the Staffing Links drop-down list box.
Field or Control |
Description |
|---|---|
Effective Date |
Enter the effective date of the career master information. If any of the information changes, insert a new effective-dated row and change the field. |
Fee Schedule |
Select the customer's fee schedule. |
Email Schedule To |
Select the person to whom you want to send the fee schedule. The options that are available for this field come from the contacts that you associate with the customer record. |
|
Click the Send Email button to send an email to the contact. This generates a preformatted email to the contact's email address. The fee schedule is attached to the email as an Adobe Acrobat PDF file. |
Schedule Sent |
Select the date that you sent the fee schedule to the customer. |
Schedule Sign |
Select the date that the customer signed the fee schedule. |
Guarantee Days |
Starting from the date when a candidate first begins a new position, enter the total number of days after which you no longer offer a refund of the placement fee or a credit. The organization's business processes dictate how this field is used. |
Send Resume To |
Select the name of the person to whom to send resumes of candidates. The options that are available for this field come from the contacts that you associate with the customer record. |
1st Interview, 2nd Interview, and 3rd Interview |
Select the name of the person who is responsible for conducting interviews with candidates. The entries that are available from these fields come from the contacts that you associate with the customer record. |
Reference Check By |
Select customer, staffing organization, or third-party to indicate who is responsible for completing the reference check on the candidate: Customer, Recruiter, or Th. Party (third-party). |
Other Recruiters |
If more than one recruiter is responsible for the placement of a candidate, enter the name of the recruiter. |
First Review |
Enter the date upon which the candidate, if placed, will receive a salary and performance review. |
Extend Offer |
Select Customer, Recruiter, or Th. Party (third-party) to indicate who is responsible for extending an offer to the candidate when the customer makes a hiring decision. |
Renewal % Increase |
Enter the average percent increase that a candidate is likely to receive upon a review of performance. |
Weekly Hours |
Enter the number of hours that the customer expects a candidate to work per week. |

Use the Benefits page (FO_CUST_BENEFITS) to enter benefits information that the customer offers its employees.
Navigation:
Select 0180 - Staffing Information in the General Info Links drop-down list box.
Select 0140 - Benefits in the Staffing Links drop-down list box.
Each field on this page is a free-form text field that is limited to 50 characters, except the Comments text box, which allows 256 characters. Enter a description of each benefit that is offered by the customer. For any benefits that are not listed, use the Comments text box.
Use the Customer Sales Data page (FO_CUST_SALES_DATA) to enter information about the customer for the purpose of supporting the Staffing business development process.
Navigation:
Select 0180 - Staffing Information in the General Info Links drop-down list box.
Select 0150 - Customer Sales Data in the Staffing Links drop-down list box.
Field or Control |
Description |
|---|---|
Sales Levels |
Select the level of sales that the customer will generate for the entire company. |
Potential Temp Worker (potential temporary worker) |
Select the potential number of workers that the customer will use within the entire company. |
Company Size |
Select the approximate customer headcount in the entire company. |
Peak Seasons
Field or Control |
Description |
|---|---|
Contact ID |
Select the ID of the person that the staffing organization interacts with at the customer site. The options that are available come from the contacts that you associate with the customer record. |
Date From |
Select the date that the peak period begins. |
Date To |
Select the date that the peak period ends. |
Comments |
Describe the peak season period. |
Location Data
Field or Control |
Description |
|---|---|
Location |
Select a location associated with the customer. |
Country |
This field is automatically populated based on the location selected. |
Sales Levels |
Select sales-level information for this location. |
Potential Temp Worker (potential temporary worker) |
Select the potential amount of temporary workers for this location. |
Location Size |
Select the approximate headcount for this location. |
Peak Seasons
Enter peak season information for this location.
Use the Customer Sales Profile page (FO_CUST_SALES_PROF) to enter any additional sales information for this customer.
Navigation:
Select the Sales Profile link on the Customer Sales Data page.
Enter a description for this customer profile.
Use the Location Sales Profile page (FO_CT_SLS_LOC_PROF) to enter any additional sales information for this customer location.
Navigation:
Select the Location Sales Profile link on the Customer Sales Data page.
Enter a description for the sales profile for this location.
Use the Competitors page (FO_CUST_COMPETITRS) to enter information about other staffing firms with which you compete for the customer.
Alternatively, you can enter information to identify competitors of customers.
Navigation:
Select 0180 - Staffing Information in the General Info Links drop-down list box.
Select 0160 - Competitors in the Staffing Links drop-down list box.
Field or Control |
Description |
|---|---|
Competitor |
Enter the name of the competitor. If the competitor does not appear in the list, you can enter the name in the field. |
Type |
Select the type of competitor:
|
Information |
Select the entry that most closely describes the nature of the competitive information about the work that is performed at the customer's site. |
Comments |
Enter any comments about the competitor. |
Rates
Field or Control |
Description |
|---|---|
Pay Rate |
Enter the rate that the competitor pays its employees for the work that is performed at the customer's site. The currency code used here is the same as the one that you entered on the Customer page. |
Billable Rate |
Enter the rate that the competitor charges for the work that is performed at the customer's site. The currency code that is used here is the same as the one that you entered on the Customer - Customer page. |
Job Code |
Select a job code. The Description field is populated automatically. Note: The pay and billable rates are keyed by job code. |
Use the Lines of Business page (FO_CUST_SRVC_AREA) to enter the lines of business in which the customer operates.
Navigation:
Select 0180 - Staffing Information in the General Info Links drop-down list box.
Select 0170 - Lines of Business in the Staffing Links drop-down list box.
Lines of business are broad categories of job sectors that the staffing company normally services. Lines of business are defined through system configuration. Examples may include Health Care, Technology, Legal, Clerical, or any other available appropriate description for the customer.
Use the Job Supplement page (FO_CUST_JOB_SUPP) to enter additional information about certain job descriptions.
Navigation:
Select 0180 - Staffing Information in the General Info Links drop-down list box.
Select 0180 - Job Supplements in the Staffing Links drop-down list box.
Job Supplement Information
Field or Control |
Description |
|---|---|
Form Type |
Select the type of form that you want to use to enter supplemental job information. |
Form Code |
Select the specific form to use. Note: The page view that appears for each form contains a different set of questions or fields for you to complete. The organization is responsible for deciding what information these forms contain. |
Job Supplement Details
Field or Control |
Description |
|---|---|
Field Name |
The system displays the name of the form fields as defined through system configuration. |
Long Description |
Enter the values for each form field. |
Use the Forms page (FO_CUST_FORMS) to use this page to review forms currently associated with the customer record.
From this page you can also click the Add New Form button to associate more forms with the customer record.
Navigation:
Select 0180 - Staffing Information in the General Info Links drop-down list box.
Select 0190 - Forms in the Staffing Links drop-down list box.
Field or Control |
Description |
|---|---|
Form Description |
This field describes the form associated with the customer record. Click the description to access the Form Detail page and review the values for each Form field. |
Form Code |
View the code of the forms associated with the customer record. |
View Form |
Click the View Form link to view the detail of a previously added form. |
Add New Form |
Click the Add New Form button to associate additional forms with the customer record. |
Use the Forms Detail page (FO_CUST_FORMS_DTL ) to associate additional forms with customer records.
Forms can be configured to capture extra information about the customer that is not already captured in the delivered fields in the application.
Navigation:
Click the Add New Form button on the Forms page.
Field or Control |
Description |
|---|---|
Form Type |
The form type CUST (customer form) automatically populates in this component. |
Form Code |
Enter the code of the form that you want to associate with the customer. When you select a code, the system automatically loads the form definition. The form field names are automatically supplied by Staffing Front Office from the form configuration. Enter the date that the form detail will be effective; then complete the form detail information. |
Insert Row |
Click the Insert Row button if another effective-dated row is needed. |
Use the Default Customer Event Lists (FO_CUST_EVL) page to set up specific event lists for a customer for use on the Job Order page. You can set up standard event lists for the customer and set up specific event lists for each order type.
Navigation:
Select 0180 - Staffing Information in the General Info Links drop-down list box.
Select 0200 - Customer Event Lists in the Staffing Links drop-down list box.
This example illustrates the fields and controls on the Default Customer Event Lists Page. You can find definitions for the fields and controls later on this page.

Header Information
Field or Control |
Description |
|---|---|
Standard Event List |
Enter the name of the standard event list for this customer. |
Allow Recruiting Funnel List |
Select this check box to enable users to select a user defined event list on the Job Order page. If this option is not checked, the event list will be read only at the order level. |
Force Dependency |
Select to indicate that the previous event, in the event list, must be completed before a candidate can proceed to the next event. Note: This value may be set at the event level, at the customer event list, or at the order level. There is a hierarchy beginning with the event level. The value will be carried over to the customer event list. The value at the customer event list level will be carried over to the order level. You can overwrite the value defaulted from the previous level in the hierarchy. |
Recruiting Funnel Data
Field or Control |
Description |
|---|---|
User Order Type |
Select the name of the order type to add or update. |
Event List |
Select the name of the event list to default onto the job order for that user order type. |
Use the Contract Rates page (FO_MC_RATES) to capture pay rate, bill rate and markup %, which have been negotiated and agreed upon by the staffing company and the customer.
Navigation:
Select 0180 - Staffing Information in the General Info Links drop-down list box.
Select 0210 - Master Contract Rates in the Staffing Links drop-down list box.
Field or Control |
Description |
|---|---|
Use for Job Code Validation |
Select this checkbox to use the Job Code table when creating orders for this customer. If you do not select this checkbox, the system will use the values set up here for the Job Code prompt in the order component. |
Copy Rate Set |
Click this button to access a page to enter the customer ID of the customer with the rate set you want to copy. The system copies all values except the customer ID, effective date, status, and worksite or job location. You can then modify the values as needed. |
Use the Worksite Master page (CUST_WRKSTE_MSTR) to enter additional information about a customer worksite by associating forms with a customer work address.
Navigation:
Select 0190 - Worksite Master in the General Info Links drop-down list box.
Field or Control |
Description |
|---|---|
Address Seq (address sequence) |
Select the address sequence number that the worksite master is describing. The rest of the address information is supplied when the sequence number is selected. |
Contact |
Select the contact name from the list of available entries. |
Form Type |
Select the form type that you want to use to enter worksite information. |
Form Code |
Select the specific form that you want to use. The page view that appears for each form contains a different set of questions or fields for you to complete. The organization is responsible for deciding what information these forms contain. |
Complete all the fields for which you have information and click Save.
Use the Customer Fields page (CUST_CSF) to select the Customer Field Definition templates that you can use when creating orders and assignments for a customer.
These templates enable you to capture additional information in the order and assignment that can be sent to PeopleSoft Billing and used for invoice printing or reporting purposes.
Navigation:
Select 0200 - Customer Fields in the General Info Links drop-down list box.
Field or Control |
Description |
|---|---|
Definition ID |
Select the Customer Field Definition templates that you can use when entering orders and assignments for this customer. |
Default |
Select to have the customer fields definition ID be the default for this customer. |
Use the SAM Entity Inquiry page (select 0300 – SAM Registration in the General Info Links drop-down list box on the General Info page) to create a new customer
Field or Control |
Description |
|---|---|
Customer |
Click this link to access the Customer Information page for this previously created customer. |
Create Customer |
Click this button to access the Federal Entity Create page and to use this page to create a new customer. Only buyer or a seller and buyer can be used to create customers. An error message is displayed if SAM staged data has expired. Check Federal Processing installation options to ensure Customers have been enabled for SAM. Note: This field does not appear when the entity is a seller only. |
Note: The 0300 – SAM Registration option is displayed in the General Info Links drop-down list box only for customers created from within the SAM component.
For more information on SAM Entity Inquiry page, see Processing System for Award Management Data