Defining Business Unit Defaults by SetID
Page Name | Definition Name |
Usage |
|---|---|---|
BUS_UNIT_OPT_AR1 |
Define history options, aging options, correspondence information, Intra-Governmental Payment and Collection (IPAC) Systems information, write-off tolerances for customer account maintenance, and other general information. Set up integration with PeopleSoft HCM: Pension Administration. |
|
BUS_UNIT_OPT_AR3 |
Enter options for payment interfaces, commitment control accounting, and ChartField combination editing. | |
|
BUS_UNIT_OPT_AR2 | Define defaults for payment processing, grace days, deduction dates, revaluation, and worksheets. | |
|
BUS_UNIT_OPT_AR5 | Define the defaults for VAT processing. | |
BUS_UNIT_OPT_AR6 |
Define the maximum write-off amounts and discount tolerances for the #DTL_TLR algorithm group. Specify the default entry type and reason that the Payment Predictor process (ARPREDCT) uses to create accounting entries for partial payments and discounts when it executes the algorithm group. | |
BUS_UNIT_OPT_AR7 |
Specify the default currency that appears on some of the inquiry pages, the maintenance and transfer worksheets, and the run control pages for dunning letters and statements. | |
BUS_UNIT_OPT_AR8 |
Define the historical statistics that you want to appear on the Customer Trend 1 page, Customer Trend 2 page, and Customer Trend 3 page. |
To define business unit defaults, use the Receivables Options component (BUS_UNIT_OPT_AR1).
Use this component to:
Define general options.
Define additional general options.
Define payment options.
Define value-added tax (VAT) defaults.
-
Define Payment Predictor options.
Select default currency options.
Define defaults for customer historical trends.
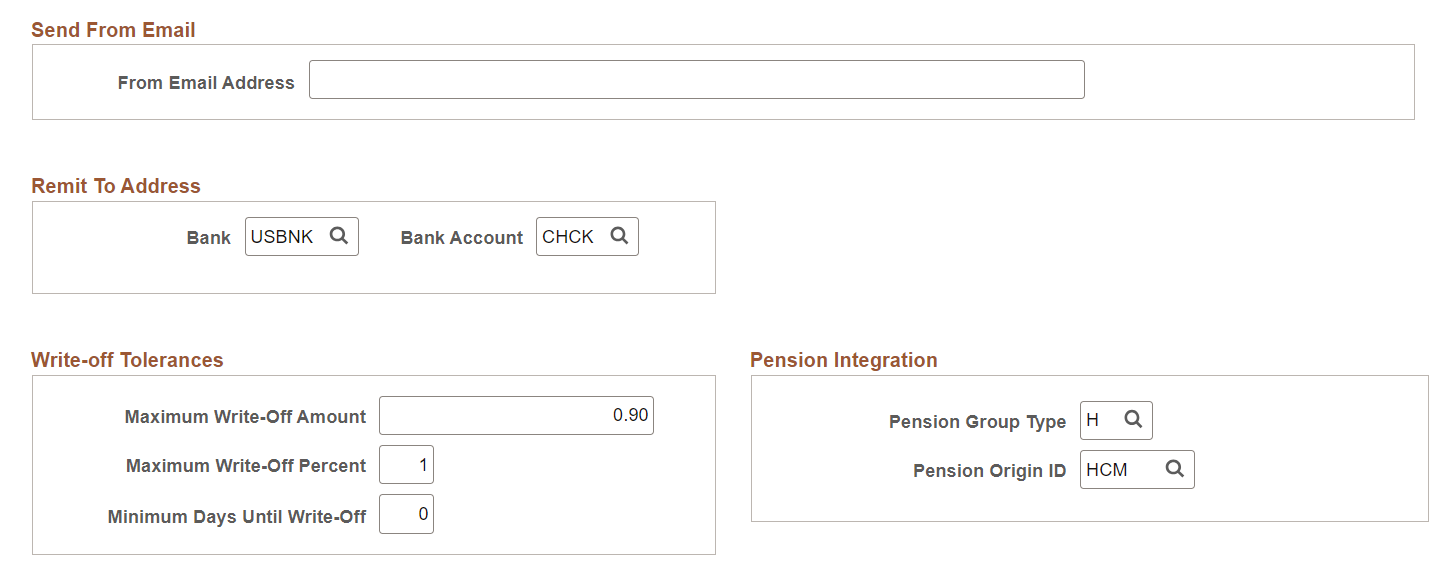
Use the Receivables Options - General 1 page (BUS_UNIT_OPT_AR1) to define history options, aging options, correspondence information, Intra-Governmental Payment and Collection (IPAC) Systems information, write-off tolerances for customer account maintenance, and other general information.
Navigation:
This example illustrates the fields and controls on the Receivables Options - General 1 page (1 of 2). You can find definitions for the fields and controls later on this page.

This example illustrates the fields and controls on the Receivables Options - General 1 page (2 of 2). You can find definitions for the fields and controls later on this page.
Calendar and Aging Options
|
Field or Control |
Description |
|---|---|
|
Aging ID |
Select an aging ID that you set up on the Aging page. The Aging Application Engine process (AR_AGING) uses this identifier for the aging rules for all business units associated with the TableSet. |
|
Calendar ID |
Select the calendar ID used to perform history calculations. You define the calendars on the Calendar Periods page. |
General Options
|
Field or Control |
Description |
|---|---|
|
AR Specialist (accounts receivable specialist) |
Select the AR specialist who you want to be the initial owner for deduction and disputed items. The system assigns the specialist when you create a deduction on the payment worksheet and when you mark an item as disputed or as a deduction on the View/Update Item Details - Detail 1 page. You can override the default specialist for individual customers on the Bill To Options page and for the deduction or dispute reasons on the Deduction Reason page and the Dispute Reason page. Note: You must assign an AR specialist to each business unit. To assign all deductions or disputed items initially to a specific AR specialist, such as a manager, use the same specialist for each business unit and do not override the specialist for individual customers or reasons. Managers can use the Item List page to search for items assigned to them and drill down to the items to assign them to someone else. Alternatively, you can set up an assessment rule to create an action for the AR specialist when you run the Condition Monitor Application Engine process (AR_CNDMON). The manager can then assign each deduction or disputed item to individual AR specialists on the Reassign Action page. |
DSO Calculations
|
Field or Control |
Description |
|---|---|
|
Year and Period |
Enter dates that the Receivables Update Application Engine process (ARUPDATE) uses to determine which period to update for days sales outstanding history. These dates appear on the Receivables Update - Request page. The system calculates, summarizes, and stores all monetary transactions that fall in the date range for the defined periods. |
Correspondence
|
Field or Control |
Description |
|---|---|
|
Statement ID and Dunning ID |
Select the IDs that determine the conditions and parameters that the system uses to prepare customer statements and dunning letters. The statement ID also defines the default statement type to generate. You define these IDs in the Statement (STATEMENT_TABLE) and Dunning (DUNNING_TABLES) components. |
|
Generate Statement Image |
Select Yes to make statement images available on the Collections Workbench, Correspondence tab, or No to turn off this functionality. You can override this value at the correspondence customer level on the General Information - Correspondence Options Page. This field controls only the availability of statement images on the Collections Workbench. It does not affect the image displayed in the self-service component, eBill Payment. For more information, see Setting Up PeopleSoft eBill Payment Security. See also Correspondence Tab. |
|
Generate Dunning Image |
Select Yes to make dunning images available on the Collections Workbench, Correspondence tab, or No to turn off this functionality. You can override this value at the correspondence customer level on the General Information - Correspondence Options Page. See also Correspondence Tab |
|
Admin ID (administrative ID), Finance ID, and Penalty ID |
Select an overdue charge ID for each of these fields whose overdue charge type matches the field name. These IDs determine the conditions and parameters that the system uses to generate overdue charge invoices. The system also uses these IDs to determine when not to prepare an overdue charge invoice. You define these IDs in the Overdue Charging component (OVRDUE_CHG_TABLE2). Note: Override the identifiers for statements, dunning letters, and overdue charges for individual customer on the Correspondence Options page. |
Remit To Address
|
Field or Control |
Description |
|---|---|
|
Bank |
Select the bank of the business unit whose remit to address will appear on correspondence. |
|
Bank Account |
Enter the bank account number of the business unit whose remit to address will appear on correspondence. |
Federal Options
This section is only available if you select the AR IPAC Interface check box on the Installation Options - Receivables Page
|
Field or Control |
Description |
|---|---|
|
(USF) Billing ALC (billing agency location code) |
Enter the agency location code for the billing agency that is sending data. The federal IPAC interface uses the business unit agency location code when transmitting data. |
|
(USF) Sender DO (sender disbursing office) |
Enter the disbursing office symbol for the agency location that is sending the transaction using the IPAC interface. This is the five-character ID assigned by the U.S. Department of Treasury. |
|
(USF) IPAC Subcategory |
Select a default IPAC subcategory code to be populated by AR Posting when the IPAC header is created. Subcategory options are:
|
Write-off Tolerances
You must specify the tolerances that the maintenance worksheet and Automatic Maintenance process use to write off items.
Field or Control |
Description |
|---|---|
Maximum Write-Off Amount | Enter the maximum amount that you can write off for either an individual item or for the remaining balance for a match group. The process writes off an amount less than or equal to the maximum amount if the amount does not exceed the percentage of the original amount for the item. For example, if you enter an amount of 25.00, the process writes off amounts up to 25.00. However, if you enter a maximum write-off percent of 10 and the total original amount of an item is 240.00, the system will not write off more than 24.00. For no limit, enter all 9s. |
Maximum Write-Off Percent | For the maintenance worksheet, enter the maximum percentage of the item amount that the system can write off. The write-off percent applies only to write-offs for individual items, not for remaining amounts for items or match groups. For the Automatic Maintenance process, enter the maximum percentage that the remaining balance can be for a match group. The process adds the total debits or totals credits and divides the higher amount by the remaining balance for the match group to determine the percentage that can be written off. The maximum percentage that you can enter is 100. For no limit, enter 100. |
Minimum Days Until Write-Off | Enter the minimum age of items before you can write them off on the worksheet or the process automatically writes them off. For example, if you enter 30, you cannot write off an item until it has been in the system for 30 days. For no limit, enter 0. |
You can also define the tolerances for each customer on the Bill To Options page. The default tolerances for customers is no limit. You must define tolerances for each entry reason on the Automatic Entry Type - Selection page for the following entry types:
Write off a credit (MT-02).
Write off a debit (MT-03).
Write off remaining credit (MT-06).
Write off remaining debit (MT-07).
Because the system always uses the most restrictive tolerance requirement regardless of the level for which you define tolerances, you probably want to use the least restrictive tolerance at the business unit level. For example, suppose that you set up the following write-off tolerances for the deduction write-off amount:
Level | Amount |
|---|---|
Business unit: FRA06 | 100.00 |
Customer: FRA08 |
50.00 |
Entry reason: PROMO | 75.00 |
In this example, the system uses the write-off tolerance for the customer to determine the maximum write-off amount because it is the most restrictive.
Pension Integration
Field or Control |
Description |
|---|---|
Pension Group Type | Enter any Group Type value acceptable for pending item groups (such as Pension Administration, Billing, entered on-line). Note: This field does not accept these values: P, M, T, D, X, F, and U. This set of Group Types is delivered as system data; the types are designated for other purposes in Receivables. The user can enter the same Group Type used for OnLine Pending Item Entry, or Integration with Billing or Integration with other product, but there is also the flexibility to enter a Group Type specific for Pension Integration. The advantage is to have specific Document Type or Journal Template for Integration with HCM, in case it fits better the business needs of the company. |
Pension Origin ID | Enter a Pension origin ID. Only Origin IDs with the following settings are available for selection:
|
Use the Receivables Options - General 2 page (BUS_UNIT_OPT_AR3) to enter options for payment interfaces, commitment control accounting, and ChartField combination editing.
Navigation:
This example illustrates the fields and controls on the Receivables Options - General 2 page. You can find definitions for the fields and controls later on this page.
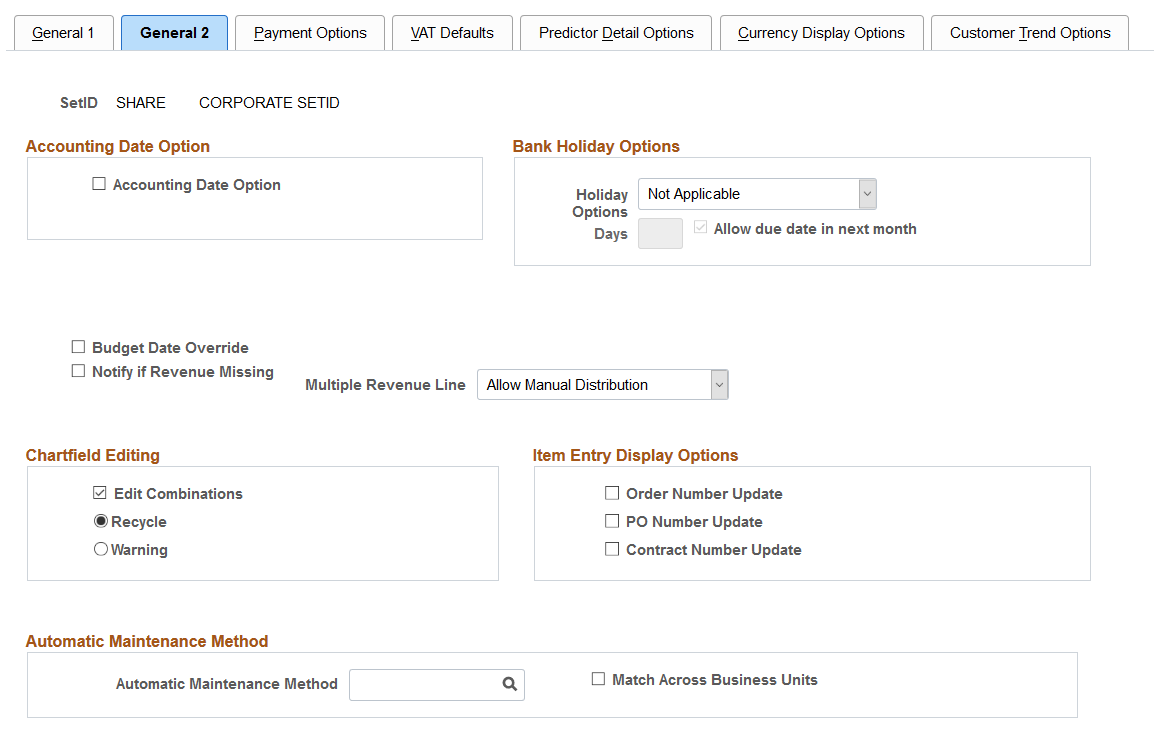
Accounting Date Option
Field or Control |
Description |
|---|---|
Accounting Date Option | Select to have the system issue a warning if the user enters a date other than the current date for transactions in this business unit. |
Bank Holiday Options
Field or Control |
Description |
|---|---|
Holiday Options | Select the default rules for the SetID that the system uses to change the due date when it falls on a bank holiday. Options are: Not Applicable: Does not change the due date. Due After Holiday: Changes the due date to a day after the holiday. Due Before Holiday: Changes the due date to a day before the holiday. The system uses the bank account assigned to the correspondence customer to determine bank holidays. Override this default for an individual business unit on the Bank/Payment Options page, or override this default for an individual customer on the Bill To Options page. Note: Define holidays on the Business Calendar page; then assign a calendar to a bank account on the External Account - Account Information page. |
Days | Enter the number of days to move the due date to accommodate the holiday. |
Allow due date in next month |
If you select Due After Holiday as the holiday option, select this check box to permit the new due date to be in the next month. If you do not select this option, the system adjusts the due date to the last business day before the original due date. |
Revenue Estimate Options
Field or Control |
Description |
|---|---|
Synchronize Budget Date | Select this option to use the same date for entries in the collected budget as the date in recognized budget. Otherwise, the system uses the accounting date for the source transaction. |
Budget Date Override | Select this option to enable users to override the BUDGET_DT field when creating online accounting entries. You must have Commitment Control activated at the installation level and at the ledger group for the business unit. |
Notify if Revenue Missing | Select this option to display an error message when a user selects an item on the Payment, Express Deposit, and Maintenance Worksheet pages, and revenue lines have not been generated in Contracts. |
Transaction Type | Specify the default source transaction template for the Budget Processor Application Engine process (FS_BP) to read the source data and to perform budget checking. The Budget Processor uses the default for transactions that the Revenue Estimate Application Engine process (AR_REV_EST) generates. Override the default when you run the Revenue Estimate process or the Budget Processor process. |
Misc Payment Transaction Type (miscellaneous payment transaction type) | Specify the source transaction template for the Budget Processor to use to read the source data and to perform budget checking for directly journaled payments. You cannot override this value when you run the process from the Direct Journal Entry - Accounting Entries or Directly Journalled Payments pages. However, you can override this value when you run the process from the Budget Processor - Request page. Note: Define source transaction templates in the Source Transaction Definition component (KK_SOURCE_TRAN). |
Multiple Revenue Line | Specify whether to perform manual multiple revenue line distribution for the items in the business unit. If you select Allow Manual Distribution, a user can manually distribute the revenue amounts for control budgets in the worksheets if a partial payment is applied to items with multiple revenue lines. If you select No Manual Distribution, the system distributes the revenue amount automatically. |
You can choose to synchronize the budget date and allow users to override the budget date independently. The following table describes the actions of the system in each case:
Synchronize Budget Date Field | Override Budget Date Field | Description |
Actuals and Reporting Ledgers (PENDING_DST, ITEM_DST) | Revenue Estimate Ledger (AR_CC_TRAN) |
|---|---|---|---|---|
Cleared | Cleared | You cannot override the budget date. The system uses the accounting date as the budget date on all transactions. | The accounting date is used as the budget date on all transactions. | The accounting date is used as the budget date on all transactions. |
Cleared | Selected | You can override the budget date for any transaction. | The accounting date is used as the budget date on all transactions, but the user can override the budget date. | The accounting date and the budget date match their values in ITEM_DST. |
Selected | Cleared | Use the same date for entries in the collected budget as the date in the recognized budget. Note: This selection only affects the budget ledger. | The accounting date is used as the budget date on all transactions. | The system uses the original budget date from the recognized revenue for the budget date related to entries affecting the collected revenue. Note: The budget and reporting ledgers are not synchronized, only the budget date for the recognized revenue and collected revenue. |
Selected | Selected | You can only override the budget date for pending item entry transactions. | The accounting date is used as the budget date, but you can override the date as required for:
For all other transactions, the budget date is populated based upon the recognized revenue budget date. | The accounting date and the budget date match their values in ITEM_DST. The system uses the original budget date from the recognized revenue for the budget date related to entries affecting the collected revenue. Note: The budget ledger and actuals ledger dates are the same. |
ChartField Editing
Field or Control |
Description |
|---|---|
Edit Combinations | Select to enable ChartField combination editing for business units with this SetID and select one of two methods for handling errors. |
Recycle | Select to display an error message for accounting entries that you create online. You can save the accounting entries, but you cannot post them until you correct the errors or fix the combination edit rule on the Rule Definition page. The system changes the posting action for the group to Do Not Post and sets the edit status to Error. If you generate accounting entries by running the Receivables Update process, the process creates an entry in the message log. You must use the error correction pages to correct the errors before you can post them. |
Warning | Select to display a warning message for accounting entries that you create online. You can choose whether to correct the accounting entries or to post them without correction. The Receivables Update process adds a warning message to the message log for batch accounting entries and posts the group. |
Item Entry Display Options
Field or Control |
Description |
|---|---|
Order Number Update, PO Number Update (purchase order number update), and Contract Number Update | Select to enable users to update the Order Number, Purchase Order, and Contract Number fields on the View/Update Item Details - Detail 2 page. Note: You can update these fields only if you are working with Item Entry Type transactions that are typically interfaced from external billing systems. You cannot update these fields for other transactions. |
Automatic Maintenance Method
Field or Control |
Description |
|---|---|
Automatic Maintenance Method | Select the automatic maintenance method containing the rules that you want to use by default to match items when you run the Automatic Maintenance Application Engine process (AR_AUTOMNT). You can override the method for individual run controls if needed. |
Match Across Business Units | Select the check box if you want the Automatic Maintenance Application Engine process (AR_AUTOMNT) to match items across multiple business units entered on the Automatic Maintenance run control page (Accounts Receivable, Receivables Maintenance, Automatic Maintenance, Request Automatic Maintenance). The Match Across Business Units check box is deselected by default. If the check box is deselected, the process matches items within each of the business units entered on the run control page. |
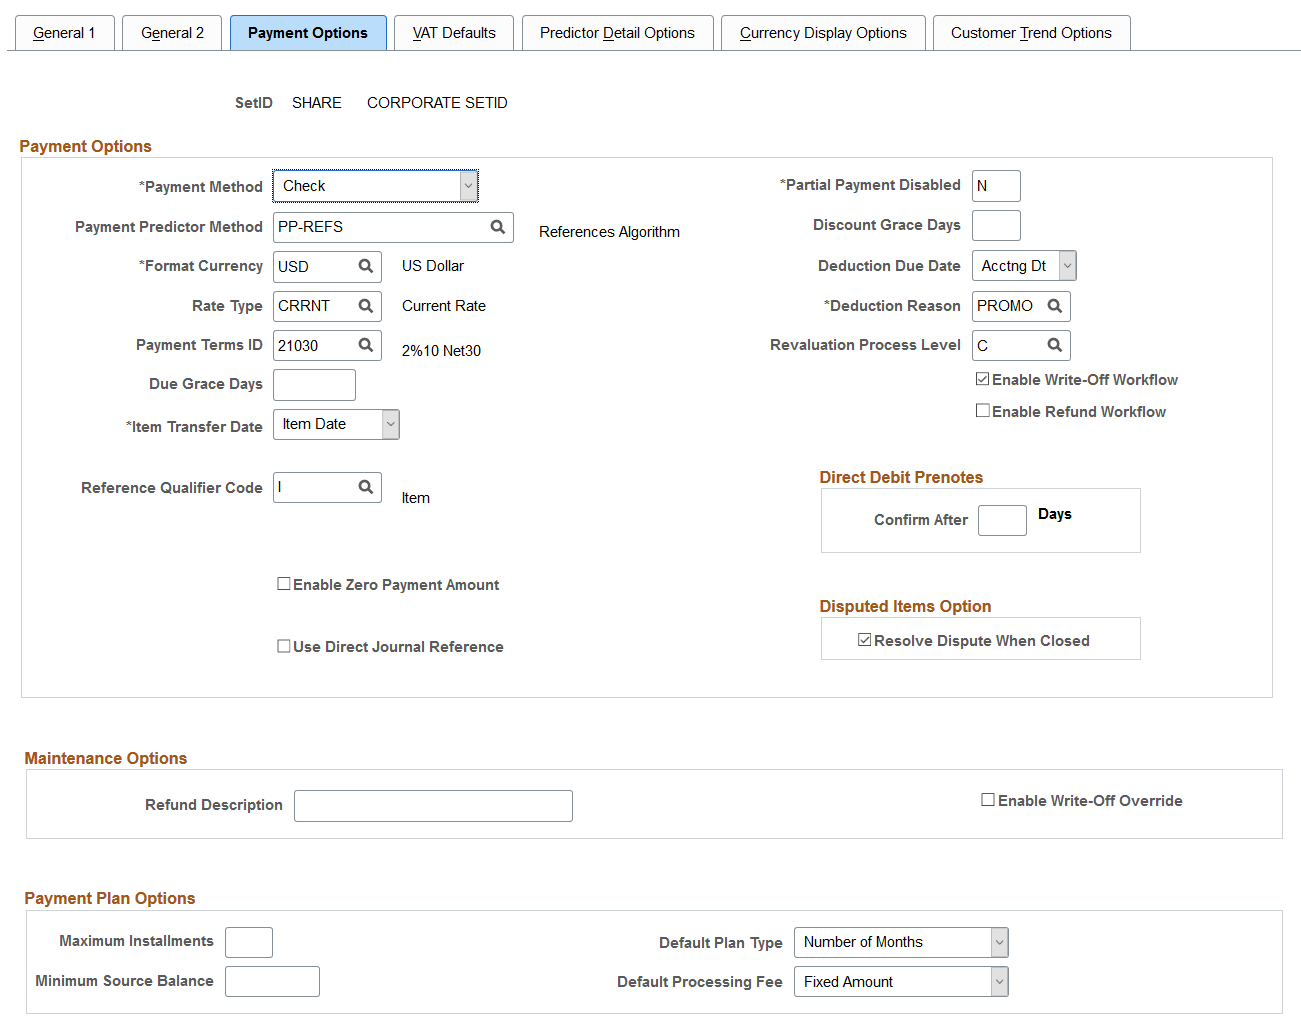
Use the Receivables Options - Payment Options page (BUS_UNIT_OPT_AR2) to define defaults for payment processing, grace days, deduction dates, revaluation, and worksheets.
Navigation:
This example illustrates the fields and controls on the Receivables Options - Payment Options page. You can find definitions for the fields and controls later on this page.
Field or Control |
Description |
|---|---|
Payment Method | Select the default payment method for items. Options are: Check, Credit Card, Direct Debit, Draft, Electronic Funds Transfer, or Giro - EFT. Override the value for individual customers, items or payments. Note: If you receive payments using a payment interface, such as an electronic data interchange (EDI), lockbox, or bank statement, select Check or Electronic Funds Transfer. If you receive electronic payments for acceptgiro attachments, select Giro - EFT. |
Payment Predictor Method | Select the method that the Payment Predictor process uses if you do not specify a method at the customer level. The payment predictor method defines the rules that the process uses to apply payments and to make adjustments such as write-off items. See Defining Payment Predictor Methods. If you want to use Payment Predictor to apply all payments from a particular bank account, select the Payment Predictor check box on the External Accounts - Account Information page. Override this default, and select or deselect Payment Predictor for individual payments, using the deposit entry pages. |
Format Currency | Select the default currency that the system uses for receivables processing. |
Rate Type |
Select the exchange rate type that the system uses to perform currency conversion. Override the default at the customer level or when you enter pending items, enter deposits, create maintenance worksheets, or create customer-initiated drafts. |
Payment Terms ID | Select the default payment terms for the business unit. Override the default at the customer level or when you enter pending items. Define payment terms on the Payment Terms page. The payment terms determine the item due date and discount information. |
Due Grace Days | Enter the number of days beyond the due date that a customer can pay without the payment being considered late. The Overdue Charges Application Engine process (AR_OVRDUE) uses due grace days to determine whether an item is overdue. If the item's due date is May 1, 2003 and you run the process on May 2, 2003, the process does not create an overdue charge if you enter 5 for the due grace days. However, after the grace days pass, the system calculates overdue charges from the item's due date. The Aging process uses grace days to determine in which aging category to place an item. For example, you enter 5 days and an item is 22 days old. You have aging categories for 10, 20, and 30 days. The item would be in the aging category for 10 days, because the system subtracts five days from the age. |
Item Transfer Date | Select the option that the system uses to determine the accounting date for transfer activities when you transfer items from one customer to another. Options are:
|
Reference Qualifier Code | Select the type of remittance information generally provided by customers, such as document, item, or bill of lading. This is the default value for identifying items to include in the payment, draft, maintenance, and transfer worksheets. You can override the value at the customer level. |
Enable Zero Payment Amount | Select this option to allow deposits with zero payment amounts. This option is deselected by default. You can only save the deposit with zero amount payments if this option is selected, otherwise the system returns an error message indicating that payments with zero amounts are not allowed. |
Use Direct Journal Reference | Select this option to allow users to enter document reference information for a directly journaled payment on the Regular Deposit - Payments page. |
Partial Payment Disabled | Enter a value that determines whether you can modify the amount on the payment worksheet to create a partial payment. The default is N, which enables users to create partial payments. Enter Y if you do not want users to create partial payments. |
Discount Grace Days | Enter the number of days beyond the discount date that a customer is still eligible for an earned discount. Payment worksheets, express deposits, and the Payment Predictor process use discount grace days to calculate discounts. Override the due grace days and discount grace days for a customer on the Bill To Options page and for individual items during pending item entry or item maintenance. |
Deduction Due Date | Select the type of date that the system uses to determine the due date of the new item created for a referenced deduction. Select Acctng Dt (accounting date) if the due date is to be the accounting date of the payment. Select Item Dt (item date) to carry over the original item due date. |
Deduction Reason | Select the default deduction reason to assign to new deductions that the Payment Predictor process or payment and draft worksheet create. Users can override the reason when they create the deduction on the payment worksheet or on the View/Update Item Details - Detail 1 page. Use a generic reason as the default reason and override it as needed. Note: You can also create unique deduction reasons for each entry reason for the Deduction entry type. If you do this, the system assigns the appropriate deduction reasons for deductions that you create on the payment or draft worksheet. |
Revaluation Process Level | Select the level where the revaluation process occurs. Options are: B (business unit), C (customer ID), or I (item). You must specify a revaluation level to summarize revaluation information by a specific level according to these rules:
|
Enable Write-Off Workflow | Select this check box to activate approval workflow for write-offs entered on the payment worksheet, maintenance worksheet, or draft worksheet. This approval workflow is controlled by the Approval Framework feature in PeopleSoft Enterprise Components. The user is not able to set the worksheet to post until the write-off amount is approved. Both the approver and the worksheet user can set the worksheet to post after approval is granted. |
(USF) Entity Code and Receivable Type | Enter the default code that identifies the government agency to which you submit the Treasury Report on Receivables (TROR) and the code that categorizes the types of receivables that are included on the report. This value is the default for items. These fields are available only if you select the Treasury Report on Receivables check box on the Installation Options - Receivables page. |
Revaluation Process Level | Select the level where the revaluation process occurs. Options are: B (business unit), C (customer ID), or I (item). You must specify a revaluation level to summarize revaluation information by a specific level according to these rules:
|
Confirm After n Days |
Enter the default number of days that a prenote will be automatically confirmed by the system.
|
Resolve Dispute When Closed | Select this check box to automatically resolve a dispute when the item is closed. For more information, see Dispute Processing. |
Refund Description | Enter a description that can be populated as the default voucher description in Payables vouchers. The refund description can indicate why the voucher was created (for example, a refund in Receivables). |
Enable Write-Off Override | Select this check box to allow users to override inherited ChartFields on write-off transactions on the payment and maintenance worksheets. |
|
Maximum Installments |
Enter the maximum number of payment plan installments allowed for the business unit. See: |
|
Default Plan Type |
Select a default payment plan type for the business unit. Values are:
|
|
Minimum Source Balance |
Enter the minimum source balance required to create a payment plan. |
|
Default Processing Fee |
Select a default processing fee for the business unit. Values are Fixed Amount or Percentage of Plan Balance. |
Use the Receivables Options - VAT Defaults page (BUS_UNIT_OPT_AR5) to define the defaults for VAT (value-added tax) processing.
Navigation:
This example illustrates the fields and controls on the Receivables Options - VAT Defaults page. You can find definitions for the fields and controls later on this page.

Field or Control |
Description |
|---|---|
VAT Default | Click this link to access the VAT Defaults Setup page. The VAT Defaults Setup page is a common page used to set up VAT defaulting for all PeopleSoft applications processing VAT transactions. On this page you can define PeopleSoft Receivables VAT business unit defaults as applicable. Use the VAT Defaults Setup page to identify this PeopleSoft Receivables business unit as subject to the domestic reverse charge provision by selecting Yes in the Domestic Reverse Charge field. In addition, use the Domestic Reverse Charge Sales field to enter a VAT Transaction Type code and enter a value in the VAT Driver field. The domestic reverse charge fields are displayed on various receivable transactions for pending item entry, draft entry, and payment entry. |
VAT Service Treatment Setup | Click to access the Services VAT Treatment Defaults Setup page. The Services VAT Treatment Defaults Setup page is a common page used to set up VAT services treatment defaults for all PeopleSoft applications processing VAT transactions. If you are required to implement special handling for services, you can specify PeopleSoft Receivables VAT service treatment defaults on this page as applicable. When defining service VAT treatment defaults for a specific service, you specify the defaults applicable to that service. When defining defaults for a driver higher in the hierarchy, such as a supplier, customer, or business unit, you specify the defaults that apply to the services most often supplied by or for that driver. |
Note: The VAT Defaults Setup and Services VAT Treatment Defaults Setup pages are described in detail in the PeopleSoft Global Options and Reportsdocumentation.
Field or Control |
Description |
|---|---|
Physical Nature | Select the default physical nature for transactions. Options are: Physical Goods or Intangible/Services. |
Where Service Performed | Select the default location for where a service is most often physically performed. Options are: Buyer's Location, Ship From Location, Ship To Location, or Supplier's Location. |
Use the Receivable Options - Predictor Detail Options page (BUS_UNIT_OPT_AR6) to define the maximum write-off amounts and discount tolerances for the #DTL_TLR algorithm group.
Specify the default entry type and reason that the Payment Predictor process (ARPREDCT) uses to create accounting entries for partial payments and discounts when it executes the algorithm group.
Navigation:
This example illustrates the fields and controls on the Receivables Options - Predictor Detail Options page. You can find definitions for the fields and controls later on this page.

The Payment Predictor process uses the tolerances that you specify to write off or adjust an underpayment or overpayment or to adjust the discount amount when you run a payment predictor method that executes the #DTL_TLR or #DTL_TPM algorithm groups. The system uses these tolerances for underpayments to determine whether to write off or adjust the balance, or make a partial payment if the Partial Payment Switch check box on the Bill To Options page for the customer is selected. If you deselect the Partial Payment Switch check box, it only uses the tolerances to determine whether to write off or adjust the balance. The tolerances apply to individual items not to all invoices paid by the payment.
Field or Control |
Description |
|---|---|
Invoice Tolerance Amount | Enter the maximum amount of an underpayment or overpayment that the Payment Predictor process can write off. The Payment Predictor process can write off an amount below the invoice tolerance amount if it does not exceed the percentage of the payment or item. For example, suppose that you receive a payment of 1,000.00 EUR. You enter 25.00 EUR for the invoice tolerance amount, and you enter .01 in the Percent field. The Payment Predictor process applies the payment to a 1,023.00 EUR item. It does not write off the remaining amount of the item because 23.00 EUR is larger than 1 percent of the 1,023.00 EUR item. Note: The currency is the format currency that you entered on the Payment Options page. |
Percent | Enter the maximum percentage to write off. You can use decimals in the percentage. If you enter .25 this equals .0025. If you enter 1.00 this equals 1 percent. |
Discount Tolerance Amount | Enter the maximum amount of an unearned discount that the Payment Predictor process can take. To take unearned discounts, users must select the Disc field on the Detail Reference Information page for the payment and enter the discount amount. Note: The currency is the format currency that you enter on the Payment Options page. |
Percent | Enter the maximum percentage that the Payment Predictor process can add to the payment terms. You can use decimals in the percentage. If you enter .25 this equals .0025. If you enter 1.00 this equals 1 percent. |
Last Entry Date | Displays the date on which the page was last changed. |
Control Bus Unit and Customer (control business unit and customer) | Click the down arrow to display these values:
|
Assigning Default Entry Types and Reasons
Enter the entry type and entry reason codes that you want to use to override the defaults for the system function. The following table provides a list of conditions that are in the Exception Type field and the default system function that the Payment Predictor process uses for the condition. It also provides other system functions that you can use for the exception type and the entry type and reason to enter if you want the Payment Predictor process to use that system function.
Condition | Default System Function | Possible System Functions |
Entry Type and Reason |
|---|---|---|---|
Invoice amount or percent overage within tolerance | WS-10 (Write-off an Overpayment) | WS-09 (Write-off an Item) WS-06 (Adjust Remaining Overpayment) WS-10 (Write-off an Overpayment) | WO and IOIT AO and IOIT WAO and IOIT |
Invoice amount or percent overage exceeds tolerance | WS-05 (Place Amount on Account) |
WS-05 (Place Amount on Account) WS-04 (Prepay an Item) WS-06 (Adjust Remaining Overpayment) | OA and IOET PR and IOET AO and IOET |
Invoice amount or percent underage within tolerance | WS-11 (Write-off an Underpayment) | WS-09 (Write-off an Item) WS-07 (Adjust Remaining Underpayment) WS-11 (Write-off an Underpayment) | WO and IUIT AU and IUIT WAU and IUIT |
Invoice amount or percent underage exceeds tolerance | WS-08 (Create a Deduction) | WS-08 (Create a Deduction) | DED and IUET |
Discount amount or percent overage within tolerance | WS-11 (Write-off an Underpayment) | WS-09 (Write-off an Item) WS-07 (Adjust Remaining Underpayment) WS-11 (Write-off an Underpayment) | WO and DOIT AU and DOIT WAU and DOIT |
Discount amount or percent overage exceeds tolerance | WS-08 (Create a Deduction) | WS-08 (Create a Deduction) | DED and DOET |
Discount amount or percent underage within tolerance | WS-10 (Write-off an Overpayment) | WS-09 (Write-off an Item) WS-06 (Adjust Remaining Overpayment) WS-10 (Write-off an Overpayment) | WO and DUIT AO and DUIT WAU and DUIT |
Discount amount or percent underage exceeds tolerance | WS-05 (Place Amount on Account) |
WS-05 (Place Amount on Account) WS-04 (Prepay an Item) WS-06 (Adjust Remaining Overpayment) | OA and DUET PR and DUET AO and DUET |
Select Generate Worksheet on this page and in payment predictor methods where you use the #DTL_TLR algorithm group to generate a worksheet when the condition occurs. This enables you to review the payment application before you post it.
Note: If VAT is enabled at BU Level, then WS-11 (Write-off an Underpayment) serving as default system function cannot be used. The only possible system functions which can be used if VAT is enabled at the BU level are WS-09 (Write-off an Item) and WS-07(Adjust Remaining Underpayment).
Use the Receivables Options - Currency Display Options page (BUS_UNIT_OPT_AR7) to specify the default currency that appears on the Collections Workbench and some of the inquiry pages, the maintenance and transfer worksheets, and the run control pages for dunning letters and statements.
Navigation:
This example illustrates the fields and controls on the Receivables Options - Currency Display Options page. You can find definitions for the fields and controls later on this page.
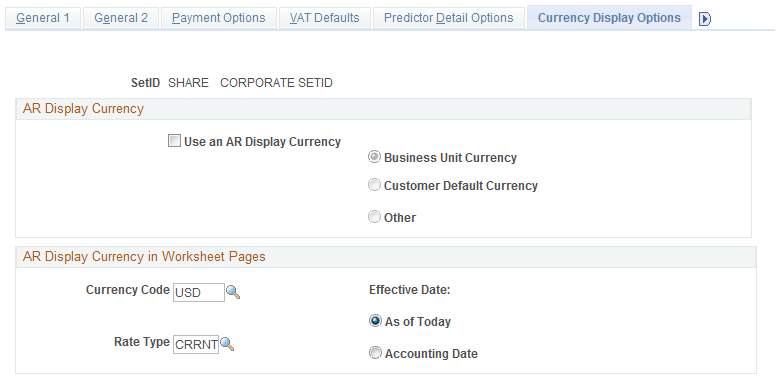
AR Display Currency
Field or Control |
Description |
|---|---|
Use an AR Display Currency | Select to enable the associated currency options. Use these options to determine which currency transaction and balance amounts appear in the PeopleSoft Receivables inquiry pages, and to determine the default currency that appears on the run control pages for statements and dunning letter processes. Options are: Business Unit Currency: The system displays amounts in the format currency for the business unit that you defined on the Receivables Options - Payment Options page, and the system uses the exchange rate type for the business unit to convert the amount. The business unit currency is usually the same as the base currency. Customer Default Currency: The system displays amounts in the default currency for the customer and uses the exchange rate type for the customer to convert the amount. You define customer currency defaults on the Miscellaneous General Info page for the customer. Other: The system displays amounts in the currency that you specify, and the system uses the exchange rate type that you specify to convert the amounts. Only this option enables you to change the display currency for inquiry pages and the dunning letter and statement run control pages when you access them. |
AR Display Currency in Worksheet Pages
The values that you enter here determine the default values that display on the Currency Conversion page for maintenance, payment, and transfer worksheets. You can override the values at the worksheet level if needed. The values are used to convert the item amounts to a different currency and they display in the Conversion Amount - Currency field if you use the Currency Conversion page to convert them.
Field or Control |
Description |
|---|---|
Currency Code | Enter the default currency for converting item amounts. |
Rate Type |
Specify the exchange rate that the system uses to convert currency amounts on worksheets. |
Effective Date | Specify whether the conversion date should be the current date (As of Today), or the Accounting Date for the item. |
Use the Receivables Options - Customer Trend Options page (BUS_UNIT_OPT_AR8) to define the historical statistics that you want to appear on the Customer Trend 1 page, Customer Trend 2 page, and Customer Trend 3 page.
Navigation:
This example illustrates the fields and controls on the Receivables Options - Customer Trend Options page. You can find definitions for the fields and controls later on this page.
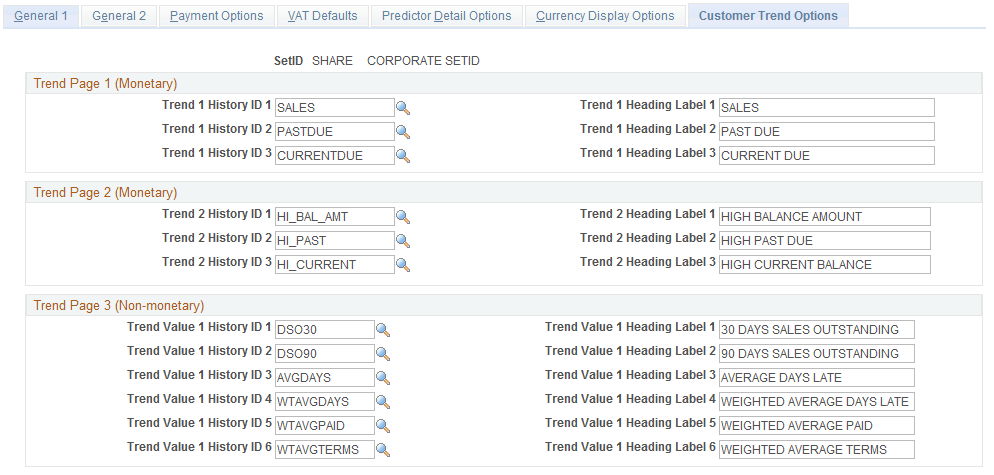
Enter the history ID that you want to use to calculate the historical data for each of the trend pages along with the heading label that you want to display for the data on the trend pages. You use the trend pages to compare historical data for different history IDs. Enter either system-defined or user-defined history IDs.
The Customer Trend 1 and Customer Trend 2 pages can display up to three historical statistics for history IDs that track amounts, such as High Balance Amount, and the Customer Trend 3 page can display up to six historical statistics for history IDs that track the number of days, such as average days late.