Configuring Account Reconciliations
The configuration components provide you the flexibility to specify what information should be part of the Reconciliation Rules. Configuration should be done before Reconciliation Rules are set up and before reconciliation processes are performed.
|
Page Name |
Definition Name |
Usage |
|---|---|---|
|
FIN_ATTRIBUTES |
Define the attributes to be used in the reconciliation rule, such as risk, reconciliation type, and whether they are required. |
|
|
GLRN_CONFIG_USRFNC |
Configure the roles that you need to support your reconciliation process. |
|
|
GLRN_RECON_RULE |
Define the parameters to be used for reconciliations that are created from this rule, which include ledgers and ChartField values as well as default options for the rule. |
|
|
GLRN_RECON_INST |
Include instructions for reconcilers; information regarding the reconciliation rule as well as supporting attachments. |
|
|
GLRN_RULE_COPY_SEC |
Copy the existing reconciliation rule to create a new rule, supplying a new reconciliation rule name. |
|
|
GLRN_UNIT_OF_RECON |
Specify how ledger balances are to be summarized when reconciliations are created. |
|
|
GLRN_UOR_CF_SEC |
For each Assignment Level, define the combination of fields and level of summarization for each field. |
|
|
GLRN_STATUS |
Configure reconciliation statuses and status change reasons that you need to support your reconciliation process. |
|
|
GLRN_SEC_STATUS |
Configure Workbench privileges by Reconciliation Role. |
|
|
GLRN_USER_SECURITY |
Configure privileges by user ID. |
Use the Account Reconciliation Rule Attributes page (FIN_ATTRIBUTES) to define the attributes to be used in the reconciliation rule, such as risk, reconciliation type, and whether they are required.
Navigation:
This example illustrates the fields and controls on the Account Reconciliation Rule Attributes page. You can find definitions for the fields and controls later on this page.

Account Reconciliation Rule Attributes are used when creating reconciliation rules. As these attributes are associated with reconciliation rules, you can use them to query or monitor the reconciliation processes. For example, you can query all reconciliations that are pending approval, where the Risk attribute has an attribute value of Very High, or those needed for Sarbanes-Oxley compliance.
Field or Control |
Description |
|---|---|
Attribute |
Enter the attribute name that you want to appear in the reconciliation rule. The attributes that you create here are populated with the designated default attribute value when you create a new reconciliation rule. |
Enabled |
Select to activate the attribute. If this check box is deselected, the attribute does not appear in the reconciliation rule. |
Required |
Select if this attribute is required to have a value in order to save a reconciliation rule. |
Attribute Value |
Define all of the possible values for an attribute. |
Default |
Select to designate the default value that will appear in the reconciliation rule for this attribute. |
Note: Attributes should be added before you create any Reconciliation Rules. If you add, modify, or enable Attributes after Reconciliation Rules are created, the system does not add the new attributes to the existing rules.
Set up your reconciliation roles based on your company’s organizational requirements and policies. You may only require one Reconciler and one Approver, or you may require a more elaborate process.
Use the Reconciliation Roles page (GLRN_CONFIG_USRFNC) to define the user roles to be assigned for each reconciliation process.
Navigation:
This example illustrates the fields and controls on the Reconciliation Roles page.

Field or Control |
Description |
|---|---|
Assignment Type |
Select an option that allows you to determine the default assignment in the Default Assignment section of the Reconciliation Rule – Rule Options Page, Options include:
|
Recon Role (reconciliation role) |
Enter a two-character, alphanumeric reconciliation role identifier. After you click the Save button, this field is display only. Reconciliation Roles added to the configuration appear on the Reconciliation Rule page for default user assignment. |
Reconciler |
Select to identify the reconciler in order to derive the associated Approver from the Approval Framework setup. It is possible to have multiple Reconcilers so that one or more persons can work on the same reconciliation, and multiple Approvers can approve the work. |
Enabled |
Select to enable a Recon Role. Only Enabled Recon Roles are available for assignment. You cannot deselect this check box if the role is being used in an assignment. |
Required |
If selected, this Recon Role must be assigned a user ID or user role. |
Note: Reconciliation Roles must be set up before any Reconciliation Rules are created. If new Reconciliation Roles are added or enabled after Reconciliation Rules are created, the system does not add them to the Reconciliation Rule (GLRN_RULE_DFUSR).
Use the Reconciliation Rule component to define the ChartField combinations that are to be reconciled in a given fiscal year and period. The Reconciliation Rule allows you to specify what ledger balances are to be reconciled and how often the reconciliation should occur, the users involved, due dates, and other attributes.
Use the Reconciliation Rule - Rule Options page (GLRN_RECON_RULE) to define the parameters to be used for a reconciliation, which includes ledgers and ChartField values as well as default options for the rule.
Navigation:
This example illustrates the fields and controls on the Reconciliation Rule - Rule Options page.

The Reconciliation Rule – Rule Options page defines the parameters for the account reconciliation.
Field or Control |
Description |
|---|---|
|
Click this icon to access the Copy Reconciliation Rule page where you can supply a new reconciliation rule name and create a new rule by copying the existing rule. |
Adhoc Recon |
Select to create adhoc reconciliations. The adhoc reconciliation does not require ledger, ChartField, and Unit of Recon information. It is identified by the name of the rule, business unit, and as of date. A reconciler works on it like other reconciliations. Once saved, it is one single unit of work and the reconciler can begin working on it and submit it for approval. |
Frequency |
Select the frequency for which the desired reconciliation should occur. This field is for information purposes only and is not used by the Create Reconciliations process. Values are:
|
Days Due From As of Date |
Specify when the reconciliation must be completed by entering a number of days relative to the As of Date of the reconciliation. The number of days that you enter here is added to the As of Date that is specified on the Create Reconciliations run control to determine the Due Date of the reconciliation. For example, if you enter 3 here, and the As of Date on the Create Reconciliation run control is September 30, the due date is calculated as October 3. Note: The due date calculation only counts business days as according to the Holiday List that is specified within the business unit. If a calculated date falls on a weekend or holiday, it is changed based on the applicable holiday options. For more information, see Defining Business Calendars. See also, Defining General Ledger Business Units. |

Ledger Options
Field or Control |
Description |
|---|---|
If No Activity |
Select one of the following actions if there has been no activity posted since the last reconciliation for the ChartField values included in the rule:
|
Ledger Group |
Enter a Ledger Group if you intend to have the Create Reconciliation process calculate balances from a ledger. |
Ledger |
Enter a Ledger if you intend to have the Create Reconciliation process calculate balances from a ledger. Leave this field blank if you intend to have the Create Reconciliation process calculate balances from the primary ledger of the ledger group. |
In No Activity in Past # Days |
Select when ledger transactions are found but none of them have been updated in the past number of days indicated in the field. Then select an action:
|
TimeSpan |
Select to determine how to calculate the ledger balance for the reconciliation. Period Activity (PER) is commonly used for income statement accounts while Balance (BAL) is most often used for balance sheet accounts. See Application Fundamentals, Setting Up Ledgers, Setting Up TimeSpans. |
Auto Approve if Balance (less than or equal to) |
Select this option to automatically approve the reconciliation if the ledger balance is within the specified amount. For example, if you enter 50 USD any balance between -50 and +50 will be automatically approved. |
Transaction Currency |
Select a currency, which is used when calculating ledger balances during the reconciliation process. When this field is left blank, base currency balances from all transaction currencies are used when calculating the amount. When a currency is entered in this field, then only the balances that are associated with that transaction currency are used when calculating the amount to be reconciled. |
Note: If a reconciliation qualifies for auto-approval, the Create Reconciliations process changes the status of the reconciliation to Approved, records the date and time of the auto-reconciliation, as well as the reason for the auto-reconciliation (Insufficient Activity or Small Balance). This is independent of the Reason Code on the Reconciliation Workbench.
Other Options
The options that appear in this group box are those that were enabled and configured on the Account Reconciliation Rule Attributes page. See Account Reconciliation Rule Attributes Page. Attributes should be added before you create any Reconciliation Rules. If you add, modify, or enable Attributes after Reconciliation Rules are created, the system does not add the new attributes to the existing rules (GLRN_ATTRIB_TBL). Select an attribute value if you would like to filter your reconciliation for certain attributes.
ChartField Values to Reconcile
Select one or more ChartField Value Sets that contain the ChartField value or values that you want to include in the reconciliation for the specific rule.
Field or Control |
Description |
|---|---|
Update/New |
Select this link to update the selected ChartField Value Set or add a new ChartField Value Set. See Application Fundamentals, Defining and Using ChartField Value Sets. |
Default Assignments
Select a user ID or user role as the default assignment for each reconciliation role that is listed in this group box. These user IDs or roles are used to populate the assignment when reconciliations are created. The assignment roles that appear on this page are those that were configured on the Reconciliation Roles Page.
Note: If roles are added to the Reconciliation Roles page and you add a new effective dated row to an existing reconciliation rule, the assignments from the previous row are copied, and the new roles are inserted into the list. You must assign User IDs or Roles for the new role.
Use the Reconciliation Rule – Instructions page (GLRN_RECON_INST) to include instruction for reconcilers and information regarding the reconciliation rule as wells as attach supporting documents.
Navigation:
Scroll Area
Field or Control |
Description |
|---|---|
Instructions |
Add detailed instruction text for the reconciliation that will be helpful to those who reconcile, audit, review, and approve the reconciliation. You can add multiple sets of instructions for the reconciliation rule by clicking the Add a New Row button that is located below the Scroll Area. |
Attachment |
Select to add one or more attachments to the reconciliation as supporting documentation. Click the View button to download and view the attachment. Click the Delete button to delete the attached file. The system displays and error message if you try to load more than the number of attachments specified on the Installation Options - Multiple Attachments Page for the General Ledger product. |
Use the Copy Reconciliation Rule page (GLRN_RECON_COPY_SEC) to copy the existing reconciliation rule and create a new rule, supplying a new reconciliation rule name.
Navigation:
Click the button from the Reconciliation Rule - Rule Options page.
This example illustrates the fields and controls on the Copy Reconciliation Rule Page. You can find definitions for the fields and controls later on this page.

Supply a New Reconciliation Rule name and click OK. You can access the newly-created rule by exiting the current rule and searching for the new name that you created. Once you have accessed the new reconciliation rule, you can modify the existing parameters specific to the new rule as necessary.
The Define Assignment Levels page allows you to define how ledger balances are summarized for each reconciliation that is created. For each Assignment Level required to support your reconciliation process, define the combination of fields and level of summarization for each field. This is done by specifying whether a separate reconciliation should be created for each detail value of a particular ChartField or group of detail values based on a tree node.
Use the Define Assignment Levels page (GLRN_UNIT_OF_RECON) to define an Assignment Level for each type of summarization required by ChartField combinations that you are reconciling each period.
Navigation:
This example illustrates the fields and controls on the Define Assignment Levels Page. You can find definitions for the fields and controls later on this page.

Field or Control |
Description |
|---|---|
Assignment Level |
Enter a two-character, alphanumeric assignment level identifier. Assignment levels added to the configuration will be available on the Reconciliation Set page (if enabled). |
Enabled |
Select to enable an assignment level. If this check box is not selected, the assignment level is not available to the Reconciliation Set. |
ChartField |
Click the ChartField icon to access the Assignment Level page where you define the fields and level of summarization that are associated with each Assignment Level. See Assignment Level - ChartFields Page. |
Use the Assignment Level - ChartFields page (GLRN_UOR_CF_SEC), to associate fields and the level of summarization desired for each field for each assignment level.
Navigation:
Click the ChartField icon from the Define Assignment Levels page.
This example illustrates the fields and controls on the Assignment Level - ChartFields page . You can find definitions for the fields and controls later on this page.

Field or Control |
Description |
|---|---|
Field Name |
Select a field to associate with the selected Assignment Level. In the example presented, the Assignment Level value from the Assignment Level page is B. Here, the field name selected is BUSINESS_UNIT. |
Assignment Done At |
Options for field rollup are as follows:
You can select more than one field to include in the reconciliation. For example, you can create an Assignment Level called DF, and select Field Names for both Department and Fund . The Create Reconciliation process will then create reconciliations for each valid department and fund combination. |
Tree SetID |
If you select an Assignment Done At value of Nodes At Selected Level, the tree fields on this page are enabled. Select the SetID of the tree name that you want to select for your field parameters. |
Tree Name |
Select a tree name. This is a required field for tree assigned parameters. |
Level Name |
Select a tree level. This is a required field for tree assigned parameters. |
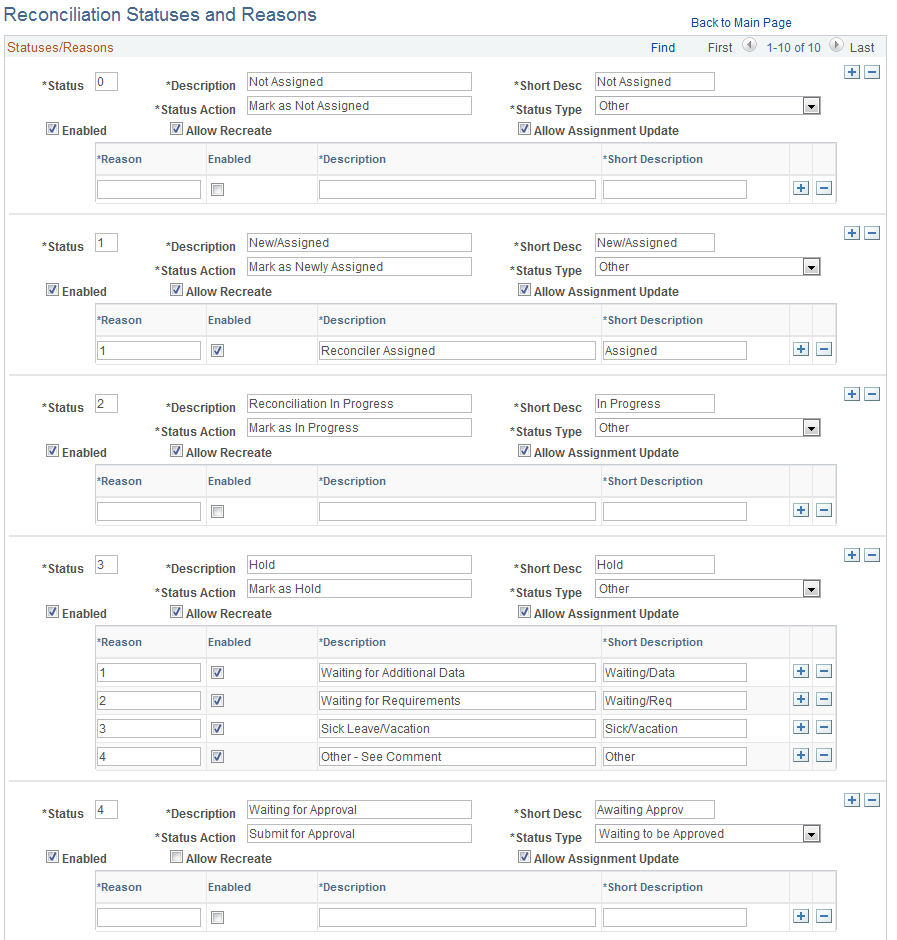
This component allows you to configure reconciliation statuses and associated status change reasons. Reasons are status-dependent.
Use the Reconciliation Statuses and Reasons page (GLRN_STATUS) to configure reconciliation statuses and status change reasons.
Navigation:
This example illustrates the fields and controls on the Reconciliation Statuses and Reasons page (1 of 2).
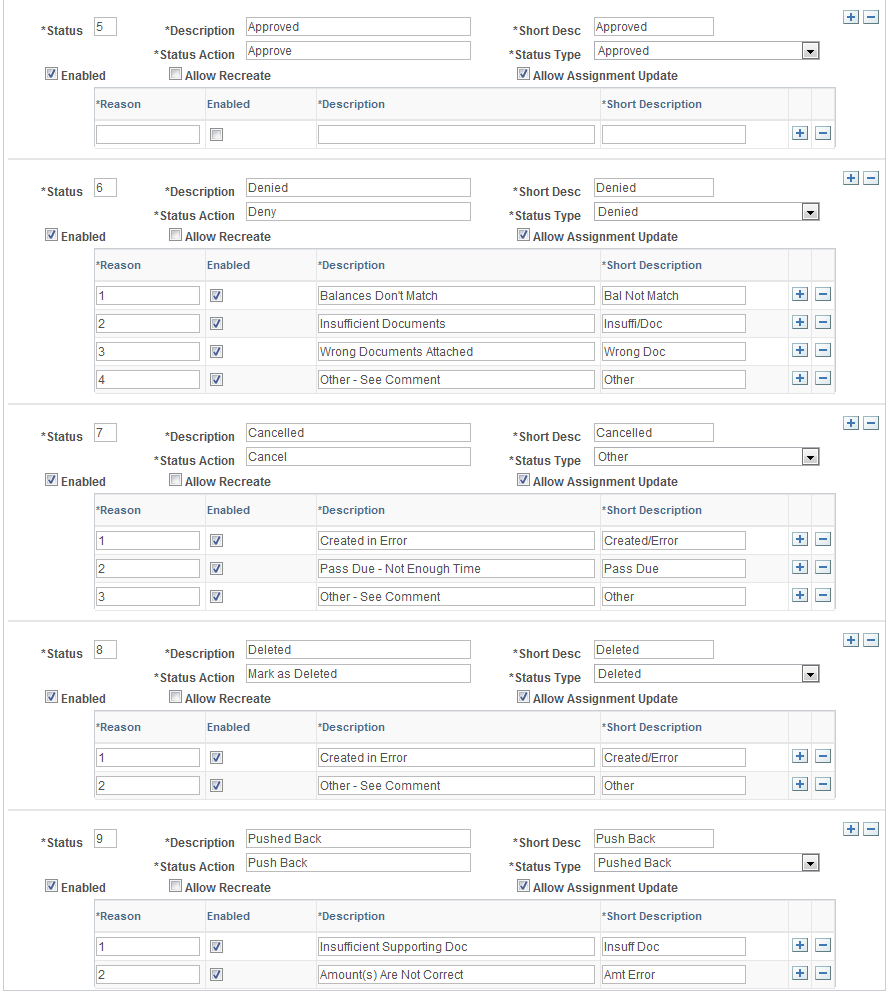
This example illustrates the fields and controls on the Reconciliation Statuses and Reasons page (2 of 2).
Field or Control |
Description |
|---|---|
Status |
Enter a one-character, alphanumeric status identifier. PeopleSoft delivers statuses 0-9. You can modify these or create your own. |
Status Type |
Select one of the following delivered values: Waiting to be Approved, Approved, Denied, Deleted, Pushed Back, or Other. Since statuses are user-defined, the selected Status Types tell the approval code what Statuses to change from or to. |
Enabled |
Select to enable the status tracking of reconciliations. |
Allow Recreate |
Select this option to allow reconciliations with this status to be deleted or overridden. This option works together with the security control that is granted to the user. Both conditions have to be present to allow a user to delete a reconciliation. The Create Reconciliation batch process also looks to this option to decide whether existing data can be overridden. |
Allow Assignment Update |
Select to indicate that a user can change assignments using the Reconciliation Assignment Page when a reconciliation transaction has this status. The system default for this field is selected. Deselect to indicate that a user cannot change assignments when a reconciliation transaction has this status. This option prevents users from changing assignments on the Reconciliation Assignment Page. |
Reason Grid
Field or Control |
Description |
|---|---|
Reason |
Enter possible reasons for each status to be used in the approval process. |
Enabled |
Select to activate the reason for the status so that it may be used in the reconciliation process. |
This component allows you to configure Workbench access for each enabled Reconciliation Role. The same user that is assigned as Reconciler for one unit of work may be assigned as an Approver for another. Security control applies after assignments are done for each reconciliation. Before any Reconciliation Roles are assigned, Component Security is used to control access of Reconciliation Rule, Reconciliation Set, Assignment, and so on.
Note: ChartField Security is not available for the GL Account Reconciliation feature; however, if you implement ChartField Security for your system, users without proper ChartField access are not able to perform reconciliation on ChartFields that they cannot access. See Understanding ChartField Security
Use the Security - Access Control page (GLRN_SEC_STATUS) to configure Workbench access at the Reconciliation Role level.
Navigation:
This example illustrates the fields and controls on the Security - Access Control Page. You can find definitions for the fields and controls later on this page.

Field or Control |
Description |
|---|---|
Reconciliation Role |
Select the reconciliation role for which to view or update security access control. |
Fields User Can Update
Select the fields that the selected Reconciliation Role can update on the Reconciliation Workbench.
Assignment Access Control
Select a Super User Role ID (PeopleTools role) that has the ability to update any assignment. Also enable the assignments that this reconciliation role can perform on the Reconciliation Workbench.
In the bottom grid, the Description column lists the possible statuses; the columns to the right of the statuses list the actions that the role can perform on the Workbench when a reconciliation is in the status shown in the first column. Select to enable those actions that apply to each status for the given Reconciliation Role.
Use the User Security - Access Control page (GLRN_USER_SECURITY) to specify security for a specific user ID.
Navigation:
This example illustrates the fields and controls on the User Security - Access Control Page.
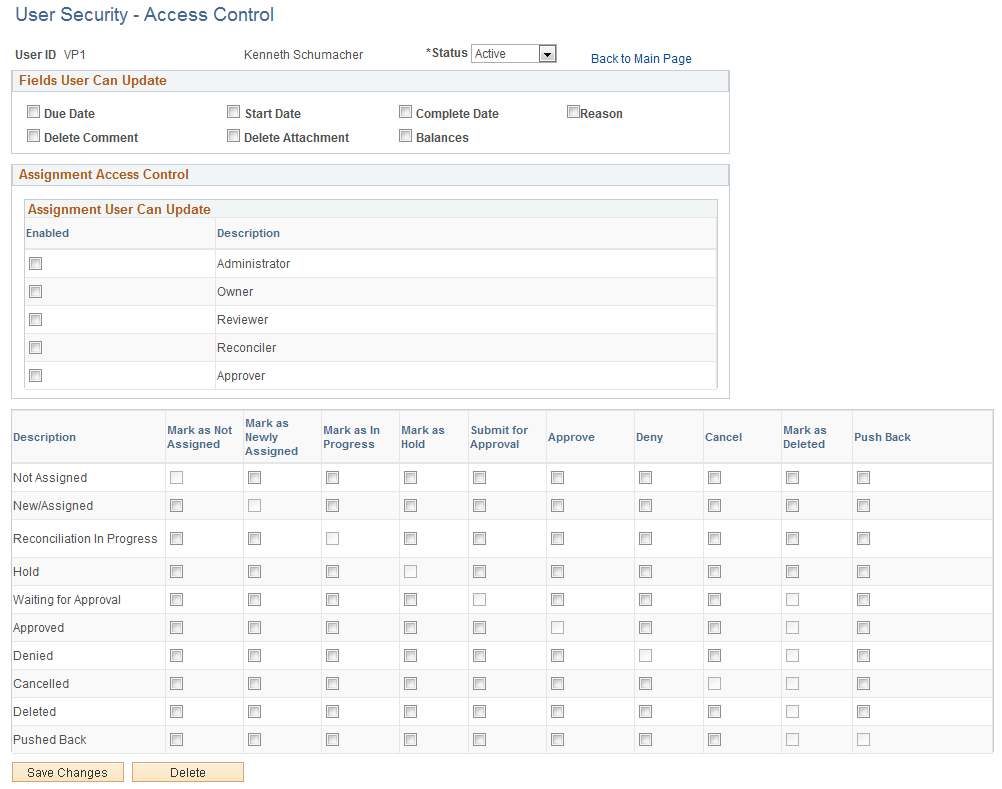
If you setup user security for a specific user ID and that user belongs to a reconciliation role that is setup on the Security - Access Control Page, then the system grants access to all options selected for the user ID and the role.