Adding Activities to Projects
|
Page Name |
Definition Name |
Usage |
|---|---|---|
|
PC_PROJ_ACTIVITY |
Add activities to a project and view all activities assigned to a project. This page operates in deferred processing mode. If you use PeopleSoft Program Management, you cannot access this page if no activities exist for the project, a change request is required to add activities to the project, and you are not the project manager. |
|
|
Activity Alerts Page |
PGM_PRJ_ACTALT_SEC |
If you use PeopleSoft Program Management, view alert messages for an activity in the Project Activities grid. |
|
PC_GANTT_CHART |
View project activity schedules in a WBS grid and Gantt chart format. |
Use the Project Activities page (PC_PROJ_ACTIVITY) to add activity schedules to a project and view all activities assigned to a project. This page operates in deferred processing mode.
Navigation:
This example illustrates the fields and controls on the Project Activities page: Schedule tab. You can find definitions for the fields and controls later on this page.
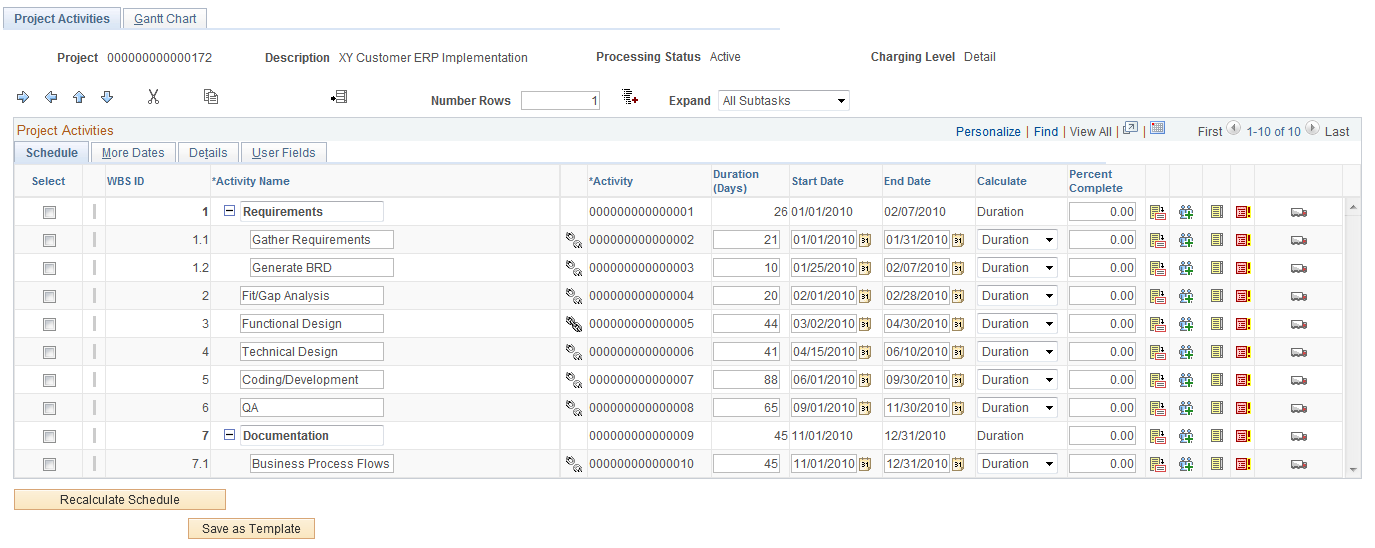
Changes that you make to fields on this page also appear on the Activity Definitions - General Information page.
Use the toolbar located just above the Project Activities grid to expand and collapse rows and to perform actions on selected activities in the WBS.
Field or Control |
Description |
|---|---|
|
Click to indent the selected row by one WBS level. This is a list of characteristics and restrictions for indenting rows:
|
|
Click to outdent the selected row by one WBS level. This is a list of restrictions and characteristics for outdenting rows:
|
|
Click to move the selected row one row higher in the grid. If you move a summary activity up in the grid, the system also moves the detail activities that belong to the summary activity. The moved row inherits the lower (more indented) WBS level of the row above and below the moved row. For example, in the page shown above, if you move activity Install (WBS level 2) up one row, then it is placed between activity Expenses (WBS level 2) and Phase II Implementation (WBS level 1). Therefore, the Install activity inherits WBS level 2. |
|
Click to move the selected row one row lower in the grid. If you move a summary activity down in the grid, the system also moves the detail activities that belong to the summary activity. The moved row inherits the lower WBS level of the row above and below the moved row. For example, in the page shown above, if you move activity Milestone 1 (WBS level 3) down one row, then it is placed between activity Expenses (WBS level 2) and Phase III Implementation (WBS level 1). Therefore, the Milestone 1 activity inherits WBS level 2. |
|
Click to cut the selected row from the grid. If you cut a summary activity, the system also cuts all of the detail activities that belong to the summary activity. After you cut a row, the next action in the grid should be to paste the row, or click the Undo Cut icon for the cut row to reappear in the location from which it was cut. If your next action is anything other than to paste the row or undo the cut, a message appears stating that cut rows are still in the clipboard. Select an action to perform next:
If you use PeopleSoft Program Management, you cannot permanently delete cut rows on this page if a change request is required to delete activities on the project, and you are not the project manager. |
|
Click for the cut row to reappear in the location from which it was cut. This icon appears when you cut a row and disappears when you paste the row. |
|
Click to copy the selected rows. If you copy a summary activity, the system also copies all of the detail activities that belong to the summary activity. If you use PeopleSoft Program Management, the Copy icon does not appear if a change request is required to add or delete activities on the project, and you are not the project manager. |
|
Select a row and click the Paste icon to paste the most recent cut or copied rows below the selected row. This icon appears on the page when you cut or copy a row. You can paste a copied row as many times as needed until you copy or cut another row. You can paste a cut row only once, after which the Paste icon disappears until you copy or cut another row. The pasted row inherits the lower WBS level of the row above and below the pasted row in its new location. On pasted rows that you copied, the default value of the activity ID is NEXTn, where n is the number of rows that you are inserting since the last save. At save time, the system assigns the next sequential activity ID number to all rows with an activity ID of NEXTn. On pasted rows that you cut, the row retains the activity ID of the cut row. |
|
Select a row and click the Delete icon to delete the selected row. This icon appears only for pending projects. If you use PeopleSoft Program Management, you cannot delete an activity that is a predecessor to another activity. Note: To remove a predecessor-successor relationship, use the Gantt chart to identify the successor activity, navigate to the successor activity row on the Project Activities page, and access the Activity Predecessors page to remove the predecessor activity. |
|
Select a row, enter the number of rows that you want to add, and click the Add icon to add the blank rows below the selected row. New rows that you add to the grid are inserted below the selected row. Rows following the new inserted rows are renumbered sequentially. If you select a detail activity, the new rows are inserted at the same level as the selected detail row. If you select a summary activity with detail rows that are expanded in the grid, the new rows are inserted as detail rows to the selected summary activity. If you select a summary activity with detail rows that are collapsed in the grid, the system ignores the hidden subtasks and inserts the new rows at the same level as the selected summary row. The default value of the activity ID on inserted rows is NEXTn, where n is the number of rows that you are inserting since the last save. At save time, all rows with an activity ID of NEXTn are assigned the next sequential activity ID number. |
|
Click the Expand All icon to expose all summary and detail rows. You do not need to select rows when you use the Expand All icon. |
Expand |
Select the WBS level that you want to view in the Project Activities grid. Available options are: All Subtasks: Select to display all levels of the WBS. This value is the default. Level 1 through the level specified on the Project Costing Options page. Select to collapse all summary activities at the selected level and lower (more indented). For example, if you select Level 3, only rows in Levels 1, 2, and 3 are visible in the grid. If you select Level 1, all rows are collapsed and only the first level is visible. You can then individually expand summary activities by clicking on the plus sign next to the activity name in the grid. You do not need to select individual rows when you use the Expand drop-down list box. |


 and
and 
Project Activities - Schedule
On the Schedule tab you can:
View all summary and detail activities on a project and their relationships in the Project Activities grid.
You can expand and collapse summary activity rows and select the WBS level to appear.
Modify the activity name, schedule, and percent complete.
Modify activity relationships.
You can indent and outdent rows, move rows up and down, and insert rows. If the project processing status is Pending, you can delete rows from the grid.
Add a new activity to the list.
After you add an activity on this page, you may further define the activity using the Project Activity component pages, beginning with the Activity Definitions - General Information page.
Note: If the Standard Activities option is selected on the Project Costing Definition page, you can assign only predefined standard activities to the project.
Field or Control |
Description |
|---|---|
Select check box |
Select to perform an action on a row, such as to indent, outdent, cut, copy, or move the row. Each time you select a new row, the previously selected row is deselected. |
|
Indicates one of these conditions for the activity if you use PeopleSoft Program Management:
Move the mouse pointer across the icon to view alternate text about the nature of the condition. This icon appears only if you use PeopleSoft Program Management. |
|
Indicates one of these conditions for the activity if you use PeopleSoft Program Management:
Move the mouse pointer across the icon to view alternate text about the nature of the condition. If more than one condition exists, click the icon to access the Activity Alerts page to view the alert messages. This icon appears only if you use PeopleSoft Program Management. |
WBS ID (work breakdown structure ID) |
Displays the WBS level where the activity resides. |
Activity Name |
Enter a unique description of the activity. |
|
Click the Create Predecessors icon to access the Activity Predecessors page to add predecessors. This icon appears only if you use PeopleSoft Program Management and no predecessor exists for the activity. |
|
Click the Review Predecessors icon to access the Activity Predecessors page to view, modify, or delete predecessors. This icon appears only if you use PeopleSoft Program Management and one or more predecessors exist for the activity. |
Activity |
Displays the activity ID for existing activities. When you add rows to the grid, this field is available for you to enter a new activity ID, or accept the default value for the system to assign the activity ID. |
Duration (Days) |
Enter or view the activity duration in days. The duration calculation is based on the option that you select in the Calculate field for this row. If you choose a Calculate value of Duration, the system calculates the Duration (Days) value anytime that you change the Start Date or End Date and the scheduling Calculate method on the Activity Definitions - Definition page is not Manual. This field appears only if you use PeopleSoft Program Management. |
Start Date and End Date |
Enter the start and end dates for the activity. The default value for the Start Date is based on the project start. The end date is determined by the start date plus a default duration of one day. You can override the default dates. If you enter activity dates that are outside of the project date range, the system updates the corresponding project dates. If you use PeopleSoft Project Costing without PeopleSoft Program Management, you must manually enter activity start and end dates or accept the default start and end dates. The system does not calculate the scheduling dates, and the detail activity start and end dates do not roll up to the summary activity dates. If you use PeopleSoft Program Management, you can select an Activity Date Cascade Calculations option on the Program Management options page for the project that enables automatic calculation of activity dates. For example, if you select an Activity Date Cascade Calculations option of Realtime Calculations or Delay Calculations Until Save:
If you use PeopleSoft Program Management and you select an Activity Date Cascade Calculations option of Manual:
See Establishing PeopleSoft Program Management Business Unit Options. |
Calculate |
Select the method of calculating the activity schedule. This field appears only when you use PeopleSoft Program Management and you select an Activity Date Cascade Calculations option of Delay Calculations Until Save or Realtime Calculations on the Program Management definition page for the project. Select Duration, End Date, or Start Date, to specify which one of these three fields is calculated by the system based on the values that you enter for the other two fields. For example, select End Date for the system to calculate the activity end date based on the values that you enter for activity start date and duration. The default value is based on the Activity Calculation Method on the Program Management definition page for the project. Note: You can override the default calculation method on an activity; however, you should limit this practice to exceptions only. Oracle recommends that the activity use the same Activity Calculation Method as the project. |
Percent Complete |
Displays the percentage of the activity completed based on calculation method that you define on the Project Costing Definition page. If you select Manual in the Calculation Method field on the Project Costing Definition page, you can enter a value in the Percent Complete field on this page. If you select a calculation method of Budget Amount, Budget Hours, Duration, Forecast Amount, or Forecast Hours, the system automatically calculates and displays the percent complete value. The Duration calculation method is available only if you use PeopleSoft Program Management. |
|
Click the Activity Definition icon to access the Activity Definitions - General Information page, where you can view specific information about the activity. |
|
Click the Drill to Resources by Activity icon to access the Activity Definitions - Team page if you use PeopleSoft Project Costing without PeopleSoft Program Management. If you use PeopleSoft Program Management, click this icon to access the Resources by Activity page. |
|
Click the Project Transaction List icon to view transactions for the corresponding activity on the Transaction List page. |
|
Click to access the Issue page to view, add, or modify issues for the activity. This icon appears only if you use PeopleSoft Program Management. |
|
Click to access the Deliverables Summary page to view, add, or modify deliverables for the activity. This icon appears only if you use PeopleSoft Program Management. |


Primavera Synchronization Options
If your organization synchronizes project and activity data with Primavera P6, then these fields are available on this page; Synchronize with Primavera P6, Synchronization Template, and Add or Modify Template. For information about these fields:
Project Activities - More Dates
Use the Project Activities page: More Dates tab to enter a deadline date, baseline start and finish dates, actual start and finish dates, and early start dates.
This example illustrates the fields and controls on the Project Activities page: More Dates tab. You can find definitions for the fields and controls later on this page.

This page contains additional activity dates that are not part of the summary activities date calculation.
You cannot enter a finish date without first entering the corresponding start date, and you cannot enter a finish date that is earlier than the corresponding start date.
Field or Control |
Description |
|---|---|
Deadline |
Enter the deadline date for the activity. The date that you enter in this field also populates the Deadline Date field on the Activity Definitions - General Information page. This field is for informational purposes only and appears only if you use PeopleSoft Program Management. |
Constraint Type |
Displays the value that you entered in the Constraint Type field on the Activity Definitions - General Information page. This field appears only if you use PeopleSoft Program Management. |
Constraint Date |
Displays the value that you entered in the Constraint Date field on the Activity Definitions - General Information page. This field appears only if you use PeopleSoft Program Management. |
Project Activities - Details
Use the Project Activities page: Details tab to enter activity and owner information.
This example illustrates the fields and controls on the Project Activities page: Details tab. You can find definitions for the fields and controls later on this page.

This page contains activity attributes for activity owner, type, processing status, milestone, and interest calculation.
Field or Control |
Description |
|---|---|
Activity Type |
Enter or modify the activity type. |
Cascade Owner |
Select to populate the Activity Owner field on child activities of this summary activity with the activity owner of the summary. |
Activity Owner |
Select an activity owner from the list of project team members. |
Activity Status |
Displays the current activity status. Click the link to transfer to the Activity Definitions - Status page to view or update activity status. |
Processing Status |
Select an activity status. Select Active to make the activity available for selection from prompt lists within feeder systems to charge transactions. |
Milestone |
Select to indicate that this activity is a milestone. |
Allow Interest Calculation |
Select to include this activity in interest calculations. |
Project Activities - User Fields
Use the Project Activities page: User Fields tab to enter and maintain user-defined attributes for the activity
The only edit that the system performs on this page is to the User Currency field. Available currencies are based on the Currency Codes table (CURRENCY_CD_TBL).
Use the Project Activities - Gantt Chart page (PC_GANTT_CHART) to view project activity schedules in a WBS grid and Gantt chart format.
Navigation:
This example illustrates the fields and controls on the Project Activities - Gantt Chart page. You can find definitions for the fields and controls later on this page.
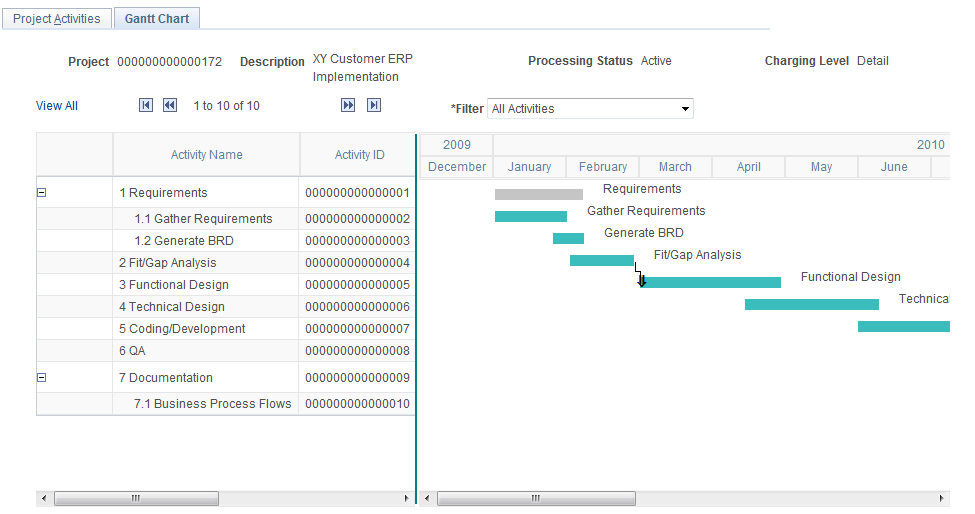
The Project Activities - Gantt Chart page represents project activity schedules in a WBS grid and Gantt chart format for the rows that appear on the Project Activities page. The count of rows in the grid and the total number of activities on the project appear above the grid. The chart refreshes each time that you access the page.
Field or Control |
Description |
|---|---|
Filter |
Select All Activities, Critical Path, or Milestone Activities to indicate how to filter the activity rows. The Critical Path option identifies each activity path in the project by using the activity hierarchy as well as the chain of dependencies plus their constraints. It then determines the activity path that has the latest end date. The activity path that has the latest end date is the critical path. Critical path activities appear in orange. |
WBS Grid
In the grid area you can view the WBS ID, activity description and ID, duration, activity start and end dates, and percent complete.
To navigate in the grid:
Click the blue First, Previous, Next, and Last navigation arrows to scroll vertically through the activity rows.
Click the plus and minus symbols to expand and collapse summary activities in the WBS grid and the Gantt chart area.
This action also expands and collapses the grid on the Project Activities page.
Click the black navigation arrows below the grid to scroll horizontally across the columns.
Note: You must click the black navigation arrows, not the sliding bar, to scroll horizontally across the grid.
Gantt Chart
The chart area displays schedules for multiple periods beginning with the earliest activity start date. A horizontal bar represents the duration for each activity. Summary activities appear in gray, detail activities appear in cyan, and critical path activities appear in orange. A black overlay bar represents the percent complete for the activity. Use the horizontal scroll bar of the browser to view earlier and later periods.
Based on the duration of the project, the system determines the appropriate two-tier calendar scale to appear at the bottom of the chart. If the project duration is greater than or equal to 180 days, then the calendar scale is in increments of month and year. If the project duration is less than 180 days, then the calendar scale is in increments of day and month.
Move the mouse pointer across each bar to view alternate text about the activity name, start date, end date, and percent complete.
If you have more than 25 rows of activities, select View All for all activities to appear in the grid.
If you use PeopleSoft Program Management, lines appear on the Gantt chart to show activity dependency relationships if any exist. If you have more than 25 rows in the grid, you must select View All to view all dependency relationships. If you have more than 25 rows and you do not select View All, then the Gantt chart will not display all of the dependency relationships for the project.