Setting Up Custom Rates
|
Page Name |
Definition Name |
Usage |
|---|---|---|
|
PC_CRATE_DEFN |
Define and maintain custom rate definitions. |
|
|
PC_CRATE_POPULATE |
Populate custom rates on the Define Custom Rate page. |
Prior to using custom rates you must perform these steps:
Define custom rates using the Define Custom Rates Page.
Populate custom rates using the Populate Custom Rates page.
As an alternative to using this method of defining custom rates, you can use the PeopleSoft Data Migration Workbench and Application Data Sets (ADS) to move custom rate data. For additional information see Understanding the PeopleSoft Data Migration Workbench.
Use the Define Custom Rates page (PC_CRATE_DEFN) to define and maintain custom rate definitions.
Navigation:
This example illustrates the fields and controls on the Define Custom Rates page .
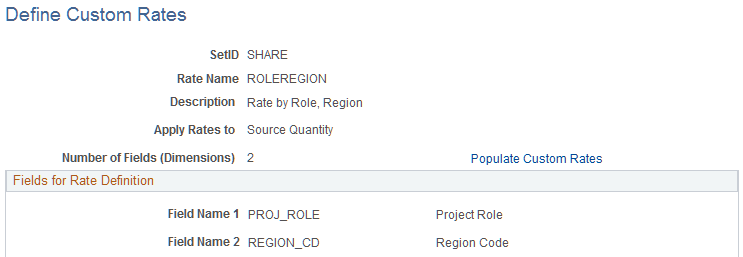
The purpose of the Custom Rate page is to provide you with the means to create different rate structures in addition to rates by employee, role, and jobcode. Custom rates enable you to create rates with multiple criteria. For example, you may want to define one custom rate based on job code and department, and a second custom rate based on source type and supplier.
After defining the field names to use for a custom rate, access the Populate Custom Rate page to establish and maintain the cost and billing rates for the defined criteria.
When rates are populated using the Populate Custom Rates process, the Define Custom Rates page becomes display only. You cannot change field names after rates are populated. If you want to make a change, then you will have to create a new custom rate.
Note: The system data table is delivered without a prompt record for the RES_USER1 through RES_USER5 fields because these are user-defined fields. If you want to include a prompt record for these fields, use a SQL tools to update the PC_CRATE_FIELDS record directly.
Field or Control |
Description |
|---|---|
Rate Name |
Enter a unique identifier for the custom rate. |
Apply Rates to |
Select Source Amount or Source Quantity. The pricing process calculates the target amount based on the option selected in this field. If Source Amount is selected, then the target amount is calculated as transaction amount x custom markup. If Source Quantity is selected, then the target amount is calculated as transaction quantity x custom rate. |
Number of Fields (Dimensions) |
Select a number from 1 to 5. This number indicates the number of field names that appear in the Select Fields for Rate Definition section. |
Populate Custom Rates |
Click this link to access the Populate Custom Rates page. |
Fields for Rate Definition
Field or Control |
Description |
|---|---|
Field Name (1-5) |
Select a field name from the drop-down list. This list includes selected fields that are available on the Project Resource table (PROJ_RESOURCE), project role field (PROJ_ROLE), and the region code field (REGION_CD) . Depending on the number selected in the Number of Fields (Dimensions) drop down, the system displays one to five fields. For example, if you select 3 in the Number of Fields (Dimensions) field, then the system displays Field Name 1 – 3. Note: Whatever field names you use to define a custom rate, should have values when a transaction is sent to the Project Resource table (PROJ_RESOURCE). |
Use the Populate Custom Rates page (PC_CRATE_POPULATE) to populate custom rates on the Define Custom Rate page.
Navigation:
This example illustrates the fields and controls on the Populate Custom Rates page.
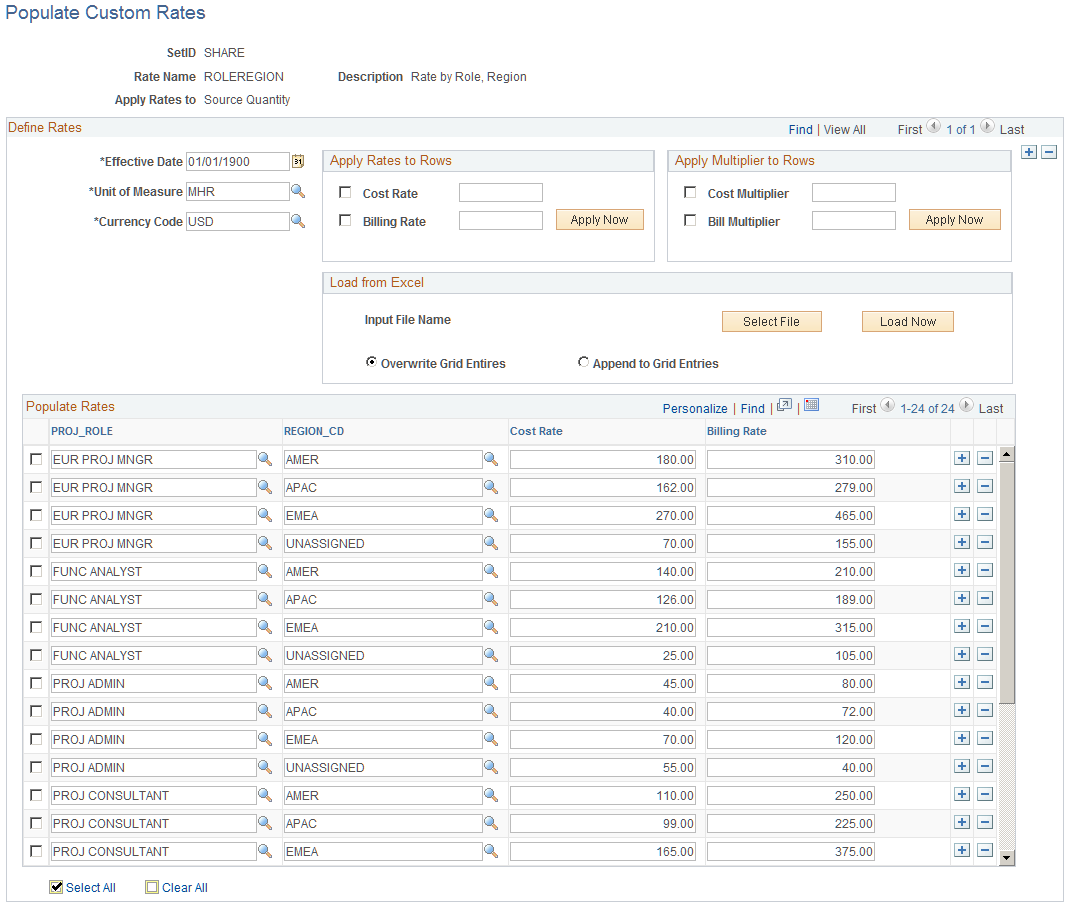
The Populate Custom Rates page enables you to establish and maintain cost and billing rates that can be used for projects. This page enables you to enter the rates manually, or use the available tools to help load or update the rates. You can:
Enter a cost rate and billing rate manually.
(Optional) Use the Apply Rates to Rows tool to enter a cost rate, a billing rate, or both onto selected rows of data on the grid.
(Optional) Use the Apply Multiplier to Rows tool to update a cost rate, a billing rate, or both by multiplying the existing rate with a multiplier to selected rows of data on the grid.
(Optional) Use the Load from Excel tool to import rates from an excel file and override existing entries.
(Optional) Use the Load from Excel tool to import rates from an excel file and add to existing entries.
The Populate Rates grid is displayed based on the fields entered for the rate name on the Define Custom Rates Page. The Define Custom Rate page determines the column headings that appear in front of the Cost Rate and Billing Rate columns. For example, if you select 3 in the Number of Fields (Dimensions) field, and define these three field names: JOBCODE, ACCOUNT, and DEPTID in the Selected Fields for Rate Definition section of the Define Custom Rate page, then the system displays JOBCODE, ACCOUNT, DEPTID, Cost Rate, and Billing Rate as the columns on the Populate Custom Rates page.
Note: When importing Field Name values from an excel file, you must have all five Field Name columns, even if you’re not using columns 4 and 5, plus the Cost Rate and Billing Rate columns. This equals a total of seven columns that should be on the spreadsheet.
After a custom rate is defined and the rates are populated, the custom rate can be associated with a rate set. When the Pricing process (PC_PRICING) runs, the appropriate custom rate value is used to calculate the cost of the priced transaction. The priced transaction is then written to the Project Transaction table (PROJ_RESOURCE).
Define Rates
When the Apply Rates to field displays Source Amount, the Unit of Measure and Currency Code fields are hidden. When the Apply Rates to field displays Source Quantity, the Unit of Measure and Currency Code fields are displayed
Apply Rates to Rows (when rates are applied to the source amount)
This is an optional tool used to update multiple rows with a set cost, billing, or both markups.
Field or Control |
Description |
|---|---|
Cost Markup (check box) |
Select to indicate that the cost markup should be applied to all selected rows in the grid when you click the Apply Now button. |
Cost Markup |
Enter the rate that will be applied to the Cost Markup column for all selected rows in the grid. This value can be zero. |
Billing Markup (check box) |
Select to indicate that the billing markup should be applied to all selected rows in the grid when you click the Apply Now button. |
Billing Markup |
Enter the rate that will be applied to the Billing Markup column for all selected rows in the grid. This value can be zero. |
Apply Now |
Click to apply the cost markup, billing markup, or both (depending whether they are selected in this group box) to the selected rows in the Populate Rates grid. The values are not saved until you click the Save button. |
Apply Rates to Rows (when rates are applied to the source quantity)
This is an optional tool used to update multiple rows with a set cost, billing, or both rates.
Field or Control |
Description |
|---|---|
Cost Rate (check box) |
Select to indicate that the cost rate should be applied to all selected rows in the grid when you click the Apply Now button. |
Cost Rate |
Enter the rate that will be applied to the Cost Rate column for all selected rows in the grid. This value can be zero. |
Billing Rate (check box) |
Select to indicate that the billing rate should be applied to all selected rows in the grid when you click the Apply Now button. |
Billing Rate |
Enter the rate that will be applied to the Billing Rate column for all selected rows in the grid. This value can be zero. |
Apply Now |
Click to apply the cost rate, billing rate, or both (depending whether they are selected in this group box) to the selected rows in the Populate Rates grid. The values are not saved until you click the Save button. |
Apply Multiplier to Rows
This is an optional tool used to update the cost, billing, or both rates by applying a multiplier on selected rows.
Field or Control |
Description |
|---|---|
Cost Multiplier (check box) |
Select to indicate that the cost multiplier should be applied to all selected rows in the grid when you click the Apply Now button. |
Cost Multiplier |
Enter a multiplier that will be applied to the Cost Rate or Cost Markup column for all rows selected in the grid when you click the Apply Now button. This value can be zero. |
Billing Multiplier (check box) |
Select to indicate that the billing multiplier should be applied to all selected rows in the grid when you click the Apply Now button. |
Billing Multiplier |
Enter a multiplier that will be applied to the Billing Rate or Billing Markup column for all rows selected in the grid when you click the Apply Now button. This value can be zero. |
Apply Now |
Click to apply the cost multiplier, billing multiplier, or both (depending whether they are selected in this group box) to the selected rows in the Populate Rates grid. The values are not saved until you click the Save button. |
Load from Excel
This is an optional tool to load the entire grid using data from an Excel .csv (comma separated value) formatted file.
Field or Control |
Description |
|---|---|
Input File Name |
Displays the name of the excel file when using the Select File button. After selecting a file the file name becomes a link that can be used to view the file. |
Select File |
Click this button to attach an excel file to the file server or database. When clicking this button, the system calls the browse dialog for file attachments. An excel .csv formatted file can be used to populate values in the grid. |
Load Now |
Click to populate values in the grid from an excel file. The excel file must be loaded and the name of the excel file must be displayed in the Input File Name as a link. |
Override Grid Entries |
Select to indicate that existing values in the grid are to be deleted before an excel file is loaded to the grid when you click the Load Now button. |
Append to Grid Entries |
Select to indicate that you do not want to delete existing values in the grid before an excel file is loaded when you click the Load Now button. |
Populate Rates
The columns displayed prior to the Cost Rate column is based on the custom rate definition. Depending on the number selected in the Number for Fields (Dimensions) field, on the Define Custom Rates page, columns 2 through 5 may or may not be displayed.
The labels for these columns that are displayed are based on the values selected in the Select Fields for Rate Definition section of the Define Custom Rates page.
The prompts for these columns are delivered as system data on the PC_CRATE_FIELDS record.
These fields are required and cannot be blank.
Field or Control |
Description |
|---|---|
Cost Rate |
Enter the cost rate that the system uses when the combination of values (that precede the Cost Rate column) is met on a project. This field is hidden when the rates are applied to the source amount. |
Billing Rate |
Enter the billing rate that the system uses when the combination of values (that precede the Cost Rate column) is met on a project. This field is hidden when the rates are applied to the source amount. |
Cost Markup |
Enter the cost markup that the system uses when the combination of values (that precede the Cost Markup column) is met on a project. This field is hidden when the rates are applied to the source quantity. |
Billing Markup |
Enter the billing markup that the system uses when the combination of values (that precede the Billing Markup column) is met on a project. This field is hidden when the rates are applied to the source quantity. |
The excel .csv formatted file must contain 7 columns. The first 5 columns represent the values that correspond to the custom rate criteria fields. Even if your custom rate definition has less than 5 fields, you must still have 5 columns in your excel field. Leave unused fields blank. Your last 2 columns represent the cost rate and billing rate, in that order. Do not include headers in your file.
Note: Prior to populating custom rates, you must define the custom rate on the Define Custom Rates Page.
Example of a Spreadsheet
There are two tables in this example:
The first table is informational only and describes the columns in your spreadsheet.
Warning! DO NOT add these column headings to your spreadsheet.
The second table is an example of the rows and columns that should appear in your spreadsheet.
This table represents an example where the first column represents the JOBCODE field value 1. The second column represents the ACCOUNT field value2. The third column represents the Department ID field value 3. The fourth column and the fifth column are not used. The sixth column always represents the COST RATE. The seventh column always represents the BILL RATE.
This table indicates that in the first row of a spreadsheet, when a transaction is recorded for job code KU036, account 100001, and department ID 14000, the system uses a cost rate of 100.00 and a bill rate of 150.00.
|
A |
B |
C |
D |
E |
F |
G |
|---|---|---|---|---|---|---|
|
(FIELD VALUE1) |
(FIELD VALUE2) |
(FIELD VALUE3) |
(FIELD VALUE4) |
(FIELD VALUE5) |
COST RATE |
BILL RATE |
|
JOBCODE |
ACCOUNT |
DEPTID |
(not used) |
(not used) |
||
|
KU036 |
100001 |
14000 |
100.00 |
150.00 |
||
|
KU036 |
100001 |
15000 |
100.00 |
150.00 |
||
|
KU051 |
100001 |
3600 |
65.00 |
75.00 |
||
|
KU051 |
100001 |
3700 |
50.00 |
55.00 |