Performing Manual Configuration Tasks
This topic provides an overview and discusses how to:
Perform one-time manual configuration tasks.
Perform product-specific manual configuration tasks.
Running the Configuration Steps report and inquiry.
Generally, the following items do not require manual modification as a result of performing a ChartField configuration:
Record definitions
Pages
PeopleCode
SQL Objects
View Text
Application Engine
COBOL
SQR
Depending on the configuration actions that you request, the following objects might require manual modification:
Queries
Message Definitions
Component Interfaces
File Layouts
Mass Change Types/Templates
Delivered PS/nVision layouts
All ChartField configuration actions require that certain manual steps be performed to complete the configuration. Standard actions typically require many fewer steps than advanced actions. The manual steps are listed in the order they should be performed on the Configuration Steps report that is produced by running either the full configuration process or the preview configuration steps process.
The Preview Configuration Steps process produces the report without performing any database updates. This enables you to make changes to your ChartField configuration actions prior to running the full configuration. The full configuration process produces the same report in addition to applying the appropriate database updates.
The Configuration Steps Report first lists the tasks that need to be performed only one-time for all installed products, and then the product tasks that need to be performed for each installed product. If product is blank, that definition is used in multiple products and will be listed only once.
The manual tasks listed and discussed subsequently are a comprehensive listing of tasks for all ChartField configuration actions. The Configuration Steps report lists only the tasks that are appropriate for the actions that are requested.
See the product documentation for PeopleTools: PeopleSoft Application Designer Developer's Guide.
The following table summarizes the manual configuration tasks listed on the Configuration Steps report that typically need to be performed only once regardless of the number of products installed. However, some of these tasks might need to be repeated during a subsequent project-based configuration.
Required steps must be performed for the system to function properly. Optional steps do not affect the functioning of the system, but typically affect the appearance of pages and reports.
This table of sample sequence numbers indicates the order in which the steps are performed. (Gaps occur in the number sequence.)
|
Seq # |
Common Tasks |
Notes/Require/Optional |
|---|---|---|
|
00010 |
Run Full Configuration Process |
Applies only when the Preview Configuration Steps process is run Required for all actions except changing the IntraUnit Affiliate Related ChartField. |
|
00020 |
Define new ChartField Validation Table |
Required only for an Add action. Does not apply to IntraUnit Affiliate ChartFields. |
|
00040 |
Create new ChartField Prompt Views |
Required only for an Add action. |
|
00060 |
Define new ChartField Definition page (Set Up Financials/Supply Chain, Common Definitions, Design ChartFields, Configure, ChartField Definition). (may need to create component in Application Designer first). |
Required only for an Add action. Does not apply to the IntraUnit Affiliate ChartField. |
|
00070 |
Create a table listing Query reports |
Add action only (optional). Does not apply to the IntraUnit Affiliate ChartField. |
|
10010 |
Alter Tables/Create Indexes |
Required for:
|
|
10020 |
Create Indexes |
Applies only when Activate/Inactivate is requested without an Add, Delete, Rename, or Resize. |
|
10040 |
Create Views |
Required for:
|
|
10050 |
Add new TableSet Record Group |
Required for Add (does not apply to IntraUnit Affiliate ChartFields) |
|
10060 |
Update the Table Listing Reports |
Required for Resize and Rename. Optional for Relabel. |
Note: Create the related language tables first. These tables have a suffix of Lxxx, for example, OPER_UNIT_LANG or OPER_UNIT_LN.
Define New ChartField Validation Tables (Seq.# 00020)
In the PeopleSoft Application Designer, copy the Model table listed in the Configuration Steps Report by selecting File, Save As, and name the new validation table as shown in the report. If the table already exists, replace it. Complete the following steps:
When prompted whether to save a copy of the PeopleCode, answer Yes.
When the new validation table is in place, highlight the model ChartField and select Insert, Field to add the new ChartField.
Compare the attributes of the model ChartField to the new one, and modify the new field attributes to match the model.
Copy any PeopleCode associated with the model ChartField to the new ChartField and modify it as needed.
Delete the model ChartField from the new validation table.
Change the name of the Related Language Record in the Record Properties, if present, to the correct record for the new ChartField.
Change the description of the table in Record Properties.
Save the new validation table.
Use Build, Current Object to create the new table. Acknowledge any warning messages by clicking OK.
Follow the same procedure for each new validation table listed.
Note: Create the related language tables first. These tables have a suffix of _Lxxx, for example, OPER_UNIT_LANG or OPER_UNIT_LN.
Create New ChartField Prompt Views (Seq.# 00040)
In the Application Designer, copy the Model prompt view listed in the Configuration Steps Report by selecting File, Save As, and name the new prompt view as shown in the report.
When prompted whether to save a copy of the PeopleCode, answer Yes.
When the new prompt view is in place, highlight the model ChartField and select Insert, Field to add the new ChartField.
Compare the attributes of the model ChartField to the new one and modify the new field attributes to match the model.
Copy any PeopleCode associated with the model ChartField over to the new ChartField and modify it as needed.
Delete the model ChartField from the new prompt view.
Modify the view text to reference the new ChartField name. Ensure that the SQL Objects (%Sql) reference the new ChartField name or new validation table name as appropriate.
Change the name of the Related Language Record in the Record Properties, if present, to the correct record for the new ChartField.
Change the description of the prompt view in the Record Properties.
Save the new prompt view.
Follow the same procedure outlined for each new prompt view listed.
The views will be built in Seq.# 10040.
Warning! Complete this step before opening records containing ChartFields in Application Designer or you might receive an error stating that a prompt table cannot be found.
Define New ChartField Definition Page and Component (Seq.# 00060)
Copy the Model page listed in the report and use the name provided for the new page.
When prompted whether to save the associated PeopleCode, answer Yes.
Ensure that all references to the old validation table are replaced.
Review any Page PeopleCode that was copied from the existing page and modify or delete it as appropriate.
Copy the Model component, including PeopleCode, replacing references to the Model ChartField and validation table with the new ChartField and validation table. Use the same name as the new page and add the new page to it.
Copy the following two message definitions, including PeopleCode, replacing references to the Model ChartField and validation table with the new ChartField and validation table:
<model ChartField name>_CF_FULLSYNC
<model ChartField name>_CF_SYNC
In Application Designer under Tools, Register Component, add the new component to the DESIGN_CHARTFIELDS menu, the portal registry, and the appropriate permission lists.
Use the following values and accept the default values provided for fields not included in the following list:
Menu Name: DESIGN_CHARTFIELDS
Bar Name: USE
Portal Name: EMPLOYEE
Folder Name: EPCO_DESIGN_CHARTFIELDS_HIDDEN
Content Reference Name: EP_<new component name>_GBL (for example, EP_OPERATING_UNIT_GBL)
Content Reference Label: <Long Name of the new ChartField>
Long Description: <Long Name of the new ChartField>
Sequence Number: 99xx (where xx is a number you assign)
Node Name: ERP
Permission Lists: <select based on your security setup>
Create a Table Listing Query Reports (Seq.# 00070)
Access PeopleTools, Security, Query Security, Query Access Manager and open QUERY_TREE_ERP.
Click the ChartFields Access Group, click the Insert Child Record icon, enter the name of the validation table for the new ChartField, click Add, and save the tree.
Access Reporting Tools, Query, Query Manager and select the Model query listed in the report. Using this query as a model, build a new query to represent the new ChartField using the name specified on the report. Do not copy this query to make the new query, because the new query should refer to the validation table of the new ChartField.
See Managing ChartFields for Reports.
In Application Designer under Tools, Register Component, add the new component to the DESIGN_CHARTFIELDS menu, the portal registry, and the appropriate permission lists.
Use the following values and accept the default values provided for fields not included in the following list:
Menu Name: DESIGN_CHARTFIELDS
Bar Name: REPORT
Portal Name: EMPLOYEE
Folder Name: EPCO_DESIGN_CHARTFIELDS_HIDDEN
Content Reference Name: EP_<new component name>_GBL (for example, EP_RUN_FIN9000_GBL)
Content Reference Label: <Long Name of the new ChartField>
Long Description: <Long Name of the new ChartField>
Sequence Number: 99xx (where xx is a number you assign)
Node Name: ERP
Permission Lists: <select based on your security setup>
Modify FS_PANELS_WRK.PB_SELECT_CF FieldChange PeopleCode to include the new ChartField by cloning all PeopleCode related to the Model ChartField. The CheckSecurity and Xfer2Page functions parameters are Menu Bar Name, Menu Item Name, and Component Item Name respectively.
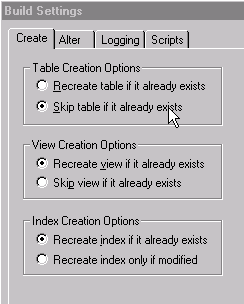
Alter Tables/Create Indexes (Seq. #10010)
Build the objects in the project listed on the report. Verify the Build Settings by selecting the Create tab on the Build Settings page:
Verifying Build Settings: Create tab
Select the Alter tab to verify build settings:
Verifying Build Settings: Alter tab

Acknowledge any warning messages by clicking OK.
Create Indexes (Seq.# 10020)
Build the objects in the project listed on the report.
Select the Create Indexes check box.
Verify that Build Settings are set as indicated in Seq #10010.
This task and Seq.# 10010 are mutually exclusive.
Create Views (Seq.# 10040)
Build the objects in the project listed on the report.
Select the Create Views check box.
Verify that Build Settings are set as indicated in step #10010.
Add a New TableSet Record Group (Seq.# 10050)
Add a new record group for each new ChartField you are adding under PeopleTools, Utilities, Administration, Record Group using FS_ and select the next available number. Add all the records and views listed in the report to the appropriate record group.
Update the Table Listing Report (Seq.# 10060)
Update the report listed to reflect the ChartField configuration actions requested.
The following table summarizes the product-specific manual configuration tasks that might be listed on the report:
|
Seq # |
Product Tasks |
Notes/Require/Optional |
|---|---|---|
|
20010 |
Update Pages |
Required for Add Optional for:
|
|
40010 |
Update Queries |
Required for:
|
|
40020 |
Update Reports and Queries |
Required for:
Optional for:
|
|
70030 |
Copy AMCHARTS.SQC to your SQR folder |
Required for:
|
|
80010 |
Update Mass Change Templates |
Required for:
|
|
80020 |
Update Mass Change Types |
Required for:
|
|
80030 |
Update Delivered PS/nVision Layouts |
Required for:
Optional for Resize. |
|
80040 |
Update Message Definitions |
Optional for Activate/Inactivate. |
|
80050 |
Update File Layouts |
Required for:
Optional for Activate /Inactivate. |
|
80070 |
Update Component Interfaces |
Required for:
Optional for Activate/Inactivate. |
|
90010 |
Mark Actions complete on the Configuration Status - Action Status page. |
Required for:
|
Note: Review System Setup Data - If using the Business Request and Approval process for ChartFields, update the Business Request Setup and Core Table Fields pages. This is required for Add, Rename, and Delete.
Update Pages (Seq.# 20010)
Update the pages listed to reflect the ChartField configuration actions requested.
For newly-added ChartFields, check the page field names where multiple grids occur on a page. The page field names should be unique for each field on the page. Modify added ChartFields on the multiple grids to conform to page field-naming specific for each grid.
Update Queries (Seq.# 40010)
Access PeopleTools and update the queries listed to reflect the ChartField configuration actions requested.
For newly added ChartFields, select the new field to be included in the query. Click the Edit button for the new ChartField and change the column number to reflect the desired position of the ChartField. Edit the field properties and criteria and make any changes necessary to match the model ChartField.
Update Reports and Queries (Seq.# 40020)
For added or deleted ChartFields, update the query associated with each report listed. Update the reports listed to reflect the ChartField configuration actions requested.
You must modify the reports listed if any ChartFields are set to an Inactive status. You must remove Inactive ChartFields from these reports. You can do this by opening each report and using the Verify Database function, remove the Inactive fields.
Note: See Managing ChartFields for Reports.
Copy AMCHARTS.SQC to your SQR Folder (Seq. # 70030)
This step is required only if PeopleSoft Asset Management is installed.
In Process Monitor, click the Details link for the AMCFBULD SQR Report process and then select the View Log/Trace link. Right-click the AMCHARTS.SQC entry and copy that file to your %HOME%\SQR folder.
Update Mass Change Templates (Seq.# 80010)
Access PeopleTools, Mass Changes, and select Templates.
For newly added ChartFields, access each template listed and select the Criteria and Fields tab to update each template with the new ChartField in every instance that the model ChartField name appears.
For deleted ChartFields, delete all rows that contain a reference to the deleted ChartField.
Update Mass Change Types (Seq.# 80020)
Access PeopleTools, Mass Changes, Types, and select the Record and Join Fields tab.
For newly added ChartFields, access each type listed and select the Criteria and Fields tab to update each template with the new ChartField in every instance that the model ChartField name appears.
For deleted ChartFields, delete all rows that contain a reference to the deleted ChartField. Also update the other pages in the component.
Update Delivered PS/nVision Layouts (Seq.# 80030)
Access PS/nVision from Application Designer. For newly added or renamed fields, open each layout listed and enter the new name or new ChartField on the layout, if appropriate.
For deleted ChartFields, remove each reference to the deleted ChartField.
For resized ChartFields, verify that the new length will fit the space provided.
Update Message Definitions (Seq.# 80040)
If you are inactivating any of the delivered ChartFields, you might also want to exclude them from Message Definitions. If so, open the Messages listed and disable the Include flag on the inactivated ChartField.
Update File Layouts (Seq.# 80050)
Update the file layouts listed to reflect the ChartField configuration actions requested.
If you are inactivating any of the delivered ChartFields, you might also want to exclude them from File Layout Definitions. If so, delete the inactivated ChartField from the definitions listed.
Update Component Interfaces (Seq.# 80070)
Update the component interfaces listed to reflect the ChartField configuration actions requested.
If you are inactivating any of the delivered ChartFields, you can also delete the inactivated ChartField from the listed component interfaces.
Oracle delivers a component interface for each ChartField that can be used to load values for the ChartField rather than having you enter the values through its online page.
When you add a new ChartField, you can create an associated component interface by copying the component interface for one of the delivered fully configurable ChartFields, such as Operating Unit, and updating the copy to use the new ChartField.
Mark Actions Complete (Seq.# 90010)
When you complete the manual steps associated with an Advanced ChartField action for a product, mark the product complete using the Mark Complete button on the Configuration Status - Action Status page under the Product Status link. This changes the status from Auto Configuration Complete to Complete.
When all products are marked complete for a particular Advanced ChartField action, the status of the action is set to Complete. This step does not apply to Standard ChartField actions because their status is set to Complete by the full configuration process.
Review System Setup Data
If you are using the Business Request and Approval process, follow the steps for adding a new ChartField as documented in the Application Fundamentals documentation, Setting Up and Using Business Request and Approval, to add the new ChartField to the Business Request Setup and Core Table Fields pages.
When deleting an existing ChartField, navigate to the Business Request Setup page (Set Up Financials/Supply Chain, Common Definitions, Business Request Configuration, Business Request Setup, Business Request Setup), and deselect its Enabled check box if it is selected.
When renaming an existing ChartField, deselect the Enabled check box on the Business Request Setup page as described in the previous paragraph (for deleting the ChartField with the old name); then follow the Business Request setup process as described in the first paragraph for adding the new row for the new ChartField name. You can clone all the information from the old (disabled) ChartField name.
Verify Results
Review your most frequently used pages, enter transactions, and run critical processes to verify that your requested ChartField actions have been applied properly.
If you have installed General Ledger, also verify that:
If you are using the Journal Import feature, you update the Excel file JRNL1.XLS to reflect the ChartField configuration actions requested.
If you are using summary ledgers, you review your summary ledger definitions and update as appropriate.
The Configuration Steps Report lists the manual steps that are necessary to complete the configuration process and the objects and definitions that require modification. It is automatically initiated from both the Preview Configuration Steps and full configuration processes. The report is grouped by PeopleSoft product. Objects common to multiple products are separately grouped together and listed first. These common objects have no product indicated.
The manual steps can also be accessed through the Configuration Steps inquiry page.