Example: Setting Up the Purchase Order Dispatch EIP
This section discusses setting up the Purchase Order Dispatch EIP.
|
Page Name |
Definition Name |
Usage |
|---|---|---|
|
PO_HDR_DTL |
Enter or change PO header information online. |
|
|
IB_SERVICE |
Define and activate a service operation. |
|
|
IB_SERVICEHDLR |
Activate one or more service operation handlers. |
|
|
IB_SERVICERTNGS |
Define and activate routing definitions on the service operation. |
|
|
IB_ROUTINGDEFNDOC |
Verify the external service alias name, nodes, and transform programs used by this routing. |
|
|
IB_QUEUEDEFN |
Activate the queue used by the service operation. |
|
|
IB_NODE |
Activate node used by the service operation. |
|
|
IB_NODECONN |
For an outbound service operation, verify the node is connected to the correct network. |
|
|
EO_MSGPUBATCH |
Set up publication rules. You must activate a publish rule for the publication messages you create to follow. This rule includes instructions on message chunking, if necessary. |
|
|
PO_CHUNK_VENDOR |
Set up chunking for the batch publish rule. |
The Purchase Order Dispatch EIP is an outbound asynchronous service operation to send purchase orders and purchase order change requests (change orders) to suppliers. If enabled, the system generates a Purchase Order Dispatch EIP transaction when you run the Publish Outbound Message process. This message also supports flat-file processing. You can specify whether to send purchase orders based on business unit or supplier.
Before you can publish messages with the Purchase Order Dispatch EIP, you must:
|
Types of Setup |
Steps |
|---|---|
|
Complete application setup |
On the purchase order, specify EDX as the PO dispatch method. |
|
Complete Integration Broker setup |
|
|
Complete Enterprise Component setup |
|
Use the PO Header Details page (PO_HDR_DTL) to enter or change PO header information online.
Navigation:
Click the Header Details link on the Purchase Order page.
This example illustrates the fields and controls on the PO Header Details page. You can find definitions for the fields and controls later on this page.
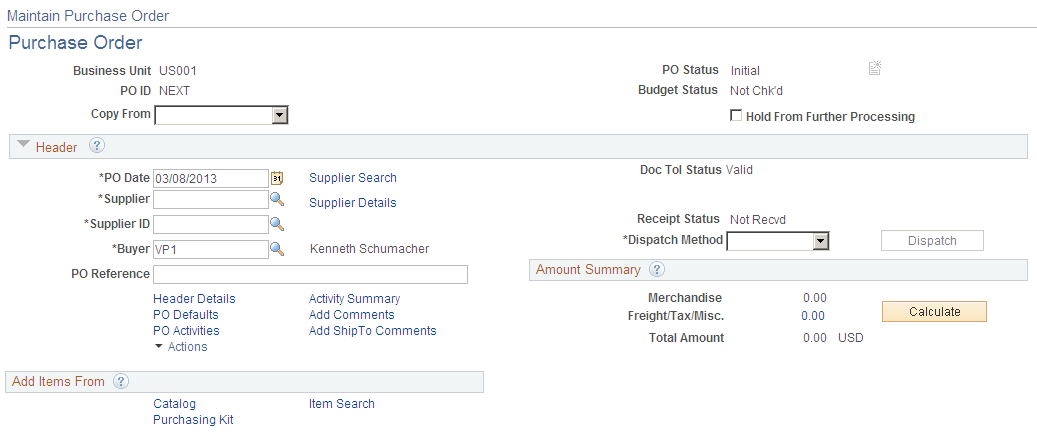
Select the Dispatch check box to ensure that the system dispatches the PO. Also, select a dispatch Method of EDX.
Use the PeopleSoft Integration Broker to activate the Purchase Order Dispatch service operation.
Use the Service Operations-General page (IB_SERVICE) to define and activate a service operation.
Navigation:
PeopleTools, Integration Broker, Integration Setup, Service Operations, General
This example illustrates the fields and controls on the Service Operations-General page (1 of 2). You can find definitions for the fields and controls later on this page.
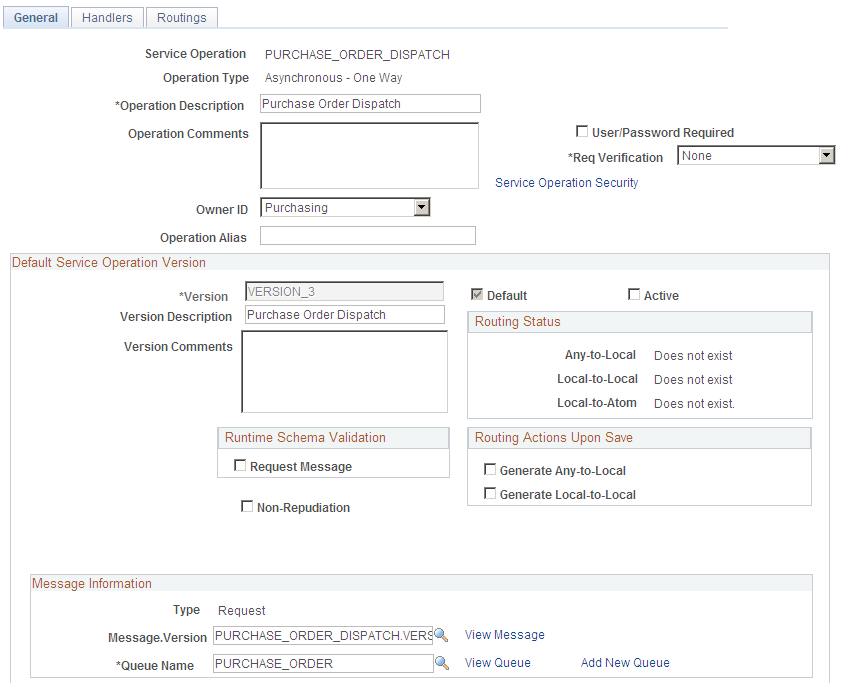
This example illustrates the fields and controls on the Service Operations-General page (2 of 2). You can find definitions for the fields and controls later on this page.

For the PURCHASE_ORDER_DISPATCH service operation, select the Active check box for the applicable service operation version. If the desired version is not the default version for the service operation, the default version must also be activated.
On the General tab of the Service Operations component, select the View Queue link at the bottom of the page to access the Queue Definitions page.
Service Operation Versions
The Default Service Operation Version group box displays the most current version of this service operation. If there have been changes to the PeopleSoft application that have required the service operation to change, for example new fields or tables, then the Non-Default Versions group box displays any older versions of the service operation based on the older release of the PeopleSoft application. The default version is always the current version, however you can use a non-default version to communicate with third-party systems that want to receive the data based on an old version. Select the link in the Non-Default Versions box to access the Service Operation Version page. This page contains information about the non-default version, including message and queue. In addition, the Logical Transforms group box contains transforms to convert the data to or from the default version. A transform program is a type of PeopleSoft Application Engine program that can convert data from one format to another. Based on your environment, you will review and possibly change these transforms.
PeopleTools: Integration Broker
Use the Queue Definitions page (IB_QUEUEDEFN) to activate the queue used by the service operation.
Navigation:
PeopleTools, Integration Broker, Integration Setup, Service Operations, General. Select the Queue link attached to this service operation.
PeopleTools, Integration Broker, Integration Setup, Queues
This example illustrates the fields and controls on the Queue Definitions page. You can find definitions for the fields and controls later on this page.
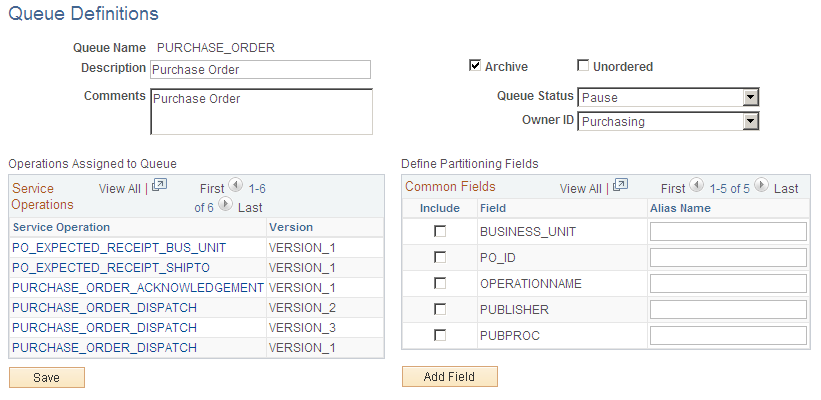
For the PURCHASE_ORDER queue, verify the Queue Status field has a value of Run.
Click the Return button to go back to the Service Operations component.
Use the Service Operations-Handlers page (IB_SERVICEHDLR) to activate one or more service operation handlers.
Navigation:
PeopleTools, Integration Broker, Integration Setup, Service Operations, Handlers
This example illustrates the fields and controls on the Service Operations-Handlers page. You can find definitions for the fields and controls later on this page.

For the PURCHASE_ORDER_DISPATCH service operation, click the Handlers tab of the Service Operations component. If you are using chunking, select the value of Active in the Status field for the OnRoute handler.
Use the Service Operations-Routings page (IB_SERVICERTNGS) to define and activate routing definitions on the service operation.
Navigation:
PeopleTools, Integration Broker, Integration Setup, Service Operations, Routings
This example illustrates the fields and controls on the Service Operations-Routings page. You can find definitions for the fields and controls later on this page.
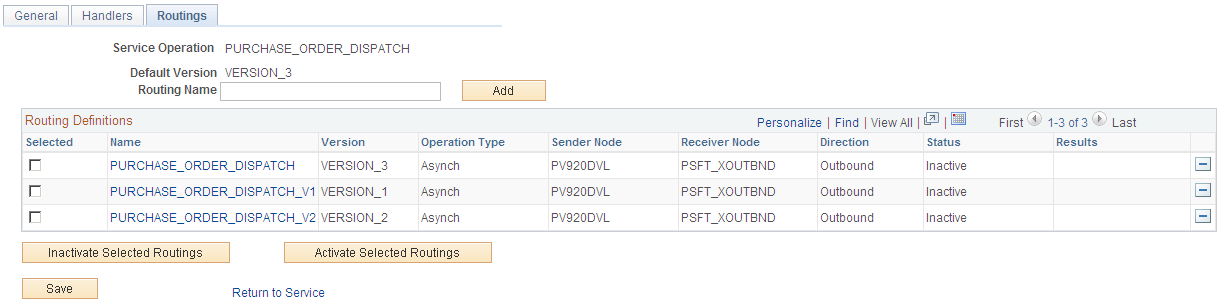
For the PURCHASE_ORDER_DISPATCH service operation, click the Routings tab of the Service Operations component. Activate an outbound routing definition for each receiver node and external alias name that data will be sent to. To activate a routing, select the check box next to the routing definition and click the Activate Selected Routings button. The following routing definitions are predefined:
The PURCHASE_ORDER_DISPATCH routing definition sends outbound purchase orders using the PeopleSoft standard XML format. This routing definition is used when you are sending data to a third-party system that is using the current version of the service operation.
The PURCHASE_ORDER_DISPATCH_V1 routing definition sends outbound purchase orders using the PeopleSoft standard XML format and converts the data from the current service operation version (version 2) to an older version (version 1) of the service operation. This routing definition is used when you are sending data to a third-party system that is still using an older version of the service operation.
Note: You do not need to select a routing definition if the batch publish rule is set up to post to a flat file only.
Use the Routings-Parameters page (IB_ROUTINGDEFNDOC) to verify the external service alias name, nodes, and transform programs used by this routing.
Navigation:
PeopleTools, Integration Broker, Integration Setup, Service Operations, Routings. Select the link attached to the routing definition name, then select the Parameters tab.
PeopleTools, Integration Broker, Integration Setup, Routings, Parameters
This example illustrates the fields and controls on the Routings-Parameters page. You can find definitions for the fields and controls later on this page.
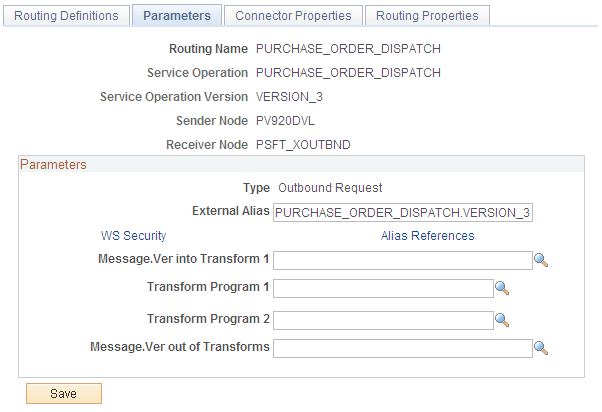
On the Routings tab of the Service Operations component, select the link attached to the routing definition name. This link accesses the Routing Definitions component. Select the Parameters tab and complete the following steps:
Confirm the external alias name in the External Alias field for the routing is correct. When sending or receiving data, the Integration Broker determines which routing to use by referring to the external alias name, not the routing name.
Verify or change the transform programs on this routing definition. A routing definition defines the sending and receiving nodes for a transaction and specifies any inbound and outbound transformations to invoke. A transform program is a type of PeopleSoft Application Engine program that can convert data from one format to another; for example, from XML to a flat file. Use a transform program when one node sends a request or response message with a data structure different from the structure required by the other node. You must decide, based on your environment, to change, remove, or add transform programs.
The transform program, to convert data from the current version of a service operation to an older version, is located on the Service Operation Version page of the non-default version. Select the non-default version on the Service Operations-General page to access the Service Operation Version page.
Use the Node Definitions page (IB_NODE) to activate node used by the service operation.
Navigation:
PeopleTools, Integration Broker, Integration Setup, Nodes, Node Definitions
This example illustrates the fields and controls on the Node Definitions page. You can find definitions for the fields and controls later on this page.
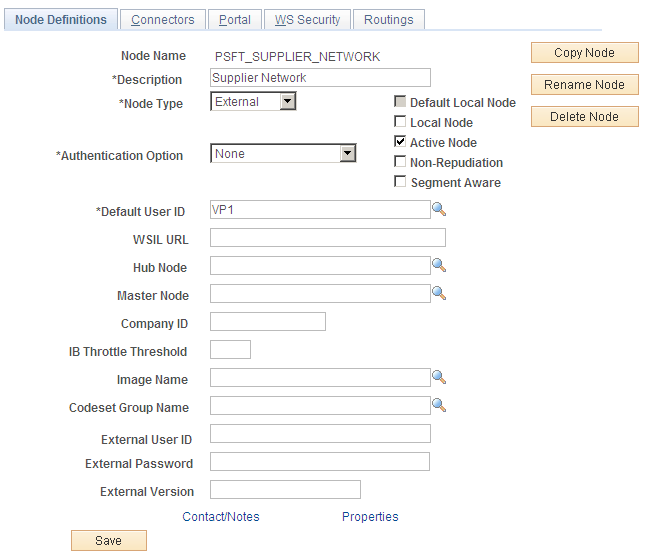
Verify the Active Node check box has been selected for any nodes used in the routings that you activated on the Service Operations-Routings page for PURCHASE_ORDER_DISPATCH service operation.
Use the Nodes-Connectors page (IB_NODECONN) to for an outbound service operation, verify the node is connected to the correct network.
Navigation:
PeopleTools, Integration Broker, Integration Setup, Nodes, Connectors
This example illustrates the fields and controls on the Nodes-Connectors page. You can find definitions for the fields and controls later on this page.
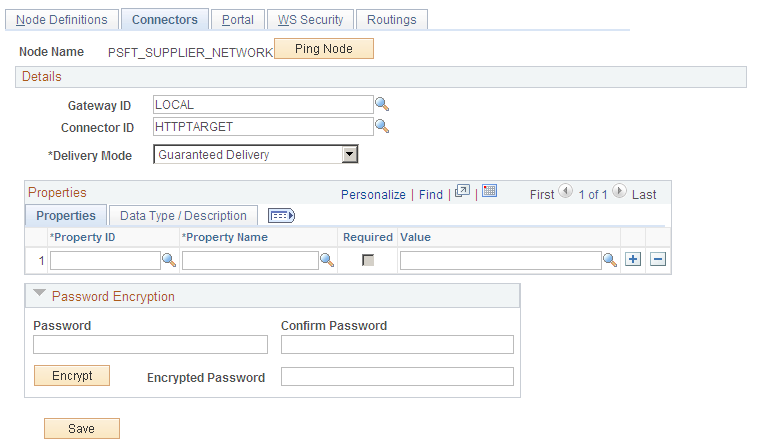
For an outbound service operation, verify the node or routing is connected to the correct network using the Gateway ID and Connector ID fields. Depending on the file output location, you may need a password. If a password is needed, you should use the password encryption utility on this page.
Note: Your database administrator will need to assist you with this setup.
Use the Batch Publish Rules page (EO_MSGPUBATCH ) to set up publication rules.
You must activate a publish rule for the publication messages you create to follow. This rule includes instructions on message chunking, if necessary.
Navigation:
This example illustrates the fields and controls on the Batch Publish Rules page. You can find definitions for the fields and controls later on this page.
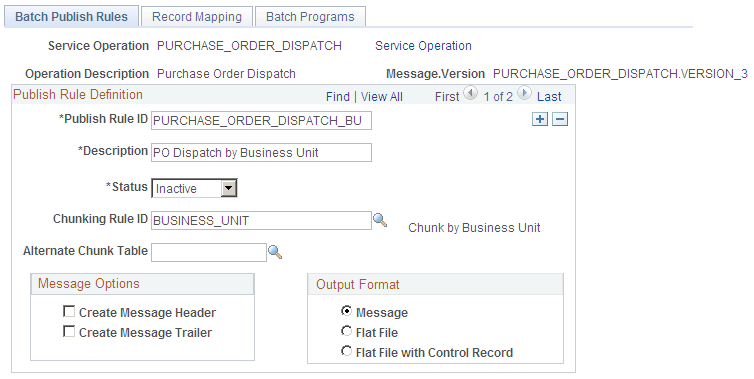
For the PURCHASE_ORDER_DISPATCH message name (service operation):
Select Active Status to activate this publish rule definition.
Select the appropriate Output Format. The PeopleSoft Application Engine program can create either an Extensible Markup Language (XML) message that flows through PeopleSoft Integration Broker architecture or a flat file generated on the PeopleSoft Process Scheduler server and not published elsewhere.
If you want to use message chunking, configure the chunking rule and then enter it in the Chunking Rule ID field.
Use the Setup Supplier to Node page (PO_CHUNK_VENDOR) to set up chunking for the batch publish rule.
Navigation:
This example illustrates the fields and controls on the Setup Supplier to Node page. You can find definitions for the fields and controls later on this page.

If using chunking for the batch publish rule, set up the chunking rule mapping definitions. You can use a delivered chunking rule or create a new chunking rule.
If using the VENDOR_ID chunking rule ID, access the Setup Supplier to Node page. If using the BUSINESS_UNIT chunking rule ID, access the BusUnit Mapping page.
Select the node for each supplier that receives electronic data.
Chunking is only needed if you have requirements to break up the outbound data and send them to different destinations based on attributes in the message such as business unit or supplier ID. For example, use chunking to send a single supplier's messages to a specific node setup for that trading partner. If you are using a middleware product to actually determine trading partner destinations then a single transaction with all trading partner transactions can usually be sent directly to the middleware product. You would not need to activate message chunking in this situation.