Expediting Work Order Completion
This section provides an overview of the Work Order Completion Component and discusses how to use the Work Order Completion component.
|
Page Name |
Definition Name |
Usage |
|---|---|---|
|
WM_WO_ACT |
Enter data to complete a work order. |
|
|
Tool Usage |
WM_TLS_USAGE |
Enter actual tool usage for a work order. |
|
Materials |
WM_WOE_MTLS |
Enter the quantities of materials used for each work order task and issue materials, as necessary. |
|
Meter Readings |
WM_WOE_METER |
Enter the meter readings for the asset associated with the work order. |
|
Causal Parts |
WM_WOE_CAUSAL_PART |
Enter the parts that caused the problem addressed in the work order. |
|
Mass Change |
WM_WOE_MASS_SEC |
Update the actual dates, times, and PCR codes for each work order task. |
|
Change Status |
WM_WOE_STATUS |
Change the status of one or more selected work order tasks and optionally notify the scheduler of the change. |
|
Checklist |
WM_WOE_CKLST |
Identify items listed on the checklist that have been completed. |
|
Work Order Task Notes |
WM_TSK_NOTES |
Review and add notes associated with the work order task. |
|
Downtime Entry |
WM_WO_DOWNTIME |
Enter actual asset downtime. |
|
Asset Information |
WM_WO_ASSET_SEC |
Review detailed information about the asset. |
|
Work Order Failure Tracking |
WM_WO_FAIL_TRACK |
Add or review details concerning a work order failure event associated with an asset selected for the work order or a work order task. |
|
WO Issue Search |
IN_WO_ISS_SEARCH |
Select a pick plan or enter a work order ID as search criteria. |
|
WO Issue Location |
IN_WO_ISS_LOC |
Enter the parts quantity issued and the quantity returned. |
|
WO Issue Summary |
IN_WO_ISS_SUMMARY |
Review the total quantities requested, reserved, allocated, and issued. |
|
Labor Distributions |
WM_LBRACT_DIST_SEC |
Review or modify the labor distribution ChartFields. |
The Work Order Completion component enables you to expedite the entry of labor time, inventory usage and returns, and tool usage for the tasks associated with a selected work order.
To submit a time sheet for posting in the Work Order Completion component, you must set up the Time sheet Default page for each shop associated with the resources for which you are entering time. The time sheet prefix is used to generate a time sheet within Work Order Completion so as to bypass Expenses and go directly to the Expenses integration table for Project Costing. The time sheet prefix combined with the time sheet ID is a unique number. The PeopleSoft Expenses to Project Costing integration table indicates when a row is directly populated from PeopleSoft Maintenance Management.
Labor Time
Before you can enter time on the Work Order Completion component, work orders must be approved. You enter the actual start and end dates and times for every technician assigned to any of the tasks associated with the selected work order in the Technician Workbench. You can also add and remove unscheduled time entry rows to each task. After creating these entries, if authorized, you can select the Submit For Posting button. The system automatically stages the transactions in the PeopleSoft Expenses to Project Costing integration table until Cost Collection for PeopleSoft Expenses is run in PeopleSoft Project Costing, which collects the time information for each resource and stores it in the PROJ_RESOURCE table. The PeopleSoft Project Costing cost collection process also performs pricing on the time data. You must run the Cost Summarization process to see these actual labor costs updated in the Costs page of the work order.
Note: You can enter time on the Work Order Completion component at any time.
Important! Labor time entered for a labor resource per Work Order Task on the Work Order Completion component cannot be updated on the Technician Workbench Time Entry page, and labor time entered on the Technician Workbench Time Entry page cannot be updated on the Work Order Completion component. Also, selecting the Elapsed Time or Punch Time option on the User Preferences, Maintenance Management page does not apply to the Work Order Completion component.
Tools Usage
Click the Tool Usage link on the Work Order Completion page to access the Tool Usage page, where you can enter the actual start and end dates and times for tool usage for each task associated with a selected work order. The transaction processing for these entries is the same as it is for the Technician Workbench.
Material Usage and Return
Click the Materials link on the Work Order Completion page to access the Materials page, where you can enter the quantities of inventory items used for each work order task in the selected work order. This grid also indicates the quantity of the item that was reserved and the reservation status of each item. You can also create a picking plan for selected items.
If more inventory materials are needed for the tasks associated with the selected work order and you have access to the Issue to Work Orders component, click the Issue to Work Orders link on the Materials page to enter a direct issue in PeopleSoft Inventory for the unscheduled items. PeopleSoft Inventory creates an issue transaction, which updates one or more inventory lines for a task in the work order.
You can also click the Print button, add a bar code, and print:
Labor Assignment Report
Material Assignment Report
Procurement/On-Hand Report
Tools Assignment Report
Instruction Report
Check List Report
Work Order Task Notes Report
Equipment Parts List
Attachments
Meter Readings
If the work order is for preventive maintenance for an asset that is based on meter readings, click the Meter Readings link to access the Meter Readings page. You can update the current meter readings that are associated with the asset and, if you click the Advanced Options link, see detailed readings, such as the accumulated reading. You can also click a link to access the Meter Reading History in PeopleSoft Asset Management and to view a Meter Reading trend chart.
Causal Parts
Click the Causal Parts link to enter assets or item parts that caused each task in the selected work order to be opened. This information does not update a Warranty Claim created in the work order.
Users can change the status of assigned tasks in the Work Order Completion component. If you wish to change all the tasks to the same status, you can select that status from the dropdown menu. When you click the Go button, a Change Status page displays where you can change each of the individual statuses for selected tasks. You can also review any editing errors, add notes, and notify the scheduler concerning the status change. Users must be set up in User Preferences as authorized to complete and close a work order task or work order before they can change the status of a work order task or work order to Complete or Closed. These authorized users can change a Closed task back to a status of Complete. You cannot cancel tasks from the Work Order Completion component. Canceled and Closed tasks appear as display only. A status that is set up with an internal status of Cancel, will not appear on the list of available statuses. There are edits that prevent you from changing the status of a work order task to Complete if the work order has inventory on a pick plan or has an open peg.
Important! You may notice that the sample data that accompanies your PeopleSoft Maintenance Management application displays a user-defined status of Canceled - Work started but no longer needed. However, if you review the setup of this status in Set Up Financials/Supply Chain, Product Related, Maintenance Management, Setup, Work Order Status, you will see that the internal status is Complete.
You can access the checklist associated with each task to mark the steps as complete. You can review and modify existing notes and, if authorized, enter planned and actual downtime for the asset being maintained or repaired.
Note: You cannot perform prior period adjustments on the Work Order Completion component.
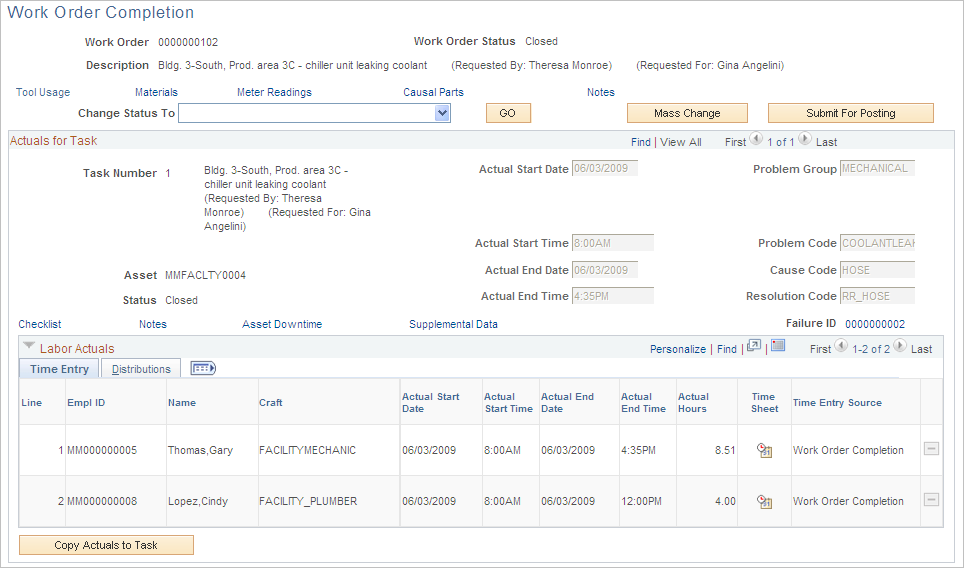
Use the Work Order Completion page (WM_WO_ACT) to enter data to complete a work order.
Navigation:
This example illustrates the fields and controls on the Work Order Completion Component. You can find definitions for the fields and controls later on this page.
Field or Control |
Description |
|---|---|
Tool Usage |
Click this link to access the Tool Usage page, where you enter actual tool usage for this work order task. See Tool Usage Page. |
Materials |
Click this link to access the Materials page, where you enter actual quantities of items used. You can also click the Issue link to issue additional materials to the work order or to enter returned items. See Materials Page. |
Meter Readings |
Click this link to access the Meter Readings page, where you enter the current meter readings for the asset. See Meter Readings Page. |
Causal Parts |
Click this link to access the Causal Parts page, where you enter any assets or asset components that caused the task problem. See Causal Parts Page. |
Mobile Updates Pending |
This link is appears on the page if a task or any task-level data such as Materials, Checklists, and more have been sent to a mobile device from Maintenance Management and an update to that data has not been received from the mobile device since the last date and time that the previous update was sent. In this case, the task is considered to have an update pending. |
Change Status To |
Select the status to which you want to change the status for all of the work order's tasks. Only authorized users can change the status to Complete or Closed. The status rules for the work order apply to this component. |
Go |
Click this button to access the Change Status page where you can select a status for one or more work order tasks associated with this work order. You can also select the Notify Scheduler check box and add a note concerning the reason for the status change. An email is sent to the scheduler of the work order task. |
Mass Change |
Click this button to access the Mass Change page, where you can update the actual start dates and times, the PCR values, or both for all of the work order tasks. You select the Update Actuals Dates/Time check box and enter dates and times in these fields:
You can select Apply to Labor Actuals check box to allow the entered actuals to be copied not just to the task actuals but also down to the next level of the labor actuals. If the fields are editable, the mass change actuals will be copied into the fields, regardless of whether data was already entered. You select the Update P-C-R Codes check box and enter the PCR codes in these fields:
|
Submit For Posting |
Click this button to submit the time entries for posting in PeopleSoft Expenses. Only users who have the Allow Submit Time for Posting check box selected on the User Preferences - Maintenance Management page can access this button. Note: Once you submit the time sheet directly to the staging tables for Project Costing from the Work Order Completion component, you cannot modify the data posted. If you need to adjust the data, then you must enter a new line of labor data with the corresponding positive or negative adjustment. When a task is set to complete status and the complete actuals for any labor lines have been entered but have not been submitted for posting, the user will receive a reminder message when returning from the Task Status Change page on whether they would like to submit those actuals to Project Costing for posting. |
Checklist |
Click this link to access the Checklist page, where you select completed tasks. See Procedures. |
Notes |
Click this link to access the Work Order Task Notes page, where you can review existing task notes and add new notes. See Procedures Page. |
Asset Downtime |
Click this link to access the Downtime Entry page, where you can enter the planned and actual downtime of the asset. You can also click a link to access the Asset History page from this page. See Asset Downtime. |
Actual Start Date, Actual Start Time, Actual End Date, and Actual End Time |
Enter the actual start and end dates and times for the work order task. |
Problem Group, Problem Code, Cause Code, and Resolution Code |
Select a problem group and PCR codes for this work order task, if applicable. |
Failure ID |
Click this link to access the Work Order Failure Tracking page and add or review the details of a failure event associated with an asset selected for the work order or a work order task. This information is used by the PeopleSoft Maintenance Management Failure Analysis component to enable you to perform a meaningful analysis of system-calculated metrics-based on the tracking of failure events associated with a work order task. |
Inspection ID |
Click this link to access the inspection instance created for the work order task. You can review or complete an inspection instance before setting the parent task’s status to Completed. You cannot set the parent task’s status to Completed until you complete the associated inspection tasks. |
Copy Actuals to Task |
Click this button to copy the appropriate labor actuals to the task actuals (if task actuals are enterable). For all the labor actuals entered for a given task, the earliest labor actuals are copied as the task start actuals and the latest labor actuals are copied as the task end actuals. |
Labor Actuals Time Entry and Distribution
Select the Labor Actuals Time Entry tab on the Work Order Completion page.
Field or Control |
Description |
|---|---|
Employee ID |
Select a resource for whom to enter time. This field is available for resources that you add to the task. If labor is already scheduled for the work order task, an Employee ID appears in this field. |
Craft |
Select a craft for the resource. This field is available when you add a resource to the task. If labor is already scheduled for the work order task, a craft ID appears in this field. This field is provided by default if a primary craft is already specified for the resource. |
Actual Start Date, Actual Start Time, Actual End Date, and Actual End Time |
Select the actual dates and times that each resource worked on the task. The actual start date and time must be less than or equal to the actual task end date and time. The actual end date and time must be greater than or equal to the actual task start date and time. |
Duration |
Enter the number of hours the employee worked on the task. This value is required in order to submit time for posting. |
Distribution |
Click this link on the Distributions tab to access the Distribution page, which displays the distribution data entered by default into the labor schedule row. You can override these values. Note: The Distributions tab does not appear unless you select the View and Update Accounting check box on the User Preferences - Maintenance Management page for selected users. |
Time Entry Source |
Displays the component from which the Labor Actuals were entered. The component names will be either Work Order Completion or Technician Workbench. If no actuals have been entered and saved, the time entry source value will be blank. The Time Entry options include:
|