Managing Warranty Claims
This section discusses how to review an asset's warranty, search for asset warranty templates, recover costs for work order tasks, generate warranty claims, and revise and submit warranty claims.
|
Page Name |
Definition Name |
Usage |
|---|---|---|
|
ASSET_WARRANTY |
Review the warranty information for assets that are associated with work order tasks. |
|
|
AM_WTMPL_SRH |
Search to find a Standard Warranty Template to apply to an asset. |
|
|
WM_WO_TSK_CLAIM |
Indicate whether to recover costs for an asset, and specify downtime rates, supplier, warranty, and causal parts. |
|
|
WM_CLAIM_GEN |
Generate a warranty claim. |
|
|
WM_CLAIM_HDR |
Review information for a warranty claim, update the status, and create the warranty claim report. |
|
|
Warranty Claim - Supplier Contact Page |
WM_CLAIM_VENDOR |
Update supplier information for a warranty claim. |
|
Warranty Claim - Cost Details Page |
WM_CLAIM_COST_DTL |
Update tasks and costs for a warranty claim |
|
Warranty Claim - Related Meter Readings Page |
WM_CLAIM_METER |
Update meter readings associated with a warranty claim. |
Use the Asset Warranties page (ASSET_WARRANTY) to review the warranty information for assets that are associated with work order tasks.
Navigation:
Click the Active Warranties icon on the Express Work Order page.
Click the Active Warranties icon on the Work Order page.
Click the Active Warranties icon on the Work Order - Requirements page.
Field or Control |
Description |
|---|---|
|
Active Warranties icon. |

Note: This icon does not appear if the asset is not associated with a warranty.
If users have the appropriate security in PeopleSoft Asset Management, they can add or update warranty information for the asset. The user completes the information on the page or applies a warranty template.
Detailed information about the Asset Warranties page is available in the PeopleSoft Asset Management documentation.
Use the Search for Asset Warranty Templates page (AM_WTMPL_SRH) to search to find a Standard Warranty Template to apply to an asset.
Navigation:
Click the Apply Warranties from Template link on the Asset Warranties page.
Use this search page to find a defined standard warranty template and apply the warranty terms to this asset.
Enter search criteria to restrict template selections based on:
Asset type
Asset subtype
Supplier ID
Model
Item ID
The valid warranty templates matching the search criteria appear, and you can select one to associate with this asset. Standard warranties are defined on the Standard Warranty Template.
See Setting Up Asset Warranties.
Field or Control |
Description |
|---|---|
Asset Type and Asset Subtype |
Override these fields, if necessary. The field values that display here depend on the asset selected for the work order or work order task. |
Use the Task Cost Recovery page (WM_WO_TSK_CLAIM) to indicate whether to recover costs for an asset, and specify downtime rates, supplier, warranty, and causal parts.
Navigation:
Click the Warranty Claim link on the Work Order - Requirements page.
Click the Warranty Claim link on the Work Order - Schedules page.
This example illustrates the fields and controls on the Task Cost Recovery page. You can find definitions for the fields and controls later on this page.

Field or Control |
Description |
|---|---|
Attempt to Recover Cost |
Select this check box if the asset was repaired within your organization to indicate that you want to recover the cost of the repairs for this task's asset from the supplier by generating a warranty claim. The system routes the task to a claim clerk when this option is selected. Deselect this option if either the asset is sent to the supplier for repair or replacement or the repair is not one for which the supplier will reimburse. |
Claim Number |
The claim number appears only if the work order task is complete and a warranty claim has been generated. Click the claim number to access the Warranty Claim component pages for this task. The system automatically generates claim numbers. |
Asset downtime hours |
Enter the hours the asset was unable to be used for work purposes. The value for this field is derived from the work order task information, but you can override it if necessary. |
Downtime rate |
Enter the hourly rate to charge for the time the asset was down and unable to be used. |
Failure date |
Enter or select the date the asset went down. The value for this field is derived from the work order task information, but you can override it if necessary. |
Warranty Name |
Select the name of the warranty covering this asset. |
Supplier ID and Supplier Contact |
Enter or select the ID of the supplier that issued this warranty and select the supplier's contact person for this warranty. The system automatically populates these fields with the supplier information associated with the specified warranty. |
Causal Parts |
Identify parts that are either from PeopleSoft Inventory or PeopleSoft Asset Management that caused this asset to be down. Enter or select the:
|
Use the Generate Claim page (WM_CLAIM_GEN) to generate a warranty claim.
Navigation:
This example illustrates the fields and controls on the Generate Claim page. You can find definitions for the fields and controls later on this page.
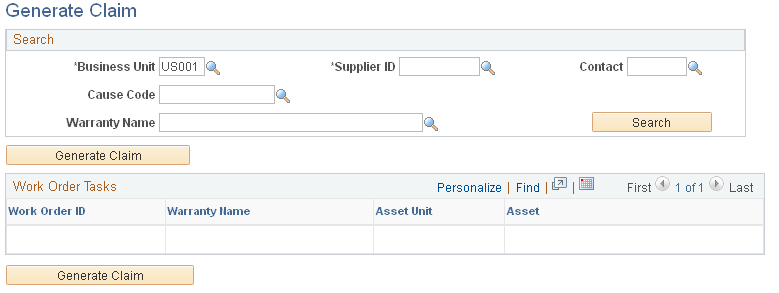
Search
Field or Control |
Description |
|---|---|
Business Unit, Supplier ID, Contact, Cause Code, and Warranty Name |
Specify the criteria by which to retrieve work order tasks that are pending warranty claims by selecting values for the business unit and supplier ID, and clicking the Search button. You can optionally select a contact, cause code, and warranty name to further limit the work orders tasks that you retrieve. |
Work Order Tasks
The work order tasks that meet the search criteria specified appear in this grid. Select the tasks for which to generate a warranty claim, then click Generate Claim to create a warranty claim. The page updates and the claim ID appears.
Field or Control |
Description |
|---|---|
Generate Claim |
Select the tasks for which to generate a warranty claim, then click this button to create a warranty claim. |
Claim ID |
This appears if the associated task has a generated warranty claim. Click the claim ID to access the Warranty Claim component pages for the task. |
Warranty Claim - Claim Summary Page
Use the Warranty Claim - Claim Summary page (WM_CLAIM_HDR) to review information for a warranty claim, update the status, and create the warranty claim report.
Navigation:
Click a claim ID on the Generate Claim page.
This example illustrates the fields and controls on the Warranty Claim - Claim Summary page. You can find definitions for the fields and controls later on this page.
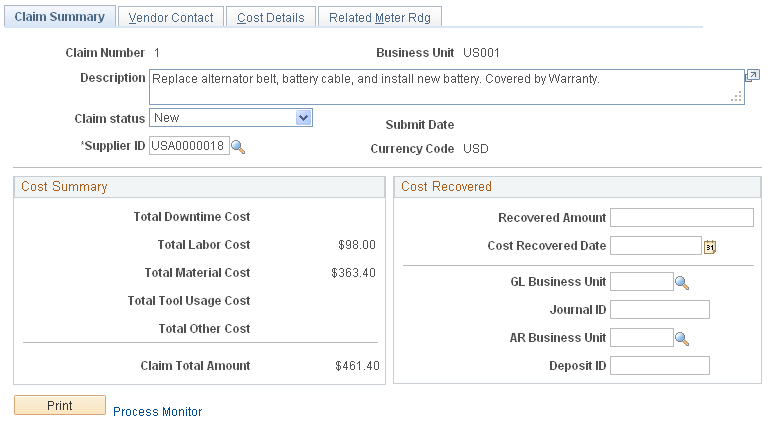
The Cost Summary group box displays totals of the various cost amounts for the warranty claim, and the total claim amount. These values are display-only because they are summarized amounts from the Warranty Claim - Cost Details page.
The claim status controls which of the other fields you can modify on this page. If the claim status is New, you can modify all the remaining fields. If the status is Submitted or Resubmitted, you can edit only the Claim Status field. If the claim status is Recovered, you can edit only the fields in the Cost Recovered group box.
Field or Control |
Description |
|---|---|
Claim Status |
Select a value to update the status of the warranty claim. Options are: New: The initial status value once a claim is generated. Submitted: Indicates that you have printed and mailed the claim in order to recover the costs. Resubmitted: Indicates that the initial claim was rejected by the supplier, and you are submitting the claim again. Recovered: Indicates that you have received payment for the costs. Canceled: Indicates you are cancelling the claim and no longer intend to recover the costs. |
Recovered Amount and Cost Recovered Date |
Enter the amount recovered from the supplier, and the date you received the payment. |
GL Business Unit and Journal ID |
Optionally, enter a general ledger business unit and journal ID to cross reference the associated accounting information related to the recovered costs. Note: You must manually enter a general ledger journal entry and accounts receivable invoice to record the transaction; the fields on this page are informational only. |
AR Business Unit and Deposit ID |
Optionally, enter the accounts receivable business unit and deposit ID to record invoice information related to the transaction. Note: You must manually enter a general ledger journal entry and accounts receivable invoice to record the transaction; the fields on this page are informational only. |
|
Click to launch the warranty claim report process, and generate a report for the claim that you can send to the supplier. |
Note: Accounting entries that are associated with cost recovery must be done manually. The system does not automatically generate them.
Warranty Claim - Supplier Contact Page
Use the Warranty Claim - Supplier Contact page (WM_CLAIM_VENDOR) to update supplier information for a warranty claim.
Navigation:
This page contains information on how to contact the supplier associated with a warranty claim.
Warranty Claim - Cost Details Page
Use the Warranty Claim - Cost Details page (WM_CLAIM_COST_DTL) to .
Navigation:
This example illustrates the fields and controls on the Warranty Claim - Cost Details page. You can find definitions for the fields and controls later on this page.
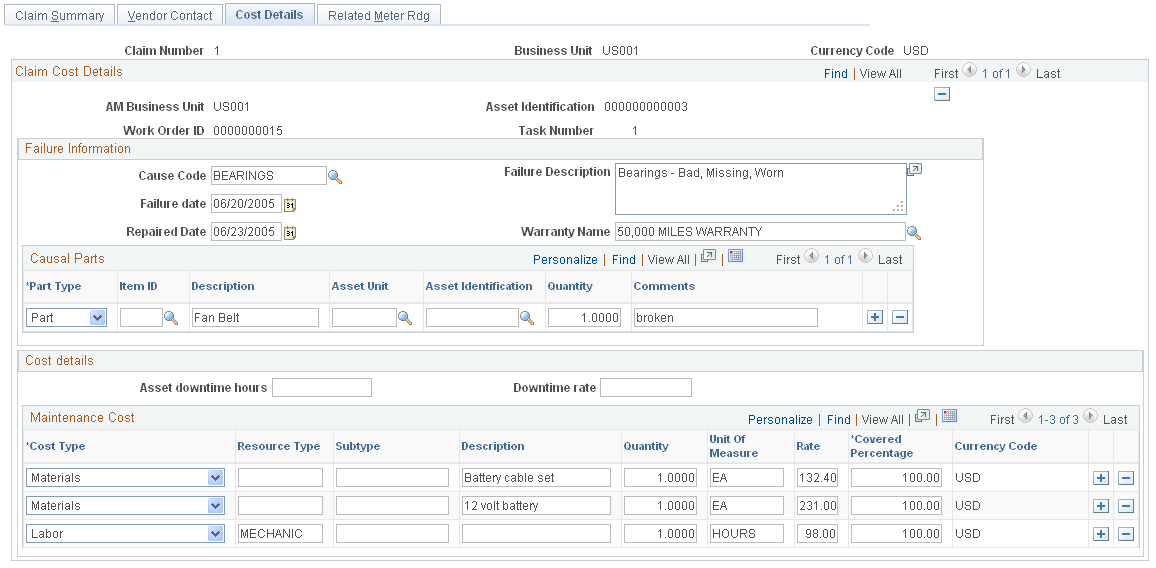
If a claim line is deleted, the claim ID field of the corresponding work order task is set to blank so that it can be grouped into a different claim.
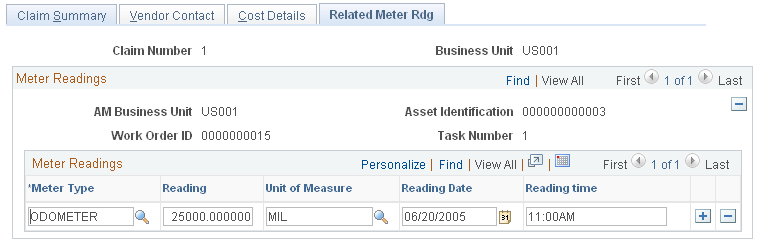
Warranty Claim - Related Meter Readings Page
Use the Warranty Claim - Related Meter Readings page (WM_CLAIM_METER) to update meter readings associated with a warranty claim.
Navigation:
This example illustrates the fields and controls on the Warranty Claim - Related Meter Readings page. You can find definitions for the fields and controls later on this page.