Spreadsheet Invoice Import
This topic provides an overview of spreadsheet invoice import, lists prerequisites, and discusses:
|
Page Name |
Definition Name |
Usage |
|---|---|---|
|
INTFC_BI |
View data for interface transactions in the INTFC_BI table. |
|
|
RUN_BI_INTFC |
Run the Billing Interface process. |
|
|
PMN_BAT_MSGLOG |
Check if any of the data returned an error for the particular process instance. |
|
|
INTFC_BI |
Correct errors from the Billing Interface process. |
The Spreadsheet Import to Billing Interface is used to enter invoice data in a worksheet format and have an xml file generated automatically. The xml file can be posted into the PeopleSoft Billing Interface tables via Integration Broker or it can be used with a third-party application.
The worksheet can be personalized to display only the specific fields needed for data entry.
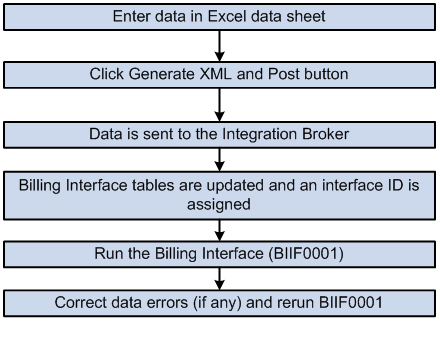
Process Flow
The following diagram illustrates the process flow to create an invoice:
This example illustrates the Process flow to create an invoice.
Before you can enter and import spreadsheet invoice, you must:
Copy the Excel workbook to a folder on your workstation.
Set up your Microsoft Excel to accept macros.
Configure Integration Broker and Excel workbook.
Use Microsoft Office Excel 2007 version or higher.
This section discusses the configurations required for the Excel workbook and the PeopleSoft Integration Broker to communicate with each other.
Configuring the Integration Broker
Follow the given steps to set up the Integration Broker:
Access the Quick Configuration page (PeopleTools, Integration Broker, Configuration, Quick Configuration). This page displays the information on the gateway and the domains. Verify a ping is successful by clicking the Ping Gateway button. Ensure that the domains to be used are in the Active status.
Access the Service Operations page (PeopleTools, Integration Broker, Integration Setup, Service Operations). Select the Active checkbox on the General tab to activate the Service Operation EXCELUPLOADFORBILLING. Set the status as Active on the Handlers tab and verify that the status for the EXCELUPLOADFORBILLING service operation is active on the Routings tab. Add appropriate permission list using the Service Operation Security hyperlink on the General tab. This web service enhances the security and will prevent the user from bypassing the login validation.
Configuring the Excel Workbook
An Excel workbook is used for the generation of the XML file that is passed to the Integration Broker. The Excel book is comprised of three worksheets: Template, Data Sheet and Example.
The configuration information entered in Excel workbook is case sensitive. Each row can hold data for only one table. If a row contains data from two or more tables, it will be highlighted as red.
Service Operation, Routings, Nodes, Gateways and Domains must be configured and be made active. Security privileges must be set for Service Operations. Service Operation manager can be used to review processed data.
View the Spreadsheet Invoice - Template worksheet by clicking the BillingInterfaceExcelUpload.xlsm file delivered with your PeopleSoft products. You set the defaults and set up your invoice spreadsheets for importing into PeopleSoft Billing on the Template worksheet.
This example illustrates the fields and controls on the Template worksheet. You can find definitions for the fields and controls later on this page.
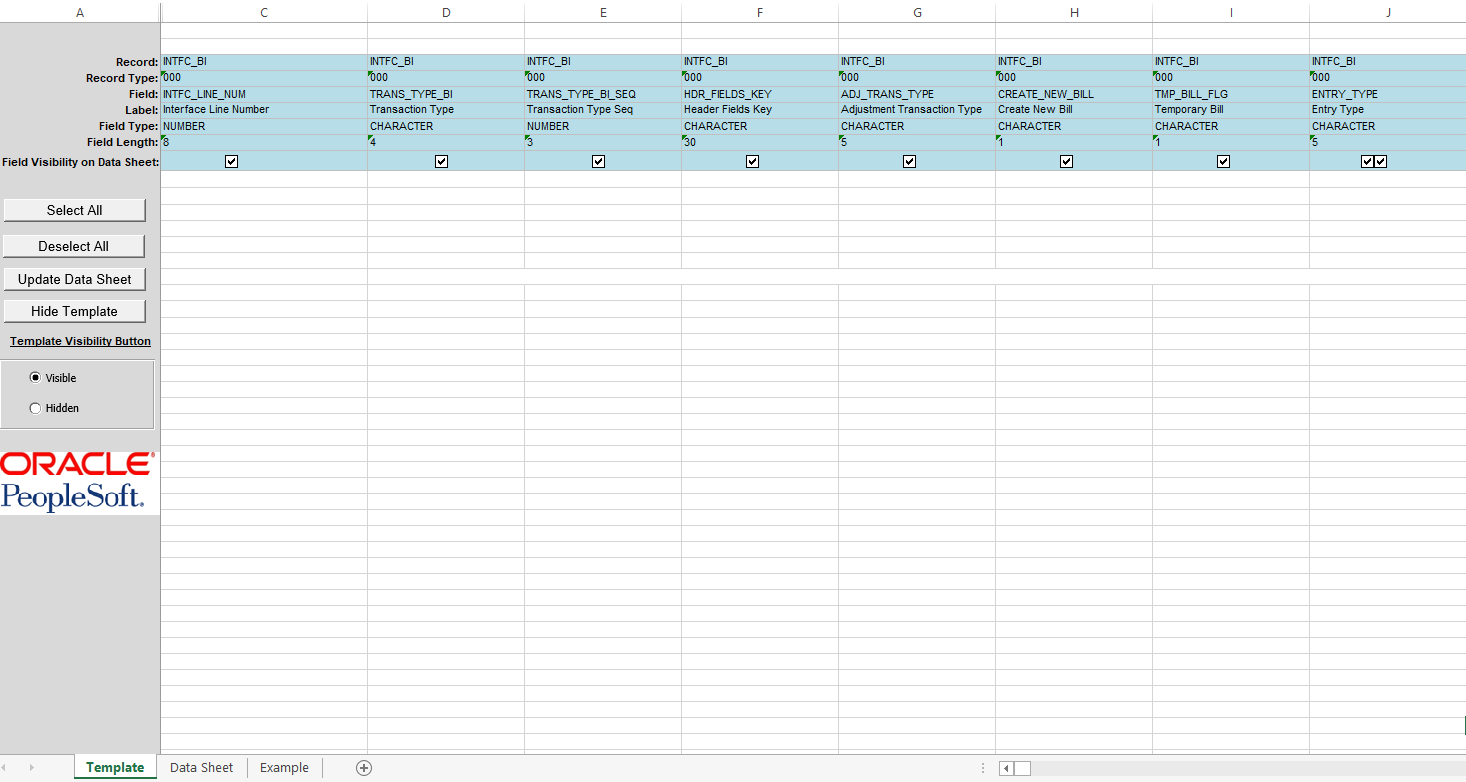
The Template worksheet in the Spreadsheet Invoice workbook contains all of the available fields that you can use on the Data Sheet worksheet to enter invoice data. However, since customers typically require a subset of fields based on the business requirements and the user role, this sheet can be customized to restrict the visibility of certain fields.
Field or Control |
Description |
|---|---|
Record |
Displays the Billing Interface table name associated with the field. |
Record Type |
Displays the record type associated with the field. Values are:
|
Field Type |
Displays the type of the field. Types include Character, Date, and Number. |
Field Visibility on Data Sheet |
Selected fields will be visible on the Data Sheet worksheet. |
Select All |
Click this button to select all the fields on the Template sheet. All the check boxes on the Field Visibility on Data Sheet row will be selected. |
Deselect All |
Click this button to deselect all the fields on the Template sheet. All the check boxes on the Field Visibility on Data Sheet row will be deselected. You can also manually select or deselect individual fields based on the requirement. |
Update Data Sheet |
Click to update the Data Sheet worksheet with the selected fields. |
Hide Template |
Select to hide the Template worksheet. The Template Visibility Button also acts in union with the Hide Template button. |
Template Visibility |
If the Template Visibility Button option is Visible, clicking Hide Template button will hide the template and only the data sheet will be visible. The user can click Display Template from the Data Sheet to redisplay the template. If the Template Visibility Button option is Hidden, clicking Hide Template button will hide the template and only the data sheet will be visible. The user does not have an option to redisplay the template. If the template is visible to the users, they can make changes to the fields available on the data sheet. An administrator should determine which fields are to be available and whether users should be granted access to change those fields if required. |
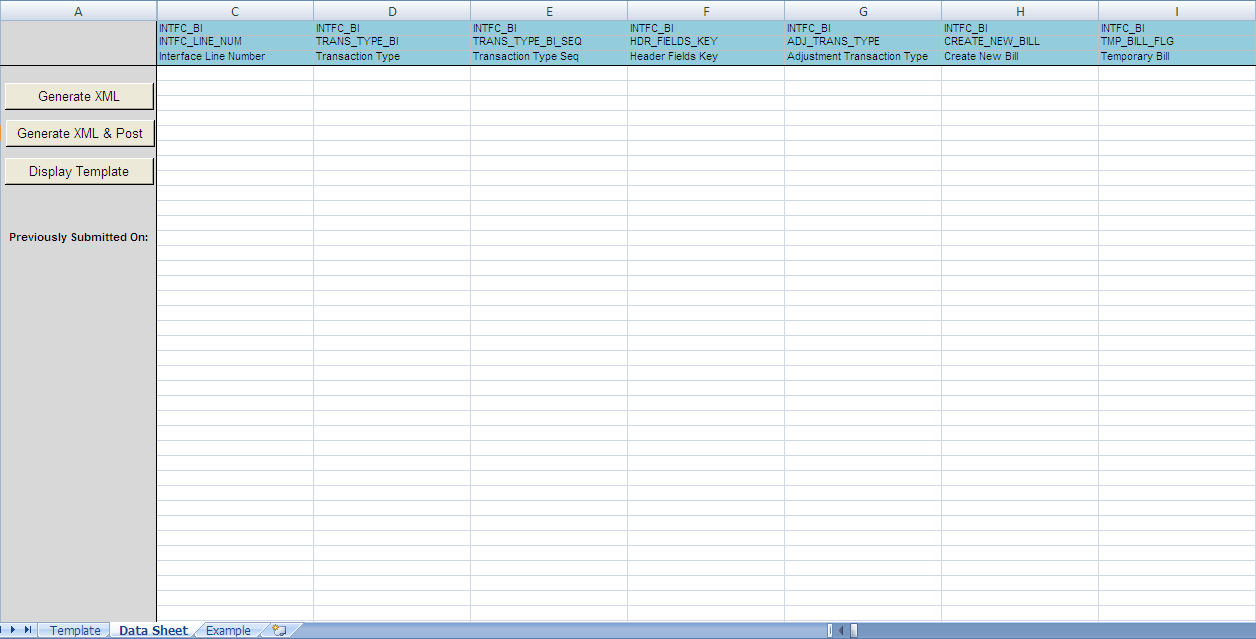
View the Spreadsheet Invoice - Data Sheet worksheet by clicking the BillingInterfaceExcelUpload.xlsm file delivered with your PeopleSoft products. You use the Data Sheet worksheet to create and import invoice data.
Each row on the sheet can contain an entry for only one table.
This example illustrates the fields and controls on the Data Sheet worksheet. You can find definitions for the fields and controls later on this page.
Field or Control |
Description |
|---|---|
Generate XML |
Click to create an XML file. This XML file can be edited and transferred to the PeopleSoft system via a third-party application. The Excel Save As window appears when you click the Generate XML button. Indicate the file name and the location where you want to save it. For example, you can write the data to an FTP site and create another process to post the XML file to the URL. When Integration Broker is active, it posts the XML data to the system making the data available for processing by the batch Billing Interface Excel Upload process. |
Generate XML & Post |
Click to create an XML file and post the file to PeopleSoft database. The Login window appears when you click the Generate XML and Post button. Enter available User ID, Password and Address. If the IB Gateway is not a dedicated gateway server, then the Default Local Node name is also required as part of the URL construction. |
Display Template |
Click to display the Template sheet if it is hidden. This button is displayed only if the administrator has set the Template Visibility Button option to Visible on the template. |
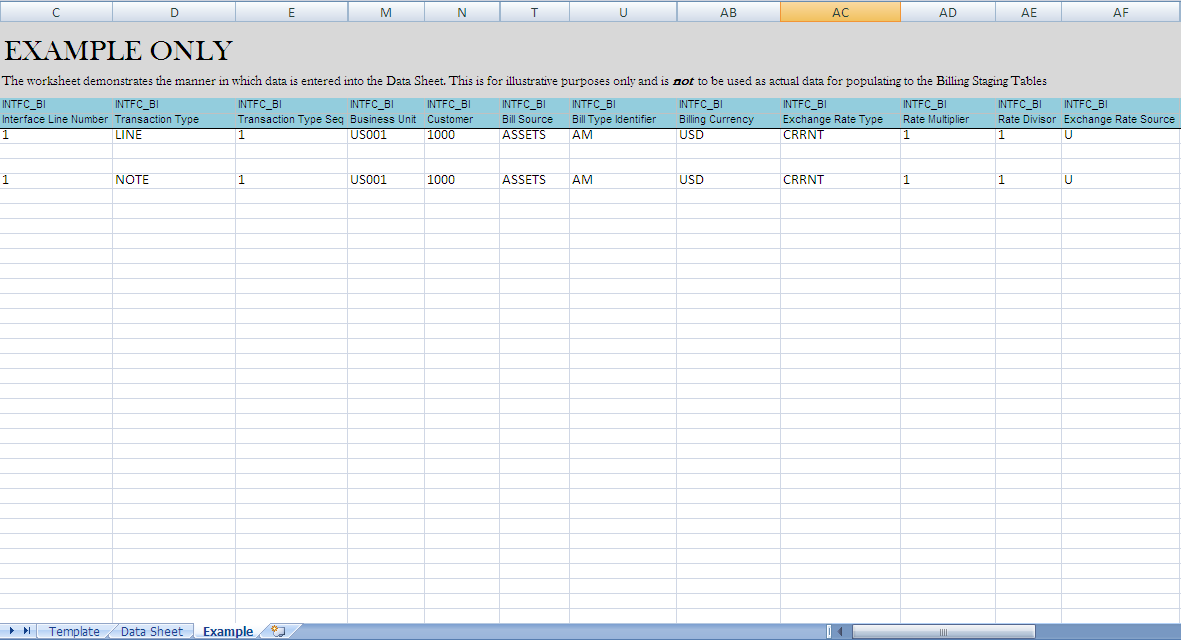
View the Spreadsheet Invoice - Example worksheet by clicking the BillingInterfaceExcelUpload.xlsm file delivered with your PeopleSoft products. The Example worksheet acts as a guideline for the user on how to enter data.
This example illustrates the fields and controls on the Example worksheet.
Follow the given steps to post an invoice:
Enter data for parent record and the child record on the respective rows on the data sheet.
If data is entered in an incorrect location, the entire row will be highlighted to indicate the problem.
Click Generate XML & Post button to populate the Billing Interface tables.
Click OK to the message displayed.
Save the XML file. Each time a new file is saved, the previous file is overwritten.
You will receive a confirmation message that the data has posted after the xml file is saved.
Use the Review Pending Transactions page (INTFC_BI) to view data for interface transactions in the INTFC_BI table.
Navigation:
Review the data posted by either querying the tables or viewing it online.
Use the Process Billing Interface page (RUN_BI_INTFC) to run the Billing interface (BIIF0001).
Navigation:
This example illustrates the fields and controls on the Process Billing Interface page.

Create the invoice by running the Billing Interface to post the data.
|
Field or Control |
Description |
|---|---|
|
Range Selection |
Select one option:
|
On the Process Scheduler page, select the Interface & VAT Defaulting (interface and value-added tax defaulting) job if the transactions are liable for Value Added Tax (VAT), which contains both jobs in one. If you decide to run the processes individually, you must do so one at a time.
Use the Message Log page (PMN_BAT_MSGLOG) to check if any of the data returned an error for the particular process instance.
Navigation:
This example illustrates the fields and controls on the Message log page.

Use the Correct Interface Errors page (Billing, Interface Transaction, Correct Interface Errors) to rectify any errors. Update the data and rerun the Billing Interface.
An alternate method to rectify errors is to update the Data Sheet on the workbook with correct data and repost the XML file.
Note: This method should be used during testing phase only as a new interface ID will be generated and data for the previous interface ID will remain in the tables.