Making Electronic Check Payments (Classic)
This topic discusses how to pay invoices by electronic check using PeopleSoft Classic eBill Payment.
|
Page Name |
Definition Name |
Usage |
|---|---|---|
|
AR_EBP_PAYCART_WZ1 |
View the contents of the Payment Cart to begin the payment process. A horizontal navigation provides each step in the payment process. |
|
|
Short Pay Reason Page |
SH_PAY_RSN_TBL |
Set up valid reason options that a customer can select when they elect to short pay. The options that you define here are available to customers on the Payment Cart page. See the Short Pay Reason Page for more information. |
|
ePay Partial Payments Page |
AR_EBP_PPEP_SEC |
View a list of partial electronic check payments for the invoice. |
|
AR_EBP_PAYCARD_WZ2 |
Initiate the payment process. |
|
|
Payment Amount Detail Page |
AR_EBP_PITM_SEC |
Review details about the invoices for the corresponding amount. See Make Payment - Step 2 of 3 for more information. |
|
AR_EBP_PAY_RSLT_EP |
Review payment results for electronic check payments. |
The Electronic Check payment option requires ePayment integration with a third-party payment processor. See the product documentation for PeopleSoft Integration Interfaces.
You must also set up your Receivables system to support ePayments through the self-service component, eBill Payment. See Setting Up Electronic Payment Options and Setting Up ePayment Profiles.
The Payment Cart displays the following steps for payments using electronic checks:
Payment Cart
Make Payment
Payment Results
After selecting the Electronic Check payment method, the user is transferred to the hosted payment supplier’s site for payment completion.
Note: When the system detects an error in any step, the subsequent steps are locked until the error is fixed.
The electronic check payment option supports only USD payments and real-time transactions; you cannot make future or scheduled payments. The system displays an error message and marks the payment line in error if a customer enters a future payment date.
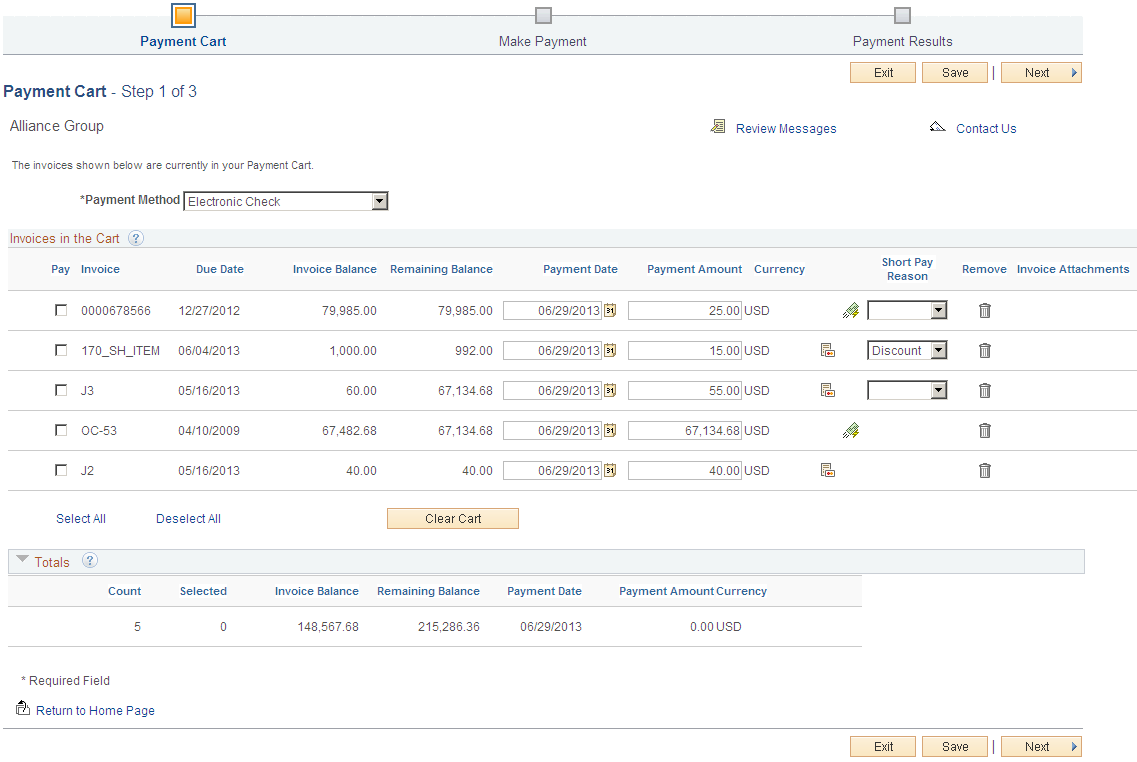
Use the Payment Cart page (AR_EBP_PAYCART_WZ1) to display and select invoices for payment.
Navigation:
Click the Add to Cart button that is located on pages displaying invoices or click the Payment Cart link from the Menu.
This example illustrates the fields and controls on the Payment Cart (Step 1 of 3) for an electronic check payment.
Field or Control |
Description |
|---|---|
Payment Method |
Select Electronic Check from the available options. The system uses the payment method that is defined on the My Preferences for eBill Payment page as the default value. |
Invoices in the Cart
Customers can select the corresponding check box for the invoices they want to pay.
Field or Control |
Description |
|---|---|
Payment Date |
The current system date is the default. Electronic Check payment methods do not support scheduled payments. The system displays an error message and marks the payment line in error if a customer enters a future payment date. |
Payment Amount |
The system uses the value in the Customer Balance field as the default for this field. However, the customer can use the PeopleSoft eBill Payment Short Pay feature by overriding this value with an amount that is less than the customer balance. If Customers choose to short pay the invoice, they must select a short pay reason. You set up the short pay reasons on the Short Pay Reason page (SH_PAY_RSN_TBL). The system displays an error message and marks the payment line in error if a customer does not provide a short pay reason. Note: Invoices with negative amounts can be added to the payment cart, but the total Payment Amount cannot be negative. An error message appears if the total Payment Amount for a currency in the cart is negative. |
Currency |
The payments are grouped by currency. |
|
Click the ePay Partial Payment icon to open the ePay Partial Payments page (AR_EBP_PPEP_SEC), where you can view the partial payments done by electronic check for that specific invoice. |
Invoice Attachments |
Click to view or add supporting documentation as attachments. |

Note: The fields Invoice Balance and Payment Amount reflect that a partial payment has been made. An invoice is removed from the Payment Cart only when the payment is fully paid.
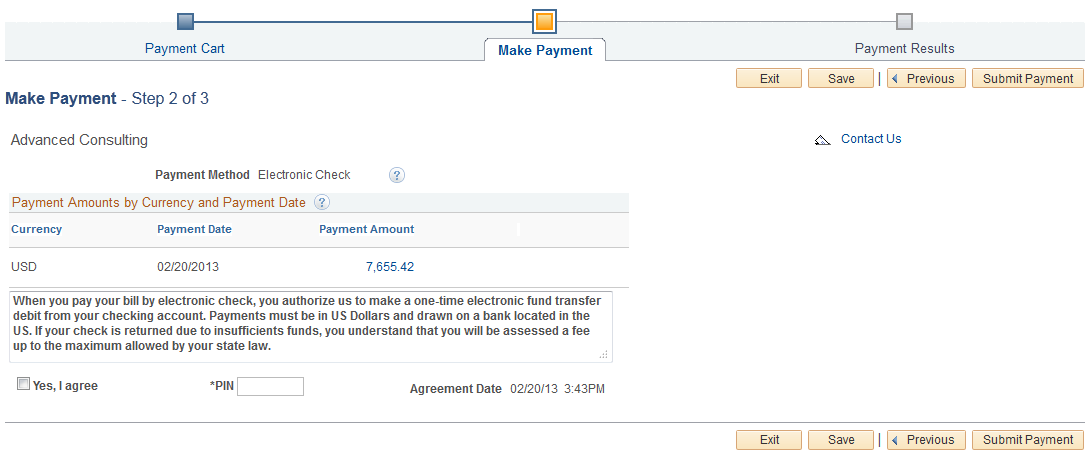
Use the Make Payment page (AR_EBP_PAYCARD_WZ2) to initiate the payment process.
Navigation:
Click the Next button on the Payment Cart - Step 1 of 2 page.
This example illustrates the fields and controls on the Make Payment (Step 2 of 3) for an electronic check payment.
Field or Control |
Description |
|---|---|
Payment Method |
Displays the Payment Method used, in this case Electronic Check. |
Short Pay Comment |
Enter or modify the text in this field when short paying an invoice. If customers short pay an invoice and enter nothing in this field, the system generates an error message when they attempt to go to the next step. |
Payment Amount |
Click the amount link in this column to access the Make Payment - Payment Amount Detail page (AR_EBP_PITM_SEC), where you can review details about the invoices for the corresponding amount. |
Submit Payment |
Click this button to submit a single payment and transfer to the third-party site where you enter check information. To cancel a payment while in the third-party site, click the Cancel button. If a Cancel button is not available on the third-party payment page, return to the PeopleSoft site using the top navigation. |
Payment Amounts by Currency and Payment Date
Field or Control |
Description |
|---|---|
Currency |
Displays payments grouped by currency. |
Payment Date |
Displays the payment date or the default date entered on the Payment Cart page. |
Payment Amount |
Click a payment amount link to navigate to the Make Payment - Payment Amount Detail page, where customers can review details about the invoices for the corresponding amount. |
Electronic Check Fields
Field or Control |
Description |
|---|---|
Terms and Conditions text |
Displays the terms and conditions set up for the Electronic Check payment method on the eBill – Electronic Payments Page. |
Yes, I agree and Agreement Date |
Click the check box to indicate agreement with the terms and conditions. The system records the date and time in the Agreement Date field. |
PIN |
Enter the personal identification number (PIN). PIN entry depends on electronic check setup on the Electronic Payment Options for Self Service page and a customer PIN on the Maintain Contacts page. The PIN field appears when the setup for PIN entry is Mandatory. The PIN value must match the customer PIN on the Maintain Contacts page to pay successfully by electronic check. When the setup for PIN entry is Optional, the system hides the PIN field. See also the Contact Information - Maintain Contacts Page. |
See also Setting Up Electronic Payment Options.
Use the Payment Results page (AR_EBP_PAY_RSLT_EP) to review payment results for electronic check payments.
Navigation:
Click the Submit Payment button on the Make Payment - Step 2 of 3 page.
This example illustrates the fields and controls on the Payment Results page (Step 3 of 3) for an electronic check payment.
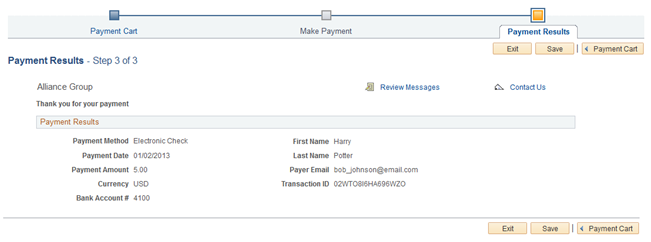
To complete the electronic check transaction, you must do one of the following on the Payment Results page:
Click the Save button to record the electronic check charges.
Click the Payment Cart button to record the transaction and return to the Payment Cart page.
Click the Exit button to record the transaction and exit the Payment Cart.
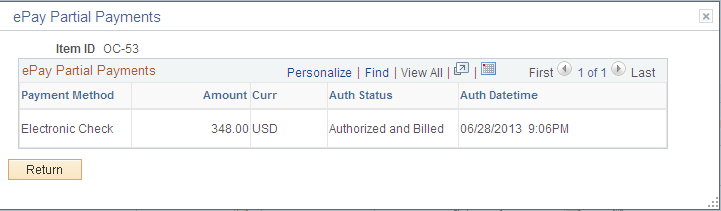
Use the ePay Partial Payments page (AR_EBP_PPEP_SEC) to view a list of partial payments for the invoice.
Navigation:
Click the Payment Cart button on the Payment Results page to return to the Payment Cart page.
Click the ePay Partial Payment icon on Payment Cart invoice line.
This example illustrates the fields and controls on the ePay Partial Payments page.