Managing Requisitions Using the Fluid User Interface
|
Page Name |
Definition Name |
Usage |
|---|---|---|
|
PV_MOB_855_ORDR_FL |
View a list of requisitions that you have ordered. |
|
|
PV_MOB_855_SR_CART |
View items on the requisition, modify quantities, unit of measure, or both, and remove items from the requisition. You can also proceed to the checkout page. See Shopping Cart Page. |
|
|
PV_MOB_NEW_CHEKOUT |
To review the contents of the requisition, make final adjustments to quantity and UOM, add last-minute items to the requisition, and to place orders. |
|
|
PV_MOB_855_ORDRSCF |
View the requisition summary, requisition lifeline, and requisition lines. |
|
|
PV_MYORD_SCHD_SCF |
View schedules for a requisition line item. |
Use the My Requisitions page (PV_MOB_855_ORDR_FL) to view a list of requisitions that you have ordered.
Navigation:
This example illustrates the fields and controls on the My Requisitions page. You can find definitions for the fields and controls later on this page.

The number of requisitions shown on this page depends on the configuration done on the eProcurement Installation Options page. The requisitions are displayed based on the From and Through dates, using the default timeframe of 90 days prior to the current date, and irrespective of the business unit or requester ID. The default number of results is 50. However, it is recommended to keep this value low as a large number of items may take longer to display, depending on the hardware configuration and the memory capacity of the system.
Field or Control |
Description |
|---|---|
|
Select the Actions icon to perform the following related action on the requisitions:
|
|
Select to access the Requisition Details Page. |

 (Details)
Requisition Search Tab
Requisition Search tab displays the list of requisitions based on the filters criteria.
Click the Update Filters button or
 (Filters by icon) to view the Filters page. Enter
search criteria on Filters page and click Done button to display
the requisitions.
(Filters by icon) to view the Filters page. Enter
search criteria on Filters page and click Done button to display
the requisitions.
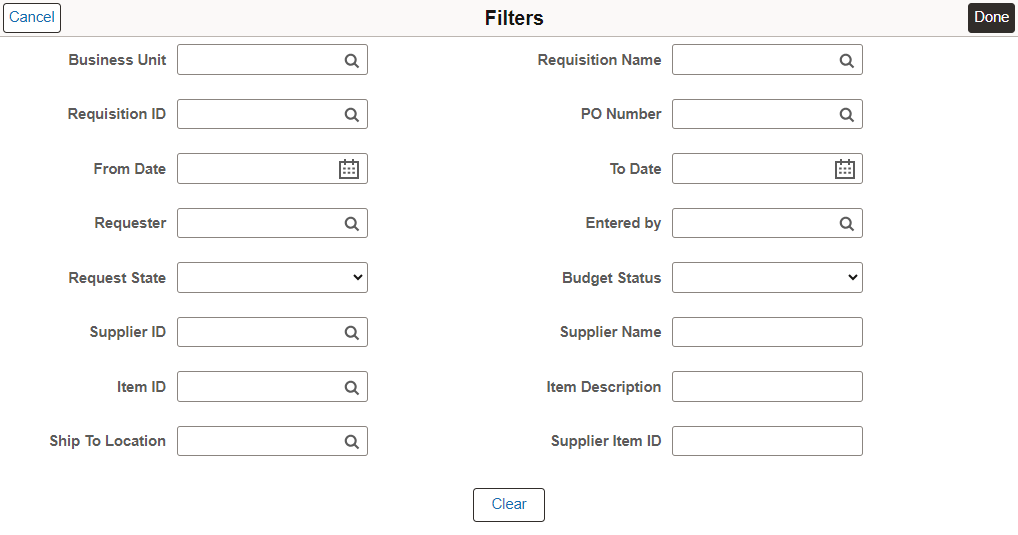
This example illustrates the fields and controls on the My Requisitions Filters page. You can find definitions for the fields and controls later on this page.
|
Field or Control |
Description |
|---|---|
|
Business Unit |
Select the PeopleSoft business unit. |
|
Requisition ID |
Enter a specific requisition ID to display. |
|
From Date and To Date |
Enter the creation date or range of dates for the requisitions. |
|
Requester |
Enter the requester name of the requisition. |
|
Request State |
Select the state for the overall requisition (header-level) to limit the requisitions displayed to this status. Leave this field blank to display search results without using request state as a search criteria. The following search criteria are included:
|
|
Supplier ID |
Enter or select the supplier ID, or use the Lookup page to select a supplier. |
|
Supplier Name |
Enter the Supplier Name. You can enter the full supplier name or partially. Search results display the requisitions that contain or begin with the entered keyword. This field is not case-sensitive. |
|
Item ID |
Enter the item ID for a requisition line. |
|
Ship To Location |
Enter the ship to location code. |
|
Requisition Name |
Enter the given Requisition Name. |
|
PO Number |
Enter the Purchase Order Number where the requisition was sourced. |
|
Entered by |
Enter the user ID of the individual who entered the requisition. This is usually the requester but can be another individual. |
|
Budget Status |
Displays the header results of a budget check initiated by clicking the Check Budget button or the Pre-Check Budget button. The options are:
|
|
Item Description |
Enter the item description used by the supplier for the item. |
|
Supplier Item ID |
Enter the item ID used by the supplier for the item. |
From Date is defaulted to the last 90 days. If all the fields are left blank on the Filters page except for Business Unit then all the requisitions are retrieved for that Business Unit. Filters page allows to enter partial values and the 'contains' operator is applied to bring results.
Keyword Search Tab
Enter a word (for example monitor) or a string of characters in the Keyword Search box, and then click the Search button to display the requisitions having keyword.
This example illustrates the fields and controls on the My Requisition Keyword Search page. You can find definitions for the fields and controls later on this page.
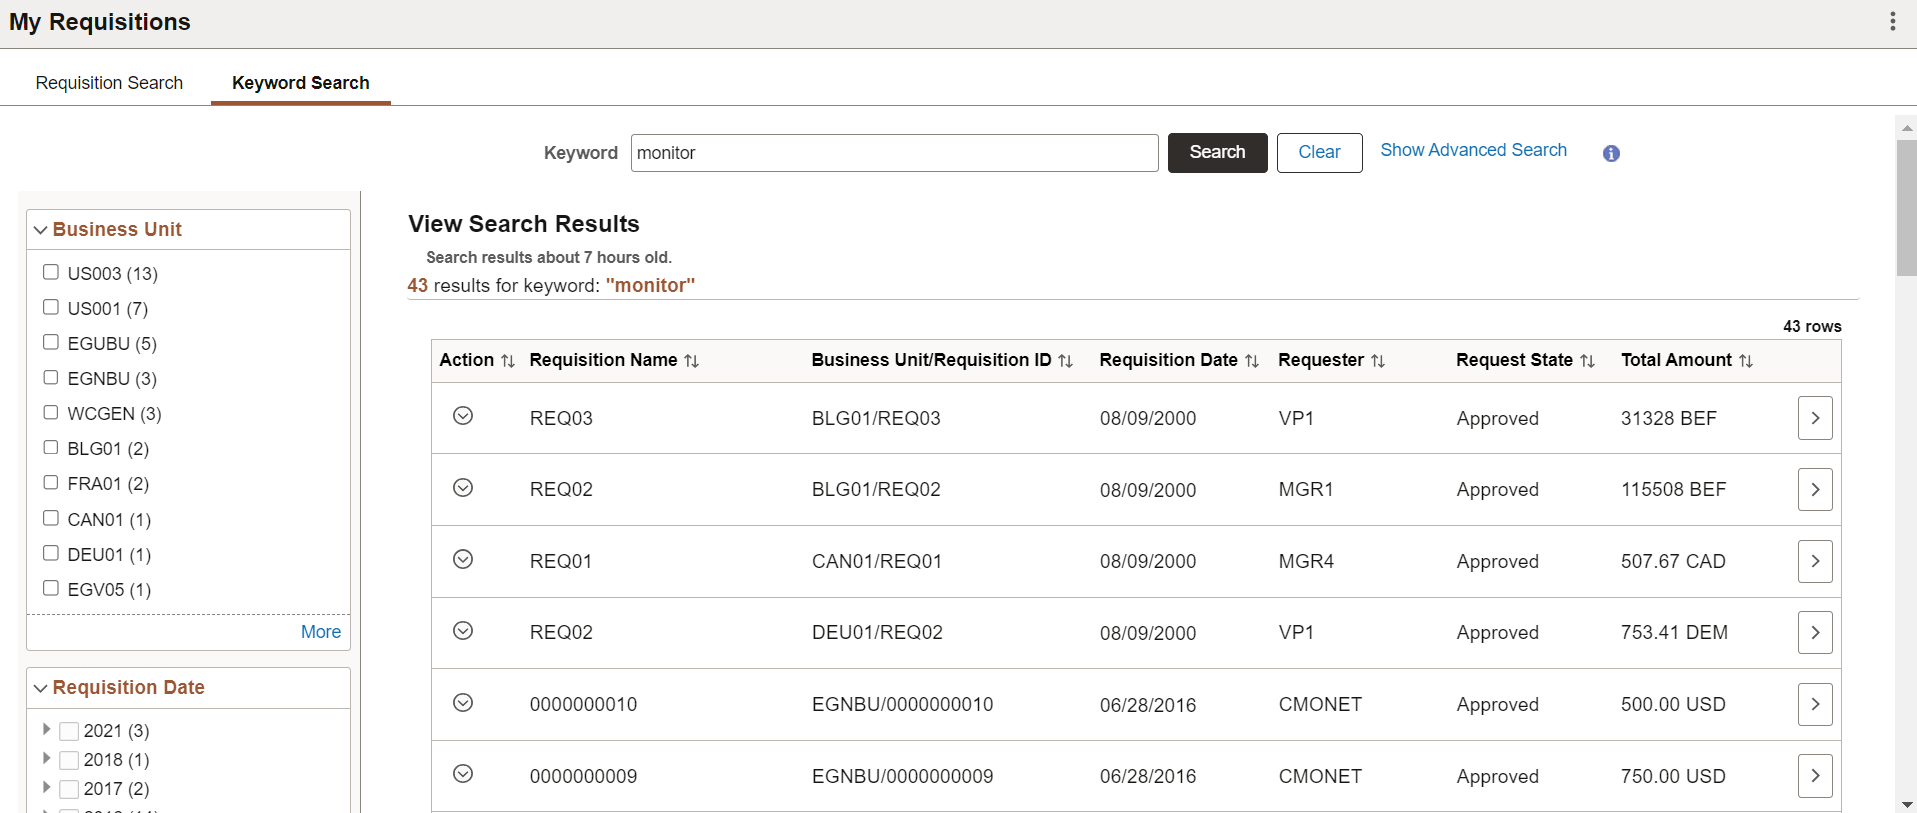
The facets on this page enable you to quickly and easily filter your search results. When you click a facet link, the system displays only the search results associated with the facet. If you select multiple facets, the system filters the search results so that only the search results associated with all of the facets appear.
The available facets are Business Unit, Requisition Date, Requester Name, Budget Checking Header Status, Supplier Name, and Requisition Status.
|
Field or Control |
Description |
|---|---|
|
Clear |
Click to clear the search result and start a new search entry. |
 (Search Tips) |
Click Search Tips icon to view the General Search Guidelines for Keyword Search. |
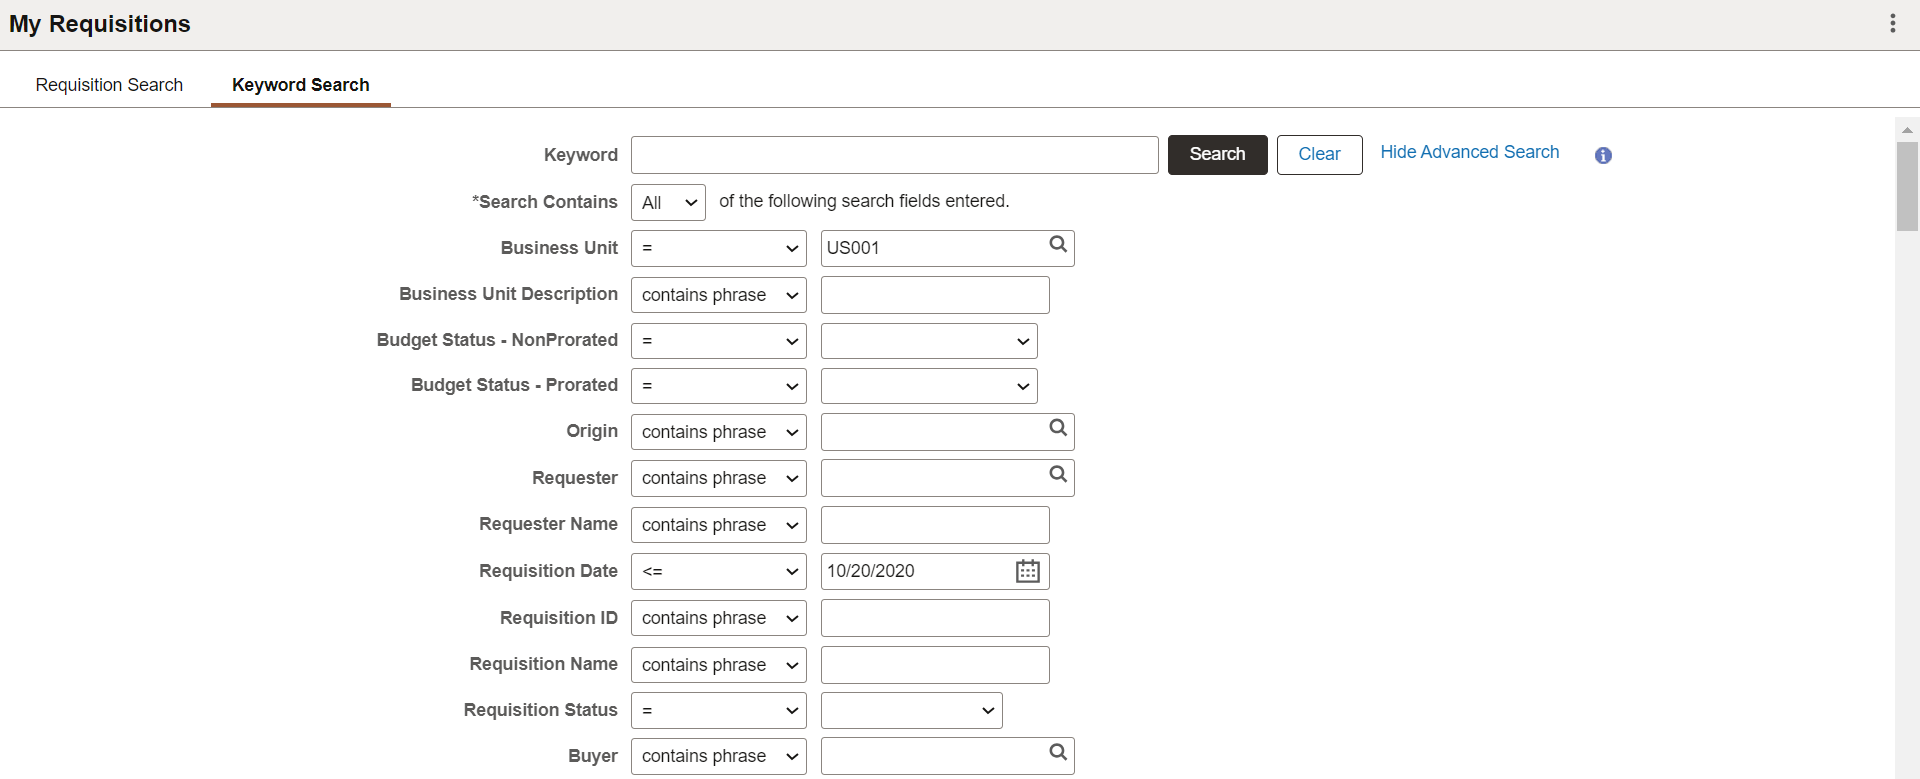
Advanced Search
Click Show Advanced Search to expand this section to enter much more specific search criteria. In addition to entering values for fields, you can select operands for those field values. For example, if you want to search for requisitions created on 20.10.2020, you can select = and enter same date in the Requisition Date criteria field.
This example illustrates the Advanced Search criteria that you can use to search for positive input entries.
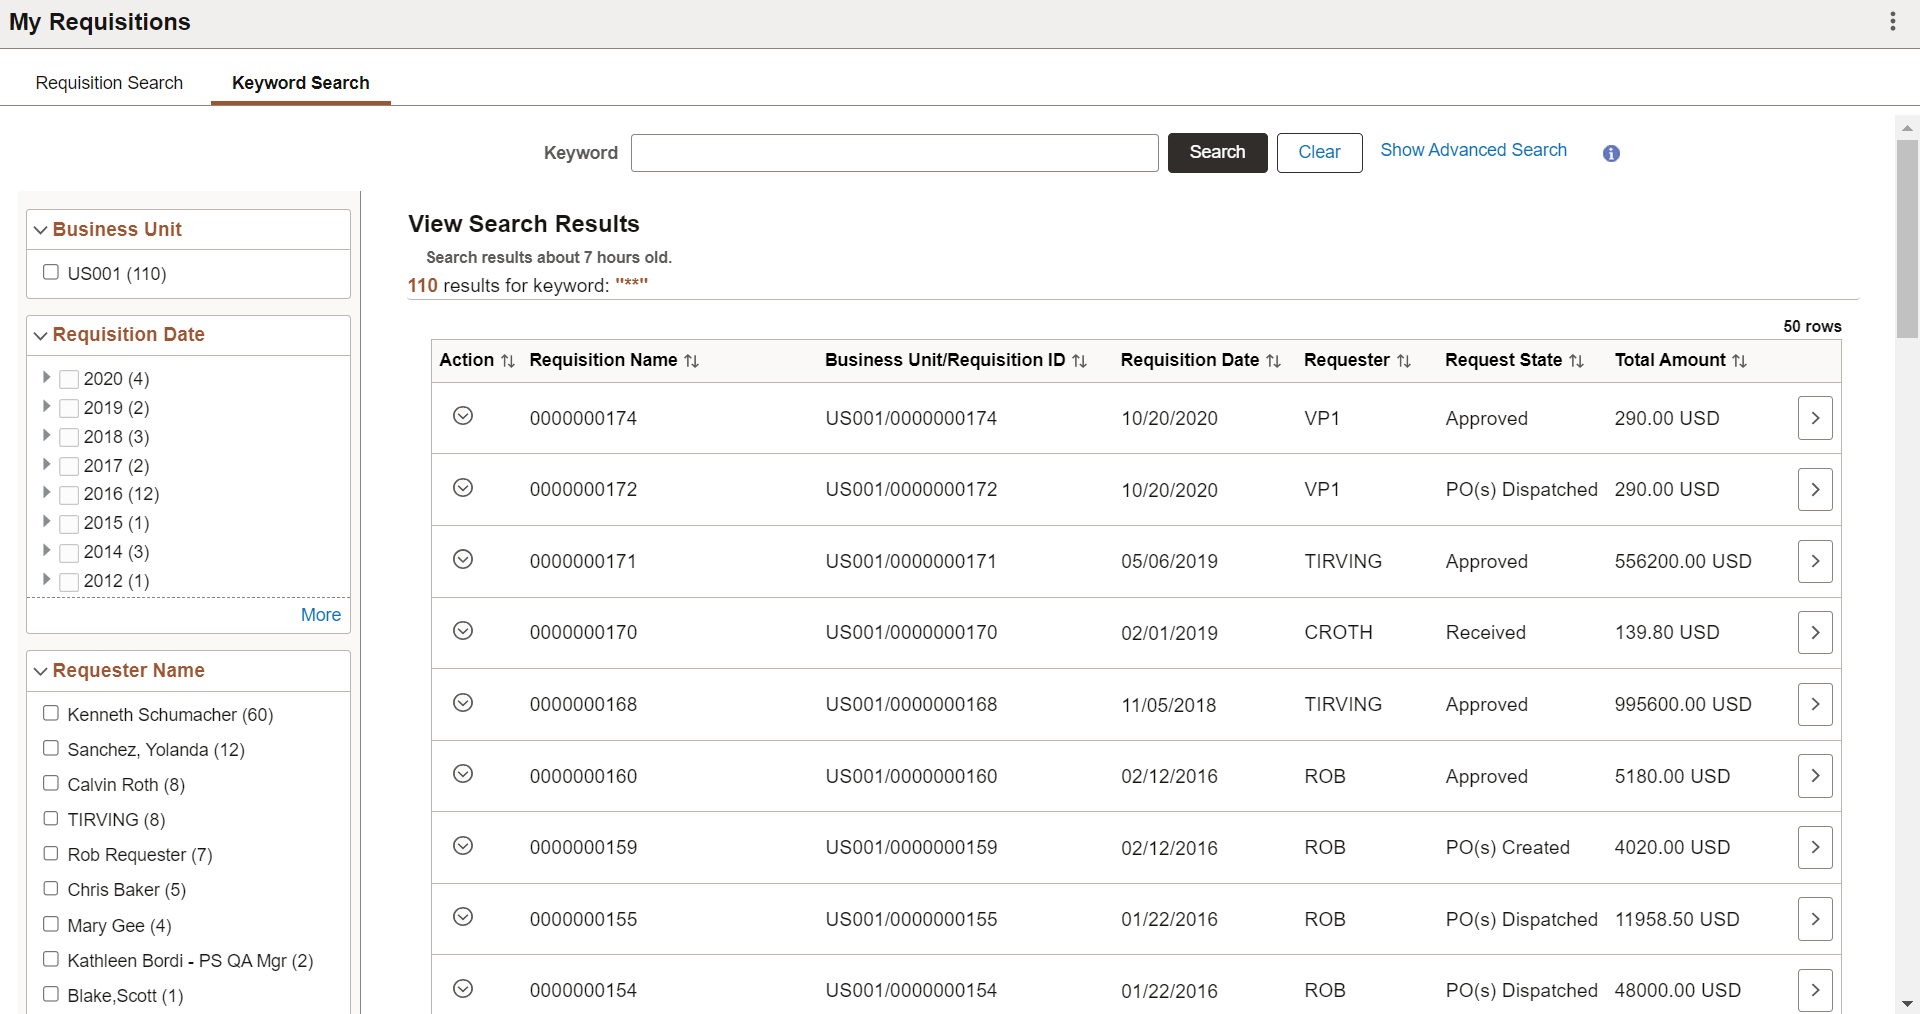
This is an example of search results generated using Advanced Search criteria.
Use the Shopping Cart page (PV_MOB_855_SR_CART) to view items on the requisition, modify quantities, unit of measure, or both, and remove items from the requisition. You can also proceed to the checkout page.
Navigation:
. Select the Action icon and then select Edit.
See Shopping Cart Page.
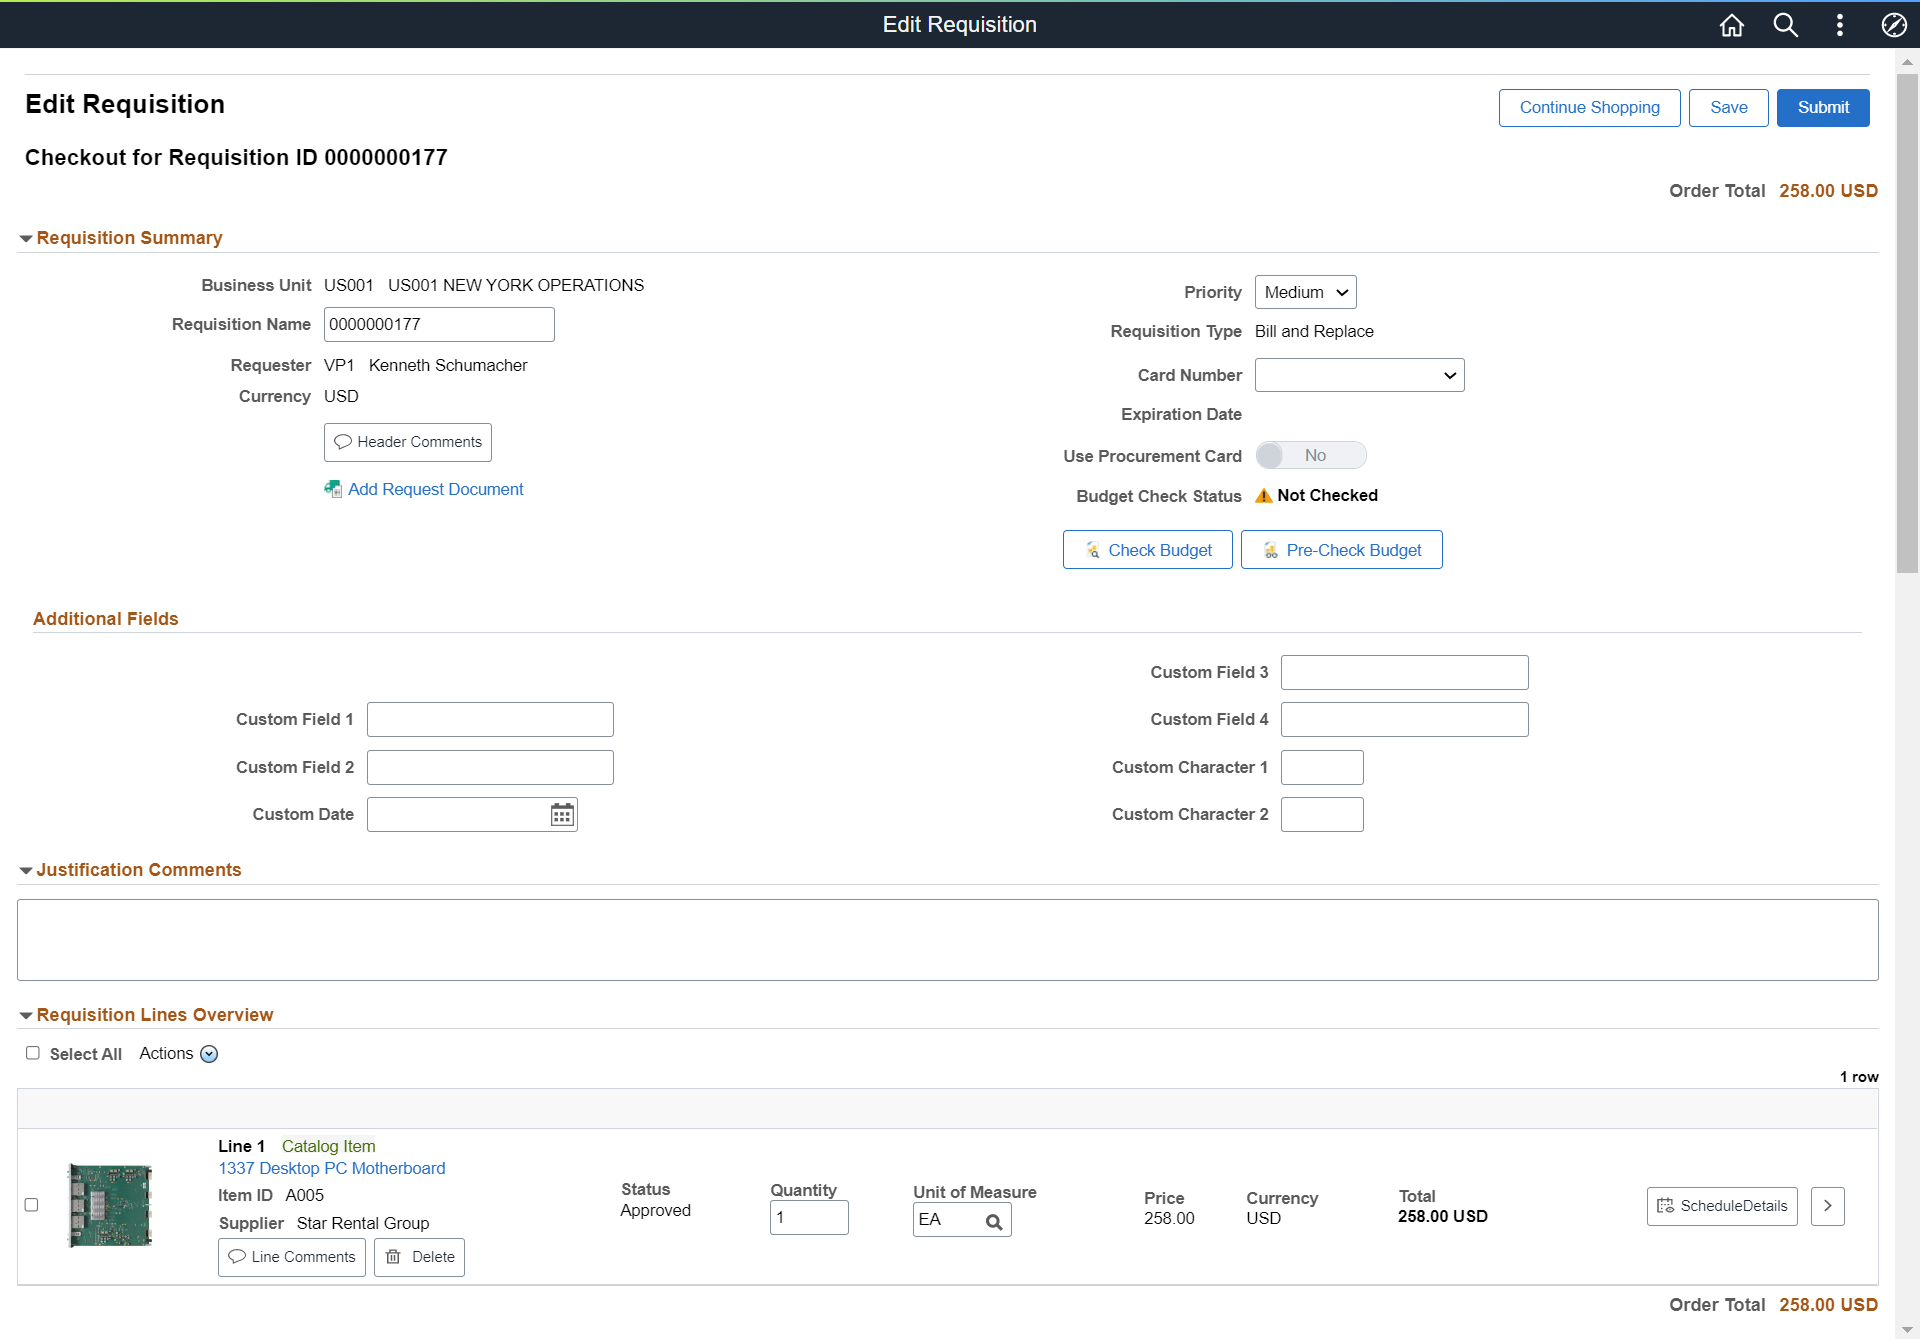
Use the Checkout page (PV_MOB_NEW_CHEKOUT) to review the contents of the requisition, make final adjustments to quantity, UOM, add last-minute items to the requisition, and to place orders.
Navigation:
. Select the Action icon and then select Edit.
This example illustrates the fields and controls on the Edit Requisition page. You can find definitions for the fields and controls later on this page.
Field or Control |
Description |
|---|---|
Item Description |
Click the item description link to view the item details. For Catalog items, the details are read-only, whereas you can modify the details of Punchout items, Special Request items, Fixed Cost items, and Time and Materials items. Note: If a requisition has been sourced, you will not be able to change the Quantity and UOM field values on the Checkout page. The values can be modified on the Schedule Detail page. |
Quantity |
Modify the quantity if required. |
UOM |
Modify the UOM if required. |
The Quantity and UOM values are retained the next time the Checkout page is accessed. You have the options to continue shopping, save your modifications, and submit the requisition.
Note: If you have changed a requisition, upon submission, the Change Request/Line Approval Summary page is displayed with the details such as, line number, item description, change request status. The Line Re-Approval details are displayed only if the required Approval Framework Control options are selected on the Purchasing Definition - Req Change Options page.
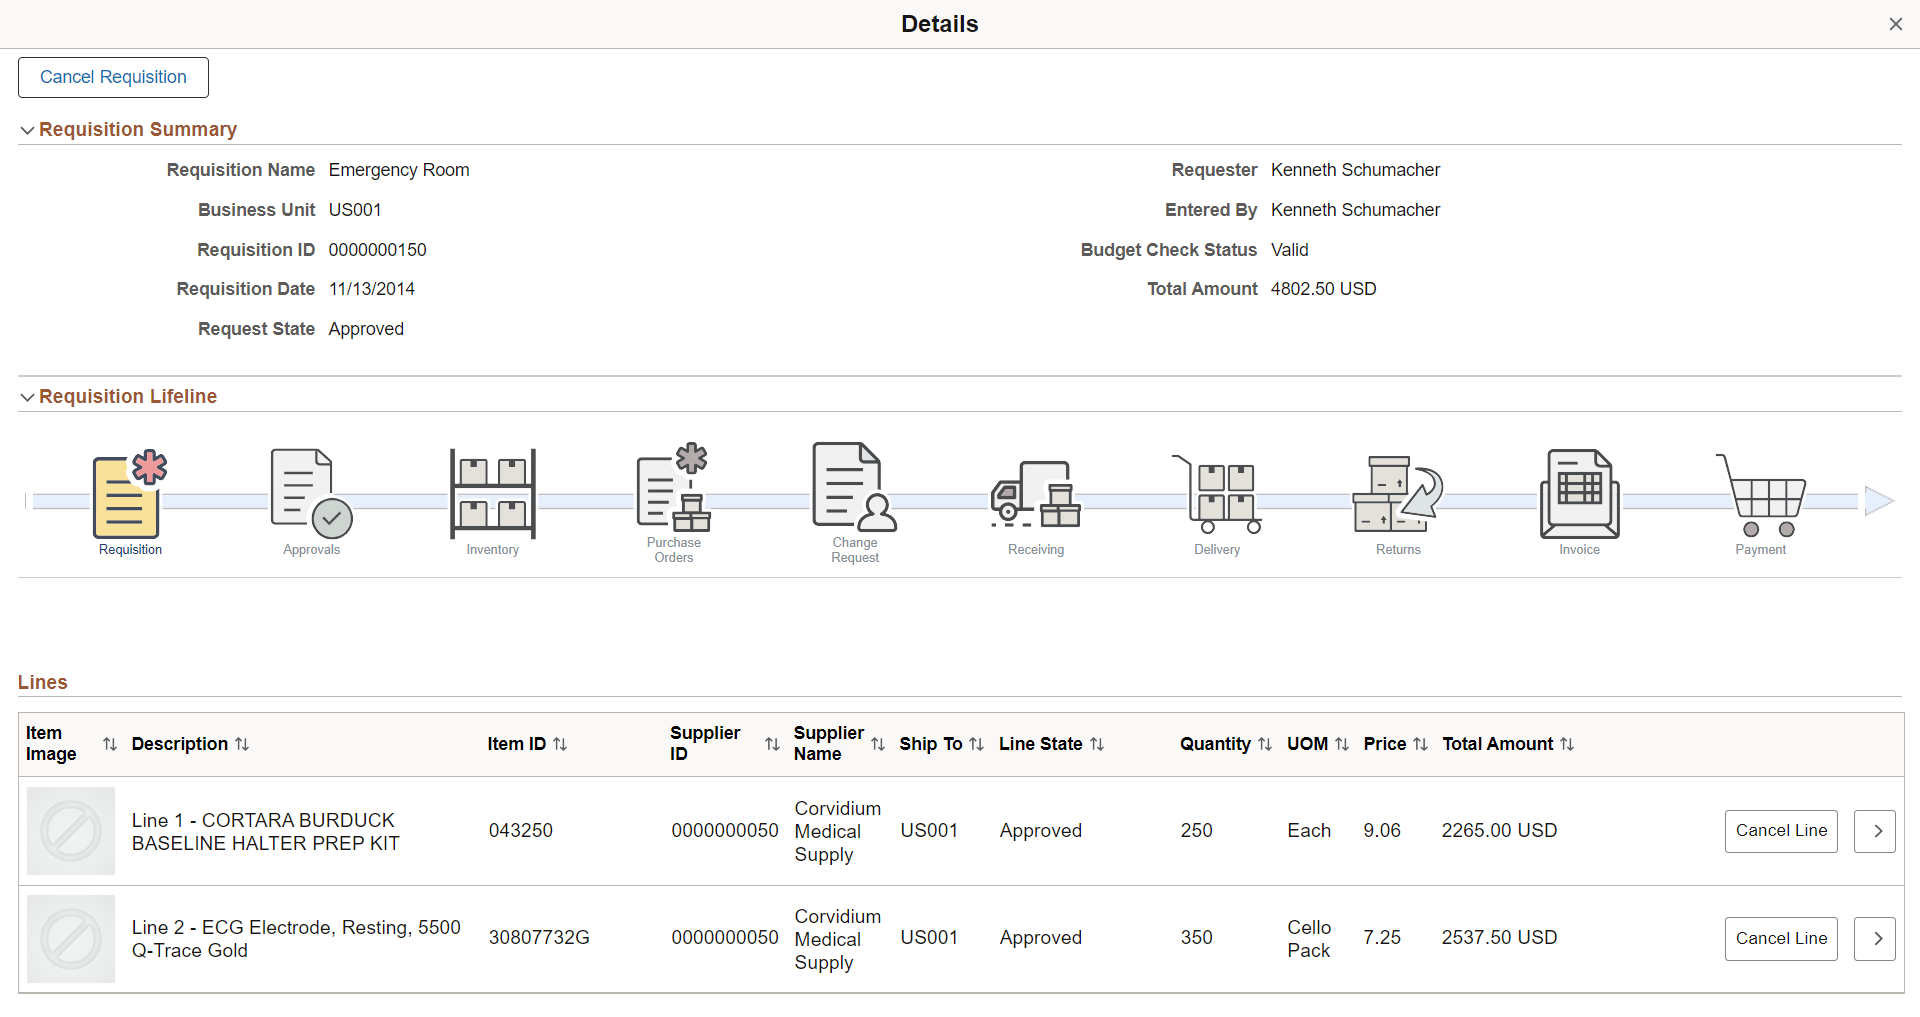
Use the Requisition Details page (PV_MOB_855_ORDRSCF) to view the requisition summary, requisition lifeline, and requisition lines.
Navigation:
. Select the Requisition Details icon.
Or
Click the Related Actions icon and select Details.
This example illustrates the fields and controls on the Requisition Details page.
Field or Control |
Description |
|---|---|
|
Displays if the Request State is Approved. Select to cancel the entire requisition. |
|
Displays if the Request State is Approved. Select to cancel the specific requisition line. |
|
Select to access the Requisition Schedule Details Page. |

Stages in the requisition cycle that are complete or in progress are highlighted with active links.
Field or Control |
Description |
|---|---|
Requisition |
Click the Requisition icon to access the Requisition Details page (PV_REQ_PO_DLTS), where you can view the requisition summary and requisition line details. |
Approvals |
Click the Approvals icon to access the Approval Status page (EOAWMA_TXNHDTL_FL), where you can view the current approval status of the requisition and view line approval details. |
Inventory |
Click the Inventory icon to access the Stock Requests page (ORDER_INQ_INV), where you can view the material stock request created from this requisition to fulfill the demand using inventory stock. |
Purchase Orders |
Click the Purchase Orders icon to access the PO Inquiry page (PV_PO_LINE_INQ2_FL), where you can view the information about the purchase order that this requisition was sourced to; including, the purchase order number, buyer, and supplier. |
POA |
Click the POA icon to access the POA Inquiry page (PV_POA_INQUIRY_FL), where you can view the purchase order acknowledgement tied to the selected requisition. Select the Details icon of a purchase order to view its acknowledgement history. |
ASN |
Click the ASN icon to access the ASN Inquiry page (PV_ASN_INQ2_FL), where you can view the advanced shipping notice tied to the selected requisition. Select the ASN Details icon of a requisition to navigate to the ASN History page. If there is only one ASN, the ASN History page is displayed directly. |
Change Request |
Click the Change Request icon to access the Review Change Requests page (PV_MOB_855_CHNG_FL), where you can view requisition change request details after it has been sourced to a Purchase Order, view change reason, and processing error if any. |
Receiving |
Click the Receiving icon to access the Manage Receipts page (PV_RECV_UPDATE_REQ), where you can view the purchase order receipt linked to your requisition. |
|
Delivery |
Click the Delivery icon to access the Delivery Details page (PV_DELV_DTL_INQ_FL), where you can view the detailed delivery information for a receipt. If there are multiple receipts for a requisition, then the Delivery Summary page is displayed when you click the Delivery icon. You can view details of each receipt from this page. |
Returns |
Click the Returns icon to access the Manage Return To Vendor (Supplier)s page (PV_RTV_UPDATE_REQ), where you can view the RTV linked to your requisition. |
Invoice |
Click the Invoice icon to access the Invoice Inquiry (PV_PO_INQ2_FL), where you can view the requisition, purchase order, receipts, vouchers, and Invoice Number. |
Payment |
Click the Payment icon to access the Payment Inquiry page (PV_PYMNT_INQ2_FL), where you can view the payment details for the selected purchase order. |
For more information on Requisition Lifeline, see Requisition Cycle — Managing Requisitions Page.
Use the Schedule Details page (PV_MYORD_SCHD_SCF) to view schedules for a requisition line item.
Navigation:
. Select the Requisition Details button and then select the Details button.
This example illustrates the fields and controls on the Requisition Schedule Details page. You can find definitions for the fields and controls later on this page.
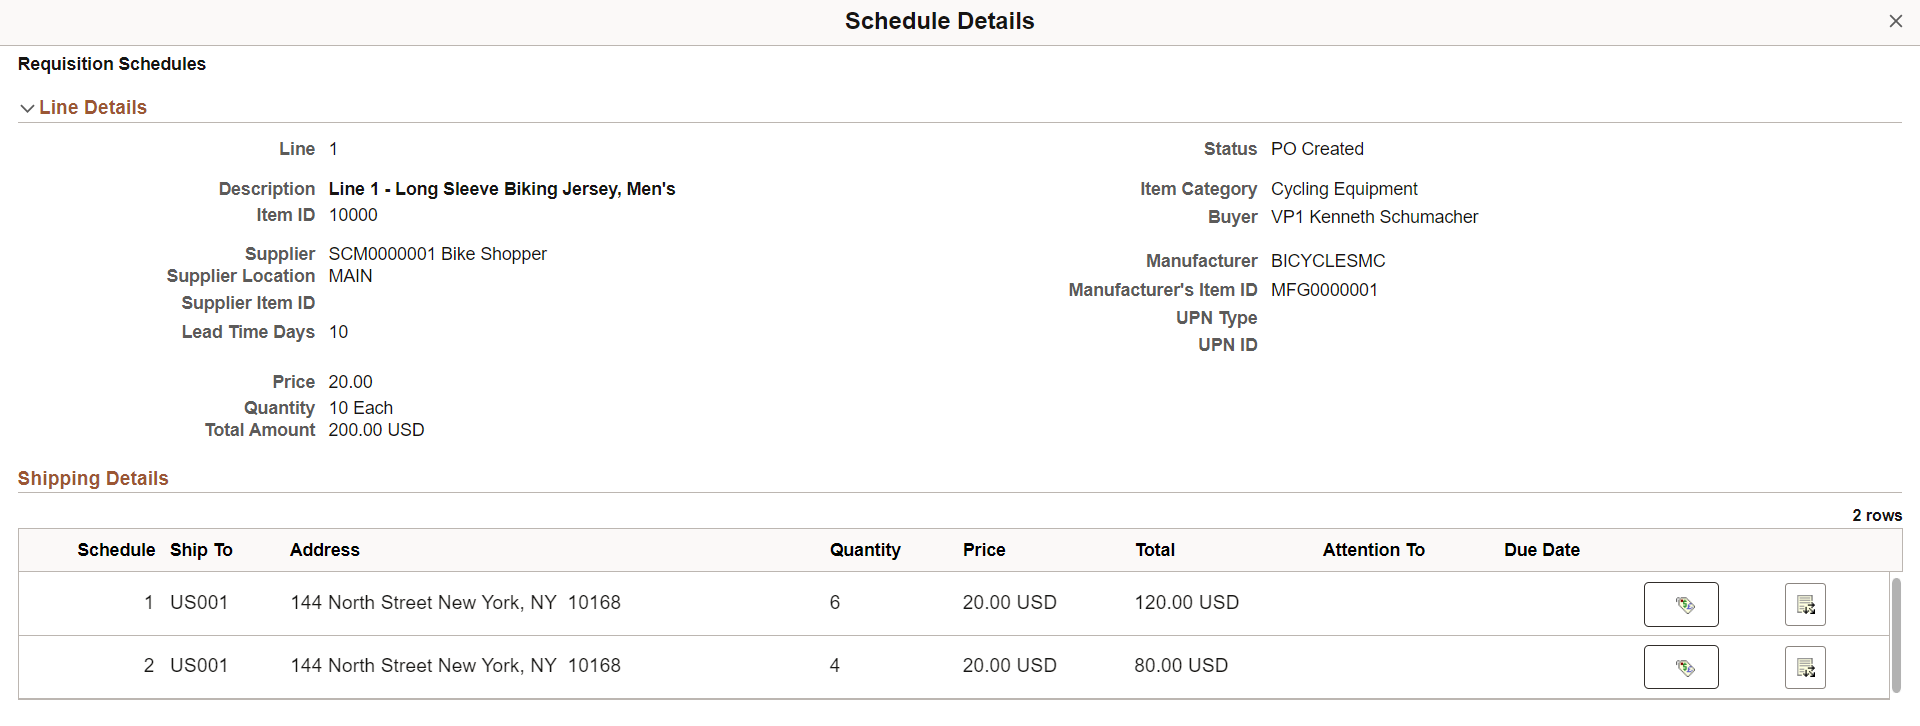
Note: This page is view only when accessed from the My Requisition page.
Field or Control |
Description |
|---|---|
|
Click this icon to access the Price Adjustments for Schedule page, where you can view the value adjustment performed for the particular schedule. The details on the page are read-only. |
|
Click this icon to access the Distribution information. |
 Price Adjustment
 Apply Distribution Changes