Creating Requisitions Using the Fluid User Interface
This section discusses how to create requisitions, search for requisition items, and submit requisition items for approval and view requisition item details using the fluid user interface.
PeopleTools documentation regarding the PeopleSoft Fluid User Interface includes:
PeopleTools: Fluid User Interface Developer’s Guide.
PeopleTools: Applications User's Guide, Working With PeopleSoft Fluid User Interface.
Click to watch a short video about PeopleSoft Fluid User Interface - Getting Started.
|
Page Name |
Definition Name |
Usage |
|---|---|---|
|
PV_MOB_855_SET_SCF |
Enter default field values for new requisition lines and define requisition settings such as purchasing business unit and requester. These fields will override any setting that comes from the requester default page. |
|
|
PV_MOBREQ_ENTRY_FL |
Enter the business unit and requester ID, if it is not already defined on the User Preferences - Procurement page. |
|
|
PV_MOB_CATBROWSE |
Search for items. |
|
|
PV_MOB_855_SRCH |
Search for items based on the Search field. |
|
|
PV_MOB_855_ITEMDET |
View item details. |
|
|
PV_MOB_855_SR_CART |
View and modify items in your cart. You can also checkout from this page. |
|
|
PV_MOB_NEW_CHEKOUT |
Verify and perform various actions to the requisition and requisition lines. |
|
|
PV_SCH_DIST_SCF |
Review and modify schedule details for an item. |
|
|
ACCTG_TAB_SEL_SCF |
Add accounting tags to the requisition line. |
|
|
PV_SCH_DIST_SCF |
Confirm requisition checkout information and edit additional details for a line, such as the buyer, supplier, and other line-specific information. |
|
|
PV_MOB_855_CONF |
View the final requisition details that have been submitted for approval. |
|
|
PV_MOB_RECENT_ORD |
View recently ordered items. |
|
|
PV_MOB_855_SRCHFAV |
View a list of favorite items. |
|
|
PV_MOB_TEMPLAT_FL |
View and add purchasing kits, company and personal templates to your cart. |
|
|
Web Suppliers Page |
PV_MOB_855_SRCH_DC |
View and access web supplier pages. See Create Requisition — Web Page. |
|
PV_MOB_SPECIAL_REQ |
Create special request items and add them to your cart. |
|
|
Fixed Cost Service |
PV_MOB_SVC_FC_FL |
Create fixed cost items and add them to your cart. See eProcurement Services - Fixed Cost Service Page |
|
Variable Cost Service |
PV_MOB_SVC_VC_FL |
Create variable cost items and add them to your cart. See eProcurement Services - Variable Cost Service Page |
|
Time and Materials |
PV_MOB_SVC_TM_FL |
Create time and material items and add them to your cart. See eProcurement Services - Time and Materials Page |
|
PV_MOB_ORDSHEET_FL |
To view the order sheets assigned and add order sheet items to the cart when creating requisitions. |
The general steps to create a requisition in Fluid are:
Access the Create Requisition page.
Select a Requisition Type (Standard, Bill Only, and Bill and Replace) from the drop-down.
Note: Requisition Type will not appear on the page unless at least one other requisition types (besides Standard) is chosen on the ePro Installation Options Page. If any item is already added to the Shopping Cart, the Requisition Type is grayed out. Remove the item from the cart to select the Requisition Type.
Add items to the cart using any of these navigation options, which are located in the left pane:
Term
Definition
Browse Catalogs
Select to display catalogs in the right panel.
Item History
Select to display the Item History page in the right panel. The Item History page displays a list of recently ordered items. The number of items displayed depends on the value in the Max Rows to Retrieve for Search Results field on the ePro Installation Options Page.
Favorites
Select to access the Favorites page. This page displays a list of items that have been marked as a favorite.
You can enter a quantity, add items to the cart, add items to templates, delete items from your favorites, and view the item description and item details.
Select the Manage Favorite Groups button to access the Favorite Groups window, where you can modify the Favorite Group name, description, and sharing information.
Templates
Select to access the Templates page. This page displays purchasing kits and personal templates. For each template or kit. Use the quantity and Add to cart button to add the template or kit items to the cart.
Select the Detail icon to view the items in the kit or template.
Select the Manage Personal Templates button to access the Personal Templates window, where you can modify the template name, description, and sharing information.
Web Suppliers
Select to access the Web Suppliers page. This page displays web suppliers only if the web suppliers are configured and the user has access to them. Additionally, users have the option to hide the navigation for web suppliers.
Special Request
Select to access the Special Requests page. This page allows you to create special requests for an item that is not in a standard catalog and has no item ID.
Use the Special Requests page (PV_MOB_SPECIAL_REQ) to create any special requests to requisitions if required. Use the Special Request page to create requisitions for items or goods that are not included in the standard catalog of items in PeopleSoft eProcurement and have no item ID. This special request can be for goods or services.
Users can either select the items you want to add to the cart or select the add special request tab to create special request .
Fixed Cost Service
Select to access the Fixed Cost Service page. This page allows you to create a service that is not in a company catalog and has a fixed cost.
Variable Cost Service
Select to access the Variable Cost Service page. This page allows you to create a service that is not in a company catalog and has a variable rate.
Time and Materials
Select to access the Time and Materials page. This page allows you to create time and materials that are not in a company catalog. The time charge uses a variable rate and the material charge is a fixed cost.
Order Sheets
Select to access the Order Sheets page. This page allows you to view the order sheets assigned and add order sheet items to the cart when creating requisitions.
Note: When you add the same item more than once using different navigation options (as described in the table above), the number of requisition line items in the cart increases instead of adding a new line.
Access the Shopping Cart page to verify items.
Access the Checkout page to verify requisition information, check budgets, or add documents.
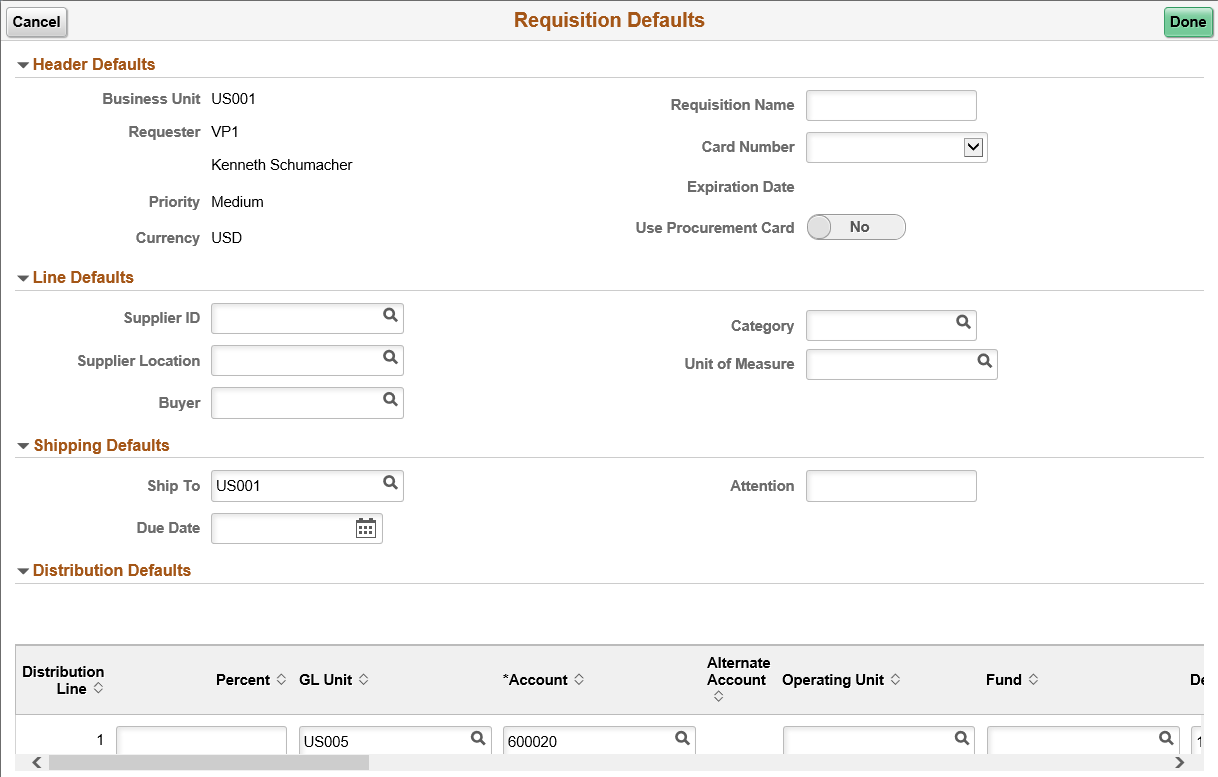
Use the Requisition Defaults page (PV_MOB_855_SET_SCF) to enter default field values for new requisition lines and define requisition settings such as purchasing business unit and requester.
Note: If you enable the LAND_ON_REQ_SETTINGS_PG role action on the Assign Role Action To Roles page, the Requisition Defaults page displays as the landing page.
Navigation:
Click the Requisition Defaults hyperlink.
This example illustrates the fields and controls on the Requisition Defaults Page. You can find definitions for the fields and controls later on this page.
Before using this page, determine the features that your users can access by linking user roles to the following eProcurement role actions:
The CHANGEREQBU role action is required to access the Business Unit and Requester fields on this page.
Note: Fluid has a persistent cart. This means that if any items remain in the cart from the previous session, then you cannot change the requester/BU fields, even if you have the CHANGEREQBU role, until the cart is empty.
When the new business unit is selected, the existing shopping cart items will be removed. You can add the new requisitions under new business unit.
|
Field or Control |
Description |
|---|---|
|
Line Defaults, Shipping Defaults, and Distribution Defaults |
The values that you enter on this page can be applied to the entire requisition at the line, shipment, or distribution levels. Note: Because these values override default values on the requester, only one distribution line is allowed on this page. This is different behavior from classic and intentional. The approved method to add more than one default distribution is to use the mass change option on all lines after all are entered. |
|
Add One Time Address |
Select this button to enter the default one time shipping address. Enter the shipping details in the Shipping Address page and save the details. |
Use the Default Entry page (PV_MOBREQ_ENTRY_FL) to enter the business unit and requester ID.
Navigation:
This example illustrates the fields and controls on the Default Entry page.
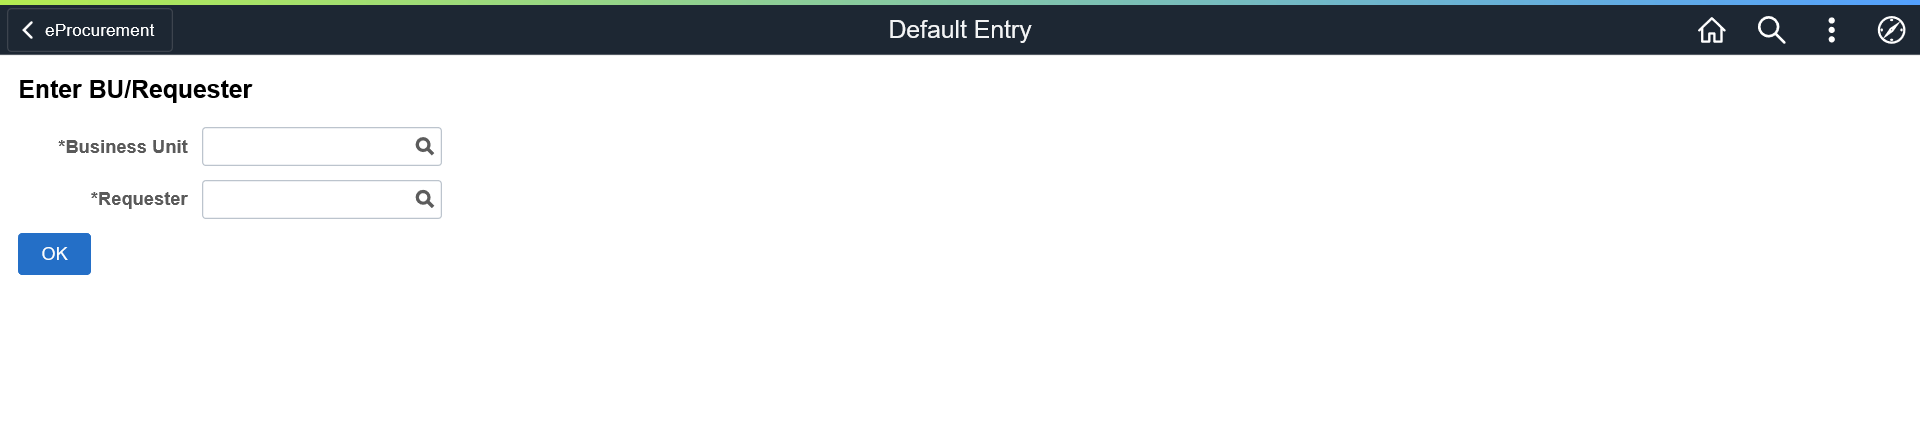
If you have already specified the business unit and requester ID on the User Preferences – Procurement page, this page does not display.
After entering the details, you can proceed with creating requisitions. If you have already defined the business unit and requester ID on the User Preferences – Procurement page, and enabled the LAND_ON_REQ_SETTINGS_PG role action on the Assign Role Action To Roles page, the Requisition Defaults page is displayed as the landing page.
Note: If you do not have the authority to add requesters, the system displays a message, in which case you can contact the Administrator to get the authorization.
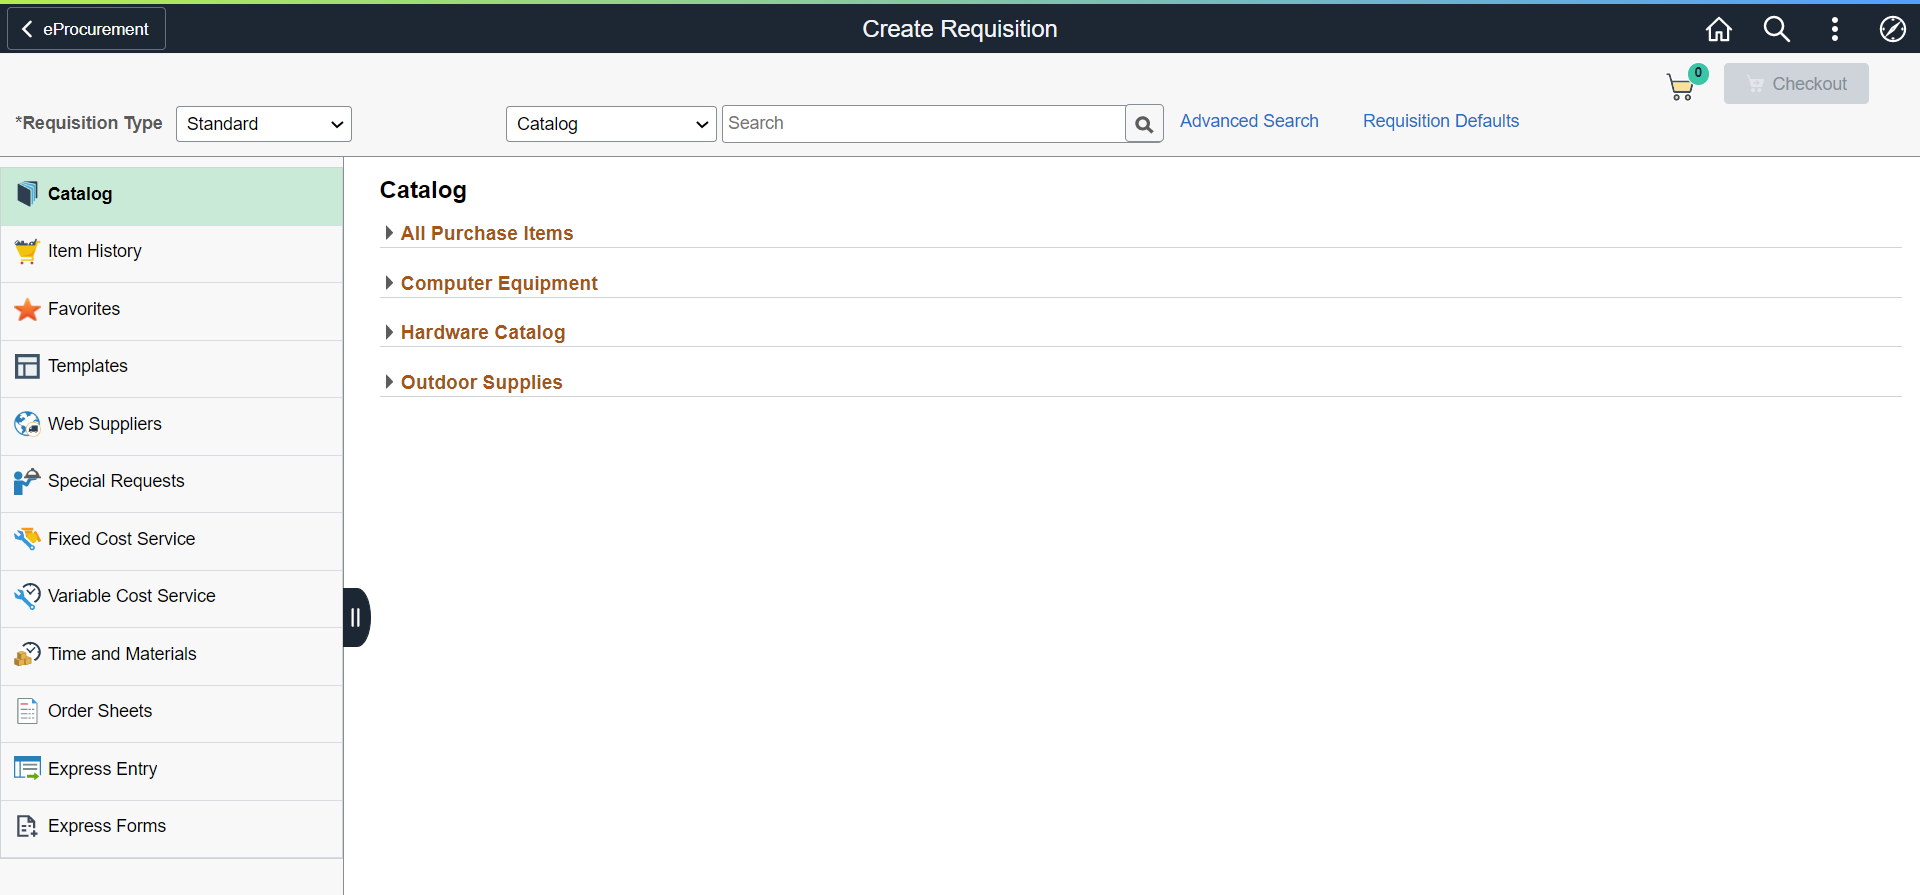
Use the Create Requisition: Browse Catalogs page (PV_MOB_CATBROWSE) to search for items.
Navigation:
Select a Requisition Type (Standard, Bill Only, and Bill and Replace) from the drop-down.
Select Catalog in the left pane.
This example illustrates the fields and controls on the Create Requisition - Browse Catalogs page.
The Add to Cart button is not available on the Favorites and Item History pages for inactive items.
If one of the item suppliers on the Item details page is not available to be added to the cart, the Add button is hidden. The categories displayed on the Requisition page are visible or hidden, based on the settings on My Preferences page. The Checkout button is enabled only when items are available in the cart.
Click the Shopping Cart icon to get an overview of the items in the cart.
This example illustrates the fields and controls on the Create Requisition - Cart Overview page.
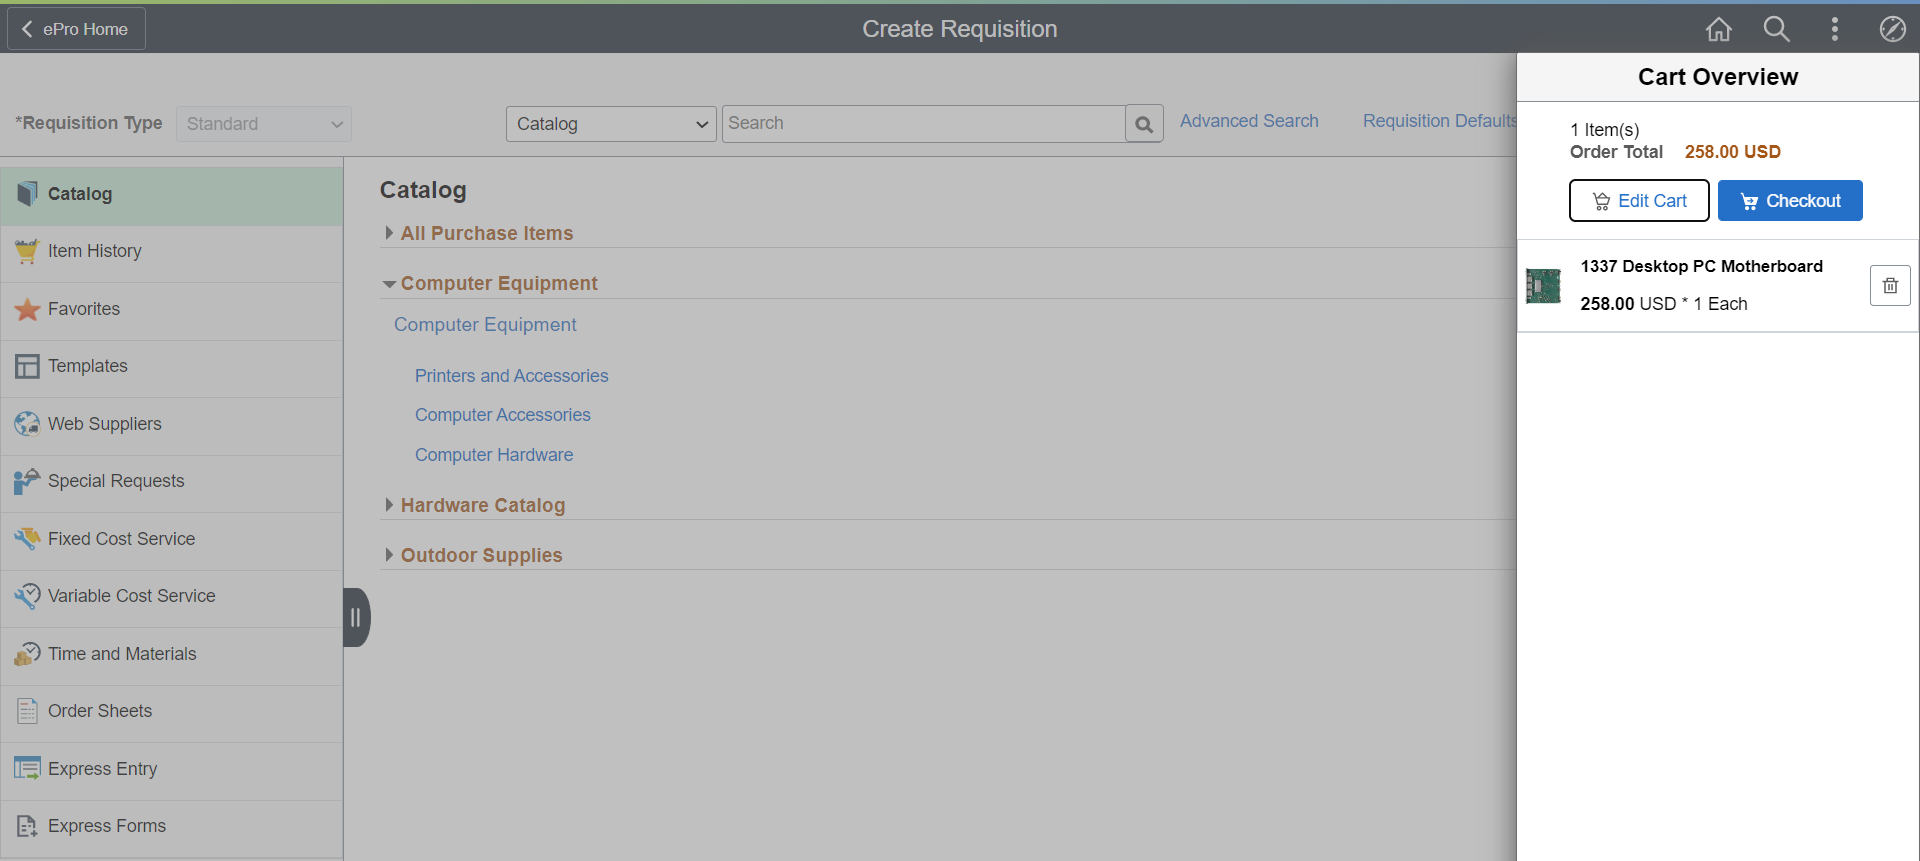
Click Edit Cart button to view the Shopping Cart page and the Checkout button to access the Checkout page. For additional details, see Shopping Cart Page and Checkout Page. You can also delete items from the cart here. Click outside the overview page to return to the requisition page.
Use the Create Requisition: Search Results page (PV_MOB_855_SRCH) to search for items based on the Search field.
Navigation:
Select a category and enter text in the search field.
This example illustrates the fields and controls on the Create Requisition: Search Results Page.
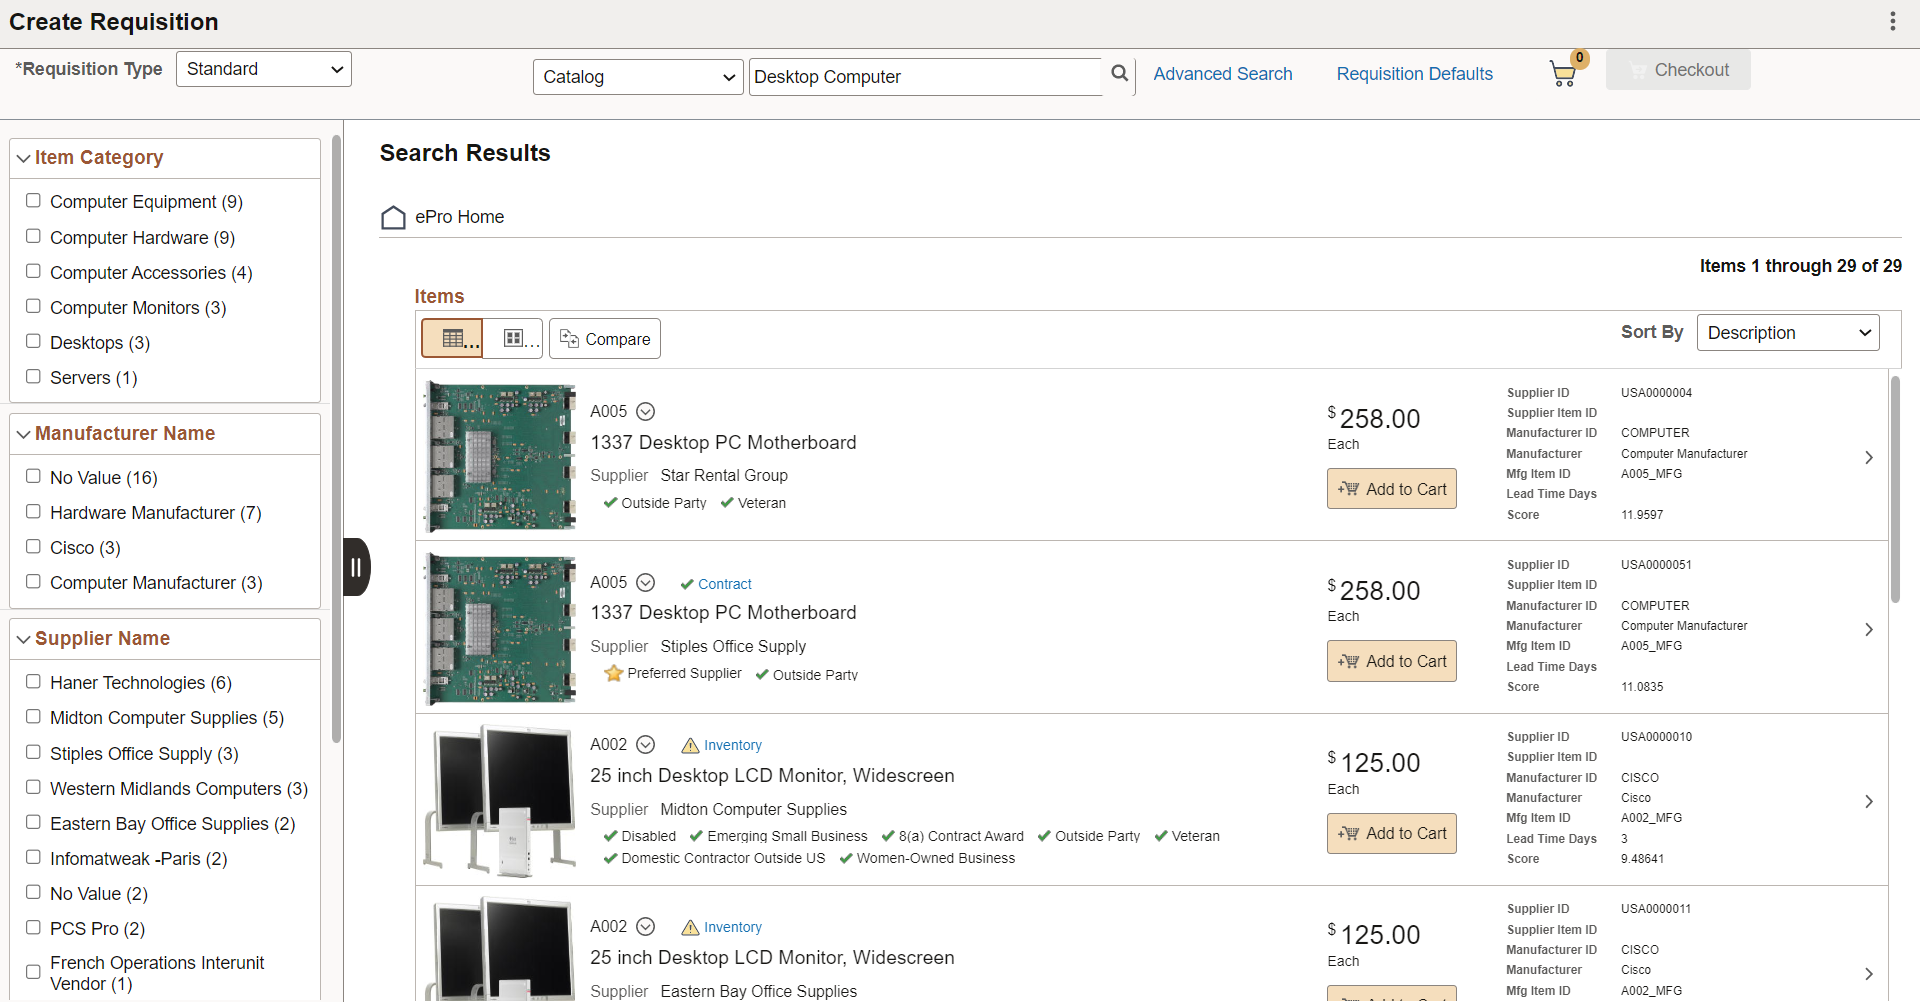
You can search for an item across all categories (All) or select a specific category (Catalog, Favorites, Templates, Web Suppliers, and Order Sheets). At the top of the Search Results page, the categories or types that contain the item matching your search criteria are displayed. In this example, the Catalog Items category is selected by default and the items within this category are displayed. Select another category to view the results within it.
The left pane displays the Item Category, Manufacturer Name, Supplier Name, and Preferred Supplier details when a catalog item is searched. In the right pane, the search results display the purchase order ID, item name, and supplier name. The Related Actions icon allows you to perform the Add to Compare, Add to Templates, and Add to Favorites actions. The links such as Inventory, Price Breaks, Contract, and Substitute Item appear for each item as applicable.
Item level and supplier level attributes are displayed in the search result. To configure which attributes to be displayed on the search result, see Manage Weighted Sort Rules Page.
Select any of the sort options (Description, Price - high to low, Price - low to high, and Relevance) in the Sort By drop-down to reorganize the search result. To configure the sort options, see Search Settings Page and Manage Weighted Sort Rules Page.
Note: Price - high to low and Price - low to high sort options sort the search result based on the price value irrespective of currency type.
To make Relevance Sort Option available, APPLY_WEIGHTED_SORT Role Action should be enabled for the requester and at least one Weighted Sort Rule should be activated.
Select the ePro Home button to navigate back to the Create Requisition page.
Use the Advanced Search link next to the search box to perform more complex searches by entering the required search criteria. You can save the search criteria by clicking the Save Search Criteria link.
For more information about performing advanced search, see Advanced Search — Create Requisition Page.
Use the Item Details page (PV_MOB_855_ITEMDET) to view item details.
Navigation:
Select a catalog and select an item row.
This example illustrates the fields and controls on the Item Details page.
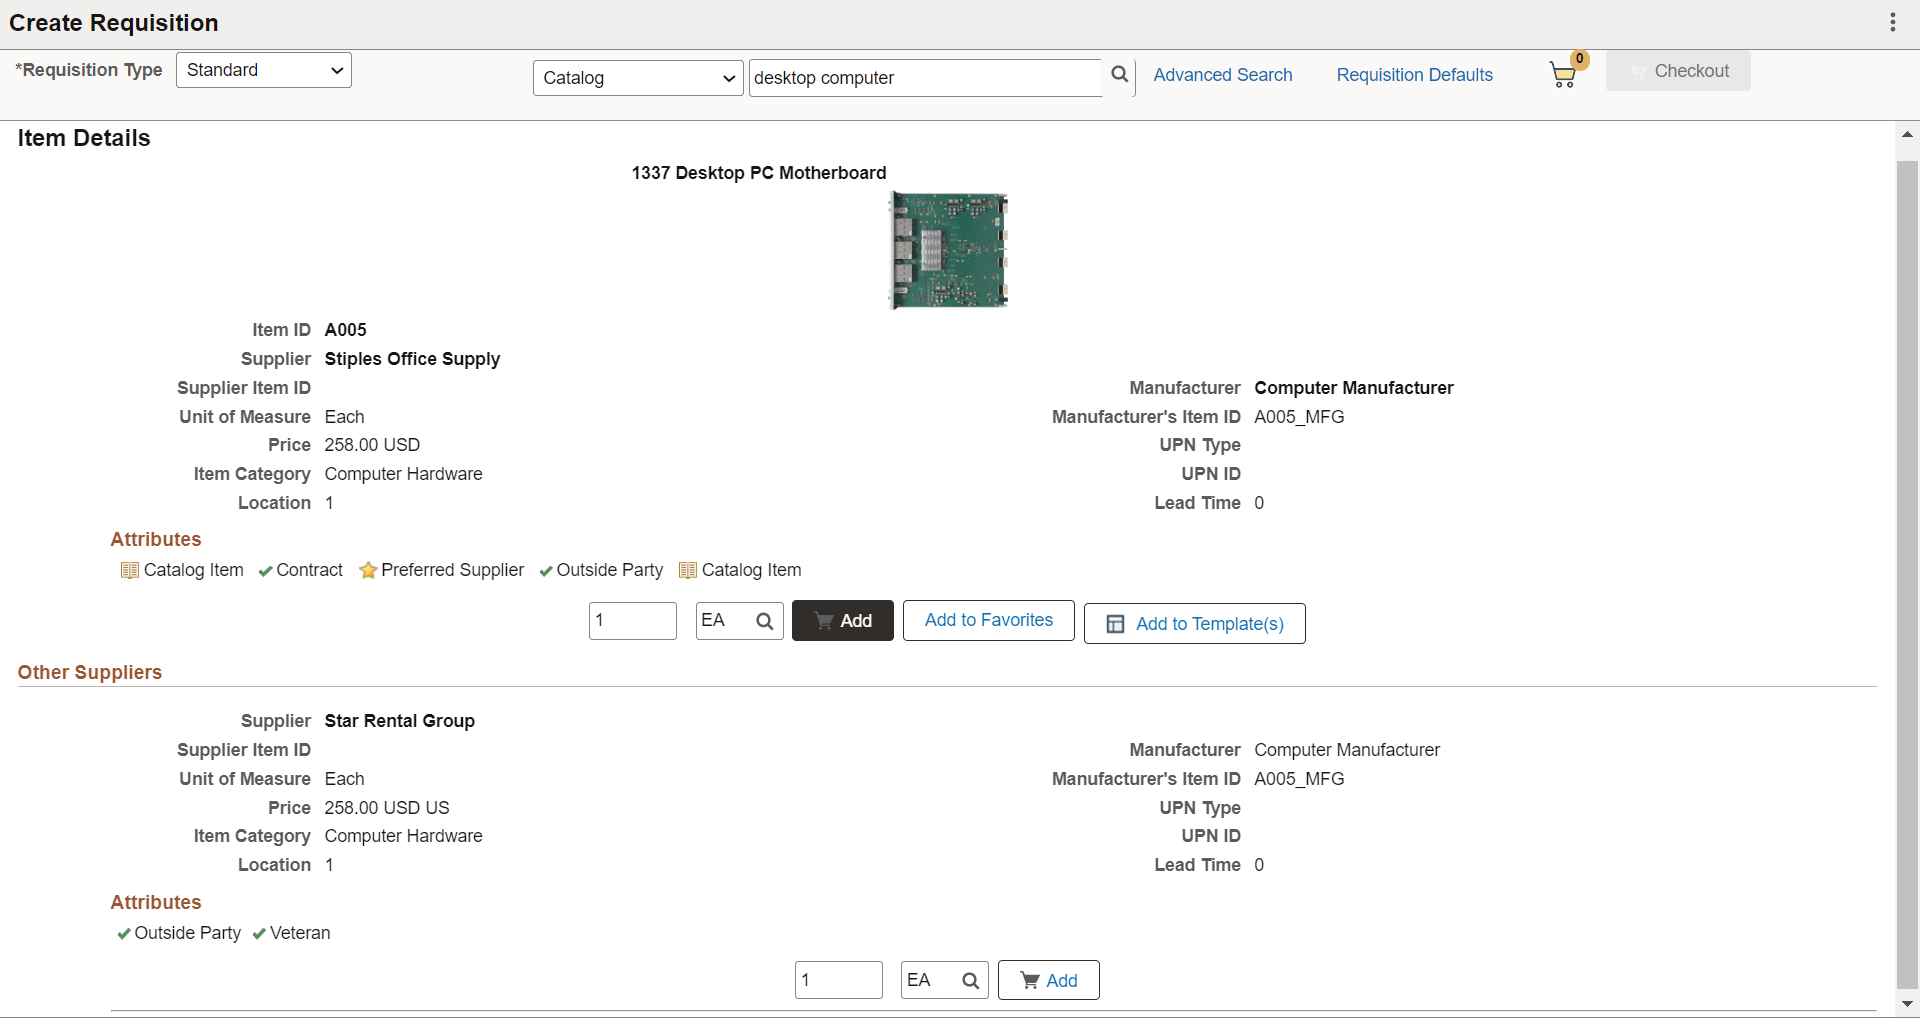
The Item Details page displays all potential suppliers for the item if the role action VIEW_ALL_SUPPLIERS is enabled. If there is a preferred supplier, it is listed at the top. You can add the item, with the preferred supplier, to your favorites list or to a template.
If you want to add this item to the cart, verify the quantity and unit of measure (UOM) and select the Add button.
To return to the list, select the Search Results button. The Browse Catalogs option in the navigation menu returns to the initial Browse Catalogs page where you can select another catalog.
Use the Shopping Cart page (PV_MOB_855_SR_CART) to view and modify items in your cart. Select the Checkout button to check out items and save or submit requisitions.
Navigation:
This example illustrates the fields and controls on the Shopping Cart page. You can find definitions for the fields and controls later on this page.
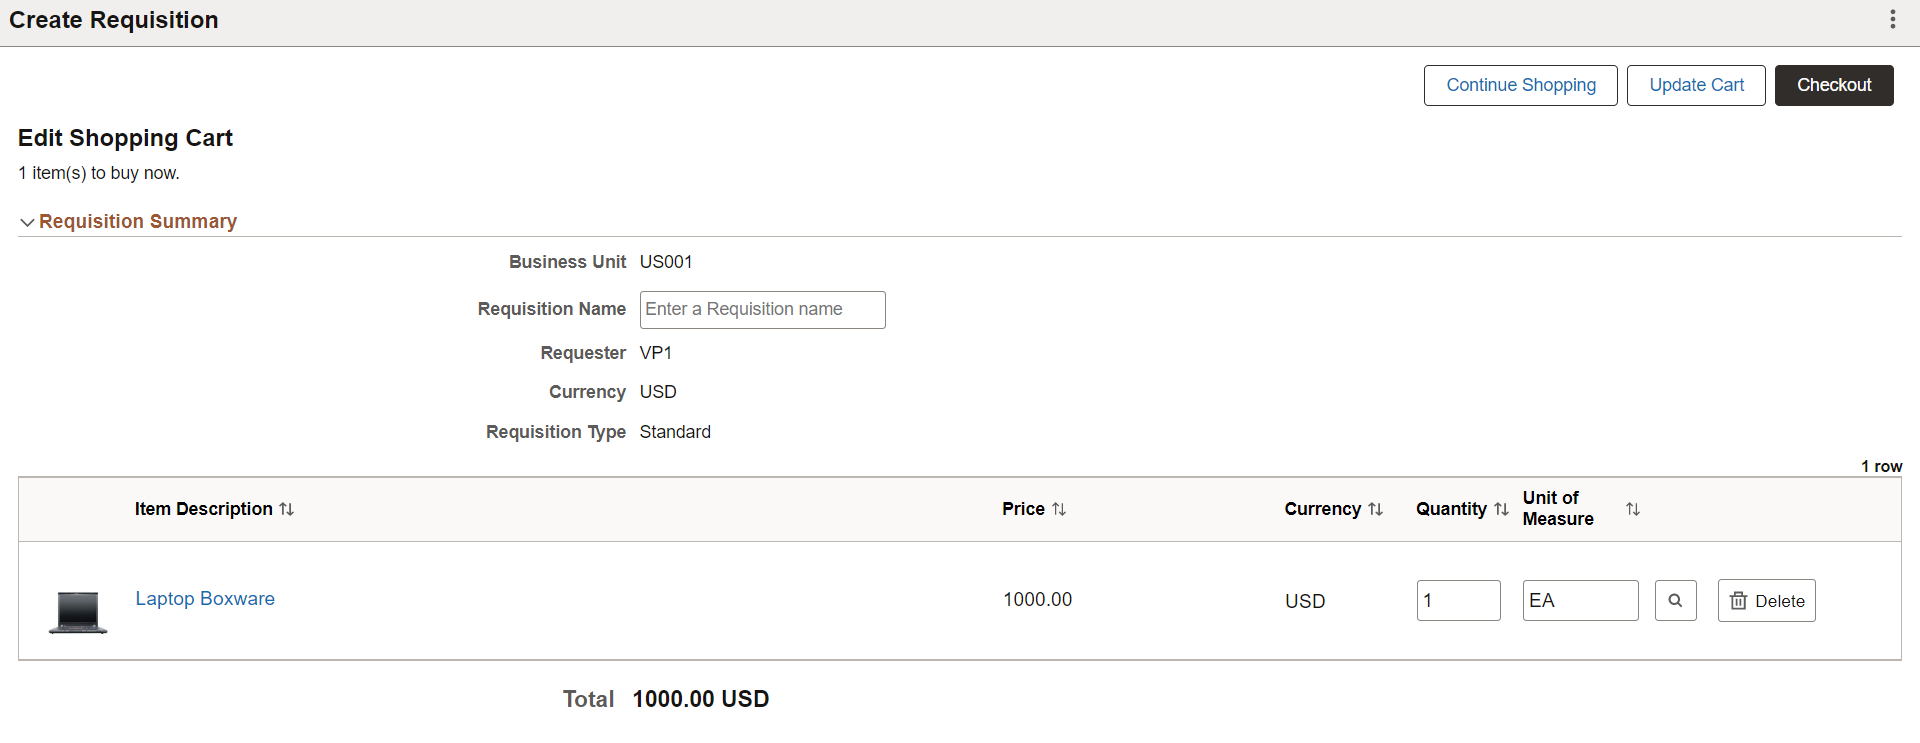
Use this page to make changes to the requisition and submit it again. You can perform the following operations:
Users can access the Edit Requisition page, make changes to the requisition, and submit it again. These operations can be performed when editing a requisition:
You can modify the Quantity if the requisition line is not multi-scheduled.
You can add or remove requisition line items, and split quantities into multiple schedules and distribution lines.
You can perform budget checking and pre-checking process.
You can either cancel the edit operation or save changes and submit the requisition.
After the requisition is saved or submitted, you can view the My Requisition and Create New Requisition buttons from the Confirmation page.
Field or Control |
Description |
|---|---|
My Requisitions |
Select this button to return to the My Requisitions page without saving changes. This button appears on the Confirmation page. |
Continue Shopping |
Select to return to the Create Requisition: Browse Catalogs Page. This button appears on the Checkout Page. |
Update Cart |
Select this button to save any changes and update the requisition. |
Checkout |
Select to access the Checkout Page. |
|
Business Unit |
Displays the name of the business unit. |
Requisition Name |
Enter a description of the request to help you identify this requisition as it flows through the system. If this field is left blank, the system uses the requisition ID as the name. |
|
Requester |
Displays the ID of the requester. |
Currency |
Displays the currency that is selected for the business unit |
|
Requisition Type |
Standard, Bill Only, and Bill and Replace Requisition Types will be display only if there are items in the cart. |
Quantity and Unit of Measure |
Modify the quantity, unit of measure (UOM), or both. Note: The UOM can be edited only if the Allow Editing of UOM check box is selected on the ePro Installation Options Page. |
Delete |
Select to remove the item from the cart or requisition. |
Use the Checkout page (PV_MOB_NEW_CHEKOUT) page to verify and perform various actions to the requisition and requisition lines.
Navigation:
This example illustrates the fields and controls on the Checkout page. You can find definitions for the fields and controls later on this page.

Field or Control |
Description |
|---|---|
Save |
Select to save the requisition and submit it later. The Save Confirmation Page appears. |
Submit |
Select to submit the requisition for approval. Select the Submit button on Checkout page to view the Save Confirmation page (PV_MOB_855_CONF). The Save Confirmation page displays the finalized requisition details that was submitted for approval. |
|
Continue Shopping |
Select to return to the Create Requisition: Browse Catalogs Page. |
Requisition Summary
Field or Control |
Description |
|---|---|
Requisition Name |
Select to enter a description of the request to help you identify this requisition as it flows through the system. If this field is left blank, the system uses the requisition ID as the name. |
Priority |
Select an option of High, Medium, or Low to indicate the priority to the approver. |
Header Comments |
Select to access the Requisition Header Comments and Attachments window. Use this page to enter comment text and indicate whether to send the comment to the supplier, show the comment at receipt, and show the comment at voucher. Select the comments and attachments to view the collated header comments and attachments for the requisition. You can also add multiple comments and attachments for the requisition. MULTI_COMMENTS role action controls whether the user can add multiple comments and attachments for the requisition or not. |
Card Number |
Select to enter a credit card number |
Use Procurement Card |
Select to indicate that a Procurement card is to be used. |
Additional Fields
Additional Fields provides the drop zone custom fields configured on the Requisition Type Template Page.
Justification Comments
Enter comments to justify the need for the requisition. These comments appear on the Requisition Approvals page.
Requisition Lines Overview
Use this section to apply the selected action to one or many lines. Click on an item name link to access the Item Description window.
Field or Control |
Description |
|---|---|
|
Select All |
Select this check box to select all line items. |
Actions |
Select the check box against the required requisitions to collectively perform the following actions:
For more information, see Submitting Requisitions. Select to access the Mass Change page (PV_MOB_855_MAS_SCF) where you can change the following:
|
|
Amount Only |
Select Yes to indicate that the line is an amount only line. Note: The Amount Only toggle button is displayed for the requisition lines if the AMT_ONLY_LINES role action is assigned and enabled for the requester. The ePro administrator can provide this access. |
|
Quantity |
Modify the quantity if required. Note: If the Amount Only toggle is set to Yes for any requisition line, the Quantity value is set to 1 and becomes display only for that line. You can modify the quantity if Amount Only toggle is either disabled or set to No. |
|
UOM |
Modify the UOM if required. |
Schedule Details |
Select to access the Schedule Detail page, where you can review and modify schedule details for an item. Use the Distributions section to modify ChartFields, and access Budget and Asset information. Note: Based on the setting of role actions SCHEDULE_DISPLAY, ACCOUNTING_DISPLAY and ENFORCE_RGN_SECURITY the Schedule Detail section can be visible and can be edited. |
Line Comments |
Select to access the Requisition Line Comments and Attachments page. Use this page to enter comment text, view the collated comments, and indicate whether to send the comment to the supplier, show the comment at receipt, and show the comment at voucher. You can also add and view attachments at the line level. |
|
Delete |
Click to delete the selected line item. |
 View Details icon |
Select to access the Line Details Page. |
|
Field or Control |
Description |
|---|---|
|
Check Budget and Pre-Check Budget |
Select the Check Budget link to initiate the Budget Processor and commit funds to pre-encumberance amount for this requisition. Select the Pre-Check Budget link to initiate the Budget Processor and check the budget without reserving funds for this requisition. Note: You can run the Check Budget and Pre-Check budget processes after saving the requisition. For information, see Submitting Requisitions. |
|
Budget Checking Status |
The Budget Checking Status is updated as Valid or Provisionally Valid after you run the Check Budget or Pre-Check Budget processes. The status is reset to Not Checked if you make any changes to the requisition and it needs to be budget checked again. |
|
Add Request Document |
Select to access the Add a Document Page, where you can create and associate an authored document with the requisition. PeopleSoft Supplier Contract Management must be installed. |
Use the Schedule Details page (PV_SCH_DIST_SCF) to review and modify schedule details for an item.
Navigation:
. Select the Schedule Details icon for a line. You can also access the Checkout page from the Browse Catalogs and Cart Overview pages.
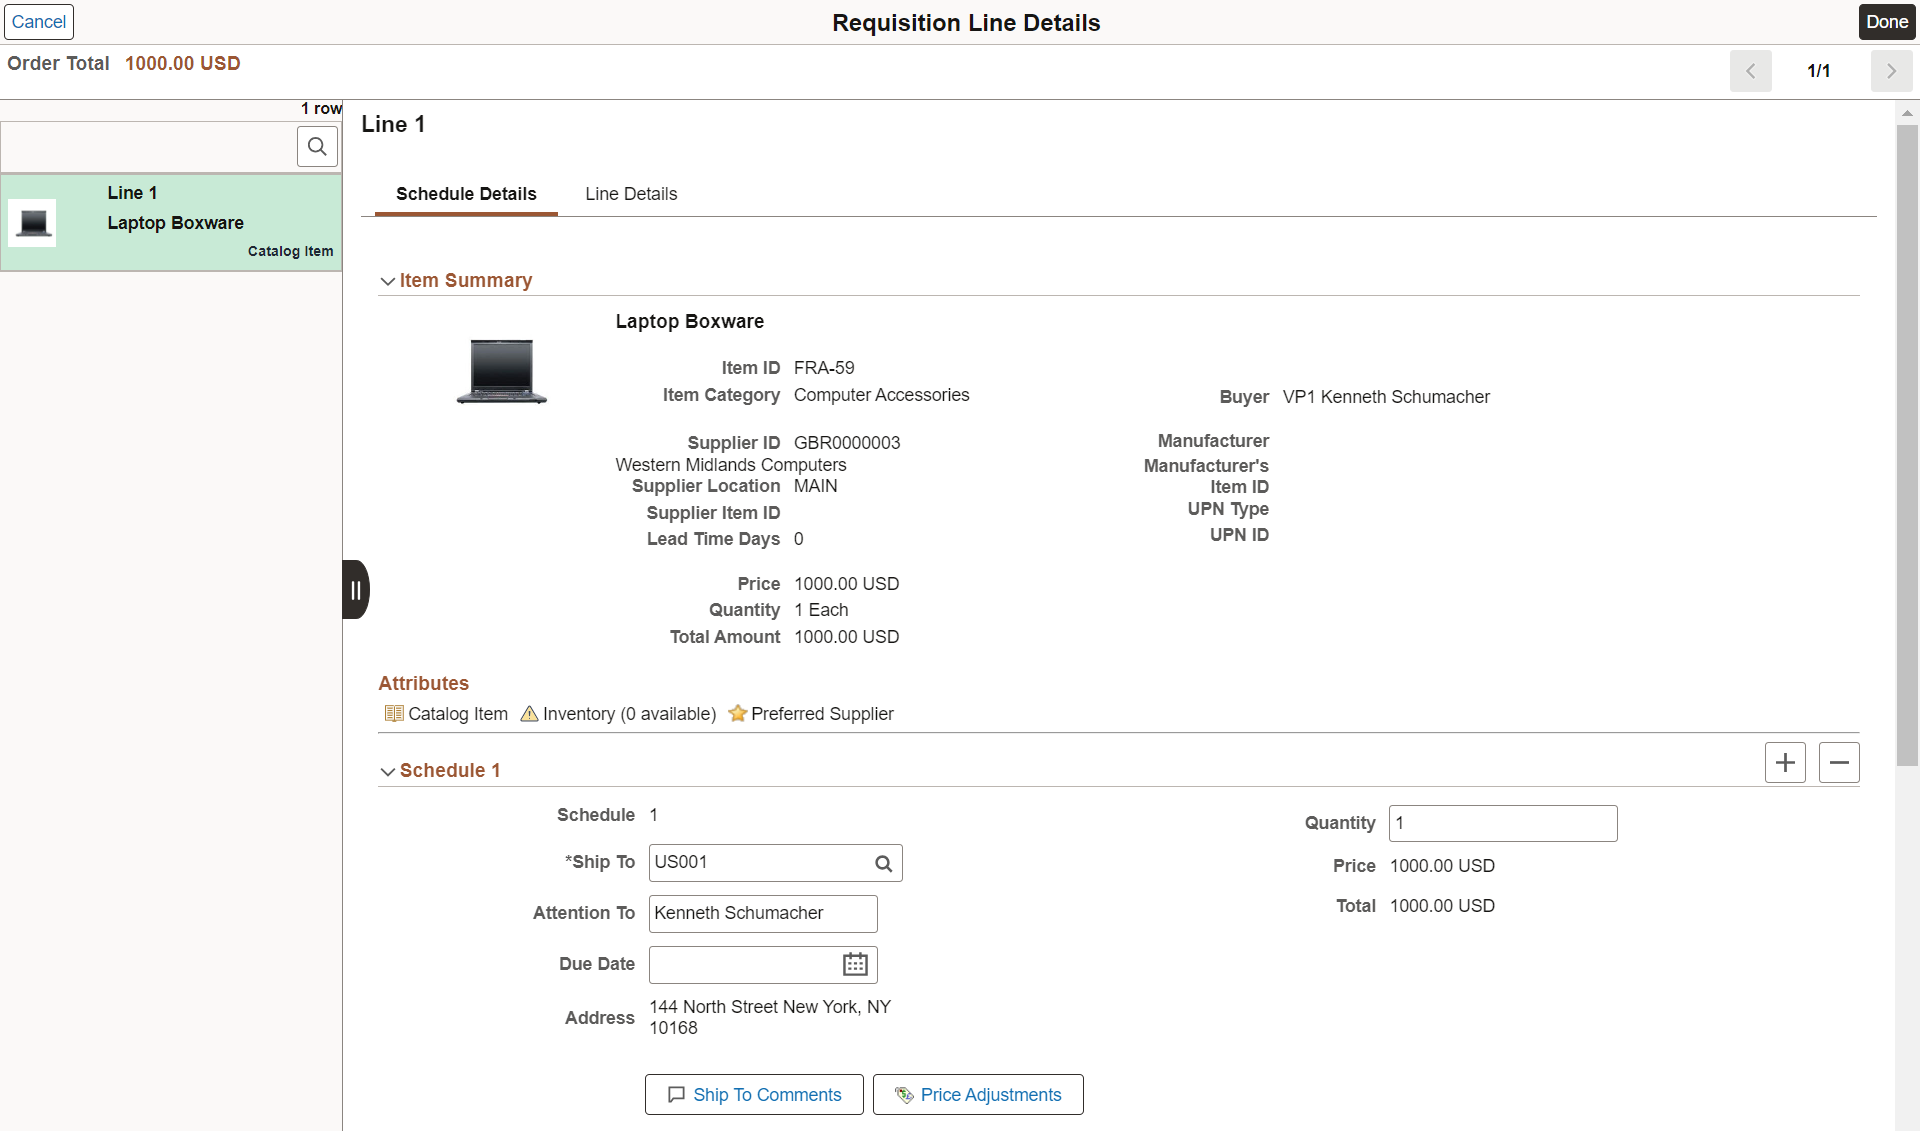
This example illustrates the fields and controls on the Schedule Detail page. You can find definitions for the fields and controls later on this page.
|
Field or Control |
Description |
|---|---|
|
Cancel |
Select to return to the Checkout Page. |
|
Done |
Select to save any changes and return to the Checkout Page. |
You can access the schedule details for each time by clicking the item row on the left panel. Alternatively, you can use the Next or Previous icon on the top right to review each line item. You can modify the Ship To, Quantity, Due Date, and Attention To fields. You cannot edit Ship To field if ENFORCE_RGN_SECURITY role action is enabled.
Total is updated whenever there is quantity or price change.
Field or Control |
Description |
|---|---|
|
|
Click to add or remove schedules. |
Schedule VAT |
Click the Schedule VAT button to access the VAT Information for Schedule page, where you can review value added tax (VAT) information for the schedule line. This button only appears when the Calculate VAT on Req check box for the Purchasing business unit level is selected, the purchasing business unit is a VAT environment, or the VAT_DETAILS eProcurement role action is used and the user eProcurement role is added to the user ID profile. |
 |
Click Ship to Comments button to enter comments and attachments. |
 |
Click Price Adjustments button to view the price adjustments for the schedule. |
 |
The user definable fields are available in the Custom Fields section for Line, Schedule, and Distribution. The custom fields are informational only. Based on the drop zone subpages configuration, the custom fields are visible on this page. For more details, see Configuring Drop Zone Subpages. |
 |
Click Maintenance WO button to integrate a work order to a requisition schedule. A requester with the CANLINK_WO role action enabled can view this option. Note: For fluid requisitions, you can peg only non-inventory items to work orders. For more information about work order integration, see Integrating Requisitions with Work Orders. |
|
Distributions group box |
You can view and override the accounting information. |
 and
and 
Use the Distributions section to access Accounting Tag information, modify ChartFields, and access Budget and Asset information.
This example illustrates the fields and controls on the Schedule Detail - Distributions page

Note: ChartField Display Templates are used to extend ChartField configuration to control the display of individual ChartFields on PeopleSoft Fluid components. It displays ChartFields in a consistent manner on PeopleSoft Fluid transaction pages across PeopleSoft products. For eProcurement mobile requisition the default ChartField display template ALLCFS is used for all users, a permission list, or user ID. Use the Assign CF Display Templates Pageto assign template to the mobile requisition component.
|
Field or Control |
Description |
|---|---|
|
Accounting Tag |
Select to access the Accounting Tag Page. Note: This link appears only if Accounting Tag check box is selected for eProcurement on the Accounting Tag Registration page. See Setting Up Accounting Tags |
|
|
Click the Distribution VAT icon to access the VAT Information for Distribution page, where you can review value added tax (VAT) information for the distribution line. This button only appears when the Calculate VAT on Req check box for Purchasing business unit is selected, the purchasing business unit is using a VAT environment, or the VAT_DETAILS eProcurement role action is used. |

Use the Accounting Tag page (ACCTG_TAB_SEL_SCF) to add accounting tags to the requisition line.
Navigation:
By adding accounting tags the system automatically prorates the amount and quantity of an accounting line according to the proration percentages defined on the Accounting Tag. Accounting tags are used to populate ChartFields on the transaction distribution lines as well.
For additional information about accounting tags, see Setting Up Accounting Tags
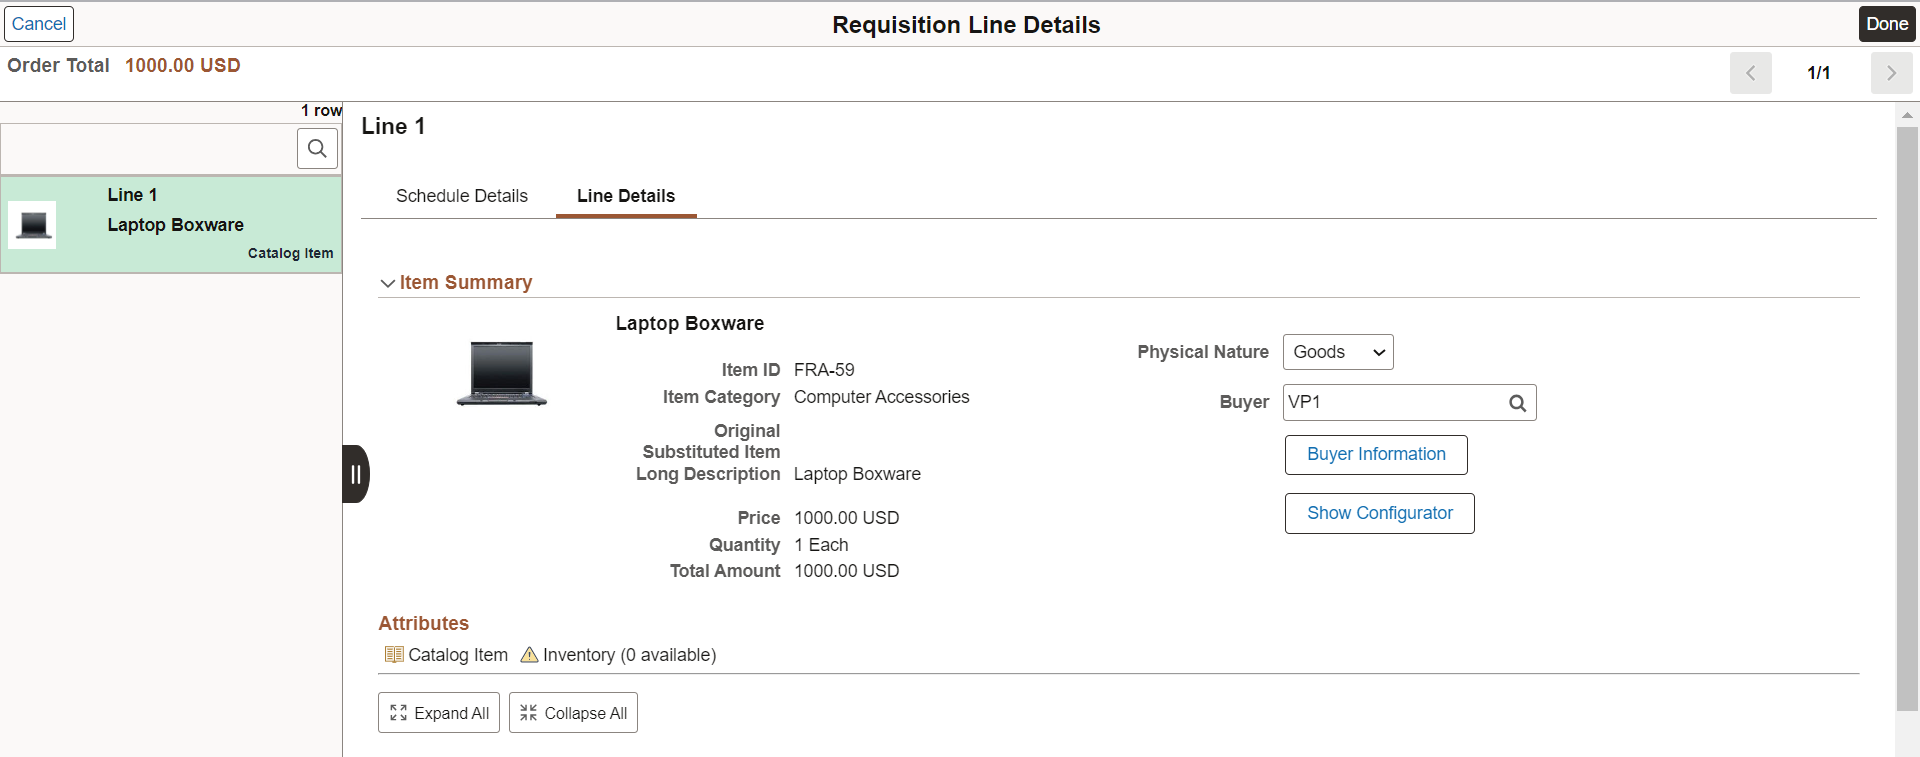
Use the Line Details page (PV_SCH_DIST_SCF) to confirm requisition checkout information and edit additional details for a line, such as the buyer, supplier, and other line-specific information.
Navigation:
. Select the View Details icon for a line.
This example illustrates the fields and controls on the Line Details Page (1 of 4). You can find definitions for the fields and controls later on this page.
This example illustrates the fields and controls on the Line Details Page (2 of 4). You can find definitions for the fields and controls later on this page.

This example illustrates the fields and controls on the Line Details Page (3 of 4). You can find definitions for the fields and controls later on this page.
This example illustrates the fields and controls on the Line Details Page (4 of 4). You can find definitions for the fields and controls later on this page.

If you have substitute items defined for the original item, the Substitute icon appears next to the Original Substituted Item field. Click the Substitute icon to access the Substitute Items window to override any auto-substituted item. Only those items that are available for Manual Substitution and Automatic and Manual Substitution types are listed for your selection.
Item Summary
Field or Control |
Description |
|---|---|
|
Physical Nature |
Indicates whether the requisition is for goods or services. |
|
Buyer |
Select the buyer name. |
Buyer Information |
Select to access the Buyer Telephone Information window, which displays the buyers name, telephone, and fax number. |
Show Configurator |
Select to access the Item Configuration Information window, where you can select an Inventory Unit and Configuration Code. |
|
Attributes |
Item level and supplier level attributes are displayed based on weighted sort rule setup. To configure Weighted Sort Rules, see Manage Weighted Sort Rules Page. |
Additional Line Fields
Additional Line Fields provides the drop zone custom fields configured on the Requisition Type Template Page.
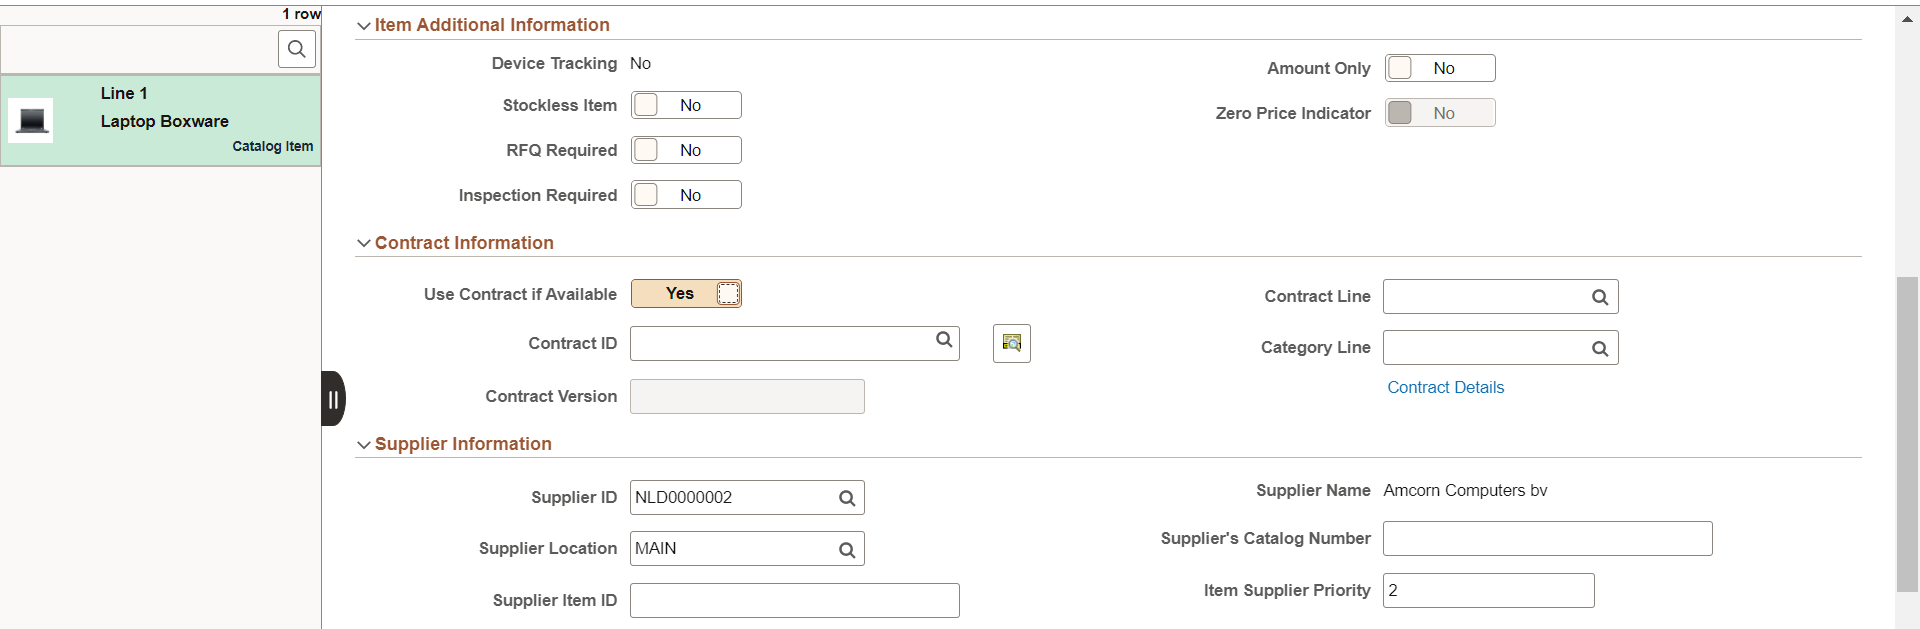
Item Additional Information
Field or Control |
Description |
|---|---|
Device Tracking |
Displays whether a receipt line is device tracked. This field is available for items that are description-only. See Using Device Tracking |
Stockless Item, RFQ Required, Inspection Required |
|
Amount Only |
Select Yes to indicate that the line is an amount only line. When you select Yes, these actions occur on the requisition:
See also, Common Elements Used in the Sourcing Workbench Note: The Amount Only toggle button is always visible and available on the Requisition Line Details page. |
Zero Price Indicator |
Contract Information
Click the Contract Search icon to access the Contract Search page, where you can perform advanced searches for contracts to be applied to the requisition line.
If you replace an existing contract or select another, the Supplier Information section reflects the modifications accordingly. You can confirm whether you want to proceed with changing the supplier when the message displays.
See Line Details Page for more information.
Supplier Information
Field or Control |
Description |
|---|---|
|
Supplier ID |
Displays the ID of the supplier that supply this item. |
|
Supplier Location |
Displays the location of the supplier. The default is based on the value that is defined for the supplier. |
|
Supplier Item ID |
Displays the ID that the supplier uses to identify this item on the Item Supplier page. |
|
Supplier's Catalog Number |
Displays the Catalog Number that the supplier assigned for the item. |
Item Supplier Priority |
Indicates the supplier priority selected for the item. The value appears by default as a medium priority, but can be changed by the user. The updated priority appears on the Requisition Header. |
Suggest New Supplier |
Select this link to access the Suggested Supplier page (PV_MB_SUG_VNDR_SEC) where you can enter supplier name, address, and phone information. |
Manufacturer Information
The Manufacturer information group box displays all information pertaining to the manufacturer.
|
Field or Control |
Description |
|---|---|
|
Manufacturer ID |
Identifies the manufacturer of the item. This value is supplied from the Supplier’s Manufacturer Info page. |
|
Manufacturer's Item ID |
Displays the identifier that the manufacturer uses for this item when the suggested supplier supplies the item. This value appears from the Supplier's Manufacturer Info page. |
|
UPN Type |
Select applicable UPN Type Code. |
|
UPN ID |
Select applicable universal product number that is defined by a unique combination of item ID, manufacturer ID, manufacturer item ID, and Unit of Measure. On selecting the UPN ID, the item line information associated with the selected UPN ID will be populated. |
See Line Details Page for more information.
Procurement Group Information
For additional information about Procurement Groups, see Understanding Procurement Groups in PeopleSoft
Field or Control |
Description |
|---|---|
Procurement Group ID |
Select a Procurement Group ID to be displayed on receipt lines. Procurement groups are defined using the Procurement Groups Page. |
Primary Unit |
Select Yes or No to indicate that this is the primary unit for the Procurement Group. |
Unit Allocation Qty |
Enter a quantity that identifies the quantity to allocate per asset for the Procurement Group. |
Sourcing Controls
Use this section to alter sourcing options for the selected requisition line. This section is controlled by role, therefore some options are display only.
Field or Control |
Description |
|---|---|
Consolidate with other Reqs (consolidate with other requisitions) |
Select Yes to consolidate multiple requisitions for the same supplier into one purchase order. This is defined at requester setup. |
Calculate Price |
Select Yes to have the sourcing process recalculate the item price when this requisition line enters the sourcing stage. |
Override Suggested Supplier |
Select Yes to enable the sourcing process to override the suggested supplier. This is determined for purchasing order sourcing. |
Inventory Source Flag |
Displays whether eligible requisition items are sourced from PeopleSoft Inventory, which is determined in user preferences. Note: If the substitute item is valid for a particular supplier, then Inventory Source Flag and Override Suggested Supplier are set to No. If the substitute item is valid for all suppliers, it can be defined at the item definition level and the Override Suggested Supplier will be Yes. |
Auto Item Substitution |
Select Yes to indicate that item substitutions can be determined by the system. This is determined by Purchasing business unti. |
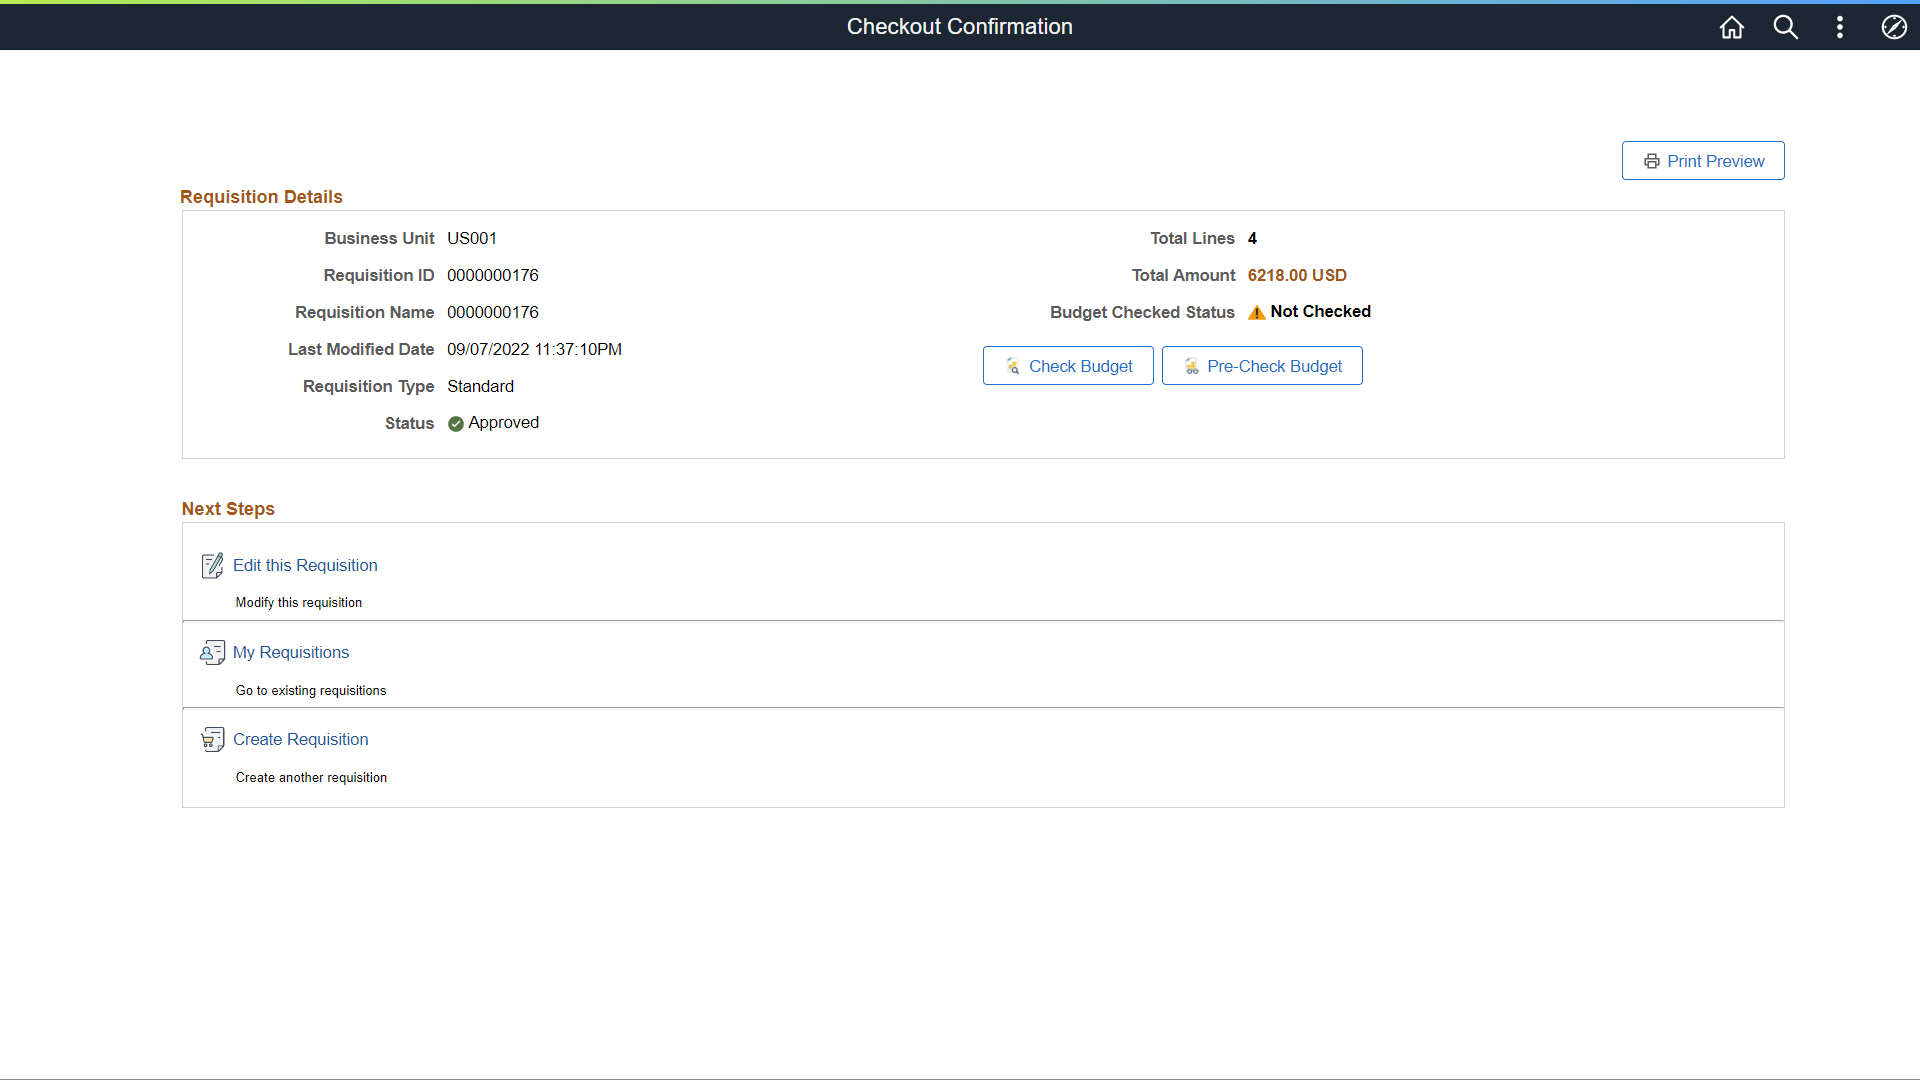
Use the Save Confirmation page (PV_MOB_855_CONF) to view the final requisition details that have been submitted for approval.
Navigation:
The message disappears after two seconds.
This example illustrates the fields and controls on the Checkout Confirmation page. You can find definitions for the fields and controls later on this page.
Field or Control |
Description |
|---|---|
|
Print Preview |
Click to print the requisition with distribution details. |
View Approval Chain |
Select to view the list of approvers for the requisition. |
|
Budget Checked Status |
Displays the following statuses based on the Check Budget and Pre-Check Budget processes:
|
|
Check Budget |
If the Check Budget process is successful, the Budget Checking Status changes to the Valid link. The Pre-Encumbrance Balance is also displayed as a link. Click the Valid link to view the Commitment Control window. In the window, click the Go To Activity Log link to navigate to the Commitment Control Activity Log page. |
|
Pre-Check Budget |
If the process is successful, click the Provisionally Valid link to view the Commitment Control details in the Commit Control window. The Pre-Budget link becomes disabled after running the process. |
|
Pre-Encumbrance Balance |
The Pre-Encumbrance balance is displayed as a link. Clicking this link opens the Accounting Entries page. Note: The pre-encumbrance value will also be displayed on the Edit Requisition page next to Order Totals and on the Budget Information tab of the Distribution page. You can click these links to view the details on the Accounting Entries page. |
|
Edit this Requisition |
Select to edit the requisition. |
My Requisitions |
Select to go to the requisition page, where you view and work with all your requisitions. |
|
Create Requisition |
Select to create new requisition directly from this page. |
You can navigate to other pages from this page via the Action menu. See Approving Requisitions Using PeopleSoft Fluid User Interface.
Use Item History page (PV_MOB_RECENT_ORD) to view the list of recently ordered items.
The number of items displayed depends on the value in the Max Rows to Retrieve for Search Results field on the ePro Installation Options Page.
Navigation:
On the ePro Homepage, select Item History from the left menu.
This example illustrates the fields and controls on the Item History page. You can find definitions for the fields and controls later on this page.
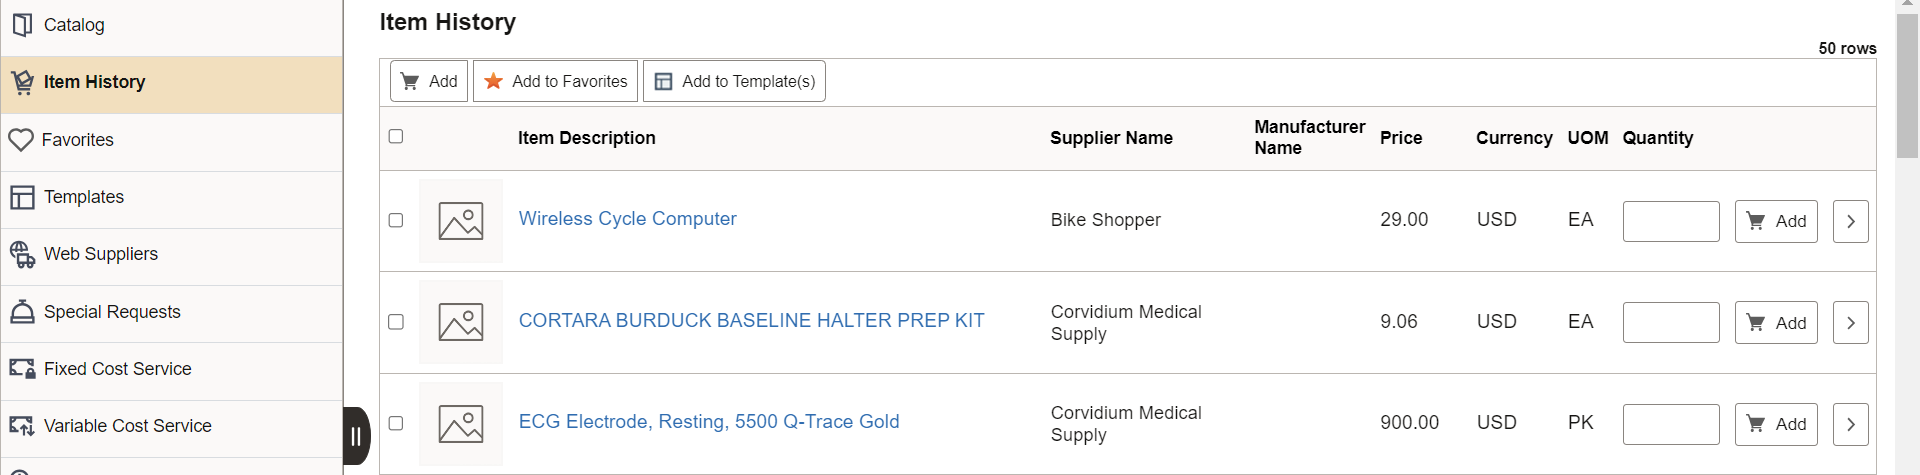
This page displays the list of recently ordered items along with their Item Description, Supplier Name, Manufacturer Name, Price, Currency, and UOM.
|
Field or Control |
Description |
|---|---|
|
Quantity |
Enter the number of items to be added to the cart. |
 (Add to cart) |
Click to add items with the defined quantity to the cart. Note: You can select multiple items using the checkbox on the left for specific items on the grid or the select all checkbox on the top left of the grid. The Add to Cart button is not available for inactive items. |
 (Details) |
Click to view the item details. For more information, see Item Details Page. |
 (Add to Favorites) |
Click to add selected items to the Favorite list. A message appears confirming that the item was added to the Favorites list. |
 (Add to Template) |
Click to add selected items to one or more templates. On clicking this link, the Add items to Templates modal window opens, where you can select the required template to add the item. You can also add a new template. |
Use the Favorites page (PV_MOB_855_SRCHFAV) to add items to your Favorites list and group them.
Favorites are frequently ordered items and groups of items that you can maintain in a single location. You can create a list of items that are frequently ordered, and organize them by creating favorites groups. You can use the list to add items to a requisition without searching the item catalog.
Favorite-Ungrouped Items are private, accessible only to you, and are stored under the Requester ID. The list can be built from items in PeopleSoft eProcurement or PeopleSoft Services Procurement.
Navigation:
On the ePro Homepage, select Favorites from the left menu.
This example illustrates the fields and controls on the Favorites page. You can find definitions for the fields and controls later on this page.
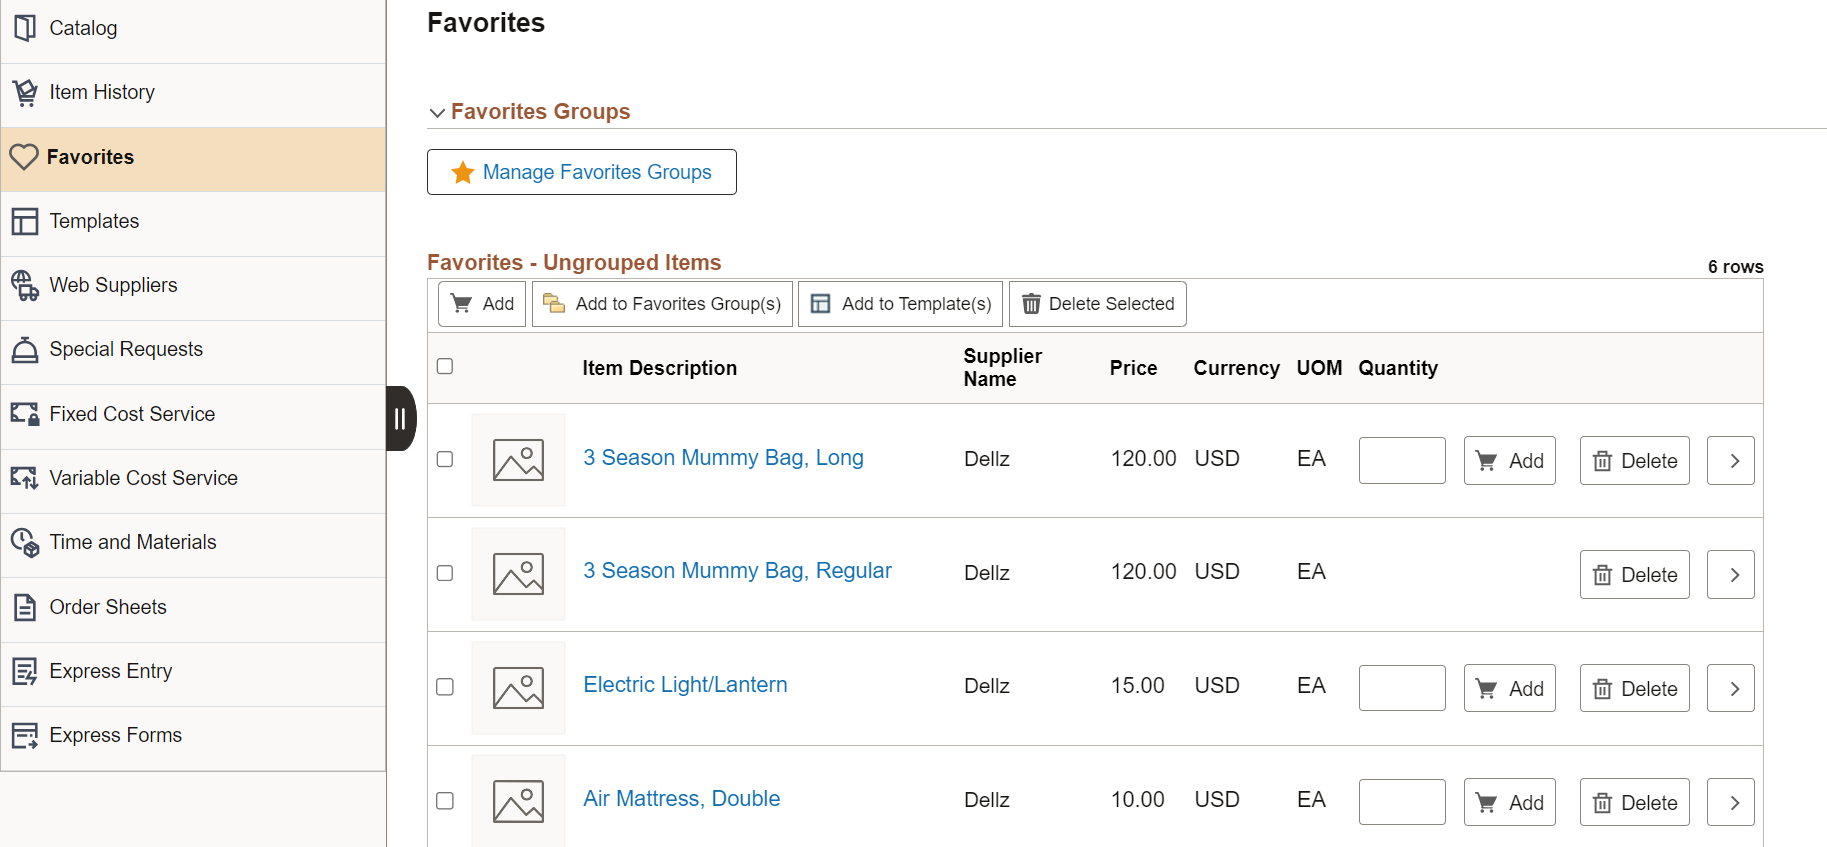
Note: The Add to Cart button is not available for inactive items.
Manage Favorites Group
Field or Control |
Description |
|---|---|
Group Name |
Enter a group name. |
Description |
Enter a group description. |
Allow Sharing |
Set the toggle to Yes to allow the favorite groups to be shared with other user roles and requesters. |
Allow Access |
Select this button to enter the requester’s details, such as Role Name and User ID. The details are required when other requesters try to copy the group to their favorites group. The Allow Access button is enabled only after you add a group name. |
Details |
Click this button to view the group details. This is enabled only if you add items to the group. |
Copy Favorites Group |
Select this link to access the Copy a Favorites Group page. For more information on Copy a Favorites Group page, see Copy a Favorites Group Page. |
For more information on Favorites, see Create Requisition — Favorites Page.
Use the Templates page (PV_MOB_TEMPLAT_FL) to add purchasing kits, company, and personal templates to your cart.
Navigation:
On the ePro Homepage, select Templates from the left menu.
This example illustrates the fields and controls on the Templates page.
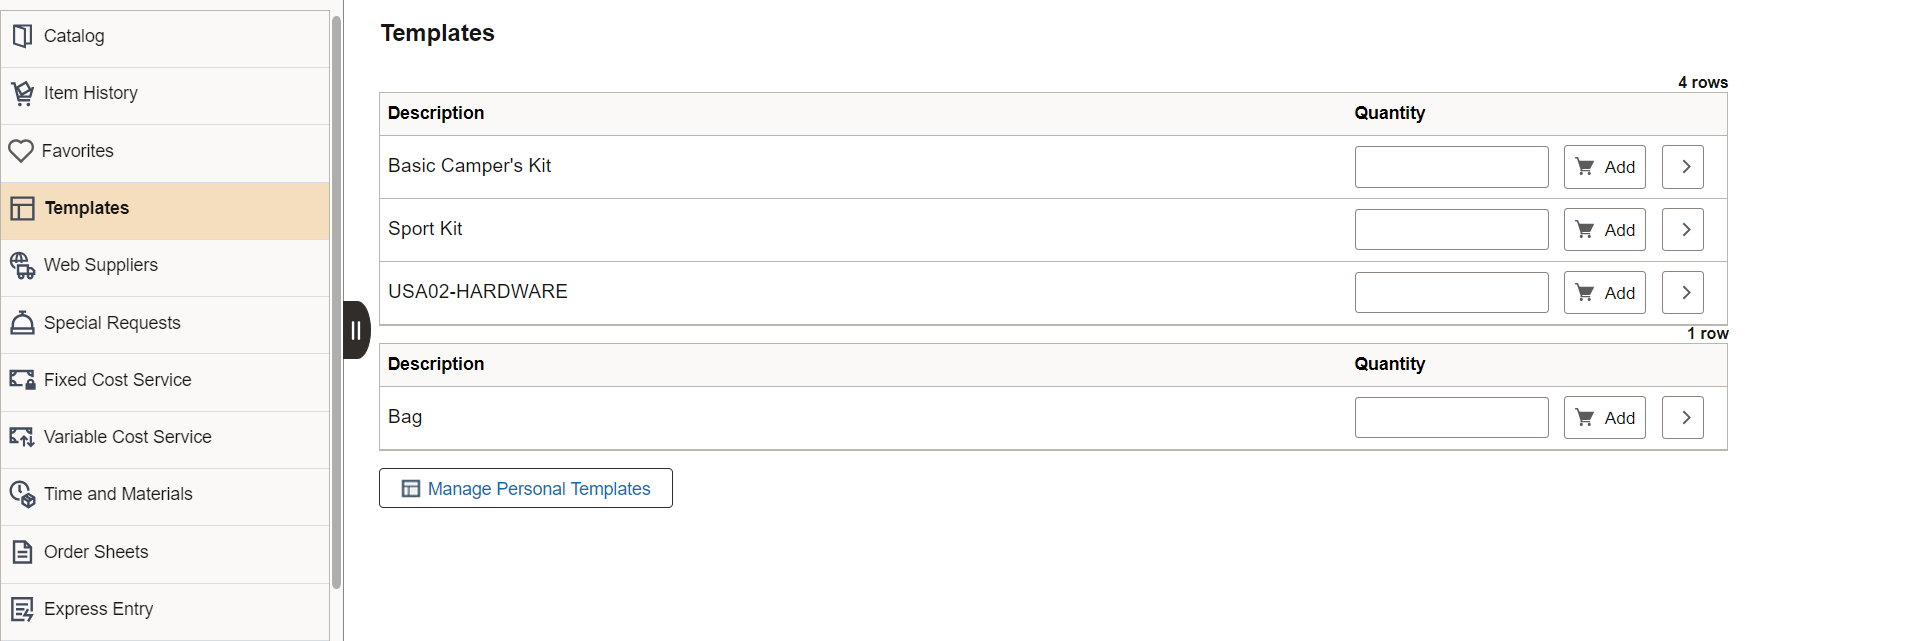
Click the Manage Personal Templates button to add a new personal template or remove the existing templates.
Click on any template description from the list to view the template details.
Manage Personal Templates
This example illustrates the fields and controls on the Personal Templates page.

|
Field or Control |
Description |
|---|---|
|
Template Name |
Enter a template name. |
|
Description |
Enter a template description. |
|
Allow Sharing |
Set the toggle to Yes to allow the templates to be shared with other user roles and requesters. |
|
Share Details |
Select this button to enter the requester’s details, such as Role Name and User ID. The details are required when other requesters try to copy a template. |
|
Details |
Click this button to view the template details. |
|
Copy Personal Template |
Select this link to access the Copy a Personal Template(s) page. |
|
Return to My Profile |
Select this link to return to the Templates page. |
Template Details
This example illustrates the fields and controls on the Template Detail page.
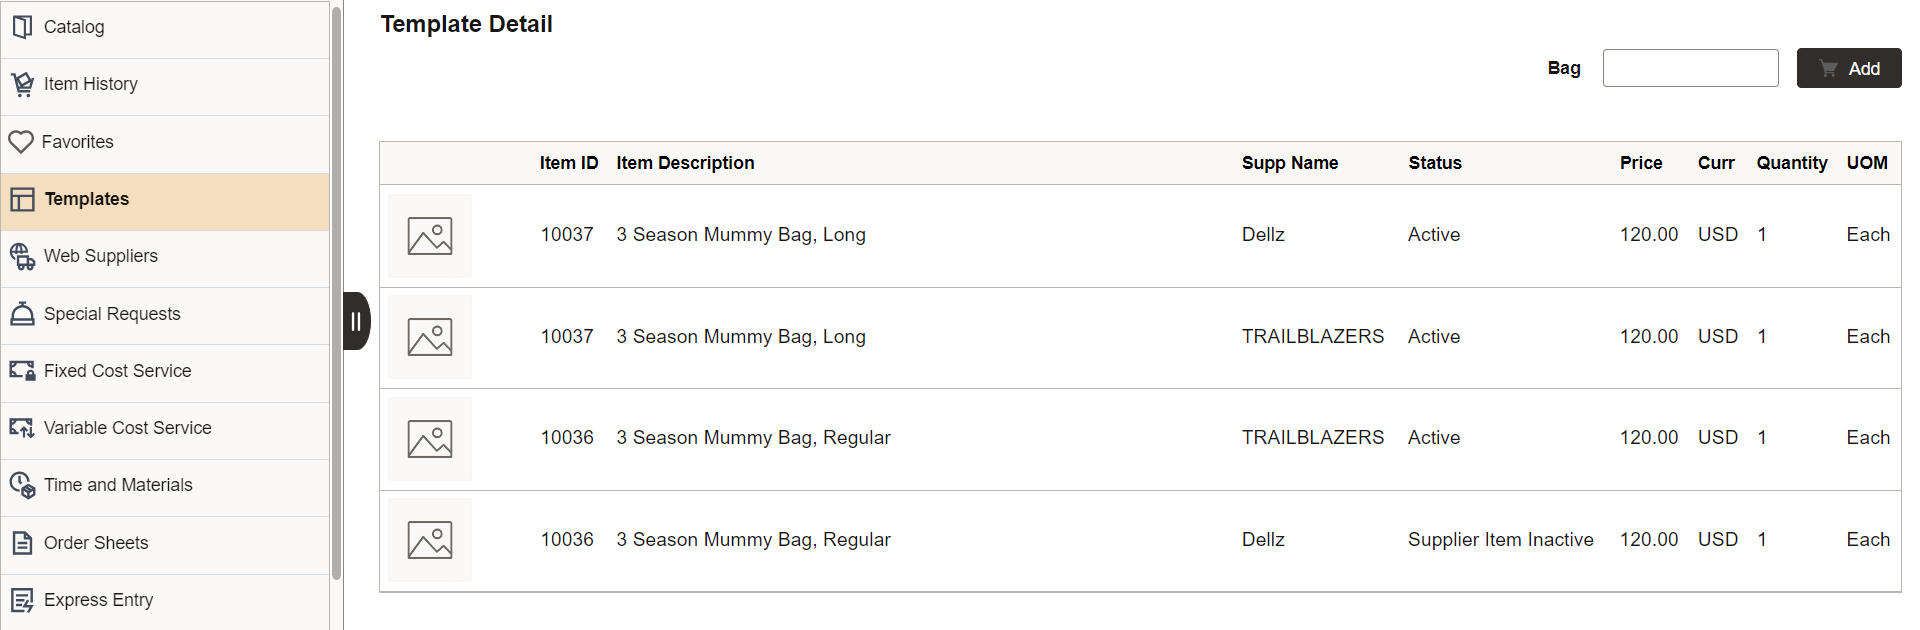
Note: If any item status is inactive in the template and you add the template items to the cart, a confirmation message appears indicating whether you want to add other items to the cart excluding the inactive one.
For more information on Templates, see Create Requisition — Templates Page.
Use the Special Requests page (PV_MOB_SPECIAL_REQ) to order items that are not found in the item catalog.
Navigation:
On the ePro Homepage, select Special Requests from the left menu.
This example illustrates the fields and controls on the Special Requests page.
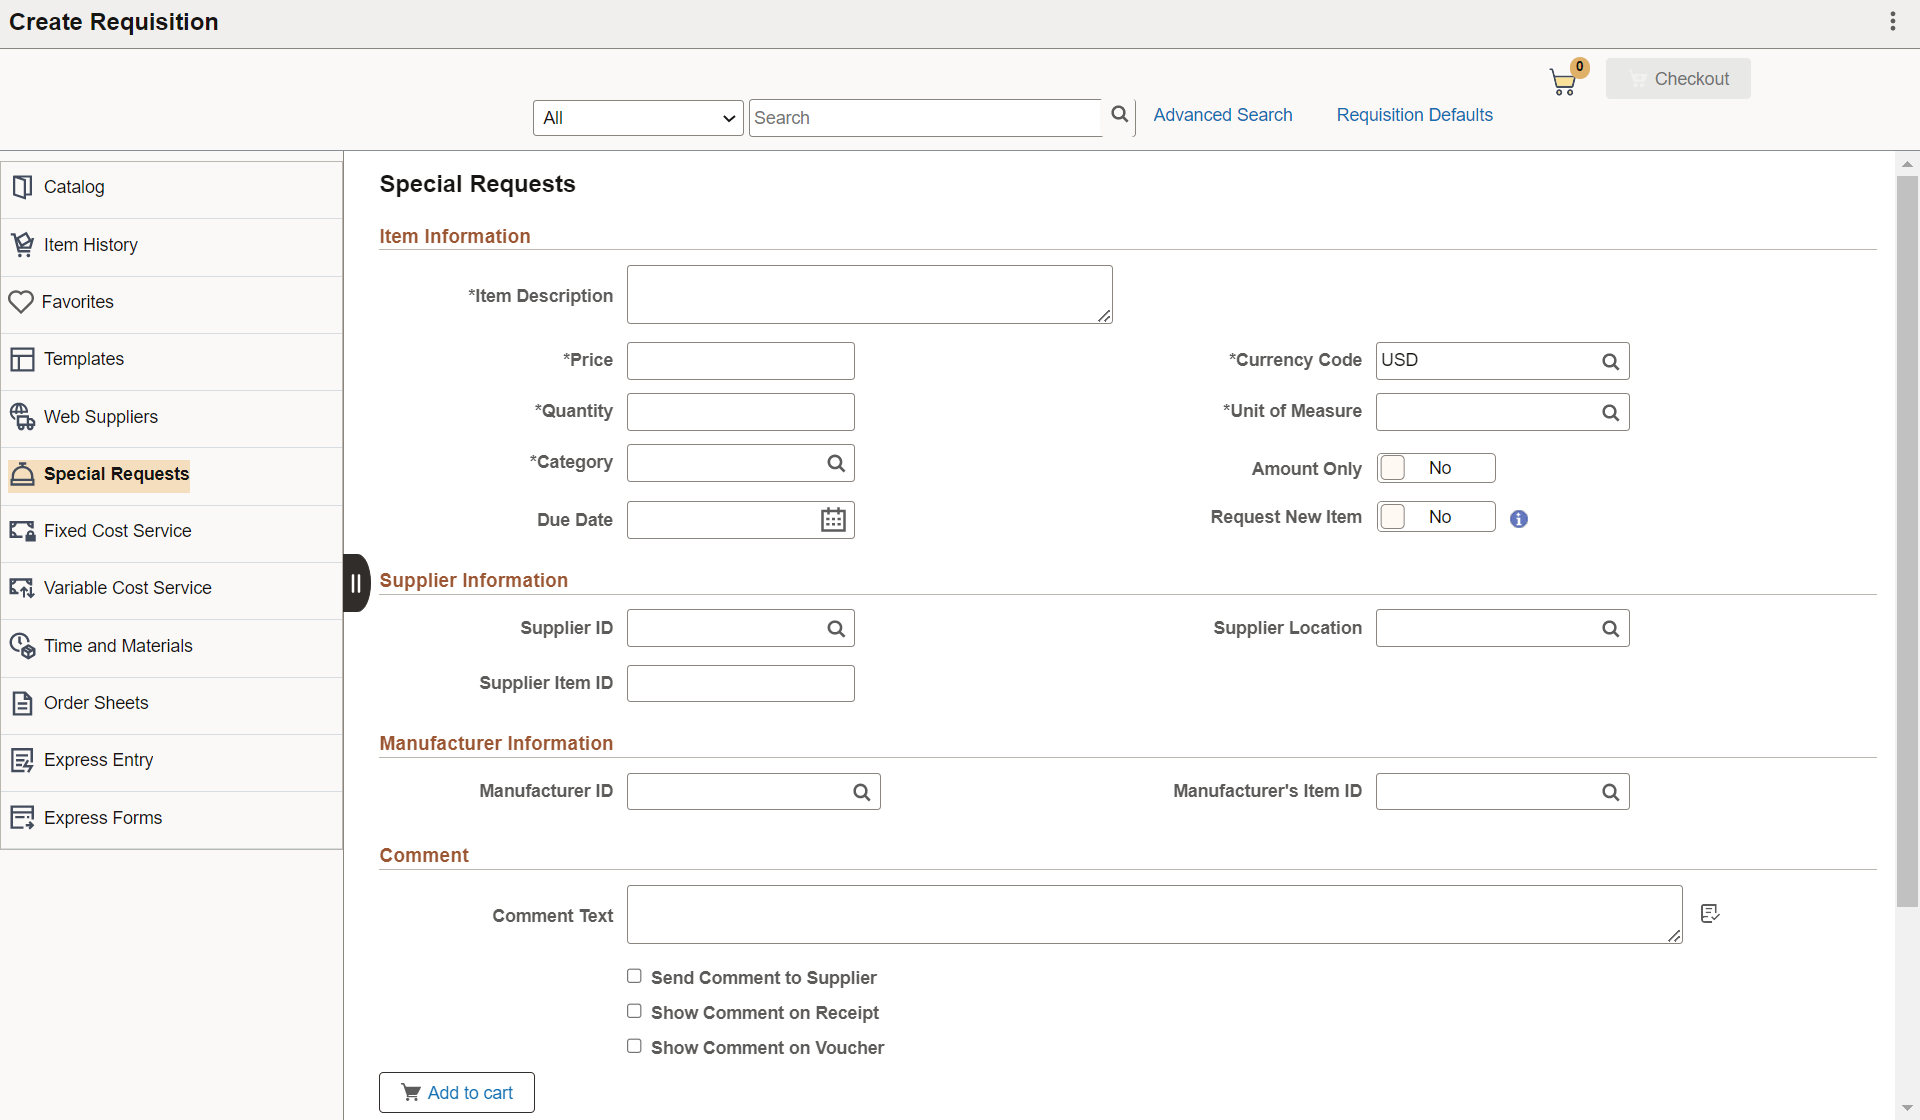
Specify the required requisition details and click the Add button to add the special item to the cart.
Note: The Amount Only toggle button is displayed only if the requester has the AMT_ONLY_SPECIAL_REQ role action assigned and enabled. By default, this button is set to No.
For more information on special requests, see Requesting Special Items.
While creating requisitions, requesters can integrate requisitions directly to a work order as needed. A requester with the CANLINK_WO role action can view the Peg Work Order option on the Schedule Details page.
Note: For fluid requisitions, PeopleSoft Update Image 42 supports work order integration of non-inventory and special request items only.
Navigation
Add items to the shopping cart and proceed to checkout.
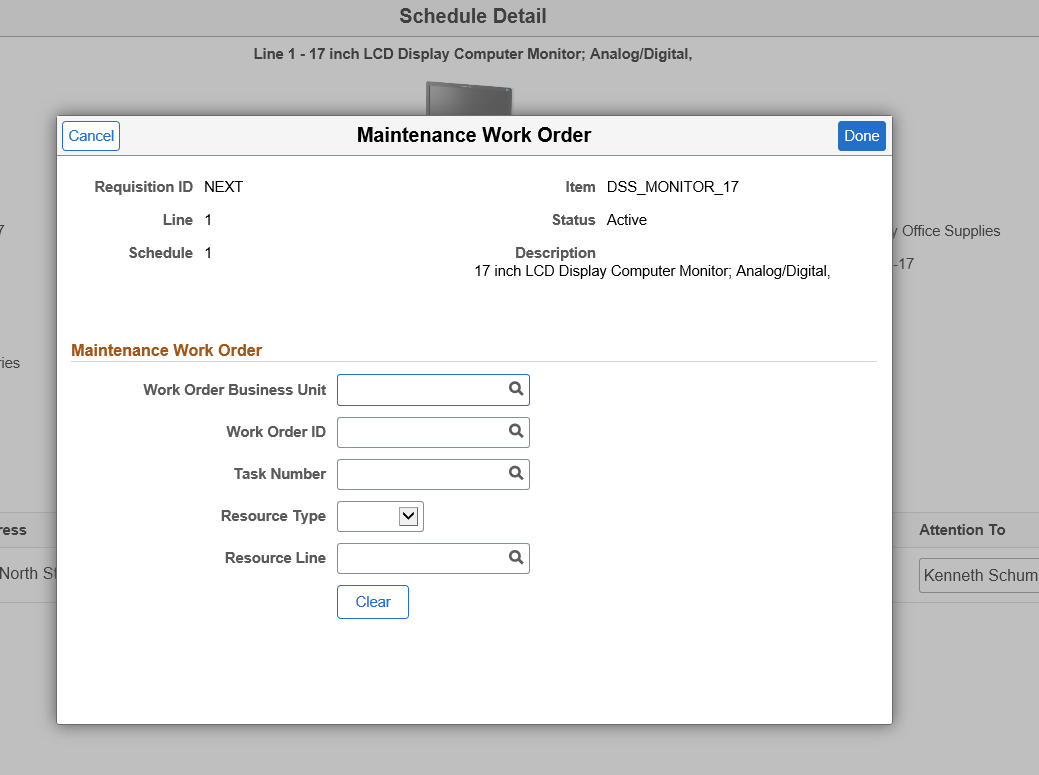
Select the Schedule Details button on a requisition line and click the Maintenance WO button.
This example illustrates the fields and controls on the Maintenance Work Order window.
|
Field or Control |
Description |
|---|---|
|
Work Order Business Unit |
Select a business unit that contains the work order that you plan to integrate. |
|
Work Order ID |
Select the required work order ID. |
|
Task Number |
Select the work order task number generated by the system. |
|
Resource Type |
Available resource types are Labor, Material, and Tools. The Resource line reflects any changes to the resource type. |
|
Resource Line |
If the work order does not have any item information, the resource line does not display any value. You can either add a value or leave it blank. If you submit a requisition without adding a resource line, the line number is automatically added. If line numbers already exist and you proceed with submitting a requisition with a blank resource line field, the resource line number will be automatically incremented by one. Whereas, if you enter a resource line number, the same number is retained upon the requisition submission. |
|
Clear |
Select to remove all the field values at the same time. |
After entering the details, click the Done button and go back to the Checkout page and submit the requisition. The Edit Requisition page will display the details entered.