Submitting Requisitions
After defining items for a requisition, use the Checkout button to review the contents of the requisition, make final adjustments, or add last-minute items to the requisition.
This section discusses how to review, edit, and submit requisitions, add comments to the requisition lines, edit line, shipping, and accounting information, change distribution information, edit shipping for all lines, maintain value added tax details for shipping lines, add multiple comments at the requisition header, and confirm requisition checkout information.
Once you have added requisition items to the cart, click on the Checkout button to review, edit and submit the requisitions for approval. You will be taken to the Checkout – Review and Submit page where you can save the requisition and submit it for approval immediately or save for later. Apart from editing the requisitions you can add comments and attachments to them as well. You can also enter justification for requiring approval for the requisition.
If you want to add more items for requisition click on the Add More Items button on the Checkout - Review and Submit page. You will be transferred to the Create Requisition page where you can search and select the additional items and add to the cart. On this page you will see a Shopping Cart icon and Total Lines hover over hyperlink displayed next to the Checkout button.
This example illustrates the fields and controls on the Cart Summary page.

The Total Lines represent the total number of lines of the entire requisition. The Total Amount represents the total amount of the entire requisition. If VAT (value added tax) is enabled for the business unit, the Total Amount is inclusive of the VAT amount.
The Total Lines hover over hyperlink opens in a hover over pop-up window and it displays a summary of the item description, quantity, units of measure, total lines and total amount in transaction currency of all items in the cart for a particular chunk set.
If the number of items added on a new requisition exceeds the chunking limit and you then select either the Check Budget or Pre-Check Budget buttons on the Checkout page you will get a warning message that the requisition will be saved in Open Status before the budget checking is performed. After budget checking you will remain on the Checkout page which will then be displayed in edit mode.
Note: Requisition Inquiry and Reports and View Printable Version will be unaffected by requisition chunking.
See Understanding Requisition Chunking
A floating shopping cart displays items that are added to the Cart (item description, quantity ordered, units of measure (UOM), total number of lines and the total amount (expressed in the transaction currency). If chunking is enabled and you are in edit mode then the lines will be displayed in chunks i.e. the current active chunk will be displayed. Click the Checkout button to navigate to the Checkout - Review and Submit page to review and checkout the selected requisition items.
This example illustrates the fields and controls on the Floating shopping cart.
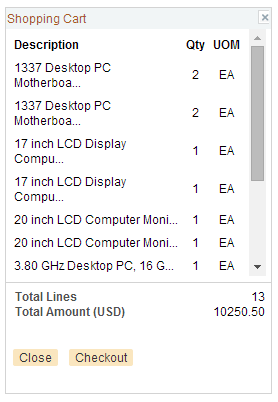
The floating cart appears constantly when you review and add items to the cart and it can be dragged and placed at different locations on the page. Select the Close button to close the floating cart window. Item description texts more than 25 characters are truncated and not completely visible in the floating cart. You have to hover over the description to view the complete text.
The floating cart will automatically appear when you add items to the cart if the Auto display shopping cart when adding items check box is selected on the My Preferences page. It will also appear when you choose the Cart icon or the Total Lines hyperlink on the Create Requisition page even if the check box is not selected.
The floating cart will appear when adding requisition items from the following pages: Search Results, Catalog, Express Item Entry, Special Requests, Forms, Favorites, Templates, ePro Services, Web, External Catalogs, and Recently Ordered.
|
Page Name |
Definition Name |
Usage |
|---|---|---|
|
PV_REQ_CHECKOUT |
Review, edit, and submit requisitions that have not been submitted for approval. Also, submit requisitions for approval. |
|
|
PV_REQ_SETTINGS |
Settings on this page can be used to default or override header, line, shipping instructions, and accounting details for all the requisition lines. |
|
|
PV_REQ_LN_DTLS |
Confirm requisition checkout information and edit additional details for a line, such as the buyer, supplier, and other line-specific information. |
|
|
PV_REQ_COMMENTS_NW |
Record one or more comments about an requisition line and add attachments. You are limited to one comment unless your user ID is linked to the eProcurement role action of MULTI_COMMENTS. |
|
|
Standard Comments Page |
PV_STD_COMM_SEC |
Use this page to apply a standard comment as a comment to the requisition line or requisition header. Standard comments are frequently used comments that have been defined in the system using the Standard Comments (STANDARD_COMMENTS) and Standard Comment Type (STD_COMMENT_TYPE) components. Enter search criteria of Comment Type, Comment ID, or Description and then click the Search button to display the standard comments. Select a standard comment and click OK to apply the comment to the requisition. |
|
Include Item Specifications Page |
PV_ITEM_SPEX |
Use this page to apply the item's specifications as a comment to the requisition line. The item specifications are defined on the Item Specifications page (ITEM_SPEX_PUR ) located in the item definition (Purchasing Attributes component). The item specifications are automatically included as a line comment if the Copy to Transactions check box has been selected on the Item Specifications page. |
|
Requisition Ship To Comments Page |
PV_REQ_COMMENTS_NW |
Record one or more comments with the Ship To value on the requisition shipment schedule line. You can also include attachments. |
|
PV_REQ_MASSCHG_SEC |
Modify line, shipping instructions, and accounting details for selected requisition lines. |
|
|
PV_REQ_DIST_CHNG |
Select how to apply distribution changes to the selected lines of your requisition. |
|
|
PV_REQ_MASSCHG_SEC |
Apply Ship to Location, One Time Address, Due Date, Attention To and Shipping Comment to all requisition shipping lines. |
|
|
REQ_SCHED_VAT |
Maintain value added tax details for shipping lines. |
|
|
PV_REQ_COMMENTS_NW |
Record one or more comments about a requisition and add attachments. You are limited to one comment at the header-level of the requisition unless your user ID is linked to the eProcurement role action of MULTI_COMMENTS. |
|
|
PV_REQ_WF_PREVIEW |
Confirm requisition checkout information. |
Note: Standard comments and item specifications are role action controlled. If role action MULTI_COMMENTS is disabled then these links will not appear.
Use the Review and Submit page (PV_REQ_CHECKOUT) to review, edit, and submit requisitions that have not been submitted for approval.
Also, submit requisitions for approval.
Navigation:
This example illustrates the fields and controls on the Checkout — Review and Submit page. You can find definitions for the fields and controls later on this page.

This example illustrates the fields and controls on the Custom Fields for Requisition Header page. You can find definitions for the fields and controls later on this page.

Use this page to review, edit, and submit a requisition for approval.
Field or Control |
Description |
|---|---|
Requester |
Displays the name of the requester for this requisition. To purchase on behalf of another requester, you can change this field. However, you must have the CHANGEREQBU role action from the eProcurement Role Actions page assigned to the user roles in the user ID. Also, the user preferences for the user ID must specify that you are authorized to enter for other requesters. |
Requisition Name |
Enter a description of the request to help you identify this requisition as it flows through the system. If this field is left blank, the system uses the requisition ID as the name. |
Currency |
Select the base currency that is used to calculate pricing for each item on the requisition. |
Priority |
Select the urgency for a requisition workflow approval. Values are Low, Medium, and High. |
Card Number |
Select a valid procurement card. |
Custom Fields |
Select to view the Custom Fields for Requisition Header page that opens in a pop-up window. In the Custom Fields for Requisition Header page that pops up enter required data for the custom fields. The custom field data will appear in the Manage Requisitions – Requisition Details page. |
Use Procurement Card |
Select this check box to use the procurement card entered in the Card Number field. |
Line |
Displays the line number for this requisition item. |
|
Displays information that pertains to this specific line. |
|
Select the icon to display its related substitute item. |
Description |
Select the description of the item to view the Item Description page for more information about the item. |
Supplier Name |
Displays the name of the supplier who supplies this item. |
Add More Items |
Select to access the Requisition page where you can browse through all the catalogs and add any items to the cart. |
Quantity |
Displays the units of this requisition item that you are ordering. You can change the value. |
UOM (unit of measure) |
The ordering UOM for this item. |
Price |
Displays the price per unit. |
|
Indicates a price discrepancy between the original Punchout price and Contract price. |
|
Indicates a contract is being used and the price is different than the original price. |
|
Choose this icon to access the Line Details page, where you can modify additional details on the line, such as the buyer, supplier, and other line-specific information. |
|
Choose this icon to access the Line Comments page, where you can record a comment or attach a file to this requisition line. The eProcurement role action of MULTI_COMMENTS determines what features are available on the Line Comments page. |
Total Amount |
Displays the extended price for this requisition line, which the system calculates by multiplying the unit price by the quantity that you order. |
Add to Favorites |
Select to add selected items to the favorites list. A message appears confirming that the item has been added to the favorites list. |
Add to Template(s) |
Select to add selected items to a template. The Add Selected Items to Template(s) page appears, where you can select an existing template or create a new template. |
Mass Change |
Select to access the Modify Lines/Shipping/Accounting details for selected lines, where you can change the shipping location, delivery date, and so on. You can also change the accounting information for this requisition line. |
Delete Selected |
Select to delete selected items from this requisition. You select items using the check box to the left of the item description. |
Requisition Comments and Attachments |
Enter a comment for this requisition at the header level. You can also add attachments to the requisition. |
Add more Comments and Attachments |
Select to access the Header Comments page where you can enter additional comments for the header level of this requisition and also include one or more attachments to your comments. To view the More Comments link, your user ID must be connected to the eProcurement role action of MULTI_COMMENTS. |
Send to Supplier |
Select if you want the header-level requisition comment recorded above to appear on the purchase orders that are dispatched to suppliers. If the comment is for internal use only, leave the check box deselected. |
Show at Receipt |
Select if you want the header-level requisition comment recorded above to appear on the receipt documents. |
Show at Voucher |
Select if you want the header-level requisition comment recorded above to appear on the vouchers. |
Check Budget |
Select this link to initiate the Budget Processor and commit funds to pre-encumbrance amount for this requisition. This button displays only if Commitment Control has been enabled for PeopleSoft Purchasing and eProcurement. The requisition is automatically saved before the budget check is performed. If the requisition is in add mode when you click this link, a message appears that the requisition will be saved in Open status and budget check process is initiated. Once the process is complete the page goes to edit mode. |
Pre-Check Budget |
Select this link to initiate the Budget Processor and check the budget without reserving funds for this requisition. This option enables you to check whether a budget exists for this requisition before committing amounts to a pre-encumbrance. The requisition is automatically saved before the budget check is performed and the page is changed to edit mode. The button only displays if:
If the requisition is in add mode when you click this link, a message appears that the requisition will be saved in Open status and budget check process is initiated. Once the process is completed, it remains on the Edit Requisition – Review and Submit page and the page goes to edit mode. If the Requisition is in edit mode when you choose this link, budget check process is initiated. Once the process is completed, the requisition is transferred to the Confirmation page if the Requisition Header status is Approved or Pending. Otherwise, the requisition remains on the Edit Requisition – Review and Submit page if it is in Open status. This budget check process also applies to the Check Budget button. |
Budget Status |
Displays the results of a budget check initiated by selecting the Check Budget button or the Pre-Check Budget button. The options are:
Note: For some scenarios budget checking is automatically done by the system. For example if the requisition status is approved and if Change Request is triggered then budget is automatically checked when you save and submit the requisition. However you can also manually validate the budget by selecting on the Check Budget button. |
Save & Submit |
Select to save the requisition and submit it for approval, sourcing, and dispatching to a supplier. It remains editable while the status is Open or Pending. When you use this button, the system displays the Confirmation page to inform you that the request has been successfully saved and provide summarized information about the request including the requisition ID and total price. |
Save for Later |
Select if you want to save the requisition for later review or submission. |
Add Request Document |
Select to access the Add a Document page, which provides information about the requisition. You must then select the document type that you want to use to create the document and respond to wizard questions concerning the new requisition document. A requisition document is one that contains responses to wizard questions. Contract specialists can use these responses to determine proper terms and conditions for a contract document when the requisition becomes a contract. This link is available when PeopleSoft Supplier Contract Management has been installed and the application installation options have been set to use document types and to use documents with purchase order requisitions. You must also setup document types to use only with purchase order requisitions and must also be set up. After you create the document, use the Modify Request Document link to update and edit the document. |
 (Expand Section icon)


 (Line Details icon)
 (Add/Edit Comments icon)
Reviewing and Modifying Requisition Line Information
Choose the Expand Section icon on the Review and Submit page.
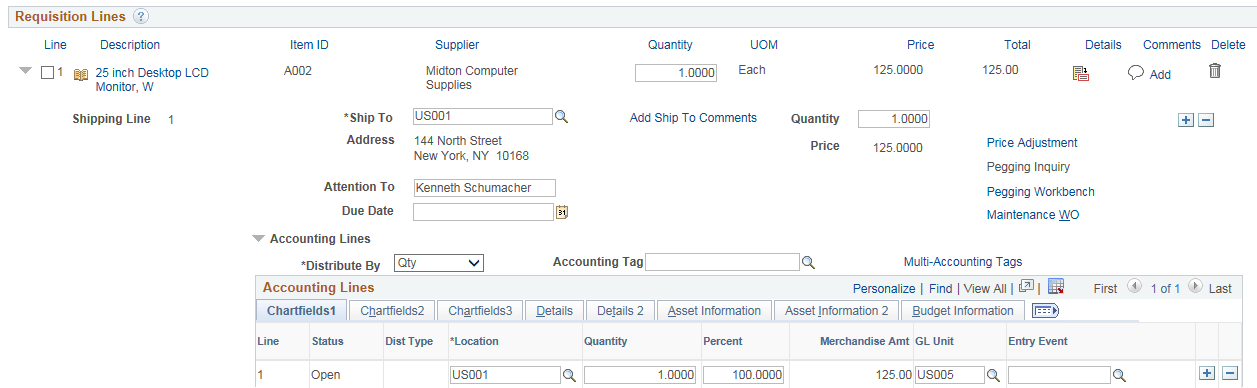
This example illustrates the fields and controls on the Reviewing and Modifying Requisition Line Information. You can find definitions for the fields and controls later on this page.
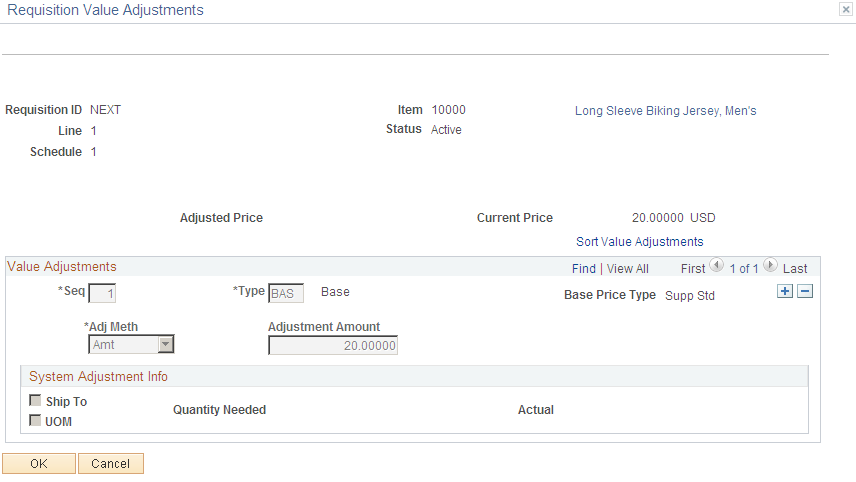
This example illustrates the fields and controls on the Requisition Value Adjustments page.
Custom Fields for Line 1 and Schedule 1 page

The requisition line section displays information that is specific to the expanded line.
Field or Control |
Description |
|---|---|
Price Adjustment |
Select to view the requisition value adjustments, which opens in a pop-up window. This link is role controlled by users with specific role name and eProcurement role action VIEW_PRICEADJUSTMENTS. |
Maintenance WO |
Associate a work order for maintenance repairs or service for the requisition line item. |
Pegging Workbench |
Use to link to items that are being received into an inventory business unit. |
Custom Fields |
Select to view the Custom Fields for Line 1 and Schedule 1 page that opens in a pop-up window. In the Custom Fields for Requisition Line1 and Schedule 1 page that pops up enter required data for the custom fields. The custom field data entered will appear in the Manage Requisitions – Requisition Details page for requisition line details. |
Add Shipto Comments |
Select to access the Requisition Ship To Comments page where you can enter additional comments for the Ship To value on the shipment schedule level of this requisition and also include one or more attachments to your comments. To view the Add Shipto Comments link, your user ID must be connected to the eProcurement role action of MULTI_COMMENTS. |
Ship Via |
Edit Ship Via Code value if required. Note: This field is visible only if SHIPVIA_FREIGHT_DISPLAY role action is enabled. |
Freight Terms |
Edit Freight Terms Code value if required. Note: This field is visible only if SHIPVIA_FREIGHT_DISPLAY role action is enabled. |
Add One Time Address |
Select the Add One Time Address link to access the Shipping Address page where you can enter a shipping address that is not currently defined in the system as a ship to location. The system uses this feature for shipments to a location that will not be used again, for example, shipments to a construction site or other temporary location. You can also load the default shipping address. Select OK to save the address. This link is not available if the user is linked to the eProcurement role action of NO_ONETIME_SHIPTO. |
Accounting Tag |
Use the prompt to select an appropriate Accounting Tag that will be used to populate ChartFields on transaction distribution lines. The system automatically prorates the amount of an accounting line according to the proration percentages defined on the Accounting Tag. Note: Accounting Tag field appears only if Accounting Tag check box is selected for eProcurement on the Accounting Tag Registration page. See Setting Up Accounting Tags |
Multi-Accounting Tags |
Click Select to open the Accounting Tags modal window where you can choose multiple accounting tags from the Accounting Tag list. Note: The Accounting Tag field and Multi-Accounting Tags link are editable/enabled only if role action ACCOUNTING_DISPLAY is assigned to the action Editable. It will be hidden if role action ACCOUNTING_DISPLAY is assigned to the action Hide and will be display only if role action ACCOUNTING_DISPLAY is assigned to the action Display Only. |
Accounting Lines |
Use this section to create multiple ChartFields for a specific line. In Details 2 tab you can click the Custom Fields link to access the Custom Fields for Line 1 and Schedule 1 and Distribution 1 page that opens in a pop-up window. |
Note: If the Amount Only check box is selected for requisition line and the requisition line is associated to Amount Only Work Order Schedule, then the Schedule Date, Amount, Currency fields are displayed. The Schedule Date, Amount, Currency fields are from WO schedule and not from the Requisition.
For more details on editing a requisition see Edit Requisition-Review and Submit Page
Use the Line Details page (PV_REQ_LN_DTLS) to confirm requisition checkout information and edit additional details for a line, such as the buyer, supplier, and other line-specific information.
Navigation:
Select the Line Details icon on the Review and Submit page.
This example illustrates the fields and controls on the Line Details page (1 of 2). You can find definitions for the fields and controls later on this page.

This example illustrates the fields and controls on the Line Details page (2 of 2). You can find definitions for the fields and controls later on this page.
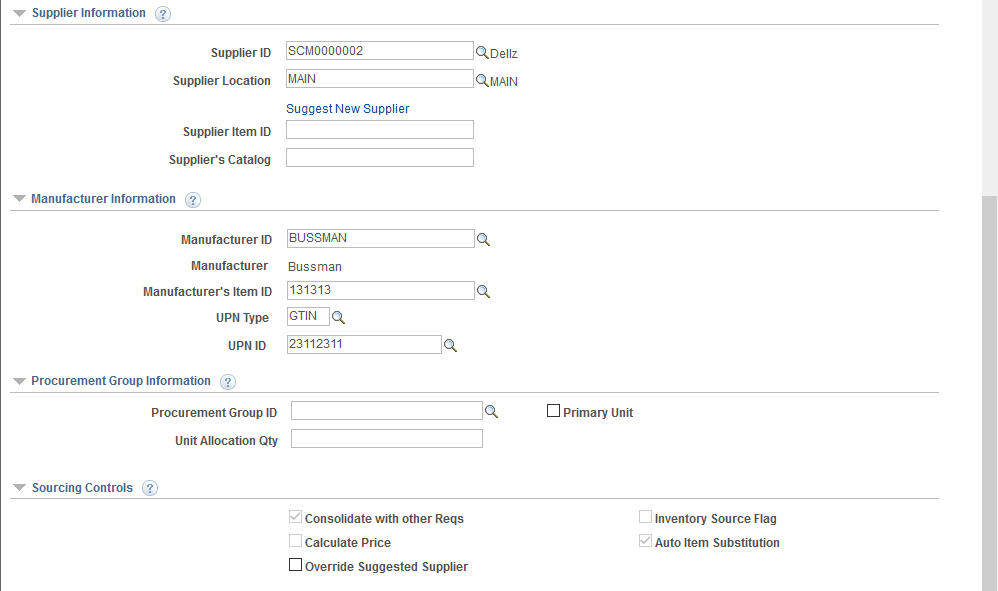
Confirm requisition checkout information and edit additional details for a line, such as the buyer, supplier, and other line-specific information.
The various information displayed on this page such as supplier information and contract information are role action controlled and can be shown or hidden accordingly.
Field or Control |
Description |
|---|---|
Line Status |
Displays the status of the requisition line. The statuses include:
|
Item Details
The Item Details group box displays item information for this requisition line.
Field or Control |
Description |
|---|---|
Merchandise Amount |
Displays the supplier's unit price and currency for the item, which are assigned on the Supplier's UOM & Pricing Info (supplier's UOM and pricing information) page. |
Item ID |
Enables the buyer to enter an item ID, when appropriate, based on the ad hoc item description entered by the requester |
Original Substituted Item |
Displays the original Item ID on the transaction line that was replaced when a Substitute Item was found. Once the field is populated, the original Item ID will not be overridden with another Item ID. If the Item ID field is changed directly by the Requester or Buyer, the Original Substituted Item field is cleared. Similarly, if the Supplier ID/Location field is changed by the Requester or Buyer, then the value in the Original Substituted Item field is cleared and the value is moved back to the Item ID field. |
|
This icon helps the Requester or Buyer to know whether the item has been substituted. This appears on a transaction line whenever the Original Substituted Item field is populated. If Original Substituted Item and Description fields are already displayed in the component, i.e. Requisition and PO, a text ‘Substitute Item in Use’ will appear. |
Auto Item Substitution |
Select to deselect the ‘Auto Item Substitution’ box on a Requisition Line when you wish to retain the current Item ID and do not want it automatically substituted during sourcing. Additionally, you will be able to reject a Substitute Item found by Auto Item Substitution on the online Requisition. |
Category |
Displays the item category. |
Description |
Displays the item description for the Original Substituted Item, if the field is populated. |
Contract Information
The PeopleSoft eProcurement, PeopleSoft Purchasing, and PeopleSoft Payables applications are integrated with the procurement contract functionality to streamline the use of contacts with requisitions, purchase orders, and vouchers. As part of the contract functionality, you can set up requisitions to automatically search for a contract to use for requisitions. Applying default contract prices to requisitions enables you to receive contract prices for requisition items and to more accurately track budgets and pre-encumbrance balances. Requesters, buyers, and administrators with the appropriate security can set to search for and use contracts on transactions at various levels.
See Applying Contracts to Requisitions.
Field or Control |
Description |
|---|---|
Contract ID |
Displays the purchasing contract used to price this requisition line. You can enter or change a contract ID in this field or a default value can be applied by the system. In order to apply a default contract, you must select the Default Contract On Req check box on the Purchasing Definition - Business Unit Options page. |
|
Select to access the Contract Search page (CNTRCT_SRCH), where you can perform advanced searches for contracts to be applied to this requisition line. |
Use Contract if Available |
Select this check box to:
Deselect this check box to not use contract pricing for the requisition line. Deselecting this check box deselects the Contract ID field and prevents the sourcing process from adding a contract. Note that deselecting this check box after a default contract has already been applied does not change the applied price. The system assumes the current price is an override value and does not change it. If the item requires a contract (the Contract Required check box is selected on the Purchasing Attributes - Purchasing Controls page) then the Use Contract If Available check box on this page is selected and cannot be changed. |
Category Line |
Apply a contract category to this line item. |
 (Contract Search icon)
Supplier Information
The Supplier Information group box displays all information pertaining to the supplier.
Field or Control |
Description |
|---|---|
Supplier ID |
Displays the ID of the supplier that supply this item. |
|
Select the SupplierLookup icon to access the Supplier Search page, where you can enter information to find a supplier. |
Supplier Location |
Displays the location of the supplier. The default is based on the value that is defined for the supplier. |
Supplier Item ID |
Displays the ID that the supplier uses to identify this item on the Item Supplier page. |
Supplier’s Catalog |
Displays Supplier’s catalog detail. |
 (Supplier Look Up)
Manufacturer Information
The Manufacturer information group box displays all information pertaining to the manufacturer.
Field or Control |
Description |
|---|---|
Manufacturer ID |
Identifies the manufacturer of the item. This value is supplied from the Supplier’s Manufacturer Info page. |
Manufacturer's Item ID |
Displays the identifier that the manufacturer uses for this item when the suggested supplier supplies the item. This value appears from the Supplier's Manufacturer Info page. |
UPN Type |
Select applicable UPN Type Code. |
UPN ID |
Select applicable universal product number that is defined by a unique combination of item ID, manufacturer ID, manufacturer item ID, and Unit of Measure. On selecting the UPN ID, the item line information associated with the selected UPN ID will be populated. |
Sourcing Controls
Use this section to alter sourcing options for the selected requisition line. You can select applicable check boxes. As it is role action controlled some check boxes will be display only.
Field or Control |
Description |
|---|---|
Calculate Price |
Select check box to have the sourcing process recalculate the item price when this requisition line enters the sourcing stage. |
Use the page (PV_REQ_COMMENTS_NW) to record one or more comments about an requisition line and add attachments.
You are limited to one comment unless your user ID is linked to the eProcurement role action of MULTI_COMMENTS.
Navigation:
Click the Add Comments icon on the Review and Submit page.
This example illustrates the fields and controls on the Line Comment. You can find definitions for the fields and controls later on this page.

Field or Control |
Description |
|---|---|
|
Select to add a new comment field. Comments are numbered as you add them. |
Use Standard Comments |
Select this link to access the Standard Comments page (PV_STD_COMM_SEC) where you can select a standard comment to be applied as a comment to this requisition line. Standard comments are frequently used comments that have been defined in the system using the Standard Comments (STANDARD_COMMENTS) and Standard Comment Type (STD_COMMENT_TYPE) components. |
|
Click to perform a spell check on the comment. |
Add Attachments |
Click to access the File Attachments window where you can browse and select a file to be attached to this comment. Multiple files can be attached to one comment. Once a file is attached, the Attachments group box displays the file details including file name, the user who attached it, and the date/time it was attached. The Send to Supplier check box applies to each file separately. |
Send to Supplier |
Select if you want the corresponding comment to appear on the purchase order that is dispatched to the supplier. Attachments can be sent with the purchase order. If the comment or attachment is for internal use only, leave the check box deselected. |
Show at Receipt |
Select if you want this comment to appear on the receipt documents. |
Show at Voucher |
Select if you want this comment to appear on the voucher. |
OK |
Select the OK button to return to the Review and Submit page with the comments and attachments that you have added on this page. |
Cancel |
Select the Cancel button to return to the Review and Submit page without saving the changes added to this page. |
 (Add a New Row icon)
 (Spell Check Comment icon)
Use the Edit Lines/Shipping/Accounting for Selected Lines page (PV_REQ_MASSCHG_SEC) to modify line, shipping instructions, and accounting details for requisition lines. However you cannot use it to modify requisition lines and requisition schedule lines that are already sourced to PO and other systems.
Navigation:
Select the Mass Change button on the Review and Submit page.
This example illustrates the fields and controls on the Edit Lines, Shipping, and Accounting Information page. You can find definitions for the fields and controls later on this page.

The requisition line number that you selected on the Review and Submit page appears for you to work with.
Field or Control |
Description |
|---|---|
Supplier ID |
Change the supplier for this specific line. When you click the Apply button, the supplier ID replaces the data on the selected lines. |
Supplier Location |
Change the supplier location for this specific line. When you click the Apply button, the supplier location replaces the data on the selected lines. |
Buyer |
Change the buyer for this specific line. When you click the Apply button, the buyer replaces the data on the selected lines. |
Category |
Change the category for this specific line. When you click the Apply button, the category replaces the data on the selected lines. |
Shipping Information
Field or Control |
Description |
|---|---|
Ship To Location |
Review or change the ship to location code. This code identifies the shipping address for this request. |
Address |
Select the Add One Time Address link to access the Shipping Address page where you can enter a shipping address that is not currently defined in the system as a ship to location. The system uses this feature for shipments to a location that will not be used again, for example, shipments to a construction site or other temporary location. Click OK to save the address. This link is not available if the user is linked to the eProcurement role action of NO_ONETIME_SHIPTO. |
Due Date |
Review or change the arrival date of this shipment. The date that you enter here is a suggested date. When the purchase order is created, the system or buyer attempts to meet this date or changes it to a realistic due date. |
Attention |
Enter the name of the individual who should receive the items or services. Once the shipment is received, this individual should record the receipt, enabling the buyers to track the quality and promptness of the supplier. |
Ship Via |
Edit Ship Via Code value if required. Note: This field is visible only if SHIPVIA_FREIGHT_DISPLAY role action is enabled. |
Freight Terms |
Edit Freight Terms Code value if required. Note: This field is visible only if SHIPVIA_FREIGHT_DISPLAY role action is enabled. |
Comments |
Enter any comments. If there is already a default or existing comment then the comment you add will be appended to the existing content. But if there are comments for other ship then it will be overwritten. To view the Comments field your user ID must be connected to the eProcurement role action of MULTI_COMMENTS. |
Accounting Lines
Use this section only if you need to change the accounting information for the selected requisition lines. The default structure is derived from the user profile, the item category, and the Define Requisition page.
Select the appropriate values for the requisition line if you must deviate from the default accounting structure.
Field or Control |
Description |
|---|---|
SpeedChart |
Select a SpeedChart Key by clicking the prompt. Based on the SpeedChart key selected, the system automatically distributes the accounting line amounts according to the proration percentage defined for the selected SpeedChart. You can modify the distribution values. Note: This field is visible only if role action ACCOUNTING_DISPLAY is assigned to the action Editable. It will be hidden if role action ACCOUNTING_DISPLAY is assigned to the action Hide or Display Only action. SpeedChart will be invisible if Accounting Tag is enabled. |
Accounting Tag |
Use the prompt to select an appropriate Accounting Tag that will be used to populate ChartFields on transaction distribution lines. The system automatically prorates the amount of an accounting line according to the proration percentages defined on the Accounting Tag. Note: This field is visible only if role action ACCOUNTING_DISPLAY is assigned to the action Editable. It will be hidden if role action ACCOUNTING_DISPLAY is assigned to the action Hide or Display Only action. |
Dist |
Displays the distribution line number. |
Load Values From Defaults |
Select this link to load the fields on this page with defaults specified on the Requisition Settings page. The default values replace Distribution line values. |
Note: The ChartField values on the tabs; Chartfields1, Chartfields2, and Chartfields3 are described further in this documentation.
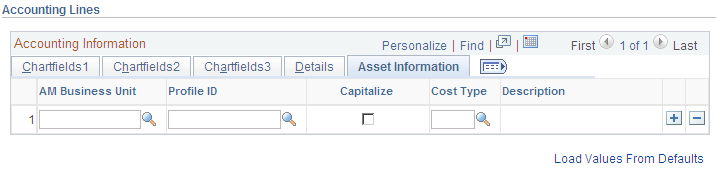
Accounting Lines — Asset Information Tab
Select the Asset Information tab.
This example illustrates the fields and controls on the Asset Information tab. You can find definitions for the fields and controls later on this page.
Field or Control |
Description |
|---|---|
AM Business Unit |
Identify the Asset Management business unit that is responsible for tracking asset transactions. |
Profile ID |
Select a value that represents the default value from the Item Categories - Category Definition page. An asset profile ID on a purchase order, in conjunction with an asset business unit, indicates that PeopleSoft Asset Management is to be notified of the purchase of this item when it is received. To access the Category Definition page, select |
Capitalize |
Select to indicate that the requisition item is capitalized. |
Cost Type |
Select the asset cost type, such as materials, labor, and overhead. Cost types are used with asset category and transaction codes to determine into which accounts the costs are entered in the general ledger. |
Use the Distribution Change Options page (PV_REQ_DIST_CHNG) to select how to apply distribution changes to the lines of your requisition.
Navigation:
This example illustrates the fields and controls on the Distribution Change Options page. You can find definitions for the fields and controls later on this page.

Use this page to determine how the system applies accounting distribution changes to the selected lines.
The options that appear on this page are dependent on the changes that you make. Select one of the following options and click the OK button to apply a change.
Field or Control |
Description |
|---|---|
All Distribution Lines |
Select this option to apply changes to all existing distribution lines. |
Matching Distribution Lines |
Select this option to apply changes to each distribution line by matching the distribution line numbers. |
Replace Distribution Lines |
Select this option to remove the existing distribution lines and replace them with the distribution line changes. |
This page displays three options only if the user has opted for one default distribution line on the Requisition Settings page or on the Edit Lines/Shipping/Accounting for Selected Lines page. This page will not appear if there is no change in the distribution section of the requisition line or if the distribution section is hidden or display-only. Instead, the system will display a message informing users that changes will be applied to the lines/schedules
This page will display only two options if the user chooses multiple default distribution lines on the Requisition Settings page or on the Edit Lines/Shipping/Accounting for Selected Lines page. The All Distribution Lines option will not be available for selection.
This example illustrates the fields and controls on the Distribution Change Options — 2 options page.

When chunking is enabled if the user edits an existing requisition (for changes initiated from the Requisition Settings page), the system displays a message asking if all the requisition lines are to be loaded:
If you select Yes then all the lines are loaded with changes to the Edit Requisition – Review and Submit page and chunking icons do not appear. You must save, submit, and edit the requisition again for the chunking icons to reappear.
If you select No then the system will not continue to load all the lines. No changes are made and the chunking icons remain on the page.
For applying distribution changes from the Edit Lines/Shipping/Accounting for Selected Lines page, the default values on this page will be applied to the corresponding fields only for selected lines on the Review and Submit page.
For the All Distribution Lines and Matching Distribution Lines options, the percentage change on the Requisition Settings page or on the Edit Lines/Shipping/Accounting for Selected Lines page will not alter the percentage value of the existing requisition lines. If you select the Replace Distribution Lines option, the default distributions on the Requisition Settings page or on the Edit Lines/Shipping/Accounting for Selected Lines page will replace the existing distributions on the Review and Submit page. Default distributions are not overridden or provided by default to the sourced/canceled/closed distribution lines. Distribution lines that are to be applied on the Review and Submit page will be recalculated based on the SpeedChart/Accounting Tag percentage selected on the Requisition Settings page and the Edit Lines/Shipping/Accounting for Selected Lines page. When modified, if the recalculated percentage exceeds 100 percent, then the system will display a message instructing the user to readjust the total distributed percentage to 100 percent. Accounting Tags offer the same functionality as SpeedCharts, with some enhancement with respect to the ability to assign favorite tags and additional component, product, user, and permission list security options.
Use the Edit Shipping For All Lines page (PV_REQ_MASSCHG_SEC) to edit shipping information for all lines.
Navigation:
To access this page (from Checkout – Review and Submit page, click on Edit for All Lines link).
This example illustrates the fields and controls on the Edit Shipping For All Lines Page.
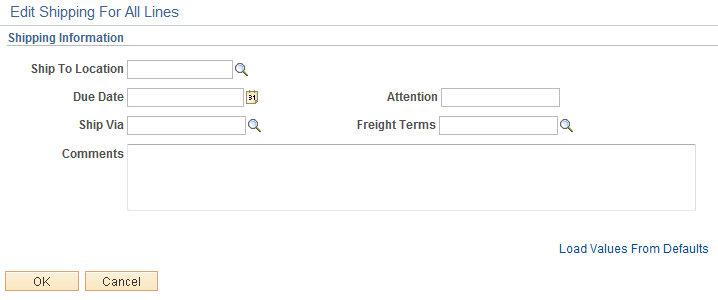
When chunking is enabled, the system displays a message asking if all requisition lines are to be loaded.
If you select Yes then all the lines are loaded with changes to the Edit Requisition – Review and Submit page, and chunking icons are not displayed. The Shipping Summary section is also updated with the latest changes on the entire Requisition. You must save, submit, and edit the requisition again for the chunking icons to reappear.
If you select No then the system will not continue to load all the lines. No changes are made and the chunking icons remain on the page.
Use the page (REQ_SCHED_VAT) to maintain value added tax details for shipping lines.
Navigation:
Click the Shipping VAT link on the Review and Submit page.
Use this page to make adjustments to VAT shipping details. Information that appears on the page relates to the item on the line number of the requisition and the shipping line that you selected on the Review and Submit page.
This example illustrates the fields and controls on the Maintaining VAT Details for Shipping Lines. You can find definitions for the fields and controls later on this page.

Before you can review VAT details on this page, make sure that you are an administrator:
Define VAT default value settings for the business unit.
To access the field, select and click the VAT Default link.
Select the Calculate VAT on Req (calculate value added tax on requisition) check box.
To access the check box, select
Assign the user role action VAT Details to the role name.
To access the check box, select select VAT Details as the Action Name, and add the user role for the role action.
Select the View/Override VAT Details check box to authorize a requester to view and update VAT information.
To access the check box, select click the Procurement link, and then click Requisition Authorizations.
(Optionally) Select a value in the Allow Override Recovery/Rebate field to enable a requester to override system-created VAT recovery and rebate percentage values.
To access the field, select click the VAT Default link, and select a value.
Values include:
Do Not Allow Override.
Override Both Recovy/Rebate % (override both recovery and rebate percentages).
Override Rebate % Only (override rebate percentage only).
Override Recovery % Only(override rebate percentage only).
Field or Control |
Description |
|---|---|
Line |
Displays the line number to which VAT information on this page pertains. |
Schedule |
Displays the schedule number from the requisition. |
Return to Schedule Page |
Click to access the Review and Submit page, where you can update shipping information. |
Physical Nature |
Displays whether the requisition is for goods or services. This is determined by the type of requisition that you created. |
VAT Locations
Field or Control |
Description |
|---|---|
Ship From Country |
Select the seller's country from which the requisition item for this line is to be shipped. |
Ship From State |
Select the state, province, or area from which the item is to be shipped. |
Ship to Country |
Displays the buyer's country where the item is being shipped. You define this value on the shipping address. |
Ship to State |
Displays the state, province, or area where the item is being shipped. You define this value on the shipping address. |
VAT Defaults
Field or Control |
Description |
|---|---|
Reporting Country |
Select the VAT registration country in which this transaction takes place. |
Defaulting State |
Select the state for recording VAT details. |
Supplier Registration Country |
Select the VAT registration country in which the seller does business. |
Supplier Registration ID |
Enter the VAT registration identifier for this supplier. |
Exception Type |
Select a value to indicate that an exception to the VAT was issued. Exception values are None, Exonerated, and Suspended. |
Certificate ID |
Enter a certificate ID if an exception was issued for the VAT. |
Calculate at Gross or Net |
Select to calculate the VAT. Values include: Net: When this option is selected, the early payment discount is applied to the goods amount before the VAT is calculated. The amount of VAT that is calculated using this method is the amount that is to be paid, regardless of whether the early payment discount is actually taken at the time of payment. Gross: When this option is selected, the VAT is initially calculated based on the gross transaction amount. The early payment discount is not taken into account at this point. However, in some countries an adjustment is made to the VAT amount at the time of payment if the early payment discount is taken. |
Recalculate at Payment |
Select to have the system recalculate VAT at the time of payment if a discount has been taken. This field value appears by default from the VAT entity. If the Calculate at Gross or Net field value is Gross, the check box is selected. If the field value is Net, the check box is deselected. |
Include Freight |
Select if the freight amount needs to be taxed. The system adds the freight amount to the gross or net amount before calculating VAT. This setting appears by default from the VAT entity. |
Include Miscellaneous |
Select if miscellaneous charges need to be taxed. The system adds the miscellaneous charges to the gross or net amount before calculating VAT. This setting appears by default from the VAT entity. |
Declaration Point |
Select when to declare VAT. Values are: Delivery: Declares VAT when shipments are received. Invoice: Declares VAT when a transaction is invoiced. Payment: Declares VAT when payment is tendered |
Rounding Rule |
Select the rounding rule for VAT amounts. Values are: Natural Round: Amounts are rounded normally (up or down) to the precision that is specified for the currency code. Up: Rounds up and limits rounding precision to one additional decimal place. Down: Rounds down. Rounding only affects VAT amounts, the currency numbers stored in the system, and how currency numbers are printed on reports. |
Apply Domestic Reverse Charge |
Select if this country requires the use of the domestic reverse charge provision. |
Use Type |
Determines VAT recoverability. The field value is retrieved from the VAT default hierarchy, but you can override this value. Use type is a type of activity in which a purchased good or service is to be used, and therefore, you use it to determine a recoverability percent and a rebate percent (when applicable) that is to be applied to a transaction line. Activities are categorized as taxable, exempt, or mixed. Where activity is mixed, you can associate either the ratio of taxable activity to exempt activity directly with the use type, or you can indicate that this ratio is determined at the ChartField level. |
Treatment |
Select a value that controls VAT default and transaction behavior. It is a description of how the transaction must be treated for VAT purposes. This is used to determine how VAT defaults are applied, what accounting entries are required, and how and whether the transaction is reported on the VAT return. You can override the value in this field. Values are: Domestic Goods Purchase Domestic Service Purchase EU Goods Purchase (European Union goods purchase) EU Service Purchase (European Union service purchase) No VAT Processing Outside of Scope Self-Assess Goods Import Self-Assess Service Import Zero-Rated Goods Import |
Applicability |
Select whether VAT should be calculated for this schedule. While most requisitions may be subject to VAT for any VAT countries, some items or item categories may be exempt or outside of scope for VAT. You can override the default value here. |
VAT Code |
Select the tax code that is used to define a percentage that the system uses to determine the VAT amount. The VAT code is similar to the sales and use tax code, with a few exceptions. The tax authority that is associated with the VAT code generally consists of a single authority, and the ChartFields for a VAT code don't reside with the tax authority but are determined by the combination of the VAT code, VAT account type, and VAT transaction type. |
Record Output VAT |
Select to have tax for this transaction charged on the supply of goods or services. You may want to select this check box for drop shipments. |
Tax Rate |
Displays the rate at which this item is taxed. |
Transaction Type |
Select a value to categorize VAT transactions according to particular VAT accounting and reporting requirements. The system uses the VAT code and transaction type in conjunction with the VAT account type to obtain the ChartFields for accounting entries. |
Adjust Affected VAT Defaults |
Click to adjust the VAT defaults on this page that are affected by changes that you have made on the page. Changes that you have made to the defaults that affect other VAT defaults are retained. |
Levels |
Displays the level of information (obligation) that intracommunity sales and purchases require. This information is used mainly in France to reduce the declarative workload for small- and medium-sized industries. PeopleSoft delivers the Intrastat form with the most restrictive level (Level 1), which covers all levels of obligation. This is an informational field that determines the level that is checked on certain Intrastat reporting forms. |
Reset All VAT Defaults |
Click to reset all the VAT defaults. Changes that you have made to VAT defaults are reset to their original values. |
Both the Header Comments page and the Requisition Ship To Comments page use the same fields. Navigation is different and each page adds comments and attachments to a different part of the requisition.
Use the Header Comments page (PV_REQ_COMMENTS_NW) to record one or more comments about a requisition and add attachments.
You are limited to one comment at the header-level of the requisition unless your user ID is linked to the eProcurement role action of MULTI_COMMENTS.
Navigation:
Select the Add more Comments and Attachments link on the Review and Submit page.
This example illustrates the fields and controls on the Header Comments. You can find definitions for the fields and controls later on this page.

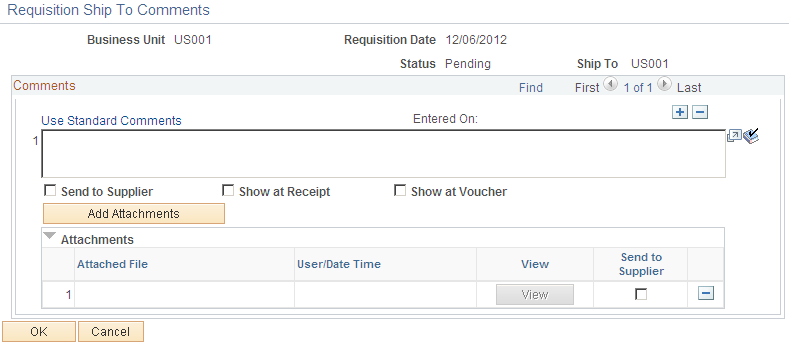
This example illustrates the fields and controls on the Requisition Ship To Comments page. You can find definitions for the fields and controls later on this page.
Field or Control |
Description |
|---|---|
|
Select to add a new comment field. Comments are numbered as you add them. |
Use Standard Comments |
Select this link to access the Standard Comments page (PV_STD_COMM_SEC) where you can select a standard comment to be applied as a comment to this requisition. Standard comments are frequently used comments that have been defined in the system using the Standard Comments (STANDARD_COMMENTS) and Standard Comment Type (STD_COMMENT_TYPE) components. |
|
Select to perform a spell check on the comment. |
Add Attachments |
Select to access the File Attachments window where you can browse and select a file to be attached to this comment. Multiple files can be attached to one comment. Once a file is attached, the Attachments group box displays the file details including file name, the user who attached it, and the date/time it was attached. The Send to Supplier check box applies to each file separately. |
Send to Supplier |
Select if you want the corresponding comment to appear on the purchase order that is dispatched to the supplier. Attachments can be sent with the purchase order. If the comment or attachment is for internal use only, leave the check box deselected. |
Show at Receipt |
Select if you want this comment to appear on the receipt documents. |
Show at Voucher |
Select if you want this comment to appear on the voucher. |
OK |
Select the OK button to return to the Review and Submit page with the comments and attachments that you have added on this page. |
Cancel |
Select the Cancel button to return to the Review and Submit page without saving the changes added to this page. |
 (Add a New Row icon)
 (Spell Check Comment icon)
Requisition Header Comments
When editing an existing requisition that has the multi-comment role action enabled and requisition chunking is being used, the system handles header comments as stated:
The Review and Submit page within the Edit Requisition component displays only the first header comment entered on the page. When moving from one chunk to another chunk, only the first header comment is displayed on the Edit Requisition-Review and Submit page.
If you have more than one header comment, the More Comments link is available within the header Comments group box. When you click on the More Comments link, all header comments are displayed with attachments (if added).
Use the Confirmation page (PV_REQ_WF_PREVIEW) to confirm requisition checkout information.
Navigation:
Select the Save & submit button on the Review and Submit page.
This example illustrates the fields and controls on the Confirmation page. You can find definitions for the fields and controls later on this page.

The Confirmation page displays basic information about the requisition and the number of items that it contains. It appears when you submit a requisition .
Field or Control |
Description |
|---|---|
Requested For |
Displays the name of the person requesting these materials or services. This can be your name or you can purchase on behalf of another person. For you to purchase on behalf of another user, these requesters must be defined on the User Preferences page. |
Number of Lines |
Displays the number of lines on this requisition. |
Requisition Name |
Displays a description of the request to help you identify this requisition as it flows through the system. If this field is left blank, the system uses the requisition ID as the name. |
Business Unit |
Displays the PeopleSoft Purchasing business unit that holds this requisition. |
Status |
Displays the status of a requisition. Values are Open, Pending, Approved, and Complete. |
Priority |
Displays the priority of the requisition. The values are Low, Medium, or High. |
Budget Status |
If the Commitment Control feature is turned on, then this field displays the current budget checking status for this requisition. Note: For some scenarios budget checking is automatically done by the system. For example if the requisition status is approved and if Change Request is triggered then budget is automatically checked when you save and submit the requisition. However you can also manually validate the budget by clicking on the Check Budget button. |
VAT Amount (value added tax amount) |
Displays the amount of value added tax (VAT) calculated on a VAT enabled requisition. It does not appear when the Calculate VAT on Requisition check box at purchasing business unit level is not selected, the purchasing business unit is not in a VAT environment, the VAT_DETAILS eProcurement role action is not used and the user eProcurement role is not added to the user ID profile. |
Pre-Encumbrance Balance |
Displays the Pre-encumbrance balance amount after requisition is successfully budget checked. Pre-encumbrance balance is displayed in the transaction currency of the requisition and is based on the transaction budget date, general ledger unit and commitment control ledger group. Pre-encumbrance balance can be partially or fully liquidated from purchase order(s). Click the Pre-Encumbrance Balance amount hyperlink to view requisition accounting entries. You can use this page to view accounting information details including the commitment control ledger group and transactions that have been performed against the requisition. |
Edit This Requisition |
Select to access the Edit Requisition component, where you can make changes to the requisition and submit it again. |
View printable version |
Select this link to review an online requisition that shows the layout of the printed version. The requisition opens up as a second window and can be printed. The Oracle BI Publisher is used to generate this report and you can customize it. You can choose to display this report with or without the distribution details. |
Manage Requisitions |
Select to go to the Manage Requisitions component, where you can further process the requisition. |
Create New Requisition |
Select to add a new requisition. |