Setting Up the Fluid User Interface to Create Requisitions
|
Page Name |
Definition Name |
Usage |
|---|---|---|
|
PV_MOB_PREF_FL |
View and edit preferences. |
|
|
PV_LEFTNAV |
Set up eProcurement requisition left navigation order and labels for the Fluid User Interface. |
|
|
PV_REQTYPE_TMP_FL |
Enable or disable Custom fields (for Header and Line) display in the drop-zone area of the requisition. |
|
|
PV_WSR_CREATE_FL |
Administrators can define a rule with weights and visibility for multiple attributes. |
|
|
PV_MASS_CHANGE_FL |
Replace the original Requester of the selected Requisitions with a new Requester |
|
|
PV_MOB_AMT_ONL_CTG |
Designate the Amount Only flag for the selected item category. Based on this designation, the Amount Only flag is defaulted on the Special Requests, Fixed Cost Service, Variable Cost Service, and Time and Materials pages. |
Use the My Preferences: eProcurement Requisition page (PV_MOB_PREF_FL) to set up user preferences for the required pages.
Navigation:
This example illustrates the fields and controls on the My Preferences: eProcurement Requisition page. You can find definitions for the fields and controls later on this page.
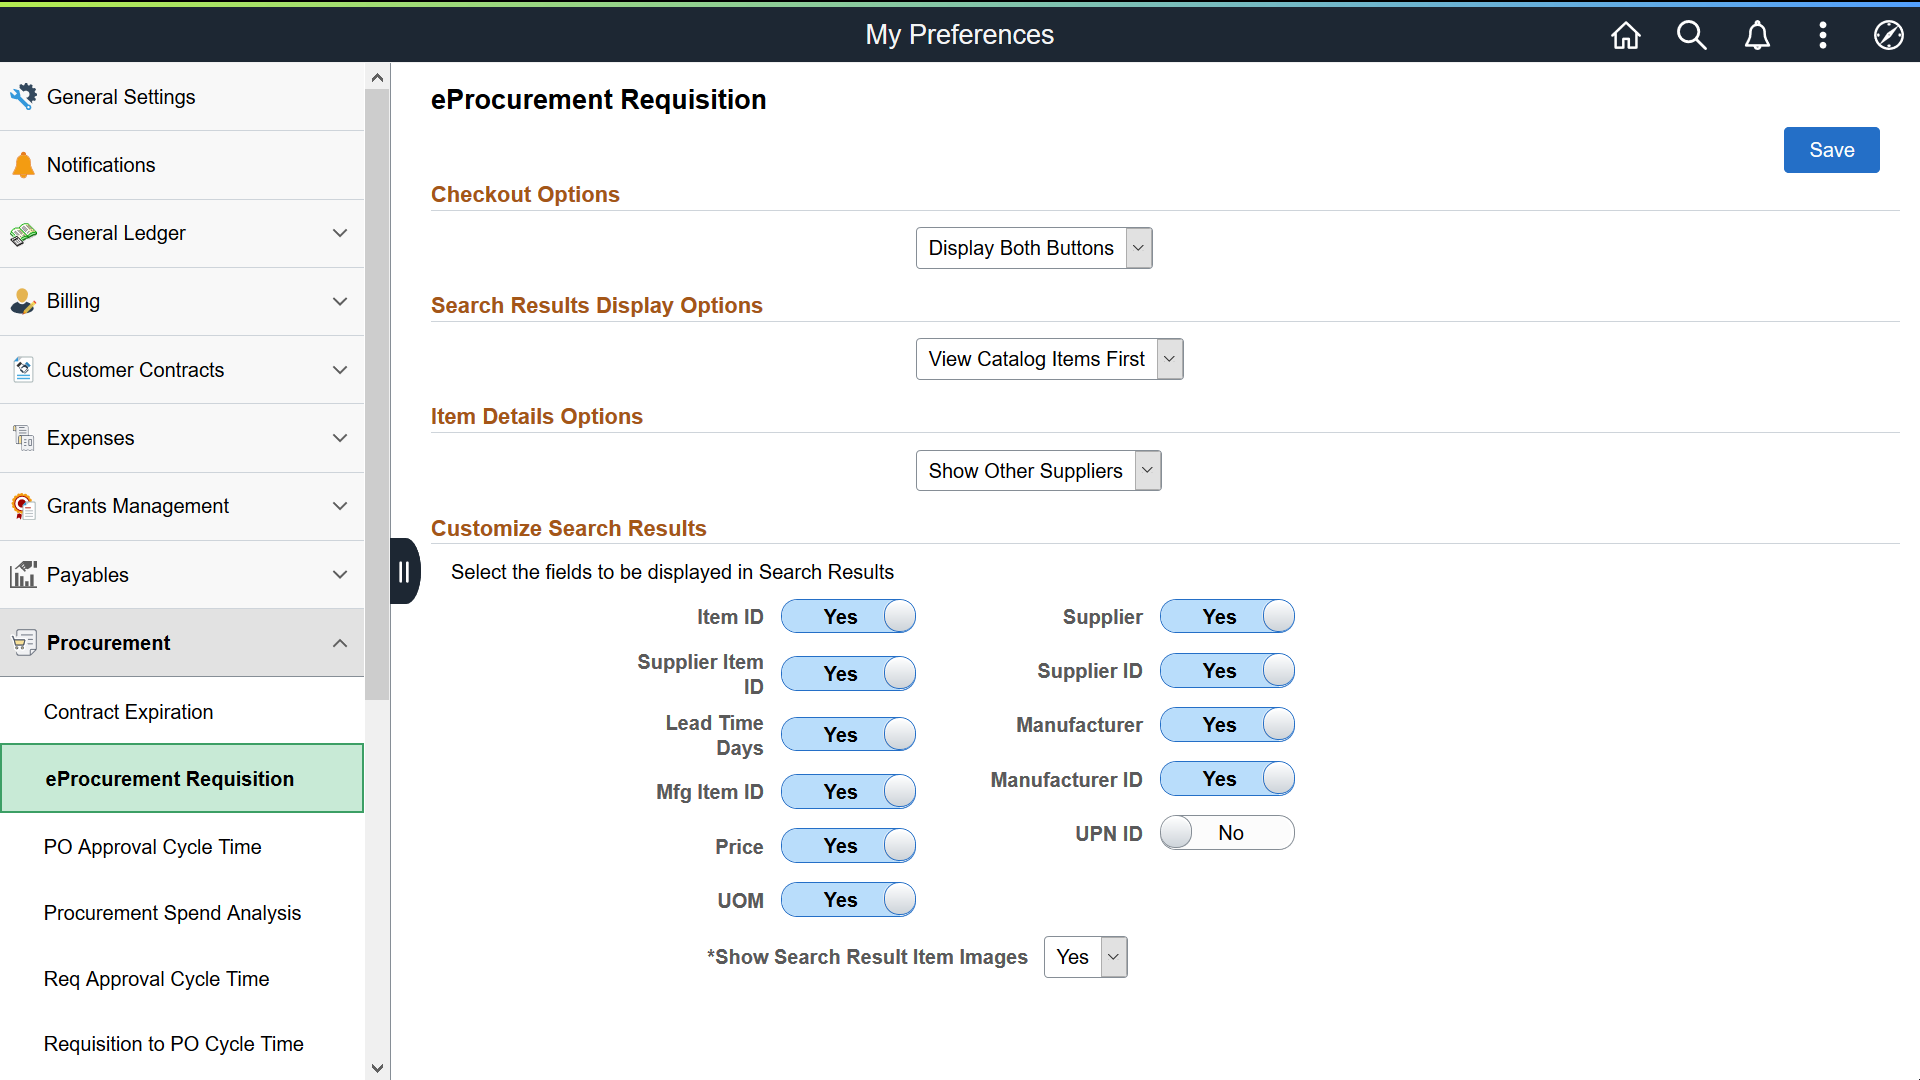
The values that you select on this page override what is selected on the ePro Installation Options Page and the Customize Search Results Display Page.
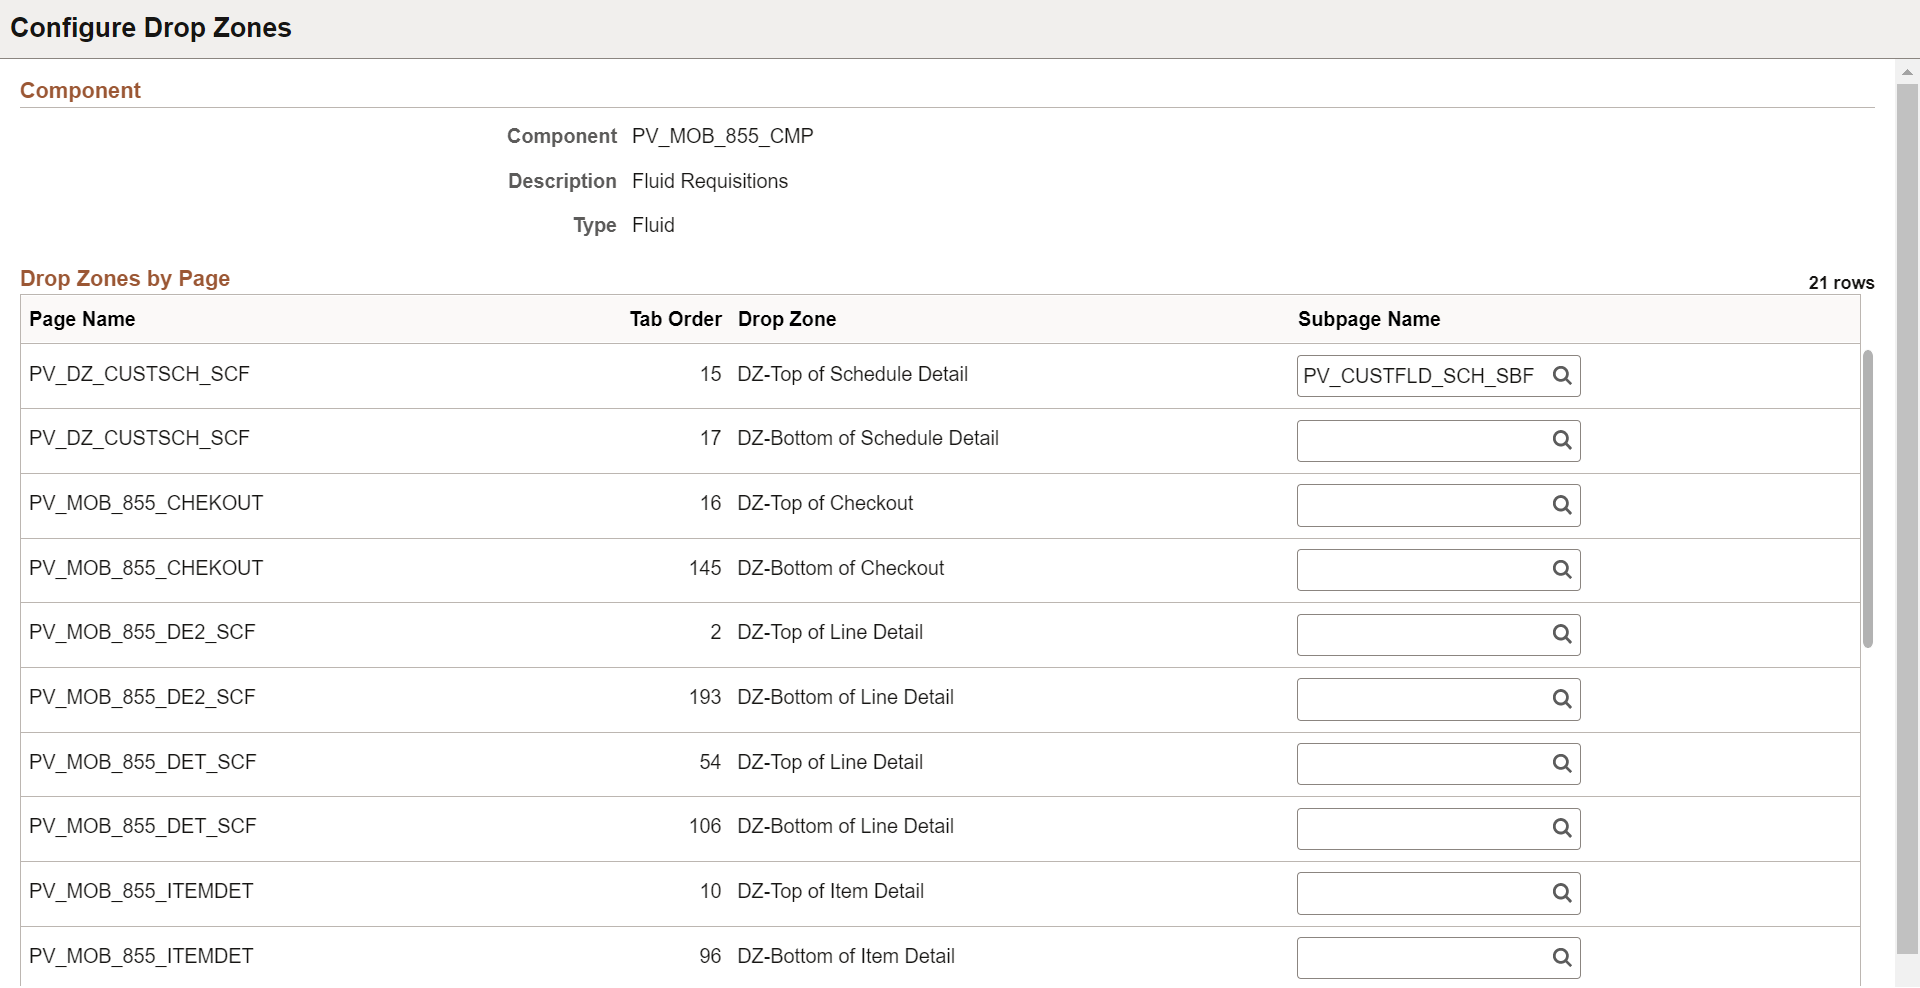
The approved method for using custom fields in fluid requisition is to use drop zones. In eProcurement, you need to set up subpages for header, line, schedule, distribution, or only for the sections for which you need drop zone pages.
Navigation:
Note: The user defined fields are available on the procurement transactions when you check the Enter Custom Fields check box under General Purchasing Controls on the Purchasing Installation Options page. See Installation Options - Purchasing Page.
This example illustrates the fields and controls on the Configure Drop Zones page (1 of 2).
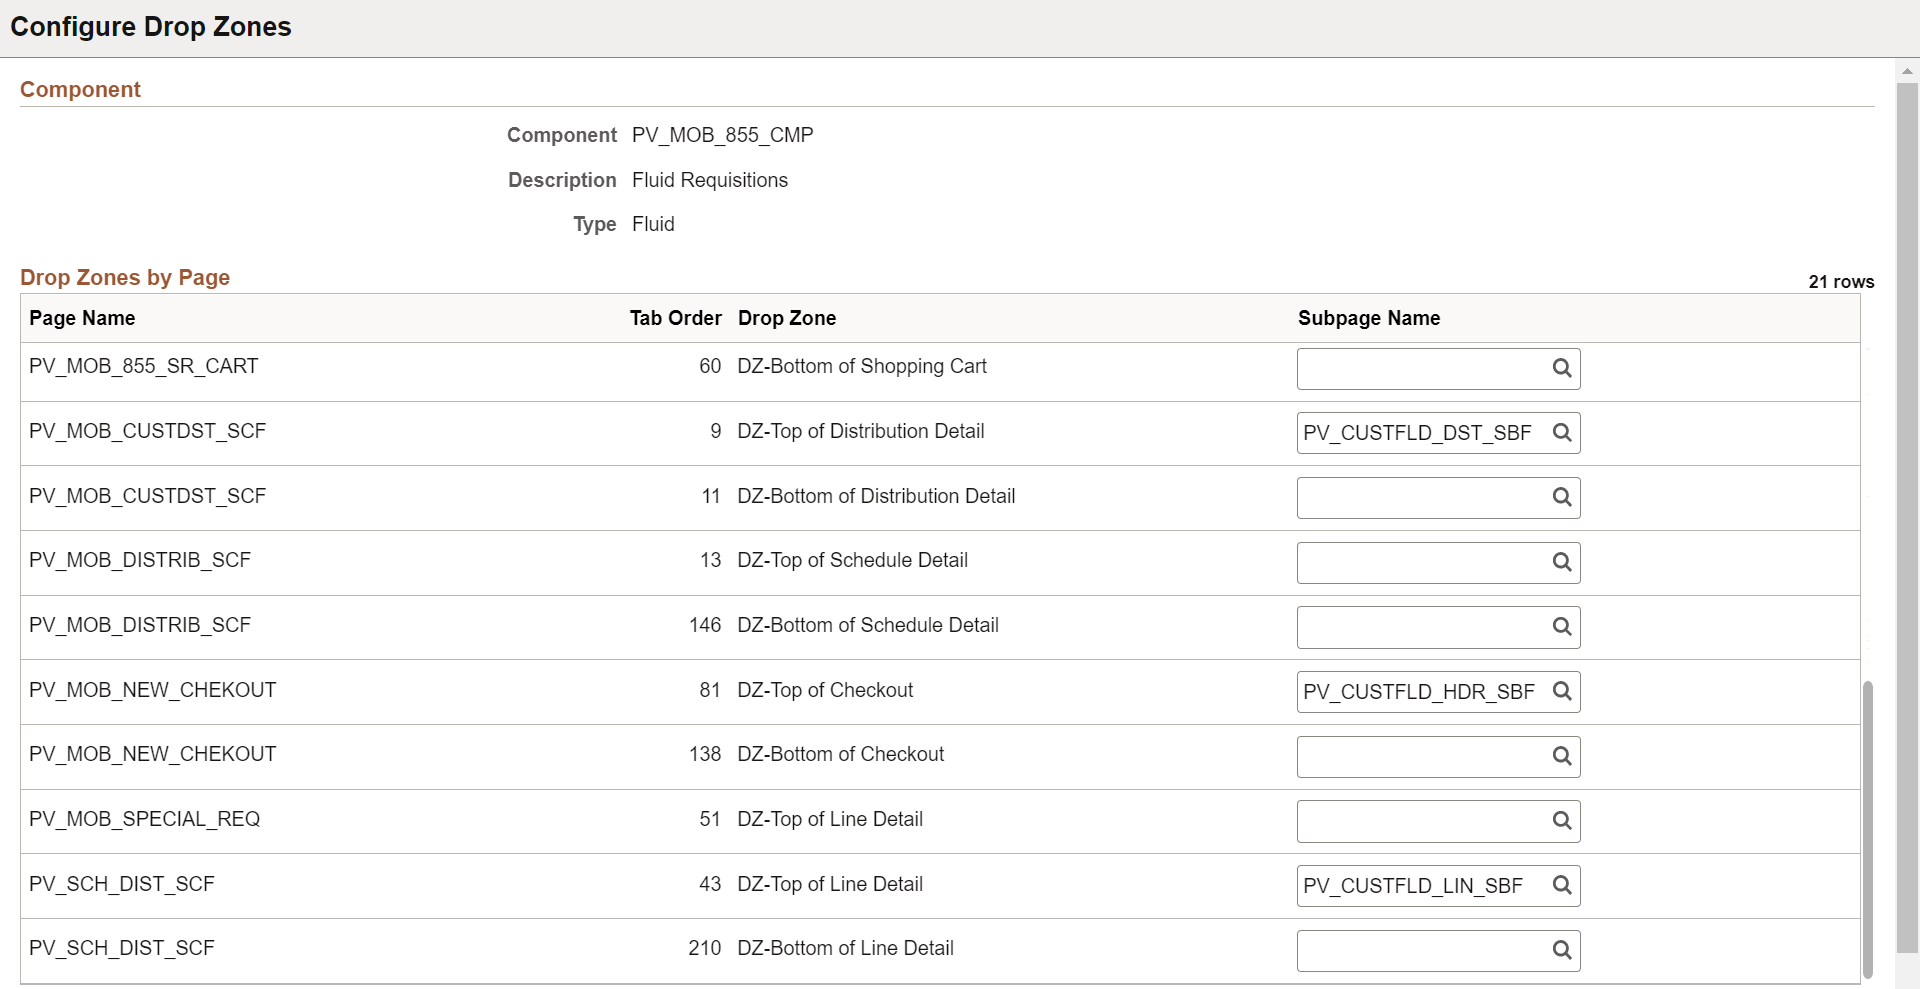
This example illustrates the fields and controls on the Configure Drop Zones page (2 of 2).
For more information about Drop Zones, see Understanding Drop Zones and the product documentation for PeopleTools: Fluid User Interface Developer’s Guide, “Creating Pages for Fluid Applications”, Creating and Configuring Drop Zones.
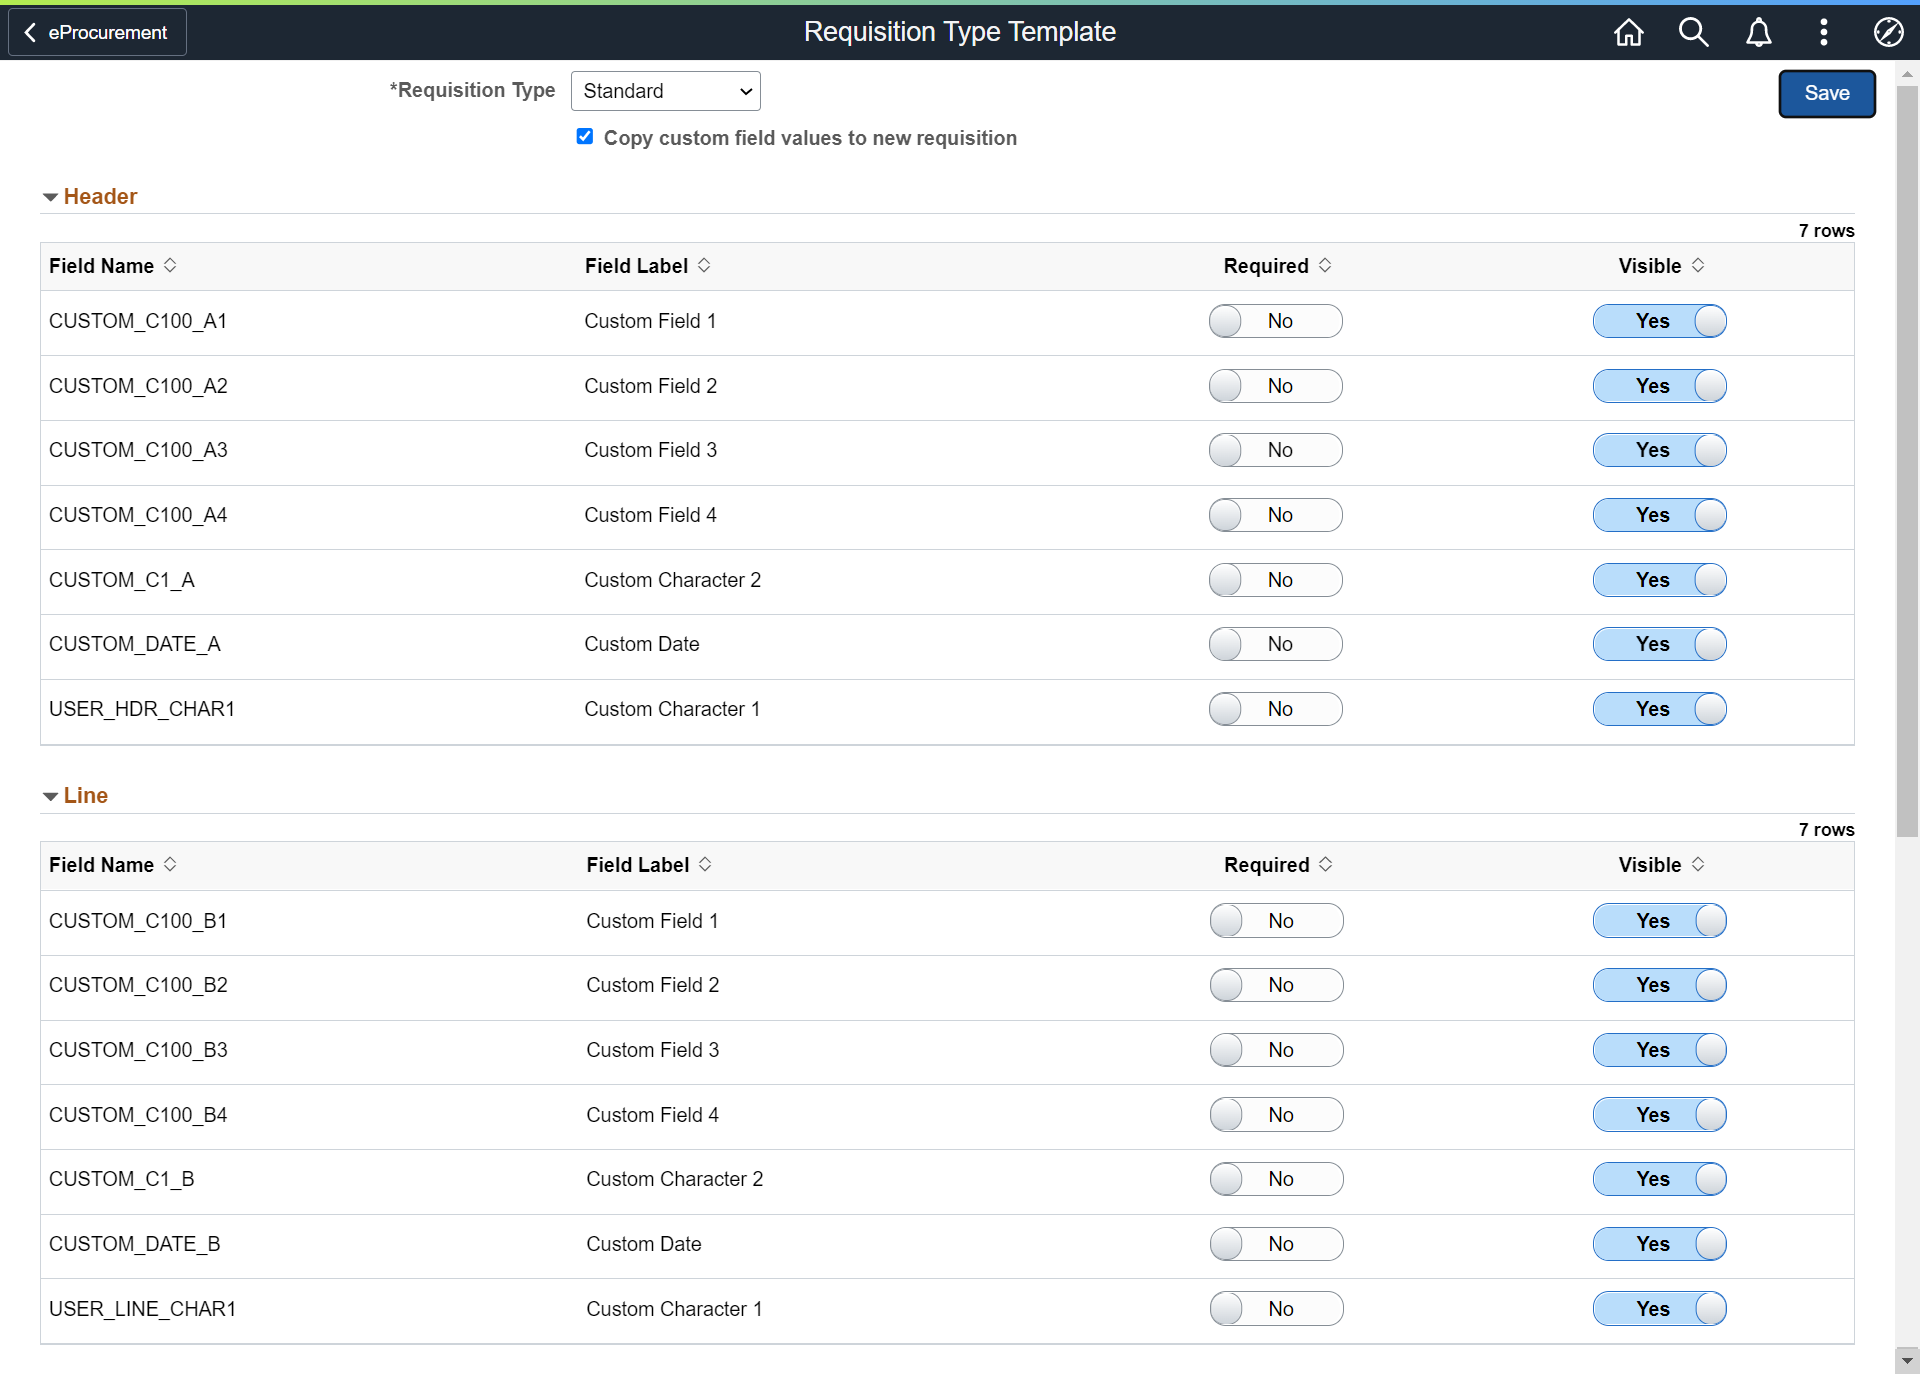
Use Requisition Type Template page (PV_REQTYPE_TMP_FL) to enable or disable custom fields (for Header and Line) which will be displayed in the drop-zone area of the fluid requisition component only.
The template type settings will affect fields only on fluid ePro requisitions. The fields available on the template page will depend on the fields in the records, PUR_USR_HDR_SBR for header and PUR_USR_LIN_SBR for line.
Navigation:
This example illustrates the fields and controls on the Requisition Type Template Page. You can find definitions for the fields and controls later on this page.
|
Field or Control |
Description |
|---|---|
|
Requisition Type |
Select the Requisition Type (Standard, Bill Only, and Bill and Replace) from the drop-down. The Header and Line custom fields will appear on the selected type of requisitions. Standard is the normal ePro Requisition used in the past. |
|
Copy custom field values to new requisition |
Select Copy custom field values to new requisition to allow to copy the custom field values from previously saved requisition to new requisition. If this is turned off, then custom field values will never be copied when a requisition is copied. |
|
Header and Line |
Provides the list of Header and Line custom fields available for the drop-zone area of the requisition pages.
|
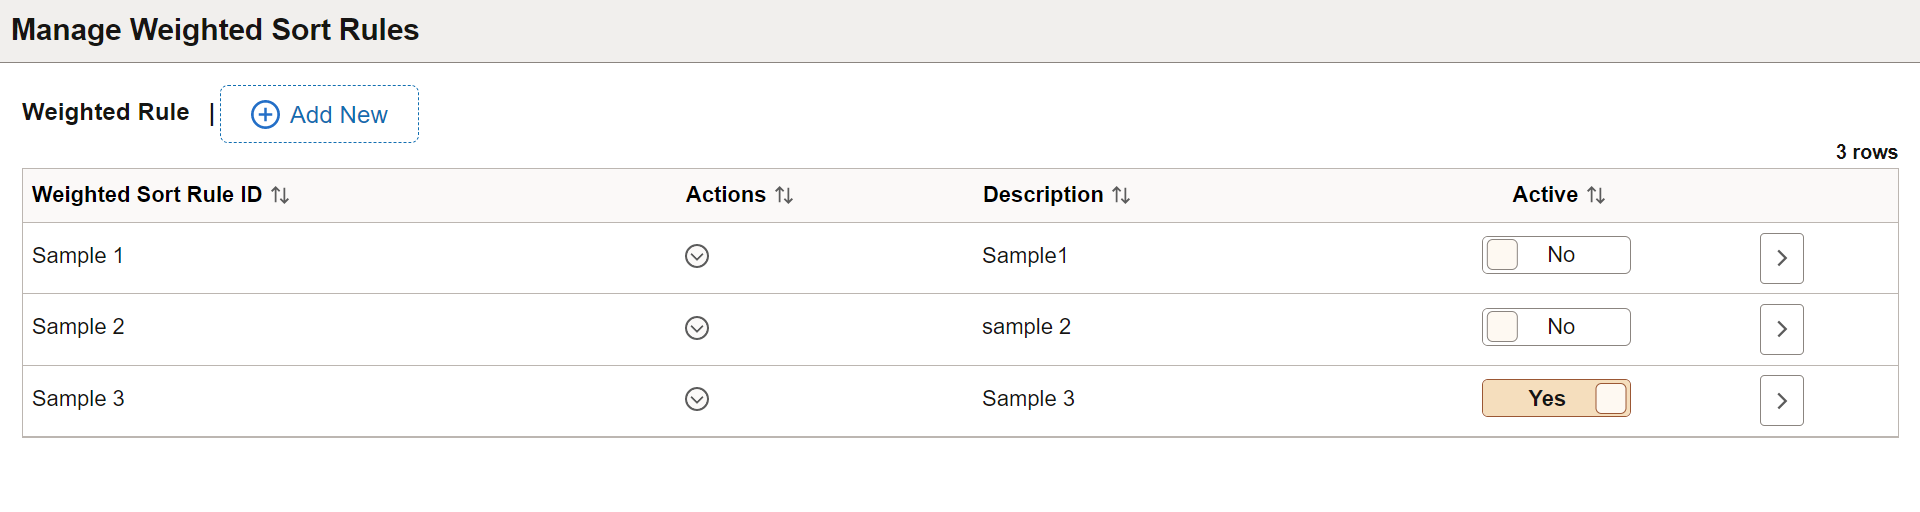
Use Manage Weighted Sort Rules page (PV_WSRULE_SRCH_FL) to define weight for the attributes (for example, contract = 10, inventory = 5, preferred supplier = 10, and so on) and whether that attribute will be visible on the search row. Administrators can define a rule with weights and visibility to multiple attributes, which is used by the Relevance Weighted Sort to dynamically push the items with the highest total weight to the top of the search results.
For each Rule ID, a number of attributes can be selected and determine the weighting of that attribute and also control whether that attribute will be visible on the search row.
Navigation:
This example illustrates the fields and controls on the Manage Weighted Sort Rules Page. You can find definitions for the fields and controls later on this page.
|
Field or Control |
Description |
|---|---|
 Actions |
Click the Actions icon to perform related actions for the selected rule.
|
|
Active |
Click the toggle button to enable or disable the selected Weighted Sort Rules. You can enable only one Weighted Sort Rule at a time. If you try to active second rule when one rule is already active, a prompt will be displayed with a confirmation message to disable the already active one. |
 Edit |
Click the Edit icon to view or modify the Weighted Sort Rules details. |
Adding Weighted Sort Rules
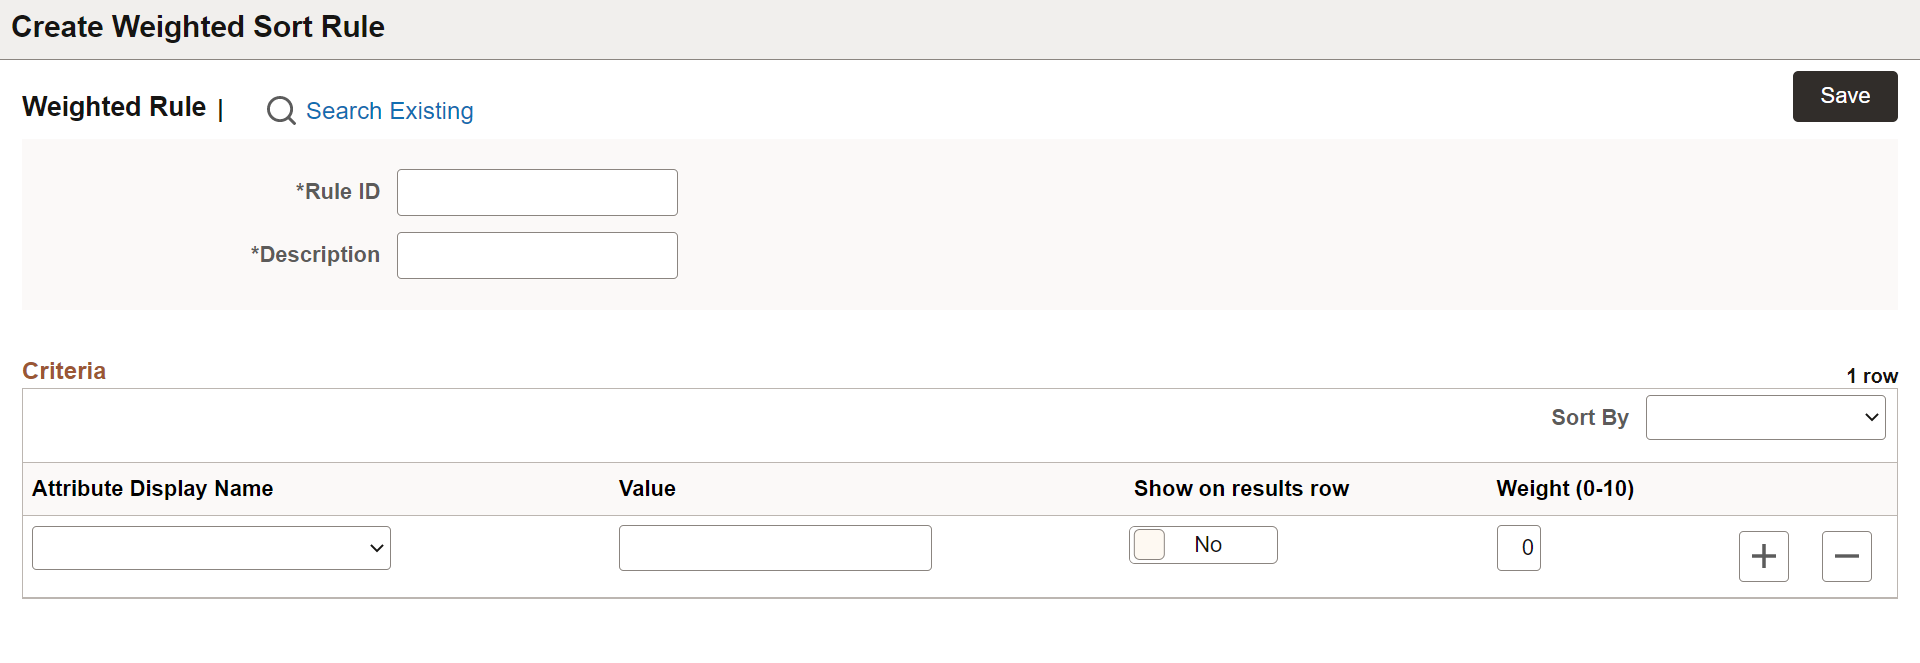
Use Create Weighted Sort Rule page (PV_WSR_CREATE_FL) to add new rules for the weighted sort.
Navigation:
This example illustrates the fields and controls on the Create Weighted Sort Rule Page. You can find definitions for the fields and controls later on this page.
|
Field or Control |
Description |
|---|---|
|
Rule ID |
Enter a Rule ID for this Weighted Sort Rule configuration. |
|
Description |
Enter a description for this Weighted Sort Rule configuration. |
|
Attribute Display Name |
Select the attribute from the drop-down for which you want to set the rule. |
|
Value |
Enter/select the attribute value for the selected attribute. Depending on the attribute selection, value field type may vary, such as drop-down list, Yes or No field, text field, and search box. |
|
Show on results row |
If you want to display the attribute in the search result, set the Show on results row button to Yes else set it to No. Note: For Inventory Item and Contract Item, the attributes are displayed based on Role configuration. For Preferred Supplier, by default Show on results row is set to Yes and disabled. Irrespective of rule set up, Preferred Supplier will always be displayed in the Create Requisition search results. |
|
Weight (0-10) |
Enter the weight of the of the attribute in the scale of 0 to 10 in integer. According to the weight, search result score will get boosted. Weight value 0 indicates the row is added to show on result purpose only. Weighted Sort Rule dynamically pushes the items with the highest total weight to the top of the search results. |
|
Add a new row |
Click to add a new line. |
|
Delete row |
Click to delete the added row. |
|
Sort By |
Set the sort order of the added rows. |
|
Search Existing |
Click to view the list of already added Weighted Sort Rules. |
|
Save |
Click to save the Weighted Sort Rules configuration. |
Configuring Attributes for Weighted Sort Rule
Attributes available under Attribute Display Name drop-down on the Create Weighted Sort Rule page are controlled by the setup record, PV_WSRULE_SETUP. These attributes are added and delivered with EP_PV_MASTERITEMVENDOR_SD and EP_PV_MASTERITEM_SD Search Definitions.
Following attributes can be configured for Weighted Sort Rule:
Classification
Contract Item (Incremental index is mandatory for contract Item attribute, even if RTI is enabled)
Disabled
Emerging Small Business
Ethnicity
HUBZone Program
Inventory Item
Item Fld C1 B
Item Fld C1 C
Item Fld C1 D
Item Fld C2
Item Fld C4
Item Fld C6
Item Fld C8
Other Preference Programs
Preferred Supplier
SDB Program
Size of Small Business
Special Purchase
Type of Contractor
Veteran
Veteran-Owned Small Business
Women-Owned Business
Use the Requester Mass Change page (PV_MASS_CHANGE_FL) to replace the original requester of the selected requisitions with a new requester. The new requester gets future notifications and can receive the requisitions entered by the original requester.
Navigation:
This example illustrates the fields and controls on the Requester Mass Change Page. You can find definitions for the fields and controls later on this page.
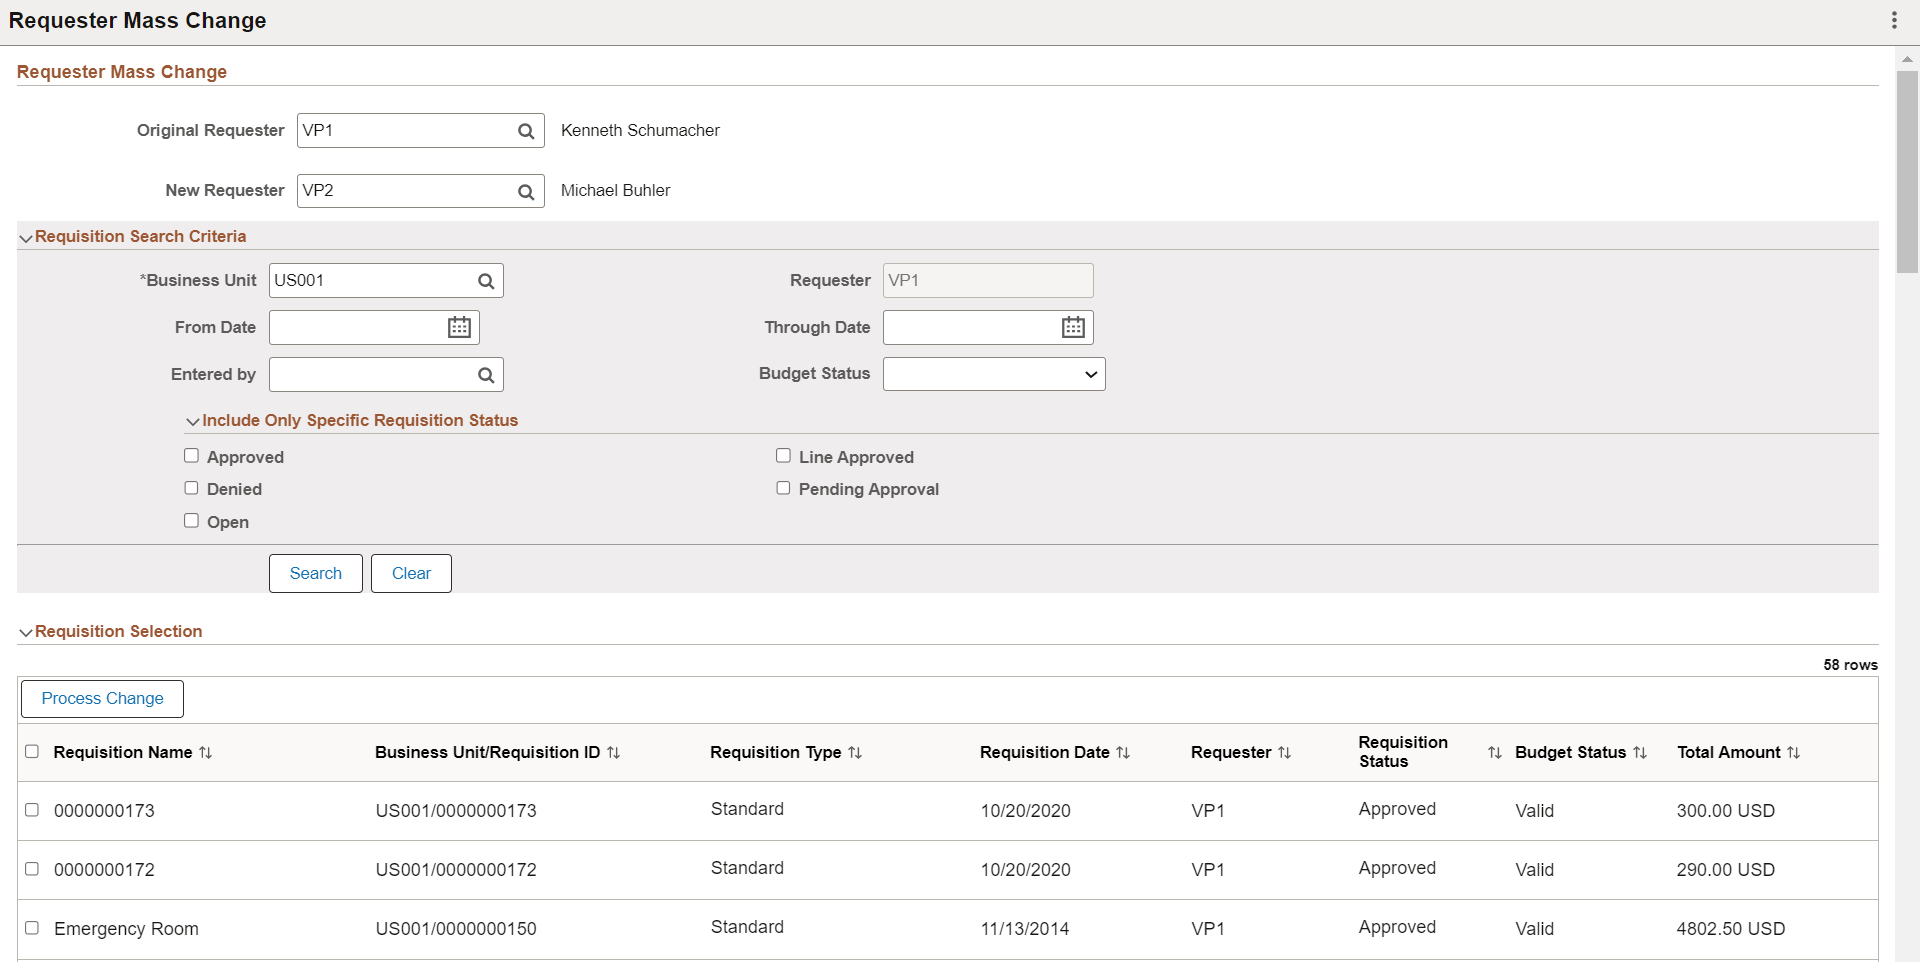
Requester Mass Change
|
Field or Control |
Description |
|---|---|
|
Original Requester |
Enter the User ID of the original requester who created the requisitions. |
|
New Requester |
Enter the User ID of the new requester. All the selected requisitions will be updated with the new requester. |
Requisition Search Criteria
Use the Requisition Search Criteria to search the requisitions created by the original requester. Use the filter criteria to search the requisitions.
|
Field or Control |
Description |
|---|---|
|
Business Unit and Requester |
Business Unit and Requester fields are defaulted from the original requester. You can override the Business Unit to search for a specific requisition. |
|
From Date and Through Date |
Enter the creation date or date range to search the requisitions for that period. |
|
Entered by |
Enter the User ID of the individual who created the requisition. This is usually the requester, but it can be another individual. |
|
Budget Status |
Based on the selected budget status, requisitions are displayed in the search results. Select any of the following budget statuses for the requisition:
|
|
Include Only Specific Requisition Status |
Select one or more statuses from the Include Only Specific Requisition Status drop-down menu to search the requisitions only with the selected status. If no status is selected, the search results will display the requisitions for all the statuses. |
|
Search |
Click Search to view the list of requisitions created by the original requester. |
|
Clear |
Click to clear the search filter and start a new search. |
Requisition Selection
Use Requisition Selection to view the search results. You can select one or more requisitions and change the requester.
|
Field or Control |
Description |
|---|---|
|
Process Change |
Select one or more requisitions using the checkbox on the left for specific items on the results grid or the select all checkbox on the top left of the grid. Then click Process Change to replace the original requester of the selected requisitions with the new requester. Note: Every time a Requester Mass Change is made to a requisition, the change is updated in the Requisition Header Comments and Attachments, which can be accessed on the My Requisitions page. |
Use the Manage Amount Only By Category page (PV_MOB_AMT_ONL_CTG) to designate the Amount Only flag for the selected item category. Based on this designation, the Amount Only flag is defaulted on the Special Requests, Fixed Cost Service, Variable Cost Service, and Time and Materials pages.
Navigation:
This example illustrates the Manage Amount Only tile.
Note: This tile is displayed only if it is configured for the Fluid Structure Content eProcurement home page. You can enable Manage Amount Only tile under PeopleTools, Portal, Structure and Content, Fluid Structure Content, Fluid Homepages, Edit eProcurement, Tile Content tab.
This example illustrates the fields and controls on the Manage Amount Only By Category page. You can find definitions for the fields and controls later on this page.
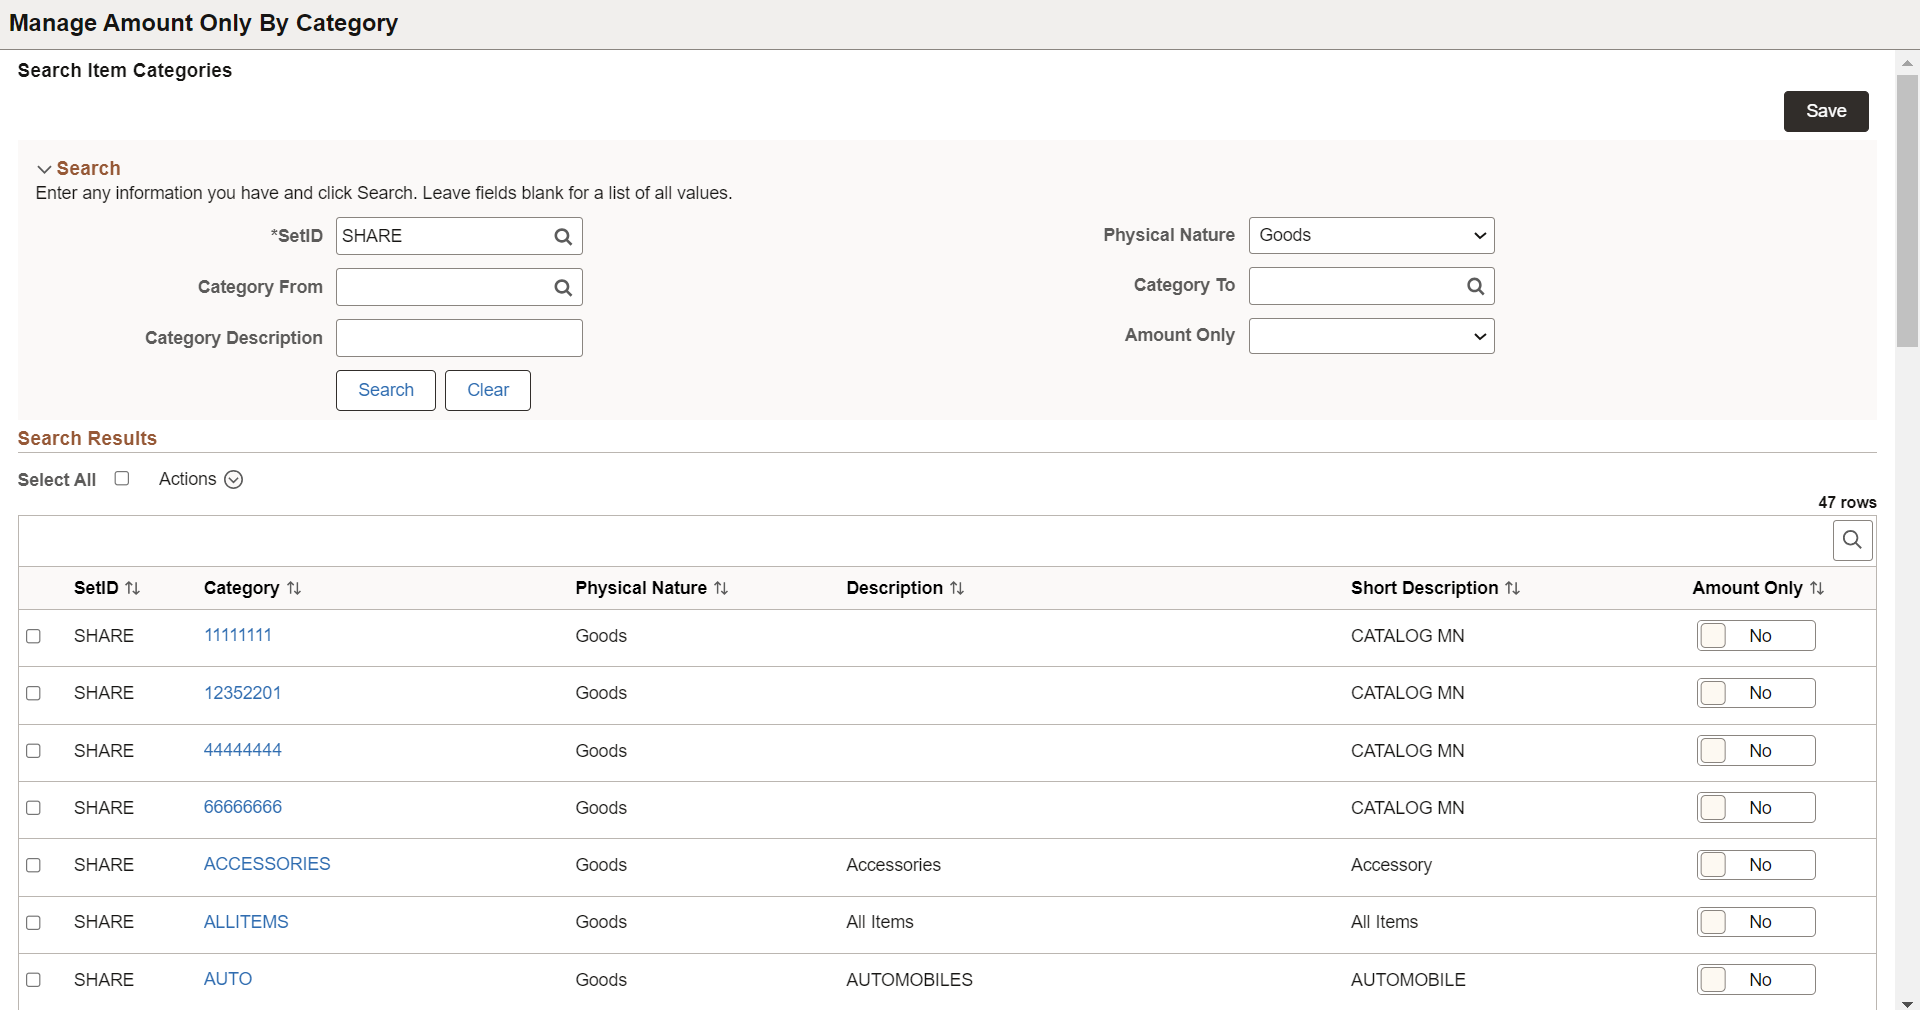
Search
Use this section to search the list of categories based on the selected search criteria.
|
Field or Control |
Description |
|---|---|
|
SetID |
Enter the SetID or select it from the Lookup page. The categories displayed in the search results are based on the selected SetID. This is a mandatory field. |
|
Category From and Category To |
Select the range of category values for which you want to default the Amount Only flag. For example, if you enter Category From as A and Category To as D, all the category names that start with the letters A, B, C, and D appear on the search results. Note: Click the Search icon to open the search Lookup page to search for a specific category. On the Lookup page, you can use advanced search criteria, including operators, to find a specific category. |
|
Category Description |
Enter the category description or partial description. Search results display the categories that contain the entered description keywords. |
|
Physical Nature |
Select the physical nature of the category: Goods, Services, or Blank. Select blank to view both the Goods and Services categories. By default, Services is selected. |
|
Amount Only |
Select to view the categories for which the Amount Only flag is designated or not. |
|
Search |
Click to get the results based on the applied criteria. |
|
Clear |
Click to clear the search criteria. Note: SetID and Physical Nature will be reset to their default values. |
Search Results
Use this section to view the list of categories. Select one or more categories and designate the Amount Only flag.
|
Field or Control |
Description |
|---|---|
|
Actions |
Click Actions to set the Amount Only flag to Yes or No in bulk. Note: Before performing the action, either click the Select All check box to select all the category lines or select individual lines by clicking the respective check boxes. |
|
Category |
Click this link to view Item Category Details. |
|
Amount Only |
Click to enable or disable the Amount Only flag for that category. Note: You can toggle the Amount Only button for any row in the search result without selecting the checkbox for that row. |