Configuring and Creating Questionnaire Event
PeopleSoft Questionnaire Events enables you to provide questionnaires outside of an activity guide through email or online notifications. This feature works with the existing Questionnaire Framework, which is used to create the questionnaire.
These topics discuss configuring and creating questionnaire events using the Questionnaire Framework.
Note: Oracle PeopleSoft delivers Notification Composer framework to manage the setup and administration of all notifications in one central location. Once you have adopted the Notification Composer feature, you must use it to create new notifications and manage your existing notifications. For more information about Notification Composer, see Understanding Notification Composer.
|
Page Name |
Definition Name |
Usage |
|---|---|---|
|
EOQF_RECIPIENT_FL |
Add or edit a recipient list for the questionnaire event. |
|
|
EOQF_NOTIF_FL |
Add or edit notification message text for questionnaire events. |
|
|
EOQF_SUBST_FL |
Create text placeholders for questionnaire event notifications. |
|
|
EOQF_EVENT_ADMN_FL |
View, update, add, delete, and copy questionnaire events. |
|
|
EOQF_EVENT_ADD_SCF |
Create a new questionnaire event and define basic event information. |
|
|
EOQF_EVENT_CNFG_FL |
Specify questionnaire event details and recipients. |
|
|
EOQF_EVENT_NOTF_FL |
Associate one or more notifications with the questionnaire event. |
|
|
EOQF_NOTF_DSGN_SCF |
Create a notification for the questionnaire event. |
|
|
EOQF_EVENT_PRCS_FL |
Activate or Deactivate the Questionnaire Event. |
|
|
EOQF_EVNT_STAT_SCF |
View data related to the questionnaire event, such as response status and processing history. |
|
|
EOQF_CLONE_EVN_SCF |
Copy an existing questionnaire event. |
|
|
EOQF_EVENT_RUNCNTL |
Run an adhoc notification process for a specific questionnaire event. |
A Questionnaire event allows you to share questionnaires with recipients outside of an activity guide, using email and push notifications.
The questionnaire event feature enables you to:
Define parameters for the event, such as start date and frequency of the event.
Associate a questionnaire with the event.
Specify recipients and associate them with the event.
Define notifications and associate them with the event.
Initiate an adhoc notification process for an event.
View statistical data for the event.
Follow these steps to create a questionnaire event:
Create questionnaire event using the Create Questionnaire Event Page.
Specify event details using the Define Event Configuration Page.
Associate notifications with the event using the Define Notification Settings Page.
Activate the questionnaire event using the Process Questionnaire Event Page.
Sending Questionnaire Event Notifications
After event activation, set up a schedule to run the EOQF_PROCESS job (for example, nightly) in the system. It selects all active questionnaire events and sends out corresponding notifications when the scheduled dates of the notifications match the current date.
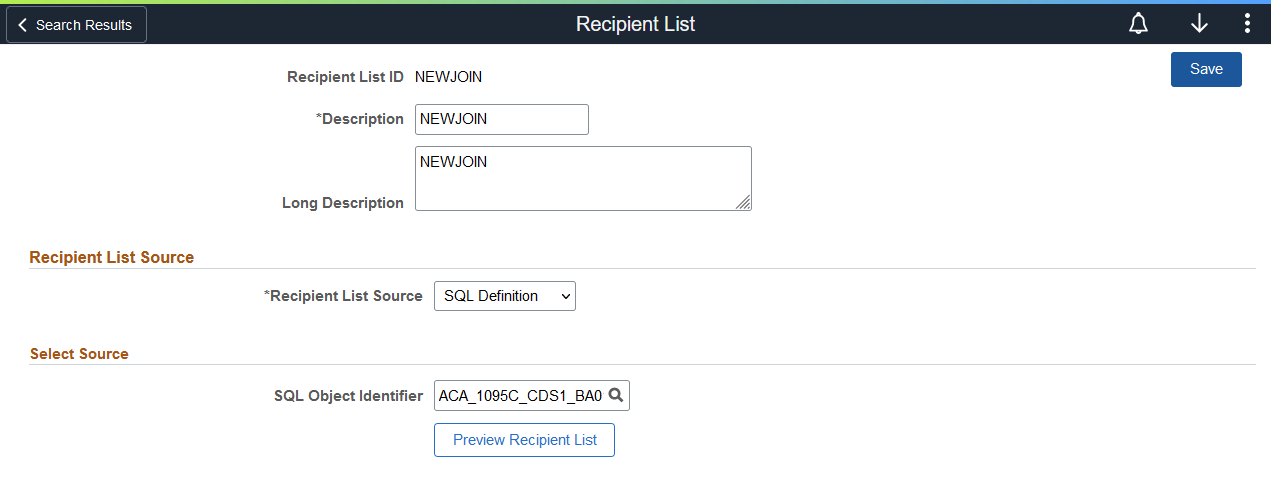
Use the Recipient List page (EOQF_RECIPIENT_FL) to add or edit a recipient list for questionnaire event.
Navigation:
This example illustrates the Recipient List page.
|
Field or Control |
Description |
|---|---|
|
Recipient List ID |
Displays the recipient list ID you entered prior to accessing this page. |
|
Description and Long Description |
Enter a meaningful short and long description for the recipient list. |
|
Recipient List Source |
Select a source for the recipient list. Available values are:
|
|
Root Package ID |
Select the Root package associated with the PeopleTools Application Class that acts as the source for the recipient list. This field appears only when Application Class is selected as the Recipient List Source. |
|
Qualified Package/Class Path |
Select the path that defines the location of the PeopleTools Application Class to be used as a source for the recipient list. This field appears only when Application Class is selected as the Recipient List Source. |
|
Application Class ID |
Select the PeopleTools Application Class to be used as a source for the recipient list. This field appears only when Application Class is selected as the Recipient List Source. |
|
Method |
Select the method associated with the PeopleTools Application Class to be used as a source for the recipient list. This field appears only when Application Class is selected as the Recipient List Source. |
|
Query Name |
Select the PeopleSoft query to be used as a source for the recipient list. This field appears only when Query is selected as the Recipient List Source. |
|
Role Name |
Select a role to be used as a source for the recipient list. This field appears only when Role is selected as the Recipient List Source. |
|
SQL Object Identifier |
Select the SQL Object to be used as a source for the recipient list. This field appears only when SQL Definition is selected as the Recipient List Source. |
|
Preview Recipient List |
Select to access the Preview Recipient List page and view recipient list details, such as user ID and email address. |
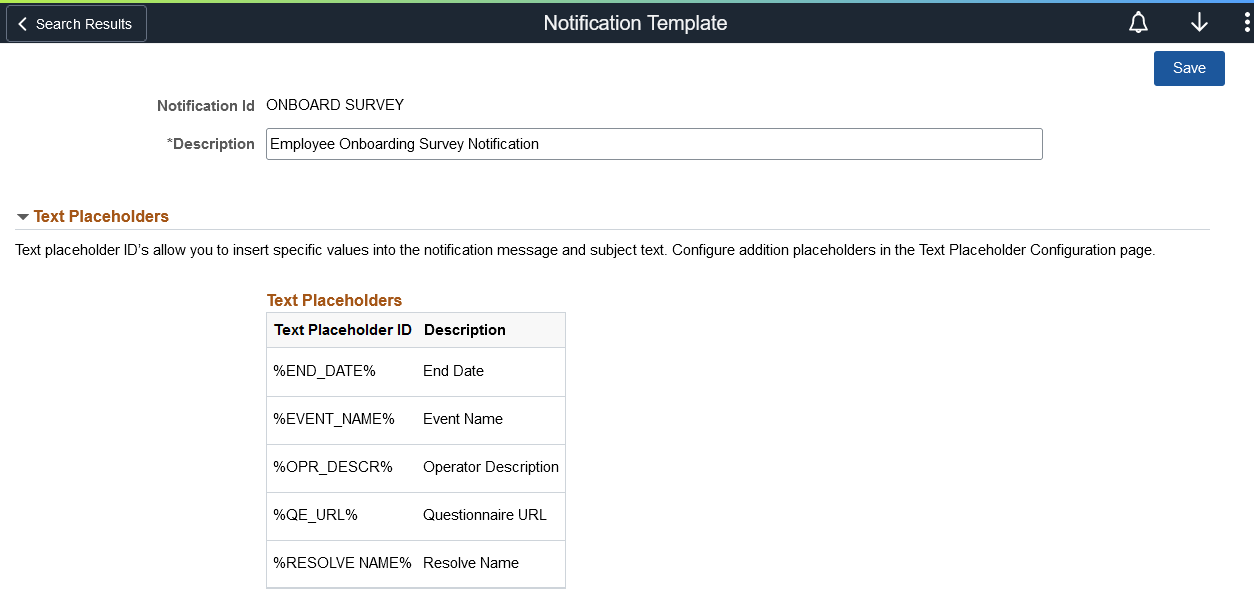
Use the Notification Template page (EOQF_NOTIF_FL) to add or edit notification message text for questionnaire events.
Navigation:
This example illustrates the Notification Template page (1 of 2).
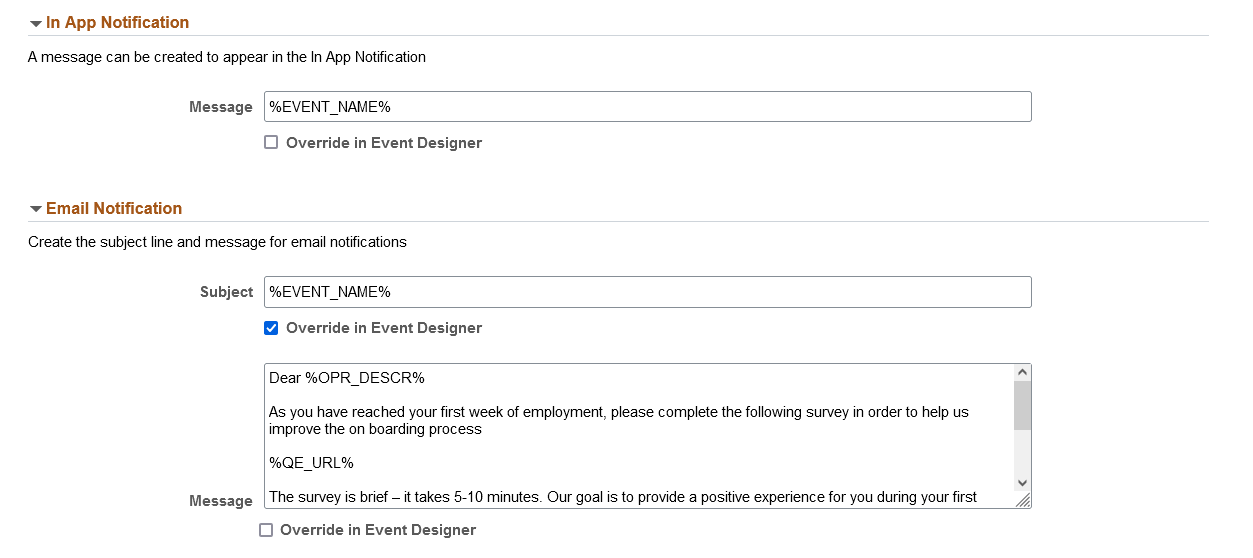
This example illustrates the Notification Template page (2 of 2).
|
Field or Control |
Description |
|---|---|
|
Notification ID |
Displays the notification ID you entered prior to accessing this page. |
|
Description |
Enter a meaningful description. |
Text Placeholders
Use this section to review text placeholders available for the notification. Text placeholders enable you to insert variable text into the notification message and subject text. For example, you can add a text placeholder for employee name within the subject text. When the notification is sent to a group of employees, each employee has their own name in the subject.
Use the Text Placeholder Definition Page to add new text placeholders.
|
Field or Control |
Description |
|---|---|
|
Text Placeholder ID |
Displays the ID of the text placeholder. |
|
Description |
Displays a description of the text placeholder. |
In App Notification
Use this section to create online notification message content.
|
Field or Control |
Description |
|---|---|
|
Message |
Enter the message text for the online notification. You can use text placeholders here. |
|
Override in Event Designer |
Select this check box if you want to make this message text editable in the Event designer. |
Email Notification
Use this section to create email notification message content.
|
Field or Control |
Description |
|---|---|
|
Subject |
Enter the subject. This text will be the subject line of the e-mail notification. You can use text placeholders here. |
|
Override in Event Designer (Subject) |
Select this check box if you want to make this subject text editable in the Event designer. |
|
Message |
Enter the message text for the e-mail notification. You can use text placeholders here. |
|
Override in Event Designer (Message) |
Select this check box if you want to make this message text editable in the Event designer. |
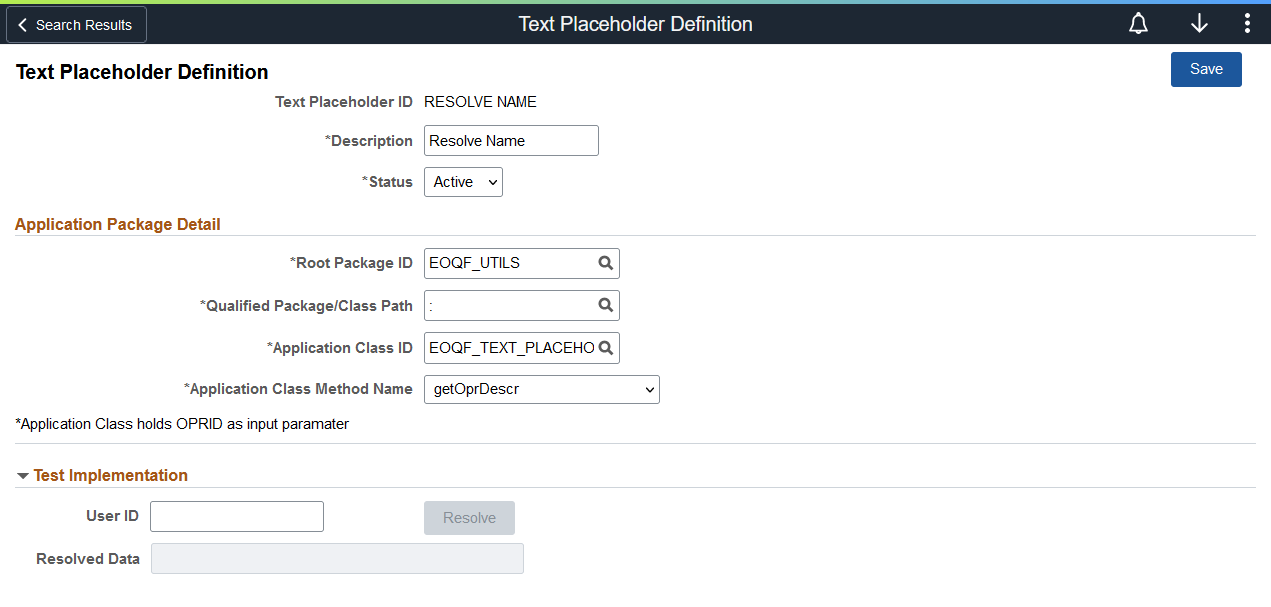
Use the Text Placeholder Definition page (EOQF_SUBST_FL) to create text placeholders for questionnaire event notifications.
Navigation:
This example illustrates the Text Placeholder Definition page.
|
Field or Control |
Description |
|---|---|
|
Text Placeholder ID |
Displays the text placeholder ID you entered prior to accessing this page. |
|
Description |
Enter a meaningful description for the text placeholder. |
|
Status |
Select a status for the text placeholder. |
|
Root Package ID |
Select the root package associated with the PeopleTools Application Class that acts as the source for the text placeholder. |
|
Qualified Package/Class Path |
Select the path that defines the location of the PeopleTools Application Class that acts as the source for the text placeholder. Options listed are based on the selected Root Package. |
|
Application Class ID |
Select the PeopleTools Application Class that acts as the source for the text placeholder. |
|
Application Class Method Name |
Select the required PeopleTools Application Class Method to invoke. |
|
User ID and Resolve |
Select the ID of the user and click the Resolve button. |
|
Resolved Data |
The name of the user based on the selected ID is displayed. |
Use the Manage Questionnaire Events page (EOQF_EVENT_ADMN_FL) to view, update, add, delete, and copy questionnaire events.
Navigation:
This example illustrates the Manage Questionnaire Events page.

Field or Control |
Definition |
|---|---|
|
Filter |
Filter event results displayed in the grid. |
|
Create Event |
Select this button to access the Create Questionnaire Event Page and create a new questionnaire event. There are four pages required to create a new questionnaire event: |
Event ID |
Displays the questionnaire event ID. |
Event Name |
Displays the questionnaire event name. |
Event Type |
Displays the questionnaire event type. Values are Single or Continuous. |
Status |
Displays the questionnaire event status.Values are:
Deactivate or activate a questionnaire event using the Process Questionnaire Event Page. |
Start Date |
The date on which the questionnaire event link is active. |
End Date |
The date on which the questionnaire event link expires. |
Statistics |
Select to access the Statistics Page and view data related to the questionnaire, such as response status and processing history. |
Update Event |
Select to access the Define Event Configuration Page and view or edit the questionnaire event. |
Delete Event |
Select to delete the questionnaire event. |
Clone Event |
Select access the Clone Questionnaire Event Page and copy the questionnaire event. |
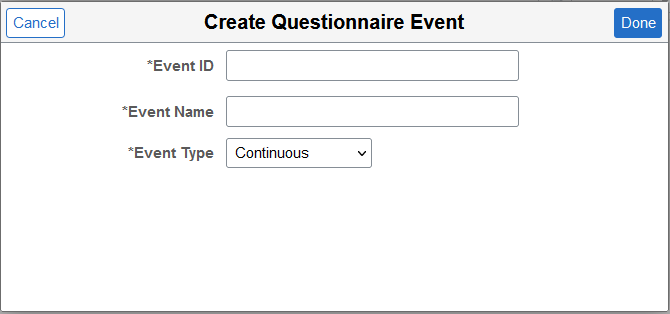
Use the Create Questionnaire Event page (EOQF_EVENT_ADD_SCF) to create a new questionnaire event and define basic event information.
Navigation:
This example illustrates the Questionnaire Event Designer page.
|
Field or Control |
Definition |
|---|---|
|
Event Name |
Enter a name for the questionnaire event. |
|
Event ID |
Enter an event ID for the questionnaire event. |
|
Event Type |
Select the event type. Values are:
|
|
Done |
Select this button to access the Create Questionnaire Event activity guide and the Define Event Configuration Page. |
Use the Define Event Configuration page (EOQF_EVENT_CNFG_FL) to specify questionnaire event details and recipients.
Navigation:
This example illustrates the Define Event Configuration page.
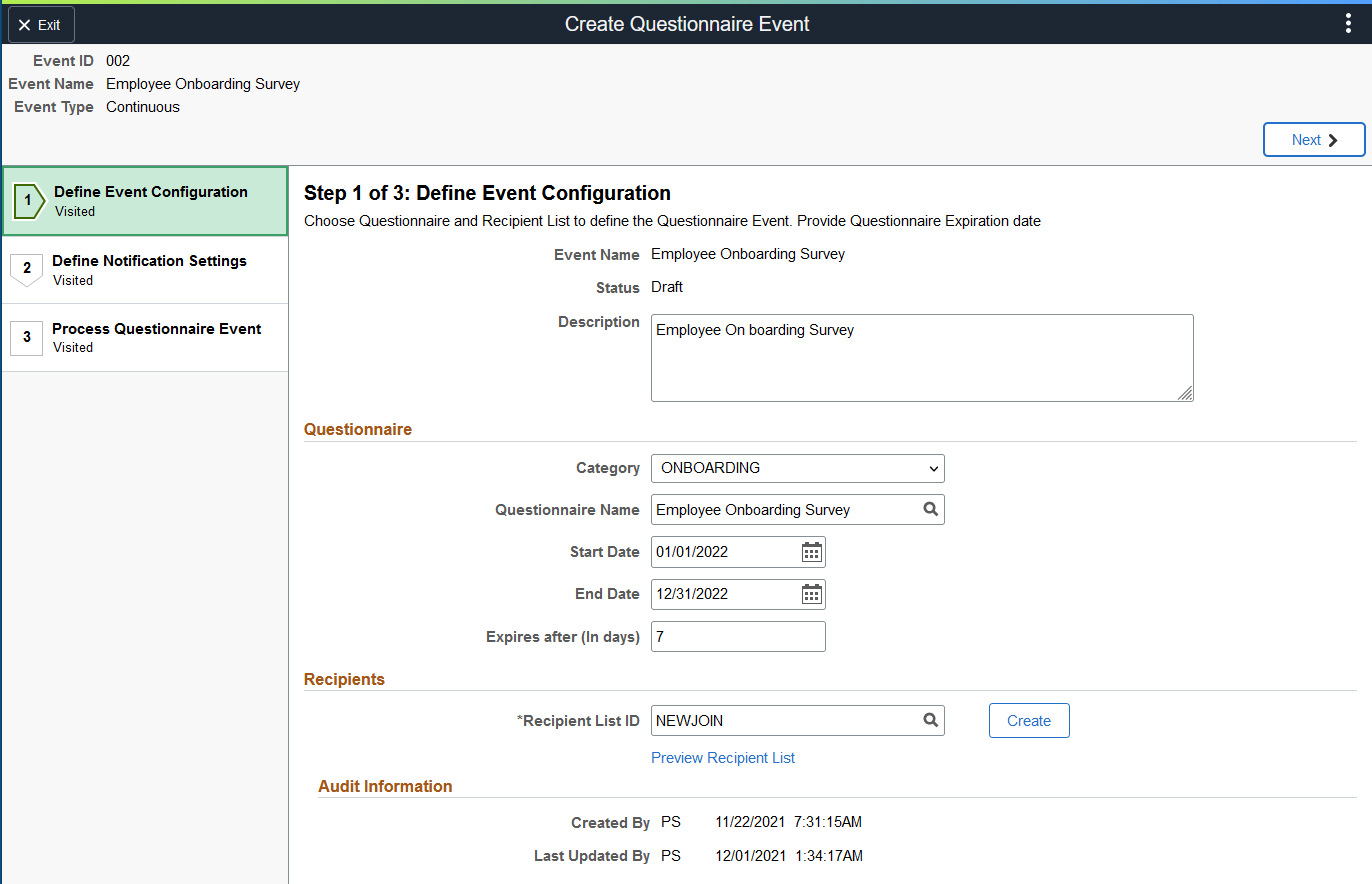
Click the Next button to proceed to the next step in the create questionnaire event guided process. You can click any of the steps on the left-hand pane to access that particular step in the guided process if you had already visited that step.
Field or Control |
Description |
|---|---|
Event Name |
Displays the event name, which you entered on the Create Questionnaire Event page. |
Status |
Displays the event status, which you entered on the Create Questionnaire Event page. |
Description |
Enter a meaningful description that explains the questionnaire event. |
Questionnaire
Field or Control |
Description |
|---|---|
Category |
Select the questionnaire category to which this questionnaire event belongs. For example, values for HCM are:
Questionnaire categories are defined in the Questionnaire Category Page. |
Questionnaire Name |
Select the questionnaire for the questionnaire event. Available field values are based on the questionnaire category you select. Questionnaires are defined in the Define Questionnaire Page. |
Start Date and End Date |
Define the period in which the questionnaire is available to recipients using the Start Date and End Date fields. |
Recipients
Field or Control |
Description |
|---|---|
Recipient List ID |
Select a recipient list for the questionnaire event, based on your target audience. |
|
Create |
Select this button to access the Recipient List Page and create a new Recipient List. |
Preview Recipient List |
Select this link to view users associated with the recipient list. You can also view email address for each user. |
Audit Information
This section displays the user ID and time-stamp associated with the creation and update of this questionnaire event.
Use the Define Notification Settings page (EOQF_EVENT_NOTF_FL) to associate one or more notifications with the questionnaire event.
Navigation:
This example illustrates the Define Notification Settings page.
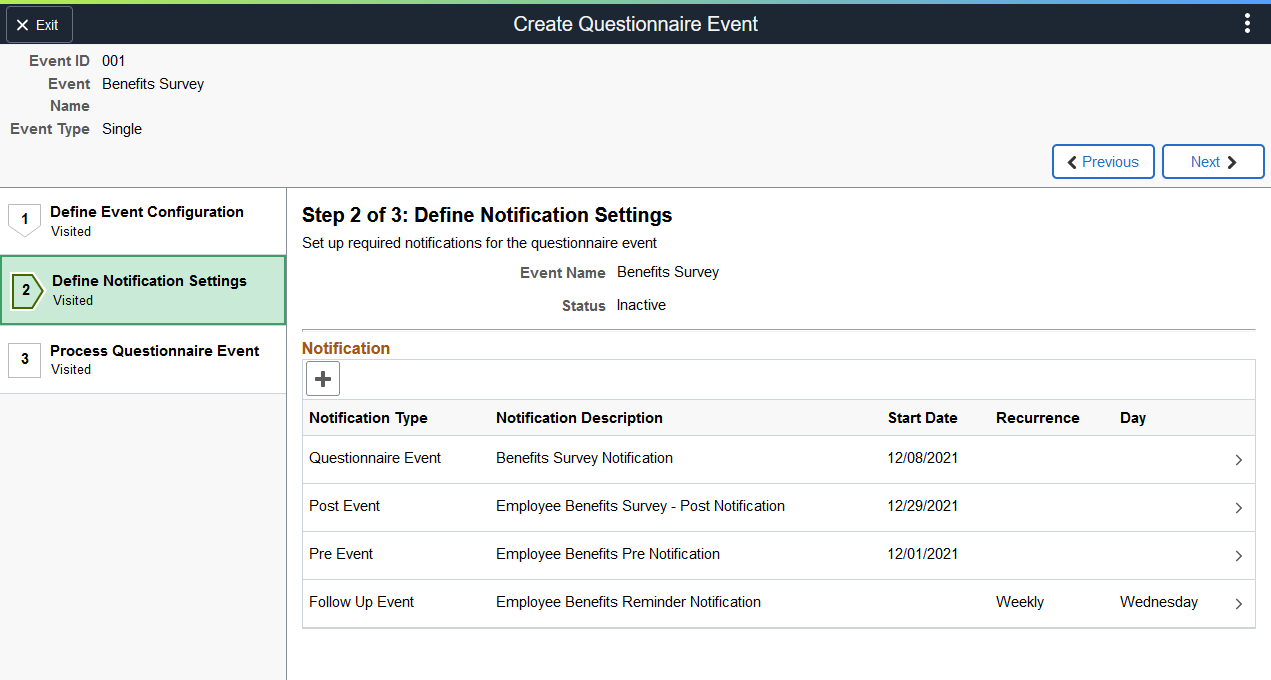
Select a notification row to view notification details in the Notification Designer Page.
Field or Control |
Description |
|---|---|
|
Add a New Value |
Select this button to access the Notification Designer Page and create a new notification for the questionnaire event. |
Notification Type |
Displays the notification type associated with the notification. |
Notification Description |
Displays the description associated with the notification. |
|
Start Date |
Displays the date on which the questionnaire event is available to recipients. Note: This field appears only when you select Post Event, Questionnaire Event or Pre Event as the notification type. For Questionnaire Event, the date defaults from the date given in the Define Event Configuration page. |
Recurrence |
Displays recurring notification information. This field only appears for the Follow Up Event notification type. |
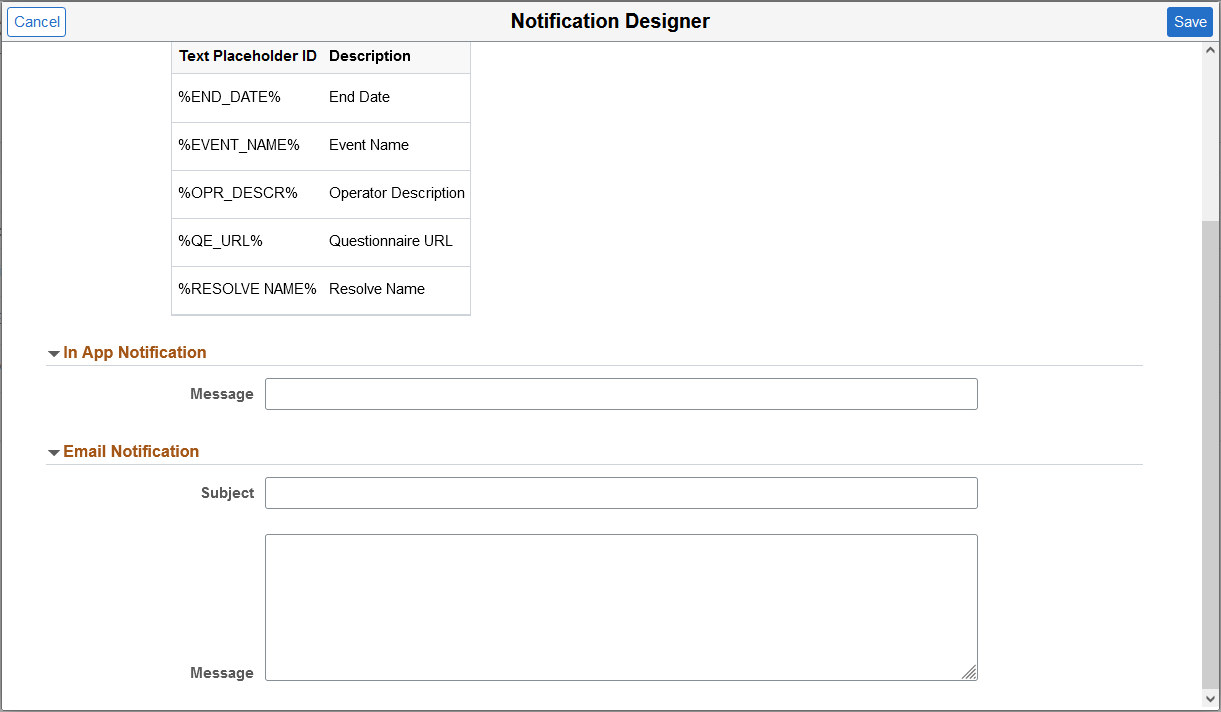
Use the Notification Designer page (EOQF_NOTF_DSGN_SCF) to create a notification for the questionnaire event. This page is only accessible within the Create Questionnaire Event activity guide.
Navigation:
This example illustrates the Notification Designer page (1 of 2).
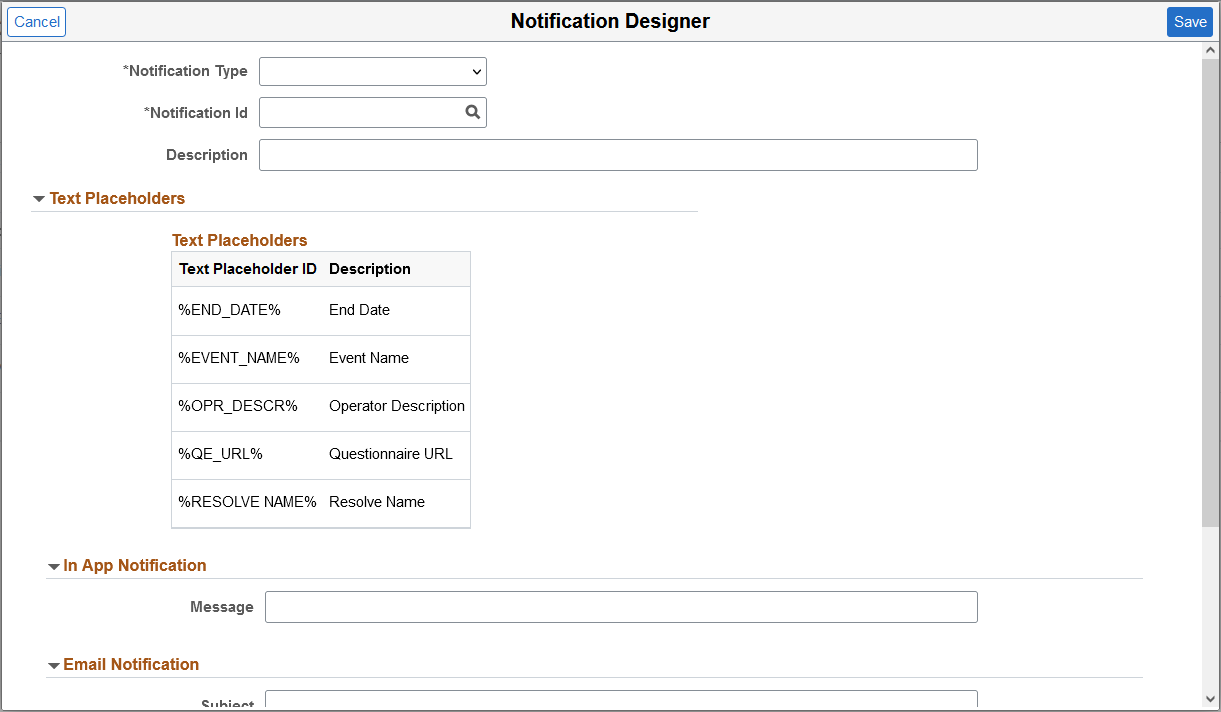
This example illustrates the Notification Designer page (2 of 2).
|
Field or Control |
Description |
|---|---|
|
Notification Type |
Specify the type of event associated with this notification. Available values are:
|
|
Recurrence |
Specify whether the notification is recurring. Available values are:
Note: This field only appears for the Follow Up Event notification type. |
Note: The remaining fields on this page are identical to those found on the Notification Template Page. Please refer to the page for more information.
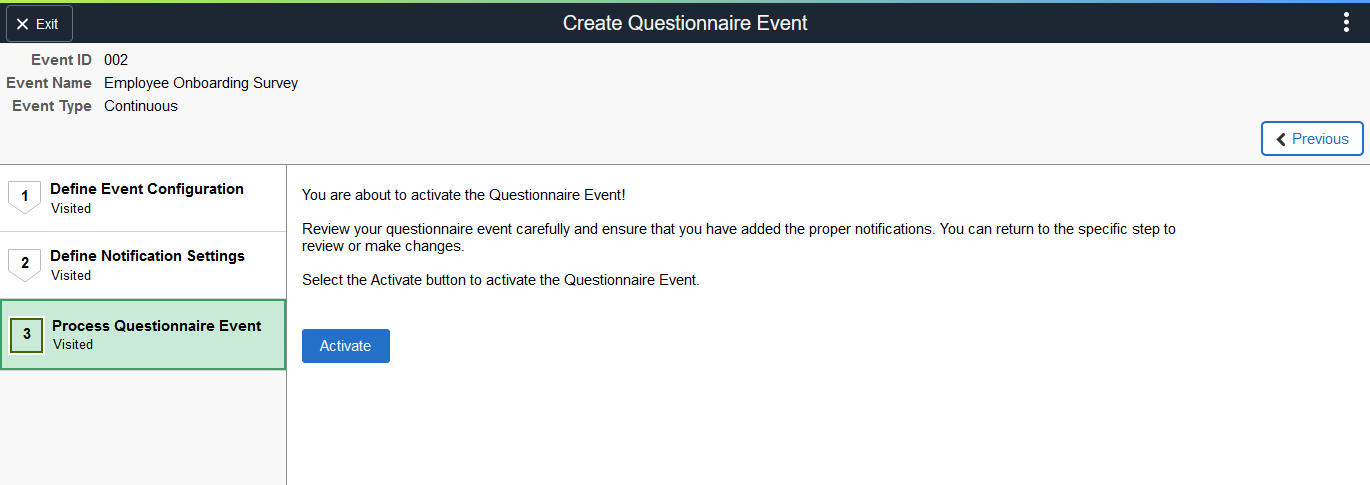
Use the Process Questionnaire Event page (EOQF_EVENT_PRCS_FL) to activate or deactivate a Questionnaire Event.
Navigation:
This example illustrates the Process Questionnaire Event page.
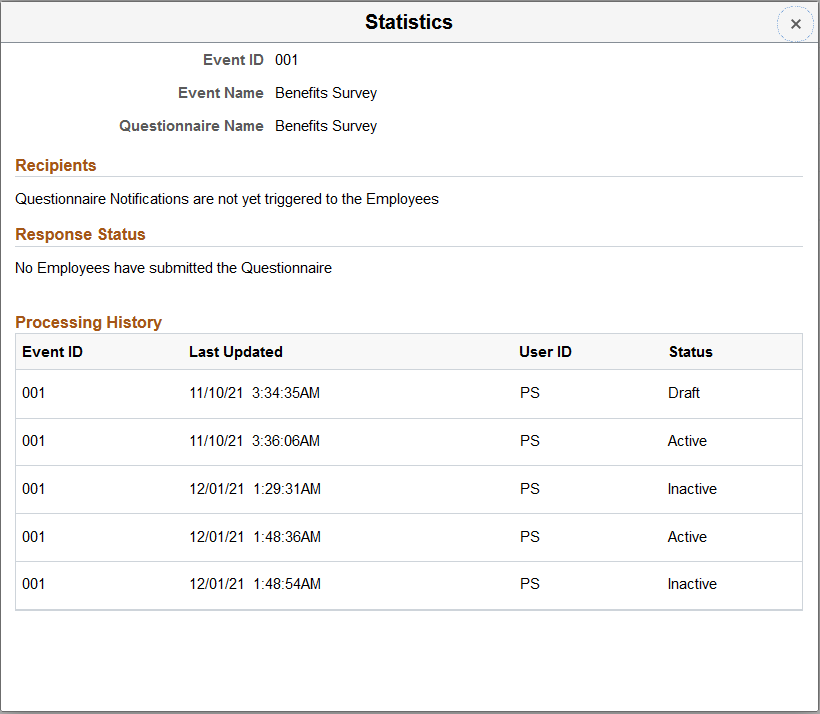
Use the Statistics page (EOQF_EVNT_STAT_SCF) to view data related to the questionnaire event, such as response status and processing history.
Navigation:
This example illustrates the Statistics page.
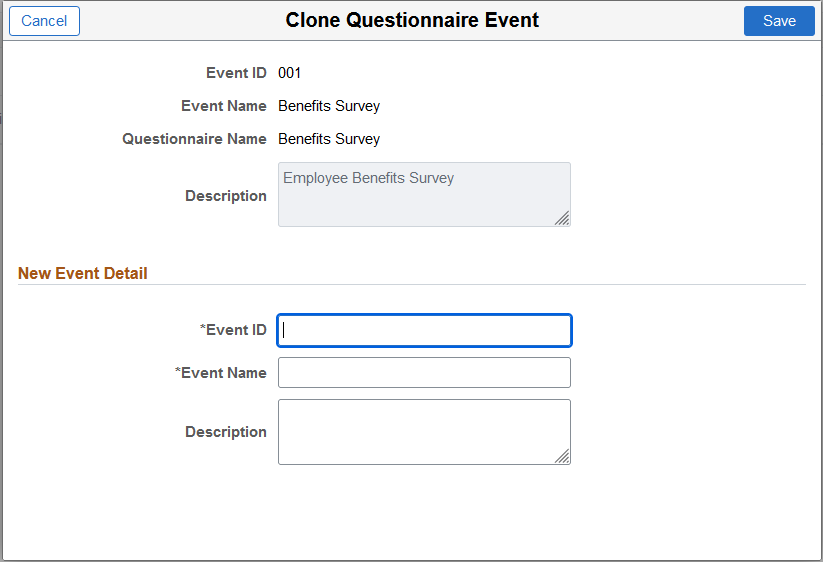
Use the Clone Questionnaire Event page (EOQF_CLONE_EVN_SCF) to copy an existing questionnaire event.
Navigation:
This example illustrates the Clone Questionnaire Event page.
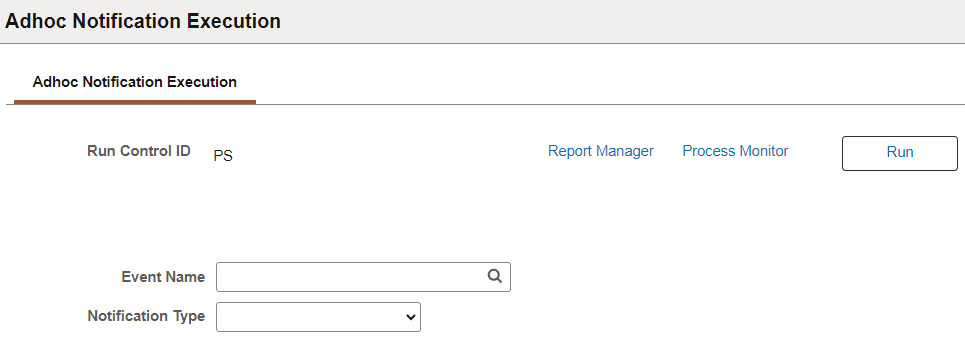
Use the Adhoc Notification Execution page (EOQF_EVENT_RUNCNTL) to run an adhoc notification process for a specific questionnaire event.
This example illustrates the Run control page for Adhoc Notification.
Field or Control |
Description |
|---|---|
Event Name |
Select the questionnaire event for which you need to initiate the Adhoc notification process (EOQF_RUNEVNT). |
Notification Type |
Select either Adhoc or Questionnaire Event as the notification type. |