Creating Job Offers
This topic provides an overview of job offers and discusses how to create job offers.
|
Page Name |
Definition Name |
Usage |
|---|---|---|
|
HRS_APP_RCMNT |
Create and manage a job offer. |
|
|
HRS_OFF_SELATC_SEC |
Select items from your organization's library of existing attachments, and attach them to the job offer. |
|
|
HRS_OFF_SELDOC_SEC |
Add document definition attachments to an offer. |
|
|
HRS_OFFER_SEND_SEC |
Post a job offer to Candidate Gateway. |
This overview describes job offers.
Offer Creation
Create and manage job offers on the Prepare Job Offer page. To access this page, use the Prepare Job Offer action. This action is available from multiple locations:
Manage Job Opening page: Applicant tab
Manage Applicant page: Applicant Activity page: Current Status section
Search Applications page
Manage Application page
You can also access an existing offer by clicking the Edit Offer link on the Manage Application page: Offer tab
Position and Job Code Information
The Prepare Job Offer page displays job information that comes from the job opening, including the business unit, position number, and job code. If the job opening is associated with multiple positions or job codes, you can select the one to which the offer applies.
There are two situations where position and job code data are not available to be brought into the job offer:
If you initiate the offer process for an applicant who is not linked to a job opening.
If you initiate the offer process for an applicant who is linked to a continuous job opening that doesn't have position or job code data.
In these situations, you must enter the necessary data on the Prepare Job Offer page (or, for continuous job openings, on either the Prepare Job Offer or the Prepare for Hire page). The requirements for position and job code data depend on your position management settings:
Full position management: All offers must include a position number.
When you enter a position number in the job offer, the system brings in the associated job code.
Partial position management:
Offers that are not associated with any job opening must include a job code; a position number is optional.
Offers that are related to continuous job openings can be submitted without a position or job code, but you will not be able to prepare the applicant for hire without at least a job code.
Online Job Offers
On the Recruiting Installation – Applicants Page, you can configure the system to support online job offers through PeopleSoft Candidate Gateway. When this functionality is active, you can post offers to Candidate Gateway, and applicants can review the posted offers (along with offer attachments) and then accept or reject the offer online.
When you post a job offer, the system sends the applicant an email notification containing a link to Candidate Gateway. If the applicant's contact information doesn't include an email address, you cannot post the job offer online.
Posting an offer also creates an applicant contact note that you can see on the Manage Applicant page.
When online job offer functionality is active, the Prepare Job Offer page displays several additional page elements that support the online job offer process, including:
An offer expiration date, after which the online offer becomes read-only.
The default date is based on the setting on the Recruiting Installation - Applicants page that specifies how many days online job offers remain active. You can override the default value.
Relevant applicant information, including applicant type, whether the applicant is a registered user of Candidate Gateway, and the applicant’s preferred contact method.
An Attachments section for the files, URLs, and notes that you want to make available to the applicant along with the offer.
Any offer letter that you generate is always added to the attachments grid. You can also manually add additional attachments, including local files that you attach and generic documents from your organization’s attachment library.
Links for posting and unposting offers to Candidate Gateway.
When you modify a job offer, saving the changes does not update the online offer in Candidate Gateway. Instead, you must unpost the offer and then repost it.
Offer Letters
Talent Acquisition Manager uses Oracle Business Intelligence Publisher (BI Publisher) to generate recruitment letters, including offer letters.
When you enter job offer information, you choose a template to use for the offer letter. After the offer is submitted (and, if necessary, approved), you can then generate the letter manually on the Prepare Job Offer page. If you do not generate a letter manually, then the system adds the letter to the queue for the HRS Letter Generation process (HRSLETTR). This process generates all queued letters in batch.
The buttons that you use to generate a letter from the job offer are not available when the offer is in an editable state, even if the offer has been submitted and approved. If you edit an offer, you must resubmit it before generating the letter. Submitting makes the offer fields read-only, thus activating the buttons for generating the letter. This behavior ensures that any changes to the offer are saved before the letter is generated, so the letter always brings in the most current offer amounts.
Components of Pay
The offer must include compensation information. This takes the form of one or more components of pay such as base salary, bonuses, car and meal allowances, and so forth. When you enter components of pay, you select from components that you set up in the Offer Component Type and Offer Component pages.
Use the Prepare Job Offer page (HRS_APP_RCMNT) to create and manage a job offer.
Navigation:
Select on any of the following pages:
Manage Job Opening page: Applicant tab
Manage Applicant page: Applicant Activity page: Current Status section
Search Applications
Manage Application
When an offer already exists, you can also click the Edit Offer link on the Manage Application page: Interview tab.
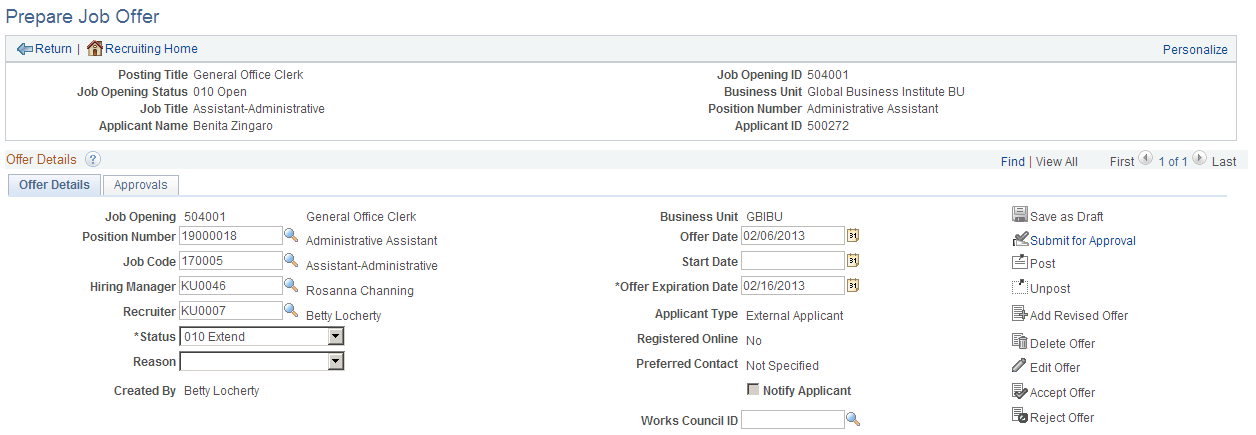
This is the first of two examples illustrating the Prepare Job Offer page. In this example, the offer has been through the approval process, so the offer information is on an Offer Details tab and the approval information is on an Approvals tab. If approvals are not active, the page does not have tabs.
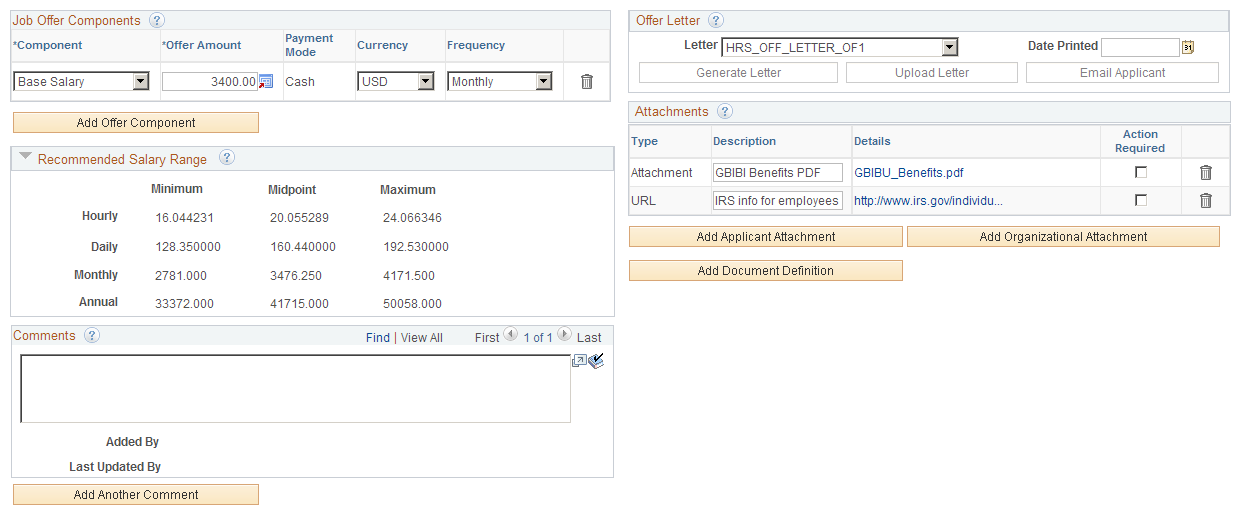
This is the second of two examples illustrating the Prepare Job Offer page.
Toolbar
Field or Control |
Description |
|---|---|
Return |
Click to return to the page from which you accessed the job offer. If you have unsaved data, the system asks if you want to save your data first. |
Recruiting Home |
Click to access the Recruiting Home Page. If you have unsaved data, the system asks if you want to save your data first. |
Header
The header area of the page displays identifying information about the applicant, the job opening, the job code, and if relevant, the position number.
Some fields may not have values if this offer is for an application that does not include a job opening or if the job opening is a continuous job opening without a job code.
Offer Details
Note that the Offer Details section is a scroll area for accessing all of the offers that exist for the current applicant and job opening. Typically, you do not create additional offers unless the original offer has been rejected or withdrawn. This ensures that there is not more than one offer extended at a time.
Field or Control |
Description |
|---|---|
Job Opening |
Displays the job opening ID and posting title. If the offer was created without the context of a job opening, the field is editable so that you can supply a job opening ID. |
Position Number |
This field appears only if the system is configured for full or partial position management. Under full position management, a position number is required. Under partial position management, it is optional. Initially, this field displays the position number, if any, that is associated with the job opening. If the job opening is associated with multiple positions, you can select any of the associated positions. If the offer is not associated with a job opening, or if it is associated with a continuous job opening that doesn't have position data, you can manually enter a value (and must do so under full position management). |
Job Code |
Initially, this field displays the job code that is associated with the job opening. If the job opening is associated with multiple jobs, you can select any one of the associated job codes. If the offer includes a position number (required under full position management), the system enters the associated job code. If the offer is not associated with a job opening, then you must manually enter either a job code or position number. If the job opening is a continuous job opening without job code data, then the job code is optional. However, a job code will be required before you can prepare the applicant for hire. |
Hiring Manager |
The default value is the primary hiring manager for the job opening. You can override this value if necessary. |
Recruiter |
The default value is the primary recruiter for the job opening. You can override this value if necessary. |
Status |
Although you can configure offer statuses on the Recruiting Status and Reason Page, Oracle delivers a complete set of statuses and recommends that you use the delivered status codes. Generally you can let the system set the value based on the actions you perform. However, it is possible to manually select an offer status except for these situations:
The delivered statuses are:
|
Reason |
If your organization has set up reasons for a particular status, you can select a reason for putting the offer in a status. For example, reasons for the Offer Rejected status might include Base Salary, Benefits, or Personal. |
Created By |
Displays the name of the person who created the job offer. |
Business Unit |
Displays the business unit that is associated with the job opening. If the offer was created without the context of a job opening, the field is editable so that you can supply a business unit. |
Offer Date |
Enter the date the offer is effective. The default is the current date. |
Start Date |
Enter the date that the applicant is to report for work. This date cannot be before the offer date. |
Works Council ID |
This field appears if job offers require works council approval. This occurs if the Optional Works Council approval option is selected on the Recruiting Installation - General Page and if the job opening template includes the Works Council section. The default value is the works council ID associated with the job opening. |
Offer Details: Additional Fields for Online Job Offers
Note: These fields appear only if the system is configured to allow online job offers for this job opening's regulatory region.
Field or Control |
Description |
|---|---|
Offer Expiration Date |
The default value is date based on the system-wide setting for the default number of days that an online job offer remains active. This setting is configured on the Recruiting Installation – Applicants Page. If you change the expiration date for a job that is already posted to Candidate Gateway, you do not need to unpost and repost the job opening to make the change effective. |
Applicant Type |
Displays Employee, External Applicant, or Non-Employee. Non-employees are applicants who, although not current employees, already have data in the PeopleSoft HCM system. External applicants and non-employees can access Candidate Gateway only if they are registered Candidate Gateway users. Refer to the Registered Online field to see if these types of applicants are registered users. Employees do not register for Candidate Gateway. Instead, they need to have a PeopleSoft user ID that provides access to Candidate Gateway. Your organization’s business practices determine whether employees have the necessary PeopleSoft user IDs. |
Registered Online |
This field is visible only if the applicant type is External Applicant or Non-Employee. This field displays Yes if the applicant is a registered user of Candidate Gateway. This indicates that the applicant is able to view online job offers. A value of No prevents you from posting the offer to Candidate Gateway. |
Preferred Contact |
Displays the applicant’s preferred contact method. Refer to this field when notifying applicants of online job offers. |
Notify Applicant |
This check box must be selected before you post a job offer online. Selecting the check box indicates that the system will send an email notification when the job offer is posted. If the preferred contact method is Email, the Notify check box is selected by default. If the preferred contact method is anything else, the check box is initially not selected, and you must manually select this check box before posting an online job offer. If you select this check box, but the applicant record does not include an email address, the system displays an error message if you attempt to post the offer. Note: The setting for the Notify check box does not get saved. Each time you access this page, the check box setting is based on the applicant's preferred contact method. |
Actions
Field or Control |
Description |
|---|---|
Save as Draft |
Saves the job offer and puts it in the status configured as the draft status for offers. You must have at least one row in the Job Offer Components grid before you can save the offer. |
Submit Offer |
This link is visible if offers do not require approval. Click to save the offer and set the status to the default status for the offer area. As delivered, the default status is Extend. After you submit an offer, it becomes read-only, and this link is no longer active. If you need to make additional changes, click the Edit Offer link. If the offer that you are submitting brings the total number of hires and of applicants with offers over the number of target openings for a standard requisition, the system displays a warning. The system only counts offers and hires that were created through prepare job offer and prepare for hire processes; it does not take into consideration any manual disposition changes. You can submit the offer anyway, but doing so can cause problems. The best practice is to promptly update the statuses of rejected and withdrawn offers to avoid having multiple offers active in the system at once. |
Submit for Approval |
This link replaces the Submit Offer link if offers require approval. Click to submit the offer, start the approval process, and set the status to the value configured for pending approvals. As delivered, submitting an offer for approval sets the status to Pending Approval |
Post |
Click this link to access the Post Online Job Offer page, where you complete the process of posting the job offer to Candidate Gateway. If the applicant does not have an email address, you will not be able to post the offer. This link is visible only if the system is configured to allow online job offers for this job opening's regulatory region. It is active when the offer has been submitted (but is not currently posted) and the applicant is either an employee or a registered external user of Candidate Gateway. If you click the Edit Offer link, the Post link becomes unavailable until the offer is resubmitted. |
Unpost |
Click this link to remove a posted offer from Candidate Gateway. To post offer revisions, it is necessary to unpost and then re-post the offer. This link is visible only if the system is configured to allow online job offers for this job opening's regulatory region. It is active only for posted offers. If you click the Edit Offer link, the Unpost link becomes unavailable until the offer is resubmitted. |
Add Revised Offer |
This link is available if the offer has a status of Rejected. Click to add a new job offer. Clicking this link creates a new row in the Offer Details scroll area. |
Delete Offer |
This link is active only for recruiting administrators. An administrator clicks this link to delete the offer. A new, blank offer replaces the deleted offer on the Prepare Job Offer page. If the deleted job offer was posted to Candidate Gateway, deleting the offer also removes the posted offer. Deleting an offer does not remove any associated contact notes, nor does it update the applicant’s disposition. |
Edit Offer |
When you save or submit an offer, or when you initially access an existing offer, the offer is not editable. Click the Edit Offer link to make the fields on the page editable. When you modify a posted job offer, changes other than attachment-related changes are not reflected in Candidate Gateway until you unpost the offer and then re-post it. However, if you change the attachments in a posted offer, the changes are immediately visible in Candidate Gateway. For example, if you edit an offer and generate a new offer letter, the new offer letter is immediately visible in Candidate Gateway. The original offer letter also remains visible unless you remove it from the offer. To avoid deleting old offer letters, unpost the old offer, then create and post a revised offer. . |
Job Offer Components
The compensation package for an offer is made up of one or more job offer components such as base salary, bonuses, stock options, car or meal allowances, and so forth. Every offer must include at least one offer component. The system has these restrictions on modifying components of pay for a posted offer:
If a posted offer is in Accept status (or whatever status is configured as the complete status for offers), you cannot modify the offer components.
If a posted offer is in a status other than Accept, the system displays a warning if you modify the offer components, but it does not prevent you from making the change.
Note: If approvals are active and the offer is in a pending status or open status, modifying components of pay (or other offer data) re-triggers the approval process.
Field or Control |
Description |
|---|---|
Component |
Select an offer component. These are compensation elements that you configure on the Job Offer Component Page. |
Offer Amount |
Enter an amount. If
the offer component is configured as base compensation, the system
warns you if the amount is above or below the recommended salary range.
|
Payment Mode |
Displays the payment mode associated with the selected component. Values include Cash, Leaves, Meal Voucher, Non Cash, and Stock Options. |
Currency |
Select the currency. The default value comes from the job offer component. |
Frequency |
Select a pay frequency. The default value comes from the job offer component. |
Add Offer Component |
Click to add a new row to the Job Offer Components grid. |
Recommended Salary Range
You can expand this section, which is initially collapsed, to see the salary range associated with the job code. If there is no job code, or if the job code does not have a recommended salary range, this section does not appear.
Comments
Enter any comments related to the job offer. Offer comments are not shown on any other page.
Offer Letter
Use this group box to create an offer letter.
See Sending Correspondence and Recruitment Letters.
Field or Control |
Description |
|---|---|
Letter |
Select a template to use for the applicant’s offer letter. The BI Publisher templates that are available to use as offer letters are those from the HRS_OFF_LET report definition. |
Date Printed |
Displays the date that you printed the offer letter. The system populates the field when you click the Generate Letter button or when the offer letter is generated by the HRS Letter Generation process. You cannot generate a new offer letter if there is a date in this field, but you can manually clear the date to reactivate the Generate Letter button. |
Generate Letter |
This button is available only if the offer is in an open status, a template is selected in the Letter field, and the Date Printed field is clear. The button is not available when the offer is in an editable state. Click this button to immediately generate a letter based on the selected template. The system opens the generated letter in a new browser window, where you can print it or save it locally. If you make changes, save the modified letter to your local disk so that you can upload the revised version. When you generate the letter, the system enters the current date in the Date Printed field and removes the letter from the HRS Letter Generation process queue. The Generate Letter button becomes inactive; to make it available again, clear the date in the Date Printed field. If, after generating a letter, you subsequently click the Email Applicant button, the system automatically attaches the generated letter to the email. When you generate a letter, the system creates an applicant contact note. The letter is an attachment to the note. If you delete the offer, or if you delete the letter from the offer attachments grid, the system does not remove the related contact note. The note still shows the deleted letter as a note attachment. However, the attachment cannot be opened from the note. A warning message that appears when an offer or an offer letter is deleted recommends that the user manually modify the related applicant note. Note: The system does not create notes for offer letters that are generated in batch. |
Upload Letter |
Click this button to upload a saved letter as an attachment. Most commonly, you use this button to upload a modified version of the original generated letter. However, it is not necessary to generate a letter before uploading one. Uploading a letter does not remove the original generated letter from the attachments grid, but you can remove the original letter manually if necessary. When you upload a letter, the system creates a contact note for the applicant. The letter is an attachment to the note. If you subsequently click the Email Applicant button, the system automatically attaches the modified letter (rather than the original) to the email.
|
Email Applicant |
Click this button to display the Send Correspondence page. If you generated or uploaded an offer letter, the Attachments grid on the Send Correspondence page includes the offer letter, but you can remove or replace it if you wish. After accessing the Send Correspondence page, enter the email subject and message, then send it to the applicant. When you send the email, the system creates an applicant contact note; the email attachments are saved as note attachments. |
Attachments
This section appears only if the system is configured to allow online job offers for this job opening's regulatory region. If you post a job offer on Candidate Gateway, the applicant will see all of the attachments that you include here.
The system creates rows for any offer letters that you generate or upload on this page. Offer letters that the HRS Letter Generation process creates do not get added to the grid.
Certain fields and field values relate to document definitions, which are not commonly used in recruiting. Document definitions are empty placeholders where users can add file attachments, URLs, and notes.
See Understanding Online Job Offer Attachments.
Note: Before you add attachments, you must save the offer. Because saving the offer puts the offer into read-only mode, use the Edit Offer link to make the offer editable again so that you can add attachments. You can add and remove attachments only when the offer is editable.
Field or Control |
Description |
|---|---|
Type |
Identifies the attachment as one of these:
|
Description |
Enter identifying information for the document. The default description for offer letters is Offer Letter. |
Details |
Click to display the attachment. The link text is the file name for file attachments and the URL for URL attachments. Notes, which are added as document definitions, display the note subject. |
Action Required |
Select this check box for any items that the applicant must complete and return if the offer is accepted. In Candidate Gateway, an icon appears next to these documents, along with instructions to review the marked documents. |
|
Click this icon to delete an attachment. Deleting an offer letter attachment does not remove the applicant note that was automatically created when the letter was generated. The note continues to display the offer letter as a note attachment. However, the attachment cannot be opened from the note. A warning message that appears when an offer letter is deleted recommends that the user manually modify the related applicant note. |
Add Applicant Attachment |
Click to display a Choose File dialog box, where you select a local file to upload. This button is active only when the offer is editable. |
Add Organizational Attachment |
Click to display the Organizational Attachments page, where you can select existing attachments (file attachments or URLs) to add to the offer. The attachments that appear on the Organizational Level Document page are context-dependent. For example, if an attachment is valid only for a particular business unit, then it is available only for job offers in that business unit. This button is active only when the offer is editable. |
Add Document Definition |
This button appears only if your organization has enabled document definitions for offers, and if there are document definitions that are valid in the current context. This is not common. Click this button to access the Document Definitions page, where you choose document definitions to add to the offer. |

Use the Organizational Level Documents page (HRS_OFF_SELATC_SEC) to select items from your organization's library of existing attachments and attach them to the job offer.
Navigation:
Click the Add Organizational Attachment button on the Prepare Job Offer page.
This example illustrates the Organizational Level Documents page.
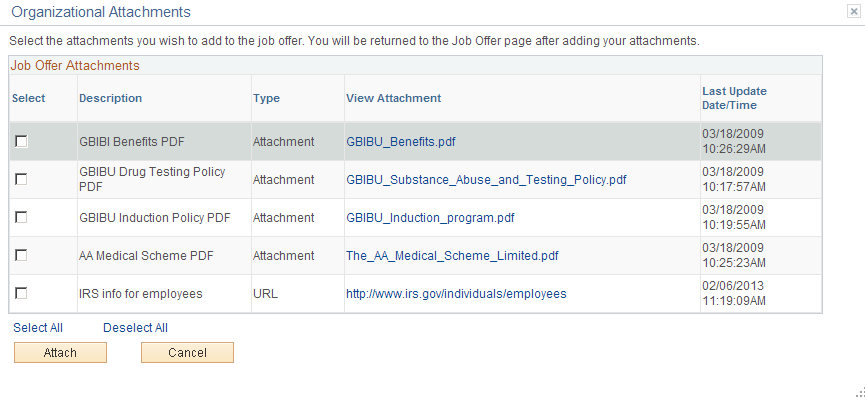
Job Offer Attachments
The list of available attachments and URLs is context-sensitive. For example, certain attachments might be valid for some business units but not others.
Field or Control |
Description |
|---|---|
Select |
Select one or more documents that you want to attach to the job offer. |
Attach |
Click to attach the selected documents to the job offer and return to the Prepare Job Offer page. |
Cancel |
Click to close the dialog box without adding any attachments to the job offer. |
Use the Document Definitions page (HRS_OFF_SELDOC_SEC) to add document definition attachments to an offer.
Document definitions are not typically used in recruiting.
Navigation:
Click the Add Document Definition button on the Prepare Job Offer page.
This button is hidden when there are no valid document definitions for this context.
This example illustrates the Document Definitions page.
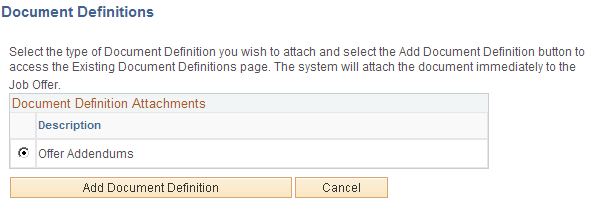
Document definitions are part of the PeopleSoft HCM common attachments framework. They are empty placeholders where users can add file attachments, URLs, or text notes. Because recruiters can add files attachments directly to the offer, and they can incorporate URLs and text notes into the offer letter, document definitions are not typically used in the context of job offers.
Field or Control |
Description |
|---|---|
Document Definition Attachments |
This grid lists document definitions that are valid for the context of the job opening. Select the type of document definition that you want to add to the offer. |
Add Document Definition |
Click to access the Existing Document Definitions page for the selected document definition. Then select and attach preexisting document definition attachment or create and attach new ones. |
Use the Post Online Job Offer page (HRS_OFFER_SEND_SEC) to post a job offer to Candidate Gateway.
Navigation:
Click the Post link on the Prepare Job Offer page.
This example illustrates the Post Online Job Offer page.
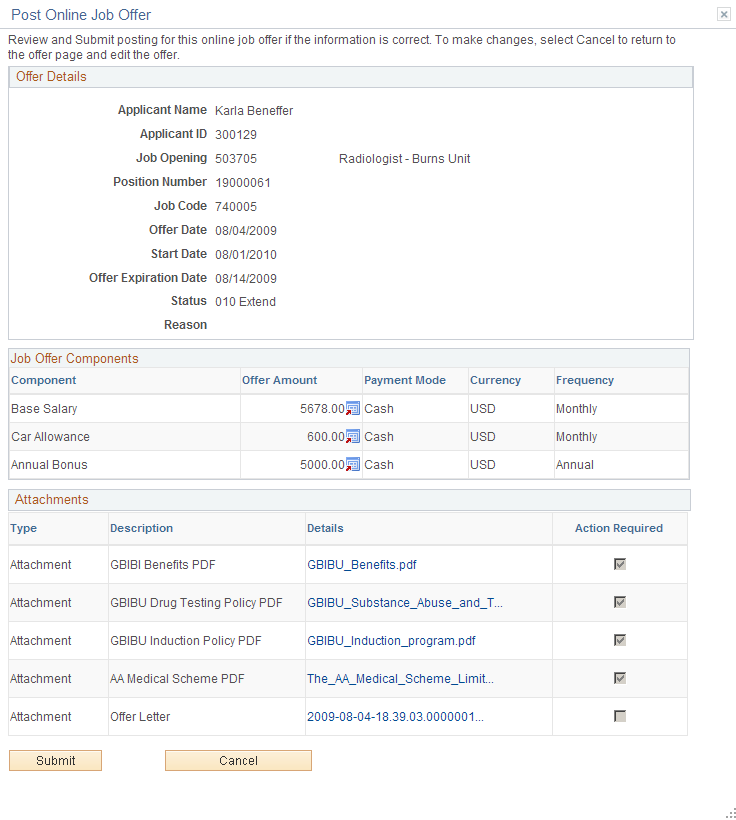
Review the offer details on this page, then click the Submit button to post the offer.
When the offer is posted, the system generates a Candidate Gateway notification, sends an email to notify the applicant of the job offer, and creates a contact note.