Entering Application Details
This topic discusses how to enter application details.
|
Page Name |
Definition Name |
Usage |
|---|---|---|
|
HRS_APP_PROFILE |
Add or edit job application details. |
|
|
HRS_APP_QSTN_RSLT |
Review an applicant's answers to a completed questionnaire. |
|
|
HRS_APP_WRK_SEC |
Add or edit work experience details. |
|
|
HRS_APP_DETAIL |
Add or edit applicant profile information such as competencies, degrees, licenses & certificates, language skills, and so forth. |
|
|
HRS_CE_ADM_PP |
(USF) Add or edit priority placement information for U.S. federal implementations. |
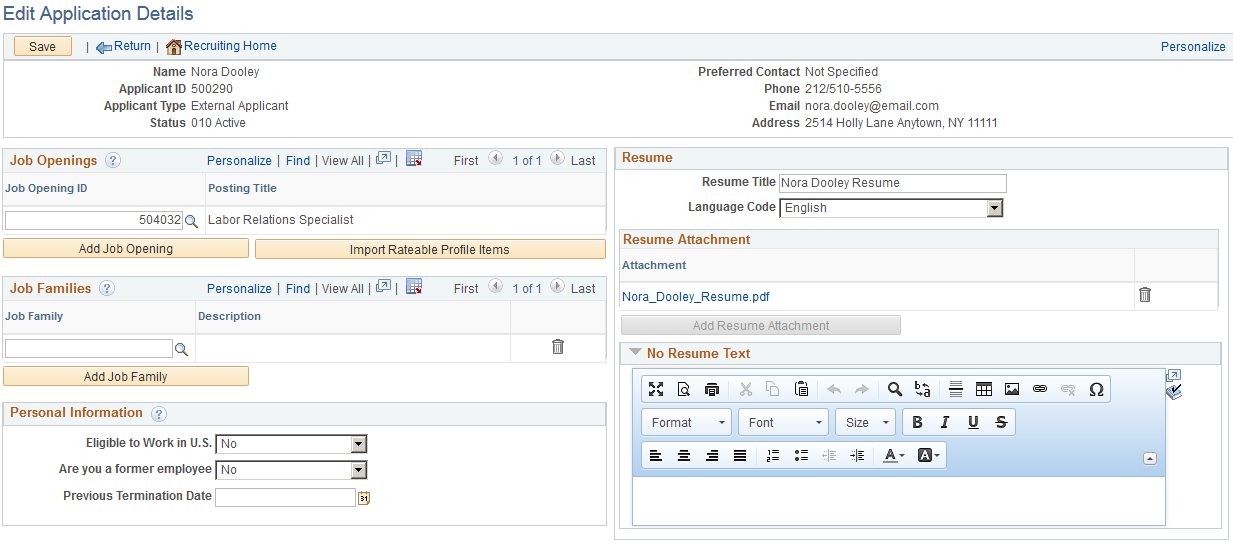
Use the Application Details page (HRS_APP_PROFILE) to enter or review the applicant's complete job application details. The page title is either Add Application Details or Edit Application Details, depending on context.
The Application Details page corresponds to an application form. It is the only page where you can enter or edit application data.
To take actions related to an application, use the Manage Application Page instead. The Manage Applications page includes a read-only view of the data from the Application Details page so that you can review the information as you evaluate the application and take action.
Navigation:
Click the Add Application button on the Create Applicant page: Applications tab.
Click the Add Application toolbar button on the Manage Applicant page.
Select on various pages, including Search Applications, Search Applicants (keyword search and advanced search), Manage Applicant, Manage Application, and Manage Job Opening.
This is the first of four examples that illustrate the Application Details page.
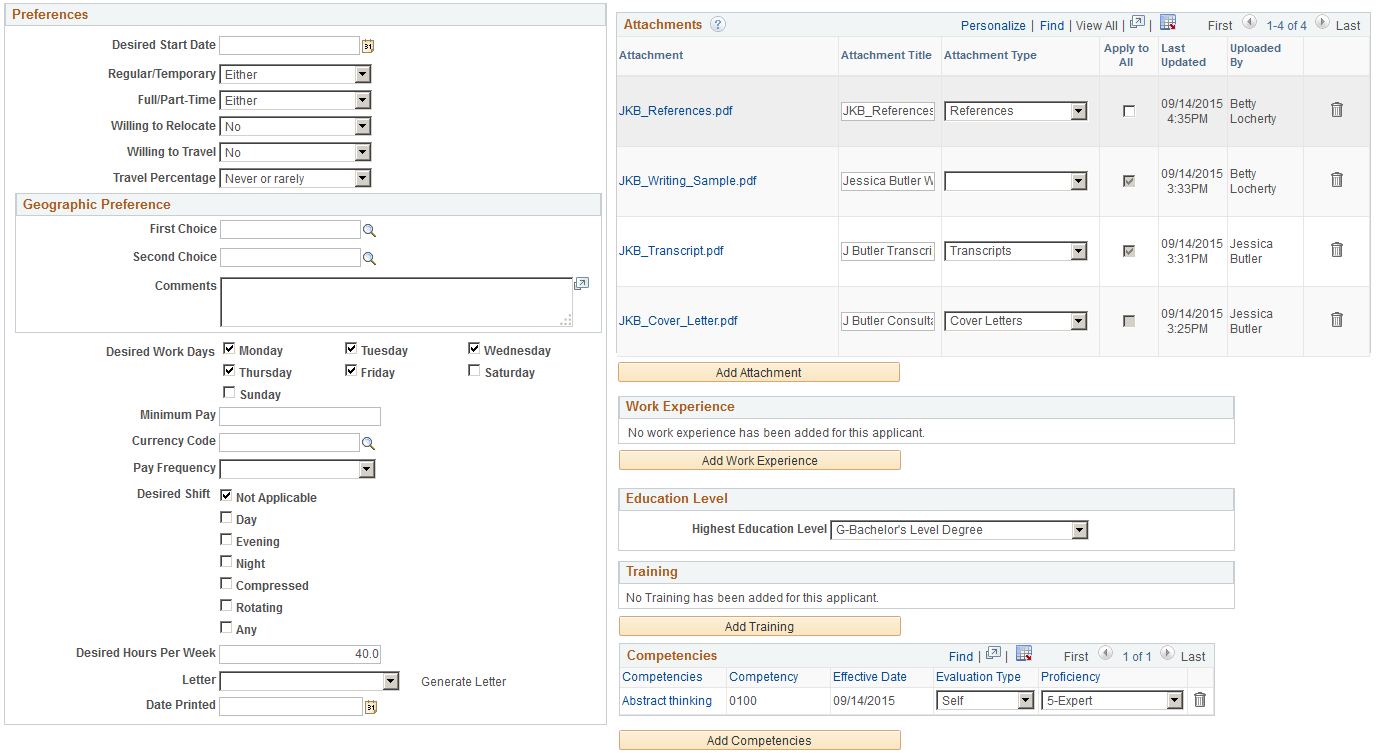
This is the second of four examples that illustrate the Application Details page.
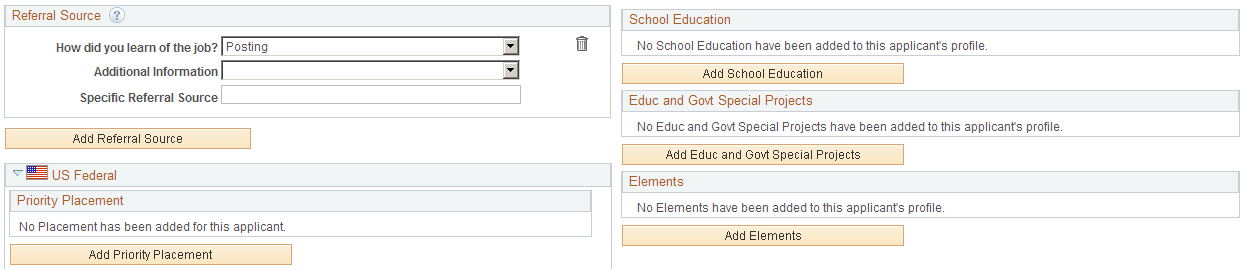
This is the third of four examples that illustrate the Application Details page.
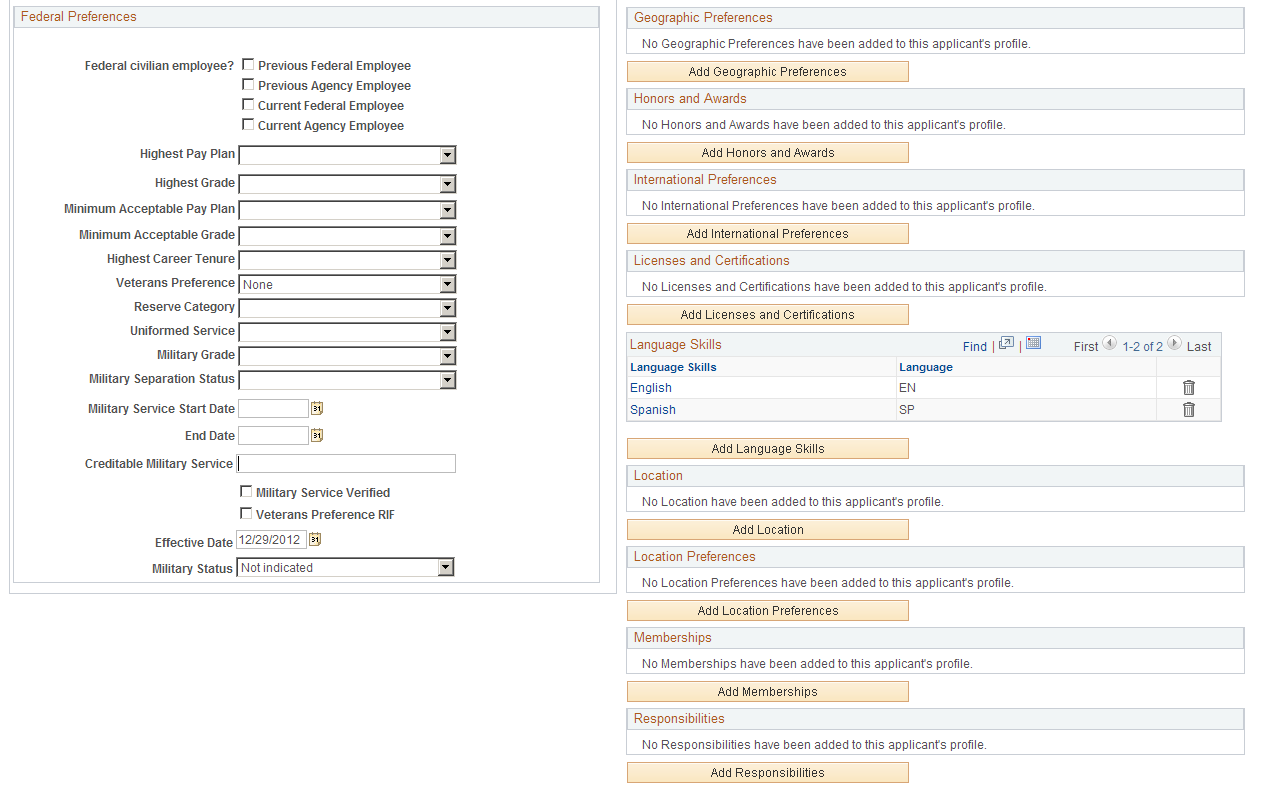
This is the fourth of four example that illustrate the Application Details page.
Toolbar
Field or Control |
Description |
|---|---|
Save |
Click to save the application. |
Return |
Click to return the page from which you accessed the Application Details page. If you have unsaved changes, the system displays a message and you can choose whether to cancel the changes or go back to the Application Details page and save them. |
Recruiting Home |
Click to access the Recruiting Home Page. If you have unsaved changes, the system displays a message and you can choose whether to cancel the changes or go back to the Application Details page and save them. |
Previous and Next |
These buttons appear if you accessed the Application Details page by selecting multiple applications on a page and then using the Group Actions menu to invoke the Edit Application Details action. Use the buttons to navigate between applications. |
Header
Field or Control |
Description |
|---|---|
Name and Applicant ID |
These fields display identifying information about the applicant. |
Applicant Type |
Displays whether the applicant is an External Applicant, Employee, or a Non-Employee (a person of interest). |
Status |
Displays the overall applicant status. This is not the disposition with regards to any particular job opening, it is a more general status such as Active or Inactive. |
Preferred Contact |
Displays the applicant’s preferred contact method. |
Phone, Email, and Address |
These fields display the applicant’s contact information. |
Job Openings
Use this grid to view the job openings that are linked to this application and to link additional job openings to the application.
Field or Control |
Description |
|---|---|
Job Opening ID and Posting Title |
These fields identify the job opening that is linked to the application. When you add a job opening to the grid, the linkage is assigned the default disposition according to your configurable status settings. As delivered, the default disposition is Applied. When you add a job to this grid, Candidate Gateway lists the jobs separately in the applicant’s list of applications (rather than showing one multi-job application). If you add a job opening that includes a questionnaire, and if the job is posted to Candidate Gateway, the system invites the applicant to submit an additional application. Submitting an additional application gives the applicant a way to answer the questionnaire. To invite the applicant to submit a new application, the system sends an email with directions for signing on to Candidate Gateway and applying for the job. The system also creates a contact note with a record of the outgoing email and creates a Candidate Gateway notification (one that the applicant sees after signing in to Candidate Gateway). For more information about linking applicants to job openings with questionnaires, see Understanding Questionnaires in Linked Jobs. Note: Although you can clear the data in the Job Opening ID field, you cannot delete rows from this grid. |
View Questionnaire |
Click this link to view the completed online questionnaire for this job opening. The online questionnaire consists of any screening questions that are associated with the job opening. The link appears only for job openings where the applicant has answered the questionnaire. Applicants complete questionnaires in Candidate Gateway, either when initially applying or after receiving a request to submit an application for a job opening with a questionnaire. |
Add Job Opening |
Click this link to add a blank row to the Job Openings grid so that you can select another job opening to associate with this application. |
Import Ratable Profile Items |
Click this button to add certain content items from the job openings that are associated with the application. The imported items are from content types that are configured such that applicants supply ratings for predefined content items rather than choosing which content items to add. (Specifically, these are the content types where the Applicant May Add Items check box is not selected on the Content Section Configuration – <Content Type> Page. For example, the delivered content type configuration for competencies prevents applicants from adding competencies to their applications. The assumption is that you want to rate applicants on specific job-related competencies that you have defined in the job opening. To facilitate data entry, and to ensure that you rate applicants on the correct set of competencies, you click the Import Ratable Profile Items button. If there are any competencies that are associated with the job openings listed in the application, the system copies those competencies to the application so that you can enter applicant-specific ratings. |
Job Families
Use this grid to identify one or more job families that the applicant is interested in. This information can be used as a means of searching for applicants that are interested in jobs within a specific job family.
Personal Information
Field or Control |
Description |
|---|---|
(USF) Disability Code |
If the applicant is disabled, select the code that identifies the type of disability. Otherwise, select No Handicap. Define disability codes on the Handicap Table page. |
Eligible to Work in U.S. |
Select Yes or No to indicate whether or not the applicant is eligible to work in the United States. This field is the same as the identically-named field that appears in the USA group box of the applicant data Eligibility & Identity section. Changes made to this field carry over to all of the applicant's applications and to the Eligibility & Identity section of the applicant data. In Candidate Gateway, job applications include this field only if the resume template includes the Federal Preferences section. |
Are you a former employee |
Select Yes or No to indicate whether the applicant is a former employee. This setting is independent of the applicant type and employee ID shown in the Personal Information section of the applicant data. On the Search Applicants page, a Former Employee icon appears in the search results grid when this field has a Yes value. The value in this field also affects the available hire types on the Prepare For Hire Page. If the value is Yes, the Rehire option replaces the Hire option. |
Previous Termination Date |
If the applicant is a former employee, enter the applicant's last day worked, if known. |
Preferences
Field or Control |
Description |
|---|---|
Desired Start Date |
Enter the earliest date that the applicant is available to start. This field can be used to screen applicants. It is compared to the Start Date field on the job opening. |
Regular/Temporary |
Select Regular if the applicant is seeking a permanent job, Temporary if the applicant wants a temporary contract, or Either if the applicant is willing to consider both. This field can be used to screen applicants. It is compared to the Regular/Temporary field on the job opening. |
Full/Part-Time |
Select either Full-Time or Part-Time if the applicant is seeking a particular type of job, or Either if the applicant is willing to consider both full-time and part-time jobs. This field can be used to screen applicants. It is compared to the Full/Part-Time field on the job opening. |
Willing to Relocate |
Select Yes or No to indicate whether the applicant is willing to move to a new location. |
Willing to Travel |
Select Yes or No to indicate whether the applicant is willing to travel for work, . |
Travel Percentage |
Select a value that indicates the maximum amount of time that the applicant is willing to travel for work: Never or Rarely, Up to 25% of the time, Up to 50% of the time, Up to 75% of the time, or Up to 100% of the time, This field can be used to screen applicants. It is compared to the Travel Percentage field on the job opening. |
Geographic Preference
Field or Control |
Description |
|---|---|
First Choice and Second Choice |
Enter the applicant's first and second location choices. The recruiting locations that appear in these prompts are those that are associated with the set ID for the business unit to which the user belongs. Recruiting locations are defined on the Recruiting Location page. This field can be used to screen applicants. It is compared to the values in the recruiting locations grid on the job opening. |
Comments |
Enter comments about an applicant's geographic preference. The screening process does not evaluate these comments. |
Additional Preference Fields
Field or Control |
Description |
|---|---|
Desired Work Days |
Select the check boxes next to the days that the applicant is willing to work. |
Minimum Pay, Currency Code, and Pay Frequency |
Use these fields to specify the applicant's minimum salary requirements. For example, if the minimum acceptable pay is 70,000 CAD per year, enter 70,000 in the Minimum Pay field, select CAD in the Currency Code field, and select Year in the Pay Frequency field. Minimum pay can be used to screen applicants. It is compared to the Maximum Salary field on the job opening. |
Desired Shift |
If the applicant wants shift work, select the appropriate shift from the available options. Selecting the Not Applicable check box causes the system to deselect all other shift check boxes. Likewise, selecting anything other than Not Applicable causes the system to deselect the Not Applicable check box. This field can be used to screen applicants. It is compared to the Shift field on the job opening. |
Desired Hours Per Week |
Enter the number of hours per week that the applicant prefers to work. This field can be used to screen applicants. It is compared to the Standard Hours/Week field on the job opening. |
Application Acknowledgement Letter
Field or Control |
Description |
|---|---|
Letter |
Select a letter template for generating a form letter to send to the applicant. The system generates letters using Oracle Business Intelligence Publisher (BI Publisher) for PeopleSoft. The letters that are available for selection are those with the report definition HRS_APP_LET. Unless you manually generate the letter, saving a letter template for an application adds the letter to the queue of the Print Recruitment Letters batch process. |
Generate Letter |
This link is available only if a letter template is selected. Click the link to generate the letter. The system opens the letter in a new window, where you can review it, save it locally, and optionally modify it. Once you generate a letter, you are responsible for printing and sending it; generating the letter removes it from the queue of the Print Recruitment Letters batch process. When you generate a letter, the system populates the Date Letter Printed field with the system date and adds the letter to the Contact History grid on the Manage Applicant Page: Notes Tab. |
Date Printed |
Displays the date that the letter was printed. The system automatically populates this field after you manually generate the letter or when the Print Recruitment Letters batch process prints the letter. |
Referral Source
Use this group box to enter referral information for the applicant.
Field or Control |
Description |
|---|---|
How did you learn of the job |
Select a value that indicates how the employee learned about the job opening. Employee and Marketing type recruitment sources are available for selection. |
Additional Information |
If the referral source is a Marketing recruitment source for which subsources are defined, you can select a subsource to provide additional information about how the employee learned about the job opening. |
Specific Referral Source |
Enter freeform text with any additional information about how the employee learned about the job opening. |
Empl ID, Referral Name, and Applicant is a Family Member |
If the referral source is an Employee recruitment source, these fields appear. Use these fields to enter additional information about the employee that referred the applicant. The Referral Name is a freeform text field. |
Resume
Field or Control |
Description |
|---|---|
Resume Title |
Enter a title for the resume. Applicants who use Candidate Gateway to apply can to reuse existing resumes, and the resume title helps identify individual resumes. |
Language Code |
Select the language in which the resume is written. This field is informational only. |
Resume Attachment
Field or Control |
Description |
|---|---|
File Name |
Applications can include a single resume attachment. If one exists, you can click the filename link to view the resume. The system opens the resume in a separate window. |
Add Resume Attachment |
Click to browse for and upload a resume. If a resume is already attached, this button is disabled. It becomes available again if you subsequently delete the resume attachment. |
Resume Text
If no resume text exists, the group box title is No Resume Text, and the group box is initially collapsed.
Field or Control |
Description |
|---|---|
Resume Text |
Enter or paste the text of the applicant's resume. Pasted text retains its original formatting. You can optionally format and spell-check resume text using the tools adjacent to the text field. It is possible to have both resume text and a resume attachment. |
Attachments
This grid displays the applicant’s non-resume attachments, including attachments that are specifically associated with this application and attachments that are associated with all applications.
Field or Control |
Description |
|---|---|
Attachment |
Displays the file name of the attachment. Clicking this link opens the file. |
Attachment Title |
Enter a descriptive title for the attachment. |
Attachment Type |
Select an attachment type. Attachment types are defined on the Attachment Type Setup Page. Although Candidate Gateway requires applicants to select an attachment type for every file, this field is not required in Talent Acquisition Manager. The maximum number of attachments specified on the attachment type definition is not applicable when you enter attachments in Talent Acquisition Manager. (The maximum applies only to applicants who upload attachments using Candidate Gateway.) |
Apply to All |
Select this check box to indicate that the attachment is associated with the applicant rather than with this one job application. When this check box is selected, the attachment is visible in all of the applicant’s applications. Important! This check box is editable when you first upload a new attachment, but it becomes read-only after you save the page. If you forget to select the check box before saving, you can delete the attachment and start over. |
Last Updated |
Displays the date and time that the attachment information was last updated. |
Uploaded By |
For attachments that were uploaded in Talent Acquisition Manager, this column displays the name of the user who uploaded the file. For attachments that were uploaded in Candidate Gateway, this column displays the applicant name. (However, in some older applications, attachments that were uploaded in Candidate Gateway show the name from the user ID that was used to access Candidate Gateway. For internal applicants, this is the applicant’s name. For external applicants, this is the name, if any, that is associated with the Candidate Gateway guest user ID. If there is no name associated with the guest user ID, this field is blank.) |
Add Attachment |
Click this button to open the File Attachment dialog box and upload a new attachment. The system adds a row to the Attachments dialog. In this new row, the Apply to All check box is editable at first, but it becomes read-only after you save the page. |
Work Experience
Use this grid to display and define the applicant's work experience.
For internal applicants, the system brings in prior work experience from employee’s Human Resources records (as seen on the Prior Work Experience Page). You can add or remove work experience in the application without affecting the Human Resources data.
Unlike other types of application data, work experience that you add for internal applicant is not carried forward to subsequently created applications, which will show only the data from the Human Resources system.
Field or Control |
Description |
|---|---|
Start Date and End Date |
These fields show how long the applicant worked at a job. The system uses the start date and end date to calculate the applicant's years of work experience. When there is no end date, the system calculates the years of work experience through the current date. This information can be used to screen applicants. The calculated value is compared to the Years of Work Experience requirement entered in the Work Experience & Education matrix on the job opening. Note: When the screening process evaluates whether an applicant meets particular education & experience requirements, it fails applications where there are no work experience entries with start dates, even if there are zero years of work experience required. |
Employer and Ending Job Title |
These fields describe the applicant’s work experience. |
|
Click to open the Work Experience page where you can view and modify additional work experience details. |
Add Work Experience |
Click to access the Work Experience page and enter additional work experience information. |

Education Level
Field or Control |
Description |
|---|---|
Highest Education Level |
Select the highest level of education attained by the applicant. The screening processes uses this field when determining whether an applicant has the minimum number of years of experience required of applicants with a particular level of education. |
Training
Use this grid to list relevant training courses that the applicant has taken. For each course, enter the course title, the school name, and the course date. Click the Add Training link to add a blank row to the grid so that you can enter another training course.
New applications for employees bring in default training data from the Professional Training Page or Global Assignments Training Page in PeopleSoft Human Resources.
<Profile Content Type>
Job applications include a separate grid for each profile content type in the system's primary person type profile. Grids appear alphabetically by content type code (which is different from the content type name that appears as the grid label).
Field or Control |
Description |
|---|---|
<Content Item Name> |
In each content type grid, the first column displays the name of the specific content item that you added. For example, in the Competencies grid, the first column (labeled Competencies) displays a specific competency such as Analytical Thinking, while in the Degrees grid, the first column (labeled Degrees) displays a specific degree name such as Bachelor of Arts. To modify information about a content item that you have already added to the grid, click the value in this first column to access the corresponding detail page. |
<Additional Column Names> |
The columns that appear in each grid depend on the settings in the Content Section Configuration – <Content Type> Page. Specifically, fields for which you select the Summary check box on the Content Section Configuration page appear as grid columns. |
Add <Content Item> |
Click this button to access the content item detail page, where you enter specific content items (such as Analytical Thinking and Bachelor of Arts). The fields on the detail page depend on the content type definition within the Manage Profiles business process. Save the data on the detail page to add the content item to the grid. Note: You can also import content items from associated job openings using the Import Ratable Profile Items button in the Job Openings grid on this page. That button loads content items for content types such as competencies that are configured so that applicants rate themselves on predefined content items. |
(USF) Priority Placement
This grid displays priority placement codes for the applicant.
This information, along with the salary grade and level, is used by the Priority Placement process to identify applicants who should be considered as a candidate for a specific job opening. This information is compared to the priority placement codes and salary information entered on the job opening.
Field or Control |
Description |
|---|---|
|
Click to open the Priority Placement page where you can view and modify additional work experience details. |
Add Priority Placement |
Click to access the Priority Placement page and enter additional work experience information. |
(USF) Federal Preferences
Use this group box to enter federal preferences.
Field or Control |
Description |
|---|---|
Federal Civilian Employee? |
Select the appropriate check box to indicate whether the applicant is a current or previous employee of the federal government or an agency. This information can be used to screen applicants. The check boxes that are selected here are compared to the Recruiting Type field on the job opening. |
Highest Pay Plan and Highest Grade |
Enter the applicant's highest pay plan or grade. |
Minimum Acceptable Pay Plan and Minimum Acceptable Grade |
Select the minimum pay plan and grade that the applicant will accept. Minimum Acceptable Grade can be used to screen applicants. This field is compared to the Minimum Pay Grade field on the job opening. |
Highest Career Tenure |
Select the applicant's highest career tenure. Values are Conditional, Indefinite, None, and Permanent. |
Veterans Preference |
Select the veterans hiring preference that applies. Veterans preference values are defined on the (USF) Setup Veterans Preference Page. |
Reserve Category |
Select the employee's reserve category, or select Not Applicable. |
Uniformed Service |
Select the type of uniformed service in which this veteran served. Values are: Air Force, Army, Coast Guard, Marines, and Navy. |
Military Grade |
Select the veterans military grade. |
Military Separation Status |
Select the veterans military separation status. |
Military Service Start Date and End Date |
Enter the applicant's military service dates. |
Creditable Military Service |
Enter the amount of military service for which the applicant receives credit. |
Military Service Verified |
Select this check box if you have verified the applicant's military service. |
Veterans Preference RIF (Veterans Preference in Reduction in Force) |
Select this check box if the applicant is eligible for veterans preference in RIF. |
Effective Date |
Enter the effective date for the applicant's military status. |
Military Status |
Select the applicant's military status. |
Use the View Questionnaire page (HRS_APP_QSTN_RSLT) to review an applicant's answers to a completed questionnaire.
Navigation:
Click the View Questionnaire link in the Job Openings grid on the Application Details page.
The link appears only for job openings that are associated with screening questions. The link is active only if the applicant has completed the questionnaire (which means it is never available when a user is adding a new applicant on the Create Applicant page).
This example illustrates the View Questionnaire Page.
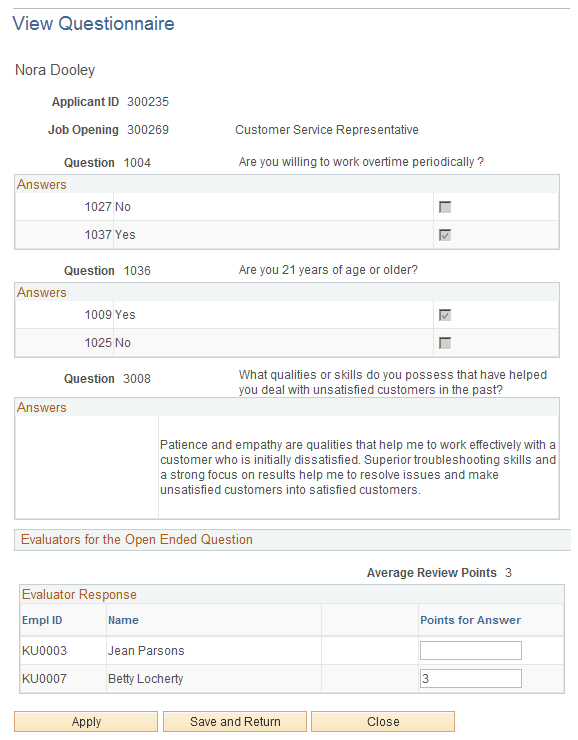
This page shows the questions that are associated with the job opening along with any answers that the applicant provided while applying (including questions that were answered during prescreening).
Questions and Answers
For each multiple-choice question, the page displays the possible answers; a selected check box indicates the applicant's answer.
Evaluators for the Open Ended Question
Following each open-ended questions, the page displays a list of assigned evaluators, and the score assigned by each evaluator. Evaluators can use this grid to award points to the answer. The Average Review Points field shows the average of all submitted evaluations.
Buttons
Field or Control |
Description |
|---|---|
Apply and Save and Return |
If the page includes an editable field for entering points for an open-ended question, use the Apply button to save the change without leaving the page, or use the Save and Return button to save the change and return to the Edit Application Details page. Neither button appears if there are no open-ended questions with evaluators. |
Close |
Click to return to the Edit Application Details page. Changes to the points for open-ended questions are not saved. |
Use the Work Experience page (HRS_APP_WRK_SEC) to enter work experience information.
The page title is either Add Work Experience or Edit Work Experience, depending on context.
Navigation:
On the Application Details page, click the Add Work Experience button or click the Edit Employment History icon for an existing record.
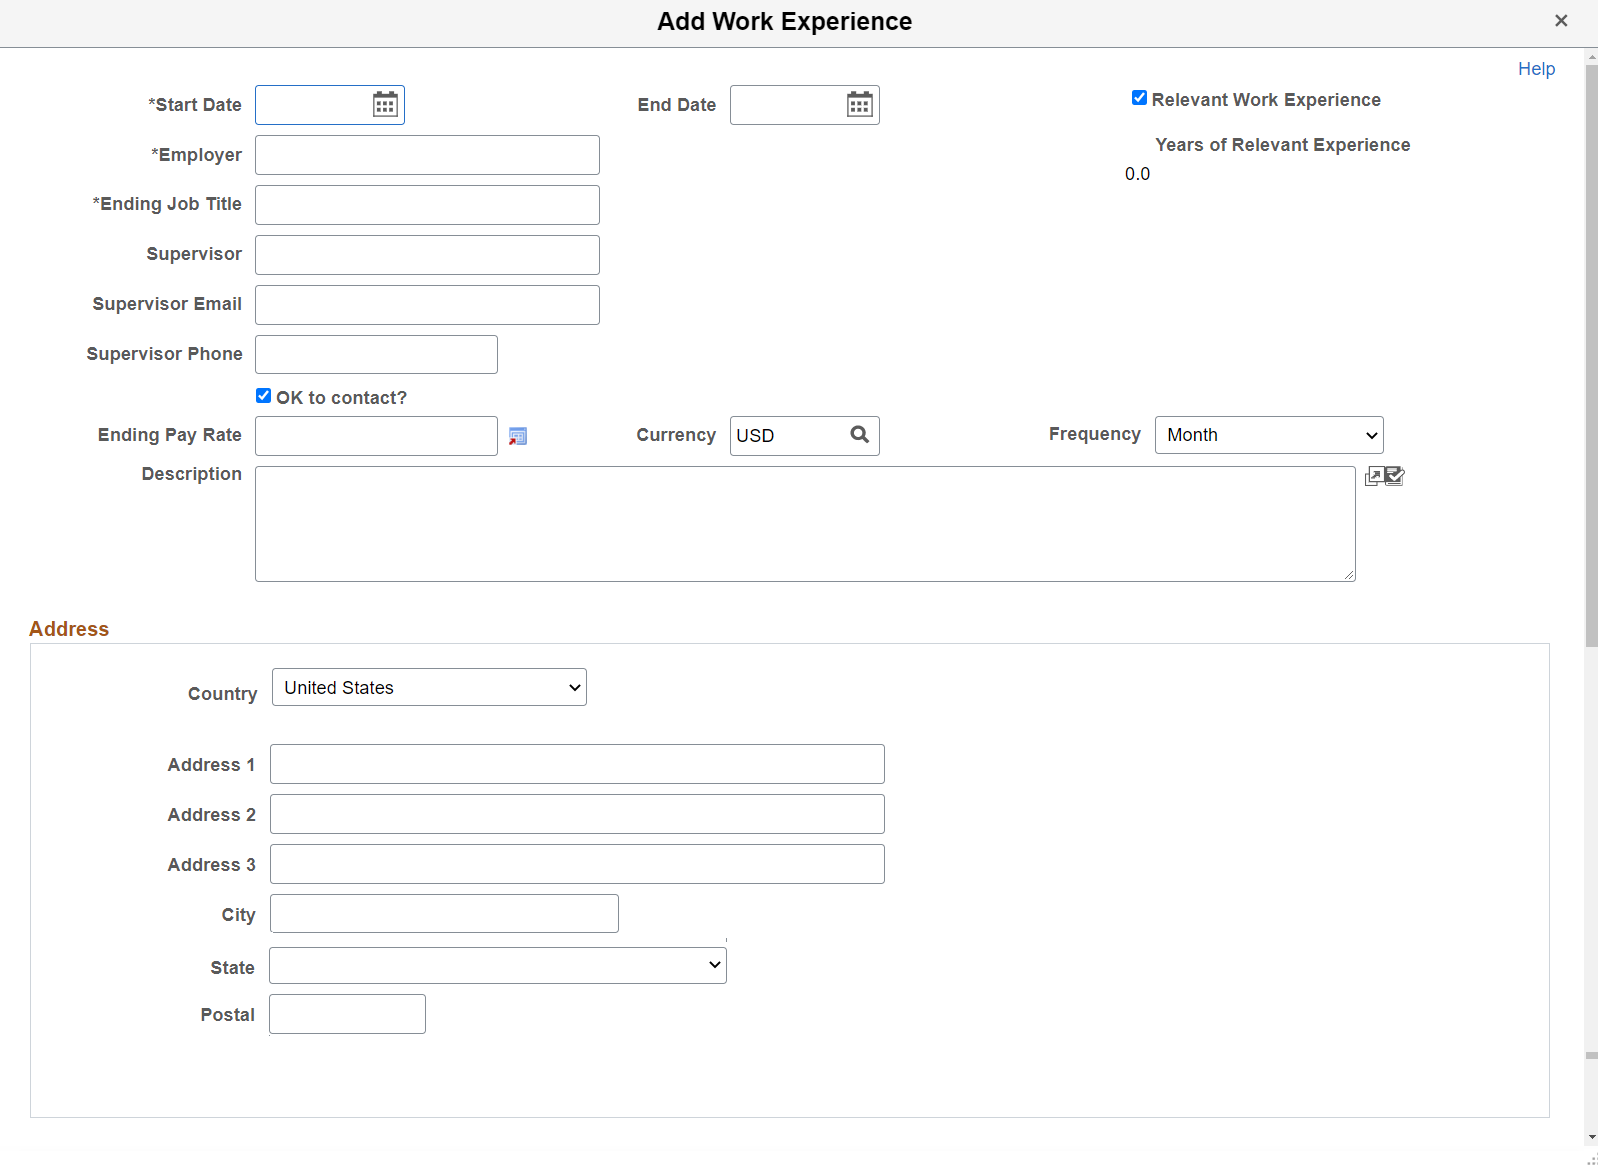
This example illustrates the Work Experience Page.
Field or Control |
Description |
|---|---|
Start Date and End Date |
These dates determine the number of years of experience represented by this entry. When the end date is blank, work experience is calculated through the current date. |
Relevant Work Experience |
Select this check box if the screening process should consider this work experience when evaluating whether the applicant has the required years of experience for a particular level of education. The screening process ignores entries where this check box is not selected. When this check box is selected, the Years of Relevant Work Experience field appears and displays a system-calculated value. |
Address fields (with lookup) appear as drop-down by default. However, this configuration can be changed from the framework using the Country Format setup. For more information, see Entry and Validation Page
Use the <Content Type> page for applicants (HRS_APP_DETAIL) to add or update applicant profile information such as competencies, degrees, licenses & certificates, language skills, and so forth. The page title depends on the type of profile content you are entering and whether you are adding or editing data.
Navigation:
Click the Add <Content Type> button under a content type grid on the Application Details page.
Click the Edit icon for an existing entry in any content type grid on the Application Details page
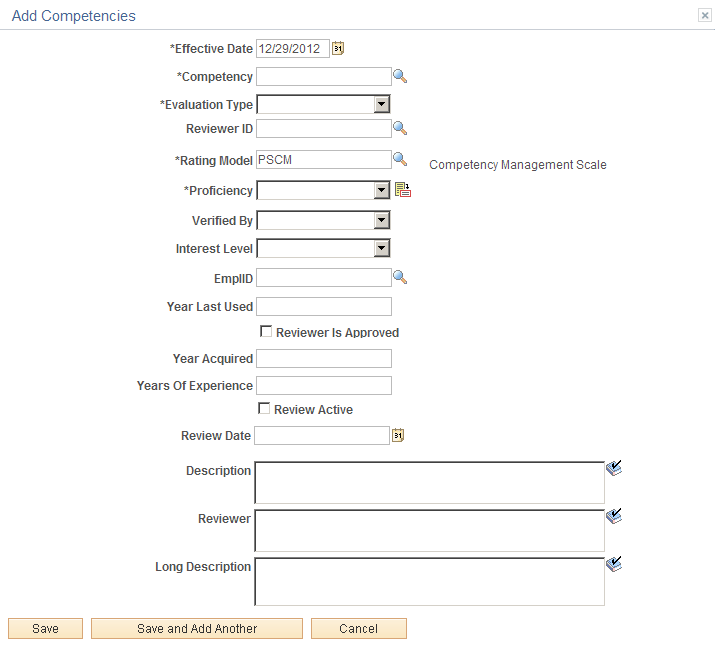
This example illustrates the Add Competencies page.
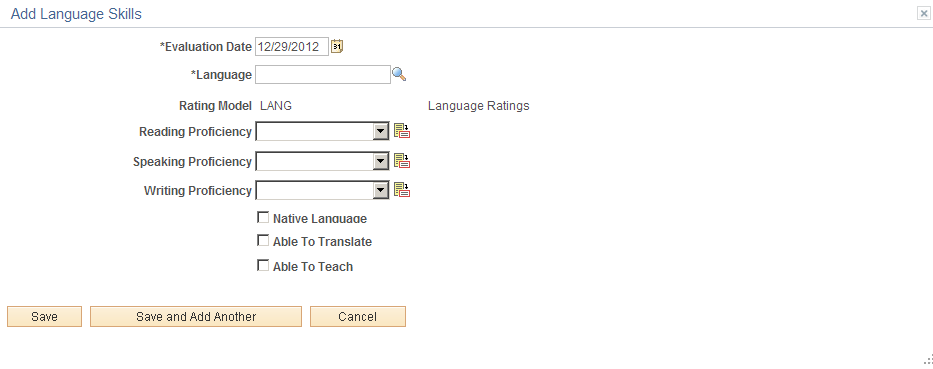
This example illustrates the Add Language Skills page.
The fields on the content type detail pages depend on the content type configuration in the Manage Profiles business process and on the Content Section Configuration – <Content Type> Page.
Field or Control |
Description |
|---|---|
Save |
Click to save the current content item and return to the Application Details page. |
Save and Add Another |
Click to save the current content item and clear the page so that you can enter information about a new content item. The saved content item will become visible on the Application Details page after you close the dialog box. |
Cancel |
Click to close the dialog box and return to the Application Details page without saving the current content item. Any content items that you previously saved using the Save and Add Another button are not canceled. |
Use the Priority Placement page (HRS_CE_ADM_PP) to add or edit an applicant’s priority placement information for U.S. federal implementations.
Navigation:
Click the Add Priority Placement button or the Edit icon on the Application Details page.
This example illustrates the Priority Placement Page.
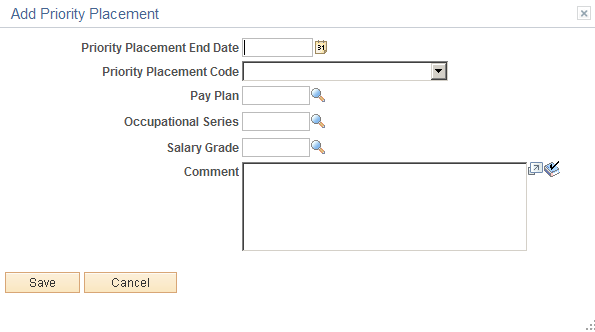
The Priority Placement process uses priority placement information to identify applicants who should be considered as a candidate for a specific job opening. The applicant’s priority placement information is compared to the priority placement codes and salary information entered on the job opening.