Setting Up Plan Eligibility Requirements
Set up your plan requirements on the Custom Statement Page, using the non-editable statement type P (plan eligibility).
Note: Before setting up eligibility parameters, be sure you understand the proper syntax for Boolean clauses.
The remainder of this section summarizes the information that you are most likely to need while building eligibility formulas.
When you set up plan eligibility, you enter the conditions for eligibility in an IF or IN clause. If you use an IF statement, the system assumes that employees are eligible when the condition is true. For this reason, IF clauses don't use a final assignment (or THEN) clause. This also means you can't have more than one IF in the definition. IN clauses, on the other hand, do require assignments, and you can have as many as you like in the statement.
Using IN Clauses
Use a clause with the keyword IN to check for several different values for a single field. For example, you can check whether the employee status is in the set of values active, deceased, leave, and leave with pay. When you use IN clauses, you assign a temporary variable to the result. You can then reference that variable from within an IF clause.
|
Key |
Operand1 |
Op1 |
Operand2 |
Op2 |
Operand3 |
Type |
|---|---|---|---|---|---|---|
|
IN |
UNION_CD |
|
"81" |
|
|
FUNCTION |
|
|
"82" |
|
"83" |
= |
TEMPC01 |
FUNCTION |
|
IF |
TEMPC01 |
== |
"Y" |
AND |
|
BOOLEAN |
|
|
EMPL_TYPE |
== |
"S" |
|
|
BOOLEAN |
This is a useful technique when you're checking a large set of valid values because the IN statement uses an implied OR condition. It separates all the OR clauses from the AND clauses of the final IF statement.
You can use an IN clause as your eligibility criteria as long as you make a final assignment to the definition name, as illustrated in this table:
|
Key |
Operand1 |
Op1 |
Operand2 |
Op2 |
Operand3 |
Type |
|---|---|---|---|---|---|---|
|
IN |
UNION_CD |
|
"81" |
|
|
FUNCTION |
|
|
"82" |
|
"83" |
= |
ELIG_DEF |
FUNCTION |
On the Custom Statement page, use the EQU (equation) button to toggle the long text field at the bottom of the page between:
A description field, where you can enter information about the formula.
An equation field that translates your statement into an equation, using parentheses to show the precedence among the operations. Always check the parentheses in an equation.
Note: You can use the EQU button to refresh an equation.
When you calculate plan eligibility, a custom statement evaluates the eligibility requirements over time and builds a timeline of eligible and ineligible periods. This feature is key to implementing your plan rules. To use it, select the History check box under any effective-dated variable.
For example, suppose you are setting up a group for full-time employees, as illustrated here:
This illustration shows a plan eligibility custom statement where the History check box is selected for the field where an employee’s full-time or part-time status is stored.
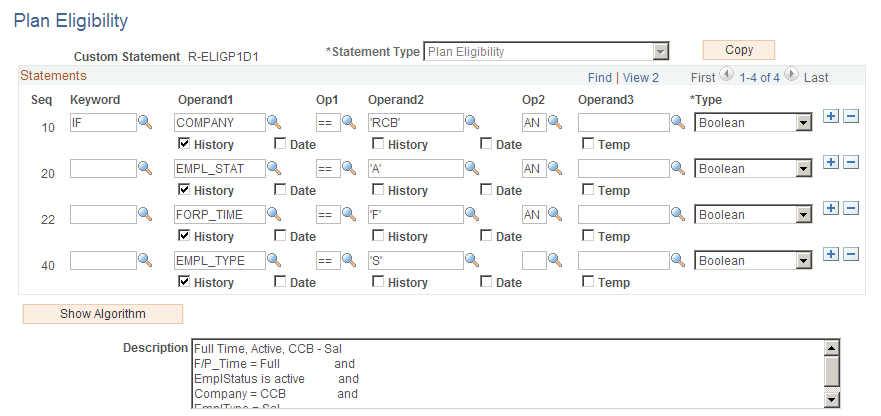
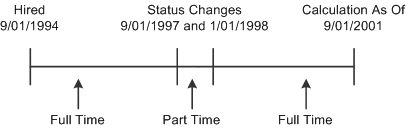
Because History is selected under the alias FORP_TIME, the system looks at an employee's full- or part-time status over time when determining eligibility. If Julius Jones works part-time for three months, the plan eligibility function produces the following three work history segments:
This timeline illustrates an employee’s full-time and part-time history. The employee started out working full-time, then changed to part-time for a while, then returned to full-time.
You can enter an unformatted date in most PeopleSoft pages. For example, in most pages the system automatically reformats 01011004 (January 1, 2004) as 01/01/2004. However, if you enter an unformatted date in one of the Operand fields, the system treats it as a number. To tell the system that the eight digits represent a date and not a number, either:
Include a separator (a slash, dash, or space) when you enter a date, or
Select the Date check box under the operand.
Note: The Custom Statement page requires you to enter eight-digit dates that include the century in the year. This is different from most PeopleSoft pages, which accept six-digit dates. For example, in the Custom Statement page, enter January 1, 2005 as 01/01/2005, not as 01/01/05.
When you use a date alias, there's no reason to select the Date check box. The system already knows the value is a date and formats it appropriately.